User’s Guide
for Windows 95, 98, 2000, ME, XP, NT 4.0
and Macintosh OS 8.5 through 9.x
At SMART, we’re always improving our customer’s experience by offering free software upgrades. In the past, we’ve made new features such as handwriting recognition, USB support and SMART Recorder available to all customers, new and old alike. Register your SMART Board to be notified of free upgrades like these in the future. We also want to give you the best technical support possible. Please help us by registering your SMART Board and keeping this information available:
: : Register online at:
TM TM Serial Number Date of Purchase www.smarttech.com/products/registration FCC Warning
This equipment has been tested and found to comply with the limits for a “Class B” digital device, pursuant to Part 15 of the FCC rules. These limits are designed to provide reasonable protection against harmful interference in a residential installation. This equipment generates, uses, and can radiate radio frequency energy and, if not installed and used in accordance with the instruction, may cause harmful interference to radio communications. However, there is no guarantee that interference will not occur in a particular installation. If this equipment does cause harmful interference to radio or television reception (this can be determined by turning the equipment off and on) the user is encouraged to try to correct the interference by one or more of the following measures:
Reorient or relocate the receiving antenna.
Increase the separation between the equipment and receiver.
Connect the equipment into an outlet on a circuit different from that to which the receiver is connected. Consult the dealer or an experienced radio/TV technician for help.
Any changes or modifications to this “Class B” digital device that have not been expressly approved by SMART Technologies Inc. could void the user's authority to operate the equipment.
l l l l Trademark Notice Copyright Notice
SMART Recorder, SMART Board, SMART Board, SMART Board , SMART Pen
Tray, SMART Notebook, SMART Aware, and SMART Grouping are trademarks of SMART Technologies Inc. ParaGraph and CalliGrapher are registered trademarks and the ParaGraph logo and Write Naturally are trademarks of ParaGraph, a business unit of Vadem. Third-party product and company names are mentioned for identification purposes only and may be trademarks of their respective companies.
U.S. Patent Nos. 5,448,263 and 6,141,000. Other U.S. and foreign patents pending.
The use and copying of this product is subject to a license agreement. Any other use is prohibited. No part of this publication may be reproduced, transmitted, transcribed, stored in a retrieval system or translated into any language in any form by any means without the prior written consent of SMART Technologies Inc. Information in this manual is subject to change without notice and does not represent a commitment on the part of the vendor.
Portions of this software are copyrighted by Intel Corporation.
Portions of this software are copyrighted by ParaGraph, a business unit of Vadem. CalliGrapher Copyright © 1997-2001 ParaGraph, a business unit of Vadem. © 1995-2001 SMART Technologies Inc. Printed in Canada 10/2001 All rights reserved.
Rear Projection for Plasma Displays
â
Important Information
Please read this manual carefully before setting up and using the SMART Board. With proper care, your SMART Board should provide years of trouble-free service.
NOTE: The information provided in this section applies to the SMART Board 500 Series. If you have a Rear Projection SMART Board or a SMART Board for Plasma Displays, refer to the installation manual that came with your product for warnings, precautions and maintenance instructions.
Other Precautions
For operating safety and to avoid damage to the unit, read carefully and observe the following instructions.
1 If you decide to move a SMART Board that has been mounted on a Floor Stand, do so with care. Quick stops, excessive force, and uneven surfaces may cause the SMART Board to overturn.
2 If you are transporting the SMART Board over a distance, we strongly urge you to
completely repackage it using the original packaging. If the original packaging is no longer available, pack all components with as much padding as reasonably possible to ensure that they are not exposed to excessive vibration or shock.
3 Avoid setting up and using the SMART Board in an area with excessive levels of dust, humidity and cigarette smoke.
4 Avoid leaving cables on the floor where they can be tripped over. If you must run a cable over the floor, lay the cable in a flat, straight line and secure it to the floor with tape or a cable management strip in a contrasting color. Handle cables carefully and avoid excessive bending.
5 If replacement parts are required, ensure the service technician has used replacement parts specified by SMART Technologies Inc. or parts with the same characteristics as the original.
WARNING
If you use a projector with your SMART Board, do not view directly or stare into the beam of light created by the projector. Be especially careful to instruct children not to look in the direction of, or stare at, the beam of light created by the projector.
WARNING
Cleaning the Writing Surface
Before you clean the SMART Board, you should first log off. If you touch the screen when the computer is in any other state (e.g., with a program open or at the desktop), pressure applied to the screen will activate program components or scramble desktop icons. We therefore recommend that you first log off, and then put the projector into standby mode to more easily view dirt and streaks. We also recommend that you clean a frequently used SMART Board approximately once a week to maintain optimal clarity.
To clean the writing surface of the SMART Board, use standard glass cleaner. Just spray the Board with cleaning fluid and wipe with a paper towel.
Remove marks made with a permanent marker by completely covering them with the ink from a dry-erase marker and wiping with a soft cloth while the ink is still wet. Dry-erase ink contains solvents that work to remove permanent ink. Do not use low-odor or non-scented dry erase markers as these markers do not contain appropriate solvents. If any trace of the original permanent ink remains, spray the area with standard glass or whiteboard cleaner and wipe clean.
Preventing Damage to the Writing Surface
While the SMART Board is very durable, sharp writing instruments, such as ballpoint pens or fine-pointed pens, can damage the surface if enough pressure is applied. Keep these types of pens away from the SMART Board and avoid abrasive erasers and cleaning materials.
Getting Started
Getting your SMART Board set up and ready to use is easy. Follow the steps below and you’ll find that as soon as you install SMART Board Software on your connected computer, your SMART Board becomes touch sensitive: in other words, every touch on the Board will be interpreted by your
computer as a mouse click. Open, minimize or close applications, scroll through files, open your browser – all just by touching the Board. You can also press a SMART Pen Tray button to use the SMART Keyboard or make your next contact with the Board a right-mouse click (Windows only). To activate your Pen Tray and other SMART Board tools so you can write over projected
applications, just open the SMART Board tools. You can now pick up a stylus from the Pen Tray and write over any application displayed on the SMART Board surface.
For your SMART Board connection, you have the option of using the provided serial cable or, if you prefer to use a USB cable, you can order a USB adapter cable from SMART Technologies Inc. that is especially designed for connecting a SMART Board. To quickly find the connection procedure that meets your needs, refer to the table below.
NOTE: The information provided in this section applies to the SMART Board 500 Series. If you have a Rear Projection SMART Board or a SMART Board for Plasma Displays, refer to the installation manual that came with your product for set up instructions.
Operating System Cable Connection Page
Windows Serial iii
Windows USB vi
Macintosh Serial viii
Macintosh USB vii
Windows Serial Cable Setup
1 Insert the SMART Board Software CD into your CD-ROM drive.
The SMART Board Software setup program should start automatically. If it doesn’t, select Start,
Run and enter x:\autorun.exe (where x: is your CD-ROM drive). Follow the on-screen instructions to install SMART Board Software.
During SMART Board Software installation, you’ll be asked if you want to put the SMART Board icon in your StartUp Folder. We recommend you reply affirmatively. Then, whenever you activate Windows, SMART Board tools will always be open, and your SMART Board will be fully functional without any further action.
2 Without removing the SMART Board Software CD, shut off your computer.
3 Connect the short DB9 end of the supplied serial cable to the 9-p in serial port underneath the SMART Board (see the figure on the next page).
4 Connect the other end of the serial cable (long DB9 connector) to a COM (serial) port on your computer. Unplug your keyboard connector and reconnect it to the supplied SMART Keyboard Adapter. Insert the male end of the keyboard adapter into the keyboard port on your computer. Finally, insert the keyboard adapter’s power plug into the power plug socket on the back of the long DB9 connector.
NOTE: If you’re connecting to a laptop computer, you’ll need to connect an external power supply rather than a keyboard adapter to the long DB9 connector.
PC Serial Connections
9-pin Serial Port (Underneath Board)
Short DB9 Connector
Serial Port Keyboard Port
Power Plug Socket Keyboard Adapter Keyboard Connector Serial Cable To Power Plug on DB9 To Keyboard Port To Keyboard Connector
5 Turn on your computer.
The Ready Light on the Pen Tray will turn red. This indicates that the Pen Tray is receiving power from the keyboard port on your computer.
When Windows starts, a Found New Hardware plug-and-play wizard will lead you through the process of locating the SMART Board driver (which is located on your hard drive).
6 Ensure that Windows searches your hard drive for the SMART Board driver. Once you’ve completed the plug-and-play wizard, the Ready Light on your Pen Tray will turn from red to green. This indicates that your SMART Board is now touch sensitive.
7 If you added the SMART Board icon to your StartUp menu during the software installation, it will automatically open when you restart your computer. However, you can also open SMART Board tools at any time by going to Start, Programs, SMART Board Software and selecting SMART Board. With SMART Board tools open, you can now write over top of any application with a Pen Tray stylus.
8 Press the SMART Board icon in the System Tray and select Orient to perform a brief procedure that orients the computer image on the SMART Board, ensuring that SMART Board Software accurately tracks your touch (see page 7 for more information).
Manually Configuring Your Serial Port
You may need to manually configure your serial port if:• the Windows operating system you’re running does not perform plug and play (e.g., Windows NT 4.0 or ME)
• the Found New Hardware wizard fails to appear
• you plugged in your SMART Board after you started your computer
• the Ready Light simply remains red rather than turning green
To manually configure your serial (COM) port:
1 Click theSMART Board icon in the System Tray and select Control Panel. The SMART Board Control Panel will appear.
2 In the Boards tab, click the Connect button under Serial Ports. The Select COM Port dialog will appear.
3 If you know the COM port to which the SMART Board is connected, you can type it or select it from the COM port drop-down list and click the Select button under Manual. or
Win
If you’re unsure of the correct COM port, click the Detect SMART Hardware button under Automatic to initiate SMART Board detection. Your COM ports will be searched for the presence of an attached SMART Board until the correct COM port is located. The Ready Light on the Pen Tray will change from red to green, indicating the SMART Board is now touch sensitive. Open the SMART Board tools to use any Pen Tray stylus to write over projected applications.
Windows USB Adapter Cable Setup
1 Connect the short DB9 end of the optional USB adapter cable to the 9-pin serial port underneath the SMART Board (see the upper figure on page iv).
NOTE: To order a SMART USB adapter cable (part # USB-FRU), call SMART Technologies Inc. at 1.888.42.SMART.
2 Connect the USB connector at the other end of this cable to the USB port on your computer.
3 If you already have the appropriate USB driver installed on your system, the Ready Light on the Pen Tray will turn red and you can proceed to install SMART Board Software (step 4 on the next page).
If you don’t have the appropriate driver installed, a FoundNew Hardware wizard will appear to assist you in locating the driver for the newly connected USB Human Interface Device (the SMART Board).
• Direct Windows to search for an appropriate driver by clicking the Next button.
• Click Next again to direct Windows to search the driver database on your hard drive for the appropriate driver.
NOTE: If Windows fails to find the correct driver, insert the Windows 98/2000/ME/XP CD in your CD-ROM to install a USB HID (Human Interface Device) driver. USB HID drivers are typically not included in a default installation. HID is a subclass of USB devices. These drivers are needed for the SMART Board to work using a USB cable.
• Click the Finish button after the driver search or driver installation is complete. USB Port
The Ready Light on the SMART Pen Tray will turn red. This indicates that the Pen Tray is receiving power from the USB port.
4 Insert the SMART Board CD into your CD-ROM and follow the on-screen instructions to install SMART Board Software.
Immediately following the SMART Board Software installation, you’ll notice the Ready Light on the Pen Tray turns from red to green. This indicates that the SMART Board is now fully touch sensitive.
5 If the SMART Board tools do not automatically open, press on Start and go to Programs, SMART Board Software, SMART Board.
The SMART Board icon will appear in the System Tray. You can now pick up a stylus from the Pen Tray and write over any projected application.
6 While not strictly necessary, we recommend that you press the SMART Board icon and select Orient to perform a brief orientation procedure to more accurately map the location of each Board contact (see page 7 for more information).
Macintosh USB Adapter Cable Setup
1 Connect the DB9 end of the optional USB adapter cable to the 9-pin serial port underneath the SMART Board (see the upper figure on page iv).
2 Connect the USB connector at the other end of this cable to the USB port on your computer (see the figure on previous page).
The Ready Light on your Pen Tray will turn red, indicating that the SMART Board is receiving power from the USB port.
3 Insert the SMART Board Software CD into your computer’s CD-ROM drive. The CD will automatically launch the installation program. Follow the on-screen instructions. When installation is complete, the SMART Board icon will appear in the menu bar and the Ready Light on the Pen Tray will turn from red to green.
4 Press on the SMART Board icon and select Orient to perform a brief orientation procedure to more accurately track your touch on the SMART Board (see page 7 for more information).
Mac
Macintosh Serial Cable Setup
1 Connect the short DB9 end of the supplied serial cable to the 9-pin serial port underneath the SMART Board (see the upper figure on page iv).
2 Attach the supplied Macintosh serial adapter to the long DB9 end of the supplied serial cable and insert the barrel-shaped end of the adapter into the modem or printer port on your Macintosh.
3 With your Macintosh turned off, unplug your keyboard connector from the keyboard port. Next, connect the power plug end of the supplied SMART Macintosh Keyboard Adapter to the power plug on the long DB9 connector and the other end to the vacated keyboard port. Finally, reconnect the keyboard connector to the SMART Macintosh Keyboard Adapter.
NOTE: If your Macintosh isn’t equipped with a keyboard port, connect an external power supply to the power plug socket on the long DB9 connector. This external power supply must have the following characteristics:
• 2.1 mm inner diameter — positive center post
• 5.5 mm outer diameter — negative outer barrel
• 6V DC to 12V DC output
• minimum 200 mA output
Power Plug Socket
Long DB9 Connector To Keyboard Port To Keyboard Connector To Serial Adapter
Mac
SMART Keyboard Adapter
Connecting the SMART Keyboard Adapter
Macintosh Serial Adapter Long DB9 Connecter Power Plug Socket Supplied Serial Cable
4 Turn on your Macintosh.
NOTE: The Ready Light on the Pen Tray will turn red when you turn on your Macintosh. This indicates it is receiving power from your keyboard port or external power supply.
5 Insert the SMART Board Software CD into your CD-ROM drive. The CD will automatically launch the installation program. Follow the on-screen instructions. Immediately following SMART Board Software installation, you’ll notice the Ready Light on the Pen Tray turns from red to green. This indicates that the SMART Board is now fully touch sensitive.
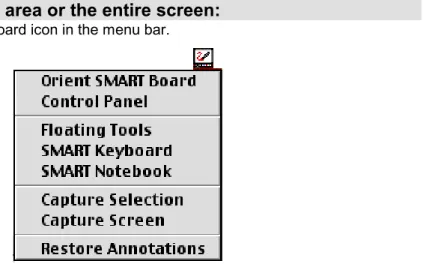
6 Press on the SMART Board icon in the menu bar and select Control Panel from the drop-down menu.
7 In the Boards tab, press the Select button under Serial Ports. The Pick a Port dialog will appear.
8 If you know the port to which the SMART Board is connected, select it from the Port List and press the OK button.
or
If you’re unsure of the correct port, press the Auto Detect button to initiate SMART Board detection. Your ports will be searched for the presence of an attached SMART Board until the correct port is located.
The Ready Light in the Pen Tray will change from red to green, indicating the SMART Board is now touch sensitive.
9 Press the Orient button to perform a brief orientation procedure to more accurately map the location of each Board contact (see page 7 for more information).
About This Guide
If you decide to read beyond Getting Started, you’ll be pleased to learn that the SMART Board lets you do a lot more than control your computer via the Board’s touch-sensitive surface and write over top of projected applications in electronic ink.
A SMART Board connected to a computer and an LCD projector allows you to:
• Create and edit a wide variety of annotation objects with the Pen Tray styluses, the Floating Tools or SMART Notebook commands.
• Capture an image of that annotation into SMART Notebook with the press of a toolbar button.
• Use SMART Recorder (Windows only) to create a video file of everything you do on a SMART Board, no matter which application you’re using. If you have a microphone, you can also include audio in sync with the data.
• Save, print or e-mail a complete record of everything written, drawn or typed into SMART Notebook. You can even save your Notebook file as a PDF file (Windows only), a series of image files or HTML files that others can view via their Web browser.
• Use an On-Screen Keyboard to enter text right at the SMART Board surface without using a conventional, physical keyboard.
• Use the handwriting recognition feature to convert your handwritten text into typewritten text (Windows only).
• Import information from almost any electronic source into SMART Notebook.
• Use touch shortcuts to breeze through your PowerPoint presentation at the SMART Board.
The SMART Board User’s Guide tells you how to accomplish all of these tasks and more. While the SMART Board is an easy, natural tool that requires no special expertise to use, this guide covers the complete range of SMART Board functionality so you can take full
advantage of all of the SMART Board’s features.
The pages that follow are organized around the typical tasks performed before, during and after a SMART Board presentation. You’ll learn how to create both Notebook files and annotation objects within those files, import information from other sources, and then sort and edit file contents.
You’ll also learn how to print and send Notebook files, and the most effective ways of using your SMART Board during a presentation. Instructions for using several third-party
conferencing, presentation and graphics applications as Board-aware programs on the SMART Board are also provided. The guide concludes with customer support information and details on using the SMART Board without a projector.
The information in this guide also relates to the two other members of the SMART family of interactive whiteboard products:the Rear Projection SMART Board (both cabinet and in-wall models) and the SMART Board for Plasma Displays.For setup information, read the
installation guide shipped with your product.
NOTE: This guide assumes that you’ve already completed the SMART Board setup: You’ve mounted the SMART Board to a wall or to a Floor Stand and installed SMART Board Software as described in the SMART Board setup instructions.
This manual is for both Windows and Macintosh users. Almost all of the procedures and descriptions apply to either system. However, any information that relates solely to Macintosh is accompanied by a “Mac” icon in the margin, and information specific to Windows systems is indicated by a similarly placed “Win” icon.
Contents
Important Information ... i
Getting Started ... iii
Windows Serial Cable Setup...iii
Manually Configuring Your Serial Port ... v
Windows USB Adapter Cable Setup... vi
Macintosh USB Adapter Cable Setup ...vii
Macintosh Serial Cable Setup ...viii
About This Guide ... x
Contents... i
SMART Board Software ... 1
SMART Board Service ... 1
SMART Board Tools ... 1
Accessing and Exiting SMART Board Tools for Windows ... 5
Accessing and Exiting SMART Board Tools for Macintosh ... 6
Using the SMART Board with a Projector ... 7
General Tips for Trouble-Free Performance... 7
The Importance of Being Oriented... 7
Adjusting the Projected Image ... 8
Adjusting the Projected Laptop Image ... 10
On-Screen Display Controls for Windows... 10
Configuring and Using On-Screen Display Controls ... 11
Using the SMART Bulb Saver (Windows Only) ... 13
Getting to Know Your SMART Pen Tray... 15
Writing, Capturing and Erasing ... 16
Writing with Pen Tray Styluses over Applications ... 16
Reconfiguring the Pen Tray Tools... 17
Using the Floating Tools ... 19
Reconfiguring the Floating Tools ... 20
Saving Pen Tray and Floating Tools Settings as User Profiles (Windows Only)... 22
Capturing What You Write ... 23
Erasing What You’ve Written ... 24
Using the SMART Keyboard... 26
Using the SMART On-Screen Keyboard to Type Text... 26
Handwriting Recognition (Windows Only)... 27
Editing Converted Handwriting... 28
Entering Freehand Numbers... 31
Using SMART Recorder (Windows Only) ... 32
Accessing and Exiting SMART Recorder... 32
Defining SMART Recorder Options ... 33
Creating and Playing Video Files ... 34
Enhancing System Performance and Video Quality ... 36
Using Notebook Tools for Object Creation... 38
Opening SMART Notebook... 38
Writing with the Notebook Pen Tool... 38
Drawing Rectangles, Ellipses and Lines in Notebook ... 39
Typing in Notebook ... 40
Editing Notebook Objects ...42
Selecting Objects...42
Moving Objects...43
Grouping and Ungrouping Objects ...43
Automatic Object Grouping ...44
Protecting Objects from Further Editing (Windows Only)...45
Rearranging Stacked Objects ...45
Resizing Objects...45
Changing Object Attributes...46
Deleting and Erasing Objects ...46
Undoing Your Mistakes ...47
Managing Notebook Files ...49
Opening, Creating and Saving Notebook Files ...49
Publishing Notebook Files on the Internet (Windows Only) ...52
Printing and Distributing Notebook Files ...52
Importing Information into Notebook ...54
Import Methods for Windows Users ...54
Capturing Pen Tray Annotations for Windows Users ...54
Capturing All or Part of a Screen...55
Capturing Entire Files with Print Capture ...56
Importing Scanned Pictures ...57
Importing Graphic Files and ClipArt...57
Cutting, Copying and Pasting ...58
Dragging and Dropping via the Task Bar ...58
Import Methods for Macintosh Users ...58
Capturing All or Part of a Screen...59
Importing Graphic Files ...59
Cutting, Copying and Pasting ...60
Sorting Information in Notebook...61
Page Sorter View...61
The Side Sorter ...62
Presenting on the SMART Board ...64
Customizing the SMART Board Interface ...64
Full Screen View...64
SMART Zoom (Windows) and Scale to Fit (Macintosh) View...65
Navigating through a Notebook Presentation...66
Working with Board-Aware Third-Party Applications
(Windows Only)...67
Board-Aware Third-Party Applications ...67
Disabling SMART Aware ...68
Aware Online Help...69
Using PowerPoint on a SMART Board...70
Touch Shortcuts for PowerPoint Users ...70
Saving PowerPoint Annotations ...71
Printing PowerPoint Annotations ...71
Clearing and Restoring PowerPoint Annotations ...72
Accessing the PowerPoint Pop-Up Menu...72
Customer Support ...73
Contacting SMART Technical Support...73
Other SMART Contacts...73
Appendix A: Using the SMART Board without a Projector... 74
Setting Up the SMART Pen Tray for Non-Projected Use... 74
Configuring SMART Board Software for Non-Projected Use... 74
Capturing Your Notes... 75
Appendix B: Floating Tools Options For Windows Users... 76
Appendix C: Using Multiple SMART Boards... 78
SMART Board Software
SMART Board Service
The SMART Board Service is the driver component of SMART Board Software. It runs in the background, translating SMART Board contact into mouse behavior.
As soon as you install SMART Board Software on a computer connected to a SMART Board, the SMART Board Service goes into action to enable immediate touch control of your
projected computer application. You can activate programs, open and scroll through files, even surf the Internet − all without doing anything more than installing SMART Board Software on your connected and projected computer. At this point, you can also use the Pen Tray buttons either to produce a right-mouse click (Windows only) or to activate the SMART Keyboard. After initial software installation, each time you start up your operating system, the SMART Board automatically becomes touch sensitive.
SMART Board Tools
The remaining program components of SMART Board Software – the SMART Board tools – provide all the functionality of the SMART Board beyond basic touch control and Pen Tray button use. Specifically, the SMART Board tools provide you with SMART Board annotation and tool-configuration capabilities. The SMART Board tools are accessed by pressing on the SMART Board icon.
It’s important to note that the SMART Board tools must be running to use the Pen Tray styluses and eraser. In other words, if you want to write on your SMART Board with a Pen Tray stylus, make sure the SMART Board icon appears in the System Tray (Windows) or in the menu bar (Macintosh).
In Macintosh, these tools are available as a drop-down menu of commands, accessed by pressing once on the SMART Board icon that appears in the menu bar.
In Windows, the SMART Board tools are available as a pop-up menu that appears when the SMART Board icon in the System Tray is pressed.
Tip
Use the On-Screen Keyboard to log in – before SMART Board tools are even active. When the log-in screen appears, press the Keyboard button on the Pen Tray. The On-Screen Keyboard will appear and you can type your user name and password without moving to an actual keyboard. SMART Board Icon
Win
Mac
The components of SMART Board tools are briefly described below.
SMART Notebook
SMART Notebook allows you to create, organize and save notes either on a SMART Board or at your workstation, and then send those notes to a printer.
Notebook provides many object-creation tools that allow you to create a variety of
annotations within Notebook files. Notebook commands also enable you to import graphics, text, clip art and entire files from any other application into your Notebook file. You can use these tools in a meeting to assist you in writing notes and capturing participant input. Or use them at your workstation to help you create a multi-page Notebook file for presentation at an upcoming meeting. During the meeting, open that file on the SMART Board: Everything you prepared earlier will be displayed on the large surface of the Board (and if you use Notebook in Full Screen mode, your display surface will be even larger). And, of course, you’ll be able to navigate through your presentation just by touching the Board.
But Notebook is much more than just an electronic flip chart for displaying presentations or capturing notes from a brainstorming session. It also serves as a receptacle for anything you write on the SMART Board over any application.
As soon as you begin writing over a Windows application with a Pen Tray stylus, a toolbar appears that lets you save a bitmap image of both your annotation and the underlying application with the press of a button. Macintosh users can access the same annotation-capture capability from the SMART Board tools menu. The annotation-captured image is automatically placed on a new page of the current Notebook file. The captured annotations can now be saved for later reference as a Notebook file, a PDF file, a series of image files or an HTML file.
SMART Board Control Panel
The SMART Board Control Panel is a tabbed interface that enables you to easily configure SMART Board functionality and access advanced features.
SMART Board Control Panel (Windows)
Tip
Save your Notebook file as a PDF file, HTML file or series of image files if you’re sending the
information to people who don’t have SMART Board Software installed on their computers.
In the Boards tab you can:
• connect or disconnect the SMART Board to serial ports on your computer
• perform the SMART Board orientation procedure
• configure projected or non-projected mode of SMART Board operation
• run a status log for diagnostic purposes, and if you’re a Windows user, access the SMART Board Diagnostics program to test the functionality of connected SMART Boards
• access advanced Board settings
NOTE: This should only be attempted with the assistance of SMART Technical Support.
• configure video card(s) and perform orientation for multiple SMART Board operation (Windows only)
• install on-screen display controls for your particular projector or plasma display panel (Windows only)
In the Pen Tray tab you can:
• customize the Pen Tray tools to accommodate individual user preferences or revert to default values
• create and save individual user profiles (Windows only) In the Floating Tools tab (Windows only) you can:
• customize the Floating Tools to accommodate individual user preferences
NOTE: Windows users can also enlarge the Floating Tools with additional buttons and create and save unique Floating Tools profiles for individual users.
In the Aware tab you can:
• disable SMART Aware (the default is an active Aware application), access Aware preferences and display active Aware applications (Windows only)
• establish PowerPoint preferences
Floating Tools
The Floating Tools are a versatile palette of buttons that float over any open application on your SMART Board and offer you a wide variety of functionality: In addition to providing software counterparts to the Pen Tray tools (a virtual stylus, highlighter and eraser), the Floating Tools also offer access to tools that change a left- to a right-mouse click (Windows only), create geometric shapes, provide a large pointer for presentation purposes and restore cleared annotations.
SMART On-Screen Keyboard
The SMART Board (used with a projector) is a great tool for presenting information to others, allowing you to control your applications by touch alone and write over top of those applications to make or emphasize a point. Many occasions arise, however, when a keyboard is a necessary tool. For example, you may want to rename a file and type a new name into the Save As dialog. The SMART On-Screen Keyboard is a quick and easy way to fill in the dialog right at the Board surface, without having to move to an attached keyboard. The On-Screen Keyboard also offers a very easy way to log in without resorting to an actual keyboard.
Tip
You can press and drag the SMART Keyboard by its title bar anywhere on the Board. If you want to try two-handed, ten-fingered typing, position the keyboard higher up on the Board.
Floating Tools
If you’re a Windows user who prefers not to type, you can press the Write button on the keyboard and then write in the Handwriting Recognition window with your finger or a stylus. You don’t need to alter your handwriting so that it can be recognized by the software; neither do you need to perform any handwriting-training procedures. The SMART Keyboard will recognize and convert your handwriting into typewritten text that can be further edited before being committed to the application or input directly into an active application or dialog.
Press here for handwriting recognition
SMART On-Screen Keyboard (Windows)
SMART Recorder (Windows Only)
With SMART Recorder, you can record everything you do on a SMART Board, no matter which applications you’re using. You can play the recording back and watch it like a movie in Windows Media Player (a free video player) on any computer. If you have a microphone attached to your computer, you can even record audio in sync with your data.
SMART Recorder produces standard Audio Video Interleave (AVI) files that can be viewed with Windows Media Player.
SMART Aware: Making Windows Third-Party Programs Board-Aware
SMART Aware works in the background to make 13 popular conferencing, graphics and presentation programs Board-aware.
A Board-aware program is one in which whatever you write or draw with a Pen Tray stylus or Floating Tools button becomes an actual component of that program. Annotations you make over a non-Board-aware program – such as Word or Excel – can still be captured using our screen-capture tools, but you can’t make actual changes to the program itself. In other words, you can’t save your annotation into the program.
While Aware functions transparently, you may want to deactivate it for certain applications if you prefer them not to be Board-aware. In other words, if you’d rather not save the
annotations you’ve created as a part of the program, you don’t need to. You may prefer to save screen captures of only your annotations in a Notebook file or keep no record whatsoever.
Macintosh users have access to one third-party Board-aware program: Microsoft PowerPoint for Macintosh. The unique touch shortcuts, annotation-capture and printing capabilities available when running PowerPoint on a Macintosh-connected SMART Board are described in detail in Using PowerPoint on a SMART Board on page 70.
Note
For a complete list of all third-party Windows applications supported by SMART Aware, turn to page 67.
Win
Mac
Win
Using Microsoft Paint on a SMART Board
Microsoft Paint is one of the graphics programs supported by SMART Aware. When you open Paint on a SMART Board, you can use the Pen Tray stylus to draw a picture – instead of using your mouse to select and then manipulate a tool from the Paint toolbox, as you would normally. Similarly, pick up the Pen Tray eraser and erase part of the picture. Or use the Paint toolbox to further enhance the object you’re creating. Now save or print the picture by selecting Save or Print from the Paint File menu or send it to a printer in the same way. You’ll find you’ve created a bitmap with much greater ease than normal: you have the extra-large canvas of the SMART Board surface to work on and the artistic control that can only be achieved with a pen in your hand. You’ll also find that Aware offers the same advantages when you’re running CorelDRAW (version 8.0) or AutoCAD.
Two Popular Board-Aware Programs: NetMeeting and PowerPoint
SMART Aware is especially useful for SMART Board users running NetMeeting and PowerPoint – two very popular applications for conferencing and presentation purposes respectively. Although Aware operates very much in the background, it greatly enhances the effectiveness of both these applications. Turn to Using PowerPoint on a SMART Board on page 70 and Working with Board-Aware Third-Party Applications on page 67 for more information.
Accessing and Exiting SMART Board Tools for Windows
We recommend that you put SMART Board tools in your Windows StartUp folder. During the SMART Board Software installation, you’ll be asked if you wish to do this. If you replyaffirmatively, whenever you activate Windows, SMART Board tools will automatically be available to you in the form of the SMART Board icon residing in your System Tray.
If you close down SMART Board tools, your SMART Board will remain touch sensitive, and you can still use the Pen Tray buttons to create a right-mouse click and access the SMART Keyboard. However, you will not be able to write over top of an application with a Pen Tray stylus or use any of the other SMART Board tools.
To open SMART Board tools for Windows:
1 Double-presson the SMART Board icon in the desktop. OR
1 Press the Start buttonin the Task Bar,select Programs, SMART Board Software and then press on SMART Board.
The SMART Board icon will appear in the System Tray (on the right side of the Task Bar). 2 Press on the SMART Board icon in the System Tray and select the option you want
from the menu that appears. or
Double-press on the SMART Board icon in the System Tray and press on the button you want in the toolbar that appears. You can also open the toolbar by pressing and dragging the SMART Board tools menu away from the System Tray.
To minimize the toolbar, double-press on the title bar along the left edge. Double-press again to restore the toolbar.
To exit SMART Board tools in Windows:
Press the SMART Board icon in the System Tray and select Exit.
Accessing and Exiting SMART Board Tools for Macintosh
To access SMART Board tools for Macintosh:
Press on the SMART Board icon in the menu bar. The SMART Board tools drop-down menu will appear.
To exit SMART Board tools for Macintosh:
1 Press on the Application menu on the right side of the menu bar. 2 Select SMART Board from the drop-down Application menu.
The SMART Board menu will appear on the left side of the menu bar. 3 Press on SMART Board and select Quit.
Mac
Using the SMART Board with a Projector
When you use a projector with your SMART Board, finger contact on the Board can control any application projected onto it as effectively as a mouse. You can touch on the SMART Board to start the program, then pick up a stylus from the Pen Tray and write in virtual, electronic ink over it. SMART Board contact can be configured to produce a left- or right-mouse click, draw a circle, rectangle, or straight line, write or draw in an array of colors, highlight anything on the Board, or selectively erase annotations.
How does it work? The SMART Board Service running in projected mode on the connected computer translates Board contact into mouse functionality and Pen Tray tool use into the appearance (writing) or disappearance (erasing) of electronic ink.
In non-projected mode, the computer automatically scales the entire surface of the SMART Board into an image the size of the writing area of the application in which you’re working. Since this scaling is automatic, you don’t need to perform an orientation procedure. For information on running the SMART Board in non-projected (whiteboard) mode, turn to
Appendix A: Using the SMART Board without a Projector on page 74.
General Tips for Trouble-Free Performance
These tips apply to a SMART Board that is completely set up, with SMART Board Software installed and running.
• Make sure all the styluses and the eraser are placed securely in the Pen Tray.
• Check to see that the Ready Light on the Pen Tray is illuminated green.
• Ensure that the SMART Board is connected to a USB or COM port that is recognized by the operating system and is not being used by another program.
The Importance of Being Oriented
To provide an accurate and appropriate response to SMART Board touch, the computer needs to know exactly where on your Board the projected image is located, so as to translate Board contact to a precise point on the computer. You provide the SMART Board Service with this information when you perform an orientation procedure − a very simple process of touching firmly and precisely on a grid of red crosses that appear on the orientation screen. With correct orientation, the cursor will appear directly beneath your fingertip when you touch the SMART Board screen, and closely track finger or tool contact made anywhere on the Board.
Orientation Tips
• Press firmly in the small yellow square in the center of each red cross that appears in the orientation screen. If you neglect to do this, the SMART Board will not track your finger or Pen Tray tool correctly.
• If you’re dissatisfied with the precision of a particular orientation point, you don’t need to begin the entire orientation procedure again. Just press either of the two Pen Tray buttons or the left arrow key on the keyboard to retract a poorly aligned orientation point. You won’t lose any previously established orientation points and you can redo the last orientation point.
• If you want to redo the entire orientation procedure, press the Esc key on the keyboard.
Press on the yellow square in the center of the cross
When Should You Perform an Orientation Procedure?
While orientation is the first task performed after configuring the COM port and installing the SMART Board Software, the SMART Board may be accidentally jostled or deliberately moved to another location. If this occurs, you’ll need to perform the orientation procedure again.
Press the SMART Board icon and select Orient (for Windows) or Orient SMART Board (for Macintosh) and follow the on-screen instructions. You can also access this feature by pressing the Orient button in the Boards tab of the SMART Board Control Panel.
Which Orientation Level Should You Choose?
The SMART Board Service offers three orientation levels: Quick (9 points), Standard (20 points) and Fine (80 points). The level you choose should be based on the time you have available to perform the procedure and the degree of tracking accuracy you require.
• Quick orientation requires only nine presses to complete and is well-suited for fast orientations. If your Board is accidentally moved or jostled during a presentation, use the Quick orientation to re-orient quickly and with minimal interruption.
• Standard orientation requires 20 presses and provides a level of accuracy suitable for most systems. This is the recommended orientation level.
If you’re orienting a projected SMART Board for the first time, and you’re using the display surface for normal presentation purposes, select the Standard orientation. This orientation takes under a minute and, if performed carefully, will provide a high level of tracking precision.
• Fine orientation involves pressing on 80 individual crosses.
Fine orientation provides the highest level of tracking precision, but is relatively time-consuming to perform.
Adjusting the Projected Image
You must make a few final adjustments to the projector to ensure a focused image that fits within the bezel of your SMART Board at the top and bottom, with a margin of approximately 3/8" on both right and left sides.
NOTE: The 3/8" margin described above is an optimal measurement. Alignment can vary: in some instances, the image can fill the entire screen; in others, the margin can be greater than 3/8", but be perfectly satisfactory as long as it’s even on all sides.
Many projector-related problems can be fixed right at the projector itself, by shifting the projector to the right or left, tilting it or using the zoom lens to sharpen the focus or expand and contract the image. Keystoning problems can also be solved by raising or lowering the front or back of the projector until the sides of the image are parallel to the SMART Board bezel.
A few special problems need to be fixed at the software level by adjusting computer or projector settings. These image problems are discussed below.
If the Projected Image Is the Wrong Size or Distorted
If, after orienting, you find that the image cast on the SMART Board does not properly fill the screen, the resolution settings of your projector and your computer may not match. It’s very important that computer and projector resolutions correspond exactly. If they don’t match, the on-screen image will not properly fill the SMART Board screen or may suffer from distortion or shimmering.
Quick Orientation
Standard Orientation
Fine Orientation
First ensure that the projector is set to its optimal image resolution. Refer to your projector’s manual for the true resolution of your projector, and reset it if necessary. While these instructions may indicate that resolutions other than the optimal one are permitted, you should not set the resolution to any of these other settings.
For example, if the projector’s true resolution is 800 x 600, but it’s also capable of displaying at 640 x 480, set both the computer and the projector to the true resolution − 800 x 600.
To set your Windows computer resolution to match the projector
resolution:
1 Click the Windows Start button and then point to Settings.
NOTE: You may need to perform the following procedure at your computer monitor, as resolution differences can distort the image on the Board to the point where visibility is impaired.
2 Point to the Control Panel folder and release the mouse button. The Control Panel directory will appear.
3 Double-click on Display.
The Display Properties dialog will appear. 4 Click on the Settings tab.
5 In Desktop, Screen area or Screen Resolution, click and drag the sliding bar to adjust the pixel setting to match the resolution of your projector.
6 Click the Apply and OK buttons. 7 Restart your computer, if required.
To set your Macintosh computer resolution to match the projector
resolution:
1 On the Control Strip, click the Monitor Resolution button. 2 Click the appropriate resolution from the pop-up menu.
The new resolution is applied to your monitor. OR
1 Select Control Panels from the Apple menu. 2 Select Monitors from the Control Panels menu.
The Monitors window opens.
3 Select the appropriate resolution in the Resolution area of the window.
If the Board Becomes Unresponsive
If you find that the Board is unresponsive to either contact or Pen Tray tool use, check that the Board driver is set to run in projected mode. While projected operation is the default mode for the Board driver, Non-Projected (Whiteboard Mode) may have been accidentally selected in the Control Panel.
To ensure the SMART Board Service has been correctly configured, open the SMART Board tools, select Control Panel and make sure Projected (Mouse Mode) has been selected for the active COM port.
Win
Adjusting the Projected Laptop Image
If No Laptop Image Appears or It’s Severely Distorted
If you’re unable to see an image from a powered-up and connected laptop computer, or the image produced is severely distorted, that laptop’s external video port may be inactive. With newer laptops, you can synchronize the internal and external video ports at the software level, as follows:
1 From the Windows Start menu, select Settings, Control Panel, and then Display. 2 Select the Refresh (or Monitor Refresh) tab.
3 Click the CRT/Panel option to activate simultaneous monitor and external video port display.
This procedure may not be possible with older laptop models. With some older laptop models, you may need to switch back and forth between the internal and external video ports. If you aren’t sure which commands or keyboard combinations are required for switching back and forth between the internal and external video ports of your laptop, consult your laptop owner’s manual.
If Your Laptop’s Serial Port is Unavailable for the SMART Board
If you’ve connected a SMART Board to a COM port on your laptop computer, but the SMART Board remains unresponsive, you may be experiencing a COM port conflict created by software on your laptop. If you use a laptop or personal digital assistant that transmits information to your computer using infrared (IR) light waves, software resident in your StartUp directory may be telling the COM port to continually monitor the air for nearby IR devices.
Although you can physically connect a serial device such as a SMART Board to the laptop’s COM port, the software can override this connection, reserving the COM port for the device specified by the software.
One solution is to use a different COM port. If your IR device software uses COM1 but your computer has COM2 available, perform the following procedure:
1 Plug your SMART Board into COM2.
2 Click the SMART Board icon in the System Tray and select Control Panel. 3 Click the Connect button under Serial Ports in the Boards tab.
4 Select COM2 from the drop-down list and click the Select button.
If you have only one COM port, you’ll need to disable the detection feature of the infrared software so your SMART Board can use the COM port. If you require further assistance, consult your laptop owner’s manual or call SMART Technical Support at 1.866.518.6791.
On-Screen Display Controls for Windows
When you use a SMART Board with a projector, you’ll also want to use the On-Screen Controls to enable touch-control of your display. These On-Screen Display Controls are also available for the SMART Board for Plasma Displays.
Win
Win
To help you economize on expensive projector lamps or simply to prevent image burn-in in your plasma display, SMART’s On-Screen Display Controls have been designed to detect the presence of any screen saver you may have installed. The On-Screen Display Controls respond when the screen saver becomes active by automatically turning off the projector lamp or putting the plasma display into sleep mode after a specified period of time has elapsed.
As soon as activity resumes on the SMART Board − i.e., after the SMART Board is touched or the mouse is moved − the On-Screen Display Controls will turn the projector lamp back on or reactivate your plasma display.
To summarize, the On-Screen Display Controls:
• allow you to control such aspects of the projector or plasma display as volume, power and input source right at the SMART Board surface
• work with your screen saver to put your display into standby mode (turning off your projector lamp or putting your plasma display into sleep mode) after a period of inactivity. The next time you touch the Board, the projector lamp or plasma display is reactivated.
In order for an On-Screen Display Controller to work, you’ll need:
• an available COM port on your computer
• an RS-232 serial cable connection from the projector or plasma display to the computer
Configuring and Using On-Screen Display Controls
On-Screen Display Controls are available for both supported and non-supported projectors and for all plasma display panels that work with a SMART Board for Plasma Displays. If your projector does not appear on the list of supported projectors, you can select A Generic Projector from the list of Display Controllers and configure it as shown in the procedure below.After you’ve installed or configured the On-Screen Display Controls, a Display Controls icon is added to your System Tray (on the right side of the Task Bar), as shown below.
Press once on this icon to view the Controls dialog for your On-Screen Display Controls, and then adjust and control your display by pressing the appropriate buttons in the dialog. You can also access the controls in the form of a command menu list with a right-mouse press on the icon. Pressing twice on the icon will cause your projector or plasma display to shut down immediately.
NOTE: Specific on-screen controls vary according to the projector and plasma display model, but, in general, standby mode, volume, display mode and input source controls become touch accessible.
Tip
If you don’t have a screen saver installed, consider installing the SMART Bulb Saver, which is especially designed for use with a SMART Board. See page 13 for details.
Win
On-Screen Display Controls Icon in System Tray
To configure On-Screen Display Controls:
1 If you haven’t already done so, connect an RS-232 serial cable from the projector or the plasma panel serial port to an available COM port on your computer.
2 Press the SMART Board icon in the System Tray and select Control Panel.
3 In the Boards tab, press the Advanced button, and then select On-Screen Controller Settings.
The On-Screen Controller Installer dialog will appear.
4 In the Serial Port box, select the serial or COM port on your computer (e.g., Com1, Com2, etc.) you want to configure with the On-Screen Controller.
NOTE: This serial port should be occupied by the RS-232 serial cable connection made previously (see step 1).
5 Under Display Controller, press the arrow button and select your projector or plasma display model from the drop-down list.
If your projector doesn’t appear on this list, select A Generic Projector and follow the procedure on the next page.
6 If you’re displaying on more than one SMART Board, press the arrow button and select the SMART Board you want to associate with this particular set of On-Screen Display Controls under Associated Board.
7 Select the amount of time to elapse between screen-saver activation and the initiation of standby mode by pressing the up or down arrow button in Delay Time.
NOTE: Position your cursor in the time field you want to adjust – seconds, minutes or hours – and then press on the up or down arrow to increase or decrease the time value. 8 Press the Install button.
The selected projector or plasma display model will appear next to the selected serial port.
9 Press the Start button.
The On-Screen Display Controls for your projector or plasma display panel will immediately appear, together with the On-Screen Display Controls icon in the System Tray.
Tip
If you don’t want your display to go into standby mode when your screen saver is activated, set the Delay Time to 24 Hours.
To configure a generic projector (not in list of supported projectors):
1 Select A Generic Projector from the drop-down list under Display Controller.
2 Select the amount of time to elapse between screen-saver activation and the initiation of standby mode by pressing the up or down arrow button in Delay Time.
NOTE: Position your cursor in the time field you want to adjust – seconds, minutes or hours – and then press on the up or down arrow to increase or decrease the time value. 3 Press the Set Serial Port buttonand configure the communication protocol for this
projector.
NOTE: You can locate the information you need to complete this dialog in the owner’s manual for your projector. Look in the specifications section of the manual for the following communication protocol information: bits per second, data bits, parity, stop bits, and flow control.
4 Enter the name of your projector in the Display Name text-entry box.
5 Enter the binary PC command codes for Power On and Power Off in their respective text-entry boxes.
NOTE: You’ll find this information in the PC Command or Control Code section of the owner’s manual for your projector.
6 If necessary, enter the single-digit values that represent the byte length of the projector’s acknowledgement response to the computer’s control commands in the AckLen text-entry boxes.
NOTE: If you set up the On-Screen Projector Controls for your projector and they fail to work, it may be necessary to enter the AckLen values in AckLen. If this information can’t be found in the owner’s manual for your projector, you may need to contact the projector manufacturer for this information.
7 Press the Install button and then the Start button.
The On-Screen Display Controls for your projector will immediately appear, together with the On-Screen Display Controls icon in the System Tray.
Using the SMART Bulb Saver (Windows Only)
If you want to take advantage of the On-Screen Display Controls feature but have no screen saver installed, we’ve provided one that’s especially tailored for SMART Board use. Even if you’re already using another screen saver, you may want to consider using the SMART Bulb Saver instead. Not only is the SMART Bulb Saver designed especially for use with a SMART Board, but it’s highly configurable as well: it can put your projector or plasma panel into standby mode, customize the screen graphic, shut down the computer and log off the current user after a specified period of inactivity.
To activate the SMART Bulb Saver:
1 Connect the appropriate cable from the projector’s computer control connection to an available COM port on your computer. You may have already made this serial connection between the projector and computer to activate an On-Screen Display Controls (see page 11).
2 Press the Start button , point to Settings, and then press on Control Panel. 3 Double-press on Display.
The Display Properties dialog will appear. 4 Press the Screen Saver tab.
Warning If you connect an external computer (e.g., a guest laptop) to the projected SMART Board, turn the SMART Bulb Saver off.The screen saver responds to periods of inactivity in the internal computer, so the image from the external computer may be unexpectedly interrupted by its activation.
5 Press the scroll-down arrow under Screen Saver, and then select SMART Bulb Saver from the list of available screen savers.
6 Press the Settings button.
The SMART Bulb Saver dialog will appear.
If you’ve previously installed an On-Screen Display Controls for your projector or plasma display, the serial port will be selected and associated with your display. You will likely have already specified the delay time. These values will be displayed in this tab. You can proceed to step 8.
7 If you haven’t configured the On-Screen Display Controls, press the Display Installer button and configure your display with the serial port on your computer. Also select the delay time.
8 To use your own custom bitmap or company logo as the SMART Bulb Saver graphic, press the Custom tab and browse to the graphic file you want to use.
9 To shut down the computer and log off the current user, press the Shut Down tab and follow the instructions in that dialog.
Getting to Know Your SMART Pen Tray
The Ready Light
When illuminated, this LED indicates the current state of your SMART Board. When the Ready Light flashes between red and green, the Pen Tray is in the process of powering up. Steady red indicates the Pen Tray is receiving power. Steady green occurs when SMART Board Software is installed and active on the connected computer. It indicates your Pen Tray is fully
operational: power is being received and the hardware and installed software are fully integrated.
Using a Pen Tray Stylus
To write over top of the computer image, just pick up one of the four colored styluses from the Pen Tray and write on the active SMART Board.
To write in a different color, place the stylus back in its slot and select another. Since the color recognition comes from the slots in the Pen Tray rather than the styluses themselves, you must ensure that each stylus is returned to its proper slot (the slot with the corresponding color) when you finish using it.
You also have the option of changing any or all of these styluses to highlighters,
assigning any one of an array of colors to them, or altering their width. The size of the area erased with the Pen Tray eraser can also be easily changed. Turn to page 17 for information on configuring the styluses and eraser.
Using the Pen Tray Buttons
Press the top Pen Tray button to make the SMART On-Screen Keyboard appear. Press the bottom button to make the next contact with the Board a right-mouse click
(Windows) or a floating mouse (Macintosh).
These default behaviors can be reconfigured (see page 18) so that either button can:
• Send the current page to the printer
• Create a new Notebook page
(Windows) or move to the preceding or the following Notebook page
• Clear all annotations from the current page
• Produce a floating or a middle mouse (Windows)
Eraser Black Stylus
Blue Stylus Red Stylus Green Stylus Pen Tray Buttons Ready Light
Keyboard
Right or Floating Mouse
Writing, Capturing and Erasing
You can create or erase annotation objects using the styluses and eraser in the Pen Tray, the varioustools available from Notebook,or a combination of both.
This section describes how to:
• create annotations by writing over top of Windows applications projected on your SMART Board using the Pen Tray tools or their software counterpart − the Floating Tools
• configure the Pen Tray tools
• create a user profile to save your reconfigured Pen Tray and Floating Tools settings (Windows only)
• capture an image of your annotations into SMART Notebook
• erase what you’ve written on the SMART Board
Writing with Pen Tray Styluses over Applications
Start up an application on your projected SMART Board, select one of the four colored styluses from the Pen Tray, and then write in the color you selected. If you’re using regular dry-erase markers, be sure to leave the caps securely on, as you’re writing in virtual, electronic ink rather than physical ink.To write in a different color, place the stylus you first used back in its slot and select another. Since the color recognition comes from the slots in the Pen Tray rather than the styluses themselves, ensure that each stylus is returned to its proper slot (the slot with the corresponding color) when you finish using it.
WARNING: If you touch the Board after writing over an application that is not Board-aware and replacing the stylus in the Pen Tray, the annotations you just made will disappear. While this is an easy way to clear the screen of all external annotations, it also means you must be careful not to inadvertently delete annotations by accidentally touching the Board. However, if you’ve accidentally lost annotations by touching the Board, don’t panic: you can easily restore the lost annotations.
Open the Floating Tools and press the Restore Annotations button in the Floating Tools palette. The last cleared annotation will be restored to view.
Tip
You can write and erase on the SMART Board with your finger. Just pick up a stylus or the eraser from the Pen Tray and touch the Board with your other hand. Any pressure applied to the Board after a tool has been lifted is interpreted by the SMART Board Service as the behavior of the lifted tool.
Press to restore last cleared annotation
Reconfiguring the Pen Tray Tools
The Pen Tray styluses can be reconfigured to alter line thickness, color or opacity (to create a transparent highlighter effect). The size of the Pen Tray eraser can also be changed to suit individual needs, as can the function of the Pen Tray buttons.
To reconfigure the Pen Tray Tools:
1 Press the SMART Board icon and select Control Panel. 2 Press on the Pen Tray tab.
3 Press any of the large tool buttons.
The configuration area to the right of the buttons will alter to let you change the settings for the selected tool.
4 To change eraser settings:
Press the radio button and scroll to a number of pixels between 10 and 100 for the new eraser diameter.
NOTE: 10 pixels is approximately fingertip-sized. or
Press the radio button next to Automatically size eraserto SMART Boardsize to have the eraser sized to match your SMART Board.
Press on any of the tool buttons
To change stylus settings:
To change the width (the default is 2 pixels), scroll up or down in the Width box to increase or decrease line width. The width range is from 1 to 32 pixels.
To change to a highlighter, select the Highlighter check box.
To change the color, press the arrow button in the Color box. A basic 16-color palette will appear. For a greatly expanded color palette, press the Other button at the bottom of the basic palette.
A preview of the selected color and width will appear in the Sample box. To change Pen Tray button settings:
If you’re running a SMART Board with projection (or a SMART Board for Plasma Displays), the top/right button is a keyboard button, and the bottom/left button turns the next contact with the Board into a right-mouse click (Windows) or a floating mouse (Macintosh).
NOTE: If you’re using your SMART Board without a projector turn to Appendix A: Using the SMART Board without a Projector on page 74 for information on changing your Pen Tray button settings.
To alter these default behaviors, press the scroll-down button next to the button you want to alter and select one of the available options.
Button Setting Resulting SMART Board Behavior
Keyboard Opens the SMART On-Screen Keyboard for on-screen typing Right Mouse
(Windows only) Turns the next SMART Board contact into a right-mouse click Print Page Sends the current page to the default printer (Board-aware
application only)
Next Page Moves ahead one page in the current application (Board-aware application only)
Previous Page Moves back one page in the current application (Board-aware application only)
Clear Screen Clears all annotations from the current screen
Float Mouse Produces a floating mouse rather than a right- or left-mouse click with the next Board contact
Middle Mouse
(Windows only) Produces a middle-mouse click with the next Board contact 5 If you want to retain these settings, follow the procedure Saving Pen Tray and Floating
Tools Settings as User Profiles on page 22. Otherwise, press the OK button and your settings will be retained only until you log off or shut down on your computer.
Press for basic 16-color palette