LINER MEASURING Made Easy
Tips and Tricks to make measuring Simple and Accurate
• Every pool is different. For a long-lasting and properly fitting liner, take the time to measure your pool in detail! • Always measure to the “Bead Receiver”. The coping isn’t used for these measurements.
• It pays to have help! This will be an easier project with two people involved.
• Even if you have the original pool plan diagram, it’s best to measure. Not everything goes according to plan when building a pool. Measuring will give you the best fit.
• Pages 1 and 2 of the Liner Measuring Form are there for you to record all the information we need. Make sure to include all your contact information as well as your measurements and preferences.
• Write neatly, and use black ink. The easier it is for us to read, the easier it is for us to quote!
• When writing down your measurements, use feet, inches, and fractions of an inch. Decimal conversions can be confusing! • When giving measurements, give the actual measurements. You don’t need to add or subtract anything to help.
• Keep copies of everything! We may have to call to ask a few questions, and having your paperwork will help!
Step-by-Step Measuring Instructions
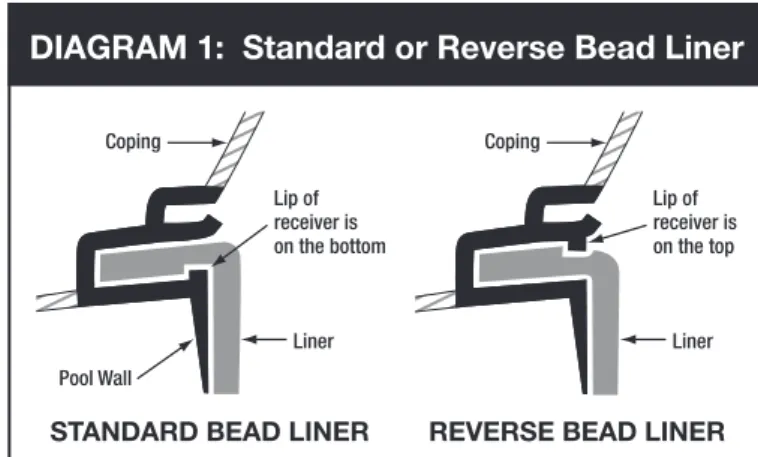
STEP 1: LINER TYPEGo to page 1 of the measuring form and select your liner type. If you have a beaded liner, use Diagram 1 to help pick the bead. For overlap liners, tell us how many inches of overlap you need. Mark it on page 1, LINER TYPE.
STEP 2: CHOOSE YOUR POOL SHAPE
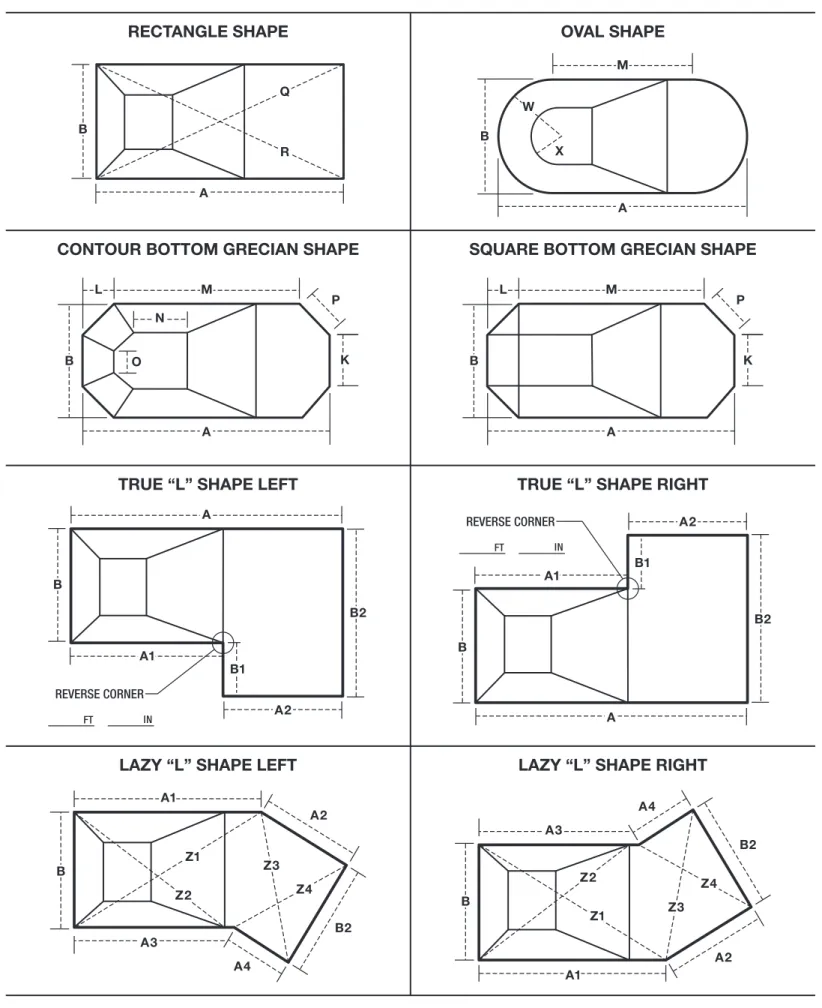
Use Diagram 2 to select your pool shape. Mark it on page 1, POOL SHAPE, and go to step 3.
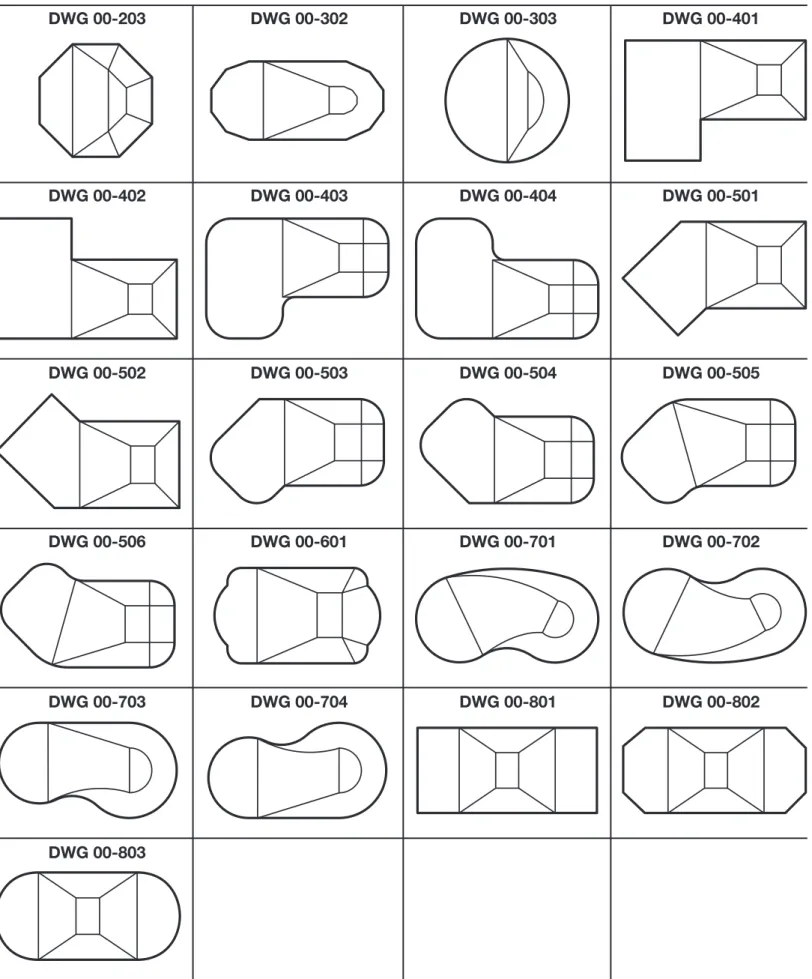
Note: If your pool shape isn’t on the list, try Diagram 3 and call us with the closest match for a special form for your pool.
STEP 3: CORNER TYPE
Use Diagram 4 to select the type of corners on your pool. If your pool has a corner that points IN (for example, a “Lazy L”), make a sketch and give us an approximate measurement. Mark it on page 1, CORNER TYPE.
Write legibly
with black ink
Make copies for
your records
Measure in
feet & inches
Give complete information for faster quoting and ordering, and to ensure correct fit!
PHONE: (800) 288-7946 • FAX: (877) 292-5773
www.intheswim.com
• EMAIL:
[email protected]
320 Industrial Drive • West Chicago, IL 60185
IMPORTANT:
We base our Custom Liner quotes exactly on the measurements and information you provide on this form. PLEASE READ ALL INSTRUCTIONS BEFORE YOU BEGIN MEASURING.Step-by-Step Measuring Instructions
(Continued) STEP 4: MEASURING LENGTH AND WIDTHIn step 2, you picked a diagram that represents the shape of your pool. Using that diagram as a template, you can now measure the Length (A) and Width (B) dimensions. Write them down on page 1 in the DIMENSIONS section. The A measurement goes on the A line. The B measurement goes on the B line. Do this for all the perimeter measurements shown in the diagram of your pool. You can always call us for help!
STEP 5: MEASURING DIAGONALS (for Rectangle and “Lazy L” Pools Only)
If your corners are either RADIUS or CUT (you determined this in step 3) you need to take diagonal measurements at the squared corner points to make them accurate.
(Refer to Diagram 4 for an example.)
Referring to the diagram you selected of your pool, take diagonal measurements and record them on page 1 in the DIMENSIONS section. On a rectangle, they are the Q and R measurements. We use those to make sure your pool is evenly shaped. With a “Lazy L” pool, you will need measurements Z1, Z2, Z3, and Z4 instead.
STEP 6: MEASURING SHALLOW END COVED BOTTOMS
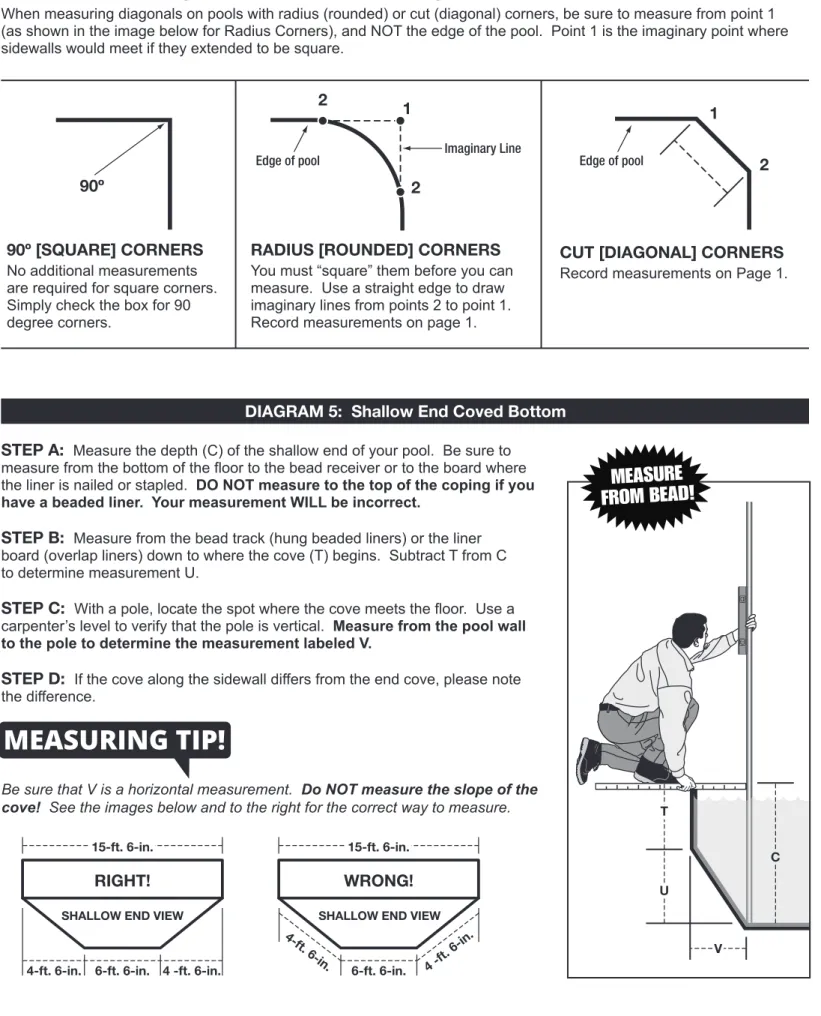
Diagram 5 is an example of a shallow end coved bottom. It’s important to know if there is a cove at the bottom of your pool, or if the bottom is squared off. If you DO have a shallow end coved bottom, please collect measurements C, T, U, and V. The diagram shows you which one is which. As always, be sure you measure from the bead receiver, not from the coping. Using the coping for measurements will result in measurements that don’t add up.
STEP 7: HORIZONTAL MEASUREMENTS OF POOL BOTTOM & DEPTH MEASUREMENTS
Refer to Diagram 6, Image D. Choose the style that most
closely matches your pool, take the measurements shown, and write them down on page 1, DIMENSIONS. The trickiest part of these measurements is to remember to measure horizontally. In the diagram, notice the dashed lines. They show you the correct way to measure. Measuring along the slope will result in measurements that do not add up.
STEP 8: FINISH MEASURING ACCORDING TO YOUR POOL SHAPE DIAGRAM
Continue to take measurements for any remaining letters shown in your diagram. Make sure they are all correctly recorded in the space after the corresponding letter on page 1 in the DIMENSIONS section.
STEP 9: VINYL COVERED STEP SECTIONS
If your pool has a built-in step section that will be completely covered by the vinyl liner, please check the box on page 1, VINYL COVERED STEP SECTIONS, and then complete page 2 of the measuring form.
Note: Be precise! Step section measurements must be extremely accurate!
STEP 10: VERIFICATION
Please go back through all your measurements again to verify they are absolutely correct. (Again, make sure you have taken your measurements from the bead receiver!) Now you can refer to page 1, VERIFICATION, for formulas to help double check your measurements. If something doesn’t add up correctly, you will need to go back and re-measure to make sure everything is accurate.
Note: If any measurements are not accurate, it will affect your liner and will cause it not to fit correctly!
STEP 11: LINER PATTERN
Choose as many liner patterns as you like from our selection. Our available patterns are on our website and in our catalog. Please make sure to use the exact pattern name as displayed in our catalog or on our site to avoid confusion.
DIAGRAM 1: Standard or Reverse Bead Liner
STANDARD BEAD LINER
Coping Liner Lip of receiver is on the bottom Pool Wall
REVERSE BEAD LINER
Coping
Liner Lip of receiver is on the top
Identify the shape of your pool from the illustrations below. You need to take all of the measurements that are labeled for your pool shape. If you have any unusual features that extend into the pool (such as a built-in spa, fountain, or water feature) you need to include a sketch of your pool with the measurements labeled. Please include photos as well.
DIAGRAM 2: Pool Shapes
RECTANGLE SHAPE OVAL SHAPE
CONTOUR BOTTOM GRECIAN SHAPE SQUARE BOTTOM GRECIAN SHAPE
TRUE “L” SHAPE RIGHT TRUE “L” SHAPE LEFT
LAZY “L” SHAPE RIGHT LAZY “L” SHAPE LEFT
REVERSE CORNER IN FT A1 B1 A2 B B2 A REVERSE CORNER IN FT A1 B1 A2 B B2 A L M B A K P N O L M B A K P B A R Q X W A M B A2 B A1 Z2 A3 A4 B2 Z1 Z3 Z4 A2 B A1 Z2 A3 A4 B2 Z1 Z3 Z4
DWG 00-203 DWG 00-302 DWG 00-303 DWG 00-401 DWG 00-402 DWG 00-403 DWG 00-404 DWG 00-501 DWG 00-502 DWG 00-503 DWG 00-504 DWG 00-505 DWG 00-506 DWG 00-601 DWG 00-701 DWG 00-702 DWG 00-703 DWG 00-704 DWG 00-801 DWG 00-802 DWG 00-803
Please contact us with the drawing reference (DWG) number that matches your pool shape so we can provide you with the correct additional measuring form. Please contact us by phone:1-800-288-7946 Or email: [email protected]. Note: You will need to submit your DWG form in addition to page 1 (and 2 if applicable) of this guide.
STEP A: Measure the depth (C) of the shallow end of your pool. Be sure to measure from the bottom of the floor to the bead receiver or to the board where the liner is nailed or stapled. DO NOT measure to the top of the coping if you have a beaded liner. Your measurement WILL be incorrect.
STEP B: Measure from the bead track (hung beaded liners) or the liner board (overlap liners) down to where the cove (T) begins. Subtract T from C to determine measurement U.
STEP C: With a pole, locate the spot where the cove meets the floor. Use a carpenter’s level to verify that the pole is vertical. Measure from the pool wall to the pole to determine the measurement labeled V.
STEP D: If the cove along the sidewall differs from the end cove, please note the difference.
Be sure that V is a horizontal measurement. Do NOT measure the slope of the cove! See the images below and to the right for the correct way to measure.
90º [SQUARE] CORNERS No additional measurements are required for square corners. Simply check the box for 90 degree corners.
90º
CUT [DIAGONAL] CORNERS Record measurements on Page 1.
1
2
Edge of pool
RADIUS [ROUNDED] CORNERS You must “square” them before you can measure. Use a straight edge to draw imaginary lines from points 2 to point 1. Record measurements on page 1.
1 2
2
Imaginary Line Edge of pool
DIAGRAM 4: Measuring With Corners
Choose your corner type from the illustrations below. Remember to indicate your corner type on page 1, in the CORNER TYPE section, and make sure to take all the measurements as shown below. It will ensure that your liner fits the corners of your pool correctly!
Special Note about Diagonal Measurements for Rectangle and Lazy L Pools
When measuring diagonals on pools with radius (rounded) or cut (diagonal) corners, be sure to measure from point 1 (as shown in the image below for Radius Corners), and NOT the edge of the pool. Point 1 is the imaginary point where sidewalls would meet if they extended to be square.
DIAGRAM 5: Shallow End Coved Bottom
C T U V
MEASURE
FROM BEAD!
15-ft. 6-in. 6-ft. 6-in. 4-ft. 6-in. 4 -ft. 6-in. RIGHT!SHALLOW END VIEW
WRONG!
6-ft. 6-in.
4-ft. 6-in.
4 -ft. 6-in.
15-ft. 6-in.
BOTTOM CONTOUR
Choose the Bottom Contour of your pool from Image D (below) to determine which measurements you need to take. How do I measure the bottom of my pool?
You can take measurements of the pool bottom without getting in the water! Follow the instructions to the right to construct this easy-to-make “fishing-pole” tool from items your probably already have around the house!
What you need:
1. A long straight pole (Like your telepole). 2. String attached to one end of the pool. 3. A weight tied to the other end of the string. 4. A measuring tape.
DIAGRAM 6: Horizontal Measurements of Pool Bottom and Depth Measurements
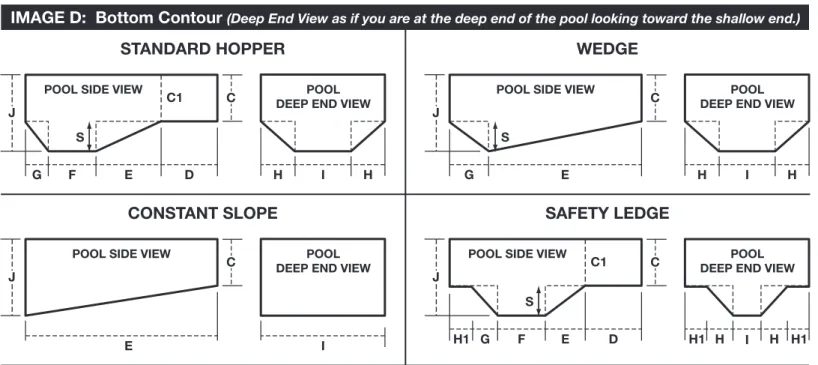
IMAGE D: Bottom Contour (Deep End View as if you are at the deep end of the pool looking toward the shallow end.)
HORIZONTAL BOTTOM MEASUREMENTS
Use your “fishing pole” to “fish” for a point on the bottom of the pool. With the pole parallel to the ends of the pool and the string vertical (do not allow slack in the string), measure the distance from the edge of the pool (water’s edge) to the end of the pole where the string is attached. You should “fish” for points that will give the measurements needed based on the bottom contour of your pool, as outlined above. For example, to take measurement H, you would stand on one side of the pool and “fish” for a corner of the hopper. Then, you measure the distance from the edge of the pool (water’s edge) to the end of the pole where the string is attached.
DEPTH MEASUREMENTS
When taking depth measurements C and J, be sure to measure from the bottom of the pool to the bead receiver (for beaded liners) OR to the liner board where the liner is nailed or stapled (for overlap liners). Don’t measure to the top of the pool if you have a beaded liner. Your measurements will be incorrect, and your liner won’t fit correctly.
QUICK CHECKS
Note for the following: A is the total length of the pool and B is the total width from measurements taken in step 6. • C + S must equal J (S is a cross-check)
• D + E + F + G must equal A for Standard Hopper. • E + G must equal A for a Wedge.
• D + E + F + G + H1 must equal A for a Safety Ledge. • H + I + H must equal B for Standard Hopper & Wedge • H1 + H + I + H + H1 must equal B for Safety Ledge.
15-ft. 6-in.
6-ft. 6-in.
4-ft. 6-in. 4 -ft. 6-in. RIGHT!
DEEP END VIEW
WRONG!
6-ft. 6-in. 4-ft. 6-in.
4 -ft. 6-in.
15-ft. 6-in.
DEEP END VIEW
Following the instructions below, using your “fishing pole” to take these measurements.
WEDGE STANDARD HOPPER
H I H
POOL DEEP END VIEW C
J C1
G F E D
POOL SIDE VIEW
S
H I H
POOL DEEP END VIEW C
J
G E
POOL SIDE VIEW
S
I E
CONSTANT SLOPE
POOL DEEP END VIEW C
J
POOL SIDE VIEW
SAFETY LEDGE
C
J C1
G
H1 F E D
POOL SIDE VIEW
S
H1 H I H H1 POOL DEEP END VIEW
Be sure that (H) is a horizontal measurement, do not measure the slope of the cove.
We only use measurements parallel to the deck. See IMAGE D and the QUICK CHECKS to the left for the correct way to measure a coved bottom pool.
7. VERIFICATION: (See Measuring Instructions Step 10)
❏ STANDARD HOPPER G + F + E + D = A ❏ YES
H + I + H = B ❏ YES
❏ WEDGE G + E = A ❏ YES
H + I + H = B ❏ YES
❏ CONSTANT SLOPE E = A ❏ YES
I = B ❏ YES
❏ SAFETY LEDGE H1 + G + F + E + D = A ❏ YES
H1 + H + I + H + H1 = B ❏ YES
Custom Liner Measuring Form
PHONE: (800) 288-7946 • FAX: (877) 292-5773
www.intheswim.com
• EMAIL:
[email protected]
320 Industrial Drive • West Chicago, IL 60185 P
Name: ___________________________________________ Email: ___________________________________________ Address: ______________________________________ City: ____________________ State: ___ Zip Code: ________ Best Phone: __________________________________ Best Time to Contact: __________________________________ Fax: __________________________________ Source Code (from our catalog or website): _______________________
1. LINER TYPE:(See Measuring Instructions Step 1)
❏ BEADED
❏ Standard Beaded
❏ Special Beaded ____________
❏ LOW HUNG BEADED
❏ OVERLAP
How many inches of liner do you need for the overlap? __________
2. POOL SHAPE:(See Measuring Instructions Step 2) Enter the Name or DWG # you selected from Diagram 2 or 3: __________________________
On the line below enter the Manufacturer or Brand Name of pool (if available): ________________________________________ 3. CORNER TYPE:(See Measuring Instructions Step 3)
Please indicate your corner type below. If your corners are Radius (rounded), Cut (diagonal), or Reverse, enter the measurements below. (Refer to Diagram 4 for instructions on how to measure corners).
❏ CUT CORNERS Diagonal, Point 1 to Point 2: _______ in.
❏ RADIUS CORNERS Diagonal, Point 1 to Point 2: _______ in.
❏ REVERSE CORNERS Diagonal, Point 1 to Point 2: _______ in.
❏ 90 DEGREE CORNERS Square, No measurement needed
4. VINYL COVERED STEP SECTIONS: (See Measuring Instructions Step 9)
❏ If you have a step section that is covered by the vinyl liner,
check this box. You must also complete “Page 2” of this measuring form and submit it with “Page 1”.
5. LINER PATTERN:(See Measuring Instructions Step 11) Please list all pattern names you would like to receive quotes for. NOTE: Overlap liners DO NOT have a tile border.
Pattern name: ___________________________________ Pattern name: ___________________________________ Beaded Low Hung Beaded POOL DECK LINER TYPE EXAMPLE
SUBMIT FORM: Submitting this measuring form indicates you have verified your measurements and the information you have provided is correct. Your new liner will be made to these specifications once your order is placed.
6. DIMENSIONS:(See Measuring Instructions Steps 4-8)
FEET INCHES FEET INCHES
A Q B C C1 D E F G H H1 I J K L M N O P R S T U V W X A1 A2 A3 A4 B1 B2 Z1 Z2 Z3 Z4 Page 1
1. WHAT TYPE OF BACK CORNERS? This refers to the corner at the back of the stair on the top riser as indicated in the Step Section. Images on the right will help determine the type of corners on your pool. Use the space provided to record your measurement. 2. IS THE STEP FLUSH
OR RECESSED?
If the bottom riser is flush with the wall indicated in the Step Section, check the Flush option. If not, the type and size of corner must be provided. (see Recessed Step)
4. WHAT IS THE STEP POSITION? Please circle the position that best describes the location of your steps. Please circle only one. Provide the measurements (X) and (Y) in the Step Section Measurements column.
5. DO YOU REQUIRE LOOPS? Do you require
loops to secure stairs with rods? (Select only one)
❏ YES ❏ NO
3. STEP SECTION
Record all the measurements in the boxes provided. Measure the Height of the risers and the Depth of the treads. To check your measurements, verify that the sum of all the Riser Heights equals the Wall Height (WH). Also, verify that the sum of all the Tread Depths equals the Total Step Section Depth (D).
Custom Liner Measuring Form
PHONE: (800) 288-7946 • FAX: (877) 292-5773
www.intheswim.com
• EMAIL:
[email protected]
320 Industrial Drive • West Chicago, IL 60185
Vinyl Covered Steps:
(Complete this page only if you have steps that will be covered by the liner.)Name: ___________________________________________ Email: ___________________________________________ Phone: ____________________________________________ Fax: ____________________________________________
1 2 ❏ CUT CORNERS (Diagonal) Point 1 to Point 2: _______ inches
Measure the distance from point (1) to point (2). 1 2 2 Measure the distance from point (1) to point (2). Continue the side wall of the pool to create an imaginary corner.
❏ RADIUS CORNERS(Rounded) Point 1 to Point 2: _______ inches
The step is Flush, No measurements are needed. ❏ FLUSH STEP No measurement needed. Top Step Bottom Step Pool Wall
Measure the Straight Recess Step between the bottom step and pool wall. ❏ STRAIGHT RECESSED STEP Measurement: ______________
Top Step Bottom Step
Pool Wall
❏ DIAGONAL RECESSED STEP Measurement: ______________
Measure the Diagonal Recess Step between the bottom step and pool wall.
Top Step Bottom Step Pool Wall 90º 90° (Square) No measurements required.
❏ 90 DEGREE CORNERS (Square) No measurement needed.
ALL STEP MEASUREMENTS MUST BE HORIZONTAL & VERTICAL. MEASURE TO THE NEAREST 1/8"
Y X X X Y Y SHALLOW DEEP
Note: If step is at edge, then (Y) is zero.
ROD BACK CORNER
RECESS
Note: The recess can be square, cut or a combination of both. An additional drawing must accompany if different. W = Width D = Depth WH = Wall Height 1 2 FEET INCHES W D WH R1 R2 R3 R4 T1 T2 T3 X Y
STEP SECT. MEASUREMENTS