CHAPTER
21
Using Internet Direct
1
IN THIS CHAPTER:
Which Comes First, the Client or the Server?
A Simple Server Example
A Database Server Example
Handling Exceptions in Clients
Sending Mail Using TIdSMTP
A ZIP Code Lookup Server and Client
Creating a Console Server
I
n the preceding chapter, you learned about the various classes included in Internet Direct that you use to build clients and servers for the distributed environment. This chapter continues this discussion with an in-depth look at a number of applications that use Internet Direct components.Which Comes First, the Client or the Server?
When you need to build a new client for an existing server using an established protocol, your task focuses solely on the development and testing of the client application. However, when your needs call for both a client and a server application, whether you are using an established protocol or a protocol you define yourself, you are faced with the classic “chicken or the egg” problem. Which to you build first—the client or the server?
Obviously, you eventually need to build both the client and the server in order to ensure that they work together smoothly. But is there one that you can typically start with? Fortunately, the answer is simpler than you might have thought. In many instances, particularly when your protocol is text-based (for example, HTTP, Hypertext Transfer Protocol), the server is easier to build first. While it is true that to test a server, you need a client, and to test a client, you need a server, there is a handy client that already exists that you can use to test almost any text-based server. This is the Telnet application.
Using Telnet to Test a Text-Based Server
If you have Apache installed and running on your machine, and Telnet is installed, you can demonstrate this very easily. To do this, use the following steps:
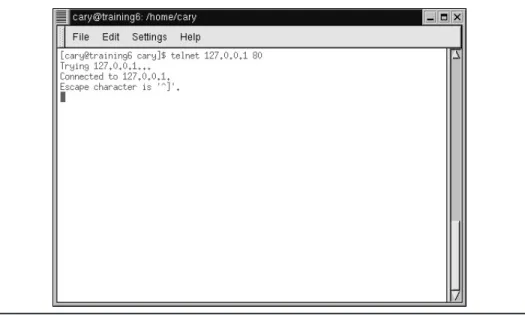
1. From the command prompt, or, if you are in an X Window session, from a console window, type telnet followed by the server name and the port on which the server is listening. For example, assuming that Apache is listening on port 80 (the default port for Web servers), type the following command:
telnet 127.0.0.1 80
2. The Telnet session should respond that the connection has been accepted, as shown in Figure 21-1. Next, type the following command and pressENTER. Make sure to include one space before and one space after the first forward slash (/), but no other spaces:
3. Now pressENTERone more time. After the GET command is received, the Web server waits for headers. The end of the request is signaled by a blank line, which is supplied by the second carriage return.
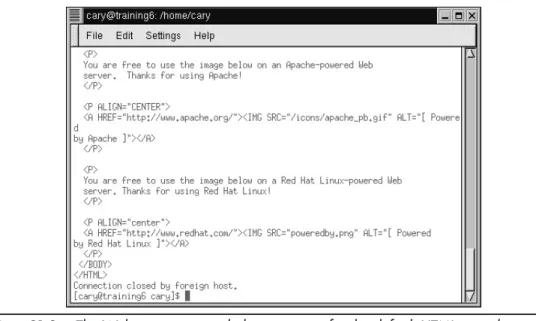
This GET command, when submitted to an HTTP server, while not a very meaningful request, asks the Apache server to return the default resource, which is typically a default HTML page (on many servers, this is the home page). Depending on how you have Apache configured, your output might look something like that shown in Figure 21-2. The default page delivered from this Apache server is longer than can be displayed in the command window, so only the end of the reply is shown. Notice in this figure that after the request was satisfied, the server again closed (terminated) the connection.
4. If you are still in your Telnet session, exit by typing quit.
NOTE
If you do not have Apache running, but you are connected to the Internet, you can use a domain name, such as www.borland.com, instead of 127.0.0.1. That domain name will be resolved to the IP address of the domain and will attempt to attach to a Web server at whatever port you specify (most Web servers listen on port 80).
Now that you see how easy it is to test a text-based server using Telnet as a client, the following example shows you how to create a simple text-based server using Internet Direct components.
A Simple Server Example
Many servers, once they have accepted your connection, perform the following steps:
þ Optionally signal readiness þ Wait for a request
þ Respond to the request
þ Close the connection
The following steps demonstrate how to use the TIdTPCServer component to create a simple, text-based TCP (Transmission Control Protocol) server.
WEB REFERENCE
This project can be found in the code samples in thesimpletcpserverdirectory.
Figure 21-2 The Web server responded to a request for the default HTML page by returning the entire requested HTML file to the Telnet client, after which the server terminated the connection.
To create this example, use the following steps:
1. Create a new project.
2. Add to the main form a TIdTCPServer, located on the Indy Servers page of the Component Palette. The main form is shown here:
Ill 21-1
3. Set the IdTCPServer component’s DefaultPort property to 6002 and its Active property to True. (You can choose any arbitrary port number above 1024. However, make sure that you select a port that is not being used by some other application on your network.)
4. Add the following OnExecute event handler to the IdTCPServer:
procedure TForm1.IdTCPServer1Execute(AThread: TIdPeerThread); var s: String; i: Integer; begin with AThread.Connection do try
WriteLn('Type an integer and Enter'); s := ReadLn;
try
i := StrToInt(s);
WriteLn(s + ' squared is ' + IntToStr(i*i)); except
WriteLn(s + ' is not an integer'); end;
finally Disconnect; end;
end;
5. As you can see in this code, it is anticipated that exceptions will be raised. Handling exceptions is discussed a little later in this chapter. However, in order that your server, running in the IDE, does not load the integrated debugger,
temporarily disable the integrated debugger by selecting Tools | Debugger Options from Kylix’s main menu. Uncheck the Integrated debugging checkbox located in the lower-left corner of the Debugger Options dialog box. Close the dialog box to return to your project.
6. Now save your project and then run it.
7. Open a console window.
8. Begin a Telnet session, and connect to your simple server by entering the following command at the command prompt. Remember to use the same port number you defined for the TIdTCPServer DefaultPort property:
telnet 127.0.0.1 6002
9. The simple server signals that it is ready to receive a request by displaying the instructions to enter an integer, as shown here:
Ill 21-2
10. Type 5 and pressENTER. The server responds by displaying the result of its calculation, and then closes the connection, as shown here:
Ill 21-3
11. Begin a new Telnet session (Hint: Press theUP ARROWkey to restore the last entered command and then pressENTER).
12. This time enter some nonnumeric text (an invalid entry). The server responds with an error message, as shown here:
Ill 21-4
Obviously, this was a very simple example. However, it does not take much imagination to envision including some sophisticated formulas in this simple server to produce a calculating engine that could be used by any client on the Internet.
CAUTION
It is true that any client on the Internet could potentially access this server. However, many clients will not be able to because they are located behind a firewall (especially corporate clients). Firewalls permit clients to communicate with servers outside of the firewall using only selected port numbers, such as port 80. In order to communicate with this server, a client behind a firewall will likely have to ask the network administrator to open port 6002 in the firewall, which is something that network administrators are often reluctant to do, unless there is a compelling reason to do so.
TIP
If you turned off integrated debugging, do not forget to turn it back on.
Threads and the IdTCPServer
Before continuing, the use of the AThread parameter of the OnExecute event handler deserves mention. The TIdTCPServer class is multithreaded, utilizing one thread for each connection it accepts. This is a powerful element of its design, in that it permits a single IdTCPServer to handle many simultaneous requests, a common occurrence in the concurrent environment of distributed servers.
In short, for each client connection that the IdTCPServer accepts, it uses a dedicated thread, invoking the OnExecute event handler from that thread. The AThread formal parameter of OnExecute is a reference to this particular thread. The Connection property of AThread references the internal TIdTCPConnection instance that was
created to process this particular client connection (the one associated with this particular invocation of OnExecute). TIdTCPConnection is a rich class that provides you with extensive support for reading and writing over the connection, as well as terminating (disconnecting) the connection.
The major points of this discussion are:
þ A separate thread is created to handle each client request that is accepted. þ OnExecute is executed by the thread created to handle a particular client’s
request. This means that OnExecute may be executing two or more times simultaneously.
þ The AThread formal parameter of OnExecute is a reference to the thread
that is assigned to handle that particular client request.
þ The Connection property of the AThread parameter gives you access to the
TIdTCPConnection created within that thread. The Connection property represents the Client’s connection.
þ You use the TIdTCPConnection properties and methods in the Connection
property of AThread to implement all interaction with the client. That OnExecute executes concurrently for simultaneous client requests is demonstrated in the next section, which demonstrates how to create a server that returns information from a database.
Blocking Calls and Concurrency
As you learned in an earlier chapter, Internet Direct uses blocking socket connections. From the perspective of a client application making calls to an Internet Direct server, this means that requests made of the server will pause while the server produces the response.
The simple server you created in this previous example does this as well, but you probably did not notice this. Specifically, after you type an integer into the Telnet session and pressENTER, there is a pause while the server reads the input, performs the calculation, and writes the output. In this case the pause is extremely brief, seeming almost instantaneous. But this is not the case with all servers. For example, the request you send to a server that must access a database may include a number of steps that take more than a few seconds to complete before the response can be returned. In those instances, the client will appear frozen for a few moments while the server completes its task.
But what is particularly important about blocking, as far as Internet Direct servers are concerned, is that the delay in responding to one client’s request is independent
of all other client requests, precisely because IdTCPServer uses a different thread for each client request. For example, if it takes a server five seconds to produce the response to a single client request, and two clients issue a request at the same time, each request will be satisfied in about five seconds total, not ten seconds. In other words, response time is not cumulative, since each request is handled independently and concurrently.
You can demonstrate this effect easily using the SimpleTCPServer project. To do this, use the following steps:
1. Display the OnExecute event handler for the IdTCPServer component you placed on the main form. Add a new line following thetrykeyword, and enter the following statement:
sleep(5000);
2. Compile and run the server.
3. Open at least two console windows. Connect to the server from the command prompt in each console window by entering the following statement:
telnet 127.0.0.1 6002
4. Enter an integer into each console window, but do not yet pressENTER. After you have prepared each window, quickly move to each window and press ENTER. The server will receive these requests, one after the other.
5. Notice that after about five seconds, each console window will receive the response from the server, one after the other. In other words, the second console window into which you pressedENTERdid not have to wait another five seconds after the first console window received its reply. Instead, both console windows were responded to independently of one another.
OnExecute and Exceptions
Normally, when an unhandled exception is raised in Kylix, the method from which it is raised ends abnormally, and none of the remaining statements in the method are executed. If an unhandled exception occurs within the OnExecute method of a IdTCPServer, and it occurs prior to the server responding to the client and disconnecting, the client may have to wait until the TCP stack times out, which may be as long as a minute or two. As a result, it is important to handle exceptions within OnExecute.
At a minimum, your OnExecute method should include atry-finallyblock, where the Disconnect method of the TIdTCPConnection is called in thefinally
block. If an exception occurs, the client will be immediately disconnected, preventing it from waiting for a response that will never come.
If you want to design your server so that it will inform a client about an encountered error, possibly providing information to the client that it can use to reformulate its request, you should also include atry-exceptblock in your OnExecute method. From theexceptblock, you can either simply write the error to the client (using one of the write methods) or use one or moreonblocks within theexceptclause to determine the nature of the exception, and write specific information to the client.
The use of both atry-exceptand atry-finallyis shown in this skeletal OnExecute method:
L 21-1 procedure TDataModule1.IdTCPServer1Execute(AThread: TIdPeerThread);
var s: String; begin with AThread.Connection do try try s := ReadLn;
// Perform the task of the server here // if no exception is raised,
// write out the server's response WriteLn(s); except on e: Exception do begin WriteLn(e.Message); end; //on
end; //try except finally
Disconnect; end;
end;
A Database Server Example
While the server created in the preceding example was self-contained, being capable of responding to the client’s request without assistance, modern distributed computing increasingly relies on multiple servers to satisfy a client request. One of the more common types of servers in this category is the middleware server, a server that receives a client’s request and then communicates with one or more other servers on the network before responding to the client. Application servers are one type of middleware server. Middleware servers are an important part of multitier computing.
The middleware server created in the following section is an example of a database server, in that it returns data from a database. This server, however, does not read and write from database files directly. Instead, it communicates to a relational database server (RDBMS) to retrieve the data requested by the client. Once the client application is involved, the result is a three-tier application.
In the following section, you will write a database server that accepts a customer number from the client and performs a lookup for that customer’s company name and contact first and last name using an InterBase server. You will also build a client for this server, using Internet Direct components. In addition, in a later section you will learn how to write a multithreaded client to test the server by executing multiple, simultaneous requests to the server.
Creating the Database Server
Use the following steps to create the database server.
WEB REFERENCE
This project can be found in the code samples in thedbserverdirectory.
1. Create a new application. Place on it one IdTCPServer component from the Indy Servers page of the Component Palette.
2. Set the IdTCPServer’s DefaultPort property to 6001 and its Active property to True.
3. Add a data module to this project by selecting File | New and then double-clicking the Data Module wizard from the New page of the Object Repository.
4. Add a SQLConnection and a SQLDataSet to the data module from the dbExpress page of the Component Palette.
5. Set the SQLConnection’s ConnectionName property to IBLocal, and its LoginPrompt property to False.
NOTE
If you have not configured the IBLocal connection to point to theemployee.gdbdatabase,
refer to the discussion of configuring database connections in Chapter 6 before continuing.
6. Set the SQLDataSet’s SQLConnection property to SQLConnection1, and set its CommandText property to the following SQL statement:
select CUSTOMER, CONTACT_FIRST, CONTACT_LAST from CUSTOMER where CUST_NO = :cust
7. Return to the main form. Select File | Use Unit, and select the unit associated with the data module to add it to the main form’susesclause.
8. Next, select the IdTCPServer. Add the following OnExecute event handler to it:
procedure TForm1.IdTCPServer1Execute(AThread: TIdPeerThread); var cust: Integer; DataModule: TDataModule2; begin with AThread.Connection do try try DataModule := TDataModule2.Create(nil); try cust := StrToIntDef(ReadLn, 0); if cust = 0 then begin WriteLn('Not found'); Exit; end; // if cust = 0 DataModule.SQLDataSet1.Params[0].Value := cust; DataModule.SQLDataSet1.Open; if DataModule.SQLDataSet1.IsEmpty then WriteLn('Not found.') else WriteLn(DataModule.SQLDataSet1.Fields[0].AsString + ' contact name is '+ DataModule.SQLDataSet1.Fields[1].AsString + ' ' + DataModule.SQLDataSet1.Fields[2].AsString); except on e: Exception do begin WriteLn('Error: ' + e.Message); end; //on end; // try finally DataModule.Free; end; // try finally Disconnect; end; //with try end;
9. Save your project, and then run it.
10. Open a console window, and then type the following command at the command prompt:
11. After a moment, the server accepts then connection. Now type 1001 and press ENTER. The server receives the data, executes the query, and then returns the result shown here:
Ill 21-5
NOTE
The technique used in this example, that of creating a new data module to handle each client request, and releasing the data module when the client is through, is a simple approach that is fine for low-load servers. (A low-load server is one that does not respond to many requests. Obviously, "low load" is a relative term, relative to the available resources on the server.) However, the process of creating a new connection for each client is resource intensive, and this design will produce poor performance under heavy load conditions. When each client needs a resource that is expensive, resource-wise, to create, you should consider pooling these resources. Specifically, for a high-load version of this server, the database connections should be pooled. An easy way to pool database connections is to use a thread pool, creating the connection in each thread’s constructor, and releasing the connection in the corresponding destructor. See Internet Direct’s online help for more information on thread pooling.
Creating the Database Client
Creating clients using Internet Direct is as easy as creating servers. As you learned in Chapter 20, Internet Direct clients are blocking, meaning that you read from and write to a server in much the same fashion as you read from and write to a file using Kylix’s standard file I/O (input/output) routines. Specifically, once your client’s connection has been accepted, you use write methods to send data to the server, and read methods to get data from the server.
Most servers need some information before they can reply to a client. For example, in the database server created in the preceding section, the client must write the customer number to the server in order to tell the server which customer the client is interested in. After writing the customer number using one of the available write methods, the client should read (using one of the read methods) in order to receive the server’s reply. The
call to a read method, like the other calls in Internet Direct, is blocking, meaning that the call to read does not succeed until the server writes a response or a timeout occurs.
WEB REFERENCE
This project can be found in the code samples in thedbclientdirectory.
The following steps demonstrate how to use Internet Direct to create a client for the server you created in the preceding section:
1. Create a new project.
2. Place on this form three Label components, one Edit component, and one Button component from the Standard page of the Component Palette. Also place a TIdTCPClient component from the Indy Clients page of the Component Palette. Organize these components in an arrangement similar to this:
Ill 21-6
3. Set the caption of Label1 to Customer Number, the caption of Label2 to
Lookup Return Value:, and the caption of Label3 to an empty string.
4. Next, set the Caption property of Button1 to Perform Lookup.
5. Now set the Host property of the IdTCPClient to 127.0.0.1, and the Port property to 6001.
6. Add an OnClick event handler to the Perform Lookup button. Edit this event handler to look like the following:
procedure TForm1.Button1Click(Sender: TObject); begin with IdTCPClient1 do begin Connect; try WriteLn(Edit1.Text);
Label3.Caption := ReadLn; finally Disconnect; end; end; end;
7. That is all it takes. Save the project.
Before you can run this project successfully, you will need to launch the server. In order to test the client in the Kylix IDE, you will need to launch the server from a command window. To do this, use the following steps:
1. Open a command window, and make the directory in which you saved and compiled the DBServer project the current directory.
2. Set the LD_LIBRARY_PATH environment variable to the Kylixbin
directory. Assuming that Kylix is stored in the/usr/local/kylix
directory, this command will look like the following:
LD_LIBRARY_PATH="/usr/local/kylix/bin/"
3. Export the LD_LIBRARY_PATH variable by entering the following command at the command prompt:
export LD_LIBRARY_PATH
4. Assuming that you saved your server project using the name DBServer, and it is compiled, you can launch the server by entering the following command:
./DBSever
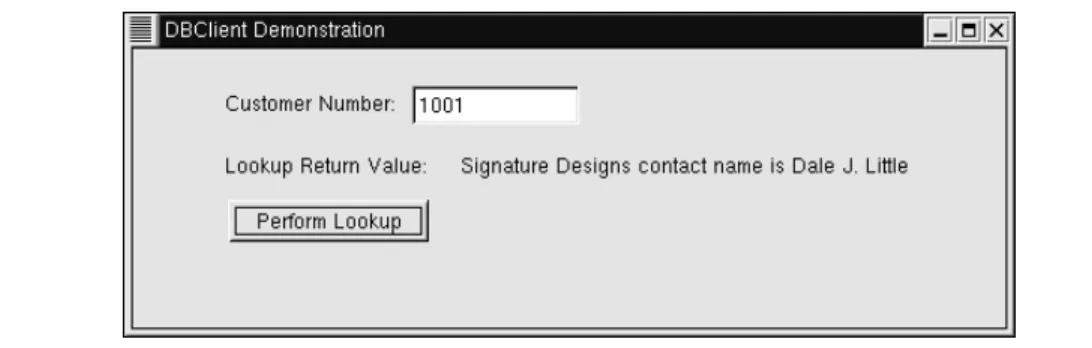
5. After a moment, your server should load and start listening on port 6001. You are now ready to test your client application. From the IDE with the client project open, select Run | Run or pressF9. Once the client is running, enter a customer number in the Customer number field, such as 1001, and then click the Perform Lookup button. After a moment, your client should look like that shown in Figure 21-3.
Handling Exceptions in Clients
Handling exceptions with Internet Direct clients is the same as handling exceptions with files. If an error occurs during the execution of an Internet Direct method, an appropriate exception is raised. To handle these exceptions, source code should be properly wrapped withtry-finallyortry-exceptblocks.
Just as any call to open a file using standard file I/O routines should be matched with a call to close the file, any Connect call in Internet Direct should be matched with a call to Disconnect. At a minimum, your calls to Connect should be matched with calls to Disconnect in afinallyclause, similar to the example shown here (this approach was used in the DBClient example):
L 21-2 Client.Connect; try //Perform reading/writing finally Client.Disconnect; end;
Instead of simply disconnecting, you may actually want to handle any exceptions that are raised through your invocation of Internet Direct component methods. Fortunately, Internet Direct exceptions are easy to distinguish from other Kylix exceptions because all Internet Direct exceptions descend from EIdException. If you want to handle Internet Direct exceptions differently from other exceptions, you can do so using atry-exceptsimilar to this one:
L 21-3 try Client.Connect; try //Perform reading/writing finally Client.Disconnect; end; except on e: EIdException do begin
Figure 21-3 The DBClient application uses a TIdTCPClient component to request information from the DBServer application.
ShowMessage('Communication Exception: ' + e.Message); end // on EIdException on e: Exception do begin ShowMessage('Error: ' + e.Message); end; // on Exception end;
Detecting Disconnects from the Client
Internet Direct uses blocking socket calls, and its events are only status related. As a result, there are no events associated with a prematurely disconnected connection. If a read or write call is in progress when a premature disconnect occurs, an exception is raised and can be handled if you like. However, if no read or write call is in progress, no exception will be raised until a read or write call is attempted again over the disconnected socket.
Some developers are uncomfortable with this fact, contending that they need to know immediately when a connection has been lost. This issue brings to mind the old philosophical question—“If a tree falls in the forest and no one is present to hear it, does it make a sound?” In reality, if a socket disconnects prematurely, and it is not being accessed, does it really matter if the connection was lost or not? Probably not. If a socket closes and it is not being accessed, no exception will be raised and no event will be fired until the socket is accessed. Once more, this issue is similar to that encountered when accessing files using standard file I/O routines. If a file on a floppy is open, and the floppy is removed from the drive, no error will occur until the next attempt to access that file. If no further attempt ever occurs, no harm done.
Note that even in the case where a connection is lost during a read or write operation, an exception may not be raised immediately. This is true of any socket connection, not just Internet Direct–related sockets. For example, if your network cable becomes disconnected, it may take a minute or more before the exception occurs. This is because the stack will wait for timeouts from the other side of the connection, as well as
attempt retries.
Testing a Server with a Multithreaded Client
As you learned in the Chapter 13, one valuable use for threads is testing a server with multiple, concurrent client requests. In short, you can create a thread that encapsulates an IdTCPClient that requests data from the server. You can then create one or more of those threads and observe your server’s behavior under load.
WEB REFERENCE
This project can be found in the code samples in thedbclientthreadeddirectory.
The DBClientThreaded project, whose main form is shown in Figure 21-4, provides you with a sample project that can spawn multiple threads, each of which repeatedly requests information from the DBServer server created earlier in this chapter.
Since the majority of the work performed in this project is performed by a thread, it is best to consider that code first. The following is the Threadu unit, which defines a TThread class named TTCPClientThread:
L 21-4 unit Threadu;
interface uses
Classes, Math, SysUtils, IdBaseComponent, IdComponent, IdTCPConnection, IdTCPClient; type TTCPClientThread = class(TThread) private FPort: Integer; FHostID: String; FCustomerInfo: String; { Private declarations } protected IdTCPClient: TIdTCPClient; procedure Execute; override; procedure UpdateList;
public
destructor Destroy; override;
property HostID: String read FHostID write FHostID; property Port: Integer read FPort write FPort; end; implementation uses Main; procedure TTCPClientThread.UpdateList; begin Form1.Memo1.Lines.Add(FCustomerInfo); end;
procedure TTCPClientThread.Execute; begin try IdTCPClient := TIdTCPClient.Create(nil); IdTCPClient.Host := FHostID; IdTCPClient.Port := FPort; while True do begin with IdTCPClient do begin
if Terminated then Exit; try
Connect; try
WriteLn(IntToStr(RandomRange(1001, 1015))); if Terminated then Exit;
FCustomerInfo := ReadLn; Synchronize(UpdateList); finally
Disconnect; end; // try finally except
end;
if Terminated then Exit;
sleep(RandomRange(1,Random(100))); end; //with
end; //while True except
//Something went wrong. Terminate the thread Exit;
end; end;
destructor TTCPClientThread.Destroy; begin
if IdTCPClient <> nil then IdTCPClient.Free; inherited; end; initialization Randomize; end.
As you inspect the TTCPClientThread class, you will notice that it has member fields for the TIdTCPClient instance, the host IP address, the host port, and the customer information that it expects to receive after the thread is created. It also has a method, named UpdateList. UpdateList is used with Synchronize to write to a Memo control on the main form. (As you learned in Chapter 13, any time a thread needs to work with visual components, it must do so from within a call to Synchronize.)
Turning our attention now to the Execute method of the thread, you will notice that it begins with atry-exceptblock that will terminate the thread if something goes wrong. Next, it starts by creating a TIdTCPClient instance, which it will use to connect to the server. It then initializes this IdTCPClient with the HostID and Port values that it expects to have been assigned to the thread during its creation.
Once initialized, the IdTCPClient is connected to the server, a randomly generated customer number is sent to the server, and the server’s response is read. This data is then written to the Memo component on the main form using the Synchronize method, after which the thread disconnects. Finally, the thread sleeps for a random moment before repeating the process. (This sleep is done to stagger the calls to the server when multiple threads are running simultaneously. Doing this was not necessary, but it makes the calls to the server more realistic).
You will also notice in the code that this thread is constantly checking to see if it has been terminated, exiting the Execute method if it has been terminated. Furthermore, the thread’s tasks are wrapped in atry-exceptclause, which is used to handle any exceptions raised by a lost connection with the server.
The final characteristic of this unit worth noting is the overridden destructor for the thread. Within this destructor, if the IdTCPClient reference was created, it is freed.
The main form contains a button, labeled Start. The button’s Onclick event handler creates one or more instances of the TTCPClientThread class. This method assumes that there will be a dynamic array of TTCPClientThread type. The following is this array’s declaration:
L 21-5 var
ThreadArray: array of TTCPClientThread;
The following is this Start button’s OnClick event handler:
L 21-6 procedure TForm1.Button1Click(Sender: TObject);
var
i: Integer; begin
if Button1.Caption = 'Stop' then begin
for i := low(ThreadArray) to High(ThreadArray) do ThreadArray[i].Terminate; Button1.Caption := 'Start'; end else begin Button1.Caption := 'Stop'; SetLength(ThreadArray, SpinEdit1.Value); for i:= 0 to Pred(SpinEdit1.Value) do
begin ThreadArray[i] := TTCPClientThread.Create(True); with ThreadArray[i] do begin FreeOnTerminate := True; HostID := Edit2.Text; Port := StrToInt(Edit3.Text); Resume;
sleep(200); //wait briefly before //creating next thread end; //with
end;// for end; //else end;
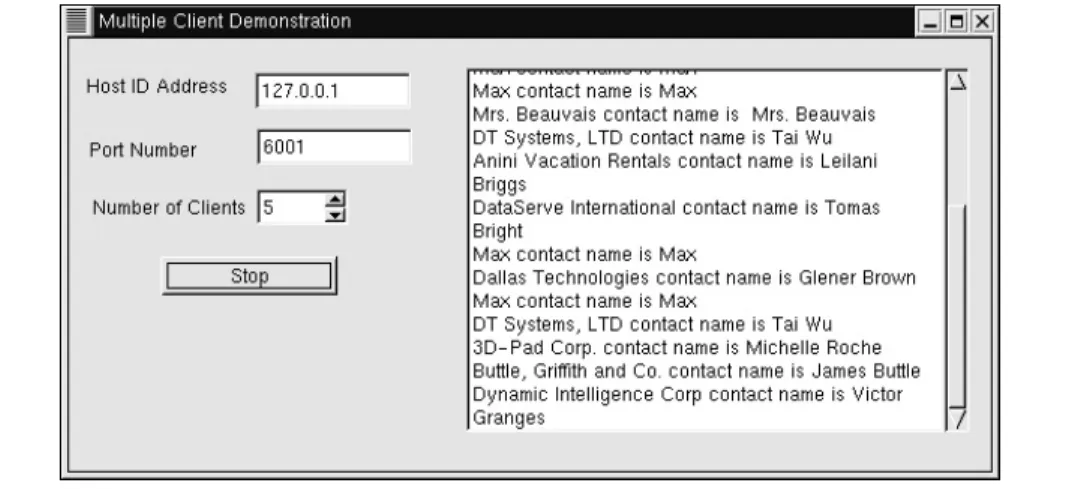
When clicked, the button begins by testing its Caption property. If the caption is Stop, the button iterates through the thread array, terminating each thread. If the caption is not stopped, this event handler uses the value of the SpinEdit component to determine how many threads to generate. Once generated, these threads will independently hit the server, displaying the returned results in the main form’s memo. Figure 21-5 shows what this project looks like when it is running with five threads pounding the DBServer server.
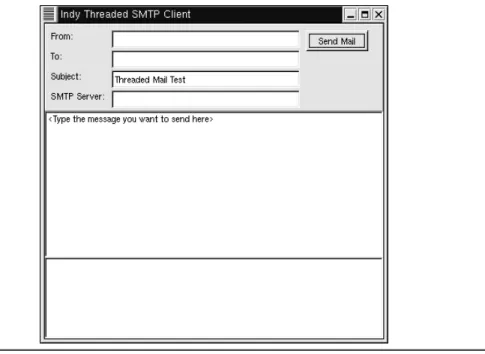
Sending Mail Using TIdSMTP
Now that you know the basics of client and server creation with Internet Direct, it is time to move on to some more complex examples. The first example is an application named ThreadedSMTPClient, whose main form is shown in Figure 21-6. This is a client application you can use to send e-mail using SMTP (Simple Mail Transfer Protocol). This project uses a TIdSMTP component. This example also requires the use of two of the helper classes included in Internet Direct. These are TIdMessage and TIdThread.
WEB REFERENCE
This project can be found in the code samples in thethreadedsmtpclientdirectory.
Creating the Message
To send a message using TIdSMTP, you must first construct the message using a separate object of type TIdMessage. This component appears on the Indy Misc page of the Component Palette and is declared in the IdMessage unit. TIdMessage represents an Internet message format and all of its associated parts and headers. The TIdSMTP, TIdPOP3, and TIdNNTP classes of Internet Direct use TIdMessage to send and receive messages.
Figure 21-5 The DBClientThreaded application running five simultaneous threads, each using an IdTCPClient to make requests of the DBServer server
Creating and configuring an IdMessage at runtime is demonstrated in the following code segment:
L 21-7 var LMsg: TIdMessage; … LMsg := TIdMessage.Create(nil); try with LMsg do begin From.Address := '[email protected]'; Recipients.Add.Address := '[email protected]'; Subject := 'Test Subject';
Body.Text := FSubject; end;
finally LMsg.Free; end;
Figure 21-6 The main form of the ThreadedSMTPClient project provides an interface for defining and sending e-mail.
This code creates an instance of TIdMessage on the fly and sets its properties to define a basic message. Alternatively, you can place an IdMessage component from the Component Palette and configure some or all of its properties at runtime. Most of the time that you are creating a message, however, you will not know any of its property values until runtime. The code that actually sends the message is described later in this section.
To create a basic e-mail message, the minimum requirements are a from address, a recipient address, a subject, and text. It is actually legal to leave the from address and subject blank, but it is not common to do so.
The From property is of type TIdEmailAddressItem. TIdEmailAddressItem is a class that performs advanced handling of e-mail addresses. For this discussion, it is sufficient to know that to set an e-mail address, simply set the Address property to the proper e-mail address using the form user@domain.
The Recipients property is of type TIdEmailAddressList, which is a collection of TIdEmailAddressItem instances. While the From property can contain only a single address, the Recipients property can hold zero or more addresses. In the preceding code sample, the TIdEMailAddressList.Add method is called to create a new TIdEMailAddressItem, whose Address property is then set.
The Subject property is a string property and it specifies the message subject. Body is a property of type TStringList and is used to construct simple, single-part text e-mail messages.
Creating the TIdSMTP Client
Using a TIdSMTP instance is also very simple. In short, the Host property needs to be initialized with the IP address (or name) of the SMTP server that you will use to send the message. Furthermore, Send is the primary method of this component, and it requires a single parameter of type TIdMessage. The Send method, like other Indy methods, is blocking, and will return only after the sending is complete, or raise an exception if an error occurs.
The following code segment demonstrates creating an IdSMTP object on the fly, and then using it to send an IdMessage, named LMsg in this example:
L 21-8 with TIdSMTP.Create(nil) do try Host := FSMTPServer; Connect; try Send(LMsg); finally
Disconnect;
end; //try Synchronize finally
Free;
end; // with TIdSMTP try
Creating the Client in a Thread
As you learned in Chapter 20, you can use the TIdAntiFreeze component to allow blocking Internet Direct clients to be used in a program’s main thread without freezing the user interface. However, to totally isolate the client code from the main thread, or to allow multiple clients to execute simultaneously, it is important to have the client execute from within a secondary thread. This multithreaded approach is used in the ThreadedSMTPClient project.
The DBClientThreaded example demonstrated earlier in this chapter made use of Kylix’s TThread class. However, Internet Direct includes a special class that is particularly well suited for writing multithreaded Internet Direct clients. This class is TIdThread, and it descends from TThread.
If you are already familiar with the TThread class, it is important to note that TIdThread is different in several key areas. When you use TThread, you override the Execute method, but with TIdThread, it is the Run method that you override instead. It is essential that you do not override TIdThread’s Execute method, as doing so would interfere with TIdThread’s internal operations.
You override Run in all TIdThread descendants. When the thread becomes active, Run executes repeatedly until the thread has terminated or an unhandled exception has occurred. The use of this may not be readily apparent for most clients. However, it is especially useful in nearly all servers and some clients as well. This is radically different from TThread’s Execute method, which executes only once, with the thread terminating when Execute is exited.
To create a thread, a new class must be created that descends from TIdThread. In this example, TSMTPThread is the new class descended from TIdThread, as shown in the followingtypedeclaration:
L 21-9 uses IdThread; type TSMTPThread = class(TIdThread) public FFrom: string;
FMessage: string; FRecipient: string; FSMTPServer: string; FSubject: string;
procedure Run; override; end;
In this example, the Run method simply uses the values entered into fields on the main form to construct a mail message and send it. (The Run method also includes some synchronization code. This code will be described later in this chapter.) When the thread’s work is complete, the Stop method is called and the Run procedure is exited to signal that it is finished. Calling Stop does not actually terminate the thread. Instead, it simply signals that termination needs to occur after the Run method exits. Until the Run method exits and IdThread actually terminates the thread, the thread is still alive.
CAUTION
When using an IdThread, do not call the Terminate method, which IdThread inherits from TThread. IdThreads may be pooled, making it especially important not to call Terminate. Always call the Stop method when you want an IdThread to discontinue its work.
The following is the implementation of the Run method, taken from the SMTPThread unit of the ThreadedSMTPClient application:
L 21-10 procedure TSMTPThread.Run; var LMsg: TIdMessage; begin LMsg := TIdMessage.Create(nil); try with LMsg do begin From.Address := FFrom; Recipients.Add.Address := FRecipient; Subject := FSubject; Body.Text := FMessage; end; //with LMsg with TIdSMTP.Create(nil) do try Host := FSMTPServer; Connect;
try Synchronize(formMain.Connected); Send(LMsg); with TSyncSendResult.Create do try FCmdResult := CmdResult; SendResult(Self); finally Free;
end; //with TSyncSendResult try finally Disconnect;
end; //try Synchronize
Synchronize(formMain.Disconnected); finally
Free;
end; // with TIdSMPT try finally
LMsg.Free; end; // try Stop; end;
Instantiating the Client Thread
As you have learned from the other multithreaded examples in this book, you create an instance of a thread by calling its constructor. With the TThread class, you pass a Boolean parameter to indicate whether or not the thread should be active once it is constructed. Most of the time, you pass a Boolean True, meaning that you want the newly created thread to be created suspended. You do this so that you can assign data to the thread’s properties and fields, such as FreeOnTerminate, before invoking Resume.
In the TIdThread class, Create is overridden, and uses a default CreateSuspended parameter of True, meaning that you can invoke Create without needing to pass it an argument if you want the thread created suspended. This is shown in the following code segment. This segment includes both the OnClick event handler used to instantiate the thread, as well as the method that is assigned to the thread’s OnTerminate event handler:
L 21-11 procedure TformMain.butnSendMailClick(Sender: TObject);
begin
butnSendMail.Enabled := False; with TSMTPThread.Create do begin
FreeOnTerminate := True; OnTerminate := ThreadTerminated; FFrom := Trim(editFrom.Text); FMessage := memoMsg.Lines.Text; FRecipient := Trim(editTo.Text); FSMTPServer := Trim(editSMTPServer.Text); FSubject := Trim(editSubject.Text); Start; end; end;
procedure TformMain.ThreadTerminated(ASender: TObject); var
s: string; begin
s := TIdThread(ASender).TerminatingException; if Length(s) > 0 then begin
ShowMessage('An error occurred while sending message. ' + s); end else begin
ShowMessage('Message sent!'); end;
butnSendMail.Enabled := True; end;
Notice that the ThreadTerminated method, which is used as the OnTerminate event handler, checks the thread’s TerminatingException property.
TerminatingException is a string. If an unhandled exception occurs in IdThread, the exception message is stored in the TerminatingException property, and the thread is terminated. This OnTerminate event handler either displays to the user the exception error message or informs the user that the e-mail was sent.
Updating the User Interface from a Thread
It is not uncommon to want to update the user interface of your client application with feedback from Internet Direct client components. In the ThreadedSMTPClient application, for example, the client updates a list box on the main form with ongoing status information, such as when the server accepts the connection, confirmation of having sent the e-mail, or SMTP server disconnection.
If the IdSMTP client was created in the main thread of the application, updating this status information would be routine. However, as you learned in Chapter 13, whenever you work with Visual CLX controls from within a secondary thread, you
must use the TThread Synchronize method in order to promote this operation to the application’s main thread. As a result, the TSMTPThread instance must update the main form’s list box through a call to Synchronize.
In Chapter 13, you learned that you invoke Synchronize, passing to it the name of a method that takes no arguments. The method you pass should contain statements that read or write properties or invoke methods of visual controls. Synchronize, in turn, causes that method to be invoked in the main thread, providing thread-safe access to these methods and properties.
The ThreadedSMTPClient application employs Synchronize in two different ways. The first technique involves the traditional invocation of Synchronize, passing to it a method to execute in the main thread. For example, the following statement, which appears in the TSMTPThread Run method listed earlier, invokes Synchronize, passing to it a method associated with the main form:
L 21-12 Synchronize(formMain.Connected);
While most examples of Synchronize that you are likely to see involve the declaration and implementation of the method used in Synchronize within the thread class itself, the syntax of Synchronize merely requires a procedural method that takes no arguments. It says nothing about the class to which the method belongs. Therefore, invoking Synchronize, and passing a method associated with some other object (the main form in this case), is perfectly valid. The following shows what the main form’s Connected method implementation looks like:
L 21-13 procedure TformMain.Connected;
begin
Status('Connected'); end;
As you can see, the Connected method invokes the Status method to write a message to the list box on the main form. The following is the implementation of the Status method:
L 21-14 procedure TformMain.Status(AMsg: string);
begin
lboxStatus.ItemIndex := lboxStatus.Items.Add(AMsg); end;
The second technique involves the use of a synchronizer class. A synchronizer class is a helper class that you declare for the purpose of storing information, and using that information to update visual controls in the main thread.
There are three parts to declaring a synchronizer class:
1. Declaring one or more member fields for holding data
2. Declaring one or more methods that update visual controls
3. Declaring a method that takes a thread and a method pointer as arguments, and executes that method by invoking the passed thread’s Synchronize method Synchronizer classes are especially useful when you have a large amount of data that is used to update visual controls, or the same synchronization needs to be performed by two or more different thread classes. In those cases, you can create an instance of the synchronizer class within your thread, populate the fields defined in the first step with the data that it will use, and then invoke the method declared in the third step, passing to it one of the methods you declared in the second step. When you are done, you free the synchronizer class.
The following is the declaration of TSyncSendResult, the synchronizer class declared in the SMTPThread unit:
type
TSyncSendResult = class private
FCmdResult: string;
procedure ShowResult; //a TThreadMethod type public
procedure DoSynchronize(AThread: TIdThread; AMethod: TThreadMethod);
end;
The implementation of the two methods of the TSyncSendResult class is shown here:
procedure TSyncSendResult.DoSynchronize(AThread: TIdThread; AMethod: TThreadMethod); begin AThread.Synchronize(AMethod); end; procedure TSyncSendResult.ShowResult; begin
formMain.Status('Mail accepted ok.');
formMain.Status('Server said ' + FCmdResult); end;
This synchronizer class is used from within the TSMTPThread Run method, as shown in the following code segment. As seen here, an instance of the class is created, a value is assigned to its FCmdResult field, and its DoSynchronize method is executed, passing to it the thread (Self) and the method that needs to be invoked through Synchronize (ShowResult). The synchronizer object is then freed. CmdResult, the value being assigned to FCmdResult in this example, is a property that TIdSMTP inherits from TIdTCPConnection. This property holds the result message generated by the call to Send.
with TSyncSendResult.Create do try FCmdResult := CmdResult; DoSynchronize(Self, ShowResult); finally Free;
end; //with TSyncSendResult try
A ZIP Code Lookup Server and Client
This next project was designed to be as simple as possible, yet still meaningful. This project defines a ZIP code lookup server that allows a client to send a ZIP code and receive the city and state associated with it.
A ZIP code, if you are not familiar with the United States Postal Service, is a postal code that identifies the city and state of the addressee. ZIP codes are used to route mail. At a minimum, a ZIP code contains five digits (although an extension that uses nine digits to more precisely route mail also exists). This sample ZIP code server accepts a five-digit ZIP code from a client and returns the corresponding city and state.
Defining the ZIP Code Protocol
The first step in building a client or server is to understand the protocol. For standard protocols, such as HTTP or FTP (File Transfer Protocol), you will want to start by reading the appropriate RFC (Request for Comments). If a protocol does not already exist, you must define the protocol yourself.
Creating your own protocol might at first sound like a daunting task, but it really is not. Most protocols are conversational and plain text. “Conversational” means that a command is given, a status response follows, and possibly data. In other words, it is an interaction similar to two people engaged in a conversation, where each one takes a turn speaking.
“Plain text” simply means that the command, status, and data are in human-readable text. Some protocols that are very limited in scope are often not conversational, but they are still usually in plain text (for example, Echo).
When defining your own protocol, you get to specify the nature of the commands, status replies, and data replies. As is the case with most things, it is best if you keep this simple. In this case, we can satisfy all of the ZIP code lookup needs with the following simple protocol:
þ Upon connection, the server responds with a welcome message. þ The server waits for a command.
þ The command can take one of two valid forms. It can beZipCodennnnn
(wherennnnnis the zip code) orquit.
þ In response to aZipCodennnnncommand, the server will look up the ZIP code and return the corresponding city and state. In response to a command that is not well formed (for example, one that omits the ZipCode prefix or enters an invalid ZIP code), or a nonexistent ZIP code, an empty string is returned. In response to aquit, the server will terminate the connection.
þ The server continues to accept commands until a command causes it to disconnect.
The ZIP Code Server
Most of the techniques employed in building the ZIP code server have already been covered in the preceding sections of this chapter; therefore, this section will focus only on the elements of this application that are unique.
WEB REFERENCE
This project can be found in the code samples in thezipcodeserverdirectory.
Let’s begin with the main form, shown in Figure 21-7. This form is defined in the following classtypedeclaration:
L 21-15 type
TformMain = class(TForm) IdTCPServer1: TIdTCPServer; Timer1: TTimer;
procedure FormCreate(Sender: TObject); procedure FormDestroy(Sender: TObject);
procedure IdTCPServer1Connect(AThread: TIdPeerThread); procedure IdTCPServer1Execute(AThread: TIdPeerThread); procedure Timer1Timer(Sender: TObject);
private
FZipCodeList: TStrings; public
end;
In addition to the components that this form uses (including the TIdTCPServer), this form contains a TStrings field named FZipCodeList. This TStrings is used to hold the ZIP code data, which is stored in a file namedZipCode.datin the same directory with the project source. This TStrings is populated with the contents of
ZipCode.datfrom the form’s OnCreate event handler, shown here:
L 21-16 procedure TformMain.FormCreate(Sender: TObject);
begin
FZipCodeList := TStringList.Create;
FZipCodeList.LoadFromFile(ExtractFilePath( Application.EXEName) + 'ZipCodes.dat'); end;
As you learned at the outset of this chapter, you configure an IdTCPServer by setting DefaultPort and Active properties, as well as creating an OnExecute event
handler. In this application, DefaultPort is set to 6004 and Active is set to True. Finally, the OnExecute event handler is defined as follows:
L 21-17 procedure TformMain.IdTCPServer1Execute(AThread: TIdPeerThread);
var LCommand: string; LZipCode: string; begin with AThread.Connection do begin LCommand := ReadLn;
if AnsiSameText(LCommand, 'QUIT') then begin
Disconnect; end
else
if AnsiSameText(Copy(LCommand, 1, 8), 'ZipCode ') then begin
LZipCode := Copy(LCommand, 9, MaxInt); GLogCS.Enter; try GUserLog.Add(LZipCode); finally GLogCS.Leave; end; //try WriteLn(FZipCodeList.Values[LZipCode]); end; //else if begin
end; //with end;
Most of this code is straightforward. With the TIdConnection objects associated with the thread created for this connection, the client’s command is read. Following the ZIP code protocol defined for this server, if the command isquit(this test is case insensitive), the connection is terminated. If this command is well formed, the ZIP code number is assigned to the LZipCode variable and then used to look up the correspond string in the TStrings. If the ZIP code is invalid, or the command is not well formed, the LZipCode variable will not have a corresponding string in the TStrings, and an empty string is returned.
There are two additional features of this code that are noteworthy. First, the server does not disconnect except in response to aquit. If the server does not disconnect, the OnExecute is triggered again and waits for the next command from the client.
The second interesting element is the use of a reference named GLogCS, which is used to execute that object’s Enter and Leave methods. GLogGS is a critical section (an instance of TCriticalSection), and it is used to coordinate the writing of the ZIP codes that have been requested into a TStringList. As you learned in Chapter 13, any time two or more threads need to work with a common resource, they need to synchronize their access to that resource. The synchronization is required in this case because OnExecute is executed within the context of a thread created to handle a particular client’s request.
The following are theinitializationandfinalizationsections of the main form’s unit, where the critical section and the TStringList are created and then destroyed: L 21-18 initialization GLogCS := TCriticalSection.Create; GUserLog := TStringList.Create; finalization FreeAndNil(GUserLog); FreeAndNil(GLogCS);
You might wonder why a critical section was used in this case instead of the Synchronize method of the AThread parameter of OnExecute. The answer is that the use of Synchronize was not required in this case, since a TStringList is not a visual control. As you may recall from Chapter 13, synchronizing with critical sections is more efficient than using Synchronize, since Synchronize places additional burdens on the main thread, while critical sections do not.
The contents of the TStringList are displayed on the memo that appears on the server. This is performed by an event handler that periodically enters the critical section (to prevent one of the threads from writing to it momentarily), updates the memo with the contents of the TStringList, and then leaves the critical section. This is shown in the following code, which is associated with the timer’s OnTimer event handler:
L 21-19 procedure TformMain.Timer1Timer(Sender: TObject);
begin GLogCS.Enter; try memo1.Lines.AddStrings(GUserLog); GUserLog.Clear; finally GLogCS.Leave; end; end;
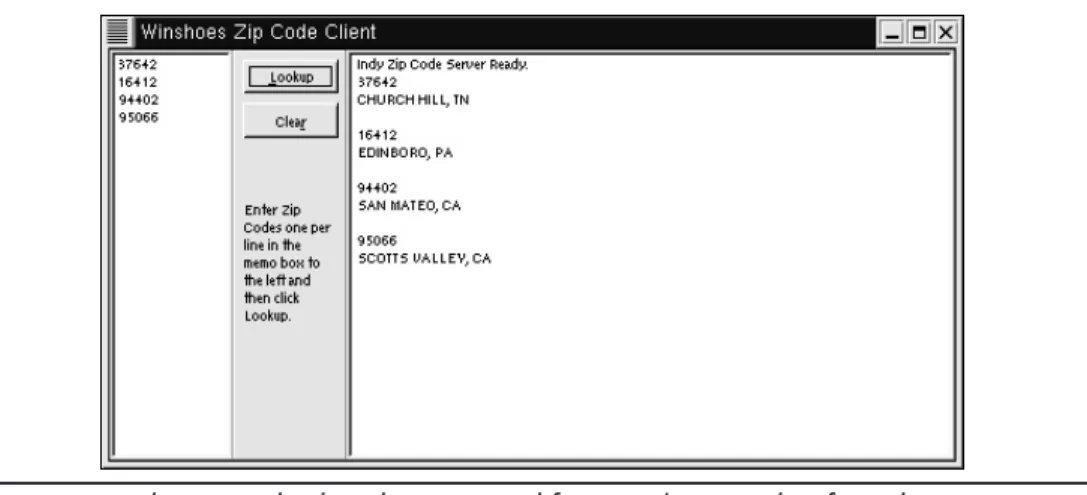
The ZIP Code Client
The ZIP code server is fairly simple, but the client is simpler still. The ZIP code client permits a user to enter one or more ZIP codes into a memo, and then to request the city and state corresponding to each code. The resulting values are displayed in a list box.
As you can see in Figure 21-8, the main form also contains an IdTCPClient as well as an IdAntiFreeze. While the SMTP client in the preceding example used a thread to submit the client requests, the TIdTCPClient component in this example executes in the application’s main thread. Running the Internet Direct client in the main thread means that we do not have to use Synchronize to work with Kylix’s visual controls. However, due to the blocking nature of Internet Direct, the IdAntiFreeze component has been added to the main form to prevent the user interface from freezing (temporarily ceasing to respond) while the Internet Direct client is involved in a blocking call.
WEB REFERENCE
This project can be found in the code samples in thezipcodeserverdirectory.
Figure 21-8 The main form of the ZipCodeClient project in the designer, showing both the user interface as well as the two Internet Direct components used by this client
The ZIP code protocol defined earlier, as well as the needs of the client application, dictate how the client must perform its task. In this case, the client will perform the following tasks:
1. Connect to the server.
2. Read the welcome message from the server.
3. For each line the user entered in the TMemo, send the ZIP code request to the server and read the response.
4. As each response is read, write the response into the list box.
5. When done processing the ZIP code list, disconnect from the server. These steps are performed by the OnClick event handler associated with the button labeled Lookup. The following is this event handler:
procedure TformMain.butnLookupClick(Sender: TObject); var i: integer; s: string; begin butnLookup.Enabled := true; try lboxResults.Clear; with Client do begin Connect; try
// Read the welcome message lboxResults.Items.Add(ReadLn);
// Submit each zip code and read the result for i := 0 to memoInput.Lines.Count - 1 do begin
WriteLn('ZipCode ' + memoInput.Lines[i]); // Write the zip code to the list box lboxResults.Items.Add(memoInput.Lines[i]); // Read the server’s response
s := ReadLn;
if Length(s) = 0 then begin
s := '-- No entry found for this zip code.'; end; //if Length
// Write the response plus a // blank line to the list box lboxResults.Items.Add(s); lboxResults.Items.Add(''); end; //for i WriteLn('Quit'); finally Disconnect; end; // Connect try end; //with Client do finally
butnLookup.Enabled := True; end; //try
end;
Figure 21-9 shows what the ZIP code client application looks like when it is running and has retrieved ZIP codes from a running ZIP code server.
Creating a Console Server
All of the servers demonstrated so far in this chapter have required an X server, since visual objects (including the TForm class) were used to build the server’s interface. But one of the more popular uses for Linux is as a server (as opposed to an end-user workstation), and many servers do not support a graphical user interface. Instead,
Figure 21-9 The ZIP code client has retrieved four city/state replies from the ZIP code server.
servers running on these machines are console servers and are launched from the command line or through a shell script.
Fortunately, it is very easy to build a console server using Internet Direct components. This process can be reduced to the following steps:
1. Create a new application using the Console Application wizard from the Object Repository.
2. Use the Object Repository to add a data module to this application. The data module will be your container for Kylix components. At a minimum, you will want to add one of the Internet Direct server components to the data module, but you are free to add any other nonvisual components, including data access or dbExpress components.
3. Add aninitializationsection to the data module’s unit, and create an instance of the data module from this section.
4. Add afinalizationsection to the data modules unit, and free the data module instance within that section.
5. In the main body of the project source file, use WriteLn to write a message to the standard output indicating that the server is running.
6. Following the write statement, invoke the ReadLn function to read from the standard input (the keyboard). This ReadLn plays the role of detecting when to terminate the server.
Creating the Console Server Example
The following steps demonstrate how to create a simple console server using Kylix:
WEB REFERENCE
This project can be found in the code samples in theconsoleserverdirectory.
1. Select File | New to display the Object Repository.
2. Select the Console Application wizard and click OK to create the initial console project.
3. Select File | New to display the Object Repository again, this time selecting the Data Module wizard.
4. Add an IdTCPServer component from the Indy Servers page of the Component Palette to the data module.
Ill 21-7
5. Set the IdTCPServer’s DefaultPort property to 6006 and its Active property to True.
6. Add the following OnExecute event handler to the IdTCPServer:
procedure TDataModule1.IdTCPServer1Execute(AThread: TIdPeerThread); var s: String; begin with AThread.Connection do try
WriteLn('Enter some text (type quit to exit: '); s := ReadLn; if AnsiSameText('quit', s) then begin Disconnect; Exit; end; // if quit WriteLn('You entered : ' + s); except on e: Exception do begin WriteLn('Error: ' + e.Message); end; // on end; // try end;
7. Add the followinginitializationandfinalizationsections after the OnExecute event handler:
initialization
DataModule1 := TDataModule1.Create(nil); finalization
8. Modify the project source file to look like the following:
program Project1; {$APPTYPE CONSOLE} uses
DataMod in 'DataMod.pas' {DataModule1: TDataModule}; begin
WriteLn('Console Server Running'); ReadLn;
end.
9. Save your project to a directory using the name ConsoleServer.dpr, and then select Project | Compile ConsoleServer, or pressCTRL-F9.
The console server is complete and ready to be tested.
TIP
The OnExecute in this console server will automatically execute repeatedly so long as the client remains connected. This was also true of the ZIP code lookup server. In other words, it is not necessary to put a looping control structure within OnExecute to read and respond to multiple, sequential client requests.
Testing a Plain-Text Console Server
At the beginning of this chapter, you learned to test a plain text server using Telnet as a client. This testing approach will work with console servers as well as they will with servers running under X Windows. The only real difference is that you cannot launch your console server from within Kylix (since the console project does not support X Windows).
Instead, you must open a console window and launch the server from the command prompt (or log out of your X Windows session and do all of your testing from two or more console sessions).
The following steps demonstrate how to test your Kylix console server using console windows.
1. Begin by opening a console window. For simplicity’s sake, make the directory in which you saved and compiled your console server the current directory.
2. Initialize the LD_LIBRARY_PATH environment variable to the fully qualified name of thebindirectory under the Kylix installation directory, and then
export this environment variable. For example, if you installed Kylix under
/usr/local/kylix, you would enter the following two statements:
LD_LIBRARY_PATH=”/usr/local/kylix/bin/” export LD_LIBRARYPATH
3. You are now ready to launch your console server. Assuming that you named the project ConsoleServer, type the following command at the command prompt:
./ConsoleServer
4. Your server is running and will continue to do so until you pressENTERin this console window. In order to test this server using a Telnet client, you must open another console window.
Ill 21-8
5. In this second console window, enter the following command at the command prompt to connect to the console server:
telnet 127.0.0.1 6006
6. The console server accepts the connection and asks you for input. Type some characters and pressENTER. After receiving your input, the server echoes that input back and then OnExecute triggers again, with the server asking for more input. Disconnect from the server by entering quit.