Processing.
Pete Bunting and Daniel Clewley
Teaching notes on the MSc’s in Remote Sensing and GIS.
May 4, 2013
Aberystwyth University
This work is licensed under the Creative Commons Attribution-ShareAlike 3.0 Unported License. To view a copy of this license, visithttp://creativecommons. org/licenses/by-sa/3.0/.
The authors would like to acknowledge to the supports of others but specifically (and in no particular order) Prof. Richard Lucas, Sam Gillingham (developer of RIOS and the image viewer) and Neil Flood (developer of RIOS) for their support and time.
Peter Bunting
Dr Pete Bunting joined the Institute of Geography and Earth Sciences (IGES), Aberystwyth University, in September 2004 for his Ph.D. where upon completion in the summer of 2007 he received a lectureship in remote sensing and GIS. Prior to joining the department, Peter received a BEng(Hons) in software engineering from the department of Computer Science at Aberystwyth University. Pete also spent a year working for Landcare Research in New Zealand before rejoining IGES in 2012 as a senior lecturer in remote sensing.
Contact Details
EMail: [email protected]
Senior Lecturer in Remote Sensing
Institute of Geography and Earth Sciences Aberystwyth University
Aberystwyth Ceredigion SY23 3DB United Kingdom
Daniel Clewley
Dr Dan Clewley joined IGES in 2006 undertaking an MSc in Remote Sensing and GIS, following his MSc Dan undertook a Ph.D. entitled Retrieval of Forest Biomass and Structure from Radar Data using Backscatter Modelling and Inversion under the supervision of Prof. Lucas and Dr. Bunting. Prior to joining the department Dan completed his BSc(Hons) in Physics within Aberystwyth University. Dan is currently a post-doc researcher at the University of Southern California.
Contact Details
Email: [email protected]
Postdoctoral Research Associate
Microwave Systems, Sensors, and Imaging Lab (MiXIL) Ming Hsieh Department of Electrical Engineering The University of Southern California
1 Introduction 1
1.1 Background . . . 1
1.1.1 What is Python? . . . 1
1.1.2 What can it be used for? . . . 2
1.1.3 A word of warning . . . 2
1.2 Example of Python in use . . . 2
1.2.1 Software in Python . . . 2
1.3 Python Libraries . . . 3
1.4 Installing Python . . . 3
1.5 Text Editors . . . 4
1.5.1 Windows . . . 5
1.5.2 Linux . . . 5
1.5.3 Mac OSX . . . 5
1.5.4 Going between Windows and UNIX . . . 5
1.6 Starting Python . . . 6
1.6.1 Indentation . . . 6
1.6.2 Keywords . . . 7
1.6.3 File Naming . . . 7
1.6.4 Case Sensitivity . . . 8
1.6.5 File paths in examples . . . 8
1.6.6 Independent Development of Scripts . . . 8
1.6.7 Getting Help . . . 9
1.7 Further Reading . . . 10
2 The Basics 11 2.1 Hello World Script . . . 11
2.2 Comments . . . 12
2.3 Variables . . . 13
2.3.1 Numbers . . . 13
2.3.2 Boolean . . . 13
2.3.3 Text (Strings) . . . 14
2.3.4 Example using Variables . . . 15
2.4 Lists . . . 19
2.4.1 List Examples . . . 19
2.4.2 n-dimensional list . . . 20
2.5 IF-ELSE Statements . . . 21
2.5.1 Logic Statements . . . 22
2.6 Looping . . . 23
2.6.1 while Loop . . . 23
2.6.2 for Loop . . . 24
2.7 Exercises . . . 25
2.8 Further Reading . . . 26
3.1 Read a Text File . . . 27
3.2 Write to a Text File . . . 30
3.3 Programming Styles . . . 30
3.3.1 Procedural Programming – File Outline . . . 31
3.3.2 Object Orientated Programming – File Outline . . . 32
3.4 Object Oriented Script . . . 33
3.4.1 Object Oriented Script for Text File Processing . . . 33
3.5 Exercise . . . 40
3.6 Further Reading . . . 41
4 File System – Finding files 42 4.1 Introduction . . . 42
4.2 Recursion . . . 44
4.3 Checking file Extension . . . 45
4.4 Exercises . . . 48
4.5 Further Reading . . . 48
5 Plotting - Matplotlib 49 5.1 Introduction . . . 49
5.2 Simple Script . . . 49
5.3 Bar Chart . . . 50
5.4 Pie Chart . . . 52
5.5 Scatter Plot . . . 53
5.6 Line Plot . . . 56
5.7 Exercise: . . . 59
6 Statistics (SciPy / NumPy) 60
6.1 Introduction . . . 60
6.2 Simple Statistics . . . 61
6.2.1 Exercises . . . 64
6.3 Calculate Biomass . . . 64
6.3.1 Exercise . . . 71
6.4 Linear Fitting . . . 72
6.4.1 Exercise . . . 79
6.5 Further Reading . . . 79
7 Batch Processing Command Line Tools 80 7.1 Introduction . . . 80
7.2 Merging ESRI Shapefiles . . . 81
7.3 Convert Images to GeoTIFF using GDAL. . . 90
7.3.1 Passing Inputs from the Command Line into your script . . 91
7.4 Exercises . . . 92
7.5 Further Reading . . . 92
8 Image Processing using GDAL and RIOS 94 8.1 Reading and Updating Header Information . . . 94
8.1.1 Reading Image Headers . . . 94
8.1.2 Read image header example. . . 96
8.1.3 No Data Values . . . 98
8.1.4 Band Name . . . 100
8.1.5 GDAL Meta-Data . . . 103
8.2.1 Getting Help – Reminder . . . 108
8.2.2 Band Maths . . . 109
8.2.3 Multiply by a constant . . . 109
8.2.4 Calculate NDVI . . . 111
8.2.5 Calculate NDVI Using Multiple Images . . . 114
8.3 Filtering Images . . . 117
8.4 Apply a rule based classification . . . 120
8.5 Exercises . . . 124
8.6 Further Reading . . . 124
9 Raster Attribute Tables (RAT) 125 9.1 Reading Columns . . . 125
9.2 Writing Columns . . . 127
9.2.1 Calculating New Columns . . . 127
9.2.2 Add Class Name . . . 129
9.3 Adding a colour table . . . 131
9.4 Using RATs for rule based classifications. . . 134
9.4.1 Developing a rule base . . . 134
9.5 Exercises . . . 145
9.6 Further Reading . . . 145
10 Golden Plover Population Model 146 10.1 Introduction . . . 146
10.2 Model Output . . . 146
10.3 Reading Parameters . . . 146
10.5 Exporting Data . . . 153
10.6 Creating Plots . . . 159
10.7 Exercises . . . 167
10.8 Further Reading . . . 167
A RSGISLib 168 A.1 Introduction to RSGISLib . . . 168
A.2 Using RSGISLib . . . 168
A.2.1 The RSGISLib XML Interface . . . 169
A.3 Segmentation . . . 173
A.3.1 XML Code . . . 174
5.1 A simple plot using matplotlib. . . 51
5.2 A simple bar chart using matplotlib. . . 52
5.3 A simple pie chart using matplotlib. . . 54
5.4 A simple scatter plot using matplotlib. . . 55
5.5 Rainfall data for summer and winter on the same axis’. . . 58
5.6 Rainfall data for summer and winter on different axis’. . . 59
6.1 A simple plot using matplotlib. . . 74
1.1 Keywords within the Python language . . . 7
2.1 The mathematical functions available within python. . . 14
2.2 Logic statements available within python . . . 22
3.1 Options when opening a file. . . 29
6.1 Coefficients for estimating volume and the specific gravity required for estimating the biomass by species. . . 65
Introduction
1.1
Background
1.1.1
What is Python?
Python is a high level scripting language which is interpreted, interactive and object-oriented. A key attribute of python is its clear and understandable syntax which should allow you to quickly get up to speed and develop useful applica-tion, while the syntax is similar enough to lower level languages, for example C/C++ and Java, to provide a background from which you can grow your ex-pertise. Python is also a so called memory managed language, meaning that you the developer are not directly in control of the memory usage within your ap-plication, making development much simpler. That is not saying that memory usage does not need to be considered and you, the developer, cannot influence the memory footprint of your scripts but these details are out of the scope of this course. Python is cross-platform with support for Windows, Linux, Mac OS X and most other UNIX platforms. In addition, many libraries (e.g., purpose built and external C++ libraries) are available to python and it has become a very pop-ular language for many applications, including on the internet and within remote sensing and GIS.
1.1.2
What can it be used for?
Python can be used for almost any task from simple file operations and text manipulation to image processing. It may also be used to extend the functionality of other, larger applications.
1.1.3
A word of warning
There are number of different versions of python and these are not always com-patible. For these worksheets we will be using version 3.X (at the time of writing the latest version is 3.3.0). With the exception of the quiz in Chapter 2, where
raw_inputmust be used instead ofinput, the examples will also work python 2.7. One of the most noticeable differences between python 2 and python 3 is that the print statement is now a function. So whilst:
print "Hello World"
will work under python 2, scripts using it won’t run under python 3 and must use:
print("Hello World")
instead. As the second is backwards compatible with python 2 it is good practice to use this, even if you are working with python 2.
1.2
Example of Python in use
1.2.1
Software in Python
Many applications have been built in python and a quick search of the web will reveal the extent of this range. Commonly, applications solely developed in python are web applications, run from within a web server (e.g., Apache;
org/chchrsc/viewer) and RIOS (https://bitbucket.org/chchrsc/rios) have also been developed.
In large standalone applications python is often used to facilitate the development of plugins or extensions to application. Examples of python used in this form include ArcMap and SPSS.
For a list of applications supporting or written in python refer to the following website http://en.wikipedia.org/wiki/Python_software.
1.3
Python Libraries
Many libraries are available to python. Libraries are collections of functions which can be called from your script(s). Python provides extensive libraries (http://docs.python.org/lib/lib.html) but third parties have also developed additional libraries to provide specific functionality (e.g., plotting). A list of avail-able libraries is availavail-able from http://wiki.python.org/moin/UsefulModules
and by following the links provides on the page.
The following sites provide links to libraries and packages specific to remote sensing and GIS, many of which are open source with freely available software packages and libraries for use with python.
• http://freegis.org
• http://opensourcegis.org
• http://www.osgeo.org
1.4
Installing Python
For this tutorial Python alongside the libraries GDAL (http://www.gdal.org), numpy (http://www.numpy.org), scipy (http://www.scipy.org), RIOS (https:
//bitbucket.org/chchrsc/rios) and matplotlib (http://matplotlib.sourceforge.
installed on almost any platform. For Windows a python package which includes all the libraries other than RIOS required for this worksheet is available, for free, as a simple download from http://www.pythonxy.com. To install this package download the installation file and run selecting a full installation. Currently this package only supports python 2.X, not the new python 3. However, this is unlikely to cause problems for the worksheet.
For further details of the installation process please see the project website http:
//www.pythonxy.com.
PythonXY is also available for Linux (https://code.google.com/p/pythonxy-linux) but all these packages are commonly available for the Linux platform through the distributions package management systems or can be build from source (harder but recommended).
For Mac OSX the KyngChaos Wikihttp://www.kyngchaos.com/software/frameworks
makes various binary packages available for installing GDAL etc. and Enthough Canopy https://www.enthought.com/products/canopy/ includes many of the tools required for this course. As with PythonXY, only python 2.X is currently sup-ported. If you would like to use python 3, packages can be build from source.
More details on installing individual packages is available athttp://docs.python.
org/3/install/.
1.5
Text Editors
1.5.1
Windows
The recommend editor is Spyder which installed within the python(x,y) package. From within Spyder you can directly run your python scripts (using the run but-ton), additionally it will alert you to errors within your scripts before you run them. Alternatively, the notepad++ (http://notepad-plus.sourceforge.net) text editor can also be used. Notepad++ is a free to use open source text editor and can therefore be downloaded and installed onto any Windows PC. If you use this editor it is recommended you change the settings for python to use spaces instead of tabs using the following steps:
1. Go to Setting – Preferences
2. Select ‘Language Menu / Tab Settings’
3. Under ‘Tab Settings’ for python tick ‘Replace by space’
1.5.2
Linux
Under Linux either the command line editor ne (nice editor), vi or its graphic interface equivalent gvim is recommend but kdeveloper, gedit and many others are also good choices.
1.5.3
Mac OSX
Under Mac OSX either BBEdit, SubEthaEdit or TextMate are recommended, while the freely available TextWrangler is also a good choice. The command line editors ne and vi are also available under OS X.
1.5.4
Going between Windows and UNIX
end of a line within a file) as these are different between the various operating systems. Using notepad++ line ending can be defined as UNIX and this is recom-mended where scripts are being composed under Windows.
Alternatively, if RSGISLib is installed then the command flip can be used to convert the line ending, the example below converts to UNIX line endings.
flip -u InputFile.py
1.6
Starting Python
Python may be started by opening a command window and typing:
python
(Alternatively select python(x,y) – Command Prompts – Python interpreter from the windows start menu).
This opens python in interactive mode. It is possible to perform some basic maths try:
>>> 1 + 1 2
To exit type:
>>>exit()
To perform more complex tasks in python often a large number of commands are required, it is therefore more convenient to create a text file containing the commands, referred to as a ‘script’
1.6.1
Indentation
common and recommend is to use 4 spaces for each indentation. The example given below shows an if-else statement where you can see that after the if part the statement which is executed if the if-statement is true is indented from rest of the script as with the corresponding else part of the statement. You will see this indentation as you go through the examples and it is important that you follow the indentation shown in the examples or your scripts will not execute.
1 if x == 1: 2 x = x + 1 3 else:
4 x = x - 1
1.6.2
Keywords
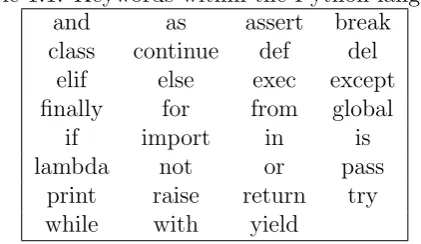
[image:20.595.190.401.423.545.2]As with all scripting and programming languages python has a set of keywords, which have special meanings to the compiler or interpreter when the code is exe-cuted. As with all python code, these keywords are case sensitive i.e., ‘else’ is a keyword but ‘Else’ is not. A list of pythons keywords is given below:
Table 1.1: Keywords within the Python language
and as assert break
class continue def del
elif else exec except
finally for from global
if import in is
lambda not or pass
print raise return try
while with yield
1.6.3
File Naming
1.6.4
Case Sensitivity
Something else to remember when using python, is that the language is case sen-sitivity therefore if a name is in lowercase then it needs to remain in lowercase everywhere it is used.
For example:
VariableName is not the same as variablename
1.6.5
File paths in examples
In the examples provided (in the text) file paths are given as ‘./PythonCourse/TutorialX/File.xxx’. When writing these scripts out for yourself you will need to update these paths to
the location on your machine where the files are located (e.g., /home/pete.bunting or C:\). Please note that it is recommended that you do not have any spaces within your file paths. In the example (answer) scripts provided no file path has been written and you will therefore need to either save input and output files in the same directory as the script or provide the path to the file. Please note that under Windows you need to insert a double slash (i.e.,\\) within the file path as a single slash is an escape character (e.g., \n for new line) within strings.
1.6.6
Independent Development of Scripts
There is a significant step to be made from working your way through notes and examples, such as those provided in this tutorial, and independently developing your own scripts from scratch. Our recommendation for this, and when undertak-ing the exercises from this tutorial, is to take it slowly and think through the steps you need to undertake to perform the operation(s) you need.
1 # Get input directory (containing the compressed files)
2
3 # Get output directory (where the files, once uncompressed, will be placed).
4
5 # Retrieve list of all files (to be uncompressed) in the input directory.
6
7 # Iterator through input files, uncompressing each in turn.
8 # Get single file from list
9 # create command line command for the current file
10 # execute command
By writing the process out in this form it makes translating this into python much simpler as you only need to think of how to do small individual elements in python and not how to do the whole process in one step.
1.6.7
Getting Help
Python provides a very useful help system through the command line. To get access to the help run python from the terminal
> python
Then import the library want to get help on
>>> import math
and then run the help tool on the whole module
>>> import math >>> help(math)
or on individual classes or functions within the module
>>> import osgeo.gdal >>> help(math.cos)
1.7
Further Reading
• An Introduction to Python, G. van Rossum, F.L. Drake, Jr. Network Theory ISBN 0-95-416176-9 (Also available online - http://docs.python.org/3/
tutorial/). Chapters 1 – 3
• Python FAQ –http://docs.python.org/faq/general.html
• Python on Windows –http://docs.python.org/faq/windows
• How to think Like a Computer Scientist: Python Edition – http://www.
The Basics
2.1
Hello World Script
To create your first python script, create a new text file using your preferred text editor and enter the text below:
1 #! /usr/bin/env python
2
3 #######################################
4 # A simple Hello World Script
5 # Author: <YOUR NAME>
6 # Emai: <YOUR EMAIL>
7 # Date: DD/MM/YYYY
8 # Version: 1.0
9 #######################################
10
11 print(’Hello World’)
Save your script to file (e.g., helloworld.py) and then run it either using a command prompt (Windows) or Terminal (UNIX), using the following command:
> python helloworld.py Hello World
To get a command prompt under Windows type ‘cmd’ from the run dialog box in the start menu (Start – run), further hints for using the command prompt are given below. Under OS X, terminal is located in within the ‘Utilities’ folder in ‘Applications’. If you are using Spyder to create your Python scripts you can run by clicking the run button.
Hints for using the Windows command line ‘cd’ allows you to change directory, e.g.,
cd directory1\directory2
‘dir’ allows you to list the contents of a directory, e.g.,
dir
To change drives, type the drive letter followed by a colon, e.g.,
D:
If a file path has spaces, you need to use quote, e.g, to change directory:
cd "Directory with spaces in name\another directory\"
2.2
Comments
2.3
Variables
The key building blocks within all programming languages are variables. Variables allow data to be stored either temperately for use in a single operation or through-out the whole program (global variables). Within python the variable data type does not need to be specified and will be defined by the first assignment. Therefore, if the first assignment to a variable is an integer (i.e., whole number) then that variable will be an integer for the remained of the program. Examples defining variables are provided below:
name = ’Pete’ # String
age = 25 # Integer
height = 6.2 # Float
2.3.1
Numbers
There are three types of numbers within python:
Integers are the most basic form of number, contain only whole numbers where calculation are automatically rounded to provide whole number answers.
Decimal or floating point numbers provide support for storing all those number which do not form a whole number.
Complex provide support for complex numbers and are defined asa+bj where a is the real part and b the imaginary part, e.g., 4.5 + 2.5j or 4.5−2.5j or
−4.5 + 2.5j
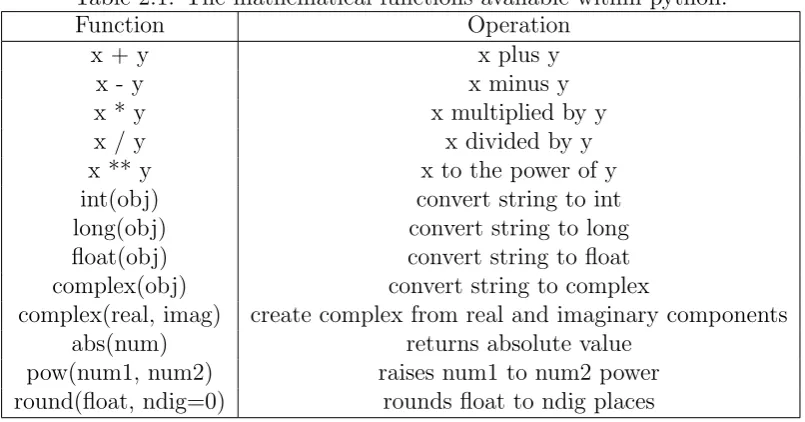
The syntax for defining variables to store these data types is always the same as python resolves the suitable type for the variable. Python allows a mathematical operations to be applied to numbers, listed in Table reftab:maths
2.3.2
Boolean
Table 2.1: The mathematical functions available within python.
Function Operation
x + y x plus y
x - y x minus y
x * y x multiplied by y
x / y x divided by y
x ** y x to the power of y
int(obj) convert string to int
long(obj) convert string to long
float(obj) convert string to float
complex(obj) convert string to complex
complex(real, imag) create complex from real and imaginary components
abs(num) returns absolute value
pow(num1, num2) raises num1 to num2 power
round(float, ndig=0) rounds float to ndig places
moveForwards = True
moveBackwards = False
2.3.3
Text (Strings)
To store text the string data type is used. Although not a base data type like a float or int a string can be used in the same way. The difference lies in the functions available to manipulate a string are similar to those of an object. A comprehensive list of functions is available for a string is given in the python documentation http://docs.python.org/lib/string-methods.html.
To access these functions the string modules needs to be imported as shown in the example below. Copy this example out and save it as StringExamples.py. When you run this script observe the change in the printed output and using the python documentation to identify what each of the functions lstrip(), rstrip() and strip() do.
1 #! /usr/bin/env python
2
3 #######################################
5 # Author: <YOUR NAME>
6 # Emai: <YOUR EMAIL>
7 # Date: DD/MM/YYYY
8 # Version: 1.0
9 #######################################
10
11 import string 12
13 stringVariable = ’ Hello World ’ 14
15 print(’\’’ + stringVariable + ’\’’)
16
17 stringVariable_lstrip = stringVariable.lstrip()
18 print(’lstrip: \’’ + stringVariable_lstrip + ’\’’) 19
20 stringVariable_rstrip = stringVariable.rstrip() 21 print(’rstrip: \’’ + stringVariable_rstrip + ’\’’) 22
23 stringVariable_strip = stringVariable.strip() 24 print(’strip: \’’ + stringVariable_strip + ’\’’)
2.3.4
Example using Variables
An example script illustrating the use of variables is provided below. It is recom-mend you copy this script and execute making sure you understand each line. In addition, try making the following changes to the script:
1. Adding your own questions.
2. Including the persons name within the questions.
3. Remove the negative marking.
1 #! /usr/bin/env python
2
3 #######################################
4 # A simple script illustrating the use of
5 # variables.
7 # Emai: <YOUR EMAIL>
8 # Date: DD/MM/YYYY
9 # Version: 1.0
10 #
11 # Compatible with python 3+
12 # For version 2, need to use raw_input
13 # instead of input
14 #######################################
15
16 score = 0 # A variable to store the ongoing score 17
18 # print is used to ’print’ the text to the command line
19 print(’#################################################’)
20 print(’Sample Python program which asks the user a few ’ \ 21 ’simple questions.’)
22 print(’################################################’) 23
24 # input is used to retrieve user input from the
25 # command line
26 name = input(’What is your name?\n’) 27
28 print(’Hello ’ + name + ’. You will be now asked a series’ \ 29 ’ of questions please answer \’y\’ for YES and \’n\’ for ’ \ 30 ’NO unless otherwise stated.’)
31
32 print(’Question 1:’)
33 answer = input(’ALOS PALSAR is a L band spaceborne SAR.\n’)
34 if answer == ’y’: # test whether the value returned was equal to y 35 print(’Well done’)
36 score = score + 1 # Add 1 to the score 37 else: # if not then the anser must be incorrect 38 print(’Bad Luck’)
39 score = score - 1 # Remove 1 from the score 40
41 print(’Question 2:’)
42 answer = input(’CASI provides hyperspectral data in ’ \
43 ’the Blue to NIR part of the spectrum.\n’) 44 if answer == ’y’:
48 print(’Bad Luck’) 49 score = score - 1 50
51 print(’Question 3:’)
52 answer = input(’HyMap also only provides data in the ’ \ 53 ’Blue to NIR part of the spectrum.\n’)
54 if answer == ’y’: 55 print(’Bad Luck’) 56 score = score - 1 57 else:
58 print(’Well done’)
59 score = score + 1 60
61 print(’Question 4:’)
62 answer = input(’Landsat is a spaceborne sensor.\n’) 63 if answer == ’y’:
64 print(’Well done’) 65 score = score + 1 66 else:
67 print(’Bad Luck’) 68 score = score - 1 69
70 print(’Question 5:’)
71 answer = input(’ADS-40 is a high resolution aerial ’ \ 72 ’sensor capturing RGB-NIR wavelengths.\n’)
73 if answer == ’y’: 74 print(’Well done’) 75 score = score + 1 76 else:
77 print(’Bad Luck’) 78 score = score - 1 79
80 print(’Question 6:’)
81 answer = input(’eCognition is an object oriented ’ \ 82 ’image analysis software package.\n’)
83 if answer == ’y’:
84 print(’Well done’) 85 score = score + 1
86 else:
89
90 print(’Question 7:’)
91 answer = input(’Adobe Photoshop provides the same ’ \ 92 ’functionality as eCognition.\n’)
93 if answer == ’y’: 94 print(’Bad Luck’) 95 score = score - 1 96 else:
97 print(’Well done’) 98 score = score + 1 99
100 print(’Question 8:’)
101 answer = input(’Python can be executed within ’ \
102 ’the a java virtual machine.\n’) 103 if answer == ’y’:
104 print(’Well done’) 105 score = score + 1 106 else:
107 print(’Bad Luck’) 108 score = score - 1 109
110 print(’Question 9:’)
111 answer = input(’Python is a scripting language ’ \ 112 ’not a programming language.\n’)
113 if answer == ’y’: 114 print(’Well done’) 115 score = score + 1 116 else:
117 print(’Bad Luck’) 118 score = score - 1 119
120 print(’Question 10:’)
121 answer = input(’Aberystwyth is within Mid Wales.\n’) 122 if answer == ’y’:
123 print(’Well done’) 124 score = score + 1
125 else:
126 print(’Bad Luck’)
127 score = score - 1 128
130 print(name + ’ you got a score of ’ + str(score))
2.4
Lists
Each of the data types outlined above only store a single value at anyone time, to store multiple values in a single variable a sequence data type is required. Python offers the List class, which allows any data type to be stored in a sequence and even supports the storage of objects of different types within one list. The string data type is a sequence data type and therefore the same operations are available.
List are very flexible structures and support a number of ways to create, append and remove content from the list, as shown below. Items in the list are numbered consecutively from 0-n, where n is one less than the length of the list.
Additional functions are available for List data types (e.g., len(aList), aList.sort(), aList.reverse()) and these are described inhttp://docs.python.org/lib/typesseq.
html and http://docs.python.org/lib/typesseq-mutable.html.
2.4.1
List Examples
1 #! /usr/bin/env python
2
3 #######################################
4 # Example with lists
5 # Author: <YOUR NAME>
6 # Emai: <YOUR EMAIL>
7 # Date: DD/MM/YYYY
8 # Version: 1.0
9 #######################################
10
11 # Create List:
12 aList = list()
13 anotherList = [1, 2, 3, 4] 14 emptyList = []
16 print(aList) 17 print(anotherList) 18 print(emptyList) 19
20 # Adding data into a List
21 aList.append(’Pete’) 22 aList.append(’Dan’) 23 print(aList)
24
25 # Updating data in the List
26 anotherList[2] = ’three’ 27 anotherList[0] = ’one’ 28 print(anotherList)
29
30 # Accessing data in the List
31 print(aList[0])
32 print(anotherList[0:2]) 33 print(anotherList[2:3]) 34
35 # Removing data from the List
36 del anotherList[1] 37 print(anotherList) 38
39 aList.remove(’Pete’) 40 print(aList)
2.4.2
n-dimensional list
Additionally, n-dimensional lists can be created by inserting lists into a list, a simple example of a 2-d structure is given below. This type of structure can be used to store images (e.g., the example given below would form a grey scale image) and additions list dimensions could be added for additional image bands.
1 #! /usr/bin/env python
2
3 #######################################
4 # Example with n-lists
6 # Emai: <YOUR EMAIL>
7 # Date: DD/MM/YYYY
8 # Version: 1.0
9 #######################################
10
11 # Create List:
12 aList = [
13 [1,1,1,1,1,1,1,1,1,1,1,1,1,1], 14 [1,1,0,0,1,1,1,1,1,0,0,1,1,1], 15 [1,1,0,0,1,1,1,1,1,0,0,1,1,1], 16 [1,1,1,1,1,1,1,1,1,1,1,1,1,1],
17 [1,1,1,1,1,1,0,1,1,1,1,1,1,1], 18 [1,1,1,1,1,1,0,1,1,1,1,1,1,1],
19 [1,1,1,1,1,0,0,0,1,1,1,1,1,1], 20 [1,0,1,1,1,1,1,1,1,1,1,1,0,1], 21 [1,0,1,1,1,1,1,1,1,1,1,1,0,1], 22 [1,1,0,0,0,0,0,0,0,0,0,0,1,1], 23 [1,1,1,1,1,1,1,1,1,1,1,1,1,1] 24 ]
25
26 print(aList)
2.5
IF-ELSE Statements
if <logic statement>: do this if true
else: do this
if <logic statement>: do this if true
elif <logic statement>: do this if true
elif <logic statement>: do this if true
else
do this
Logic statements result in a true or false value being returned where if a value of true is returned the contents of the if statement will be executed and remaining parts of the statement will be ignored. If a false value is returned then the if part of the statement will be ignored and the next logic statement will be analysis until either one returns a true value or an else statement is reached.
[image:35.595.91.507.98.290.2]2.5.1
Logic Statements
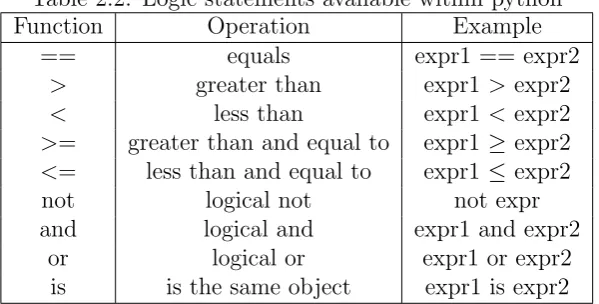
Table 2.2 outlines the main logic statements used within python in addition to these statements functions which return a boolean value can also be used to for decision making, although these will be described in later worksheets.
Table 2.2: Logic statements available within python
Function Operation Example
== equals expr1 == expr2
> greater than expr1 > expr2
< less than expr1 < expr2
>= greater than and equal to expr1 ≥ expr2
<= less than and equal to expr1 ≤ expr2
not logical not not expr
and logical and expr1 and expr2
or logical or expr1 or expr2
[image:35.595.149.449.516.668.2]2.6
Looping
In addition to the if-else statements for decision making loops provide another key component to writing any program or script. Python offers two forms of loops, while and for. Each can be used interchangeably given the developers preference and available information. Both types are outlined below.
2.6.1
while Loop
The basic syntax of the while loop is very simple (shown below) where a logic statement is used to terminate the loop, when false is returned.
while <logic statement> : statements
Therefore, during the loop a variable in the logic statement needs to be altered allowing the loop to terminate. Below provides an example of a while loop to count from 0 to 10.
1 #! /usr/bin/env python
2
3 #######################################
4 # A simple example of a while loop
5 # Author: <YOUR NAME>
6 # Emai: <YOUR EMAIL>
7 # Date: DD/MM/YYYY
8 # Version: 1.0
9 #######################################
10
11 count = 0
2.6.2
for Loop
A for loop provides similar functionality to that of a while loop but it provides the counter for termination. The syntax of the for loop is provided below:
1 for <iter_variable> in <iterable>: 2 statements
The common application of a for loop is for the iteration of a list and an example if this is given below:
1 #! /usr/bin/env python
2
3 #######################################
4 # A simple example of a for loop
5 # Author: <YOUR NAME>
6 # Emai: <YOUR EMAIL>
7 # Date: DD/MM/YYYY
8 # Version: 1.0
9 #######################################
10
11 aList = [’Pete’, ’Richard’, ’Johanna’, ’Philippa’, ’Sam’, ’Dan’, ’Alex’] 12
13 for name in aList:
14 print(’Current name is: ’ + name)
A more advance example is given below where two for loops are used to iterate through a list of lists.
1 #! /usr/bin/env python
2
3 #######################################
4 # Example with for loop and n-lists
5 # Author: <YOUR NAME>
6 # Emai: <YOUR EMAIL>
7 # Date: DD/MM/YYYY
8 # Version: 1.0
9 #######################################
10
12 aList = [
13 [1,1,1,1,1,1,1,1,1,1,1,1,1,1], 14 [1,1,0,0,1,1,1,1,1,0,0,1,1,1], 15 [1,1,0,0,1,1,1,1,1,0,0,1,1,1], 16 [1,1,1,1,1,1,1,1,1,1,1,1,1,1], 17 [1,1,1,1,1,1,0,1,1,1,1,1,1,1], 18 [1,1,1,1,1,1,0,1,1,1,1,1,1,1], 19 [1,1,1,1,1,0,0,0,1,1,1,1,1,1], 20 [1,0,1,1,1,1,1,1,1,1,1,1,0,1], 21 [1,0,1,1,1,1,1,1,1,1,1,1,0,1], 22 [1,1,0,0,0,0,0,0,0,0,0,0,1,1],
23 [1,1,1,1,1,1,1,1,1,1,1,1,1,1] 24 ]
25
26 for cList in aList:
27 for number in cList:
28 # Print with a space at the end
29 # rather than a new line
30 print (number,end=" ") 31 print()
2.7
Exercises
During this tutorial you should have followed through each of the examples and experimented with the code to understand each of components outlined. To test your understanding of all the material, you will now be asked to complete a series of tasks:
1. Update the quiz so the questions and answers are stored in lists which are iterated through as the script is executed.
2.8
Further Reading
• An Introduction to Python, G. van Rossum, F.L. Drake, Jr. Network Theory ISBN 0-95-416176-9 (Also available online - http://docs.python.org/3/
tutorial/) - Chapters 4 and 5.
• Spyder Documentation – http://packages.python.org/spyder/
• Python Documentation –http://www.python.org/doc/
• Core Python Programming (Second Edition), W.J. Chun. Prentice Hall ISBN 0-13-226993-7
• How to think Like a Computer Scientist: Python Edition – http://www. greenteapress.com/thinkpython/
Text Processing
3.1
Read a Text File
An example of a script to read a text file is given below, copy this example out and use the numbers.txt file to test your script. Note, that the numbers.txt file needs to be within the same directory as your python script.
1 #! /usr/bin/env python
2
3 #######################################
4 # A simple example reading in a text file
5 # two versions of the script are provided
6 # to illustrate that there is not just one
7 # correct solution to a problem.
8 # Author: <YOUR NAME>
9 # Email: <YOUR EMAIL>
10 # Date: DD/MM/YYYY
11 # Version: 1.0
12 #######################################
13
14 import string 15
16 # 1) Splits the text file into individual characters
17 # to identify the commas and parsing the individual
18 # tokens.
19 numbers = list()
20 dataFile = open(’numbers.txt’, ’r’) 21
22 for eachLine in dataFile: 23 #print(eachLine)
24 tmpStr = ’’
25 for char in eachLine: 26 #print(char)
27 if char.isdigit(): 28 tmpStr += char
29 elif char == ’,’ and tmpStr != ’’:
30 numbers.append(int(tmpStr)) 31 tmpStr = ’’
32 if tmpStr.isdigit():
33 numbers.append(int(tmpStr)) 34
35 print(numbers) 36 dataFile.close() 37
38 # 2) Uses the string function split to line from the file
39 # into a list of substrings
40 numbers = list()
41 dataFile = open(’numbers.txt’, ’r’) 42
43 for eachLine in dataFile: 44 #print eachLine
45 substrs = eachLine.split(’,’,eachLine.count(’,’)) 46 #print substrs
47 for strVar in substrs: 48 if strVar.isdigit():
49 numbers.append(int(strVar)) 50
51 print(numbers) 52 dataFile.close()
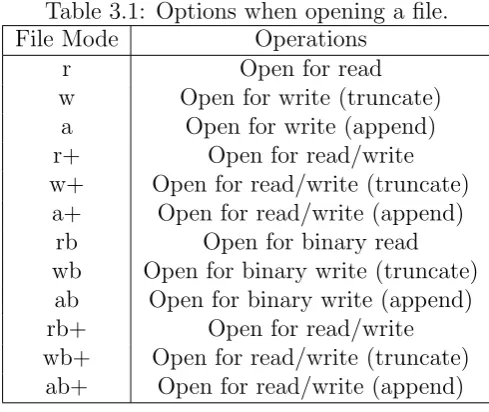
Table 3.1: Options when opening a file.
File Mode Operations
r Open for read
w Open for write (truncate)
a Open for write (append)
r+ Open for read/write
w+ Open for read/write (truncate)
a+ Open for read/write (append)
rb Open for binary read
wb Open for binary write (truncate)
ab Open for binary write (append)
rb+ Open for read/write
wb+ Open for read/write (truncate)
ab+ Open for read/write (append)
Now your need to adapt the one of the methods given in the script above to allow numbers and words to be split into separate lists. To do this you will need to use the isalpha() function alongside the isdigit() function. Adapt the numbers.txt file to match the input shown below and then run your script and you should receive the output shown below:
Input:
1, 2,pete, 3, 4,dan,5,
6,7,8,richard,10,11,12,13
Output:
>python simplereadsplit.py
3.2
Write to a Text File
Writing to a text file is similar to reading from the file. When opening the file two choices are available either to append or truncate the file. Appending to the file leaves any content already within the file untouched while truncating the file removes any content already within the file. An example of writing a list to a file with each list item on a new line is given below.
1 #! /usr/bin/env python
2
3 #######################################
4 # A simple script parsing numbers of
5 # words from a comma seperated text file
6 # Author: <YOUR NAME>
7 # Email: <YOUR EMAIL>
8 # Date: DD/MM/YYYY
9 # Version: 1.0
10 #######################################
11
12 aList = [1, 2, 3, 4, 5, 6, 7, 8, 9, 10, 13 ’one’, ’two’, ’three’, ’four’, ’five’, 14 ’six’, ’seven’, ’eight’, ’nine’, ’ten’] 15
16 dataFile = open(’writetest.txt’, ’w’) 17
18 for eachitem in aList:
19 dataFile.write(str(eachitem)+’\n’) 20
21 dataFile.close()
3.3
Programming Styles
Object oriented programming differs from procedural programming in that the program is split into a series of objects, usually representing really world objects or functionality, generally referred to as a ‘class’. Objects support the concepts of inheritance where functionality can be used in many sub-objects. For example, a Person class maybe written with functions such as eat, drink, beat heart etc. and specialist sub-objects may then be created with Person as a super-object, for example child, adult, male and female. These objects all require the functionality of Person but it is inefficient to duplicate the functionality they share individual rather then group this functionality into the Person class.
This course will concentrate on basic object oriented programming but below are the basic python file outlines for both procedural and object oriented scripts.
3.3.1
Procedural Programming – File Outline
When creating a procedural python script each of your files will have the same basic format outlined below:
1 #! /usr/bin/env python
2
3 #######################################
4 # Comment explaining scripts purpose
5 # Author: <Author Name>
6 # Email: <Author’s Email>
7 # Date: <Date Last Editor>
8 # Version: <Version Number>
9 #######################################
10
11 # IMPORTS
12 # e.g., import os
13
14 # SCRIPT
15 print("Hello World") 16
3.3.2
Object Orientated Programming – File Outline
When creating an object oriented script each python file you create will have the same basic format outlined below:
1 #! /usr/bin/env python
2
3 #######################################
4 # Comment explaining scripts purpose
5 # Author: <Author Name>
6 # Emai: <Author’s Email>
7 # Date: <Date Last Editor>
8 # Version: <Version Number>
9 #######################################
10
11 # IMPORTS
12 import os 13
14 # CLASS EXPRESSION - In this case class name is Person
15 class Person (object): # Object is the superclass 16
17 # CLASS ATTRIBUTES
18 name = ’’ 19
20 # INITIALISE THE CLASS (OFTEN EMPTY)
21 def __init__(self): 22 self.name = ’Dan’ 23
24 # METHOD TO PRINT PERSON NAME
25 def printName(self):
26 print(’Name: ’ + self.name) 27
28 # METHOD TO SET PERSON NAME
29 def setName(self, inputName): 30 self.name = inputName 31
32 # METHOD TO GET PERSON NAME
36 # METHOD TO EXECUTE CLASS
37 def run(self): 38 self.printName() 39 self.setName(’Pete’) 40 self.printName() 41
42 # IF EXECUTED FROM THE COMMAND LINE
43 if __name__ == ’__main__’: 44 obj = Person()
45 obj.run() 46
47 # End of File
3.4
Object Oriented Script
For simple scripts like those demonstrated so far simple procedural scripts are all that have been required. When creating more complex scripts the introduction of more structured and reusable designs are preferable. To support this design Python supports object oriented program design.
3.4.1
Object Oriented Script for Text File Processing
To illustrate the difference in implementation an example is given and explained below. The example reads a comma separated text file (randfloats.txt) of random floating point numbers from which the mean and standard deviation is calculated. Create a new python script and copy the script below:
1 #! /usr/bin/env python
2
3 #######################################
4 # An python class to parse a comma
5 # separates text file to calculate
6 # the mean and standard deviation
7 # of the inputted floating point
9 # Author: <YOUR NAME>
10 # Email: <YOUR EMAIL>
11 # Date: DD/MM/YYYY
12 # Version: 1.0
13 #######################################
14
15 # import the squareroot function from python math
16 from math import sqrt 17
18 # Define a new class called CalcMeanStdDev
19 class CalcMeanStdDev (object):
20
21 # Define a function which parses a comma
22 # separated file - you should understand
23 # the contents of this script from the
24 # previous examples.
25 # Note: the file is passed into the
26 # function.
27 def parseCommaFile(self, file): 28 floatingNumbers = list() 29 for eachLine in file:
30 substrs = eachLine.split(’,’,eachLine.count(’,’)) 31 for strVar in substrs:
32 floatingNumbers.append(float(strVar)) 33 return floatingNumbers
34
35 # Define a function to calculate the mean
36 # value from a list of numbers.
37 # Note. The list of numbers is passed into
38 # the function.
39 def calcMean(self, numbers):
40 # A variable to sum all the numbers
41 sum = 0.0
42 # Iterate through the numbers list
43 for number in numbers:
44 # add each number to the sum
45 sum += number
46 # Divide the sum by the number of
47 # values within the numbers list
48 # (i.e., its length)
50 # return the mean value calculated
51 return mean 52
53 # Define a function which calculates the
54 # standard deviation of a list of numbers
55 # Note. The list of numbers is passed into
56 # the function alongside a previously
57 # calculated mean value for the list.
58 def calcStdDev(self, numbers, mean): 59 # Varible for total deviation
60 deviation = 0.0
61 # Variable for a single deviation
62 singleDev = 0.0
63 # Iterate through the list of numbers.
64 for number in numbers:
65 # Calculate a single Deviation
66 singleDev = number-mean
67 # Add the squared single deviation to
68 # to the on going total.
69 deviation += (singleDev**2) 70 # Calcate the standard devaition
71 stddev = sqrt(deviation/(len(numbers)-1)) 72 # return the standard deviation
73 return stddev 74
75 # The main thread of processing. A function
76 # which defines the order of processing.
77 # Note. The filename is passed in.
78 def run(self, filename): 79 # Open the input file
80 inFile = open(filename, ’r’)
81 # Parse the file to retrieve a list of
82 # numbers
83 numbers = self.parseCommaFile(inFile) 84
85 # Calculate the mean value of the list
86 mean = self.calcMean(numbers)
87 # Calculate the standard deviation of the
88 # list.
91 # Print the results to screen
92 print(’Mean: ’ + str(mean)) 93 print(’Stddev: ’ + str(stddev)) 94
95 # Close the input file
96 inFile.close() 97
98 # When python is executed python executes
99 # the code with the lowest indentation first.
100 #
101 # We can identify when python is executed from
102 # the command line using the following if statment.
103 #
104 # When executed we want the run() function to be
105 # executed therefore we create a CalcMeanStdDev
106 # object and call run on that object - passing
107 # in the file name of the file to be processed.
108 if __name__ == ’__main__’: 109 obj = CalcMeanStdDev()
110 obj.run(’randfloats.txt’) # Update with full file path.
NOTE:
__name__
and
__main__
each have TWO underscores either side (i.e., ).
Although, an object oriented design has been introduced making the above code, potentially, more reusable the design does not separate more general functionality from the application. To do this the code will be split into two files the first, named MyMaths.py, will contain the mathematical operations calcMean and calcStdDev while the second, named FileSummary, contains the functions run, which controls the flow of the script, and parseCommaFile(). The code for these files is given below but first try and split the code into the two files yourself.
1 #! /usr/bin/env python
3 #######################################
4 # An python class to hold maths operations
5 # Author: <YOUR NAME>
6 # Email: <YOUR EMAIL>
7 # Date: DD/MM/YYYY
8 # Version: 1.0
9 #######################################
10
11 from math import sqrt 12
13 class MyMathsClass (object):
14
15 def calcMean(self, numbers):
16 sum = 0.0
17 for number in numbers: 18 sum += number 19 mean = sum/len(numbers) 20 return mean
21
22 def calcStdDev(self, numbers, mean): 23 deviation = 0.0
24 singleDev = 0.0
25 for number in numbers: 26 singleDev = number-mean 27 deviation += (singleDev**2)
28 stddev = sqrt(deviation/(len(numbers)-1)) 29 return stddev
30
31
1 #! /usr/bin/env python
2
3 #######################################
4 # An python class to parse a comma
5 # separates text file to calculate
6 # the mean and standard deviation
7 # of the inputted floating point
8 # numbers.
9 # Author: <YOUR NAME>
11 # Date: DD/MM/YYYY
12 # Version: 1.0
13 #######################################
14
15 # To import the class you have created
16 # you need to define the file within
17 # which the class is held. In this
18 # case MyMaths.py and the name of the
19 # class to be imported (i.e., MyMathsClass)
20 from MyMaths import MyMathsClass 21
22 class FileSummary (object): 23
24 def parseCommaFile(self, file): 25 floatingNumbers = list() 26 for eachLine in file:
27 substrs = eachLine.split(’,’,eachLine.count(’,’)) 28 for strVar in substrs:
29 floatingNumbers.append(float(strVar)) 30 return floatingNumbers
31
32 def run(self, filename):
33 inFile = open(filename, ’r’)
34 numbers = self.parseCommaFile(inFile) 35
36 mathsObj = MyMathsClass()
37 mean = mathsObj.calcMean(numbers)
38 stddev = mathsObj.calcStdDev(numbers, mean) 39
40 print(’Mean: ’ + str(mean)) 41 print(’Stddev: ’ + str(stddev)) 42
43
44 if __name__ == ’__main__’: 45 obj = FileSummary() 46 obj.run(’randfloats.txt’)
47
the FileSummary script:
1 #! /usr/bin/env python
2
3 #######################################
4 # An python class to parse a comma
5 # separates text file to calculate
6 # the mean and standard deviation
7 # of the inputted floating point
8 # numbers.
9 # Author: <YOUR NAME>
10 # Email: <YOUR EMAIL>
11 # Date: DD/MM/YYYY
12 # Version: 1.0
13 #######################################
14
15 from MyMaths import MyMathsClass 16 # To allow command line options to be
17 # retrieved the sys python library needs
18 # to be imported
19 import sys 20
21 class FileSummary (object): 22
23 def parseCommaFile(self, file): 24 floatingNumbers = list() 25 for eachLine in file:
26 substrs = eachLine.split(’,’,eachLine.count(’,’)) 27 for strVar in substrs:
28 floatingNumbers.append(float(strVar)) 29 return floatingNumbers
30
31 def run(self):
32 # To retrieve the command line arguments
33 # the sys.argv[X] is used where X refers to
34 # the argument. The argument number starts
35 # at 1 and is the index of a list.
36 filename = sys.argv[1] 37 inFile = open(filename, ’r’)
40 mathsObj = MyMathsClass()
41 mean = mathsObj.calcMean(numbers)
42 stddev = mathsObj.calcStdDev(numbers, mean) 43
44 print(’Mean: ’ + str(mean)) 45 print(’Stddev: ’ + str(stddev)) 46
47 if __name__ == ’__main__’: 48 obj = FileSummary() 49 obj.run()
50
To read the new script the following command needs to be run from the command prompt:
python fileSummary_commandline.py randfloats.txt
3.5
Exercise
Calculate the mean and standard deviation from only the first column of data
Hint:
You will need to replace:
substrs = eachLine.split(’,’,eachLine.count(’,’)) for strVar in substrs:
floatingNumbers.append(float(strVar))
With:
substrs = eachLine.split(’,’,eachLine.count(’,’))
# Select the column the data is stored in
column1 = substrs[0]
3.6
Further Reading
• An Introduction to Python, G. van Rossum, F.L. Drake, Jr. Network Theory ISBN 0-95-416176-9 (Also available online - http://docs.python.org/3/
tutorial/) - Chapter 7.
• Python Documentation –http://www.python.org/doc/
File System – Finding files
4.1
Introduction
A common task for which python is used is to batch process a task or series of tasks. To do this the files to be processed need to be identified from within the file system. Therefore, in this tutorial you will learn to implement code to undertake this operation.
To start this type out the code below into a new file (save it as IterateFiles.py).
1 #! /usr/bin/env python
2
3 #######################################
4 # A class that iterates through a directory
5 # or directory structure and prints out theatre
6 # identified files.
7 # Author: <YOUR NAME>
8 # Email: <YOUR EMAIL>
9 # Date: DD/MM/YYYY
10 # Version: 1.0
11 #######################################
12
13 import os.path
14 import sys 15
16 class IterateFiles (object): 17
18 # A function which iterates through the directory
19 def findFiles(self, directory):
20 # check whether the current directory exits
21 if os.path.exists(directory):
22 # check whether the given directory is a directory
23 if os.path.isdir(directory):
24 # list all the files within the directory
25 dirFileList = os.listdir(directory)
26 # Loop through the individual files within the directory
27 for filename in dirFileList:
28 # Check whether file is directory or file
29 if(os.path.isdir(os.path.join(directory,filename))): 30 print(os.path.join(directory,filename) + \ 31 ’ is a directory and therefore ignored!’)
32 elif(os.path.isfile(os.path.join(directory,filename))): 33 print(os.path.join(directory,filename))
34 else:
35 print(filename + ’ is NOT a file or directory!’) 36 else:
37 print(directory + ’ is not a directory!’) 38 else:
39 print(directory + ’ does not exist!’) 40
41
42
43 def run(self):
44 # Set the folder to search
45 searchFolder = ’./PythonCourse’ # Update path... 46 self.findFiles(searchFolder)
47
48
49 if __name__ == ’__main__’: 50 obj = IterateFiles() 51 obj.run()
Using the online python documentation read through the section on the file sys-tem:
http://docs.python.org/library/os.path.html
This documentation will allow you to understand the functionality which is avail-able for manipulating the file system.
4.2
Recursion
The next stage is to add allow the function recursively go through the directory structure. To do this add the function below to your script above:
1 #! /usr/bin/env python
2
3 #######################################
4 # A class that iterates through a directory
5 # or directory structure and prints out theatre
6 # identified files.
7 # Author: <YOUR NAME>
8 # Email: <YOUR EMAIL>
9 # Date: DD/MM/YYYY
10 # Version: 1.0
11 #######################################
12
13 import os.path 14 import sys 15
16 class IterateFiles (object): 17
18 # A function which iterates through the directory
19 def findFilesRecurse(self, directory):
20 # check whether the current directory exits
21 if os.path.exists(directory):
22 # check whether the given directory is a directory
23 if os.path.isdir(directory):
24 # list all the files within the directory
25 dirFileList = os.listdir(directory)
26 # Loop through the individual files within the directory
27 for filename in dirFileList:
29 if(os.path.isdir(os.path.join(directory,filename))): 30 # If a directory is found recall this function.
31 self.findFilesRecurse(os.path.join(directory,filename)) 32 elif(os.path.isfile(os.path.join(directory,filename))): 33 print(os.path.join(directory,filename))
34 else:
35 print(filename + ’ is NOT a file or directory!’) 36 else:
37 print(directory + ’ is not a directory!’) 38 else:
39 print(directory + ’ does not exist!’)
40
41 def run(self):
42 # Set the folder to search
43 searchFolder = ’./PythonCourse’ # Update path... 44 self.findFilesRecurse(searchFolder)
45
46 if __name__ == ’__main__’: 47 obj = IterateFiles() 48 obj.run()
Now call this function instead of the findFiles. Think and observe what effect a function which calls itself will have on the order in which the file are found.
4.3
Checking file Extension
The next step is to include the function checkFileExtension to your class and create two new functions which only print out the files with the file extension of interest. This should be done for both the recursive and non-recursive functions above.
1 #! /usr/bin/env python
2
3 #######################################
4 # A class that iterates through a directory
5 # or directory structure and prints out theatre
7 # Author: <YOUR NAME>
8 # Email: <YOUR EMAIL>
9 # Date: DD/MM/YYYY
10 # Version: 1.0
11 #######################################
12
13 import os.path 14 import sys 15
16 class IterateFiles (object): 17
18 # A function which checks a file extension and returns
19 def checkFileExtension(self, filename, extension):
20 # Boolean variable to be returned by the function
21 foundExtension = False;
22 # Split the filename into two parts (name + ext)
23 filenamesplit = os.path.splitext(filename) 24 # Get the file extension into a varaiable
25 fileExtension = filenamesplit[1].strip() 26 # Decide whether extensions are equal
27 if(fileExtension == extension): 28 foundExtension = True 29 # Return result
30 return foundExtension 31
32 # A function which iterates through the directory and checks file extensions
33 def findFilesExtRecurse(self, directory, extension): 34 # check whether the current directory exits
35 if os.path.exists(directory):
36 # check whether the given directory is a directory
37 if os.path.isdir(directory):
38 # list all the files within the directory
39 dirFileList = os.listdir(directory)
40 # Loop through the individual files within the directory
41 for filename in dirFileList:
42 # Check whether file is directory or file
43 if(os.path.isdir(os.path.join(directory,filename))): 44 # If a directory is found recall this function.
48 print(os.path.join(directory,filename))
49 else:
50 print(filename + ’ is NOT a file or directory!’) 51 else:
52 print(directory + ’ is not a directory!’) 53 else:
54 print(directory + ’ does not exist!’) 55
56
57 # A function which iterates through the directory and checks file extensions
58 def findFilesExt(self, directory, extension):
59 # check whether the current directory exits
60 if os.path.exists(directory):
61 # check whether the given directory is a directory
62 if os.path.isdir(directory):
63 # list all the files within the directory
64 dirFileList = os.listdir(directory)
65 # Loop through the individual files within the directory
66 for filename in dirFileList:
67 # Check whether file is directory or file
68 if(os.path.isdir(os.path.join(directory,filename))): 69 print(os.path.join(directory,filename) + \ 70 ’ is a directory and therefore ignored!’)
71 elif(os.path.isfile(os.path.join(directory,filename))): 72 if(self.checkFileExtension(filename, extension)): 73 print(os.path.join(directory,filename))
74 else:
75 print(filename + ’ is NOT a file or directory!’) 76 else:
77 print(directory + ’ is not a directory!’) 78 else:
79 print(directory + ’ does not exist!’) 80
81 def run(self):
82 # Set the folder to search
83 searchFolder = ’./PythonCourse’ # Update path... 84 self.findFilesExt(searchFolder, ’.txt’)
85
4.4
Exercises
1. Rather than print the file paths to screen add them to a list and return them from the function. This would be useful for applications where the files to be process need to be known up front and creates a more generic piece of python which can be called from other scripts.
2. Using the return list add code to loop through the returned list and print out the file information in the following comma separated format.
[FILE NAME], [EXTENSION], [PATH], [DRIVE LETTER (On Windows)], [MODIFICATION TIME]
4.5
Further Reading
• Python Documentation –http://www.python.org/doc/
Plotting - Matplotlib
5.1
Introduction
Many open source libraries are available from within python. These significantly increase the available functionality, decreasing your development time. One such library is matplotlib (http://matplotlib.sourceforge.net), which provides a plotting library with a similar interface to those available within Matlab. The mat-plotlib website provides a detailed tutorial and documentation for all the different options available within the library but this worksheet provides some examples of the common plot types and a more complex example continuing on from previous examples.
5.2
Simple Script
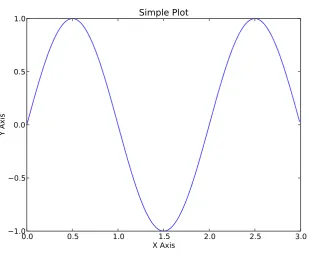
Below is your first script using the matplotlib library. The script demonstrates the plotting of a mathematical function, in this case a sine function. The plot function requires two lists of numbers to be provided, which provides the x and y locations of the points which go to create the displayed function. The axis can be labelled using the xlabel() and ylabel() functions while the title is set using the title() function. Finally, the show() function is used to reveal the interface
displaying the plot.
1 #! /usr/bin/env python
2
3 #######################################
4 # A simple python script to display a
5 # sine function
6 # Author: <YOUR NAME>
7 # Email: <YOUR EMAIL>
8 # Date: DD/MM/YYYY
9 # Version: 1.0
10 #######################################
11
12 # import the matplotlib libraries
13 from pylab import * 14
15 # Create a list with values from
16 # 0 to 3 with 0.01 intervals
17 t = arange(0.0, 3, 0.01) 18 # Calculate the sin curve for
19 # the values within t
20 s = sin(pi*t) 21
22 # Plot the values in s and t
23 plot(t, s) 24 xlabel(’X Axis’) 25 ylabel(’Y Axis’) 26 title(’Simple Plot’) 27 # save plot to disk.
28 savefig(’simpleplot.pdf’, dpi=200, format=’PDF’)
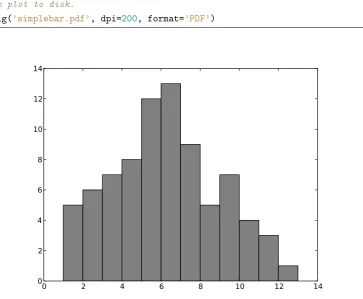
5.3
Bar Chart
0.0 0.5 1.0 1.5 2.0 2.5 3.0 X Axis
1.0 0.5 0.0 0.5 1.0
Y Axis
[image:64.595.136.473.109.368.2]Simple Plot
Figure 5.1: A simple plot using matplotlib.
sourceforge.net/matplotlib.pylab.html#-bar)
1 #! /usr/bin/env python
2
3 #######################################
4 # A simple python script to display a
5 # bar chart.
6 # Author: <YOUR NAME>
7 # Email: <YOUR EMAIL>
8 # Date: DD/MM/YYYY
9 # Version: 1.0
10 #######################################
11
12 from pylab import * 13
14 # Values for the Y axis (i.e., height of bars)
15 height = [5, 6, 7, 8, 12, 13, 9, 5, 7, 4, 3, 1] 16 # Values for the x axis
18
19 # create plot with colour grey
20 bar(x, height, width=1, color=’gray’) 21 # save plot to disk.
22 savefig(’simplebar.pdf’, dpi=200, format=’PDF’)
0 2 4 6 8 10 12 14
[image:65.595.119.483.149.448.2]0 2 4 6 8 10 12 14
Figure 5.2: A simple bar chart using matplotlib.
5.4
Pie Chart
A pie chart is similar to the previous scripts where a list of the fractions making up the pie chart is given alongside a list of labels and if required a list of frac-tions to explode the pie chart. Other opfrac-tions including colour and shadow are available and outlined in the documentation (http://matplotlib.sourceforge.
1 #! /usr/bin/env python
2
3 #######################################
4 # A simple python script to display a
5 # pie chart.
6 # Author: <YOUR NAME>
7 # Email: <YOUR EMAIL>
8 # Date: DD/MM/YYYY
9 # Version: 1.0
10 #######################################
11
12 from pylab import * 13
14 frac = [25, 33, 17, 10, 15]
15 labels = [’25’, ’33’, ’17’, ’10’, ’15’] 16 explode = [0, 0.25, 0, 0, 0]
17
18 # Create pie chart
19 pie(frac, explode, labels, shadow=True) 20 # Give it a title
21 title(’A Sample Pie Chart’) 22 # save the plot to a PDF file
23 savefig(’pichart.pdf’, dpi=200, format=’PDF’)
5.5
Scatter Plot
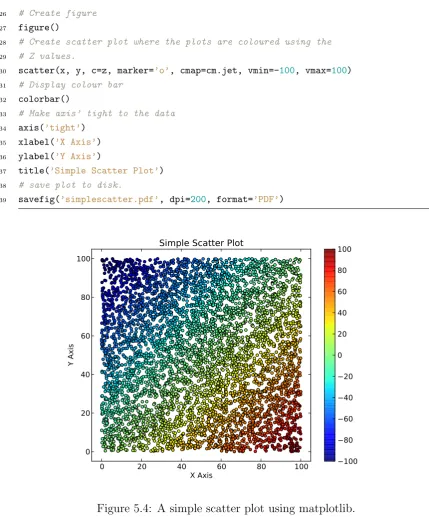
The following script demonstrates the production of a scatter plot (http://matplotlib.
sourceforge.net/matplotlib.pylab.html#-scatter) where the lists x and y
provide the locations of the points in the X and Y axis and Z provides the third dimension used to colour the points.
1 #! /usr/bin/env python
2
3 #######################################
4 # A simple python script to display a
5 # scatter plot.
25 33
17
10
15
[image:67.595.160.473.99.344.2]A Sample Pie Chart
Figure 5.3: A simple pie chart using matplotlib.
7 # Email: <YOUR EMAIL>
8 # Date: DD/MM/YYYY
9 # Version: 1.0
10 #######################################
11
12 from pylab import *
13 # Import a random number generator
14 from random import random 15
16 x = [] 17 y = [] 18 z = []
19
20 # Create data values for X, Y, Z axis’
21 for i in range(5000):
22 x.append(random() * 100)
26 # Create figure
27 figure()
28 # Create scatter plot where the plots are coloured using the
29 # Z values.
30 scatter(x, y, c=z, marker=’o’, cmap=cm.jet, vmin=-100, vmax=100) 31 # Display colour bar
32 colorbar()
33 # Make axis’ tight to the data
34 axis(’tight’) 35 xlabel(’X Axis’) 36 ylabel(’Y Axis’)
37 title(’Simple Scatter Plot’) 38 # save plot to disk.
39 savefig(’simplescatter.pdf’, dpi=200, format=’PDF’)
0 20 40 60 80 100
X Axis 0
20 40 60 80 100
Y Axis
Simple Scatter Plot
[image:68.595.71.501.97.615.2]100 80 60 40 20 0 20 40 60 80 100
[image:68.595.136.472.328.583.2]5.6
Line Plot
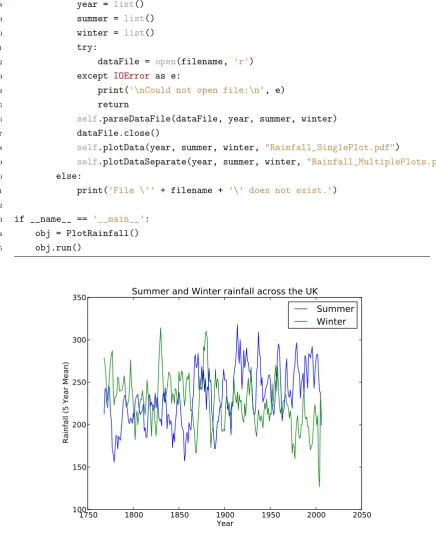
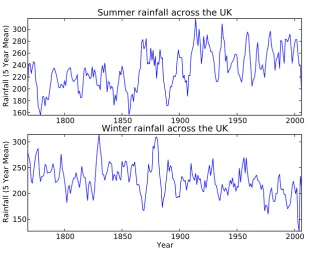
A more complicated example is now given building on the previous tutorial where the data is read in from a text file before being plotted. In this case data was down-loaded from the Environment Agency and converted from columns to rows. The dataset provides the five year average rainfall for the summer (June - August) and winter (December - February) from 1766 to 2006. Two examples of plotting this data are given where the first plots the two datasets onto the same axis (Figure 5.5) while the second plots them onto individual axis (Figure 5.6). Information on the use of the subplot() function can be found in the matplotlib documentation (http:
//matplotlib.sourceforge.net/matplotlib.pylab.html#-subplot).
1 #######################################
2 # A python script to read in a text file
3 # of rainfall data for summer and winter
4 # within the UK and display as a plot.
5 # Author: <YOUR NAME>
6 # Email: <YOUR EMAIL>
7 # Date: DD/MM/YYYY
8 # Version: 1.0
9 #######################################
10
11 from pylab import * 12 import os.path 13 import sys 14
15 class PlotRainfall (object): 16
17 # Parse the input file - Three columns