..
r,
DIII'IiBIiTE
1
j
l
Business Computers
j
t
410589
Rev .. 8
MP/M II
DOS
5
MP/M II OOS 5 User's Guide Revision History Rev. A April 1982 Rev. B June 1983
All rights reserved. No part of this publication may be reproduced, recorded or stored in a retrieval system, or transmitted, in any form or by any means, whether electronic, mechanical, photographic, or otherwise, without prior written permission of Dynabyte.
Copyright
(S)
1982 by Qynabyte.All specifications are subject to change without notice. Qynabyte does not assume any liability arising out of the application or use of any product described herein; neither does it convey any license under its patent rights nor the rights of others.
Qynabyte
521 Cottonwood Drive Milpitas, CA 95035
OOS 5
USER' S GJIDE
IR.JlOlJ(!I'ION. • • • • • • • • • • • • • • • • • • • • • •
ros 5 Features • • • • • • • • • • • • • • • • • • • • • • •
Sco~ of This Manual • • • • • • • • • • • • • • • • • • • • Documentation Conventions. • • • • • • • • • • • • • • • • • GE'1'1'llG S'I'ARJRl: <Dl'Yl:R; AND INSTALI.IH:; OOS 5 • • • • • •
·
.
.
· .
· .
·
.
Model 5200 • • • • • •
.
.
.
.
.
.
.
.
• •·
.
.
Model 5300, 5305, 5400 • • • • • • • • • •.
.
.
·
.
Model 5505 • • • • • • • • • • • • • • • • • • • • • •
·
. . ·
.
Model 5605 • • • • • • • • • • • • • • • •.
.
.
·
.
.
·
. .
Model 5615 • • • • • • • • • • • • • • • • • • • • • •·
. . · .
Model 5013, 5700, 5710 • • • • • • • • • • • • •·
. .
SY~ DEFINITION All> GENERATION • • • • • • • • • • • • • • • • • • •
D~S • • • • • • • • • • • • • • • • • • • • • • • • • • • •
AL Option: Assign / setup All Parameters • • • • • • • SC Option: Set Clear Screen Sequence • • • • • • • • • • • CA Option: Character I/O Assignments • • • • • • • • • • • CS Option: Character I/O Setup • • • • • • • • • • • • DA Option: Disk Drive Assignments. • • • • • • • • • Floppy Dr i ves • • • • • • • • • • • • • • • • • • • • Fujitsu Winchester Drives • • • • • • • • • • • • • • Mini (5.25") Winchester Drives • • • • • • • • • • • • Microp:>lis Winchester Drives • • • • •• • • • • • LS Option: Load /Save Pararreter File • • • • •
The Load (LP) Option •
. .
·
.
.
The Save (SP) Option • • •
.
.
.
.
.
.
.
The Clear (CP) Option • • • • • •
. .
.
·
.
.
.
.
DC Option: Display Current Configuration • • • • • • • CD Option: Create System Disk. • • • • • • •The Write (WR) Option • • • •
·
.
.
.
.
.
The Transfer (TR) Option • • • • • • • • • • • • • • • EX Option: Exit to Operating System.
· . ·
.
.
. .
DYNAGEN • • • • •
. .
.
.
.
.
.
.
.
·
.
.
'rile 'r.R Option • • • • • • • • • • • • • • • • • • • • • The
cr
Option • • • • • • • • • • • • • • • • • • • • • • • Memory Configurations • • • • • • • • • • • • • • • •~E:.sT • • • • • • • • • •
.
.
.
.
.
·
.
. .
.
. .
SECTION PAGE
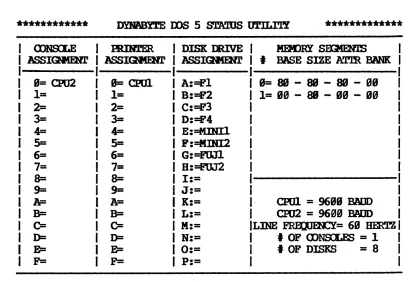
DYNAsrAT • • •
· ·
3.5-52Console Assignments •
· ·
3.5-53Printer Assignments • • • • •
·
• •·
• • • 3.5-54Disk Drive Assignments.
·
• • • • • • 3.5-54Memory Segment Parameters • • •
· ·
• • • •·
•·
3.5-54System Parameters • • • • • • • • 3.5-54
~ BX)T lD!.
· ·
•.
• • • 4.0-1256-Byte RG1 • • • • • • • • • • • • 4.1-2
512-Byte ROO • • • • • 4.1-2
2K Byte ROM.
· ·
• • • •·
• • 4.3-4Installing the 2K ROM
·
• • • •·
• 4.3-5Disabling the Nain Board ROM. • • • • • 4.3-5
Booting Procedures. •
·
·
• 4.3-6Procedur e 1. • • •
·
4.3-6Procedure 2. • • • •
·
·
4.3-6Procedur e 3. • • • 4.3-7
Determining the Floppy Disk Configuration • • 4.3-7
Setting the CPU SWitches. • •
·
4.3-8Detailed Description of the ROMs • 4.4-14
FO~ AID OONFIGtJRIR; DISKS. •
·
• 5.0-1Floppy Disks •
·
· ·
5.1-2Descr iption • • • 5.1-2
8 II Floppy Disk Systems • • • • • 5.1-3
5.25" Floppy Disk Systems • 5.1-4
FFORMAT •
·
• • •· ·
·
5.1-5The Format Option. • • • 5.1-7
Side Format •
·
• 5.1-7Density • • • • • • • • 5.1-7
Directory Entries • •
· ·
• • •·
• • • • • 5.1-8The Check Option •
·
• • • 5.1-9Micropolis Winchester Hard Disks
·
•·
5.2-10Description • 5.2-10
WFORMAT • • •
·
• 5.2-11Fujitsu Winchester Hard Disks.
.
• 5.3-13Description •
· ·
5.3-13FUJFMT.
·
•·
5.3-15Mini Winchester Hard Disks
·
5.4-19Descr iption •
· ·
5.4-19WINFMT5 •
·
•.
·
·
·
5.4-20The Check Only Option 5.4-21
SOCTION PAGE
Cl\RTRI]X;E TAFE SYSTEMS. • • • • 6.1-1
Description • • • • • 6.1-1
Testing the cartr idge Tape System
·
• • • 6.1-2 Invoking orIP • • • • • • • • • • 6.1-2 11I'IP Options • • • • • • • • • • • • • • • • •.
• • 6.2-3 Save Set Feature • • • • • • • • • • • • • 6.2-5 Examples • •.
• • • • • • • • • • • 6.3-6Executable Instruction File. • • 6.4-10
Error Messages • • • • • • 6.5-12
~P Error Messages
·
• 6.5-12Tape Abort Errors • • • • 6.5-12
Preventive Maintenance • • • • • • 6.5-13
Technical Data. • • • • 6.7-15
Tape Record Format. • • • 6.7-15
cartridge Drive Data Format. • • 6.7-16
00-100, DZ-80B I/O Connection • 6.7-17
(DPnH; DATA: BACKUP • •
·
• • • • 7.0-1BACKUP versus PIP • 7.1-3
Invoking BACKUP •
· ·
• • 7.1-3Copying from Hard Disk to a Floppy Disk Set 7.3-4
Choosing Track or File Mode • 7.3-5
File by File Copy • 7.3-5
Restoring File by File, Flopp'! Disk Set
to Hard Disk. • • 7.3-7
Track by Track Copy •
· ·
7.3-8Restoring Track by Track, Floppy Disk Set
to Hard Disk. • • • • • • • • • • 7.3-9 Copying Between Like Devices • • • • • • 7.4-10
Floppy Disk to F1opp'! Disk Copy • • • • • 7.4-10 Hard Disk to Hard Disk Copy • • •
·
• • • • • 7.4-11 Error Messages.
•·
•·
•·
• • • • •·
7.5-12mINlER AND <DNSOLE a:>NNFrrIONS • 8.2-1
Introduction • • • • 8.2-1
Pin Assignments • • 8.2-1
Serial Ports. 8.2-2
Parallel Ports. • 8.2-2
Standard Devices.
·
• • 8.2-3Consoles • • • 8.2-3
Printers • • 8.2-4
A1JVAlDD FEA'lURES • • • • 9.1-1
Interrupts • • • • • •
· ·
• • • 9.1-1Flags • • •
.
• • •· ·
• • •·
• 9.2-3APPENDICES
A. Memory Board SWitch Settings
·
• • A-IB. utility S1JIIlIlary •
·
• B-28INIroPUCl'ION 008 5 Features
1.9 m.IroIXJC.rrON 1.1 IDS 5 Features
DOS 5 is Dynabyte's new multi-user, multi-tasking operating system. OOS 5, based on the Digital Research MP/M II operating system, allows up to seven consoles (16 consoles when special re-entrant programs are run) and up to 16 printers to be attached to a single Qynabyte computer. Any Qynabyte computer with a minimum of 64K of memory can run
ros
5. '!his includes our 5.25" floppy disk drive system all the way up to our 45 megabyte Winchester hard disk system.OOS 5 also allows multi-tasking." Multi-tasking permits a single operator, from a single console, to perform up to seven sep:lrate tasks on one computer.
Dynabyte has enhanced the Digital Research MP/M II operating system with several unique features. We've also completely interfaced it with all of our hardware. Expanding the system to include more printers, memory, disks or terminals requires only a simple installation step.
We have not altered the MP/M II operating system in any way. You can use every facility available in the Digital Research MP/M II manuals. But we have enhanced the XIOS and added features that go beyoril the normal capabilities of
MP/M II.
• COmplete hardware interface and support
We have interfaced OOS 5 to a wide range of peripheral devices, such as our a-port serial board, our CPU serial and parallel ports, all of our floppy disk drives (5.25" and a"), and all of our Winchester hard disk systems
(5.25n and an).
• DYNASYS -- the systan installation program
DYNASY8, with menu selection for system features, makes system generation and configuration a lot easier. You can select individual menu items, or the DYNASYS program can automatically guide you through the entire process of defining a system.
1.2 Scope of this Manual
This manual is your guide to using all the features of the DOS 5 operating system. It is not intended to be a replacement for the Digital Research MP/M
II manuals. You are strongly urged to read the l-1.P/M II manuals BEFORE using OOS 5.
INIroPUCTIQN 008 5 Features
The manual consists of nine sections and three appendices as follows:
1. Introduction
2. Getting started: Copying and Installing OOS 5 3. System Definition and Contigura tion
4. '!be Boot ROM
5. Formatting and Configuring Disks 6. cartridge Tape Systems
7 • Copying Data: BACKUP
8. Printer and Console Connections 9. Advanced Features
Appendix A. Memory Board SWitch Settings Appendix B. Utility SllIl'II'Iary
Appendix C. User IS Canments Form
The following paragraphs descr ibe the general purpose and content of these sections.
Introduction
This section contains general information about OOS 5, including its features and options. It also describes the manual's overall scope and documentation conventions used.
Getting Started:
cOI¥in9
and Installing OOS 5The second section contains procedures that are specially written to get you started with your new Dynabyte operating system, OOS 5. This section tells you how to copy the OOS 5 distribution media (i.e., floppy disks or cartridge tape) -- a task you should do immediately to protect your masters. The sec-tion further explains how to install DOS 5 for the first time on your system.
System Definition and Configuration
The third section provides procedures to define your system and tailor the system to your requirements.
ihe Boot RCM
The fourth section describes the relationship of pynabyte1s ROM series to the
system start-up.
Formatting and Configuring Disks
INrRODUCrION Scgpe of this Manual cartridge'1.ape Systems
Section 6 contains instructions for using cartridge tape media. It also contains procedures for transferring files from the Winchester drive to a cartr idge ta~.
CoP./in9 rata: mv:KDP
Section 7 details the BACKUP program which copies volumes of data to and from disk dr i ves.
Printer and Console Cormections
The eighth section tells you how to install printers and terminals with your Dynabyte computer. These instructions include information for choosing a Dynabyte input/output (I/O) ~rt for the printer and terminal.
Advanced Features
This last section provides information and instructions for advanced Dynabyte users to program their own user I/O modules. It lists interrupt vectors and flags used by rus 5 as well as additioral information for advanced users.
Appendix A
Appendix A illustrates for systems with one to seven memory boards: the correct responSes to DYNASYS and the correct setting of the switches on the memory boards. These switches define memory placement within the DOS 5 system. Appendix A also provides a memory map for each system.
~ndix B
Summarized in Appendix B are all rus 5 utility programs and the function of each.
Appendix C
INI'RQDUCTION Documentation Conventions
1.3 Doct.m:entation Conventions
The terms in this manual are consistent with those used in the microcomputer industry. If you are new to microcomputers, we recommend you read Dynabyte's Getting started Guide. You may also acquire one of the many good texts on basic computer concepts and terms. These texts are widely available at computer and electronic hobbyist stores.
Most conventions used in this manual are also consistent with those used throughout the industry. mus manual does, however, use several conventions unique to Dynabyte. The following paragrap~ describe these conventions.
Screen Displays
This manual contains many illustrations of console screen displays. These displays are shown in bold type and capital letters.
User Entries
In these illustrations, entries you make at your console keyboard are underlined and are in bold face. For example, a typical screen display with your keyboard entry would apJ;ear as:
9A>Dm<CR>
mPXIW AND INSTALI,IW DOS 5 Introduction
2.9 CDPYIm AND ~ OOS 5
This section describes how to duplicate the original flo~ disks or cartridge
ta~ containing OOS 5, and how to install OOS 5 on your Dynabyte computer. If 005 5 resides on a cartridge tape, you should skip to Section 2.6 for complete instructions. The following discussion pertains only to operating systems shipped on floppy disks.
When the Dynabyte computer arrives, it contains no installed software; OOS 5 is shipI;ed on floppy disks (or cartridge tape). The Dynabyte OOS 5 distribu-tion disks contain the complete operating system, and you can boot from any disk. See Section 4, THE BCXJT ROM, for more infornation on booting.
When DOS 5 is first booted from one of the distribution disks, Drives A through D are assigned as floppy drives, Drives E and F are assigned to the Mini Winchester, and Drives G and H are assigned to the Fujitsu Winchester. This can be seen from the following list of disk drive assignments, as it would app:ar using the DYNASTAT command:
IDISK DRIVE
I
I
ASSI~I
I I
I A:Fl I
I
B:F2I
I C:F3 I
I D:F4 I I E:MINIl I
I F:MINI2 I I G:FOJl I
I H:F0J2 I
It is very important that you do not make any changes to any of the distribution disks. IMMEDIATELY MAKE A mFY OF ALL DIS'IRIBUTION DISKS, AND STORE THE ORIGINALS IN A SAFE PLACE. Should you incorrectly describe your operating system while reconfiquring it, you would not be able to boot from the disk on which you ran the DYNASYS. The only way to recover would be to start over, using the unaltered distribution disks.
'!hese installation procedures include formatting the disk dr ives. When a hard disk drive or a floppy disk is formatted, any data that was stored on it is erased. Therefore, do not use these installation instructions if you already have data on your hard disk •. You should first copy any data you want to save onto backup floppy disks. Then you can format the hard disk without losing inforrration.
Memory Boards
COPYIW AND INSTALLINJ 008 5 Introduction
When you use the Create System Disk (CD) option in DYNASYS, you cannot accept the GENSYS defaults. Type liN" at the prompt liDo You Want to Accept All the Default Parameters in Gensys (yiN) 1" and you will enter into the GENSYS program. Use the appropriate responses given in Appendix A to enter Memory Segment table values.
Complete instructions for duplicating and installing DOS 5 are presented sep:irately for each of the following computer system types:
f.'lETHOD DESCRIPrION OF COvlRJTER SYSI'E'11
1 Two 5.25" floppy dr i ves See Section 2.1
2 Two 8" floppy drives See Section 2.2
3 5.25" Mini Winchester with one 5.25" floppy drive See Section 2.3
4 5.25" Mini Winchester with one 8" floPRl dr i ve See Section 2.4
5 8" Fujitsu Winchester with one 8" floppy drive See Section 2.5
6 Winchester hard disk with cartridge tape drive See Section 2.6
DYNABYTE
ttDDEIS
5200
5300 5305 5400
5505
5605
5615
COPYIro AND INSI'ALLIW
ooS
52.1 l-k>del 5209
Two 5.25" floppy drives Qynabyte Model 5200
Model 5200
METOOD 1 OVERVIEW
• Boot DOS 5 from Distribution Disk #2. (Disk #2 contains the FORMAT and BACKUP utilities which you will use.)
• Format three floppy disks.
• Copy the DOS 5 distribution disks.
COPYIl\ti AND INSTALLIN3 DOS 5 Model 5200
---~---Boot DOS 5 from Distribution Disk #2.
1. Turn on the computer.
2. Insert Distribution Disk #2.
3. Press and release the reset button.
DYNABY'.IE OOS 5.XX
SA>
Insert Distr ibution Disk #2 into the left floppy drive. drive "A", and close the door. (Insert a 5.25" floppY disk so that its label faces the computer power switch.)
DOS 5 will automatically be read into the computer. The system will then sign on with the following message:
The ileA)" prompt indicates that OOS 5
is "logged" onto logical drive "A", and is ready for additional commands.
CQPYIro AND INSTALLING OOS 5 Model 5200
---,---Format three floppy disks.
1. Use FFORMAT to format three floppy disks.
DYNABYTE FIDPPY DISK FORMAT t11'ILI'lY
VERSION X.X FOR OOS S.xx
ERl'ER 1 - TO USE FIRST FIDPPY DRIVE 2 - 'ID USE SEXXH> FIDPPY DRIVE .3 - TO USE THIRD FUlPF.l DRIVE 4 - TO USE EOORIH FIDPPY DRIVE
Enter "FFORMAT" followed by a carriage return. FFORMAT will sign on with the following prompt:
FIDPPY DISK DRIVE 'IO USE (1,2,3 OR 4) ? 2<CR>
Enter "2" followed by a carriage re-turn to specify the second floppy drive. Depending on your computer system's drive type, you will then receive one of the following messages:
DRIVE 2 IS A Sm:;[.E SIDED 5 1/4 nDI DRIVE DRIVE 2 IS A IXllBLE SIDED 5 1/4 IlDI DRIVE
00 YClJ 'WARr 'lU:
F - FORMAT C - cmx:::K
Q - ClJIT
YaJR SEf·OCTION ? F<CR>
SIDE FORMAT SELOCTION
1 - FOR SDIiLE SIDED
2 - FOR IXlJBLE SIDED
RE'1URN - FOR SDIiLE SIDED
FFORMAT will then ask what function you would like to J;erform:
Enter "F" followed by a carriage return to indicate FORt-tAT.
mpyI~t2 AND INSTALLlOO OOS 5
SIDE FORl-.1AT ? 1<CR>
WMBER OF DIP~ ENmIES
1 -FOR 64 mmIES 2 - FOR 128 ENrRIES 3 - FOR 256 ENmIES
RE'lDRN - FOR 64 ENTRIES.
t
OF DIRECTORY ENTRIES ? 2<CR>Model 5200
Enter "1" followed by a carriage return to indicate single-sided.
All 5.25" floppy drives are automati-cally formatted double-density.
FFORMAT will now ask you to enter the number of directory entr ies to reserve space for on the floppy disk:
Enter "2" followed by a carriage
return to reserve space for 128
directory entries.
FFORMAT will then tell you to insert the floppy disk you want to format into the floppy drive:
rnsERr DISK. HIT ESCAPE
ro
AOORT OR Am 0'mER KEY 'IO BEGm •••....
Insert a floppy disk into the right-hand floppy dr i ve , dr i ve liB" , and close the door.
CAUTION: FFORMAT will erase any data
that exists on the floppy disk.
Also, be sure the floppy disk is not write-protected. You can write on a
5.25" floppy disk if the notch is uncovered.
Enter a carriage return to start the actual formatting process. FFORMAT then tells you it is working and asks you to wait:
~ IS R:Ji BE]l.iI; OONE PLEASE WAIT ••••
If, during the formatting process, FFORMAT finds a bad sector on the floppy disk and is unable to format it, the error will be reported as follows:
HARD ERROR AT 'mACK=XX SECrOR=XX
CDFYlOO AND INSTALLIW OOS 5
*****
FOHMAT cx:MPLE'lED O.K.*****
Model 5200
A damaged floppy disk should be removed and discarded. Start the format process on another floppy disk.
After the floppy disk has been formatted, FFORMAT will confirm its completion and then ask if you want to format another floppy disk:
REPEAT Sl\ME OPERATION ON A NE)l DISK
{YIN>
?Remove the newly formatted floppy disk from floppy drive ''B''.
Enter
"Y"
followed by a carriage return. FFORMAT will then tell you to insert a floppy disk into the drive:ImERr DISK. HIT ESCAPE '10 AOORT OR ANY 0'.1BER KEY
ro
BEmN •••....
*****
~~ COMPLETED O.K.*****
Insert another floppy disk into floppy drive "B", and close the door.
Enter a carr iage return to start the formatting process. FFORMAT tells YOU
it is working and asks you to wait:
Aaain, if FFORMAT renorts a bad sector, the damaged floppy disk should be discarded and the format process tried on another floppy disk.
After the floppy disk has been formatted, FFORMAT will confirm its completion and then ask if you "",ant to format another floppy disk:
REPEAT SNm OPERATION ON A NEW DISK
(YIN>
? Y<CR>Remove the newly formatted floppy disk from floppy drive
"B".
Enter nyuCOFYIW AND INSTALLINJ OOS
5
Model 5200*****
~ COMPLETED O.K.*****
REPEAT SAME OPERATION ON A NFlt DISK (Y/N) ? N<CR>
00 YClJ WAN!' 'ID:
F - E'OIffAT
C - CBEXl{
0- OOIT
YOOR SELEX::TION ? O<CR>
After the third disk has been formatted, enter "N" followed by a carr iage return. FFORMAT will then return to its main
menu:
Enter "Q" followed by a carriage return to exit FFORl1AT and return to the operating system.
Leave the newly formatted floppy disk in floppy dr ive "B".
CQPYlOO AND INSTALLIW DOS 5 Model 5200
Copy the DOS 5 Distribution Disks.
1. Invoke BACKUP.
Enter ~CKUPn followed by a carriage return. BACKUP will then sign on with the following menu and prompt:
***
DYNABYTE BACKUP UTILI'l.Y VER.x.x
IUNNIN:; UNDER MP/M***
F
=
FILE BY FILEropy
T = 'mACK BY 'mACK CDPY
X
=
EXIT it) OPERATIR'; SYS'lDl2. Remove Distribution Disk #2 from flopp'¥ drive nAn.
3. Insert Distribution Disk #1 into floppy drive "A", and close the door.
4. Copy Distribution Disk #1.
SOORCE DRIVE (A - P) ? A(CR>
D&S'rINATION DRIVE (A - P) ? B<CR>
Enter "Tn fOllowed by a carriage
return to indicate a track-by-track transfer from floppy-to-floppy. BACKUP will then ask you to identify the source drive:
Enter "A" followed by a carriage return to specify the left floppy drive as the source drive. BACKUP will then prompt for the destination drive:
Enter "B" followed by a carriage return to specify the right-hand floppy drive as the destination drive. BACKUP will confirm your instructions for the data transfer, and then instruct you to insert the formatted floppy disk into floppy drive "B". SOORCE
=
58 SS DD FIDPPY DIR ENmIES=
9128IlF.STINM'ION = 511
SS DD FIDPPY DIR :mImES = 0128
INl'ERNl\L RAM MEHJRY BUF'FER SIZE = 21249 B!'1.ES
CQPYIN3 AND INSrALLIKG DOS 5
INSERl' FIDPPY DISK .01
m
DRIVE B BIT REmJRN '10<X>N.rllIlE....
~BACKDP a:MPLETE
BIT REmJRN '10 CDN'l'nIJE.... ~
Model 520"
Enter a carriage return to start the actual data transfer. The screen will display a single line of incrementing numbers as BACKUP reads groups of tracks from the source disk and writes groups of tracks onto the formatted destination disk:
When all of the tracks have been copied, BACKUP will report its completion and prompt you to enter a carriage return:
Enter a carriage return. BACKUP will then return to its main menu:
***
DYNABYTE Bl\CKDP U1'ILITY VER. X.X RIJNNI1G UNDER MP/M***
F
=
Fn.E BY FILE <DPY T=
TRACK BY TRACKropy
X
=
EXIT TO ~ SYSI'EMWHICH BACKDP MJDE ?
5. Remove Distribution Disk #1 from floppy drive "A".
6. Remove the new copy of Distribution Disk #1 from floppy drive "B" and label it "Copy -- OOS s.XX Distribution Disk #1 of 3".
7. Insert Distribution Disk #2 into floppy drive "AIf, and close the door.
8. Insert one of the remaining formatted f10nW disk into floPPf drive
"B",
and close the door.
9. Copy Distribution Disk #2.
COPYIW AND INSTALLI$ OOS 5
SWRCE DRIVE (A - P) ? A<CR>
Model 5200
Enter "A" followed by a carriage return to specify the left floppy drive as the source drive. BACKUP will then prompt for the destination drive:
DESTINATION DRIVE (A - P) ? B<CR> Enter
"B"
followed by a carriage return to specify the right-hand floppy drive as the destination drive.SWRCE
=
5· 58 ID FIDPPY DESTINATION,=
5· SS DD FIDPPYBACKUP will confirm your instructions for the data transfer, and then instruct you to insert the formatted floppy disk:
DIR ENmIES
=
9128DIR ENmIES = 9128
lNl'ERNAL RAM MEXlRY WFFER SIZE
=
21249 BYTESI OF SWRCE DISK TRACKS WFF'BRED
=
85lR)ERl' FIDPPY DISK i91 IN DRIVE B
BIT REmJRN 'ID OONTImE.... ~
BACKDP IN PRCX;RESS
BACKDP <nD?LETE
BIT REmJRN 'ID
<DN.rIHJE....
~Enter a carriage return to start the actual data transfer. The screen will display a single line of incrementing numbers as BACKUP reads groups of tracks from the source disk and writes groups of tracks onto the formatted destination disk:
When all of the tracks have been
copied, BACKUP will report its
completion and prompt you to enter a carriage return:
Enter a carriage return. BACKUP will
then return to its main menu:
***
DYNABYTE BACKDP OTILITY VER.x.x
~ UNDER MP/M***
F
=
FILE BY FILE CDP.l T=
TRACK BY TRACK <DPYX
=
EXIT 'lO 0PERAT1}l'; SYS'I'EM10. Remove Distribution Disk #2 from floppy drive "Alf.
CQPYIW AND INSTALLlOO 008 5 Model 5200
label it "Copy - OOS S.xx Distribution Disk #2 of 3".
12. Copy Distr ibution Disk #3 in the same manner as you did for Distr ibution Disk #2.
BIT RRlURN 'lD
<DNrINOE ••••
~When BACKUP has finished copying Disk #3. enter a carriage return to return to the main menu:
***
DY'NABYTE BACKUP tlTILI.T!' VIm.x.x
RI.JNNIH:; UHER MP/M***
F=
FILE BY FILE roPYT
=
~CK BY TRACK ~X
=
EXIT '10 OPERATIm SYSTEMWHICH BACKUP "IDE ? X<CR> Enter
"X"
followed by a carriage return to exit BACKUP and return to the operating system.13. Remove Distribution Disk #3 from floppy drive "A".
14. Remove the new coPy of Distribution Disk #3 from floppy drive ''B'' and label it "Copy - OOS S.xx Distribution Disk #3 of 3".
copyrNJ AND INSTALI,IK2 OOS 5 Model 5305
2.2 M:>del 5305
Two S" flopP.l dr ives
Qynabyte Models 5300, 5305, 5400
METOOD 2 OVERVIEW
• Boot DOS 5 from Distribution Disk #1. • Format two floppy disks.
• Copy the DOS 5 distribution disks.
CQP¥IW AND INSTALLIN;; DOS 5 Model 5305
Boot DOS 5 from Distribution Disk
#1-1. Turn on the computer.
2. Insert Distribution Disk il.
3. Press and release the reset button.
DYNABYTE OOS 5.XX
9A>
Insert. Distribution Disk #1 into the left (or top) floppy drive, drive "An,
and close the door. (Insert an 811
floppy disk with its label face up.)
OOS 5 will automatically be read into the computer. The system will then sign on with the following message:
The
""A>"
prompt indicates that DOS 5 is "logged" onto logical drive "AIf,
and is ready for additional commands.
COPYIN3 AND INSTALLING DOS 5 Model 5305
Forma t bvo flop~ disks.
1. Use FFORMAT to format two floPRl disks.
VERSION X.X FOR OOS 5.XX
1 - 'ID USE FIRST FUlPPY DRIVE
2 -
ro
USE SEXDND FIDPPY' DRIVE3 - 'ID USE
mnm
FIDPF.l DRIVE 4 - TO USE EWR'IH FUlPPY DRIVEEnter "FFORMAT" followed by a carr iage return. FFDRMAT will sign on with the following prompt:
FUlPPY DISK DRIVE it) USE (1,2,3 OR 4) ? 2<CR>
DRIVE 2 IS A SnG:.E SIDED 8 lKlI DRIVE DRIVE 2 IS A IXlJBLE SIDED 8 lKlI DRIVE
00 YOO WANT '10:
F-~
C - CHOCK
Q - (lJIT
SIDE FORMAT SELOCTION
1 - FOR SDIiLE SIDED
2 - FOR IXXJBLE SDED
RE'ltJRN - FOR SDIiLE SIDED
Enter "2" followed by a carr iage re-turn to specify the second floppy drive. Depending on your computer system's drive type, you will then receive one of the following messages:
FFORMAT will then ask what function you would like to perform:
Enter "F" followed by a carriage return to indicate FOill,lAT.
copyrtN AND INSTALI,IOO OOS 5
SIDE FORMAT ? 1<CR>
DER)lTY' FORMAT SELOCTION
1 - Felt snG:B IENSl'lY
2 - FOR IXIlBLE DENSITY
RE'1URN - FOR lXlJBLE DENSITY
mMBER OF DIREC'lDRY ENrR:Iffi 1 - FOR 64 ENrRIES
2 - FOR 128 EmBIES
3 - FOR 256 ENrRIES
RE'1URN - FOR 64 ENrRIES
t
OF DIROC'l'ORY ENTRIES ? 2<CR>Model 5305
Enter "1" followed by a carriage return to indicate single-sided.
FFORlvlAT will then prompt for single-or double-density:
Enter a carriage return to indicate double-density.
FFORMAT will now ask you to enter the number of directory entries to reserve space for on the floppy disk:
Enter "2" followed by a carriage
return to reserve space for 128
directory entries.
FFORMAT will then tell you to insert the floppy disk you want to format into the floppy drive:
msER.r DISK. BIT ESCAPE
m
AOORT OR NflY OTHER KEY 'IO BEGIN •••....
Insert a floppy disk into the right-hand floppy drive, drive "B", and close the door.
CAUTION: FFORMAT will erase any data that exists on the floppy disk.
Also, be sure the floppy disk is not write-protected. You can write on an 8" floppy disk if the write-protect notch is covered up.
Enter a carr iage return to start the actual formatting process. FFORMAT then tells you it is working and asks you to wait:
CQPXIK(; AN[) INSTALLI~ 008 5
BARD ERROR AT 'mACK=XX SlOC!'IDR=XX
Model 5305
If, during the formatting process, FFORMAT finds a bad sector on the floppy disk and is unable to format it, the error will be reported as follows:
***
1 ! 1 BAD DISKE1'rE REEt.ACB wrm A NEJf ONE 111***
*****
~ COMPLETED O.K.*****
A damaged floppy disk should be
removed and discarded. Start the
format process on another floppy
disk.
After the floppy disk has been formatted, FFORMAT will contirm its completion and then ask if you want to format another floppy disk:
REPEAT Sl\ME OPERATION ON A NEJf DISK (YIN) ?
Y<CR>
Remove the newly formatted floppy disk from floppy drive "B".
Enter nyu followed by a carriage
return. FFORMAT will then tell you to insert a floppy disk into the drive: INSERT DISK. HIT FS'APE '10 AOORT OR ANY 0'mER KEY' 'lO BmIN •••
....
Insert another flop~ disk into flop~
drive "Bn, and close the door.
Enter a carriage return to start the formatting process. FFORMAT tells you it is working and asks you to wait:
FORMATrl}I; IS !Of BEIX; OONE PLFASE WAIT ••••
*****
~ COMPLETED O.K.*****
Aqain, if FFORMAT reports a bad sector, the damaged floppy disk should be discarded and the format process tried on another floppy disk.
After the floppy disk has been formatted, FFORMAT will confirm its completion and then ask if you want to format another floppy disk:
CQPYlOO AND INSTAI,LIW OOS 5
00 YOO WANr '1D:
F - FORMAT
C - cmx::K
Q - (lJIT
YaJR SEUC1'ION ? O<CR>
MQdel 5305
Enter "N" followed by a carriage return. FFORMAT 'Vlill then return to its main menu:
Enter "Q" followed by a carriage return to exit FFORMAT and return to the operating system.
Leave the newly formatted floppy disk in floppy dr ive "B".
CQPY-In; AND INSTALLIn; pas 5 Model 5305
Copy the DOS 5 Distribution Disks.
1. Insert Distribution Disk #2 into flopp'! drive "A", and close the door.
2. Invoke BACKUP.
Enter "BACKUP" followed by a carriage return. BACKUP will then sign on with the following menu and prompt:
***
DnW3Y'1'E Bll£KDP UTILr.I.'Y VER. X.X :mJNN]}I; UNDER MP/M***
F
=
FILE BY FILE <DP.l T=
'mACK BY 'mACK <DPYX
=
EXITro
OPERATDG 5"!SrmWHICH Bll£KDP KDE ?
3. Remove Distribution Disk #2 from floppy drive "An.
4. Insert Distribution Disk 11 into floppy drive "A", and close the door.
5 • Copy Distr ibution Disk 11.
tm:CB Bll£KDP ~ ? T<CR>
SOORCE DRIVE (A - P) ? A<CR>
DESTINATION DRIVE (A - P) ? B<CR>
Enter "T" followed by a carriage return to indicate a track-by-track transfer from floppy-to-floppy. BACKUP will then ask you to identify the source drive:
Enter "A" followed by a carriage return to specify the left floppy drive as the source drive. BACKUP will then prompt for the destination drive:
Enter "B" followed by a carriage return to specify the right-hand floppy drive as the destination drive.
BACKUP will confirm your instructions for the data transfer, and then
mPYIW AND INSTALLIW OOS 5
SCXJRCE
=
88 55 DD FIDPPYDESTINATION
=
S-ss
DO FIDPPYDIR ENIRIES
=
9128 Dm ENmIES=
9128Model 5305
INl'ERNAL RAM MEX)RY WOE'FER SIZE
=
21426 BYTESt
OF SCDRCE DISK TRACKS BDFFERED = 83 lmERr FIDPP! DISK 181m
DRIVE BHIT REIURN
ro
OON.rnl.1E.... ~BIT REIURN
ro
<DN!'IR1E.... ~Enter a carriage return to start the actual data transfer. The screen will display a single line of incrementinq numbers as BACKUP reads groups of tracks from the source disk and writes groups of tracks onto the formatted destination disk:
When all of the tracks have been copied, BACKUP will report its completion and prompt you to enter a carriage return:
Enter a carriage return. BACKUP will then return to its main menu:
***
DYNl\BYTE BACKUP UTILrlY VER.x.x
RIJNNnl'i UNDER MP/M***
F
=
FILE BY FILE (DPYT
=
TRACK BY TRACK COPY X=
EXITro
OPE:RATIR; SYST.E}1WHICH BACKUP KDE ?
6. Remove Distribution Disk #1 from flopl?{ drive "An.
7. Remove the new copy of Distribution Disk #1 from floppy drive liB" and label it "Copy -- ros 5.:X..x Distribution Disk #1 of 2".
8. Insert Distribution Disk #2 into floppy drive "AIf, and close the door.
CDPYIKG AND INSTALLIK; DOS 5
10. Copy Distribution Disk #2.
saIRCE DRIVE {A - P} ? A<CR>
D&S'rINATIOO DRIVE (A - P) ? B<CR>
Model 5305
Enter a liT" followed by a carriage return to once again indicate a track-by-track transfer from floppy-to-floppy. BACKUP w ill then ask you to identify the source dr ive:
Enter
"A"
followed by a carriage return to specify the left floppy drive as the source drive. BACKUPwill then prompt for the destination drive:'
Enter nB" followed by a carriage return to specify the right-hand
fl~pp.y drive as the destination drive.
BACKUP will confirm your instructions for the data transfer, and then instruct you to insert the formatted floppy disk:
saIRCE = X· SS DD FUlPPY DIR mmIES = 9128 D&S'rINATION
=
X· SS DO FUlPPY DIR mmIES=
8128INrERNAL IWI MEK>RY BOE'E'ER SIZE = 21426 BY'IES
t
OF saIRCE DISK TRACKS BJFE'ERED = 83nm:RT FIDPFY DISK IB1 IN DRIVE B
BIT RE'lURN '10
<DNl'DIJE....
~Enter a carriaqe return to start the actual data transfer. The screen will display a single line of incr ementing numbers as BACKUP reads groups of tracks from the source disk and writes groups of tracks onto the formatted destination disk:
When all of the tracks have-been copied, BACKUP will report its completion and prompt you to enter a carr iage return:
Enter a carriage return. BACKUP will then return to its main menu:
CQPYIR; AND INSTALLIN:i OOS 5
F
=
FILE BY FILE OOPYT
=
TRACK BY TRACK OOPYX
=
EXIT 'lO QPERATIK; SYS'lDt tmICI Bf\CKDP lUlE ? X<CR>Model 5305
Enter
"X"
followed by a carriage return to exit BACKUP and return to the op:rating system.11. Remove Distribution Disk #2 from floppy drive "A".
12. Remove the new copy of Distribution Disk #2 from floppy drive "B" and label it "Copy - OOS 5.xx Distribution Disk #2 of 2".
mPYIW AND INSTALI,IKa DOS 5
2.3 !b3el. 5595
5.25" Mini Winchester with one 5.25" floppy drive Qynabyte Model 5505
Model 5505
When the 5505 computer arrives, the Mini Winchester contains no installed software; DOS 5 is shipped on three floppy disks. You must, therefore, initially boot DOS 5 from one of the floppy disks. The 5505 can. however, easily be configured to boot DOS 5 from the Mini Winchester, and normally
ooS
5 is transferred to the Mini Winchester and run from there. BootingooS
5 from the Mini Winchester is faster and more convenient than booting from floppy disks.The procedure below describes how to copy the DOS 5 software, and how to configure DOS 5 to boot from the Mini Winchester. This procedure will
con~igure the computer into six logical drives (you may have use of only three, depending on your model type): The Mini Winchester will be assigned to logical drives "A" and "B", and the floppy drives will be assigned to logical drives nCR through "F". Even though Model 5505 has only one floppy disk drive, we recommend assigning four drives as floppy drives -- one for the current system and three more to make it easy for you to add more floppy drives to your system. Drives "A" and nan will be of equal capa.city. You may wish to later reconfigure DOS 5 in some other manner. This procedure only describes a standard first-time installation.
ME'mOD 3 OVERVIEW
• Boot OOS 5 from Distribution Disk #2. (Disk #2 contains the WINFMTS utility which you will use.)
• Format the Mini Winchester.
• Copy the
ooS
5 files from the distr ibution disks onto the r.-lini Winchester. • Format three floppy disks.• Copy the
ooS
5 loading files to the formatted floppy disks.• Copy the
ooS
5 files from the Mini Winchester to the "bootable" floppy disks.• Install DOS 5 onto the Mini Winchester.
CQPYIW AND INSTALLI!\G OOS 5 Model 5505
---Boot DOS 5 from Distribution Disk #2.
1. Turn on the computer.
2. Insert Distribution Disk #2.
3. Press and release the reset button.
DYNABYTE
ros
5.XXSA>
Insert Distribution Disk #2 into the floppy drive, and close the door. (Insert a 5.25" floppy disk so that its label faces the computer power switch.)
DOS 5 will automatically be read into the computer. The system will then print the load map and sign on with the following message:
The "0A>" prompt indicates that
ros
5 is "logged" onto logical drive "A", user number 0, and is ready for addi tional commands.CQPYltN AND INSTALLIW DOS 5 Model 5505
Format the ~1ini Winchester.
1. Use WINEMl'S to format and check the 5.25" Mini Winchester.
8A>JfINIMJ5<CR> Enter "WINFMTS" followed by a carriage
return. WINFMTS will then sign on with the following menu and prompt:
*********
DYNAB!TE 5.258 BARD DISK EUlH\T VERSION X.XX FOR. Im 5.XX********
CD} CHB::K ~ Fe} EUlH\T AND <lJEX:K
EX} RmtJ.RN 'ID 0PER.ATllG SiSrEM YOOR SELECrION: FC<CR>
•••••••••••••••••••••••••••••••• ••••••••••••••••••••••••••••••••
...
...
Enter "Fe" followed by a carriage return. WINFMTS will tell you that it has begun the formatting process, and then slowly display several rows of dots on the screen:
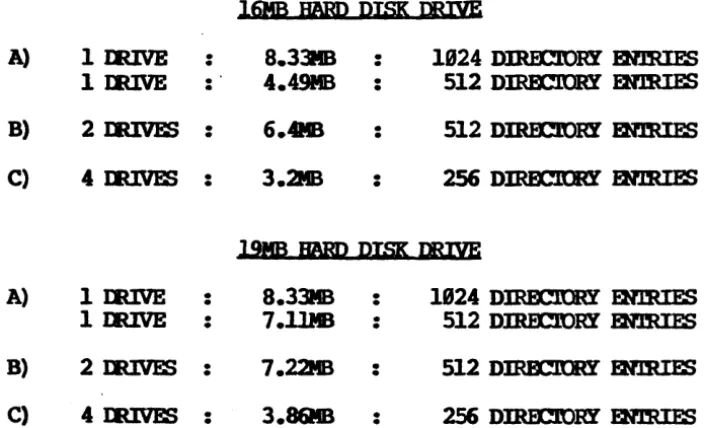
When WINFMTS has finished formatting the Mini Winchester, it will confirm its completion and then prompt you to choose a drive configuration:
CDNFIGJRATION OPl'IONS
16MB BARD DISK mIVE
A} 1 mIVE
·
·
8.33 MB·
·
1924 DIRI£lORY ENlRIES 1 mIVE·
·
4.49 MB·
·
512 DIRECroRY ENlRIESB} 2 IIUV&S
·
·
6.4 Me·
·
512 DIRJ£'1ORY ENlRIESC) 4 IIUV&S
·
·
3.2 MB·
·
256 DIRECroRY ENlRIESCQPYIN:a AND INSTALLIKG OOS 5
••••••••••••••••••••••••••••••• ••••••••••••••••••••••••••••••• ••••••••••••••••••••••••••••••• •••••••••••••••••••••••••••••••
1) 2)
6) 7)
11) 12)
16) 17)
21) 22)
26) 27)
31) 32)
36) 37)
41) 42)
46) 47)
51) 52)
56) 57)
Model 5505
Enter a "Bit followed by a carriage return to select dr ive conf iguration "B". Note that if you later change this configuration, you must reformat the hard disk, which erases all data stor ed on it.
WINFMT5 will tell you that it has begun -the checking process, and then slowly display several more rows of dots on the screen:
After the drive has been formatted and checked, the bad track table will be displayed. Do not be alarmed; this display requires no action. The WINFMT5 program automatically scans the Mini Winchester for bad tracks, places these in tables, reports them to DOS 5, and substitutes good tracks
in their place.
BAn TRACK TABLE
3)
I
4) 5)8)
I
9) 19)13)
I
14) 15)18)
I
19) 29)23) I 24) 25)
28) I 29) 30)
33) I 34) 35)
38)
I
39) 48)43)
I
44) 45)48) I 49) 50)
53)
I
54) 55)58 I 59) 69)
~****" (LOOICAL BAD 'mACK RJMBER)
-H*,C***"
(BFAD, CYL.DIER mMBER)ENrER ONE OF mE NYNE OP1'IONS OR <RE'lURN> 'ID ACCEPl': ~
COPXIW AND· INSTALLIN;
nos
5CBfl:K <DtPIB.l"ED O.K.
Model 5505
WINF~lT5 will conf irm its completion of the check process and then prompt you to enter a carriage return:
mESS <RE'lURN>
ro
DISPLAY MEHl. ~Enter a carriage return. WINFMTS will then return to its main menu:
*********
DYNABn'E 5.25- BARD DISK FOBMAT VERSION X.XX Em IX>S 5.XX********
<D) CBfl:K ONLY
Fe) FOBMAT AND cmx::K
EX) REWRN 'lD ()PERATJK; smI'E)t
COpyIN2 AND INSTALLlOO OOS 5 Model 5505
---,
Copy the OOS 5 files from the distribution disks onto the l/dni Winchester.
1. Use PIP to copy the files from Distr ibution Disk #2 to the Mini Winchester.
8A>PIP E:=A:
*.
*
[00 <CR> Enter "PIP E:=A:*.* [OV] n followed by acarriage return. PIP will display the name of each DOS 5 file as it is copied from Distribution Disk #2 to the Mini Winchester, and then automa-tically return you to the operating system.
2. Remove Distribution Disk #2 from the floppy drive. Insert Distribution Disk #1 into the floppy drive, and close the door. Reset the floppy drive.
Enter IfDSKRESET" followed by a carriage return to inform the operating system that you have changed floppy disks.
3. Use PIP to copy the files from Distribution Disk #1 to the Mini Winchester.
8A>PIP E:=A:
* . *
[OV] <CR> Enter "PIP E:=A:*.* [OV] If followed by a carriage return. PIP will display the name of each DOS 5 file as it is copied from Distribution Disk #1 to the Mini Winchester, and then automa-tically return you to the operating system.4. Remove Distribution Disk #1 from the floppy drive. Insert Distribu-tion Disk #3 into the floppy drive, and close the door. Reset the floppy dr i ve:
5. Use PIP to copy the files from Distribution Disk #3 to the Mini Winchester.
9A>PIP E:=A:
*. *
roo
<CR>CPPXIW AND INSrAI,LIW OOS 5 Model 55Q5
Format three floppy disks.
1. Log onto the Mini Winchester.
8A)B:<CR>
BE>
Enter "E:" followed by a carriage return to log onto the Mini Winchester.
The "0E>" prompt signifies that drive "E" is the current drive, and that OOS 5 is ready for additional cOnuruinds.
2. Use FFORMAT to format three floppy disks.
VERSION
x.x
FOR OOS S.xx1 - 10 USE FIRST 'FUlPPY DRIVE
2 - 'lO USE sm:Hl FIDPPY DRIVE
3 - 10 USE 'lBIRD FUlPPY DRIVE 4 - 10 USE EUJRIB FUlPPY DRIVE
Enter "FFORMAT" followed by a carriage return. FFORMAT will sign on with the following prompt:
FUlPPY DISK DRIVE
m
USE (1,2,3 OR 4) ? 1<CR>Enter "1" followed by a carriage return to specify the floppy drive. Depending on your computer system's drive type, you will then receive one of the following messages:
DRIVE 1 IS A Sna.E SIDED S 1/4 DOl DRIVE DRIVE 1 IS A TXXJBT,E SIDED S 1/4 lKlI DRIVE
00 YOO WAN!' ID:
F - F<DIAT
C -
am:x
Q - (J)IT
FFORMAT w ill then ask what function you would like to perform:
COpylt-N AND INSTALLIW OOS 5
SIDE FORMAT SELEX!I'ION
1 - FOR SIK2LE SIlB)
2 - FOR IXlJRr·E SIDED RF:lURN - FOR SIK2LE SIlB)
SIDE FORMAT ? 1<CR>
RJMBER OF DImr.IDRY ENmIES
1 - FOR 64 ENmIES
2 - FOR 128 mmIES
3 - FOR 256 ENTRIES
RF:lURN - FOR 64 ENTRIES
t
OF DIRECroRY ENTRIES ? 2<CR>Model 55~5
If the drive is double-sided, FFO~~T
will then ask whether you want one or both sides formatted:
Enter "1" followed by a carriage return to indicate single-sided.
All 5.25" flopp'! drives are automati-cally formatted double-density.
FFORMAT will now ask you to enter the number of directory entries to reserve s};8ce for on the flopp'! disk:
Enter "2" followed by a carriage return to reserve space for 128 directory entries.
FFORMAT will then tell you to insert the floppy disk you want to format into the floppy drive:
IR3ERl' DISK. HIT ESC'APE
m
AOORT OR ANY amERKEY
'ID BOOm •••••••
Insert a floppy disk into the floppy drive, and close the door.
CA.UTION: FFORMAT will erase any data that exists on the floppy disk.
Be sure the floppy disk is not write-protected. You can write on a 5.25" flopp'! disk if the notch is uncovered. Enter a carriage return to start the actual formatting process. F FORM AT then tells you it is working and asks you to wait:
carow
AND INSTALLItN OOS 5BARD ERRCR AT ~=:XX SECIDR=XX
Model 5505
If, during the formatting process, FFORMAT finds a bad sector on the floppy disk and is unable to format it, the error will be reported as follows:
***
111 .JW) DIS.<E'l-m ~wrm
A !D OOE 111***
*****
POBMAT <IMl.'IB'lm O.K.*****
A damaged floppy disk should be
removed and discarded. start the
format process on another floppy
disk.
After the floppy disk has been formatted, FFORMAT will confirm its completion and then ask if you want to format another floppy disk:
REPEAT SAME OPERATION ON A NEJf DISK (YIN) ? Y<CR>
Remove the newly formatted floppy disk from the floppy drive.
Enter
"y"
followed by a carriage return. FFORMAT will then tell you to insert a floppy disk into the drive:lmERT DISK. BIT F..TAPE '10 AOORT OR ANY omER KE! it) BmIN ••• ~
••••
Insert another floppy disk into the floppy drive, and close the door. Enter a carriage return to start the formatting process. FFORMAT tells you it is working and asks you to wait:
FOBMATrllG IS RJf BEnG JXItIE Pr..FASE WAIT ••••
*****
FOBMAT <IMl.'IB'lm O.K.*****
Again, if FFORMAT reports a bad sector, the damaged floppy disk should be discarded and the format process tried on a another disk.
After the floppy disk has been formatted, FFORMAT will confirm its completion and then ask if you want to format another floppy disk:
REPEAT SAME OPERATION ON A NEW DISK (YIN) ? Y<CR>
mFYltli AND INSTALLlOO OOS 5
*****
~ CCMP.LETED O.K.*****
Model 5505
carriage return to repeat the formatting process.
REPEAT SAME OPERATION ON A NEW DISK (Y/N) ? N(CR>
00 YOO WAN!' '10:
F-~
C - CBEX:K
Q - (XJIT
YOOR SELECrION ? O<CR>
BE)
Enter "N" followed by a carriage return. FFORMAT will then return to
its main menu:
Enter "Q" followed by a carriage return to exit FFORMAT and return to
mpxlt'N AND INSTAU,IMi DOS 5 Model 5505
---Copy the
ooS
5 loading files to the formatted floppy disks.1. Use DYNAGEN to copy the 005 5 loading files to the outer two tracks of the newly formatted floppy disks.
Enter ~~ followed by a carriage
return. (You are still logged onto the Mini Winchester on drive "E".) DYNAGEN will then sign on with the following menu and prompt:
lJYNPJGEN VERSIal X.XX FOR
onmsr.m
OOS 5.XXGENERATE S!SI'£M DISK
m)
'D'WH'ER StSlDt F1U4 ONE DISKm
AK1.I.1IERCor) ~ SiStEK USIK;
-.<lB-
JlXn' FILEEX) EXIT IJ!NPQN
~ SELFX