Appendix A
Appendix A Introduction
[image:2.595.38.562.451.723.2]Appendix B Introduction
Figure 3: Capture devices used by both Hybrid Design Tools, the
LFDS and NXt. Whenever the button or pedal is pressed the HDT
[image:3.595.173.432.264.385.2]creates a snapshot from the camera’s live feed.
Figure 4: Design constrains (metaphors). From left to right a motor
block, fuel cells and a set of wheels. These were provided within
[image:3.595.320.495.482.705.2] [image:3.595.85.241.486.714.2]Appendix C
Experiment
[image:4.595.247.560.74.738.2]Left a screenshot of the questionnaire made with surveymonkey.com [18]. A translation of the survey is available in Appendix D (below). Participants used a laptop to provide answers. Questions 3, 4, 7, 8 & 10 allowed the participants to write feedback. The feedback is translated from Dutch to English in Appendix E. Obtained data is available in Appendix F. A better visualization of the data is presented in
figure 2.6 of the Experiment section.
Translation of the questionnaire;
Q1, On which device did you start?
Q2, Did you had any previous experience with these tools?
Q3, Are the numpad and touch similar in features and functions?
If not, what did you miss on input?*
Q4, On which of the two devices you spend more time watching the screen?
Can you discover a difference and is the placement of the screen of influence:*
Q5, Which capture device did you use most often on the LFDS?
Q6, And on the NXtLFDS(Touch)?
Q7, Which of the two devices will stimulate a 3D approach more over the other.
Room for comments:*
Q8, The selecting and grouping of iterations in the review screen related to:
-Speed -Overview -Ease
Room for comments:*
Q9, I found the tool easy to use: -LFDS
-NXtLFDS(Touch)
Q10, Which of the devices will better stimulate creativity and intuition?
Room for comments:*
Q7, Which of the two devices will stimulate a 3D approach more over the other.
The device did not had any influence on stimulating 3D work. The tools provided will have a bigger influence and the pedal. Because of the pedal you can keep your hands clear to place items in perspective.
Even when using the screen to capture you can keep track on the place-ment of the object.
When creating 3D on the NXt it was easier to not get your hands on the image.
More space underneath the screen so more space to create 3D.
Because the screen being so close with the NXT you got the feeling that you had less free space in modeling.
The touch gave the feeling being more in control in what happens on the screen.
With the nxt your hands were less often onscreen, this made it easier to adjust objects in rotating and lifting. This is probably due to the camera being a bit closer to the workbench.
More tool needed to be able to make more standard figures like triangle cubes circles etc. Also some tool to make more complicated figures. On the LFDS getting the right perspective was easier because you could watch your hands in front of the screen. With the NXT you had to move your hands more blinded and this made creating a perspective a bit more challenging.
Working in 3D can be quite difficult because you have to hold your hands still without some attributes to be able to hold figures in place.
Being able to use the depth of the camera to create perspective was not clear at first hand.
Q10, Which of the devices will better stimulate creativity and intuition?
All the features on the screen (NXt) are a bit distracting. Also the screen is not very sensitive.
On the LFDS you can work less blinded because the screen is behind the workbench, this gives more overview on how to hold you building mate-rial.
The devices place iterations on top of each other with a multiply blend method. Some experiments could be done with different methods. For example it could be fun to be able to make accents on black backgrounds. This can be done in combination with a lighten/screen blend mode to make light details on a black surface. After some iterations the first iter-ations started disappearing. To bring small details in a sketch more itera-tions are needed. Also an undo button would be nice.
Feeling more free to iterate. (About the NXT) By using your hands you can be more creative.
It was a pity that isolated iterations could not be enlarged. The touch ver-sion will better stimulate because you are only using the device. With the LFDS you will watch the screen less and this causes you to con-centrate more on the figures.
Appendix E
Experiment
Written feedback from the survey, please note that the translation is literal;
Q3, Are the numpad and touch similar in features and functions?
If not, what did you miss on input?
No vertical mirroring, and the ability to remove hands is missing. Numpad gave more control
Touch gives the feeling you can do more with it and is more prominently present.
You look constant onscreen with the nxt and on the lfds you have to look away to be able to control the numpad which gets you out of concentration. On the touch you expect to be able to rotate layers by using two fingers on screen and turn. Or the ability to enlarge or make an layer smaller by pinching with two fingers.
Q4, On which of the two devices you spend more time watching the screen?
Can you discover a difference and is the placement of the screen of influence;
The interaction takes place on the screen, this causes you to look more on the screen. Further is the monitor of the NXt very close.
You have to do all the handling onscreen with the touch version. You can immediately see your result instead of the LFDS were you have to look away from the screen to the numpad to be able to capture.
NXT only exists, sort of, as a screen. On the LFDS you have more control elements like the numpad.
The display of the NXT is very close by plus the functions are mostly on-screen.
The NXt screen is on eye level and in combination with the function being on screen you did not need to watch your hands.
On both device the same level of screen time. Only the NXt is directly in front of you which causes you to keep watching.
You will not get your hands on screen that often with the NXt in comparison to the LFDS. Placement of the screen has nothing to do with it.
Because of the tools being present further no differences.
Did not watch the screen more often on one of the two. But I think that the touch invites more to watch the screen because it is a touchscreen and on eye-level. Also the workbench is further away.
Screen was lower. I only watched the screen.
Because the screen is the main design part of the NXt I noticed that I watched the screen more. For modelling I mostly watched the screen to make the model.
Q8, The selecting and grouping of iterations in the review screen
Difficult to see which layer you are selecting. You will often grab the wrong one.
The mouse proved easier to pull iterations apart but was not quite handy in building new thing with.
Appendix F
Experiment
Appendix G
Experiment
Group Name Start Device LFDS Iterations NXt Iterations Sketches Start Sketches LFDS Time NXt Time
1 Jeroen LFDS 54 21 9 6 0:15:05 0:08:23
1 Michiel NXT 28 32 8 5 0:04:05 0:11:04
2 Hilde LFDS 51 25 6 4 0:09:46 0:06:59
2 Myrthe NXT 21 28 5 3 0:05:01 0:05:25
3 Marco LFDS 61 17 3 2 0:15:11 0:03:56
3 Peter NXT 18 28 3 2 0:03:36 0:13:44
5 Mustafa LFDS 47 7 3 2 0:12:48 0:02:17
5 Alicia NXT 20 60 5 4 0:04:37 0:14:35
6 Thomas LFDS 69 28 5 4 0:13:48 0:02:12
6 David NXT 21 49 3 2 0:04:57 0:14:58
7 Elleke LFDS 81 27 5 4 0:15:26 0:05:08
7 Klaartje NXT 24 67 5 4 0:04:04 0:20:04
8 Rens LFDS 50 43 6 3 0:13:03 0:08:27
8 fe-JanGof- NXT 16 41 4 3 0:05:56 0:11:17
4* Pim NXT 21 53 7 5 0:03:25 0:10:11
LFDS NXT
Iterations 561 473
Start 413 305
End 148 168
Time 2:07:23 2:08:29
Start 1:35:07 1:31:07
End 0:32:16 0:37:22
Iterations/min 4,42 3,70
Start 4,35 3,35
End 4,63 4,54
Task Time 0:09:06 0:09:11
Start 0:13:35 0:13:01
End 0:04:37 0:05:20
Sketches 35 35
Start 25 23
End 10 12
TOTALS
Iterations
1108
excl gr 4
1034
Start
771
End
337
Sketches
77
Time taken
4:29:28
[image:8.595.22.588.97.351.2]IT/min
4,12
Table 2: Data from the devices with respect to first and second rounds. The start round on the LFDS and end round on NXT are
[image:8.595.43.275.438.675.2]from the same users. Likewise for NXt start and LFDs end.
Table 3: The combined results from the test to show the totals.
*Group 4 is only included in the totals
[image:8.595.323.547.450.671.2]Appendix H
Ideation on Future Development
All the 66 cars loaded into the Review screen of the NXt.
The brightness is too high and some image data is lost from the original cars. The systems normally shows an overview of iterations instead of the merged results that make the sketches. This was a test to try out loading the merged results and give the user the possibility to categorize their drawings.
Appendix I
Ideation on Future Development
Below a possible configuration of an HDT consisting of only a tablet and a camera. Only the new parts are taken into account and the camera and input button are left out.
Windows Surface Pro 3
It is important to note that only the Pro version 3 is compatible. Versions 1 and 2 have a special ‘tablet’ operating system that does not allow the user to install custom software. The Pro 3 uses the regular Windows 8 OS and should run the NXT software. Note that the Windows Surface RT is especially a nogo.
Furthermore, the Pro 3 only has one usb-port and thus requires either the input buttons or the camera to work on Bluetooth.
Camera table mount gooseneck
This mount will enable a camera to be moved freely in 3D. The movement is sturdy and the gooseneck needs to be bend in the right position to stay put. However this is probably the easiest and most affordable solution for a movable camera mount. Since the height is not very high the mount needs to be extended with another gooseneck.
Ikea Tived Led Lamp
[image:13.595.340.522.116.241.2]This lamp uses the same principles as the camera mount above. Although the gooseneck is smaller in circumference and has a metal look and feel. Nevertheless, the three different configurations as shown in figure 9 are lightweight, affordable and easy to adjust. The configurations can be adapted into a functional camera mount.
Figure 7: Windows Surface Pro
[image:13.595.317.536.468.589.2]Figure 8: Camera table mount
Figure 9: Ikea Tived lamp with three possible configurations. From left to right; desk, clamp,
Workflow
A possible workflow on an HDT with the Customer Requirements tool implemented is shown in figure 11.
All the icons related to the different stadia are highlighted in sequential order starting top-left and ending bottom-right.
• (A) At first the user will first be creating content, top-left icon. This is the Fuzzy Mode. The user is always able to review the data received from a CR test, by pressing the bottom-right icon.
• (B) The second highlighted icon (from left) is the Review screen and displays all the sketches. The user is now in Logic Mode.
• (C) The third column indicates the user creating concepts by sorting, evaluating and associating the individual sketches. An example has been discussed earlier in Appendix H page 12.
Appendix J
Ideation on Future Development
Please note the creation of ideas takes place without the use of the touchscreen and is therefore
not taken into account. Also take note that these are design ideations and further testing and
research is necessary to conclude whether the implied redesign will be working as expected.
First a possible workflow is discussed. Followed by an implementation of the corresponding screens
and functions. It is adviced to have read
Logic and Fuzzy Mode
,
Logic Mode
&
Rawshaping Toolkit
beforehand.
• (D) Forth column will display the generated concepts from previous screen to the designer. The user will be able to quickly revert back to the overview screen and see the related position of a concept (third column).
• (E) Fifth column, the designer rating the concepts against features obtained from the CR tool.
[image:15.595.177.421.487.646.2]A - CR Overview
An overview of the weighed features and functions obtained from the Customer Requirements application. The designer will be able to have a quick look on the features and the corresponding importance.
Icon number 1 presents the user with this screen.
Icon number 2 will show the concepts or design directions and the corresponding score on each CR feature (screen F on next page).
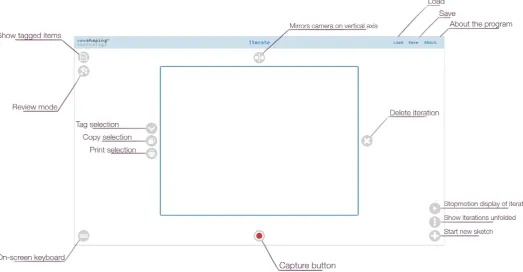
B - Review Mode
All the sketches on screen in the new review mode. The designer has all the created content at its disposal. From this moment the designer is able to evaluate, associated and create groups of suggested directions. The icon labeled with 1 enables the designer to draw circles to ‘tag’ the sketches within. An example can be found in Appendix H page 12. Icon number 2 is the ability to write comments on appropriate locations.
C - Concept Review
D - Concept Overview
This will show all the grouped or encircled sketches combined into concepts or design directions. The numbers indicate the amount of concepts created by encircling sketches.
E - Concept Rating
This screen gives the designer the ability to rate the concept against the CR features. In this way the concepts can rated on which one suits the problem best.
F - Overview of rated concepts