QMS®
SmartWriter
80+®
User's Guide
Publication Number 1720389A February 1987
QMS® is a registered trademark of QMS, Inc. SmartWriter 80+ ® is a registered trademark of QMS, Inc. Paper+™ is a trademark of QMS. Inc. Centronics® is a re~stered trademark of Centron-ics Data Computer Corp. Diablo R is a registered trademark of
About This Manual
The manual is divided into these major parts:
• Part I, Installation
• Part II, Tutorial
• Part III, Printer Setup
• Part IV, Printer Software Commands
• Part V, Maintenance and Troubleshooting
• Appendices
Part II, Tutorial, will acquaint you with the many features of your laser printer and help you start printing. Included in the Tutorial are explanations of the printer keypad and the different terms that are used throughout this manual.
Proprietary Statements
and Notices
Proprietary Statement
The digitally encoded software included with the QMS SmartWriter 80+ laser printer is ©Copyrighted 1986 by QMS, Inc., All Rights Reserved. This software may not be reproduced, modified, dis-played, transferred, or copied in any form or in any manner or on any media, in whole or in part, without the express written permission of QMS, Inc.
Copyright Notice
This manual is ©Copyrighted 1986, 1987 by QMS, Inc. All Rights Reserved. This manual may not be copied in whole or in part, nor transferred to any other media or language, without the express written permission of QMS, Inc.
Manual Notice
Approvals
Electronics Emissions
This printer complies with the Electronics Emissions Requirements of the West-German Federal Minister for Postal and Telecommu-nication Technology regulation:
VFG. 1046/1984
This printer complies with the Electronics Emissions Requirements of the European Economic Council directive:
82/499/EEC
NOTE: A SHIELDED CABLE IS REQUIRED TO COMPLY WITH VFG 1046, 82/499/EEC.
Safety
This printer is certified as a Class 1 laser product under the U.S. Department of Health and Human Services (DHHS) Radiation Per-formance Standard according to the Radiation Control for Health and Safety Act of 1968. This means that the printer does not produce hazardous laser radiation.
Warning
This equipment generates, uses, and can radiate radio frequency energy and if not installedand used in accordance with the Instruc-tion Manual may cause interference to radio communicaInstruc-tions. It has been tested and found to comply with the limits for a Class A computing device pursuant to Subpart J of Part 15 of FCC rules, which are designed to provide reasonable protection against such interference when operated in a commercial environment. Op-eration of this equipment in a residential area is likely to cause interference in which case the user at his own expense will be required to take whatever measures may be required to correct the interference.
Notice
Your OMS SmartWriter 80+ printer emulates Diablo® 630, Qume<B> Sprint®, HP LaserJet PLUS1M
, and ONE of
following: Epson® FX-80 or IBM® Proprimer®.
Contents
I
I nstallatio n
A Installation
B Adjusting Print Contrast
II Tutorial
A The Keypad
1-1
1-2
1-7
2-1
2-2
A.I Function Keys. . . .. 2-3
A.2 Printer Setup Keys . . . .. 2-4
B Making Changes
C Paper Size
C.I The Default: Letter
C.2 Changing Paper Size
2-5
2-7
2-7
2-7
D Paper Source 2-10
D.l The Default: Automatic Paper Feed. . .. 2-11
D.2 Selecting Manual Feed 2-11
E Page Orientation 2-13
E.2 The Default: Portrait Orientation. . . . .. 2-13
E.3 Selecting Landscape Orientation . . . . .. 2-14
F Page Margins
2-15
2-15
2-16
F.l Default Margins
F.2 Setting Page Margins
G Emulation Modes
2-18
G.l Selecting an Emulation Mode . . . 2-18
G.2 The Default: Epson Emulation OR
Pro-printer Emulation. . . 2-18
G.3 Selecting Another Emulation
...
2-18GA Selecting Emulation Features
...
2-23H Fonts
2-25
H.l The Default Fonts .. ..
. .
.. ... .
.. ...
.. .. ~ .. 2-25H.2 Selecting a Font .. ..
.
...
.. ~ .. .. .. .. .. .. .. ...
2-25H.2.1 Changing the Current Font . . . 2-26
H.2.2 Changing Power-Up Fonts ... 2-27
H.3 Download Fonts .. e .. " .. .. ~ .. .. .. .. .. .. .. • ~ 2-28
HA
Optional Font Cartridge . . . ....
2-28I Copy Count
2-28
1.1 The Default: Single Copies .. ~ .. .. .. .. .. .. .. 2-29
J.l Sending the Form Feed . . . .. 2-31
K Dual Interface 2-31
K.l The Default: Parallel Interface ... . . .. 2-31
K.2 Specifying Serial Interfacing. . . .. 2-32
L Using Software Commands 2-33
L.l The Default: <ESC> . . . .. 2-33
L.2 Substituting Tilde . . . 2-34
M Things You Need To Know... 2-35
M.l When to Replace the Print Cartridge. 2-35
M.2 Paper Jam . . . 2--36
M.3 Print Quality. . . .. 2-36
MA Status and Error Codes 2-37
N For More Information ... 2-38
III
Printer Setup
3-1A Groups
3-6
A.l Options.
. . . ...
.
. ·
. .
. .
. .
3-7A.2 Printer Setup Keys .
.
.
.... · .. . .
.
3-7A.3 Option 0
. . . . . . ... · . . . . · ..
3-8AA How To Change a Printer Feature
·
..
3-9B ANSI Command Mode Options (Group A)
3-12
B.1 Options land 2 - Units for Status
Sum-mary Sheet e e . . . 3-12
B.2 Option 3 - ANSI Character Spacing . . . . 3-12
B.3 Options 4 and 5 - Line Spacing
. .
~.
. .
3-13BA Option 6 - Line Overflows. . . 3-13
B.5 Option ? - Carriage Returns . . . 3-14
B.6 Option 8 - Line Feeds
...
3-14B.? Option 9 - Double-spaced Lines
...
3-14C Changing Fonts (Group C)
3-15
C.l Font Numbers . . . 3-15
C.2 Procedure e • • • • .. • • • • .. • • • • .. • • ~ • 3-16
C.3 Font Selection and the Option 0 Warm Restart
3-19
CA Automatic Font Selection . . . 3-20 \ ,
D Diablo Emulation Options (Group D)
3-20
D.l ~ptions land 2 - Diablo Character
Spac-Ing . . . 3-21
D.2 Option 3 - Carriage Returns . . . 3-21
D.3 Option 4 - Line Feeds
...
3-22DA Option 5 - Upper CaselLower Case . . . . 3-22
D.5 Option 6 - Select Character Spacing 3-22
E Epson Emulation Options (Group E)
3-23
E.3 Options 3 through 5 - International
Char-acter Sets . . . 3-25
E.4 Option 6 - Carriage Returns . . . ., 3-26
E.5 Option 9 - Printing Zeros . . . 3-26
E.6 Option A - Changing Epson Default Font 3-26
F Proprinter Emulation Options (Group I) 3-27
F.I Option I - Printing Zeros . . . 3-27
F.2 Option 2 - Automatic Line Feed . . . . .. 3-27
F.3 Option 3 - Character Set . . . .. 3-28
F.4 Option 4 - Carriage Returns. . . .. 3-28
F.5 Option 5 - Pica Default Font . . . .. 3-28
G Power-Up Landscape Font (Group L) 3-29
H Power-Up Portrait Font (Group P) 3-29
I Qume Emulation Options (Group Q) 3-30 1.1 Options I and 2 - Qume Character
Spac-ing. . . .. 3-30
1.2 Option 3 - Line Spacing . . . .. 3-30
1.3 Option 4 - Carriage Return . . . .. 3-31
1.4 Option 5 - Automatic Carriage ReturnILine Feed. . . .. 3-31
1.5 Option 6 - Select Character Spacing 3-32
1.2 Option 2 - Cancel Printing. . . .. 3-34
J.3 Option 3 - Hex Dump . . . 3-35
J.4 Option 4 - Form Feed/Carriage Return .. 3-35
J.5 Option 5 - Printer Setup Reset . . . .. 3-36
1.6 Option 6 - Reset Translation Tables. . .. 3-37
J.7 Option 7 - Suppress Blank Pages . . . 3-37
1.8 Option 8 - Suppress Status Summary Sheet
3-38
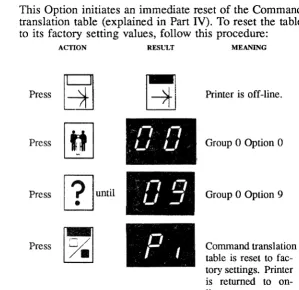
J.9 Option 9 - Immediate Command
Transla-tion Table Reset . . . .. 3-39
1.10 Option A - Immediate Font Translation
Table Reset . . . .. 3-40
K Selecting Emulation Mode and Page Size/
Orientation (Group 1) 3-41
K.1 Options 1, 2, and 3 - Emulation Mode .. 3-41
K.2 Options 4 through 6 - Paper Size . . . 3-42
K.3 Delay Before Form Feed . . . ., 3-43
K.4 Option 9 - Page Orientation . . . .. 3-43 K.5 Option A - Embedding the Escape
Char-acter. . . .. 3-44
L Number of Copies (1 to 9 copies - Group 2) 3-44 L.1 Options 1 to 9 - Number of Copies ... , 3-44
M Number of Copies
(multiples of 10 - Group 3) 3-45
N Page Margin Settings (Group 4) 3-46 N.1 Options 1 through 4 - Left Margin 3-46
N.2 Options 5 through 8 - Right Margin. . .. 3-47
N.3 Options 9 through C - Top Margin . . . . 3-48
N.4 Options D through F - Bottom Margin 3-49
o
Common Interface Options (Group 5) 3-50 0.1 Option 1 - Interface Type .. . . . .. 3-500.2 Option 2 - Online/Offline .. . . . .. 3-50
0.3 Options 3, 4, 5, 6, 7 - Print Buffer . . . . 3-51
0.4 Option 8 - Print Buffer Magnification. .. 3-53
0.5 Options 9 and A - 8th Bit. . . . .. 3-53
P Serial Interface Options (Group 6) 3-54 P.I Option 1 - Parity Checking . . . .. 3-54
P.2 Options 2 and 3 - Parity Type . . . 3-55
P.3 Option 4 - Stop Bits . . . 3-56
P.4 Option 5 - Data Bits . . . 3-56
P.5 Options 6, 7, 8, and 9 - Bit Rate . . . . " 3-57
P.6 Option A - DTR . . . .. 3-57
P.7 Option B - RTS . . . . .. 3-58
P.8 Option C - XON/XOFF . . . 3-58
Q Parallel Interface Options (Group 7) 3-59 Q.1 Option 1 - Printer Error . . . .. 3-59
Q.2 Option 2 - Set Printer Error . . . .. 3-60
Q.4 Option 4 - Off-Line on Error . . . .. 3--61
Q.5 Option 5 - Busy on Off-Line . . . .. 3-61
Q.6 Option 6 - Data Flow Control . . . 3--61
R Printer Alignment (Group 8) 3-62
R.l Options 1 through 4 - Horizontal
Align-ment . . . 3-62
R.2 Options 5 through 8 - Vertical Alignment 3-63
S Diagnostic Options (Group 9) 3-63
S.l Option D - Debugger . . . .. 3--64
S.2 Option E - Diagnostic Page . . . .. 3--64
S.3 Option F - Enter Debugger Mode . . . .. 3-64
IV
Printer Software
Commands
4-1A Command Diagrams 4-2
B Changing Fonts/Overlays 4-3
B.l Command Diagram . . . . . . .. 4-3
B.2 Using the Command. . . .. 4-3
B.3 Examples...
4-C 4-Changing Page Orientation 4-5
C.3 Examples . . . 4-6
D Selecting Paper Feed and Paper Size
4-6
D.1 Command Diagram ... 4-6
D.2 Using the Command. . . 4-6
D.3 Examples . . . 4-7
E Selecting Number of Copies
4-7
E.1 Command Diagram ... 4-7
E.2 U sing the Command. . . . 0 0 0 • • • 0 • 4-8
Eo3 Examples 0 0 • 0 0 0 0 • 0 0 • 0 • 0 0 • • 0 0 • • 4-8
F Selecting Emulation Mode
4-9
F.1 Command Diagram ... 4-9
F.2 U sing the Command. . 0 • 0 0 0 • • 0 0 • 0 0 4-9
F.3 Examples 0 • • • • • • • • 0 • • • • 0 • • • • • • 4-10
G Extended Printer Control Command
4-10
0.1 Command Diagram . . . 0 . . . . 4-10 0.2 Using the Command. . . 4-10
G.3 Examples . . . 4-11
H Redefining Translation Tables
4-12
H.1 Command Diagram ... 4-12
H.2 U sing the Command. . . 4-12
H.3 Changing the Command Translation Table 4-13
H.5 Resetting Translation Tables . . . , . . . 4-15
H.6 Decimal Values. . . .. 4-15
H.7 Examples... 4-16
V
Maintenance and
Troubleshooting
5-1
A Print Cartridge 5-2
B
C
D
E
F
A.I When to Replace the Print Cartridge. . .. 5-2
A.2 How to Replace the Print Cartridge 5-3
Fixing Assembly Cleaner
5-4
B.I Replacing the Fixing Assembly Cleaner 5-4
B.2 Cleaning the Fixing Roller . . . 5-5
Corona Wires
5-5
C.l Cleaning the Primary Corona Wire. . . 5-5
C.2 Cleaning the Transfer Corona Wire 5-7
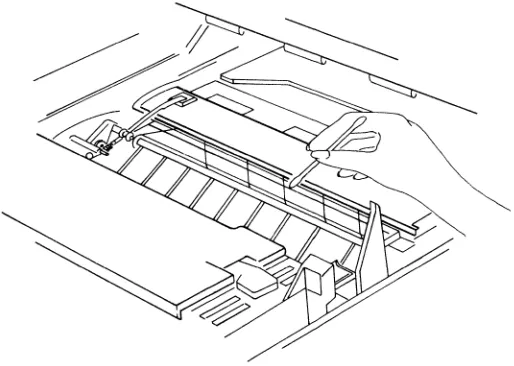
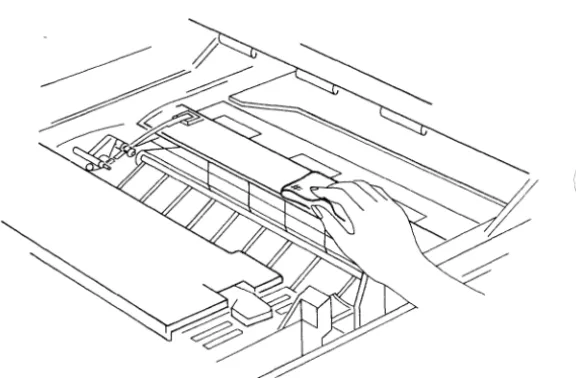
Cleaning the Transfer Guide
5-8
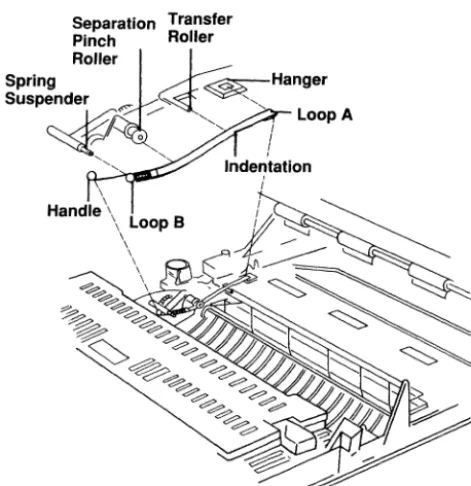
The Separation Belt
5-9
E.l Cleaning the Separation Belt
...
5-9E.2 Replacing the Separation Belt . . . 5-9
G.l Status Codes . . . 5-15 G.2 Error Codes . . . .. 5-16 G.3 The Diagnostic Page. . . .. 5-17
G.4 Print Quality Problems . . . .. 5-18
H Placing A Service Call
5-21
Appendices
Appendix A A-I
Appendix B B-1
Appendix C C-l
Appendix D D-I
Appendix E E-l
Appendix F F-I
Appendix G G-I
Appendix H H-l
Part I
Installation
Introduction
A
Installation
5
Close printer.
2
Locate two flags be-neath the green Fixing Assembly Cover and pull firmly towards rear of printer to remove. Dis-card spacers after re-moval.
1
Lift green lever and raise top half of printer.
4
3
Open Print Cartridge Door.
8
Attach Manual Feed Tray to nubs on rear of printer. Tray must be tilled slightly to fit over nubs.
6
7
Move printer to selected location. Lift using han-dles (front and rear).
Select a suitable loca-tion for the printer. Be sure to allow enough space to open printer, replace Print Cartridge, remove Paper Cassette, and to access the Man-ual Fsed area of the printer. Refer to Printer Specifications In Appendix G.
9
Fit nubs on Output Stacker Tray Into holes on front of printer.
11
Connect Power Cord to outlet.
10
12
5tH ,'0 ~ar to thG p.:ir''1" ~
tlslng (sizas are mOld ed into bottom 01 Paper Cassette).
15
Turn on printer.
-.-J
14
Insert Paper Cassette into printer.
\
.~
13 ~" ~
~~~I;~~~~1~~~~7sl---\
l\ ...~_~,
-:.'~~'
the clips In the Paper '.~. .' Cassette. Side of pa-
i )
per to be printed should ! I
ONLINE FORM FEED OPTION DISPLAY WINDOW
I[
GMS
69
0
9 9
0
y
-]1
MANUAL FEED TEST GROUP TOGGLE
16
Printer performs salt-test.
[ GMSDDDD
17
Printer warms-up.
C3MSDDDD
18
Printer prints a Status Summary Sheet. Never send data 10 the printer until alter the status summary sheet has printed.
DDD
I(
20
Push ONLINE key.
23
Printer idle. Press the ONLINE key and printer
DDDD
19
Printer Idle. Ready to receive data.
DDDMI
ODDO DDD.J
21
Push TEST key.
22
Printer prints samples of each "Defined Font" listed on Status
B
Adjusting Print Contrast
PRINTER MECHANICAL TEST BUTTON
Test Button
Print Density Adjustment Dial
Moving the dial towards darker print will affect darkness very slightly. Keeping the dial set for darker print will shorten the life of the Prinl Car-tridge.
I
Part II
Tutorial
Introduction
Your laser printer offers many adaptable features. Most of these features provide a variety of settings so that you can customize your printer to meet your requirements.
This Tutorial will introduce you to the following basic features, explain their purpose, and tell you how they may be changed:
• Paper Size
• Manual! Automatic Feed
• Page Orientation
• Page Margins • Emulation Modes
• Fonts
• Copy Count
• FOTIn feed
• Dual Interface
In the section called The Keypad, the Tutorial introduces you to the printer's keypad. It points out the keys and display window of the keypad and explains their functions.
Making Changes explains when to change a printer
The following sections of the Tutorial describe the most common features of the printer. They point out:
1. What each feature does.
2.
Which feature settings will be in effect if no changes are made.3. How to change settings.
4. Where to look in this user's guide for more informa-tion if it is needed.
Things You Need To Know ... covers routine maintenance
as well as some common problems and their solutions.
A
The
Keypad
The keypad of your printer has four function keys, three printer setup keys, and a two-digit display window. (See
Figure 1.) The function keys are used in the nonnal
oper-ation of the printer. The printer setup keys are used only to change the settings of the printer. The display window displays status and error messages during nonnal opera-tion and other informaopera-tion when the printer setup keys are being used.
ONLINE FORM FEED GROUP TOGGLE
GaMS
MANUAL FEED TEST OPTION DISPLAY WINDOW
[image:30.404.51.346.368.452.2]A.I
Function Keys
The four Function keys are: ONLINE, MANUAL FEED, FORM FEED, and TEST. Their purposes are as follows:
The ONLINE key takes the printer on-line (in communication with the computer) or off-line. When the green indicator light is on, the printer is on-line.
The MANUAL FEED key switches the printer from automatic (cassette) paper feed to manual feed. When the green indicator light is on, the paper may be hand fed from the manual feed tray. This key works only if the printer is off-line. (See Section C.)
The FORM FEED key causes the printer to print a partial page. (See Section I.) This key works only if the printer is off-line.
A.2
Printer
Setup
Keys
The three printer setup keys are: GROUP, OPTION, and TOGGLE. Their purposes are as follows:
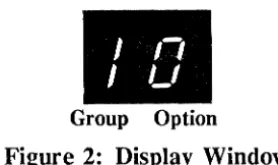
The printer features are divided into categories called Groups, each represented by a letter or number. The GROUP key calls up each Group and displays it as the left digit of the Display Window.
To use the GROUP key place the printer
off-line. Press the GROUP key. The letter of the
first Group will appear in the display window. As you continue to press the Group key, the left digit of the display will show each of the Groups in sequence. If your printer has the Ep-son option, the order of Groups is: A, C, d, E, L, P, q, 0, 1, 2, 3, 4, 5, 6, 7, 8, and 9. If
your printer has the Proprinter option the order of Groups is A, C, d, i, L, P, q, 0, 1, 2, 3, 4, 5, 6, 7, 8, and 9. (The "d", "i", and "q" are lowercase.)
Groups have sub-categories called Options. To use the OPTION key, first follow the procedure to select the proper Group. Then press the
op-TION key. The right digit of the display window
will change to the next Option number (" 1 "). As you continue to press the OPTION key, the
I
't
I
LI
Group OptionFigure 2: Display Window
The TOGGLE key is the "on/off" switch for the Options. An Option will be either on or off.
If the Option is off, pressing the TOGGLE key will turn it on. If the Option is on, it will turn it off.
The TOGGLE key has a green lighted indica-tor. This indicator is lighted when the Option appearing in the display window is on.
B
Making Changes
The printer comes from the factory with each feature set in a default setting. This default setting remains in effect unless you change it. As you read about each feature decide if the default If you prefer to change the setting, carefully follow the directions to make the change.
There are two ways to change a selection: with the Key-pad or a software command. The changes illustrated in this Tutorial are made with the Keypad. If you wish to make the changes through software commands refer to the referenced portions of the user's guide.
[image:33.402.145.284.41.123.2]The "0" Option is used to store setting changes. When the TOGGLE key is pressed with the "0" Option of any Group in the display window, all setting changes are put into effect and a status summary sheet is printed.
The illustrations in the following section show you what you see as you follow the step-by-step procedure. The display window illustrations show the display which oc-curs after each change. The indicator lights on the ONLINE, MANUAL FEED, and TOGGLE keys are shown white if they are lighted and black if they are not.
Light is ON. Light is OFF.
Figure 3: Indicator Lights
NOTE FOR LASERJET EMULATION MODE USERS: When the printer is in LaserJet Emulation Mode, it ignores all settings made through the keypad affecting page description (i.e., current font, page margins, page size, page orientation, and number of copies).
C
Paper Size
The first step in setting up the printer is to select the paper size. The paper sizes you may use with your printer are listed on the status summary sheet.
The printer uses the paper size setting to compute the area on which it can print. This print area affects the page margins that are set in the printer. You must specify the paper size to insure the page margins are correct.
C.l The Default: Letter
If you wish to use letter size (8.5xll", 216x279mm) pa-per, the printer is properly set.
C.2
Changing Paper Size
Do This:
I. Press
§
2. Press
I
ij
I
until:3.
Press 1?
Illllil:4. PreS!
11%11
3. Press
I
?
1 until:4. Press
11%11
5. Press I
?
1 until:6. Press
11%11
This Will Result: Meaning:
1
~
I
Off-lineI ' /
I
LI
I I I
I
-;
I
,-ID
Group 1
Option 4
Option 4 Off
Option 5
Option 5 Off
Option 6
Do This:
7. Press 1
u
18. Press
1
0/.1
This Will Result:
:J ,-,
L
LI
See sequence below:
Status Summary -> Sheet
Meaning:
Ready to save changes
Changes saved.
To change to any other size or for more detailed instruc-tions for making this change, see:
Paper Size (Keypad)
Part III Section K.3 Group 1 Options 4-6
You may also make this change through a software com-mand. For the instructions for using this method see:
D
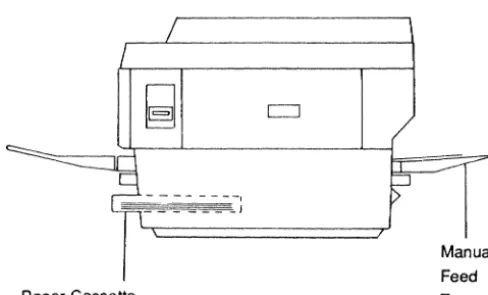
Paper Source
Your printer can print automatically from the paper cas-sette or manually from the manual feed tray. For nor-mal printing use the automatic feed. Envelopes or other special forms (such as sheets of self-adhesive labels and transparencies) must be inserted by hand from the manual feed tray at the rear of the printer (Figure 3).
/
/
~
c:=J~
~---,
?
---T J
Manual Feed
Paper Cassette Tray
[image:38.404.53.297.229.376.2]D.I The Default: Automatic Paper Feed
The default setting for the paper source is automatic paper feed. If you do not wish to use the manual feed function, the printer is properly set.
D.2
Selecting Manual Feed
To set the printer for manual feed:
Do This:
This Will Result:
Meaning:
1.
fuss
§
t;J
Off-line2.
fuss
[!]
~
Set for manual feed3.
Press
~
§J
On-lineDo This:
Send data to the printer.
This Will Result:
"0 "
I
LI
Align paper with Feed mechanism tray guide. will pull sheet
into printer.
0 0
I
I I
Meaning:
Feed Paper
Printer Active
Feed Paper
To return the printer to automatic paper feed, reverse the procedure for selecting manual feed. The lighted indica-tor in the MANUAL FEED key will go out signifying that the printer is set for automatic paper feed.
You may also make this change through a software com-mand. For the instructions for using this method see:
Part IV Section D Paper Source (Software)
E
Page Orientation
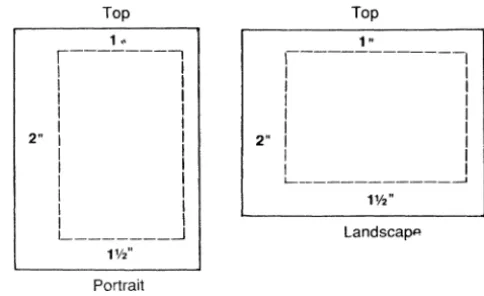
Page orientation refers to the direction that text is printed on the page. Your printer can print in two page orienta-tions: portrait and landscape. In the portrait orientation the text is parallel to the short dimension of the page. This user's guide is printed in portrait. In landscape the text is parallel to the long dimension of the page.
Top Top
1 " 1 "
r---,
I I
I I
1 1
I I
I I
2" I I
I I
I I
I I
I I
I I
I 1
'- _______ -.-l
1---1
1 1
I 1
1 I
I 1
I 1
2" I 1
1 I
I 1
L-- _ _ _ _ _ _ _ , _ _ _ _ _ - - i
1Y,'
Landscapp
1V2'
Portrait
Figure 5: Page Orientation
E.I Selecting a Page Orientation
Your choice of page orientation depends upon what you intend to print. For letters and most documents, portrait is the preferred orientation. For wide tables or spread sheets, landscape may be needed.
E.2
The Default: Portrait Orientation
[image:41.401.91.333.191.339.2]E.3
Selecting Landscape Orientation
If you wish to print spreadsheets or other documents in the Landscape Orientation, follow this procedure:
Do This: This Will Result: Meaning:
I. Press
§]
I-~
1
Off-line2. Press I
\i
1 until:, LI
, 'I
3. Press
I? 1
until:l:t
I
1'1
4. Press
1% 1
5. Press 1
tj
16. Pressl%1
D "
,
'I
J
'I
L
LI
See sequence below:
Status
Summary - t
Sheet
1,
,- I
Group 1
Option 9
Option 90n
Ready to save changes
f<or more detailed instructions for making this change, see:
Page Orientation (Keypad)
Part III Section K.2 Group 1 Option 9
You may also make this change through a software com-mand. For the instructions for using this method see:
Part IV Section C Page Orientation (Software)
F
Page Margins
Page margins can be set in the printer but may also be set by the software package you are using. Page margins set using a software package will take precedence over the margins set in the printer.
There is also a limit of approximately 3mm (0.1") at the top of the page, 6mm (0.25") at the left and bottom of the page, and 9mm (0.3") at the right of the page where no characters may be printed. This limit, imposed by the printing mechanism, must be taken into account when specifying page margins.
F.1
Default Margins
F.2
Setting Page Margins
To set the left page margin to 2,54 cm (1 "):
Do This: This Will Result: Meaning:
L
Press~
1_
'*
I
Off-line2. Press 1
ij
1 until:3. Press 1
?
1 until:4. Press II
s).1
5. Press 1
ij
16. Press
1
%1
Status
LI "
1
LI
"
-
,
-'
-
,
1- "
~
LI
See sequence below:
o
II
I
"
-+ Summary -+
Sheet
Group 4
Option 3
Option 3 On
Ready to
save changes
Changes saved.
To set the right page margin to 2,54 cm (1 "):
Do This: This Will Result: Meaning:
1. Press
I'-il
2. Press 1
U
1 until3. Press 1
?
1 until:4. Press
17.1
5. Press 1
U
16. Press
17.1
Status
LI ,-,
1 LI
I
I
-,
-;
I
I
L~,-,
Ji
LI
See sequence below:
--> Summary -->
Sheet
Off-line
Group 4
Option 7
OptionS On
Ready to save changes
Changes saved.
To select any other setting or for more detailed instructions for making this change, see:
Page Margins (Keyp~_d-,-) - - - i
G
Emulation Modes
Your laser printer is designed to respond to many of the same programs and commands as these line printers: Qume Sprint, the Diablo 630, the HP LaserJet and either the Ep-son FX-80, or IBM Proprinter depending to the model purchased. The laser printer can emulate (imitate) any one of these printers. To select an emulation mode is to specify the printer that you wish your laser printer to imitate.
G.I Selecting an Emulation Mode
You might choose an emulation mode because of previous use of one of the emulated printers. Or, it could be based on a preference for the features of one emulation.
G.2
The Default: Epson Emulation OR
Proprinter Emulation
The default emulation for your printer is either Epson or Proprinter. If you do not change this setting in your printer, it will carry out the commands and features of either an Epson FX-80 or IBM Proprinter (depending on the model). If you are currently using a word process-ing package or other software designed to work with the default emulation of your printer, it is ready to print.
G.3 Selecting Another Emulation
To select ANSI command mode do the following:
Do This: This Will Result: Meaning:
1. Press
~
I
~
I
Off-line2. Press 1
g
1 until:3. Press 1
?
1 until:4. Press
11%11
5. Press I
g
16. Press
1%1
~,
Status
,
J
II
I
LI
L
J ;
I
L
:J "
~
L
LI
See sequence below:
;,:: .. D D
:'~I
I I
-> Summary Sheet ->Group 1
Option 2
Option 2 Off
Ready to save changes
To select Diablo emulation do the following:
Do This: This "Viii Result: Meaning:
1. Press [
il
2 PressI
U
[Until
3. Press
I
?
[until:4. Press
I~
[
5. Press
I? I
until:6. Press
[I
%1
7. Press [gj
8. Press
[~I
Status
1
1,
I LI
1
J
I
I
, 1,
C
LI
See sequence below:
i'
l'
,- fi
-+ Summary-Sheet
I,
,- t
Off-line
Group 1
Option 1
Option 1
Option 2
Option 2
Ready to save changes
To select Qume emulation do the following:
Do This: This Will Result: Meaning:
1. press§
2. Press \
ij \
until:, LI
I "
UTess \
?
I
until:J
I
II
4. Press \
~\
5. Press [
g \
6. Press
I~I
,0 0
''''/
, 1
Status
I
"
C
LI
See sequence below:
-+ Summary -+ Sheet
11
,- I
Off-line
Group 1
Option 1
Option 1 On
Ready to save changes
To select LaserJet emulation do the following:
Do This: This Will Result: Meaning:
1. Press
II_~
2. Press 1
u
1 until:3. Press [
?
I
until:4. Press
11sv.11
5. Press
I
?
I
until:6. Press
1
sv.1
7. Press 1
\j
18. Press
1
sv.1
Status
I ,-,
I LJ
J .,
Ie
1 .,
1
J
,
"
C
LI
See sequence below:
,; ,;
,- <"
-+ Summary Sheet -+Off-line
Group 1
Option
2
Option 2 Off
Option 3
Option 3 On
Ready to save changes
For more detailed instructions for making this change, see the following section of the user's guide:
Emulation Mode (Keypad)
Part III Section K.l Group 1 Options 1, 2, and 3
You may also make this change through a software com-mand. The instructions for using this method are located in the following place in this user's guide:
Part IV Section F Emulation Mode (Software)
Be sure to make any necessary changes to your software setup so it matches the emulation you have chosen. You will find this information in the instructions for your soft-ware package. It is usually listed under "Printer Configu-ration" or a similar heading.
G.4
Selecting Emulation Features
Once an emulation mode has been selected, the default features of that emulation are in effect. These features can be changed to meet your requirements. (See Appendices D-H of this user's guide for a detailed description of the features and commands of each emulation.)
For instructions for making these changes, see the follow-ing sections of the user's guide:
ANSI Command Mode Features
Diablo Emulation Features
Part TIl Section D Group D Options 1 to 6
Epson Emulation Features
Part III Section E Group E Options 1 to A
Proprinter Emulation Features
Part III Section F Group I Options 1 to 5
Qume Emulation Features
H
Fonts
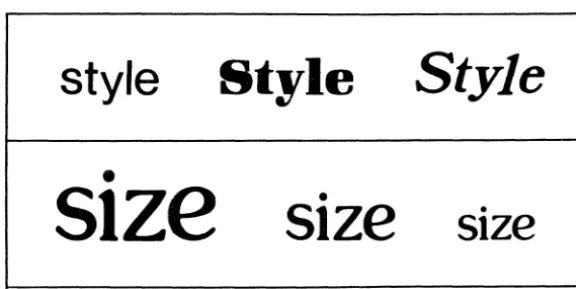
A font is a set of characters in a particular style and size.
style
Style
Style
•
sIze
•
SIze
SIze
•Figure 6: Font Style and Size
H.I The Default Fonts
Two fonts are pre-set as default fonts (one for portrait and one for landscape orientation). These default fonts are shown in reverse type on the status summary sheet. If you do not specify a different font, the printer will automatically print in the default font for the orientation it is in. If you do not wish to select a different font, the printer is properly set.
H.2
Selecting a Font
[image:53.401.67.355.134.278.2]H.2.1
Changing the Current Font
The font may be changed at any time during the operation of the printer. The fonts you may use are listed on the status summary sheet. (Each font may be used in any emulation.) If you change fonts, the new font will become the current font. The current font will be in effect until the printer is powered off.
Because of the number of possible settings, please see the following section of Printer Setup for instructions for changing the current font:
Changing Fonts (Keypad)
You may also make this change through a software com-mand For the instructions for using this method see:
Part IV Section B Selecting a Font (Software)
H.2.2
Changing Power-Up Fonts
The printer powers up in the default font of each orienta-tion (portrait or landscape). The printer will print in these fonts until a new current font is specified. Each default font (portrait and landscape) can be changed so that the printer powers up in whichever font you specify.
NOTE: When the printer is in the factory default setting (either Epson or Proprinter emulation depending on the model you ordered), it selects the Pica font (font number 382 or 385) regardless of the font specified as the power-up font. If the printer is powered-up in Diablo or Qume Emulation Mode and then switched to Epson or Proprinter Emulation Mode, it will automatically select the Pica font and ignore the power-up font.
See Part III Section E.6 (Group E Option A) or Part III
Section F 5 (Group I Option 5) for printer set-up informa-tion that allows a font already in use to override the Pica font when either Epson or Proprinter Emulation Mode is accessed.
To change the power-up landscape font see the following section of the user's guide:
Changing Power-Up Landscape Font (Keypad)
To change the Power-Up Portrait Font see the following section of the user's guide:
Changing Power-Up Portrait Font (Keypad)
Part HI Section H Group P Options 1-5
H.3
Download Fonts
Download fonts are fonts which are stored outside of the printer (usually on floppy diskette) and are loaded into the printer's memory when needed. Your dealer can assist you with purchasing downloadable fonts. Downloading of fonts may only be done when the printer is in ANSI command mode, Epson Emulation Mode, Proprinter Em-ulation Mode, or HP LaserJet EmEm-ulation Mode. Refer to the ANSI X3.64 Programming Language Manual or the applicable appendix at the back of this manual for more information.
H.4
Optional Font Cartridge
Additional fonts may be accessed by your printer through optional font cartridges. Refer to Appendix A for more information on the use and installation of font cartridges.
I
Copy
Count
1.1
The Default: Single Copies
The default copy count is one. If you want to print one copy of any file, the printer is properly set.
1.2
Changing the Copy Count
Because of the number of possible settings, please see the following section of Printer Setup for instructions for changing the copy count:
Copy Count (Keypad)
Part III Section L Group 2 Options 1-9
Part III Section M Group 3 Options 1-9
You may also make this change through a software com-mand. The instructions for using this method are located in the following place in this user's guide:
Part IV Section E Copy Count (Software)
1.3
Copy Count Reset
The Copy Count may be reset to one with the following procedure:
Copy Count Reset (Keypad)
You may also make this change through a software com-mand. The instructions for using this method are located in the following place in this user's guide:
Part IV Section E Copy Count (Software)
J
Form Feed Command
Your laser printer is a "page printer" (instead of a "line" printer). A page printer gathers in all the data that is sent from the computer and stores it in an area called "page description memory." When the printer senses that this area is full, it prints the data. Once the printer senses that this area is full, no changes to the "description" of the page can be made (i.e., current font, paper source, orientation, etc.).
If the data sent to the printer does not fill up the page de-scription memory, the printer will show P A in its display window and will wait until one of the following happens: • More data is received and the page description
mem-ory is filled.
• A command signal to print whatever is stored in page description memory is received.
J.1
Sending the Form Feed
To send the form feed command through the printer key-pad:
Do This: This Will Result:
I. Presslj
~
2. Press
I
~i
I
Page will eject.3. Press [ ]
BJ
K
Dual Interface
Your laser printer supports both parallel and serial inter-facing. The computer and printer communicate through the interface. If the proper interface is not established between computer and printer, there can be no communi-cation.
K.1
The Default: Parallel Interface
K.2 Specifying Serial Interfacing
If you wish to use a serial interface, you will need to make the following changes:
Do This: This Will Result: Meaning:
1. Press
§
I
~
1
Off-line2. Press
I
g
I
until:3. Press
I
?
I
until:_, I
CI
4. Press
1%1
5. Press
10
16. Press
I
%1
See sequence below:Status Summary --.
Sheet
,-
"
I
Group 5
Option 1
Option 1 On
Ready to save changes
To ensure that computer and printer protocols match, and for more detailed instructions for making this change, see:
Interface Options
Part III Section P Serial Interface Options Part III Section Q Parallel Interface Options
L
Using Software Commands
Software commands are commands to the printer that you type at your computer keyboard and transmit to the printer just as you would send a file for printing. Since you transmit software commands to the printer over the same line as print data, the printer needs a signal that tells it, "This is a command." Your laser printer uses the "<ESC>" code (decimal code 27) as this signal.
Do not confuse <ESC> with the Esc key on your computer keyboard. Transmitting an <ESC> code to the printer can pose problems on many computer systems. You may wish to refer to your computer's documentation for any special instructions for transmitting "low-value" codes. If your computer does not allow transmission of an <ESC> code, you may set your laser printer to use the "tilde" character (-) as the signal for software commands.
L.1
The Default: <ESC>
L.2
Substituting Tilde
If you want to set the printer to substitute - as the signal to the printer for software commands, do this.
Do This: This Will Result: Meaning:
I. Press
§
I
~
I
Off-line2. Press I
ij
1 until:, LI
I "
Group 13. Press 1
?
I
until:, I,
I
"
4. Press
1% 1
5. Press 1
t.t
I6. Press
1% I
" "
,- {I
Status
., I,
C
Ll
See sequence below:
,
-> Summary -> Sheet
II
,- I
Option A
OptionAOn
Ready to save changes
After making this change, transmitting a tilde (-) to the printer will signal the printer to interpret the data following the tilde as a software command.
For more detailed instructions about making this change, see:
Embedding <ESC>
Part ITI Section K.5 Group 1 Option A
You may also make this change through a software com-mand. For the instructions for using this method see:
Part IV Section H Redefining Characters
M
Things You Need To Know ...
After you have successfully set up your printer, there are a few things you need to know. Read through each topic and look up the referenced sections when necessary.
M.I
When to Replace the Print Cartridge.
For more infonnation see the following section in Part V,
Maintenance and Troubleshooting:
Part V Section A Print Cartridge
M.2 Paper Jam
Paper jams, though infrequent, may occur. A paper jam is indicated in the display window as a PJ. Paper jams may be cleared by opening the upper half of the printer and removing any jammed paper from four main areas:
(1) the manual feed area; (2) the cassette feed area; (3) the separation/feeder area; and (4) the fixing deli very area. After clearing the jam close the printer and it will resume printing.
For complete information and illustrations see the follow-ing section in Part V, Maintenance and Troubleshootfollow-ing:
Part V Section F Paper Jams
M.3
Quality
For complete information see the following section in Part V, Maintenance and Troubleshooting:
Part V Section G.3 Print Quality
M.4
Status and Error Codes
Errors and other conditions are indicated by a two-digit error code or status code appearing in the keypad display window or on the diagnostic page. The display window codes usually represent either normal operating conditions ("data being received", "printer idle", etc.) or less harmful errors (such as "paper jam" or "paper out"). A diagnostic page is printed when the printer senses a more serious condition.
For a complete listing of error codes and status codes see the following section in Part V, Maintenance and Trou-bleshooting:
Part V Section G.1 Error Codes
N
For More Infornlation ...
The remainder of this user's guide and reference manual contains more detailed information about the features of your printer and how to utilize them.
Part III, Printer Setup gives more information about se-lecting features with the keypad and provides a complete listing of Groups and Options.
Part IV, Printer Software Commands presents complete instructions for changing printer features with commands sent to the printer from your computer.
Part V, Maintenance and Troubleshooting explains main-tenance tasks which you can perform. The troubleshoot-ing section lists status codes, error codes, and diagnostic messages. It also discusses common print quality prob-lems and their solutions.
Appendix A, Font Information describes fonts and font commands. It also provides tables which give character locations and widths.
Appendix B, Conversion Tables lists hex, decimal, octal and binary equivalents of ASCII characters.
Appendix C, Printer Setup is a summary of the Groups and Options used to configure the printer. These are explained in detail in Part III.
Appendix D, Diablo Emulation Mode presents a complete description of the Diablo Emulation Mode. It lists sup-ported and unsupsup-ported commands and offers a complete explanation of each feature.
Appendix F, Proprinter Emulation Mode presents a com-plete description of the Proprinter Emulation Mode. It lists supported and unsupported commands and offers a complete explanation of each feature.
Appendix G, Qume Emulation Mode gives a complete de-scription of the Qume Emulation Mode. It lists supported and unsupported commands and presents a complete ex-planation of each feature.
Appendix H, Printer Specifications outlines specifications for the printer's optical system, printing system, interface, system memory, and others.
Part III
Printer Setup
Introduction
Printer Setup means customizing the printer to meet your particular printing needs. Printer Setup is performed through the printer's keypad.
In Part III you will find:
1. A description of the GROUP, OPTION, and TOGGLE keys
and the display window.
2. Step-by step instructions for making printer setup changes.
3. An explanation of all features that can be changed. The features you can use to customize your printer are ex-plained in the order the Groups and Options appear in the display window of the printer. However, a cross-reference is provided on the next few pages that groups these feature into the following task categories:
Paper Handling Features Printer Emulation Features Printer Interface Features Diagnostic Features
Font Handling Features Printer Resets
Paper Handling Features
FEATURE GROUP OPTION(S)
Blank Pages, Suppressing 0 7
Number of Copies 2 1 through 9 3 1 through 9
Page Margins 4
Left Margin 4 1,2,3,4
Right Margin 4 5,6,7,8
Top Margin 4 9,A,B,C
Bottom Margin 4 D,E,F
Page Orientation 1 9
Paper Size 1 4,5,6
Printer Emulation Features
FEATURE GROUP OPTION(S)
Diablo Emulation Features D
Character Spacing D 1,2 Carriage Returns D 3
Line Feeds D 4
Proportional Spacing D 6 Emulation Mode, Selecting 1 1,2,3 Epson Emulation Features E
Default Font E 1
Default Print Quality E 2 Int'l Characters E 3,4,5 Carriage Returns E 6 Zeros w lsi ash E 7
(Emulation Features, cont.)
Proprinter Emulation Features I
Carriage Return I 2,4
Character Set I 3 Pica Mode Rmt I 5
Printing Zeros I 1
Qume Emulation Features Q Character Spacing Q 1,2
Line Spacing Q 3
Carriage Returns Q 4
Auto Carriage Retum/Line Q 5
Feed
Proportional Spacing Q 6
Printer Interface Features
FEATURE GROUP OPTION(S)
Eighth Bit 5 9,A
Interface Type 5 1
Parallel Interface Features 7 Printer Error 7 1
Set Printer Error 7 2 Set Fault Bit 7 3
Off-line on Error 7 4
Busy on Off-line 7 5
(Interface Features, cont.)
FEATURE
Serial Interface Features Bit Rate
Data Bits DTR Parity RTS Stop Bits XON/XOFF
Diagnostic Features
FEATURE
Diagnostic Features Debugger
Diagnostic Page Debugger Mode Hex Dump
GROUP OPTION(S)
6
6 6,7,8,9 6 5 6 A 6 1,2,3 6 B 6 4
6 C
GROUP OPTION(S)
9
9 D
9 E 9 F
o
3Font Handling Features
FEATURE GROUP OPTION(S)
Printer Resets
FEATURE GROUP OPTION(S)
Cancel Printing 0 2
Number of Copies 0 1
Printer Setup Reset 0 5 Translation Tables 0 6 0 9 0 A
Warm Restart Any 0
Miscellaneous Features
FEATURE GROUP OPTION(S)
Form Feed/Carriage Return 0 4
Input Buffer 5 3,4,5,6,7,8
On-line/Off-line 5 2
Printer Alignment 8
Horizontal 8 1,2,3,4
Vertical 8 5,6,7,8
A
Groups
The available printer features are categorized into Groups: • GROUP A - ANSI Command Mode Options
• GROUP C - Changing Fonts
• GROUP d - Diablo Emulation Options
• GROUP E - Epson Emulation Options
• GROUP i - Proprinter Emulation Options
• GROUP L - Select Power-Up Landscape Font
• GROUP P - Select Power-Up Portrait Font
• GROUP q - Qume Emulation Options
• GROUP 0 - System Function Options
• GROUP 1 _ Selecting E~ulati<?n Mode, Page Size, and Page OnentatIon
• GROUP 2 - Number of Copies (1 to 9 copies)
• GROUP 3 - Number of Copies (Multiples of 10)
• GROUP 4 - Page Margin Settings
• GROUP 5 - Common Interface Options
• GROUP 6 - Serial Interface Options
• GROUP 7 - Parallel Interface Options
A.I Options
Each Group has many Options. These Options work alone or sometimes in conjunction with other Options to control a certain feature of the printer. For example, page margins are controlled by four Options working together. Page orientation is controlled by only one Option.
A.2
Printer Setup Keys
The three printer setup keys are: GROUP, OPTION, and
TOGGLE. Their purposes are as follows:
The printer features are divided into categories called Groups, each represented by a letter or number. The GROUP key calls up each Group and displays it as the left digit of the Display Window.
To use the GROUP key place the printer off-line. Press the GROUP key. The letter of the first Group will appear in the display window. As you continue to press the Group key, the left digit of the display will show each of the Groups in sequence. If your printer has the Ep-son option, the order of Groups is: A, C, d, E, L, P, q, 0, 1, 2, 3, 4, 5, 6, 7, 8, and 9. If
Groups have sub-categories called Options. To use the OPTION key, first follow the procedure to select the proper Group. Then press the OP· TION key. The right digit of the display window will change to the next Option number ("l')
As you continue to press the OPTION key, the right digit of the display will show each of the Options. The number of Options will vary ac-cording to the Group. The sequence of Option numbers is 0 through 9 and may extend into alphabetic characters.
The TOGGLE key is the "on/off" switch for the Options. An Option will be either on or off. If the Option is off, pressing the TOGGLE key will tum it on. If the Option is on, it will turn it off. Once you press the key, the Option is changed. Do not press the TOGGLE key unless you are certain of the change it will cause. The TOGGLE key has a green lighted indicator. This indicator is lighted when the Option appearing in the display window is on.
A.3
Option 0
Option 0 is the first Option displayed in every Group. This Option has a special function.
A.4
How To Change a Printer Feature
To change the setting of a printer feature, carefully follow this procedure:
1. Take the printer off-line.
2. Press GROUP to select the desired Group.
3. After the desired Group is showing in the left half of the display window, press OPTION to select the desired Option.
4. Note the setting (on/off) of the Option as indicated by the light in TOGGLE. (The light is on if the Option is on.)
5. If you wish to change the setting of the displayed Option, press TOGGLE. The light in the TOGGLE
key will change immediately. Never press TOGGLE
unless you are certain of the change it will cause.
6. Continue using GROUP, OPTION, and TOGGLE to change any printer features.
7. After you have made all desired changes, press GROUP
to display any Option O.
8. When a "0" is showing in the right half of the display window, press TOGGLE to store all settings (includ-ing those sett(includ-ings you just changed) into memory. The printer will print out a status summary sheet.
A.S
Example: Changing Page Orientation
As an example of how to make changes to a printer fea-ture, let's change the page orientation from portrait to landscape. Page orientation is controlled by Group I Op-tion 9.
In the following example,
r
~
II
means the light in ON·LINE is on. 1
~
1 means the light in the key is off.ACTION
Pre~
1ij
I umilRESULT
,
"
J
LI
MEANING
Printer is off-line.
Group 1.
Continued on next page.
ACTION
Press
[1JUDtil
Press
~
Press
[ij]
Press
~
RESULT
I
il
I
7
-,
"
C
LI
MEANING
Group 1 Option 9.
Thms Option 9 on.
Setup Option O.
,
Executes warm restart.
B
ANSI Command Mode
Op-tions (Group A)
The Options in Group A only affect the printer when it is
in ANSI Command Mode.
Toggle Option 0 of any Group to save changes to Printer Setup.
t=
Factory settingB.I
Options I and 2 - Units for Status
Summary Sheet
Group A Options 1 and 2 work together to tell the printer the units of measure to use when describing page margins on the status summary sheet.
Dots Decipoints
GROUP OPTION TOGGLE GROUP OPTION TOGGLE
A 1 off A 1 on
A 2 off A 2 off
Centimetres Inchest
GROUP OPTION TOGGLE GROUP OPTION TOGGLE
A 1 off A 1 on
A 2 on A 2 on
(300 dots
=
I" or 2,54cm)uses if no character spacing is specified. "Font spacing" means the printer uses the spacing of the current font.
Font Spacingt Proportional
GROUP OPTION TOGGLE GROUP OPTION
I
TOGGLEI
A 3 on A 3
I
offI
B.3
Options 4 and 5 - Line Spacing
These Options work together to set the default line spacing value (expressed as lines per inch or [pi) that the printer uses if no line spacing is specified. "Font spacing" means the printer uses the line spacing of the current font.
Font Spacing 4 lpi
GROUP OPTION TOGGLE GROUP OPTION TOGGLE
A 4 off A 4 on
A 5 off A 4 off
6 Ipit 81pi
!cROUP OPTION TOGGLE GROUP OPTION TOGGLE
A 4 off A 4 on
A 5 on A 5 on
B.4
Option 6 - Line Overflows
This Option controls how the printer will handle lines that are too long to fit inside the right margin.
Print Data Past Margint Absorb Data Past Margin
CROUP OPTION TOGGLE CROUP OPTION TOGGLE
B.S
Option 7 - Carriage Returns
Option 7 detennines how the printer will respond to Car-riage Return «CR » characters that are received when in ANSI Command Mode.
<CR><LF>
TOGGLE GROUP OPTION TOGGLE
I
off A 7 on
I
B.6
Option 8 - Line Feeds
Option 8 detennines how the printer will respond to Line Feed «LF» characters that are received when in ANSI Command Mode.
<LF>t <LF><CR>
I
GROUP OPTIONI
TOGGLE GROUP OPTION TOGGLEI
A
8I
off A 8 onB.7
Option 9 - Double-spaced Lines
This Option controls whether lines will be single or double-spaced when the print is in ANSI Command Mode.
C
Changing Fonts (Group
C)
Changing from one font (typeface) to another is a task that will probably be performed frequently. The procedure for using the keypad (Group C Setup Options) to change fonts is slightly different from that for other Printer Setup Options.
IMPORTANT: Do not use the warm restart when changing fonts.
C.l Font Numbers
The fonts that are available in the printer are listed nu-merically on the status summary sheet. When using the keypad and the Group C Options to change fonts, how-ever, the font number must be converted to a five-digit number. This is done by adding enough zeros to the front of the number shown on the status summary sheet to make it a five-digit number.
This font number:
382
380
10
7504
Converts to this number:
C.2
Procedure
Here is an example of using the keypad and the Group C Options to change to Font 7504. Use this example as a guide when changing to the particular font you wish to use. This same procedure is also valid for the Group L and Group P Options. NOTE: GROUP, OPTION, and
TOGGLE function differently for the Group C, Group
L, and Group P Options.
ACTION
Pre$
§J
PreM
I
\i
I
untilPre$ru
RESULT
,-
"
L
'-I
,-
I
L
I
I
II
I , '-'
MEANING
Printer is off-line.
Group C.
Group C Option 1.
ACTION
~ess ~
Press
~
Press 1
?
IIll'il
]~ess
11%1
RESULT
,- J
L
L
J
JI
L
1LI
I
-,
~,
C
II
-,- I
LEi
I
"
Ei
ILI
MEANING
Since the first digit of our font number (07504) is a zero, we continue with Op-tion 2.
Now we select the
second digit.
The second digit is
7.
This "locks in" 7 as the second digit of the font number and we continue with Op-tion 3.
ACTION
Press
I?
1
urnilPress
1
:Y.I
Press
1%1
Pms
11%11
RESULT
,- II
L -,
LI ,-,
I •
LI
MEANING
Third digit is 5.
5 is locked in and we continue with Op-tion 4.
Fourth digit is O.
Lock in 0 as fourth digit and continue with Option 5.
ACTION
Press
I? I
untilPress
I
~I
Press
RESULT
,-
"
L
LI
MEANING
Fifth digit is 4.
Lock in 4 as fifth digit. End of proce-dure. Do not p~
TOGGLE while ~
is displayed.
Printer is back on-line.
C.3
Font Selection and the Option 0
Warm Restart
C.4 Automatic Font Selection
If you do not specify a particular font, the printer is de-signed to select one automatically. The font that the printer would select in such a case depends on the current emula-tion mode. If the printer is in Diablo or Qume emulaemula-tion \ mode, it is designed to select either the power-up portrait font (Group P Options) or the power-up landscape font (Group L Options) depending on which page orientation is being used.
If you are using Epson emulation mode, the printer is designed to select the "Epson Pica" font (font number 382) regardless of the font specified by the Group P or Group L Options. If you are using Proprinter emulation mode, the printer is designed to select the "Proprinter Pica" font (font number 385) regardless of the font specified by the Group P or Group L Options.
If you use the Group C Options while in Diablo or Qume emulation mode and then switch the printer to Epson emu-lation mode, the printer is designed to automatically select the "Epson Pica" font and ignore the font you we