M
anaging
~sV
System
Software
Ol0851-AOO
Managing SysV System Software
Apollo Computer Inc. 330 Billerica Road Chelmsford, MA 01824
Confidential and Proprietary. Copyright © 1988 Apollo Computer, Inc., Chelmsford, Massachusetts. Unpublished -- rights reserved under the Copyright Laws of the United States. All Rights Reserved. First Printing: June 1988
This document was produced using the Interleaf Technical Publishing Software (TPS) and the InterCAP Illustrator I Technical Illustrating System, a product of InterCAP Graphics Systems Corporation. Interleaf and TPS are trademarks of Interleaf, Inc.
Copyright 1979, 1980, 1983, 1986 Regents of the University of California and 1979, AT&T Bell Laboratories, Incorporated.
UNIX is a registered trademark of AT&T in the USA and other countries.
Apollo and Domain are registered trademarks of Apollo Computer Inc.
BTHBRNBT is a registered trademark of Xerox Corporation. IMAGBN is a registered trademark of IMAGBN Corp. VAX is a registered trademark of Digital Bquipment Corp. Alis is a trademark of Applix, Inc. Versatec is a trademark of Versatec, Inc. Spinwriter is a registered trademark of NBC Corp. PostScript is a registered trademark of Adobe Systems, Inc.
3DGMR, Aegis, D3M, DGR, Domain/Access, Domain/Ada, Domain/Bridge,. Domain/C, Domain/ComController, Domain/CommonLISP, Domain/CORE, Domain/Debug, Domain/DFL, Domain/Dialogue, Domain/DQC, Domain/IX, Domain/Laser-26, Domain/LISP, Domain/PAK, Domain/PCC, Domain/PCI, Domain/SNA, Domain X.25, DPSS, DPSS/Mail, DSBB, FPX, GMR, GPR, GSR, NLS, Network Computing Kernel, Network Computing System, Network License Server, Open Dialogue, Open Network Toolkit, Open System Toolkit, Personal Supercomputer, Personal Super Workstation, Personal Workstation, Series 3000, Series 4000, Series 10000, and VCD-8 are trademarks of Apollo Computer Inc.
Apollo Computer Inc. reserves the right to make changes in specifications and other information contained in this publication without prior notice, and the reader should in all cases consult Apollo Computer Inc. to determine whether any such changes have been made.
THB TBRMS AND CONDITIONS GOVBRNING THB SALB OF APOLLO COMPUTBR INC. HARDWARB PRODUCTS AND THB LICBNSING OF APOLLO COMPUTBR INC. SOFTWARE PROGRAMS CONSIST SOLBLY OF THOSB SBT FORTH IN THB WRITTBN CONTRACTS BBTWBBN APOLLO COMPUTBR INC. AND ITS CUSTOMBRS. NO RBPRBSBNTATION OR OTHBR AFFIRMATION OF FACT CONTAINBD IN THIS PUBLICATION, INCLUDING BUT NOT LIMITBD TO STATBMBNTS RBGARDING CAPACITY, RESPONSB-TIMB PBRFORMANCB, SUITABILITY FOR USB OR PBRFORMANCB OF PRODUCTS DBSCRIBBD HBRBIN SHALL BB DBBMBD TO BB A WARRANTY BY APOLLO COMPUTBR INC. FOR ANY PURPOSB, OR GIVB RISB TO ANY LIABILITY BY APOLLO COMPUTBR INC. WHATSOBVBR.
IN NO BVBNT SHALL APOLLO COMPUTBR INC. BB LIABLB FOR ANY INCIDBNTAL, INDlRBCT, SPBCIAL OR CONSBQUBNTIAL DAMAGBS WHATSOBVBR (INCLUDING BUT NOT LIMITBD TO LOST PROFITS) ARISING OUT OF OR RELATING TO THIS PUBLICATION OR THB INFORMATION CONTAINBD IN IT, BVBN IF APOLLO COMPUTBR INC. HAS BBBN ADVISBD, KNBW OR SHOULD HAVB KNOWN OF THB POSSIBILITY OF SUCH DAMAGBS.
Preface
Managing SysV System Software describes system administration in the SysV environment. We've organized this manual as follows:
Chapter 1
Chapter 2
Chapter 3
Chapter 4
Chapter 5
Chapter 6
Chapter 7
Chapter 8
Chapter 9
Chapter 10
Appendix A
Is an introduction to system administration in the SysV environ-ment and a description of changes in Software Release 10 (SR1 0). Describes how to maintain nodes and provide services, including procedures to catalog nodes and manage root directories with ns_helper.
Is a comprehensive discussion of the network environment, includ-ing both start-up procedures and files and server reference infor-mation.
Describes registries, the /etc/passwd and /etc/group files, and how to update and replicate registry information.
Discusses system and software security, the ACL system and Domain®/OS modes and how they interact.
Describes the line printer system and how to configure and man-age it in the SysV environment.
Describes how to configure and maintain the uucp subsystem in the SysV environment.
Documents sendmail and how it operates in the SysVenviron-ment.
Contains the manual pages for SysV commands used for system administration.
Contains manual pages for SysV special hardware peripheral and device drivers.
Intended Audience
This manual is intended for users familiar with SysV software, the Domain/OS system, and the UNIX· operating system.
The best introduction to the Domain/OS system is Getting Started With Domain/OS
(Order No. 002348). This manual explains how to use the keyboard, display, read, and edit text, and manipulate files. It also shows how to request Domain/OS services using in-teractive commands.
If you are not familiar with the UNIX operating system, we recommend that you read one of the following documents:
• Bourne, Stephen W. The UNIX System. Reading: Addison-Wesley, 1982. • Kernighan, Brian W. and Rob Pike. The UNIX Programming Environment,
Englewood Cliffs, Prentice-Hall, 1984.
• Thomas, Rebecca and Jean Yates. A User Guide to the UNIX System. Berkeley: Osborne/McGraw-Hill, 1982.
Related Manuals
The file /install/doc/apoll%s. v.latest software release number _manuals lists current
ti-tles and revisions for all available manuals. For example, at SR10.0 refer to /install/doc/ apoll%s.v.l0.0_manuals to check that you are using the correct version of manuals. You may also want to use this file to check that you have ordered all of the manuals that you need.
(If you are using the Aegis 1M environment, you can access the same information through
the Help system by typing help manuals.)
Refer to the Domain Documentation Quick Reference (Order No. 002685) and the Domain Documentation Master Index (Order No. 9011242) for a complete list of related docu-ments.
Making the Transition to SRlO Operating System Releases (Order No. 011435) describes how to make the transition from Software Release 9.7 (SR9. 7) of the Domain operating system to Software Release 10. It includes an overview of new features and discusses the implications of operating a network of mixed-release (SR9.x and SR10) machines.
Using Your SysV Environment (Order No. 0011020) is the first volume you should read. It explains how SysV works, and contains material on the Bourne shell, C shell, and Mail.
SysV Command Reference (Order No. 005800) describes all the shell commands supported by SysV.
SysV Programmer's Reference (Order No. 005801) describes all the SysV system calls and library functions.
The Domain C Language Reference (Order No. 002093) describes C program development on the DOMAIN system. It lists the features of C, describes the C library, and gives infor-mation about compiling, binding, and executing C programs.
The Domain/OS Call Reference, Volumes 1 and 2 (Order Nos. 007196, 012888) describes calls to operating system components that are accessible to user programs.
Installing Software with Apollo's Release and Installation Tools (Order No. 008860) pro-vides instructions on installing software on your system.
The DPSS/Mail™ User's Guide (Order No. 003660) describes the DPSS/Mail system.
The Domain Display Manager Command Reference (Order No. 011418) provides descrip-tions of all the commands used for operating the DM.
Using TCP/IP Network Applications (Order No. 008667) provides instructions for using TCP/IP.
Configuring and Managing TCPJIP (Order No. 008543) describes how to configure and maintain TCP/IP on your network.
Programming with DomainJOS Calls (Order No. 005506) gives examples on how to use the Domain/OS calls.
Programming with SysV STREAMS (Order No. 012275) describes how to program with SysV STREAMS.
Getting Started with SysV STREAMS (Order No. 012276) provides an introduction to SysV STREAMS.
Managing the NCS Location Broker (Order No. 011895) describes the NCS Location Bro-ker.
Problems, Questions, and Suggestions
We appreciate comments from the people who use our system. To make it easy for you to communicate with us, we provide the Apollo® Problem Reporting (APR) system for com-ments on hardware, software, and documentation. By using this formal channel, you make
You can find more information on how to submit an APR from the appropriate Command Reference manual (Aegis, BSD, or SysV). Refer to the mkapr (make apollo problem re-port) shell command description. You can view the same description online by typing:
$ man mkapr (in the SysV environment) % man mkapr (in the BSD environment)
$ help mkapr (in the Aegis environment)
Alternatively, you may use the Reader's Response Form at the back of this manual to sub-mit comments about the manual.
Documentation Conventions
Unless otherwise noted in the text, this manual uses the following symbolic conventions.
literal values
user-supplied values
sample user input output
{ }
< >
CTRLI
Bold characters in formats and command descriptions represent commands, keywords and pathnames that you must use literally.
Italic words or characters in formats and command descriptions represent values that you must supply.
In examples, information that the user enters appears in color. Information that the system displays appears in this typeface.
Square brackets enclose optional items in formats and command descriptions.
Braces enclose a list from which you must choose an item in for-mats and command descriptions.
A vertical bar separates items in a list of choices.
Angle brackets enclose the name of a key on the keyboard. The notation CTRLI followed by the key name indicates a control character sequence. Hold down <CTRL> while you press the key. Horizontal ellipsis points indicate that you can repeat the preced-ing item one or more times.
Contents
Chapter 1
An OveJC'View of SysV System Administration
1.1 System Administration Responsibilities ... 1-1 1.2 Changes to the Operating System at SR10 ... 1-2
Chapter 2
1.2.1 Case Sensitivity and Names ... 1-2 1.2.2 The Registry ... 1-2 1.2.3 Protection: The Access Control List ... 1-3
Maintaining Nodes and Providing Services in the
Network
Synchronizing Clocks on Replicated Databases ... 2-16 Network Availability and edns ... 2-16 The edns Utility and Diskless Nodes ... 2-16 2.3.6 User Procedures for Updating the Master Root Directory ... 2-17 2.3.7 System Administrator Procedures for ns_helper ... " 2-18 2.4 Remote Process Creation - The Server Process Manager ... 2-35 2.4.1 Starting and Stopping spm ... 2-35 2.4.2 The shutspm Command ... 2-36 2.5 Installing. Configuring. and Managing STREAMS Software ... 2-36 2.6 SysV Mail Services. . . .. 2-37 2.6.1 DPSS/Mail and UNIX Mail ... 2-37 2.6.2 DPSS/MaiI and sendmail ... 2-38 2.6.3 DPSS/Mail and Alis ... 2-38
Chapter 3
Administering Nodes in the Network
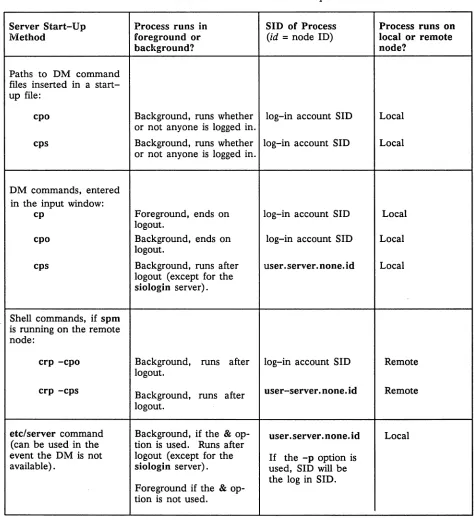
3.5.4 Methods of Starting Servers ... 3-13 Starting Servers on a Local Node. . . .. 3-14 Starting Servers on a Remote Node ... 3-14 Summary of Server Process Start-Up Methods ... 3-14 3.5.5 Naming Server Processes ... 3-15 3.5.6 Using Shell Command-Line Features ... 3-16 3.5.7 Maintaining Existing Servers . . . .. 3-16 3.6 Establishing a Node's Environment ... 3-16 3.6.1 The Node's Primary Environment ... 3-17 3.6.2 The Node's SYSTYPE ... 3-17 3.6.3 The /etc/environ File ... 3-17 3.7 Establishing a User's Environment ... 3-18 3.8 Start-Up Procedures ... 3-18 3.8.1 Node Startup ... 3-18 3.8.2 The /etc/rc File ... 3-19 Starting Servers in letc/rc ... 3-20 3.8.3 The letc/rc.local File ... 3-20 3.8.4 The letc/rc.user File ... 3-20 3.8.5 The /etc/ttys File. . . .. 3-20 3.8.6 Display Manager Startup ... 3-21 3.8.7 Server Process Manager Startup ... 3-21 Using 'node_data/spm_control to Control Node Access ... 3-21 The tty Line and Window System Startup ... 3-22 3.8.8 User Login. . . .. 3-23 User Log-In Processing ... 3-24 Key Definitions . . . .. 3-25 3.8.9 Log-Out Script Processing ... 3-25 3.9 Start-Up File Summary ... 3-25 3.9.1 Node Display Types and Their Start-Up Files ... 3-26 3.9.2 Templates for Start-Up Files ... 3-27 3.9.3 Start-Up File Format ... 3-28 3.10 Administering Diskless Nodes ... 3-28 3.10.1 Diskless Node Operation ... 3-29 3.10.2 Establishing Diskless Nodes and Their Partners ... 3-29 Specifying Partners . . . .. 3-30 The/sys/node_data.node_id Directory on New Partners ... 3-30 Providing a New Partner for a Diskless Node ... 3-31 3.10.3 Managing Diskless Nodes and Partners. . . .. 3-35 Diskless Node Management Commands ... 3-35 Warning of a Partner Shutdown ... 3-35 Requesting a Specific Partner ... 3-35 3.11 Node Troubleshooting. . . .. 3-36 Check Connections and Power ... 3-36 Check LEDs ... 3-36 Try to Communicate with the Hung Node ... 3-36 Check Processes. . . .. 3-37 3.12 Server Reference Information ... 3-37
Starting the Alarm Server ... 3-38 Configuration Files ... 3-38 Alarm Server Options and Arguments ... 3-38 Examples ... 3-40 Special Considerations ... 3-41 Related Information ... 3-41 3.12.2 The Mailbox Server: mbx_helper ... 3-41 Special Considerations ... 3-42 3.12.3 The Diskless Node Server: netman ... 3-42 Starting and Stopping netman ... 3-42 Special Considerations ... 3-43 3.12.4 The Tablet Server: sbp1 ... 3-43 Starting the Tablet Server ... 3-44 Special Considerations ... 3-44 3.12.5 siologin and siomonit Line Servers ... 3-44 The SIO Line Log-In Server: siologin ... 3-45 The siologin Options and Arguments ... 3-46 Special Considerations ... 3-46 The SIO Process Monitor: siomonit ... 3-47 Starting siomonit . . . .. 3-48 Signaling the siomonit Process. . . .. 3-48 Restarting siomonit .. . . .. 3-48 Sample siomonit_file . . . .. 3-48 Special Considerations ... 3-49 3.12.6 The Clock Server: cron ... 3-50 3.12.7 The Server for the Write Program: writed ... 3-51 3.13 Log-In Monitoring ... 3-51 3.13.1 Configuring the Log-In Facility . . . .. 3-51 3.13.2 The Log-In Facility Log File ... 3-52 3.13.3 Log File Protection ... . . . .. 3-52
Chapter 4
Creating and Maintaining the Registry
4.11.1 How importyassword Processes ... 4-31 4.11.2 Other Entries Created by importyasswd ... 4-32 4.11.3 Resolving Conflicts ... 4-33 The Identical User Option ... 4-33 The Favored Entry Option ... 4-33 Conflict Summary ... 4-34 4.11.4 The importyasswd Syntax. . . .. . . .. 4-35 4.11.5 Using importyasswd ... 4-35 Using Check Mode ... 4-35 Answering Prompts ... 4-36 Processing Prerequisites ... 4-36 Synchronizing Apollo UNIX IDs ... 4-36 Synchronizing Foreign UNIX IDs ... 4-37 4.12 A Sample importyasswd Session .. ,... 4-37 Phase 1: Invoking importyasswd ... 4-38 Phase 2: Examining the Group Entries ... 4-39 Phase 3: Examining the Password File ... 4-40 Phase 4: Adding Members to Groups . . . .. 4-41 Phase 5: Updating the Registry ... 4-42 4.13 Local Registries ... 4-43
Chapter 5
4.13.1 Setting Up the Local Registry . . . .. 4-43 4.13.2 Running a Small Network . . . .. 4-43
Protection of Files and Directories
Initial ACLs ... 5-10 5.2.6 Utilities ... 5-11 5.3 How UNIX Modes are Derived from ACLs ... 5-11 5.3.1 Permissions for Owner and Group ... , ... , ... 5-11 5.3.2 Permissions for Others ... 5-12 Reporting Permissions ... 5-12 Setting Permissions. . . .. 5-13 Checking Permissions . . . .. 5-13 5.4 Special Groups and Accounts ... 5-15 5.4.1 The root person and the locksmith Group ... 5-15 5.4.2 The sys_admin, staff, and wheel Groups ... 5-15 5.4.3 The server Group ... 5-15 5.4.4 The user.none.none SID Group ... 5-16 5.5 Backups ... 5-16 5.6 Protected Subsystems ... 5 -17 5.7 Control of Remote Access ... 5-17 5.8 Installation and Protection ... 5-18
5.9 Registries and Protection 5-18
Chapter 6
Line Printer Management
6.13.3 The prf Command Support ... 6-14 6.13.4 Directing Output to a Device ... 6-14 The lpfilter Options ... 6-15 6.13.5 Interface Program Formatting ... 6-16 6.13.6 Establishing Terminal Characteristics ... , .. 6-16 6.13.7 Printer Interface Program Return Codes ... , ... 6-16
Chapter 7
uucp Administration
Chapter 8
sendmail Configuration and Usage
8.1 Introduction . . . .. 8-1 8.2 Interfaces to the Outside World ... 8-2 8.2.1 Argument Vector/Exit Status ... 8-2 8.2.2 SMTP Over Pipes ... 8-2 8.2.3 SMTP Over an IPC Connection ... 8-2 8.3 Configuration ... 8-2 Macros ... 8-3 Header Declarations . . . ... . . . .. 8-3 Mailer Declarations ... 8-3 Address Rewriting Rules ... , 8-3 8.4 Installation ... , 8-3 8.4.1 Off-the-Shelf Configuration ... 8-4 8.5 sendmail Arguments, Configuration Options, and Mailer Flags ... 8-4 Configuration Options ... 8-5 Mailer Description Flags ... 8-7 8.6 Normal Operation .:' ... 8-8 8.6.1 The System Log ... 8-8 Levels ... :... 8-8 8.6.2 The Mail Queue ... 8-9 Printing the Queue ... 8-9 The mailq Command ... . . . .. 8-9 Format of Queue Files . . . .. 8-9 Forcing the 0ueue ... 8-10 8.6.3 The Alias Database ... 8-11 Rebuilding th'e Alias Database . . . .. 8-11 Potential Problems ... 8-11 List Owners ... 8-12 8.6.4 Per-User Forwarding (.forward Files) ... 8-12
8.6.5 Special Header Lines ... 8-12 Return-Receipt-To: ... 8-12 Errors-To: ... 8-13 Apparently-To: ... 8-13 8.7 Tuning ... 8-13 8.7.1 Timeouts ... 8-13 Queue Interval ... 8-13 Read Timeouts ... 8-13 Message Timeouts ... " 8-13 8.7.2 Delivery Mode ... 8-14 8.7.3 Log Level ... , ... " .. , .... 8-14 8.7.4 File Modes ... 8-14 When to Use suid ... I . . . 8-15
8.8.1 The Syntax ... '.' ... 8-15 Rand S - Rewriting Rules ... 8-16 D - Define Macro ... 8-16 C and F - Define Classes ... 8-16 M - Define Mailer . '. . . . .. 8-17 H - Define Header . . . .. 8-17
o -
Set Option ... 8-18 T - Define Trusted Users ... 8-18 P - Precedence Definition ... 8-18 8.8.2 Semantics. . . .. 8-18 Special Macros and Conditionals ... 8-18 Special Classes ... 8-21 The Left-Hand Side ... 8-21 The Right-Hand Side ... 8-21 Rule Sets Applied to Recipient Addresses ... 8-22 Rule Sets Applied to Sender Addresses ... 8-23 Mailer Flags ... 8-24 The "error" Mailer ...•... 8-25 8.8.3 Building a Configuration File from Scratch ... 8-25 What You Are Trying to Do ... 8-25 Philosophy . . . .. 8-25 Large Site, Many Hosts - Minimum Information ... 8-25 Small Site - Complete Information ... 8-26 Single Host ... 8-26 Relevant Issues ... 8-26 How to Proceed' ... 8-27 Testing the Rewriting Rules: The -bt Flag ... 8-27 Building Mailer Descriptions ... 8-27 8.9 Summary of Support Files ... 8-29Contents 9
Administrative Commands
uuxqt ... 9-208 ver ... 9-209 wall ... 9-210 writed ... 9-211
Contents
10
Device Files
Appendix A
Using the netmain
Interactive Tool and netmain_srvr
in the Apollo Token Ring Network
Illustra tions
3-1 Network Directory Structure - the Naming Tree. . . .. 3-2 3-2 Reading 'node_data from Diskless Nodes ... 3-6 3-3 Disked Node Directory Structure ... 3-8 3-4 Sample letc Shared Directory Structure. . . .. 3-9 3-5 Node Start-Up Files and Operations ... 3-19 3-6 Sample letc/ttys File ... 3-20 3-7 Start-Up Script for DN3000 Monochrome(startup.128bw) ... 3-21 3-8 'node_data/spm-control File ... 3-22 3-9 Node Start-Up Files and Operations ... 3-24 3-10 A Sample Isys/net/diskless_list File. . . .. 3-30 3-11 Sample Alarm Server Configuration File ... 3-38 3-12 Sample 'node_data/siologin_log File. . . .. 3-47 3-13 Sample 'node_data/siomonit_file File. . . .. 3-49 3-14 Sample 'node_data/siomonit_log File ... 3-50 3-15 Sample Log-In Monitoring Log File. . . .. 3-52 4-1 Registry Components ... 4-2 4-2 Registry Server Operation ... 4-11 4-3 Foreign Group and Password Entries. . . .. 4-37 4-4 Apollo Group and Password Entries. . . .. 4-38 5-1 UNIX Protection Utilities ... 5-5
A-7 Change Monitor Behavior Menu . . . A-44 A-8 Alter Logging Controls Submenu . . . " A-47 A-9 Alter Probe Timing Submenu . . . A-49 A-10 Alter Observer Timing Submenu . . . A-54 A-ll Analyze Network Data Menu . . . A-56
Tables
2-1 Contents of the ns_helper Database . . . " 2-12 2-2 The edns Commands . . . 2-15 2-3 The ns_helper Procedures. . . .. 2-18
3-1 Server Process Start-Up Methods. . . .. 3-15 3-2 Relationships of ENVIRONMENT and SYSTYPE Values . . . 3-18 3-3 Start-Up Files. . . .. 3-26 3-4 Start-Up File Suffixes . . . 3-27 3-5 Start-Up File Templates . . . 3-27
4-1 Registry Database Categories. . . .. 4-3 4-2 Names, Accounts, and SIDs . . . . . . .. 4-6 4-3 Effects of Identical User and Favored Entry Options . . . . . . .. 4-34
5-1 UNIX Permissions . . . 5-2 5-2 Domain/OS Access Rights . . . .. 5-6
Chapter 1
An
Overview of SysV System Administration
Contents
Chapter 1
An
Overview of Sys V
System Administration
This manual provides an overview of system administration in the SysVenvironment, as well as a summary of the major changes made to the system at Software Release 10 (SR10). The manual refers to all Apollo devices that communicate on the network as "nodes," although, where appropriate, we distinguish between nodes with displays and keyboards (for example, the DN3000 series) and nodes without (for example, the DSP160) since they are sometimes configured in different ways.
Information in this manual also assumes a single Domain network; if your site operates in an internet, please refer to the book Managing Domain Routing and Domain/OS in an Internet for any additional information about system administration in that environment.
This book deals with system software, that class of programs that manages the functioning of the operating system. We assume a certain level of familiarity with SysV user-level commands and concepts. If you've read and understood the Using Your SysV Environment, you should have no difficulties with anything explained in this book.
1.1 System Administration Responsibilities
As a system administrator, you are generally responsible for some or all of the following tasks:
19 Enabling nodes to communicate in the network by cataloging disked nodes,
providing partners for diskless nodes, and maintaining root directories.
CD Creating processes to provide both network-wide and per-node services like
printing, remote login, and diskless node booting.
a Understanding how to configure and administer individual nodes within the
network. (While individual node users will sometimes wish to determine the system software that runs on personal nodes, the system administrator is almost always a source for advice and assistance.)
• Creating and managing a registry of authorized user and account information, including accounts and group and organization lists.
1.2 Changes to the Operating System at SRI0
We've made some major changes to broad areas of the operating system at this release. The major areas of the operating system affected, especially with regard to system
administration, are the registry, protection (file and directory permissions), and the way in which the names of file system objects are represented. In the following subsections, we provide a brief discussion of the changes and their impact on SysV system administration. Complete information about these areas, as well as procedures to perform common administrative tasks, can be found in the appropriate chapters of this book. For
information on conversion tools and compatibility between pre-SR10 and SR10 versions of these subjects, see Making the Transition to SR10 Operating System Releases.
1.2.1 Case Sensitivity and Names
At SR10, the operating system is completely case sensitive. We do provide conversion tools, however, to ease the transition from a case insensitive environment to a
case-sensitive one. See Making the Transition to SRlO Operating System Releases.
The most obvious effect of case sensitivity in the operating system is that the system will interpret mixed-case pathnames literally. For example, this means that the pathnames /DIRECTORY/FILENAME, /directory/filename, and /DiReCtOrY/fIlEnAmE are no longer equivalent by default.
If you don't need to use mixed-case names, you can avoid many problems by setting the environment variable DOWNCASE to TRUE. From the point of view of naming, this will give you a pre-SR10 environment. However, DOWNCASE is intended as a temporary measure and may become obsolete at a future release. Don't rely on this mechanism for the long term.
Case sensitivity can also introduce some incompatibilities in existing shell scripts and programs. For a full discussion of the impact of the changes to naming at SR10 on programs and shell scripts, see Making the Transition to SRlO Operating System Releases.
The Naming Server Helper (ns_helper) will continue to be case insensitive, but we
recommend to system administrators that new node names reflect the case-sensitive world, both to avoid confusion and because ns_helper may become case sensitive at a future release. The ns_helper is discussed in Chapter 2.
The maximum number of characters in a leaf (single file or directory) name has been increased from 32 characters to 255 characters. The maximum length of a pathname that the system can handle has increased from 256 characters to 1023 characters.
1.2.2 11le Jlegistry
can log in in the event of network failure. A local cache of name-to-UID (Unique Identifier) mappings is maintained on each node to improve performance.
The SR10 registry includes the concepts of membership lists, groups, and organizations, which allows sites some flexibility in how the registry information is maintained. It also introduces the concept of ownership as a means of controlling access to registry database information. Simply stated, you must own a registry database relation to be able to change it. With these two additions, it is now an easy matter to partition a network's registries into logical groupings of organizations and groups, simplifying system administration.
The system administrator manipulates accounts by means of the edrgy tool. With edrgy, you can create and delete accounts, as well as edit and perform global operations on other registry database information.
It is possible to run a mixed network of pre-SR10 and SR10 machines, but you'll probably wish to site the SR10 registries and the pre-SR10 registries on different nodes. If your network is small enough that keeping two types of registries will absorb too much disk space or be too confusing otherwise, you should consider converting to SR10 all at once. Information about operating in an environment of mixed registries is available in Making the Transition to SR10 Operating System Releases.
Complete information about creating and maintaining SR10 registries is available in Chapter 4. Tools are available to convert existing registries from pre-SR10 to the SR10 format and to convert SR10 registry information back to the pre-SR10 form. The intention is that, at some future release, all registries will be converted to the SR10 format. Descriptions of the various registry conversion tools and procedures can be found in Making the Transition to SR10 Operating System Releases.
1.2.3 Protection: The Access Control List
At SR10, the Access Control List (ACL) mechanism, which manages file system object protection, has been simplified and altered. Every object in the file system has an ACL that consists of four required entries for owner, group, organization, and world. Each entry consists of a Subject Identifier (SID) and some rights specifications. Additional protection entries, if required, are stored in an "extended ACL" that is essentially like the pre-SR10 ACL. See Chapter 5 for information about ACLs. The ACL inheritance mechanism, which is based on the initial file or directory ACL, survives unchanged at SR10.
As a result of these changes, so-called "canned" ACLs, predefined sets of rights
Because of the general incompatibility between the SRI0 ACL manager and the ACL manager prior to SR9.7, there is no way to share files between pre-SR9.7 and SRI0 nodes. If your site has few enough nodes that you can update to SRI0 all at once, you should do that; if your site is upgrading to SRI0 over a long interval, and you must be able to access all files on all nodes at all times, you should install SR9. 7 before updating any nodes to SRI0. For information about transition information and system software
installation, see the books Making the Transition to SRlO Operating System Releases and Installing Software with Apollo's Release and Installation Tools.
At SRI0, all mapping between UNIX modes and ACLs is handled transparently, without any intervention by the system administrator or user. The entire UNIX protection model operates exactly as you would expect in a "standard" UNIX system.
---88---Chapter 2
Maintaining Nodes and Providing Services in the Network
Contents
Chapter 2
Maintaining Nodes and
Providing Services in the Network
This chapter assumes that your installation consists of a single Domain network. If you have mUltiple Domain networks connected in an internet, you have other considerations. See Managing Domain Routing and Domain/OS in an Internet for additional information about how to catalog nodes and maintain root directories in an internet environment.
Topics covered in this chapter include cataloging nodes and maintaining node root directories, using the us_helper process to maintain root directories, and providing such network-wide services as printing and remote login.
2.1 The Root Directory
This section describes
• Node names and node IDs
• The process of cataloging associations between nodes and node names • How to maintain root directories
• An automated way of maintaining nodes' root directories, the ns_helper (Naming Server Helper) process
2.1.1 Node IDs
Every node has a unique hexadecimal ID number (the node ID) which is contained in a Programmable Read-Only Memory (PROM). The only way a given node's ID changes is if a service representative physically replaces the node's ID PROM. The node ID allows both the network communications software and other nodes' software to recognize that node.
Machines are always identified by a node ID. In an internet environment, a network number is prefixed to the node ID to specify a nodes location.
2.1.2 Node Names
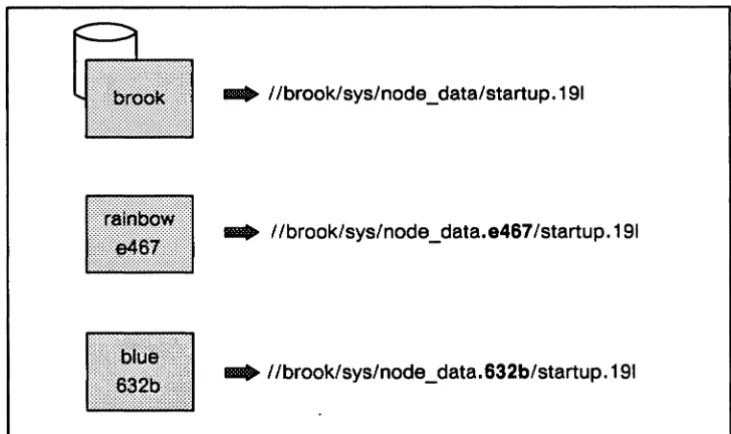
Since hexadecimal numbers are not easy to remember, you can associate a node name with a particular node ID and refer to the node by name when using shell commands like Ivolfs (list volume free space) that allow you to specify a node with the -n option. All the name-ID associations that a node knows about are stored in the node's root directory.
A node name must begin with a letter, and all alphabetic characters in the name must be lowercase. You can assign node names to both disked and diskless nodes, but a diskless node's name does not always act the same way as a disked node's. In particular, you should remember that a diskless node's name is not the same as its entry directory name, as is the case with disked nodes. For example, if the node "dublin" were disked, the following command would list the contents of dublin's entry directory.
$ is Ildublin
If the node dublin were diskless, the same command would result in "object not found."
2.1.3 Cataloging a Node
The ctnode command enters the node's name, hexadecimal ID, and other information in the root directory. You must catalog a node whenever you
Q Add a new node to the network.
<lI Change a cataloged node's name.
o Replace a node's disk.
8 Run the invol utility on a node's disk.
• Have a node's ID PROM replaced. The PROM installation procedures recatalog the node's directories with its new ID. You then must update root directories on the rest of the network with the new node ID.
A new disked node arrives at your site already cataloged in its own root directory. Its default name is node_nnnnn, where nnnnn is the node's hexadecimal ID number. Diskless nodes are not already cataloged. We strongly suggest that you name all the nodes in your network.
Cataloging a node is a two-step process. First, you must catalog the node in its own root directory (or, for diskless nodes, in the partner's root directory). Then, you must make this information available to all other root directories in the network. How you propagate the node name information to the other root directories on the network depends on whether your network uses the ns_helper server process to maintain root directories.
The ns_helper maintains a master copy of the root directory and provides node-name to node-ID associations. It reduces the cataloging effort when you add nodes or change names, and is very useful in larger networks. You must run the ns_helper process if you have a Domain internet, and you should run it if your network configuration changes frequently. For complete information and procedures for using ns_helper and the edns tool which accompanies it, see Section 2.3.
2.1.4 Cataloging a Node in its Own Root Directories
Use Procedures 2-1 and 2-2 to catalog a disked or diskless node in its local root directory. The procedures catalog the diskless node in its partner node's root directory. Use one of these procedures whenever you catalog a node except for when a PROM is changed. In this case, the PROM installation procedures recatalog the node in its own root directory; however, you must still recatalog the node in other nodes' root directories if you do not use ns_helper.
• Use Procedure 2-1 to catalog a node that has a display (that is, any node except a Domain Server Processor).
• Use Procedure 2-2 for a a server node that does not have a display.
• If you are cataloging more than one node, use Procedure 2-1 or 2-2 at each node you are cataloging.
• These procedures only catalog a node in its local root directory. If you do not use ns_helper, you must continue with Procedure 2-3, 2-4, 2-5, or 2-6 to provide this information to all other nodes.
Procedure 2-1.
Cataloging a Node in its Own Root Directory
Task 1: Log in as user
Task 2: Determine the node's hexadecimal ID
$ lcnode -me
The node ID of this node is 8523.
Task 3: Uncatalog the old node name
If this is a new diskless node, you replaced the disk on an already-cataloged node, or you ran invol, go to Task 4. If this is a new disked node, the initial node name is the node ID preceded by node_, for example, node_8523. In the following example, the -I option lists the node's name after it is uncataloged.
$ uctnode node 8523 -I "node_8523" uncataloged.
Task 4: Catalog the new node name
Enter the following command if you are cataloging a new node or are giving a node a name that has never been used before. For example, to name the node with
hexadecimal ID 8523 "salmo," type the following:
$ ctnode salmo 8523 -I
Node 8523 cataloged as "salmo".
Enter the following command if you are reusing an existing name. You usually reuse a name when you change disks, run invol, or replace a node and the user wishes to keep the old node name for the new node.
$ ctnode old_name node_id -I -r
Task 5: Update the node's root directory
This step adds node name-ID associations for other nodes on the network to this node's master root directory.
$ ctnode -update -I 3 nodes responded!
Node 8555 cataloged as "arctic char" Node 8523 cataloged as "rainbow" Node 8525 cataloged as "brook"
Procedure 2-2.
Cataloging a Domain Server Processor
Use this procedure to catalog Domain Server Processors (DSPs). If you're setting up a new network, catalog DSPs after you've cataloged nodes with monitors. Get the DSP's node ID from the inspection slip attached to the shipping carton packing slip. If you do not have the inspection slip, contact your service representative; this is the only reliable way to determine the node ID when the node is uncataloged and you don't have the packing slip. You must have the node ID before you start this procedure.
Task 1: Log in to the
nsp
as userEnter the following command at a shell prompt on a node with a monitor. Note the two single quotes (") at the end of the command line, which show that the account user has a null password. For example, if the DSP's node ID is 8533, type the following:
$ crp -on 8533 -login user " Connected to node 8533
Task 2: Uncatalog the old node name
If you replaced the disk on an already-cataloged node, or you ran invol, go to Task 3. If this is a new DSP, the initial node name is the node ID preceded by node_, for example, node_8533. In the following example, the -I option lists the node's name after it is uncataloged.
$ uctnode node 8533 -I "node_8533" uncataloged.
Task 3: Catalog the new node name
Enter the following command if you are cataloging a new DSP or are giving a DSP a name that has never been used before. For example, type the following to associate the name "chinook" with the DSP with node ID 8533.
$ ctnode chinook 8533 -I
Node 8533 cataloged as "chinook".
Enter the following command if you are reusing an existing name. You usually reuse a name when you change disks, run invol, or replace a node and the user wishes to keep the old node name for the new node.
Task 4: Update the node's root directory
This step adds node name-ID associations for other nodes on the network to this node's master root directory.
$ ctnode -update -1
3 nodes responded!
2.2 Using ctnode to Catalog Nodes on the Network
Once you catalog a node in its own root directory, you must then provide the information to all other nodes' root directories, so that remote nodes can communicate with the newly cataloged node and have access to its files. If the network is small and node configurations don't change often, you can use the ctnode and uctnode commands to manage the network root directories. Procedures 2-3 through 2-6 show the steps you must follow to update the root directories. Use these procedures as detailed below. If you have a larger network, you should probably run the ns_helper process. Go to Section 2.3 for
information and procedures for using ns_helper.
• Use Procedure 2-3 to create a new network or to add several nodes to a network.
• Use Procedure 2-4 to add a single node to an existing network.
• Use Procedure 2-5 to change the name of a node that is already on the network.
• Use Procedure 2-6 after replacing a disk drive, running invol, or if your service representative replaced a node's PROM.
Procedure 2-3.
Creating a New Network
Task 1: Log in as user
Task 2: Update the root directory
Enter the ctnode -update command to update the node's root directory to include information on all nodes that are currently responding to network queries. In the following example, the -I option lists the nodes as they are cataloged.
$ ctnode -update -I 2 nodes responded!
Node 8555 cataloged as "arctic char" Node 8525 cataloged as
"brook"-The local node now has a complete root directory. If the number of nodes
responding does not equal the number of nodes in your network, repeat Task 2 until you get a full root directory.
Task 3: Propagate new information across the network
You must propagate the new name-IO information to the root directories of all other nodes. Enter the name of the node you're logged into in place of IInode_name in the following command line:
$ ctnode -md -from //node_name -on II?*
Procedure 2-4.
Cataloging a New Node in an Existing Network
Task 1: Log in as user
Task 2: Catalog the new node
Catalog the new node on all other nodes in the network with the following command. Substitute the node's name and 10 in the appropriate places.
Procedure 2-5.
Changing A Node's Name
Task 1: Uncatalog the old name
Repeat this task at each node on the network to uncatalog the node's old name. Otherwise, the node will be cataloged under both the new and the old name.
Log in as user. Enter the uctnode command to remove the node's old name from the root directory.
$ uctnode cutthroat -I
"cutthroat II uncataloged.
Task 2: If you are not still logged on, log in to any node as user
Task 3: Upd~te root directories
To propagate the new node name to the root directories of all nodes in the network, recatalog the node under its new name. In this example, the node ID is df.
$ ctnode soclteye cff -r -on II?*
Procedure 2-6.
Updating Information for an Existing Node Name
Use this procedure after replacing a disk drive, running invol, or if your service representative replaces a node's PROM.
Task 1: Log in to any node as user
Task 2: Recatalog the node in its own root directory
To recatalog the node in its own root directory, enter:
$ ctnode node_name nodeJD -r
Task 3: Update the root directories across the network
To propagate the updated information into the root directories of all nodes in the network, enter the recataloged node's name and ID in the following command:
2.3 The Naming Server Helper: ns_heJper
The os_helper, the naming Server Helper, is a Domain server process that provides an automated method of maintaining node root directories. You can run os_helper on any Domain network, but you must use it on each Domain network in an internet. See Managing Domain Routing and Domain/OS in an Internet for information about running os_helper in an internet.
The os_helper (Isys/os/os_helper) process manages a master root directory. This database is the only comprehensive source of node identifying information in the network. The os_helper performs most of its operations automatically. The edos utility, an interactive tool used with os_helper, is available for those operations requiring your intervention, such as updating the database.
The os_helper maintains a cache of the master network root directory at each node. Whenever the naming server uses the master root directory to locate objects, it updates the local node's cache. Although the shell command ctoode is operative, you need not maintain a node's root directory with ctoode -update in the os_helper environment. It is always necessary to catalog an entry directory name with ctoode when a node is first brought into the network.
When more than one os_helper runs in a network, each process is called a replica. The the os_helper propagates changes in the database of any replica to all other replicas for a period of 14 days. In exceptional circumstances of node, loop, or disk failure, a replica may not receive updated information in this time period. Use an edos merge command to return replicated databases to a consistent state in these cases.
We recommend running os_helper as a background process. Enable os_helper from a start-up file (usually /etc/rc) so that it will continue after logout. The os_helper names itself "ns_helper" by default, so you need not specify the - 0 option to the process creation
command.
2.3.1 The ns_helper Database
The os_helper manages a database that is divided into two parts: a master root directory and a replica list. The master root directory is the comprehensive source of node
identification information in the network. You can specify the node names and addresses in the master root directory. Only the nodes themselves can supply os_helper with the rest of the information in the directory. The os_helper database resides in the
'oode _data/system _logs directory.
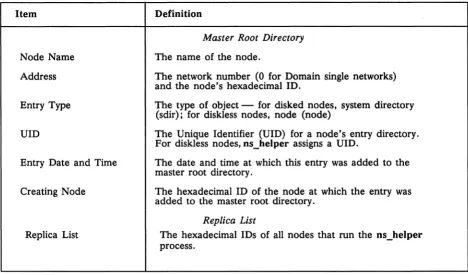
Table 2-1 lists the ns_helper database contents in detail.
Table 2-1. Contents of the ns_helper Database
Item Definition
Node Name
Master Root Directory
The name of the node.
Address The network number (0 for Domain single networks) and the node's hexadecimal ID.
Entry Type The type of object - for disked nodes, system directory (sdir); for diskless nodes, node (node)
UID The Unique Identifier (UID) for a node's entry directory. For diskless nodes, ns_helper assigns aUlD.
Entry Date and Time The date and time at which this entry was added to the master root directory.
Creating Node
Replica List
The hexadecimal ID of the node at which the entry was added to the master root directory.
Replica List
The hexadecimal IDs of all nodes that run the ns_helper process.
2.3.2 When to Use ns_helper in Your Network
Use ns_helper in networks where new nodes are introduced frequently, when many nodes have multiple users, and when you want to maintain all the node root directories from one location. As we said before, you must run ns_helper on each network in an internet.
2.3.3 Number and Placement of Replicated ns_helpers
[image:45.613.79.547.140.415.2]• You have many nodes in your network, and a single server may not be able to handle the traffic.
• You want to ensure that the server process is always available; two or more servers will provide redundancy.
• Loops in your network are switched out regularly and/or your network runs through several buildings. You might want servers in each loop or building. You can run ns_helper only on disked nodes.
2.3.4 Replica List
When more than one ns_helper runs on a network, the server processes maintain information about each other in a part of their database called the replica list (see Table 2-1). The replica list contains the hexadecimal 10 of every node running ns_helper. You manage replicated ns_helpers with the edns command.
Each ns_helper automatically tries to keep its own database (master root directory and replica list) consistent with those of the other ns_helpers. When you make changes to any database, that node's ns_helper refers to its replica list for the node IDs of other replicas. Then the ns_helper sends the new information to all the other nodes on the list. When ns_helpers receive new information from another server, they update their own databases and return an acknowledgment to the sending server.
If the sending ns_helper does not receive an acknowledgment from all the nodes on its replica list, it continues to propagate the new information for a few days. In exceptional circumstances, a replica might never receive updated information. You can use the edns merge facility to return replica databases to a consistent state in these cases.
2.3.5 Managing Root Directories with ns_helper
When ns_helper runs in a network, the naming server (the part of the operating system that locates file-system objects) has two sources of information about entry directory names: the node's local root directory and the ns_helper master root directory itself.
When the naming server tries to locate an object, it first looks in the node's root directory.
Using ctnode and uctnode with ns_helper
When you use ns_helper on the network, you normally will not need to use the ctnode command to maintain a node's root directory.
There is one situation in which you'll need to use uctnode: When you change the name of a node in the ns_helper database, the new name is added to the individual nodes' root directories, but the old name is not deleted from any of them. Use uctnode at each node on the network to remove the old entry from all root directories.
NOTE: After uctnode removes an entry directory name, objects cataloged under that node's entry directory are no longer accessible to you or other nodes on the network.
The following subsections describes tools, considerations, and procedures for managing root directories on networks that use ns_helper.
The edns Utility
Table 2-2. The edns Commands
Command Description
add Adds a node name and the corresponding address to the master root directory(s).
addrep Adds the address of an ns_helper node to the ns_helper replica lists(s).
cmp Compares two ns_helper databases and lists entries that appear in both, or that appear inconsistently in both.
delete Deletes the entry for the specified name from the ns_helper master root directory(s).
delrep Deletes an ns_helper node from the ns_helper replica lists.
diff Lists the differences between two ns_helper databases, including both the master root directories and replica lists.
info Displays address and status information for the default ns_helper.
in it Initializes an ns_helper database with data from all nodes that are currently responding on the network. ld Lists master root directory information.
Ir Lists the addresses of all ns_helper nodes on the net-work; can display the nodes' current clock dates and times.
merge Merges all entries from one ns_helper master root directory (but not replica list) into another.
merge_all Performs a global merge of all ns_helper databases, using the default or specified ns_helper database. quit Ends the current edns session.
replace Changes the address and UID associated with the specified name.
set Sets the default ns_helper to be the one running on the specified node.
shut Shuts down the ns_helper on the specified node. This command deletes that node's database but does not remove the node from other ns_helper replica lists.
[image:48.612.99.518.101.704.2]Synchronizing Clocks on Replicated Databases
The ns_helper processes keep only the most recent information about an entry in their databases. The servers use the node hardware clocks and the database item "Entry DatelTime" to recognize the most recent information. Therefore, you must keep the hardware clocks on all ns_helper nodes synchronized. Check the node clocks periodically and reset them if they diverge by more than a few minutes. The edns command provides a way to check clock synchronization (see Procedure 2-15). Procedure 2-7 explains how to synchronize node clocks.
Network Availability and edns
Two edns operations, initialize and update, are particularly sensitive to network and node availability because they request information from all nodes on the network. If a node fails to respond, it may not be cataloged in the root directory. Therefore, it is a good idea to initialize the first ns_helper process at a time when network traffic is light and all nodes are connected to the network.
The edns Utility and Diskless Nodes
When edns initializes a database, it always assigns the default name
diskless_ $nnnnnn
to a diskless node, where nnnnnn represents the diskless node's hexadecimal ID. The value is right justified and is preceded by the number of zeros required to form a six-digit number. For example, if the node ID is 3d3, the edns representation of that node is
diskless_ $0003d3
The edns utility generates a Unique Identifier (UID) for a diskless node, then associates it with the diskless node's name. This information about the diskless node appears in the master root directory and can be copied to a node's root directory. In a single Domain network, the UID and other information that edns generates for the diskless node serves only as a place marker for information that is used in a Domain internet.
The command Is II -In lists the names of all diskless nodes in the local copy of the root directory. The following commands also specify if a node is diskless:
$ netstat -n nodejpec $ lusr -0 node_spec
$ bldt -n node_spec $ lcnode -me
(The node _spec argument can be either a hexadecimal node ID or the node entry directory, that is, IInode_name.)
2.3.6 User Procedures for Updating the Master Root Directory
The ctnode and uctnode commands support a small subset of operations on the master root directory. Any user can run these commands to manage the master root directory entries.
Use the following command to delete the entry for a node name in both the node's root directory and the master root directory. If you remove a node from the network, this command removes the old node's entry from the master root directory. If you are changing a node's name, use this command to remove the entry for the old name before adding the new name.
$ uctnode node_name -root
NOTE: Any time you change a node's name and ns_helper is not running or being used, you must use uctnode on each node to delete the old entry from that node's root directory.
Use the following command to add a node name in the root directory and the master root directory. You can use this command to give a diskless node a name or to add a new node to the network.
$ ctnode node_name node_id -root
Use the following command to replace the node ID or UID that is associated with an existing node name in the root directory and the master root directory. You can use this command if your disk is changed or if you run invol. You can also use this command to associate an existing name to a new node.
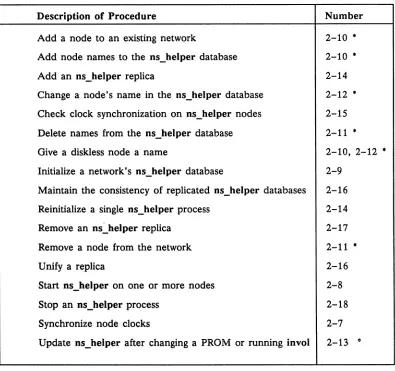
2.3.7 System Administrator Procedures for ns_helper
The rest of this chapter contains procedures for managing ns_helper processes and databases. Table 2-3 lists tasks you might wish to perform and gives the number of the appropriate procedure. In secure networks, we recommend that you set the ACLs so that only the system administrator (%.sys_admin.%) can use the edns command. If you do, only the system administrator can perform Procedures 2-9 through 2-16 that invoke edns. Other users can run the ctnode and uctnode commands to manage a node's entry in the master root directory as described in the preceding section.
Table 2-3. The ns_heJper Procedures
Description of Procedure Number
Add a node to an existing network 2-10 •
Add node names to the ns_helper database 2-10 •
Add an ns_helper replica 2-14
Change a node's name in the ns_helper database 2-12 *
Check clock synchronization on ns_helper nodes 2-15 Delete names from the ns_helper database 2-11 •
Give a diskless node a name 2-10, 2-12 •
Initialize a network's ns_helper database 2-9 Maintain the consistency of replicated ns_helper databases 2-16
Reinitialize a single ns_helper process 2-14
Remove an ns~helper replica 2-17
Remove a node from the network 2-11 •
Unify a replica 2-16
Start ns_helper on one or more nodes 2-8
Stop an ns_helper process 2-18
Synchronize node clocks 2-7
Update ns_helper after changing a PROM or running invol 2-13
'"
[image:51.612.139.534.247.618.2]Procedure 2-7.
Synchronizing Node Hardware Clocks
Use this procedure to synchronize node hardware clocks. You must use this procedure if nodes that run ns_helper are not within five minutes of each other. You should use the procedure if the ns_helper nodes are not within one minute of each other.
Task 1: Obtain an accurate timepiece
Task 2: Set the node's NORMAL/SERVICE switch to SERVICE
Task 3: Shut down the system
If the node is a DSP unit without a display, you must attach either a terminal or a Domain node with a display to the DSP unit's SIO (Serial Input/Output) line to set the node clock. Once you've done that, shut down the DSP.
If the node has a display, shut it down with the DM shut command.
Task 4: Start the calendar program
The Mnemonic Debugger prompt (» appears on the screen. Enter the following command:
> ex calendar
The calendar program prompts you for the required responses. (You must answer all questions; you cannot set the time without also entering the date.) For example, the following script illustrates prompts from calendar, and the responses for a node with a Winchester disk:
> ex calendar
Please enter disk type (W,S, or F) [,lvno]. If you do not have a disk, enter none (N):
w
The time-zone is set to -4:00(EDT).Would you like to reset it? n
The calendar date/time is 1986/07/11 13:52:03 EDT. Would you like to reset it? y
Please enter today's date (year/month/day) : 1988/07/11
NOTE: If you set a node clock backward. the node can generate duplicate UIDs for objects. which will create confusion in the operating system. You can avoid this by not rebooting until the amount of time you set the node clock past has elapsed. For example. if you set the clock back by one hour. wait one hour before you reboot the node.
Task 5: Reboot the node or DSP
Return the NORMAL/SERVICE switch to the NORMAL position and reboot. Type:
>
re<RETURN>
>
ex domain_osTask 6: Repeat Tasks 2 through 5
Procedure 2-8.
Starting the ns_helper Server Process
Use this procedure to start or restart the ns_helper on any node that maintains a master root directory.
Task 1: Check node clock synchronization
If more than one node runs (or will run) ns_helpers, check to make sure that the nodes' clocks are within one minute of each other. To do so, enter the netstat -n command, followed by the node specifications of the nodes that run ns_helpers. In this example, the nodes brook and golden run ns_helper.
$ netstat -n Ilbrook Ilgoiden
The net id.node ID of this node is 0.5678.
****
Node 4567****
-//brookTime 1986/07/01.15:25:57 Up since 1986/07/01.14:38:25
Net I/O: total= 24555 rcvs = 17930 xmits 6625
Winchester I/O: total= 13837 reads= 11098 writes= 2739 No ring hardware failure report.
System configured with 3.0 mb of memory.
****
Node 1345****
//goldenTime 1986/07/01.15:21:44 Up since 1986/06/24.20:57:25 Net I/O: total= 5572914 rcvs
=
3892617 xmits 1680297Winchester I/O: total= 244976 reads= 148445 writes= 96531 System configured with 2.5 mb of memory.
If the times reported are not within one minute of each other, use Procedure 2-7 to synchronize the hardware clocks on the ns_helper nodes.
Task 2: Log in
Log in to the node that will run ns_helper. Use the appropriate procedures for nodes with monitors or DSPs.
Task 3: Edit the start-up file
Add a line to the appropriate start-up file for the node's type; this line will start an ns_helper process on'this node when the node is rebooted. For DM start-up files, insert the following on a line by itself:
# cps /sys/ns/ns_helper
To start up servers via the UNIX system letc/rc user script, uncomment the following lines in that script:
# if [ - f /sys/ns/ns helper ]; then
# (echo" ns helpei\c" )/dev/console
# /sys/ns/ns=helper
&
Task 4: Start the ns_helperprocess
If you are working at the node you want to run ns_helper, enter the following command in the DM input window:
Command: cps Isys/ns/ns_helper
If you are working at another node (for example, if the ns_helper node is a DSP server, enter the following command. You must use this command even if you are logged in remotely to the ns_helper node.
$ crp -on node_spec -cps Isys/ns/ns_helper Where node_spec is the name of the node.
Task 5: Verify that the server process is running
Enter the pst command. The output from the command is shown below.
$ ps -e
Processor
I
PRIORITYI
Time (sec) mn/cu/mx70.938 21.297 0.850
16/16/16 1/14/16 1/14/16
Task 6: Repeat Tasks 2 through 5
Program
I
state Counter1BDE6
<active>
1BD46
wait Ready wait
Process Name
display_manager process 7
ns_helper
Procedure 2-9.
Initializing the Network ns _helper Database
Use this procedure to initialize the ns_helper database on a new Domain network. We illustrate the following procedure with ns_helper running on two nodes: golden
(ID 8521), and brook (ID 8525) and with six nodes in the network: golden, brook, grayling, gila, arctic_char, and coho.
Task 1: Catalog all nodes in their own root directories
Be sure that all nodes in the network have their own entry directory names cataloged in their own root directories. Procedures 2-1 and 2-2 show how to do this.
Task 2: Start ns_helper on each helper node
Use Procedure 2-8 to start the ns_helper process on the nodes you've selected.
Task 3: Start edns
Invoke edns from any node in the network with the node specification of the node that will run ns_helper. Our example selects brook; its ns_helper process becomes the default ns_helper.
$ edns 8525
the default ns_helper is 0.8525
<edns>
In the display, <edns> is the edns prompt.
Task 4: Initialize the ns_helper database
Use the edns init command to initialize the ns_helper database that will reside on this node.
<edns> init
6 nodes responded to lcnode request 6 entries added to directory
o
names already existed 0 errorsTask 5: Verify that all nodes are in the database
Enter the edns Is command to list the database and verify that it includes all nodes on the network.
<edns> Is grayling gila 6 entries
brook
arctic char listed.
Repeat Task 3 if some nodes were not added to the directory. Skip to Task 10 if you are only going to have one ns_helper node running on the network.
Task 6: Create an ns_helper replica
If you wish to run more than one ns_helper process, use the following command to set the default server process to a replica ns_helper node. In our example, we're setting the default server to the process running on golden, so that we can create an ns_helper database replica on that node.
<edns> set 8521
The default ns_helper is 0.8521
Task 7: Initialize the replica database
You must initialize the replica database (in the example, golden) with information from the original database (on brook).
<edns> init -from 8525
Task 8: Verify that the two databases are identical
Use the edns diff command to verify that the original and replica ns_helper databases contain the same information.
<edns> diff golden brook
The two directories are identical The two replica lists are identical
If the databases are not consistent, repeat Task 7.
Task 9: Create additional replicas
Repeat Tasks 6 through 8 for each additional replica node that you are initializing.
Task 10: Quit the edns program
End the edns session by typing the following:
<edns> quit
Procedure 2-10.
Adding Nodes to the ns_helper Master Root Director