1
Microsoft Dynamics® 80640 Training
Dynamics AX 2012 R3
Retail in Ecommerce Stores:
Development and Customization
Customization
Module 1: ECOMMERCE TECHNICAL OVERVIEW
Lesson 1: Features and Components ... 1-2 Lesson 2: Logical Design of Ecommerce Sites ... 1-11 Lesson 3: Mapping Entities in AX and SharePoint ... 1-17 Lesson 4: Ecommerce Publishing Architecture ... 1-18
Module 2: DEVELOPMENT ENVIRONMENT
Lesson 1: Configure Development Environment ... 2-2
Module 3: BRANDING THE ECOMMERCE SITE
Lesson 1: Customize the Visual Design of a Ecommerce Site ... 3-2 Lesson 2: Customize the Functionality of an Ecommerce Site ... 3-23
Module 4: ECOMMERCE WEB PARTS
Lesson 1: Create a SharePoint WebPart ... 4-2 Lesson 2: Add a New AJAX Service to the Storefront ... 4-7 Lesson 3: Customize Out-of-the-Box WebParts ... 4-14
Module 5: SEARCH CONFIGURATION AND CUSTOMIZATION
Lesson 1: Configure Refiners and Faceted Navigation ... 5-2 Lesson 2: Manage Query Rules ... 5-10
Module 6: COMMERCE RUNTIME SERVICES
Lesson 1: Commerce Runtime Extensibility ... 6-2 Lesson 2: Customize the Functionality of the Ecommerce Site ... 6-20
Module 7: TESTING, DEPLOYMENT AND VERSIONING OF
ECOMMERCE SITES
Lesson 1: Testing Considerations ... 7-2 Lesson 2: SharePoint Deployment Architecture Guidance ... 7-5 Lesson 3: Deployment ... 7-6
3 Lesson 4: Versioning and Code Maintenance ... 7-13
Module 8: ECOMMERCE LABS
Lab A: Customizethe Functionality of an Online Store ... 8-2 Lab B: Configurethe Refiner on the Search Results Page of the Ecommerce Site... 8-4 Lab C: Changea Site Logo using MasterPage ... 8-6 Lab D: OnlineStore Design Elements ... 8-8 Lab E: CustomizeSearch Results ... 8-13 Lab F: Extendinga Commerce Entity ... 8-17
Module Overview
Microsoft Dynamics AX 2012 R3 introduces a new suite of features that help you deploy, manage, and customize an online sales channel that is fully integrated with Microsoft Dynamics AX. By using this new suite of Ecommerce features, you can centrally manage products, merchandising, and order fulfillment for all aspects of your online sales channel directly in Microsoft Dynamics AX. The runtime component enables you to deliver content and retail services in a scalable way. A new starter online store speeds up the development of a highly customized online channel. The starter online store includes the patterns and best practices that are required to support production-ready deployments. This includes powerful, search-driven, adaptive experiences offered by the SharePoint Server 2013.
Objectives
The objectives are as follows:
Explain the features and components of the Ecommerce site. Present the high level logical design of the Ecommerce site. List the customizable controls available for Ecommerce.
Describe the entity mappings between SharePoint and Dynamics AX.
Technical Background
Microsoft Dynamics AX 2012 R3 Retail model includes Ecommerce features. The Ecommerce functionality includes a starter online store. This is known as the online storefront. This is built using Microsoft SharePoint Server 2013.
Commerce Runtime (CRT) is a set of .NET assemblies that connect to a custom SQL database that is named CRT Database. The Ecommerce site uses Commerce Data Exchange (CDE) – Real time or Sync Service or both to communicate with back end AX (also known as the AX Headquarter).
To customize the appearance and behavior of the SharePoint Ecommerce site, you must have HTML, CSS, and JavaScript skills. The core of the SharePoint platform is built by using .NET technologies. Familiarity with .NET will help you customize or extend the functionality of the ecommerce site.
Customization
Features and Components
Overview
This module provides an overview of the following major components of the Microsoft Dynamics Ecommerce architecture in AX 2012 R3 and an understanding of how these components interact with one another:
1. Commerce Data Exchange 2. Channel Database
3. Microsoft Dynamics AX connector for SharePoint 4. SharePoint Product Catalog
5. SharePoint Search & Web-Parts 6. SharePoint Publishing Site 7. Commerce Runtime Service
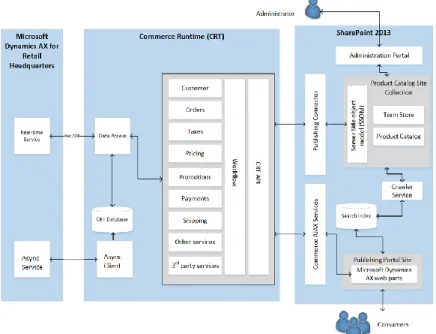
The “Components of Ecommerce Solution” figure displays the major components of Ecommerce solution.
FIGURE 1.1: COMPONENTS OF ECOMMERCE SOLUTION
The Ecommerce site is built by using the Microsoft SharePoint Server 2013 cross-site publishing platform. Cross-cross-site publishing uses one or more authoring cross-site collections to author and store content, and one or more publishing site collections to control the user interface of the site and to show content. The authoring site collection can contain catalogs such as Pages libraries, and lists of items that are tagged with metadata. These catalogs are indexed by the search system and made available to the publishing site collection. The publishing site collection displays previously indexed data on web pages by using search-driven Web Parts.
In Ecommerce, the authoring site collection is called the “Product catalog site.” This is an internal-only site that is accessed by content authors and internal employees. However, the publishing site is the public-facing site that anonymous users access for online shopping.
Reference Links: To learn more about the Cross-site publishing feature of SharePoint 2013, please refer to the Cross-site publishing feature of SharePoint 2013 that is located at http://technet.microsoft.com/en-us/library/jj635883. The “Detail Architecture of the Online Store” figure displays the logical
architecture and the flow of information between some features and components that are discussed in this section.
FIGURE 1.2: DETAIL ARCHITECTURE OF THE ONLINE STORE
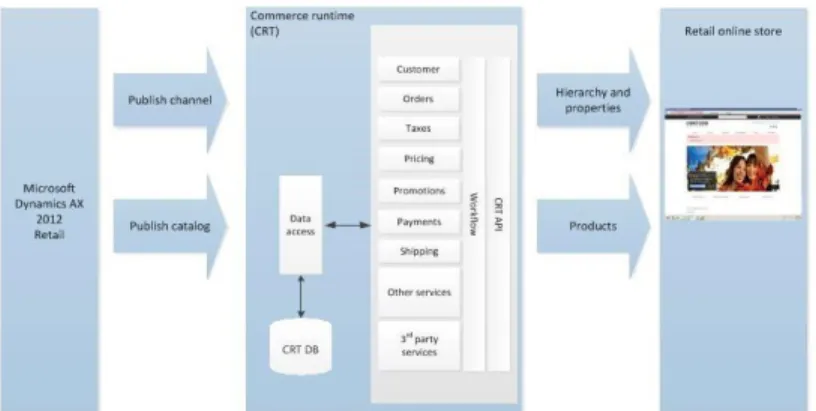
Commerce Runtime (CRT)
The Microsoft Dynamics AX commerce runtime (CRT) serves as the engine for a retail channel. It connects to a CRT database that stores business data for the Ecommerce site. The Microsoft Dynamics AX commerce runtime is a set of DLLs that performs business logic and data processing for an online store. The CRT has four layers (data access, services, workflow, and API) and a database. The CRT is installed as part of the Ecommerce site.
The “Components of Commerce Runtime” diagram displays the components of the CRT.
Customization
FIGURE 1.3: COMPONENTS OF COMMERCE RUNTIME
Channel Database Schema
The online store uses this database as a data store before pushing data into SharePoint. The database is named AxRetailSP by default; however, you can change this name during the deployment of the online store. This database contains data that is used by the CRT, products-retailed data, and the hierarchy in which the product should display on the Ecommerce site.
Dynamics AX 2012 R3 uses a single database schema for enterprise POS, modern POS, and online stores. The channel database Table schema is mainly a subset of the back-office schema. One channel database can contain data for one or more stores.
The “Channel Database” diagram displays how the CRT enables the omni-channel vision in Microsoft Dynamics AX2012 R3.
The following figure displays how the channel database is used in the Ecommerce architecture.
FIGURE 1.4: CHANNEL DATABASE
You can customize the channel database by extending one or more of the following database objects:
SQL stored procedures SQL functions
SQL tables SQL views SQL types
Data Access
The data access layer is in addition to the CRT database. This is an abstraction layer to access the CRT database. In the data access layer, raw data is translated into objects in memory. For example, an object could be a product. Products have attributes like price and color. The data access layer has functions that you can use to manipulate these objects. Stored procedures and Views pass packets of data from the database to data entities. You can use this data in services and
workflows. You can update the packets of data to include new fields that you add in Microsoft Dynamics AX.
Services
The services layer is in addition to the data access layer. Services query for real-time data. You can use these services to customize existing functionality or you can add your own service that has new functionality. These services are scalable and extensible and are empowered through a combination of the commerce data exchange and the commerce runtime.
Customization
Workflow
In addition to the services layer is the workflow layer. A “workflow” is a collection of services and business logic that together define business processes. For example, when a customer adds an item to the cart, you could use a workflow to obtain the price, perform validation, check inventory quantity, and calculate shipping, tax, and discounts. You can use workflows that are included in Microsoft Dynamics AX, or you can create new workflows. You can even use a workflow to connect to a third-party system as part of your business processes.
Application Programming Interface (API)
In addition to the workflow layer is the API layer. You can use the API for tasks such as retrieving information about items, price and shipping calculations, and order placement. You can extend the API to fit your business processes.
Commerce Runtime Configuration
The CRT configuration file (commerceRuntime.config) contains an enumeration of services as .NET types and controls which service types to load. You can add types in the commerce runtime configuration file to control which services are loaded in the commerce runtime.
Services are loaded in the order in which they are listed in the configuration file. All default services are loaded automatically. However, if you add a new service above one of the default services, the new service will replace the default service.
Commerce Data Exchange: Real-Time Service
Real-Time Service provides Retail POS and Commerce Runtime with real-time access to Microsoft Dynamics AX data for scenarios such as the following:
Customer orders
Sales orders and invoices
Customer validation and creation Inventory lookup
Cashier validation Credit vouchers Gift cards
Loyalty programs
Retail POS and Commerce Runtime can perform most operations without connectivity to Microsoft Dynamics AX. However, for certain scenarios both may retrieve and update data directly in Microsoft Dynamics AX.
Commerce Data Exchange: Real-time Service is a Windows Communication Foundation (WCF) service that uses .NET Business Connector to facilitate communication between Microsoft Dynamics AX Retail headquarters and the Microsoft Dynamics AX commerce runtime (CRT). In previous releases, this service was called the Retail Transaction Service. You use Microsoft Dynamics AX Setup to install this service.
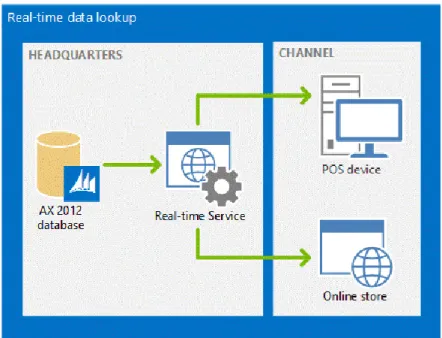
The following figure displays the interaction between AX 2012 R3 and Online Store by using Real-time service.
FIGURE 1.5: DYNAMICS AX AND ONLINE STORE USING REAL-TIME SERVICE You can extend Commerce Data Exchange: Real-time Service by adding extension methods to the RetailTransactionServiceEx class.
Commerce Data Exchange: Async Service and Async Client
Commerce Data Exchange: Async Server is part of the system for asynchronous data exchange between Microsoft Dynamics AX and retail channels. Async Server is installed at headquarters and communicates with Microsoft Dynamics AX. You can distribute the communication load at the head office by installing multiple instances of Async Server.
Async Service: Async Server runs as a Windows Communication Foundation (WCF) service on IIS.
Microsoft SQL Server change tracking on the Microsoft Dynamics AX database determines the data changes that must be sent to channels. Based on a distribution schedule, Async Server packages that data and saves it to a file location. Commerce Data Exchange: Async Client periodically checks for new data packages, collects the data packages, and then applies them at the channel.
Customization
Message Databases: Async Server uses a message database to store status information for data transfers that are in progress or have completed. Async Client contacts the message database to determine whether there are new data
packages to collect.
You can also transfer status messages from the message database to the Microsoft Dynamics AX database so that they can be viewed in Microsoft Dynamics AX. Each instance of Async Server can refer to only one message database. However, a message database can have multiple instances of Async Server that refer to it. There can be only one message database per partition in Microsoft Dynamics AX. Commerce Data Exchange: Async Client is part of the system for asynchronous data exchange between Microsoft Dynamics AX and retail channels. Async Client is installed at the channel, and communicates with the channel database. Typically, you install one instance of Async Client for each channel.
Async Client runs as a Windows service. At a configurable interval, Async Client checks with Async Server to see whether new data packages are available. If there is new data, Async Client takes the data from the working folder and applies it to the local channel database. Async Client also uploads sales transactions from the channel to Microsoft Dynamics AX.
Async Client uses the WS-ReliableMessaging protocol to transfer data by default. Reliable messaging makes sure that the data is transferred successfully over the network. However, the confirmation actions that are sent between the source and the destination can cause data transfers to be slower. For better throughput, you can use streaming instead. However, streaming does not handle network
problems. Streaming is ideal for initial high-speed data synchronization or for ongoing synchronization of large amounts of data. If you have a reliable network and high data volume, we recommend that you stream data.
Async Client uses a message database to store status information for data transfers that are in progress or were completed
The following figure indicates how the Async server interacts with the Async client.
Synch Service
Note: Synch Service is required for Retail only in Microsoft Dynamics AX 2012 R2 and Microsoft Dynamics AX 2012 Feature Pack. In Microsoft Dynamics AX 2012 R3, this component is used only to support earlier versions of Retail POS while you upgrade (N-1).
Microsoft Dynamics AX for Retail Commerce Data Exchange: Synch Service is the integrated service that periodically replicates data between the head office database and store databases, and among store databases.
Term Sets and Managed Navigation
A “term” is a word or a phrase that can be associated with an item in SharePoint Server 2013. A “term set” is a collection of related terms. You can specify that a column must contain a term from a specific term set. Managed metadata is a way to refer to the fact that terms and term sets can be created and managed
independently from the columns themselves. “Managed metadata” is a
hierarchical collection of centrally managed terms that you can define, and then use as attributes for items in SharePoint Server 2013.
You use term sets to tag catalog content such as pages or list items on the authoring site. By doing this, terms categorize the content into a hierarchy. These same terms are used later on the publishing site to issue queries, show
information about category and catalog item pages, create friendly URLs, and for “managed navigation.”
Reference Links: For more information about managed metadata, term sets, and enterprise keywords, refer to the article that is located at
http://technet.microsoft.com/en-us/library/ee424402.aspx.
The managed navigation feature in SharePoint Server 2013 enables you to build navigation for a publishing site that is derived from a SharePoint managed metadata taxonomy. Managed navigation also lets you create friendly URLs without changing the structure of your site.
The Ecommerce publishing site uses the managed navigation feature to build the site navigation. Categories that are created in AX Retail Headquarters are
published as term sets into the term store of the Publishing Site collection. These terms then are displayed as navigation hierarchy in the publishing site collection. Reference Links: For more information about Managed Navigation, refer to the article that is located at
Customization
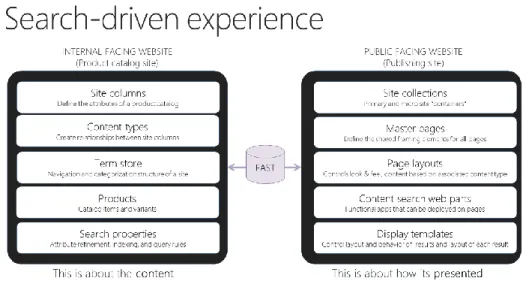
Search
The Microsoft SharePoint Server 2013 cross-site publishing platform uses Microsoft SharePoint Search and search-driven pages to dynamically display content for customers.
The Crawler service of SharePoint search crawls the product catalog lists and the term store of the Product Catalog Site collection and stores the crawled data into the Search Index.
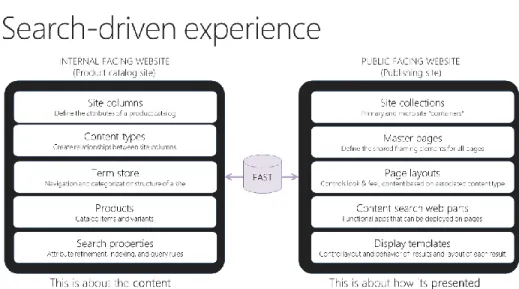
The following figure displays how search driven pages work in SharePoint 2013.
FIGURE 1.7: SEARCH-DRIVEN EXPERIENCE.
The search system indexes content from the authoring site and the product catalog site collection. When a user views a page on one of the publishing sites, queries from Search Web Parts on that page are sent to the search index. The search index returns results, and displays them in the Search Web Parts on the page.
Reference Links: For more information about Search in SharePoint 2013, refer to the article that is located at
http://technet.microsoft.com/en-us/library/jj219738.aspx.
Retail Store Databases
When you deploy the online store, the system creates the following databases in Microsoft SQL Server.
CRT Database
The online store uses this database as a data store before pushing data into SharePoint. By default, the database is named AxRetailSP. Settings for this database are stored in the oob-topology.xml file under Settings/Channel.
Identity Provider Database
This database stores user credentials for forms-based authentication. By default, the database is named SPFBA. Settings for this database are stored in the oob-topology.xml file under Settings/IdentityProvider.
Custom Claims Provider Database
This database stores the mapping between user identify and their Microsoft Dynamics AX customer number that was created when the user created an account. By default, the database is named SPAuthZ. Settings for this database are stored in the oob-topology.xml file under Settings/CustomClaimsProvider.
Logical Design of Ecommerce Sites
Once the Ecommerce site (online starter site) is deployed, it creates web applications and site collections for hosting the site. Use the Cross-publishing feature of SharePoint 2013 to separate the authoring content site from the publishing content site, which is visible to the end-user.
Lesson Objectives
Explain the information architecture of the Ecommerce site
Present the major components of SharePoint that are used to build the Ecommerce site
Review the customizable controls available for extensibility
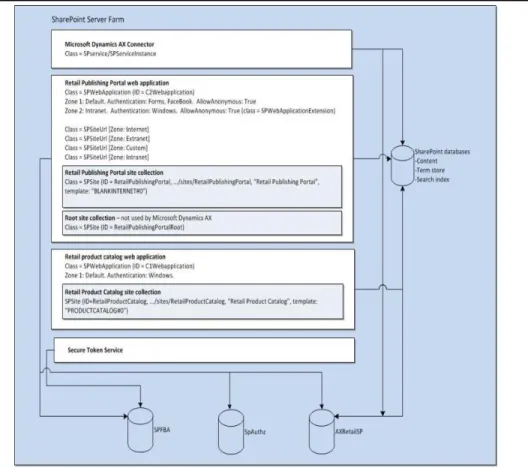
Logical Architecture
The “Logical Architecture” figure provides a detailed view of the web applications and site collections that are created on the SharePoint server when you deploy the Retail online store. It also lists the associated classes and zones that were created for the applications and site collections.
Customization
FIGURE 1.8: LOGICAL ARCHITECTURE
Site Collections
There are two main site collections created when you deploy the Retail Online Channel. They are the Product Catalog site collection and the Retail Publishing Portal site collection.
Product Catalog Site Collection
The Product Catalog contains catalogs such as Page libraries. This is a list of product items that are tagged with metadata. All libraries and lists are shared as catalogs. The site collection is located in an independent web application. The product catalog content web application uses Windows authentication (Active Directory) to authenticate content authors.
Retail Publishing Portal Site Collection
The publishing portal site collection is located in a separate web application. The publishing portal web application uses Windows authentication (Active Directory) for designers and forms-based authentication for web users. This web application is configured to also enable anonymous access for web users.
The publishing site collection has an asset library, where you can store rich media content like images and videos. Because the publishing site collections are outside the firewall, the asset library is located in a separate site collection in the same web application as the publishing site collections. This gives users on the publishing sites read access to those assets. Internal users such as designers and other content authors have Contribute permission level to add, update, and delete items in the asset library. The asset library is added to the Suggested Content Browser Locations list for the authoring and product catalog site collections so that content authors can use those assets in their content.
Reference Links: For more information about SharePoint Site Collections, refer to the article that is located at
http://technet.microsoft.com/en-us/library/cc262410.aspx.
Microsoft Dynamics AX Connector
The Microsoft Dynamics AX Connector (also named the Channel Connector) is a SharePoint service publishing job that runs in the OWSTimer.exe service. The publishing job retrieves updated product information from the CRT database and pushes it into the product catalog site collection. This information then is crawled by Search and stored in the Search Index.
Secure Token Service
The Secure Store Service is a claims-aware authorization service that includes an encrypted database for storing credentials. The Secure Store Service is an
authorization service for SharePoint that runs on an application server and is used for validated forms-based authentication users. The Secure Store Service provides a database that is used to store credentials. These credentials usually consist of a user identity and password, but can also contain other fields that you define.
Reference Links: To learn more about authentication in SharePoint, refer to the following article located at
http://technet.microsoft.com/en-us/library/jj219571.aspx.
SharePoint Page Model
SharePoint uses templates to define and render the pages that a site displays. The structure of a SharePoint page includes three main elements:
Master pages define the shared framing elements (the “chrome”) for all pages in your site.
Page layouts define the layout for a specific class of pages.
Pages are created from a page layout by authors who add content to page fields.
Customization
Master Pages
A master page defines the chrome (the shared framing elements) of your site. These elements may include the header and footer, top navigation, breadcrumbs, search box, site logo, and other branding elements. The master page remains consistent as visitors move through your site.
A master page also defines regions called content placeholders that are completed by content from matching regions on page layouts. The body of a master page usually contains just a single content placeholder known as PlaceHolderMain that is created automatically. All content from a page layout displays inside this one content placeholder.
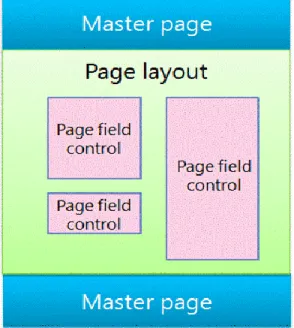
Page Layouts
A page layout is a template for a specific type of page in your site, such as an article page or a product details page. As its name implies, you can think of a page layout as defining the layout or structure for the body of a page.
Page layouts define regions or content areas that map to content placeholders on the master page. Again, the most common scenario is that a page layout defines a single content region that maps to the single content placeholder that is created automatically on a master page
Page Field Controls
The main purpose of a page layout is to arrange page fields. When you design a page layout, you insert, position, and style elements called page field controls. These controls will eventually contain content when an author creates a page that is based on that page layout. In addition to page fields, page layouts can also contain Web Part zones, to which content authors can add Web Parts. Master pages cannot contain Web Part zones.
You can define the styles that are used by the content with a page field control. While authors can add content to a page, the designer has ultimate control over how that content is rendered through the CSS that is applied to those controls.
FIGURE 1.9: SAMPLE SHAREPOINT PAGE
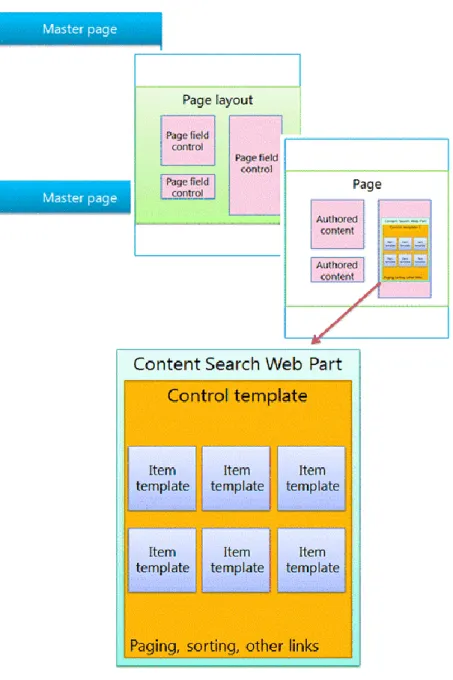
The SharePoint Page Model section explains the SharePoint page model as master pages, page layouts (with page fields), and pages. These elements are common in a publishing site in which authors regularly create and publish new content. A SharePoint page contains these main elements:
Master pages Page layouts
o Regular page layouts that you create for specific content types, as described previously
o Category and item details page layouts that are created through cross-site publishing of a catalog
Pages
Web Parts to display content to the user
o Search-driven Web Parts, such as the Content Search Web Part o Custom Web Parts that integrate with CRT Services to access
information
Display templates to control which managed properties appear in the search results of a search-driven Web Part and control the styling and behavior of those search results:
o Control display templates that control the layout of search results and any elements that are common to all results, such as paging, sorting, and other links
o Item display templates that control how each search result is displayed and repeated for each result
Customization
The Ecommerce site is based on cross-site publishing feature that uses search-driven Web Parts to surface content on sites and typical web parts that connect to the CRT Services to access information.
The “Master page, page layout, and page with Web Part” figure displays the relationship of Master page, Page layout, Page and the Content Search Web part.
FIGURE 1.10: MASTER PAGE, PAGE LAYOUT, AND PAGE WITH WEB PART Reference Links: For more information about the SharePoint 2013 Page model, refer to the article that is located at http://msdn.microsoft.com/en-us/library/jj191506.aspx.
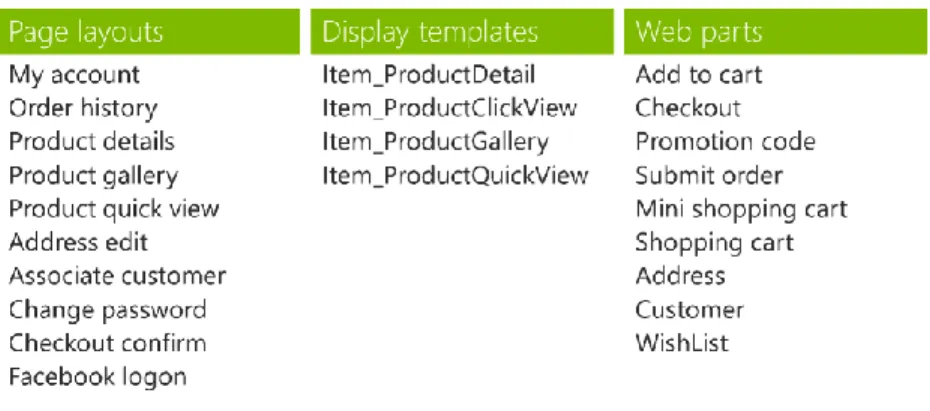
Customizable Controls
The starter online store includes the following customizable controls.
FIGURE 1.11: CUSTOMIZABLE CONTROLS FOR THE STARTER ONLINE STORE You can change the previous list of controls to alter the appearance and behavior of the Ecommerce site, and to change behavior from the UI perspective.
Mapping Entities in AX and SharePoint
AX Entities to SharePoint
The following figure contains a list of Dynamics AX entities that map to SharePoint entities.
Customization
Product Catalog Site Mapping to Public-Facing Site
The “Mapping between Internal-Facing Site and Public-Facing Site” figure highlights how the entities of the Internal Authoring site (Product Catalog) are mapped to the Public-Facing site.FIGURE 1.13: MAPPING BETWEEN INTERNAL-FACING SITE AND PUBLIC-FACING SITE
Ecommerce Publishing Architecture
This topic contains conceptual information to help developers and system administrators understand how channels and catalogs are published from the Microsoft Dynamics AX Retail module to an online store in Microsoft SharePoint 2013 Products.
Architecture of Publishing Process
The “High-Level Architecture of Retail Online Store Publishing Processes” figure displays the architecture and flow of the publishing processes. These processes are described in more detail in this topic.
FIGURE 1.14: HIGH-LEVEL ARCHITECTURE OF RETAIL ONLINE STORE PUBLISHING PROCESSES
Publish a Channel
To publish the Retail online store channel means to replicate the basic structure of your online store between Microsoft Dynamics AX and SharePoint. You create the basic structure of your online store channel in the Microsoft Dynamics AX Retail module.
The following set-up tasks must be completed before you can publish the channel:
1. Add the online store to the organization hierarchy.
2. Create the online store and configure properties in Microsoft Dynamics AX.
3. Configure the category hierarchy of your site. 4. Create the online store in SharePoint.
Note: For more information about how to publish a channel, click the following link:
Customization
http://technet.microsoft.com/en-us/library/jj682095.aspx.
After you complete these steps, you are ready to publish the store, hierarchies, and properties to SharePoint.
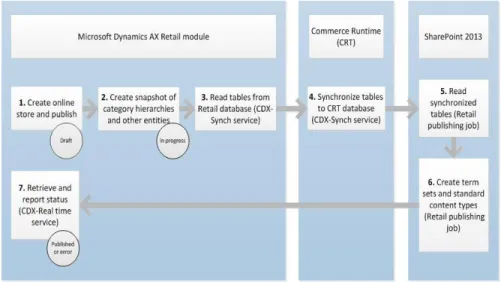
The “Process Flow for Publishing a Retail Online Store Channel” figure displays the publishing process for a Retail online store channel.
FIGURE 1.15: PROCESS FLOW FOR PUBLISHING A RETAIL ONLINE STORE CHANNEL
You create the online store in Microsoft Dynamics AX and publish it from the Online stores form. The publish status changes from “Draft” to “In progress.”
1. Microsoft Dynamics AX takes a snapshot of the category hierarchies (known as the Retail hierarchy) and properties.
2. The Commerce Data Exchange: Synch Service reads information about the online store, hierarchies, and properties in the Retail store database and sends it to the Commerce runtime (CRT).
3. The CRT synchronizes the tables in the CRT database.
4. The Retail publishing job that runs as a SharePoint timer job reads these synchronized tables from the CRT database and creates hierarchies for the site that you created in SharePoint.
5. The Retail publishing job creates term sets and standard content types in SharePoint.
6. The Commerce Data Exchange: Real Time Service reads the status of the Retail publishing job actions and publishes that status in Microsoft Dynamics AX. The status displays either Published or Error.
Publish a Catalog
A Retail product catalog lets you identify the products that you want to offer in your online stores. When you create a catalog, you identify the online stores where the products will be offered, add products, and improve the product offerings by adding merchandising details. After the catalog is approved, you publish it to make products available in the online store. The following set up tasks must be completed before you can publish a catalog:
1. Set up retail products and configure hierarchies, assortments, and variants.
2. Set up retail product catalogs and configure attribute groups and workflow.
The “Process Flow for Publishing a Retail Online Store Catalog” figure displays the publishing process for a Retail online store catalog.
FIGURE 1.16: PROCESS FLOW FOR PUBLISHING A RETAIL ONLINE STORE CATALOG
1. Microsoft Dynamics AX reads the product tables in the Retail
database (tables A-1040_OC and N-1040_OC) and creates a listing for each variant. For example, a product might be jeans and the variant might be red. The system creates a listing for red jeans.
2. The Commerce Data Exchange: Synch Service synchronizes all tables that are related to the listing. For example, the system synchronizes all tables that are related to the red jeans variant. These synchronized tables might include attribute tables such as brand and style. This information is synchronized in the Commerce runtime (CRT) database.
Customization
3. The system updates the price of the listing in the CRT database. 4. The system determines whether any new attributes were added for
the listing. For example if the listing red jeans includes a new attribute called texture the system creates a custom site column for that attribute. The system creates a new rule for this list item and finishes the process in SharePoint by creating a new row for the red jeans listing.
5. The CRT records the publishing status for the listing.
6. The Commerce Data Exchange: Synch Service synchronizes the publishing status of the red jeans listing with all other publishing statuses.
7. The Commerce Data Exchange: Real Time Service reads the catalog publishing statuses and publishes an “all-up” or aggregated status in Microsoft Dynamics AX. The status displays either Published or Error.
Module Review
This course highlighted the features and components of the Ecommerce site and the inter-relationships between Dynamics AX and SharePoint Server. This course also described the main elements of SharePoint that are used to build the Ecommerce site and the controls and services that can be extended.
Test Your Knowledge
Test your knowledge with the following questions.
1. Which of the following layers is not a part of the CRT architecture? ( ) Data Access
( ) Services ( ) Workflow ( ) Messaging
Test Your Knowledge Solutions
Module Review and Takeaways
1. Which of the following layers is not a part of the CRT architecture? ( ) Data Access
( ) Services ( ) Workflow (√) Messaging
MODULE 2: DEVELOPMENT ENVIRONMENT
Module Overview
Microsoft Dynamics AX 2012 R3 includes an online starter store (Ecommerce) that is built on Microsoft SharePoint Server 2012. You can create your own online store by using some elements of the starter store, customizing some elements, and adding your own elements.
This module will help you set up a development environment specifically to customize the starter store.
Objectives
The objectives are as follows: Install Retail SDK
Install the Development tools
Customization
Configure Development Environment
This lesson will help you set up a development environment so that you can customize the online starter store (Ecommerce) site.
Before You Start
Before you start to set up your development environment for customizing the online store, you must install and configure Microsoft Dynamics AX and Microsoft Dynamics AX Retail components. After you install the Retail components, you must configure the Retail online store.
Retail Online Channel includes components that you need to set up an online sales channel by using Microsoft SharePoint products. This component lets you integrate data from Microsoft Dynamics AX into the SharePoint site. You can also administer the online channel by using the Microsoft Dynamics AX client.
Reference Links: You can also read the following TechNet article to install and deploy the Dynamics AX Retail components: http://technet.microsoft.com/EN-US/library/jj937972.aspx
Install Visual Studio 2012, Tools, and Client Components
When you install Visual Studio 2012, Office Developer Tools for Visual Studio 2012, and SharePoint client components, you receive all templates and tools to develop and customize the Retail online store site by using SharePoint 2013 on your local development computer and CRT services.Reference Links: To install Visual Studio 2012, click here: http://msdn.microsoft.com/en-us/library/e2h7fzkw(v=vs.110).aspx
After you have installed Visual Studio 2012, download and install Microsoft Office Developer Tools for Visual Studio 2012 and the SharePoint Client Components. Here is a list of tools and software and their relative URLs to download and install.
Tools / Software URL
Install Visual Studio 2012 http://msdn.microsoft.com/en-us/library/e2h7fzkw(v=vs.110).aspx Install Microsoft Office
Developer Tools for Visual Studio 2012
http://msdn.microsoft.com/en-us/office/apps/fp123627
On the Downloads page of the Apps for Office and SharePoint Developer Center, select the link
Tools / Software URL
for the web-based platform installer (WebPI). This installs the tools and assemblies that you must have to develop apps for SharePoint. Install SharePoint Client
Components that contain the client assemblies.
http://www.microsoft.com/en-us/download/details.aspx?id=30355
You can use the SharePoint Server Client
Components Preview to enable remote and local development with SharePoint Server.
You can use the assemblies in the client components to build a web application or a client application that connects to SharePoint, which is hosted or running on an x86-bit platform. If you are targeting an x64-bit web application, then you must install the x64-bit versions of the required assemblies separately.
Install Retail SDK
The Retail Software Development Kit (SDK) includes sample code and templates that you can use to customize Retail for Microsoft Dynamics AX.
Note: Retail SDK is available only with Microsoft Dynamics AX 2012 Feature Pack and Microsoft Dynamics AX 2012 R3.
Install Retail SDK on the SharePoint server, where you have configured the Storefront site (Ecommerce components).
Follow these steps to install Retail SDK. If you install other Microsoft Dynamics AX components at the same time, the installation pages vary, depending on the components that you are installing.
1. Start Microsoft Dynamics AX Setup. Under Install, select Microsoft Dynamics AX components.
2. Advance through the first wizard pages.
3. If the Setup Support files have not been installed on this computer yet, the Select a file location page is displayed. The Setup Support files are required for installation. Provide a file location or accept the default location, and then click Next. On the Ready to install page, click Install.
4. On the Select installation type page, click Custom installation, and then click Next.
5. On the Select components page, select Retail SDK, and then click Next.
Customization
6. On the Prerequisite validation results page, resolve any errors. When all errors are resolved, click Next. For more information about how to resolve prerequisite errors, see Check prerequisites at
http://technet.microsoft.com/EN-US/library/gg731884.aspx
7. On the Ready to install page, click Install.
8. After the installation is complete, click Finish to exit the wizard. After you install the Retail SDK, two folders are created in the Documents folder inside the Retail SDK folder:
1. Commerce Run-time: This folder contains sample code, reference assemblies (DLLs) that are used by CRT, and the Services code base. Use this code base to customize the CRT services
2. POS Plug-ins: This folder contains sample code examples and the Services and Triggers code base. You can use this codebase to customize POS applications.
Install Cumulative Update 1 (CU1) for Dynamics AX 2012
R3
On the computer, where the Storefront is configured and the Retail SDK was installed, deploy cumulative Update 1 (CU–1) for Microsoft Dynamics AX 2012 R3. You can download the Cumulative update 1 for Microsoft Dynamics AX 2012 R3 here - http://go.microsoft.com/fwlink/?LinkId=296433
Note: As part of CU1, there are two executables: 459780_intl_i386_zip.exe – extracts to DynamicsAX2012R2-KB2807685.zip. 459781_intl_i386_zip.exe – extracts to DynamicsAX2012R2-KB2807685-BinaryOnly.zip.
Extract and install the DynamicsAX2012R2-KB2807685.zip version of Retail POS Plugins and Retail online channel.
Use this procedure to install CU1. If you install other Microsoft Dynamics AX components at the same time, the installation pages vary, depending on the components that you are installing.
1. Start Microsoft Dynamics AX Update by using the axupdate.exe file. 2. Under Microsoft Dynamics AX Update Setup, click Next, and then
advance through the wizard page until the Select components page is displayed.
3. On the Select components page, select Retail POS Plug-Ins and Retail Online Channel under Retail Components, and then click Next.
4. After the installation is complete, click Finish to exit the wizard. After you install the Cumulative update, a new folder is created in the Documents > Retail SDK folder named Online Channel. A new PowerShell script file that is named UpdateAssemblyIdentities.ps1also is created.
After the installation of Retail SDK and CU1, the folders that you created are displayed.
FIGURE 2.1: FOLDERS CREATED IN DOCUMENTS > RETAIL SDK FOLDER AFTER YOU INSTALL RETAIL SDK AND CU1
Commerce Run-time (CRT) services solution
After you have installed all the tools and components that you must have, you can start Visual Studio and open the Services Project that was installed as part of the Retail SDK package.
1. Start Visual Studio.
2. Click File > Open > Project / Solution.
3. In the Open Project dialog box, browse to Documents > Retail SDK > Commerce Run-time > Services folder.
4. Select the Services.sln solution file. 5. Click Open.
The Services solution contains three projects.
FIGURE 2.2: PROJECTS UNDER SERVICES SOLUTION
Storefront solution
After you have installed all tools that you must have, such as components and CU1, you can start Visual Studio and open the Storefront solution. This was
Customization
installed as part of the CU1 installation.
1. Start Visual Studio in Administrator mode. 2. Click File > Open > Project / Solution.
3. In the Open Project dialog box, browse to Documents > Retail SDK > Online Channel > StoreFront folder.
4. Select the StoreFront.sln solution file. 5. Click Open.
Note: When you open the StoreFront solution for the first time, you may receive multiple confirmation messages (displayed here) asking whether you want to upgrade the projects to a SharePoint 2013 solution. Click Yes for all messages. Do you want to upgrade "SharePoint.Web.WebParts.csproj" to a SharePoint 2013 solution? As soon as the upgrade is complete, the solution cannot be deployed to SharePoint 2010. Do you want to continue?
The StoreFront solution contains six C# projects as displayed in “Projects under Storefront Solution.”
FIGURE 2.3: PROJECTS UNDER STOREFRONT SOLUTION
You can explore the projects within the solution and make sure that you can browse through the code. Close Visual Studio after moving through the projects.
Strong Name for Code Signing
You must assign a new strong name to the source code because you will be recompiling the source code. The fully qualified name of the rebuilt assemblies will differ from the ones that were provided to you by Microsoft. Before you compile the source code, you must provide your own code signing key file. You can reuse your company’s key file or create a new strong name file for signing the customized code.
Follow these steps to create SNK file and update source code with new strong name file:
1. Create a new SNK file either by using Visual Studio or Strong name tool (sn.exe) and name it strongnamekey.snk.
2. Save the strongnamekey.snk file in the Documents >Retail SDK folder.
3. Extract the thumbprint of the strong name.
Create a sample Class library project and enable code signing by using the strongnamekey.snk. Build the Class library project. As soon as the DLL is created (usually in the bin\debug folder), run the strong name tool to extract the token. The command is:
Sn.exe –Tp <project.dll>
This command returns the token. Copy and paste it in the UpdateAssemblyIdentities.ps1 script file.
4. Edit the UpdateAssemblyIdentities.ps1 script file that has the version number and the thumbprint of the key file. The following two parameter values should be changed in the PowerShell script file. # configure these 2 below:
$newVersion = "1.0.0.0"
$newStrongNameKeyHash = "insert token here"
5. Execute the script “Retail SDK\UpdateAssemblyIdentities.ps1”. This may take several minutes. This process changes any source code with version references to the new strong name.
Map a network drive to the SharePoint 2013 files for
online stores.
You can map a network drive to access files that Microsoft SharePoint Server uses to support a Microsoft Dynamics AX 2012 R3 Retail online store. First, you must make sure that you have Web Distributed Authoring and Versioning (WebDAV) installed and running on your computer.
These procedures work for Windows Server operating systems.
Note: For information about mapping a drive on other operating systems, see How to: Map a network drive to the SharePoint 2013 Master Page Gallery that is located at http://msdn.microsoft.com/en-us/library/jj733519.aspx.
Customization
To verify that WebDAV is installed and running:
1. Click Start > Administrative Tools, and then click Services. 2. Scroll through the list of services and verify that the WebClient
service is started.
3. If the WebClient service name is not present, you must install the Desktop Experience Windows feature.
To install Windows Desktop Experience:
1. Click Start > Administrative Tools, and then click Server Manager. 2. Right-click the Features node and then click Add Features. 3. In the Add Feature Wizard, select Desktop Experience.
4. Click Next and install the feature. The installation may take several minutes.
5. Right-click the Web Client service, and then click Properties. 6. On the General tab, set the Startup Type to Automatic.
To map a network drive
1. Open Windows Explorer.
2. Right-click My Computer and then click Map Network Drive…. 3. Enter the path of the online store publishing portal in the Folder box.
The path typically resembles the following:
http://<your-server-name>:40003/sites/RetailPublishingPortal 4. Click Finish.
The drive appears in the list under Computer. The folders that contain the files that SharePoint uses are listed when you expand the node for the drive. Master pages are listed in the _Catalogs folder. This is a hidden folder.
To view hidden folders:
1. Click Start > Control Panel, and then click Folder Options. 2. On the View tab, select Show hidden files, folders, and drives. 3. Clear Hide protected operating system files.
Module Review
Test Your Knowledge
Test your knowledge with the following questions.
1. What are the prerequisites to map a network drive to SharePoint 2013 files?
2. Why is new strong naming required for the Storefront or Services solution file?
Customization
Test Your Knowledge Solutions
Module Review and Takeaways
1. What are the prerequisites to map a network drive to SharePoint 2013 files? MODEL ANSWER:
Web Distributed Authoring and Versioning (WebDAV) must be installed and running on your computer.
2. Why is new strong naming required for the Storefront or Services solution file?
MODEL ANSWER:
You must assign a new strong name to the source code because you will be recompiling the source code. The fully qualified name of the rebuilt
MODULE 3: BRANDING THE ECOMMERCE SITE
Module Overview
Microsoft Dynamics AX 2012 R3 Retail includes a sample online starter store. The starter store is a site built by using the new site cross-site publishing model in Microsoft SharePoint Server 2013.
You can customize the visual design of the starter Ecommerce site by changing certain types of files. For example, you can change the store logo by changing master pages, or you can change the background color of store pages by making modifications to cascading style sheet (CSS) files.
You can change the functionality of the Ecommerce site by customizing the Web Parts or the CRT Services, or both. In the starter Ecommerce site, there are two types of Web parts that are used to surface information or control behavior on the pages. They are Content Search Web parts (CSWP) and Custom Web Parts. The CSWP uses the Search index database to display information, whereas the custom Web Parts uses the CRT Services to control behavior or display content.
Objectives
The objectives of this module are as follows:
1. Explain how to change the appearance and behavior of the Ecommerce site.
2. Describe how to change the behavior of the Ecommerce site. 3. Examine the different components for the Ecommerce site that can
Customization
Customize the Visual Design of a Ecommerce Site
Every customer wants to apply their corporate brand to the appearance and behavior of their Ecommerce site. In this lesson, we analyze the details of the components that are available in the Ecommerce site. You can use these components to change the visual design of your Ecommerce site.
The following list describes five types of files in which you can change the elements on individual pages to customize the visual design of the starter store.
File Type Description
Master Pages Master pages define the shared framing elements, such as the header and footer for all the pages in your site.
Page Layouts Page layouts contain the page contents and its layout. Each page layout uses a specific master page and can act as a base page for multiple instances of the page layout. Each instance has a different page name. In the starter store, each page has a
corresponding page layout. For example, Welcome.aspx has a corresponding file named WelcomeLayout.aspx.
Cascading Style Sheets CSS files provide the page layouts with page content styling and formatting.
JavaScript JavaScript files provide the page layouts with client-side scripting functionality.
Display Templates Display templates are used in Web Parts. They use search technology to display the results of a query that was made to the search index. Display templates control which managed properties are shown in the search results and how they display in the Web Part. Each display template is made of two files: an HTML version of the display template that you can edit in your HTML editor, and a .js file that SharePoint uses.
How to: Customize Master Pages
This topic shows how to customize a master page by updating the Welcome page of the starter store. Log on your development environment by using
Note: For all customizations on the Ecommerce site, you must log in to your development environment by using an administrator logon.
1. Open a web browser and browse to the Welcome page for the starter store. Typically, the URL for the Welcome page resembles the following:
http://<your-server-name>:40002/sites/RetailPublishingPortal Note: View the behavior of the page. A slide show cycles through three pictures representing product categories. At the top left side of the page, you can see the Contoso logo.
2. Open a web browser on a computer where you are logged in by using the administrative account for SharePoint.
3. Browse to the Site Settings page of the store. Use port 40003 and sign in with administrative credentials. The link to the Site Settings page is typically found at a URL that resembles the following:
http://<computer-name>:40003/sites/RetailPublishingPortal/_layouts/15/settings.a spx
Best Practice: Add this page to your web browser’s Favoritesfor convenience in the future.
4. Click Master pages and page layouts in Web Designer Galleries to view a list of files in the Master Page Gallery page.
5. Right-click a file that you want to edit, such as Storefront.master, and then click Check Out.
6. Right-click the file, and then click Download a Copy.
7. Edit the file by using Visual Studio or another editor. For example, in the following code from Storefront.master, you can change the logo file that is displayed on each page. The file is named
logo_Contoso_main.png. You can edit that file or replace the file name with the name of a file that contains a graphic of similar size to display your company logo. The following code shows the path and file name of the logo in the Storefront.master file:
<div class="msax-Main">
<div class="s4-notdlg msax-LogoBar"> <div class="msax-Logo">
<a id="A1" href="<% $SPUrl:~sitecollection/ %>" runat="server">
<img src="/_layouts/15/Images/Storefront/logo_Contoso_main.png" /> </a>
</div>
8. To upload the file and add your changes to the site, click Upload Document on the Files ribbon.
Customization
9. Refresh the Welcome page in your initial browser session to see your changes.
The following are other ways and tools that you can use to access the master page or any other files on SharePoint, required for customization:
1. Design Manager
2. SharePoint 2013 Designer 3. Visual Studio 2012 4. Mapped Network drive
For more information about how to use Microsoft SharePoint Server to change the visual site design, see http://msdn.microsoft.com/en-us/library/jj733518.aspx.
Customize Page Layouts
Each page layout uses a specific master page, and each page has a corresponding page layout. For example, the Welcome page for the site, Welcome.aspx, has a corresponding page layout file that is named WelcomeLayout.aspx.
This topic demonstrates how to customize a page layout by updating the starter store’s Welcome page layout.
To update a page layout
1. Open a web browser and browse to the Welcome page for the starter store. Typically, the URL for the Welcome page resembles the following:
http://<your-server-name>:40002/sites/RetailPublishingPortal
Note: View the behavior of the page. A slide show cycles through three pictures that represent product categories. At the top left side of the page, you can see the Contoso logo.
2. Open another web browser on a computer where you are logged in by using the administrative account for SharePoint.
3. Browse to the Site Settings page of the store. Use port 40003 and sign in with administrative credentials. The link to the Site Settings page is typically found at a URL that resembles the following:
http://<computer-name>:40003/sites/RetailPublishingPortal/_layouts/15/settings.a spx
4. Click Master pages and page layouts in Web Designer Galleries to view a list of files in the Master Page Gallery page.
5. Right-click a file that you want to edit, such as WelcomeLayout.aspx, and then click Check Out.
6. Right-click the file and then click Download a Copy.
7. Edit the file by using Visual Studio or another editor. For example, the following code from WelcomeLayout.aspx specifies the names of the tabs on the Welcome page.
<div class="msax-tabs"> <ul>
<li><a onclick="return false;" href="#tabs-1">Customer favorites</a></li>
<li><a onclick="return false;" href="#tabs-2">Staff recommendations</a></li>
<li><a onclick="return false;" href="#tabs-3">Shop by brand</a></li>
<li><a onclick="return false;" href="#tabs-4">Clearance items</a></li>
8. Change the names of the tabs by editing the text. You can use the following code to change the names of the tabs.
<div class="msax-tabs"> <ul>
<li><a onclick="return false;" href="#tabs-1">Your favorites</a></li>
<li><a onclick="return false;" href="#tabs-2">Our recommendations</a></li>
<li><a onclick="return false;" href="#tabs-3">Shop by brand</a></li>
<li><a onclick="return false;" href="#tabs-4">Special offers</a></li>
9. To upload the file and add your changes to the site, click Upload Document on the Files ribbon.
10. Refresh the Welcome page in your initial browser session to see your changes.
Change Appearance and Behavior by Using Display
Templates
Display templates in SharePoint Server 2013 are used in Web Parts that use search technology (referred to in this article as Search Web Parts) to display the results of a query that was made to the search index. Display templates control which managed properties are displayed in the search results, and how they display in the Web Part. Each display template is made of two files: an HTML version of the display template that you can edit in your HTML editor, and a .js file that
SharePoint uses.
There are two primary types of display templates:
Control templates determine the overall structure of how results are presented. Structures include lists, lists with paging, and slide shows. Item templates determine how each result in the set is displayed.
Customization
To change an existing display template:
1. Open your mapped network drive to the Master Page Gallery. 2. Open the Content Web Part folders in the Display Templates folder. 3. Open an existing display template such as
Contoso_default_Item_ProductDetails.html in a HTML editor. 4. To prevent the storefront from displaying the available item count,
remove the following line from the display template.
Every time you save the HTML file, any changes are synched to the associated .js file.
5. Browse to your publishing site.
6. In the right corner of the page, select Settings, and then select Design Manager.
7. In Design Manager, in the left navigation pane, select Edit Display Templates. Your HTML file now displays with a Status column that shows one of two statuses:
o Warnings and Errors o Conversion successful
Change Appearance and Behavior by Using Cascading
Style Sheets (CSS)
You can customize the visual design of the Microsoft Dynamics AX 2012 R2 starter store by changing certain types of files. Cascading style sheet (CSS) provide the page layouts with styling and formatting. For example, you can change the color of elements on store pages by making modifications to CSS files.
For a typical installation, the path for the folder location of the CSS files resembles the following:
…\Program Files\Common Files\Microsoft Shared\Web Server Extensions\15\TEMPLATE\LAYOUTS\1033\STYLES\Storefront
The following table lists the cascading style sheets used in the online starter store.
Cascading Style Sheet Description
AddressEdit.css Defines the formatting for the components that display on the AddressEdit page.
AssociateCustomer.css Defines the formatting for the components that display on AssociateCustomer page.
Cascading Style Sheet Description
CheckoutConfirm.css Defines the formatting for the components that display on CheckoutConfirm page.
Control_ProductVariant.css Defines the formatting that applies to the control that was selected for the Item Details display template.
Core.css Defines global formatting that applies to all pages and UI components of the starter store. CustomerEdit.css Defines the formatting for the components that
display on the Login page.
Item_ProductDetails.css Defines the formatting for the components that display on the ProductDetails page.
Item_ProductGallery.css Defines the formatting for the components that display on the ProductGallery page.
Item_Recommended Defines the formatting that applies to the Item_Recommended display template that is used by the following web parts: Related Products, Customer Favorites, Shop By Brand, Clearance items.
Login.css Defines the formatting for the components that display on the Login page.
MyAccount.css Defines the formatting for the components that display on the MyAccount page.
OrderCheckout.css Defines the formatting for the components that display on the Checkout page.
OrderDetails.css Defines the formatting for the components that display on the OrderDetails page.
OrderHistory.css Defines the formatting for the components that display on the OrderHistory page.
ProgressBar.css Defines the formatting for the checkout
progress bar on the OrderCheckout page that is displayed for Shipping information, Billing Information, and Review.
Register.css Defines the formatting for the components that display on the page that enables a user to register a new account.
Reset.css Resets some default HTML formatting that is defined in Core.css on the master page to make the pages as browser-independent as possible. ShoppingCart.css Defines the formatting for the components that
Customization
Cascading Style Sheet Description
display on the ShoppingCart page.
Tab.css Defines the formatting for the tab control that displays on the Quickview and ProductDetails pages.
Welcome.css Defines the formatting for the components that display on the Welcome page.
The Welcome page for the starter store contains a slide show with a counter. The topic demonstrates how to change the CSS file for the Welcome page to change the colors that highlight the current slide number.
Update the CSS file for the Welcome Page to change the color of the
slide counter
1. Open a web browser and browse to the Welcome page for the starter store. Typically, the URL for the Welcome page resembles the following:
http://<your-server-name>:40002/sites/RetailPublishingPortal
Note: View the behavior of the page. A slide show cycles through three pictures representing product categories. In the lower-right-hand corner of the slides, a counter displays the current slide number. The following illustration shows the counter displaying slide number one in the original colors of gray and white. The following illustration displays the default Welcome page with the slide show counter
FIGURE 3.2: DEFAULT WELCOME PAGE WITH SLIDE SHOW COUNTER 2. Browse to the folders on the computer where the online starter store
is deployed. The path for the folder location for CSS files typically resembles the following:
…\Program Files\Common Files\Microsoft Shared\Web Server Extensions\15\TEMPLATE\LAYOUTS\1033\STYLES\Storefront
3. Open the Welcome.css file. You can use Visual Studio or any editor that you prefer. For example, consider the slide show on the Welcome page. That is the first page that you see when you access the store on port 40002. The indicator displays the number of the current slide. In the starter store, these are numbered 1, 2, and 3, and the numbers are white on a black background.
The following code from Welcome.css shows initial values for color and border.
.msax-reel_paging a { padding: 5px;
text-decoration: none; color: #fff;
}
.msax-reel_paging a.active { font-weight: bold;
background: #1c2023; border: 1px solid #101315; -moz-border-radius: 3px; -khtml-border-radius: 3px; -webkit-border-radius: 3px; }
The following table lists the original colors that are used.
4. Change the values for color and border as shown in the following code to create a display that has text in red (#f00) and highlights the current slide number in green (#3c8a3c).
.msax-reel_paging a { padding: 5px;
text-decoration: none; color: #ff0;
}
.msax-reel_paging a.active { font-weight: bold;
background: #1c2023; border: 1px solid #3c8a3c; -moz-border-radius: 3px; -khtml-border-radius: 3px; -webkit-border-radius: 3px; }
Parameter Element Color Code Color
Color: Text #fff White
Customization
The following table lists the new colors that you have entered. Parameter Element Color Code Color
Color: Text #f00 White
border Border for Text #3c8a3c Dark gray
5. Save and close the file.
6. Refresh the Welcome page in your initial browser session to view your changes.
The following illustration displays the slide show counter with colors that correspond to the changes that you made.
FIGURE 3.3: DEFAULT WELCOME PAGE WITH CHANGES IN COLOR OF SLIDE SHOW COUNTER
Customize User Interface Behavior
The Microsoft Dynamics AX 2012 R3 Retail starter store is a site that is built by using the commerce runtime (CRT) and the new site authoring and publishing model in Microsoft SharePoint Server 2013. You can use the Retail starter store as a basis for developing your own online store by using JavaScript methods for supported events. The starter store includes events that correspond to certain shopping activities, such as adding an item to the shopping cart and removing an item from the shopping cart. You can use these events to add custom
functionality in a way that resembles using the jQuery eventing model. You can turn your custom functionality on and off by using methods such as OnAddToCart and OffAddToCart. For example, you can change the message that is displayed
when an item is added to the shopping cart.
Additional Reading: To learn more about jQuery, click here:
http://www.jquery.com . To learn more about the jQuery Eventing model, click here: http://go.microsoft.com/fwlink/?LinkID=296268&clcid=0x409
The following topic shows how to change the message that is displayed when an item is added to the shopping cart. It also lists the methods for the types of events that are available to change the behavior of the starter store.
To change the message displayed when an item is added to the
shopping cart
1. Open a web browser and move to the Welcome page for the starter store. The URL for the Welcome page typically resembles the following:
http://<your-server-name>:40002/sites/RetailPublishingPortal 2. Add some items to the shopping cart.
3. Browse to the folders on the computer where the online starter store is deployed. Files that contain JavaScript for the starter store pages typically are found in a path that resembles the following.
…\Program Files\Common Files\Microsoft Shared\Web Server Extensions\15\TEMPLATE\LAYOUTS\Storefront\js
4. Open the file Storefront.js. You can use Visual Studio or any editor that you prefer.
5. Find the line that contains msaxServices.OnAddToCart. The following example shows how to change the code after line 170.
msaxServices.OnAddToCart(function () {
// msaxPopupOverlay.show('Updating shopping cart...'); alert('Adding to cart...');
});
6. Refresh the store pages and add an item to the cart. The following message is displayed in the message window: Adding to cart…. Click OK to continue.
Extending the Functionality of the Online Store
The starter store is designed to be extensible at many points in the shopping experience. For example, you can add the following JavaScript code in any JavaScript file for a page that includes the shopping cart objects. The following example causes a message to display before an item is added to the shopping cart.
var addToCartVM = new
Microsoft.Dynamics.Retail.SharePoint.Web.UI.ViewModel.AddToCartViewModel( services, $view);