SuccessFactors HCM Suite
PUBLIC
November 2014 Release
Version: 1.0 - December 5, 2014
Performance Management v12
Acceleration
Content
1 About the v12 Acceleration Administration Guide. . . 3
1.1 Important!. . . 3
1.2 Features and Configuration Options. . . 4
1.3 Features Not Supported. . . 8
1.4 Advanced Configuration Options Added to Manage Templates. . . 9
1.4.1 About Get Feedback. . . 11
1.5 Upgrading to Performance Management v12 Acceleration. . . 13
1.6 Validating and Updating Existing Performance Management Forms. . . 14
1.7 Key Concepts in Templates. . . .18
1.7.1 About Permissions. . . 20
1.7.2 About Competencies. . . 22
1.7.3 Managing Forms Via the Admin Tools. . . 24
1.8 Configuring the Route Map. . . .25
1.9 Creating a Rating Scale. . . 26
1.10 Managing Templates. . . 27
2 Adding a New Template from the SuccessStore. . . 28
2.1 Performance Review Form Settings and Fields. . . .30
3 General Settings - Advanced Settings. . . 32
3.1 Enabling Ask for Feedback. . . 34
3.2 Enabling the Circle Rating Option. . . 37
4 General Settings - Advanced Options. . . 39
5 Fields and Sections. . . 45
5.1 Employee Information. . . 45
5.2 Review Information. . . 46
5.3 Performance Goals. . . 46
5.3.1 Performance Goals: Advanced Options. . . 46
5.4 Competencies Section: Advanced Options. . . .56
5.5 Development Plan Section: Advanced Options. . . 58
5.6 Summary Section. . . 59
5.7 Signature Section. . . 60
5.8 Objective Competency Section. . . .60
1
About the v12 Acceleration Administration
Guide
This guide is designed to help you configure Performance Management v12 Acceleration. PM v12 Acceleration is the latest version of the Performance Management product that will continue to be developed with new features and enhancements.
This release brings functional parity between Performance Management v11 and Performance Management v12. This guide explains how to configure Performance Management v12 Acceleration forms using Administration Tools.
Performance Management v12 Acceleration-compatible templates are available from the SuccessStore.
Review the features and configurations options by Performance Management product type to be aware of what is supported by the three different version types:
● Performance Management v11
● Performance Management v12
● Performance Management v12 Acceleration
1.1
Important!
This table shows information that you need to know about Performance Management v12 Acceleration.
What You Should Know
Opt-in to Performance Management v12 Acceleration means that you will no longer be able to launch Perform ance Management v11 forms
Other's Rating tab permission must be set as needed.
Out of Turn Access is not supported for I and C steps.
Official Rating Settings from the old Performance Management v12 must be changed to Rating Options, which are available in Advanced Configurations. This is not applicable to Performance Management v11.
If configured,Team Overview will show Objective/competency and Performance Potention Section Ratings in a callout.
Combining the display of two sections is not supported. The plain text comment option is not supported.
When creating templates from scratch, start with the Performance Management V12 Acceleration-compatible templates in the SuccessStore.
Objective/Competency sections configured with weights require contents in the sections.
If these sections are configured in a Performance Management v12 form with weights, but are not populated with objectives or competencies, the overall score is calculated as if part of the form were rated with a zero.
What You Should Know
Some fields may not work with Ad Hoc Reporting
● Weighted Average
● Gap Analysis
● Ask for Feedback responses
Some administration tools are not supported
Related Information
Converting Official Rating Configurations to Rating Options for Performance Management v12 Acceleration [page 54]
How to Configure Rating Options in Performance Management v12 Acceleration [page 55] General Settings - Advanced Options [page 39]
1.2
Features and Configuration Options
This table shows features and configuration options per Performance Management product type.
Feature/Option/Section PM v11 PM v12 PM v12
Acceleration
Sections
User Information Section Section X X Planned Learning Section Obsolete Obsolete Obsolete Learning Results Section Obsolete Obsolete Obsolete
ObjComp Summary Section X X
Performance/Potential Section X X
ReviewInfo Section X X
Compensation Section X X
Job Description Section X X
Goal Section X X X
Competency Section X X X
Introduction Section X X X
Development Section X X X
Feature/Option/Section PM v11 PM v12 PM v12 Acceleration
Custom Section X X X
Signature Section X X X
Attributes
EZ-Rater X Planned
EZ-Rater Expand All X Planned
Hide Writing Assistant X Planned Include Section in Obj/Comp Sum
mary
X X
Include Section in Obj/Comp Over all Rating
X X
Include Section in Overall Rating (Performance Summary)
X X
Include Section in Summary Display X Always X
Lock Item Weights X X X
Lock Section Weights X X
Management-only Obsolete Obsolete Obsolete, replaced with Rating Options
No-Group X Planned
No-Rate X X
No-Weight X X X
Rating Options X X
Official Rating X Obsolete
Ignore Sections without Ratings X Planned Show Calculated Section Rating X Always X Show Expected Competency Rating X X Split Comments (Side by Side) X Always Always
Summary Comment Only Obsolete Obsolete Obsolete, replaced with Field Permissions
Suppress Competency Comments (or choose competency v. behavior comments
X X
Use Behaviors X X
Use Subtopic Obsolete Obsolete Obsolete, replaced with Use Be haviors
Feature/Option/Section PM v11 PM v12 PM v12 Acceleration
Allow Draft Goals (BOM) Obsolete Obsolete Obsolete, Goals must be in Goal plan
Ask for Comment Obsolete Obsolete Coming soon, controls Get Feedback
Hide Add Goal Button X X X
Edit Goal Format X Always Pop-up Always Pop-up
Use Milestones X Determined by Goal Plan Use MLT Rating if Present Always X X
Suppress Goal Comments X Obsolete, replaced with Field Permissions
Set maximum and minimum Goals in section
X
Set maximum and minimum Com petencies in section
X X X
Show Group Matrix X Planned
Elements Supported
Button-permissions X X X
Official-rating-permission X
Sect-weight X X X
Sect-level-elements Obsolete Obsolete Allow-to-add-development-goal X X Editable-in-signature-step X
Meta-grp X X
Meta-grp-label X X
Content-filter X X
Fm-rating-info-config X Obsolete, replaced with Custom Elements
Fm-comp-filter-mapping X Obsolete, replaced with Com petency Category Filter
Others-rating-permission X
Show-cdp-wizard-button X X
Section-color X Roadmap Consideration
Weight-total X X
Feature/Option/Section PM v11 PM v12 PM v12 Acceleration
Hide-weight-percentage-sign X X
Section-rating-calc X TBD, likely Section-item-rating-calc X X
EZ-rater Button Permission X Planned Add-modifier Button Permission X Planned Add-signer Button Permission X Planned Send Button Permission X X X Owner-role Field Permission Section com
ments only
X Section comments only
Tm-field-permission X X
Rating-scale-label-link Field Permis sion
X X
Inner-step-send Send Action X X
Feature
Hide Section Header (Bleed) X Planned Remove Doc Visibilility from Old EM X Still visible on Team
Overview
Still visible on Team Overview/ Planned
Comments with more than 4k Data X Coming soon Support for RTE Tags in Intros X X
Support for RTE Tags in Competen cies
X X X
Support for RTE Tabs - Excluding Images -in Custom Fields
X X
Access to past PM & 360 Forms X X Choice of Sections to Print X X Custom Elements in Development
Section
X X
Control of Goal Plan Fields Shown X X
Ask for Feedback X X
Get Feedback X Planned
Custom Print Layout Option X Planned Table of Contents on Form X Planned
Feature/Option/Section PM v11 PM v12 PM v12 Acceleration
Incomplete Items Pod X X
Overall Score Pod X X
Gap Analysis Pod X X
Supporting Pod X X
Team Rank Pod X X
Team Rater X X X
1.3
Features Not Supported
Almost all functionalities of Performance Management v11 are supported in Performance Management v12 Acceleration, however the following are not included:
● EZ Rater
● Add Signer
● Add Modifier
● Show Group Matrix
● Custom Print
● Section Combining
● Form Table of Contents
● Document Visibility Tool
1.4 Advanced Configuration Options Added to Manage
Templates
A number of configuration options have been added to Performance Management v12 Acceleration. They are configured under the Advanced Options of the various sections in the Manage Templates tool.
Key Section Type Description Section
get-comment button-permission Makes the Get Feedback
button available to collect comments for the particu lar set of users.
Note
This button can be hid den from all users by checking the appropri ate boxes on the Form Template administra tion page
General Settings
Under Advanced Options- Button Permissions
get-edits button-permission Makes the Get Feedback
button available to collect edits for the particular set of users. Note this button can be hidden from all users by checking the ap propriate boxes on the Form Template adminis tration page.
General Settings
Under Advanced Options - Button Permissions
item-cmt-rating field-permission For example, the rating-of-record: any role having item-rating Write permis sion can update rating in this field.
Objective and competency sections
Under Advanced Options - Field Permissions
subject-item-rating field-permission Only the form subject can write to this field with
Write subject-item-rating permission
Objective and competency sections
Under Advanced Options - Field Permissions
rating-label Fm-sect-config Form Element Objective and Compe tency sections
Key Section Type Description Section
weight-total Fm-sect-config The weight total for the section; negative number or null means ignore the validation of total weights. If the weighting for all competencies does not agree with the weight to tal, a warning message is displayed when the form is sent.
Objective and Compe tency sections
Under Advanced Options
min-goals-required objective-sect This represents the mini mum number of goals that must be in this section to allow the form to be routed.
Objective section Under Advanced Options
max-goals-allowed objective-sect This represents the maxi mum number of goals that are allowed to be in this section, else the form can not be routed.
Objective section Under Advanced Options
sect-weight-4-objcomp-summary
Objective-sect Allows you to apply a rela tive weighting for that ob jective section relative to other objective sections in the Performance Manage ment form. For example if you have two objective sections and you want them equally weighted you would assign the same number to both sections. Alternatively if one section was to be weighted more heavily, you could assign relative weightings to each section.
Objective section Under Advanced Options
show-9box objcomp-summary-sect perfpot-summary-sect
Allows you to show or hide the 9 box for the obj-comp section and performance-potential section.
Objcomp-summary sec tions perfpot-summary-sections
Under Advanced Options - Display the overall per formance - potential ma trix
Key Section Type Description Section
comp-manual-overall-rat ing
required-fields Used by obj-comp-sum mary section used to sep arate control competency rating. Used to control the visibility of the calculated competency rating section in a competency section where rate by behaviors is turned on
obj-comp-summary sec tion
Under Advanced Options- Required Field Permis sions
obj-manual-overall-rating required-fields Field used by obj-comp-summary section used to separate control objective rating. Used to control the visibility of the calculated competency rating section in a competency section where rate by behaviors is turned on.
obj-comp-summary sec tion
Under Advanced Options- Required Field Permis sions
subject-item-rating required-fields Affect subject's item rat ing in split rating
objective and competency sections
Under Advanced Options - Required Field Permis sions
manual-performance-rat ing
required-fields Set the default rating value for the manual per formance score.
perfpot-summary-sect
manual-potential-rating required-fields Set the default rating value for the manual po tential score
perfpot-summary-sect
Note
The comprehensive Template Configuration Options for Manage Templates must be enabled in Provisioning, and Administrator permission to access Comprehensive Template Configuration must be granted.
1.4.1
About Get Feedback
Get Feedback is an opt-in feature new to Performance Management v12 Acceleration. Get Feedback allows a rater to send an entire form to someone outside the route map for ratings and/comments.
The Get Feedback button can be configured to allow the user to whom the form is sent to add only comments, (get-comments), or to add both comments and ratings, (get-edits). The name of the commenter is associated with any text that he or she writes. Comments are not anonymous.
Get Feedback is configured under the Advanced Options of the General Settings in the Manage Templates tool. The functionality of the button is controlled by enabling and disabling check boxes on the Form Template Settings
page.
You access the Get Feedback button either from the Route Map section of the form,
or from a button at the bottom of the screen.
When you select Get Feedback, a new window opens in which you search for, select, and confirm the name of the person from whom you want to get feedback. You can recall the form when it is out for feedback without having to go through an administrator. You can also see if a form is out for feedback from the Team Overview.
The following table shows a comparison between Get Feedback and Ask for Feedback:
Get Feedback Ask for Feedback
You send the actual form asking for comments and/or ratings.
Get Feedback Ask for Feedback
You send the form to one individual at a time. You can send the email to more than one person at a time (up to 30 people).
Comments and/or ratings are added to the form. The recipient can simply reply to the email. Requires special configuration in the form itself to sup
port the desired behavior.
The email feedback is accessed from the supporting pod withing the form.
1.5
Upgrading to Performance Management v12 Acceleration
Before you can start to configure form templates you need to upgrade to Performance Management v12 Acceleration through the Upgrade Center.
Make sure that the Performance Management v12 Accelerationinterface has been enabled in Provisioning. You may need to check this with Professional Services, Customer Success, or the person responsible for configuring Performance Management v12 Acceleration. You also need to make sure that you have been allocated the required permissions, which are:
● System Admin Permission
● Form Templates
● Form Admin Permission
To upgrade:
1. From the Admin Tools page, go to the Upgrade Center.
2. Under Optional Upgrades, select PMv12 Acceleration.
Note
Read all information on the page carefully. The documents under More Information contain specific information depending on whether you are a PM v11 customer or PM v12 customer. We highly recommend that you watch the video demonstration of the validation process for making a Performance Management template compatible with PM v12 Acceleration.
3. When you are ready to upgrade, click the Upgrade link.
The upgrade may take a few minutes. When it has been completed, you see this screen:
Note
After upgrading to Performance Management v12 Acceleration, you need to make all existing form templates compatible with Performance Management v12 Acceleration if you plan on launching the forms again. If you have older form templates that will never need to be launched again, you do not need to make them compatible with Performance Management v12 Acceleration.
1.6 Validating and Updating Existing Performance
Management Forms
After upgrading, all existing forms are put into a locked state from which they are not able to be launched. No launches, scheduled or unscheduled, can take place until the forms have been made compatible with Performance Management v12 acceleration.
changes to a copy of the template. In most cases you are not required to take any particular action, however, in some cases, previously existing text is erased and you are required to copy that information.
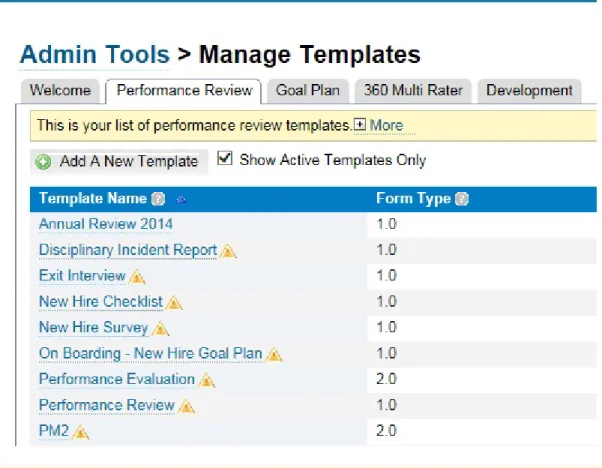
You validate and update existing templates from the Manage Templates tool. Templates that need to be updated are marked with an alert sign.
Performance Management v11 templates are marked as Form Type 1.0 and PM v12 templates are marked as Form Type 2.0. Before an upgrade, a Performance Management v11 form template still has its original appearance, however after upgrade the form has the same appearance as a Performance Management v12 form.
When you open a template you see a new tab on the left side, Validate and Approve for PM v12 Acceleration. This tab contains instructions on how to go about the validation process. You can consult this page at any time.
Review the compatibility changes that are needed
You can view all compatibility changes by clicking Print list of changes, or you can click the General Settings and
Edit Fields and Sections tabs. We recommend that you either print the list of changes or open the screen to view all the changes at one time. The list of changes provides a reference point to the sections that you might want to edit.
The notes that correspond to each section indicate the changes that will be made to the template. In most cases, you are not required to take particular action, however, in some cases, previously existing text is erased on updating, and you are required to copy that information.
Update and edit
After you have reviewed the compatibility changes, return to the Validate and Approve tab, then click Update and Edit. A new screen displays the changes that will be made by the validation tool. At this point you need to rename the template. When you validate and update the template for compatibility to PM v12 Acceleration, you clone the old template and make changes to a copy of the template.
Note
You cannot click the Update and Edit button until you have reviewed every section of the template or printed the list of all changes.
How to update the form template:
1. Open the template that you want to update.
2. On the left side of the page select Validate and Approve for PM v12 Acceleration. 3. Review the required compatibility changes by doing one of the following:
○ Click Print list of changes and print the page
○ Click each tab under General Settings and Edit Fields and Sections.
Performance Management v12 templates include a tab, Analyze Configuration that lets you see the general configurations and rating configurations of the form template, as well as a list of permissions and required fields by role and route map step. The Analyzer also shows you where you have potential configuration issues. 4. Return to the Validate and Approve for PM v12 Acceleration tab, then click Update and Edit.
5. Give the template a new name, then click OK.
The validation tool updates the template and displays a preview of the form template.
6. In the preview, make any necessary changes such as replacing text that was erased during the validation process.
7. Return to the Validate and Approve for PM v12 Acceleration tab, then click Approve for Launch
8. Click OK to confirm that you approve the template for launch. This marks the template as compatible with PM v12 Acceleration.
Note
If you have any launches, custom exports, or reports scheduled for the original template you need to updated the schedules with the name of the new template.
1.7
Key Concepts in Templates
Form templates are the basis for all forms in SuccessFactors.
The form that each user receives contains all the elements of the form template on which it is based.
Table 1: Key Concepts
Concept Explanation
Forms Forms are used to record information such as the evaluation of an employee's performance during a review cycle. Forms are gener ated from templates.
Templates Templates contain the layout, sections, and workflow for each form. Predefined templates based on best practices are available in the
Concept Explanation
Competencies Competencies are the basic abilities required by an employee to perform his or her role within the organization successfully. You can think of competencies as defining behaviors; most performance is not about what an employee knows, but about how he or she acts. Launch forms now
Launch forms later
These are both methods of launching a form. The method you use depends on your company policy.
If your review process is based on
Use this method
The employee hire date Schedule mass-creation A specific date for all employees
regardless of their hire date
Mass creation
When you mass-create a form, you launch forms only once for all users regardless of their hire date. For example, if you mass-create a 2014 Performance Review, the form is sent once, on the date you specify, to the group of employees you specify.
When you schedule mass form creation, you create a launch that will occur on a regular schedule based on employees hire dates. For ex ample, if you schedule an anniversary review with the frequency of 12 months, the review form will be automatically sent every 12 months on the anniversary of the employee's hire.
Route Map Route Maps establish the workflow and steps that employees follow during the performance review process. A Route Map defines the:
● Users involved in the review process
● Order in which the users will receive the form,
The xml of the form defines the actions that a user can take based on the route map steps.
For example, the Route Map for a performance review can specify that the employees provide comments and goal ratings and send the form to their manager. Then, managers provide their comments and ratings and return the form to the employee. Finally, both em ployee and managers sign the form.
Each form template must have one, and only one, Route Map associ ated with it.
A Route Map contains three stages:
● Modify stage
● Signature stage
Concept Explanation
Rating Scale A rating scale is required when creating a form template. Success Factors recommends using a five-point scale, which has a midpoint that permits differentiation without introducing scores that are too close to be of much value.
In the default setting, 1 is the lowest rating and 5 is the highest rat ing. The rating scale can be reversed if necessary. This change re quires the assistance of SuccessFactors consultant.
Note
In Performance Management v11, ratings can be displayed side-by-side or stacked. In Performance Management v12, ratings will always be displayed side-by-side, and can be displayed on the form as stars, circles, or as a dropdown menu.
Stack Ranker If enabled on the Performance Management form, it allows manag ers to edit competency ratings and comments and view overall scores for their team in one place.
Roles Performance Management forms and routing maps only use sup ported relationship roles at this time. RBP roles do not apply to form permissions or routing maps.
1.7.1
About Permissions
You allow users or roles to view or modify various sections or fields in a Performance Management template by granting or denying permissions. Performance Management v12 Acceleration automatically grants all
permissions to all users when no specific permissions have been configured.
The basic types of permissions that you can configure in Performance Management v12 Acceleration are:
● Section
● Button
● Action
● Field
Permission Type Set Permission On
Section ● Enabled
● Hidden
● Disabled
● Roles
Permission Type Set Permission On
Field ● None
● Read
● Write
Field
● Section Comments
● Manual Overall Rating
● Calculated Overall Rating
● Weighted Average
Action ● Enabled
● None
Actions
● Roles
● Route Steps
Button ● Enabled
● None
Button name:
● Reject
● Finalize Form
● Sign
● Overall Score
● Gap Analysis
● Incomplete Items
● Team Ranker
● Supporting Information
● Send to Previous Step
● Delete Form
Recommendations
Configure field and other permissions by taking away all permissions for all users in all steps and then explicitly adding the desired permissions back into the configuration.
If you want to grant permissions to some, but not all users, first define a None permission for all users in all route map steps, and then grant permissions on top of the blanket None.
If you want to permit access to a field when the form is completed, set Read permission for all user roles and then either grant Write permission or hide fields in particular steps.
1.7.1.1
Roles
These roles can be used to define permissions:
Role Name Description
* Everyone E Employee/owner
Role Name Description
EM Manager of the employee
EMM Second-level manager of the employee
EM+ Manager of the employee and levels above in the reporting hierarchy ED Direct report
EDD Second level direct report
ED+ Any level of direct reports below in the reporting hierarchy
EMD Direct reports of the manager of the employee for example, coworkers or peers EH Employee's HR representative
F Form reviewer (goal access restricted through a form only)
OP Objective parent, for example, a project team lead's goal that is aligned up from a team member's goal
OC Objective child, for example a team member's goal that is aligned down from a team lead's goal
EP All matrix managers of an employee EX The primary matrix manager of an employee
When you configure a route map via the Admin tools, you select a role from a list box as shown here:
1.7.2
About Competencies
Competencies are the basic abilities required for an employee to perform his or her role within the organization successfully. You can think of competencies as defining behaviors; most performance is not about what an employee knows, but about how her or she acts.
In order for an admin to set competencies as Core Competencies certain settings must be enabled in Provisioning by Customer Services.
To allow admins to set core competencies:
1. In Provisioning, select Company Settings, then scroll down to Enable PE Self Service. 2. Select Enable PE Self Service and Enable Performance Review.
1.7.2.1
Adding Competencies
SuccessFactors provides a number of competency libraries that you can tailor to suit your needs. You can also create your own competency libraries from scratch. The competency libraries contain a writing assistant and coaching advice.
Context
To add a pre-built competency library from the SuccessStore:
Procedure
1. From the Admin Tools, select Performance Management Manage Competencies . 2. From the Competency Library List, click Add New Library Choose from SuccessStore . 3. Choose a library that you would like to add, then click Add to My Instance.
4. When the competency library is loaded, click the library and then click any competency then begin editing the key details. They are:
Option Description
Name or description of the competency and the category
The category is most-often used to help organize information within this tool.
Performance Details Text that appears in the writing assistant and coaching adviser.
5. If you want to identify a competency as core to your organization, for example if your organization has core values or mission competencies, select Yes in the Core field to tag or identify this competency as core to the organization.
In the Manage Templates tool, you can set the form to dynamically pull the core competencies for all your employees when you launch the form.
Note
If the Core flag is set in Manage Templates, users must mark also competencies as core in the Manage Competencies tool, otherwise this section will be blank for your users.
6. Under Performance Details click the text to update the tone and voice that you want to change. 7. When you have finished updating the text, click Save.
1.7.3
Managing Forms Via the Admin Tools
You can create and configure a number of forms from the Company Processes & Cycles section in the
Administration Tools
Use this tool: To do this:
Change Form Dates - Change the start, end, or due dates of a document Company Dictionary Modify the dictionary used for the spell checker on a
form
Delete Form Search for and delete a document
E-Mail Notification Template Settings Edit the email notification settings to enable, disable, or configure the content of email templates
Form Creation Permission Grant and remove form creation privileges for system users through a group of users or through individual users
Form Template Settings Manage existing form templates.
Launch Forms Schedule and launch forms for a given process Legal Scan Library Add to and modify the legal scan library Legal Scan Library Import Import a legal scan library to the system
Manage Competencies Map competencies on which employees are rated to job roles.
Manage Route Maps Define the recipients of a route map and the order in which he or she receives the map.
Manage Scheduled Reviews Cancel or modify the launch of a form Manage Templates Create and update a form template Modify Form Route Map Search for and modify a route map Rating Scales Create, copy, or modify a rating scale
1.8 Configuring the Route Map
The next step in configuring the performance management review form is to configure the route map.
Context
Configure the route map from the new Admin Tools interface.
Procedure
1. From the enhanced Administration Tools interface, select Performance Management Manage Route Maps .
2. Click Add New Route Map, then select Build Your Own.
3. In Modify Stage, click the add button, then create a step called Self Assessment. 4. In the next screen, under Role, select Employee.
5. Select a start date and an exit date.
6. Click Advanced options, then enter any information you require from the advanced options such as mouseover and exit button text.
Make sure that you enableStart of Review, which indicates that the review process starts from this part of the review, Self Assessment, and ensures that a Team Overview page is created for the manager.
7. Add a new step called Manager Assessment with the following:
○ Start date
○ Exit date
○ Out of Turn Access
You can configure alternate managers, if necessary, by selecting the type of role. You can also create a custom role.
8. Add a new step called 1:1 and configure:
○ Role: Manager
○ Start date
○ Exit date
○ 1:1 Meeting
1.9 Creating a Rating Scale
A rating scale is required before creating a form template. SuccessFactors comes with a number of predefined rating scales that are based on best practices, but you can also create a new rating scale using the Rating Scale Designer. We recommend using a 5-point rating scale. To create a new rating scale:
Procedure
1. From the Admin Tools, select Performance Management Rating Scales . 2. In the Rating Scale Designer, select Create New Rating Scale.
3. Type a name for your rating scale and a description.
A rating scale with a range of 1-5 appears on the page. You can also choose from among these options:
○ 1-3
○ 1-5
○ 1-7
○ Build your own
4. Select one of the rating scale options.
5. The scores are entered by default depending on the option you choose. SuccessFactors also proposes labels and descriptions for each label. If you wish to modify the label or description, enter your changes.
Option Description
If you choose this option Do this
Pre-built rating scale Modify the Label and Description or leave the default values. Build your own Enter a Score, Label, and Description
Click Add New Score to add lines to your scale. Generate a rating scale based on
○ Minimum score
○ Maximum score
○ Increment
Enter values for:
○ Low
○ High
○ Increment
Then click Generate.
6. Click Save.
The rating scale appears in the list of available rating scales.
Next Steps
1.10 Managing Templates
A template is where the configuration and structure of forms is set and recorded.
When forms are launched, they will appear and behave as configured in the template. The manage templates tool allows you to update your SuccessFactors process forms and plans quickly and easily.
In the manage templates tool you can:
● Add a new template
● Copy a form or plan from a previous year
● Change labels
● Reorder sections
If you have permission to Comprehensive template configuration for Performance Management V12, you are also able to make advanced configuration changes. This includes modifying permissions and configuring rating and comment options.
2
Adding a New Template from the
SuccessStore
You add templates from the SuccessStore, which you access via the Administration Tools. Some steps in this procedure are explained in greater detail in subsequent pages.
Context
You must have previously configured a route map and a rating scale. In the Administration Tools under
Performance Management
Procedure
2. In the Manage Templates tool, click Add a New Template.
The SuccessStore opens to display a number of pre-built templates for the type of form that you want to create.
3. In the SuccessStore window, you can click the name of the template to see a preview of the form. Choose the template that you want to use, for example, Annual Review (PMv12), then click Add to My Instance.
4. In the Save as New Template dialog box, type a name for your template, then click Save.
Next Steps
The next steps are to define the General Settings and to edit the Fields and Sections from the tabs on the left side of the screen. You define the foundational pieces of your template such as the name and description on this page as well as the rating scale and the route map.
2.1
Performance Review Form Settings and Fields
All performance review forms contain the following required components.
● Form title: descriptive of the form. The title is visible in the Inbox and on the open form. It is a combination of Form Template Name and User Full Name
● Form workflow: controlled by the route map, the workflow controls how the form moves throughout the review process.
● Form content: sections that provide additional information to the reviews, display information from other areas of the software such as goals, and let the reviewer rate and comment on goals and/or competencies. Regardless of whether you add a new template from the SuccessStore, or modify an existing template, you need to define the general settings and then edit the fields and sections.
The General Settings page is where you define the basic fields of your template such as name and description. This is where you define the rating scale. When you add a route map, you also indicate how the form will be routed when it is launched.
Under Edit Fields and Sections you define more detailed settings for your form templates.
Form Section Comments
Meta Allows you to set some overall parameters for the summary section.
Employee Information Displays basic employee data for the individual you are reviewing - the subject of the form. You can rename the section and include or exclude various fields to show more or less information about the employee. This information in this section is non-editable and read-only.
Review Displays the review period that the form covers and the person who created the form Introduction May contain text-based content to provide information to your users. This information
may be about the purpose of the review, whom to call for assistance, or any other in formation that you feel is relevant to the review.
Job description
Section weights Each of the Goals and Competencies sections on the form must have a weight. This weight is used in the overall performance form score calculation. For example, you may set the weight of the Goals section as 30% and the weight of the Competencies section as 70%, or you may set these sections as 50/50. The calculated overall rating takes this into consideration.
Goals On a performance form:
● Performance Goals can be automatically populated into the form from the goal plan of the employee, or added manually.
● Development Goals can be added to assist in planning for the upcoming year. Competencies The basic abilities needed by employees to perform their role within the organization
successfully. Including core competencies in the review reinforces their importance to all employees and signals what is expected of them. Competencies can be automati cally populated into the form or added manually.
Form Section Comments
Summary Displays summarized information from the goal and/or competency sections on the form in one cental area. The amount of summarized information is determined by the content in the working sections of the form. For example, if your form includes ratings and weights, the average score from these values is shown for each section, as well as a general overall performance score. You can also set the weights for each section here.
Custom Can be used in a form use to display or capture information that is not objective or competency-based.
Objective/Competency Calculates two scores: an Objectives score and a Competencies score. These two scores are then plotted to determine the quadrant in which an employee fall on the obj-comp chart. These two scores are obj-completely independent of each other
Performance/Potential Supports two overall scores: an overall Performance score and an overall Potential score. These two scores can then be plotted to determine the quadrant in which an employee fall on the performance-potential chart. These two scores are completely in dependent of each other.
Signature Displays the names of the people who will sign the form and, once signed, displays the signature of the signer and the date signed.
3
General Settings - Advanced Settings
When you click Advanced Settings in the General Settings section of the template you open a new window to the form template settings where you define a number of parameters.
Default Dates for Form Creation
Set the Default Start, End, and Due dates either Fixed or Relative to the:
● Form Creation Date
● Default Start Date
● Default Due Date
Ask for Feedback
You can:
● Disable the Ask for Feedback functionality by selecting this option
● Select a date range for collecting feedback from employees
Display circle icon as rating
The default rating icon is a star. By selecting this option you select a circle icon to display the rating.
Display check mark instead of rating in Team Overview
Show the form template used for the last competency ratings
Select a default due and late notification days. Show the status of the template.
Flag the template as public or private
Transfer or not transfer documents to a new manager
You can opt to automatically transfer documents to a Manager or a Matrix Manager as follows:
● Insertion of a new manager as the next document recipient
● Inbox transfer to a new manager
● En Route document transfer to a new manager
● Completed document copy to a new manager
Apply overrides
● Do not remove inactive employee completed documents Set default targets
From the following:
● Self and direct reports
● Self only
● HR reports only
● Self and matrix reports
● Matrix reports only
Form timeout alert
5, 10, or 15 minutes before the end of the session
Various parameters:
● Keep last touched version upon document completion
● Enable Auto Logout at session timeout
● Enable Auto Restore Deleted Form when importing user
● Enable spell check
● Enable legal scan
● Disable spell check on route
● Disable legal scan on route
● Enable writing assistant
● Allow Add Approver or Add Evaluator
● Disable all tool bar buttons, which overrides button selections
● Disable Print button
● Disable Page Setup button
● Disable Delete button
● Disable Note button
● Disable Form button
● Disable 360 button
● Disable Info button
● Disable Send button
● Disable Send button for completed documents
● Disable Late notification
● Disable Due notification
● Disable Step Exit notification
● Disable PDF printing
● Allow form create to select anyone as the subject
● Allow Matrix Manager to delete document if the Delete button is available
● Show signoff routing step names in the Signoff stage
● Display step start date
● Enable form title editability in the form
● Create only for users who don't have an existing or in-progress form with an end date between two dates
● Hide the Export and Export (Compact) buttons for documents in the Completed folder
● Show digital signatures in Document Print Preview
● Disable due date validation
● Disallow users from changing the start date
● Disallow users from changing the due date
● Disallow users from changing the end date
● Enable form routing to previous step in minutes per field
● Enable SMART Goal Wizard
● Prevent forms from being created with overlapping date ranges
● Enforce permissioning for Detailed Document Search and Archive and Print Reporting
● Allow exit step comments to be visible to all participants in a Collaborative C step
● Define the PDF file name format
Related Information
Enabling Ask for Feedback [page 34]
3.1
Enabling Ask for Feedback
Ask for Feedback allows mangers to be ask other employees for feedback on the person being rated.
Context
To enable Ask for Feedback, you need to enter date ranges in the Advanced settings of the General Settings when you create a form template.
Procedure
1. Under Managing Form Templates select the template that you for which you want to enable Ask for Feedback. 2. Select the Default Start, End, and Due dates during which managers can request and people can respond with
feedback. The dates can be
If you select Then do this
If you select Then do this
Relative Select the type of relative date and enter a date range
The relative dates can be set relative to the form creation date or the default start, end, or due dates.
Note
Do not select Disable Ask for Feedback.
Ask for Feedback now supports multiple, discrete requests for feedback from the same user, as long as the feedback requests are made on different days.
Results
3.2 Enabling the Circle Rating Option
The default icon in a rating scale is the star. If you want to use a circle instead of a star, you need to select that option in the Advanced Options of the General Settings.
Procedure
2. When you have completed selecting your advanced options, click Update Form Template at the bottom of the
4 General Settings - Advanced Options
Access the advanced options by clicking the Show advanced options link in the General Settings page.
Scale Adjusted Calculation
Adjusted rating scales allow you to control the calculation or display of ratings. You can use an adjusted scale to show only the label of a calculated score. For example, instead of displaying a scale that rates from 1 to 5, you want the ratings to display:
● Unsatisfactory
● Needs improvement
● Satisfactory
● Meets Expectations
● Exceeds Expectations
In this case, use the scale adjusted calculation to map values to a score. You can map values up or down
depending on your company policy by setting a minimum and a maximum value to map to a score. Performance Management maps the values to the score, maps the score, and then displays the description as the rating. In this example maximum scores are mapped down: a score of 1.49 is mapped down to 1, 2.49 is mapped down to 2, 3.49 is mapped down to 3, and so on.
If you want to allow users to view the calculated rating value, select Enable Display Calculated Rating.
Button Permissions
When you select the Enable Previous Step Button option you insert a Previous Step button into the form, which allows the form to be sent to the previous step for specified roles and steps.
When you select Enable Delete Button, you enable the Delete button for specific roles and steps.
The Previous Step and Delete buttons are controlled by button permissions as well as form template settings. By default, 3 button permissions are defined. Click the link to modify the permissions.
There are two types of access:
● None: the user cannot see the button
● Enabled: the user can see and click the button The buttons for which the permission is applicable can be:
● Reject- sends the form from a signature step to the last modify step.
● Sign - in the signature stage
● Overall Score
● Gap analysis - shows where the employee has rated himself higher or lower than the manager's rating
● Incomplete Items - highlights a number of required fields that have not been completed. We recommend hiding this pod if there are no fields required at a certain step.
● Team Ranker - shows where this employee ranks when compared to peers who have been evaluated with the same form template. We recommend turning this pod off when manual ratings are used.
● Supporting Information - this pod displays responses from the:
○ Ask for Feedback tool
○ Notes from the Employee Profile Notes
○ Touchbase topics from the Mobile app
● Send to Previous Step - gives the user permission to send the form to the step prior to the current step.
● Delete Form - grants permission to the Delete button. This is also controlled through Form Template Settings.
● Get Comments - enabled the Get Feedback button that button allows you to get feedback from a particular set of roles in selected route steps.
● Get Edits - when enabled, the Get Feedback button permits comments from a particular set of roles in selected route steps.
Note
The Get Feedback button can be hidden from all users by checking the appropriate boxes via Form Template Settings > Managing Form Templates in the Admin Tools.
The Roles for which you set the button permissions are based on the route map that is associated with the template. You can select all roles, specific roles from the template, or custom roles that you define.
In this example, the Reject button is enabled for the manager.
Route Steps come from the route map attached to the template. You can enable buttons for all steps in the route map or you can select specific route steps from the list.
By using roles and route steps you can set permissions granularly.
In this example, Get Comments and Get Edits are enabled, which means that the Get Feedback button is enabled for both comments and edits by three roles in all route steps.
Other's Rating Tab Permissions
The Other's Rating tab applies to the entire form. In Performance Management v12 Acceleration, you can always see the ratings of the logged-in user. Everyone other than the logged-in user is under Other's Ratings. The manager can see the employee's ratings as well as his or her own ratings. The manager can also see the ratings of other raters, such as a matrix manager or an HR manager, under the Other's Ratings tab. The logged-in user's ratings are on the left and other ratings are on the right.
This behavior is different from that of Performance Management v11 where it is customary to have only two rating fields with other roles rating into one data field. The route map determines which role has the final say. The only way to view a specific user's rating after it has been changed is to look at the audit trail.
Performance Management v12 Acceleration takes a snapshot of each individual rating and stores it in the Other's Ratings tab. You can choose to hide or display this tab. When you enable the Other's Ratings tab you allow the selected roles to view ratings and comments made by other roles. In this example, the tab is enabled for the employee's manager and 2nd level manager for all route steps.
5
Fields and Sections
After you have defined the general settings you need to edit the other fields and sections in the form. As with the General Settings, the various sections also contain advanced options that are discussed in this chapter.
5.1
Employee Information
The Employee Information section displays basic employee data for the individual being reviewed.
Employee Information
This section displays basic employee data for the individual being reviewed. You can rename the section and include or exclude various fields to show more or less information about the employee. The section name and description are mandatory whereas other display information is optional:
● First and last names - sometimes mandatory
● Human resource
● User name
● E-mail address
● Manager
● Department
● Division
● Middle Initial
● Time Zone
● Title
● Hire Date
● Job Code
In the advanced options, you can choose to show or hide the Employee Information section to selected roles along selected steps of the route map.
5.2 Review Information
The Review Information section displays dates of a review form.
The start and due dates dates of a review form are displayed in the reveiw section when the form is launched. You launch the form from a separate administration tool. In the advanced options, you can choose to show or hide this section to selected roles. There are section permissions to hide or show the section by user role and route map step.
5.3 Performance Goals
The goal section is where you see, rate, and comment on how an employee has achieved his or her performance goals.
Along with the name and the description, you need to select a section type:
If you select Then choose the
Objective Section Objective plan that you want to link to the form Individual Development Plan Section Development plan you want to link to the form
You can also choose to allow users to add existing objectives to the form from the objective play by selecting
Show Add Existing Development Objective Button.
Note
This button is not needed if goals are synced to the form automatically.
The Unable to Rate field is where you type a label that explains the reason an employee cannot be rated. This appears with the rating scale but does not impact the overall rating. Some examples of a label are Not Applicable
or Too New to Rate.
5.3.1
Performance Goals: Advanced Options
In Performance Management v12 Acceleration, the rating of record is stored in a separate data field from the rating considered to be a user’s personal rating.
The configuration of who has influence over the final rating form has two layers. These layers are the selected
Rating Option with, in some cases, the addition of Field Permissions
Option Selection Result
Include the ability to rate Not selected No ratings Include the ability to rate Everyone has their own rating box
for each item
Everyone has a rating box and see his or her own box.
Option Selection Result
Include the ability to rate Everyone has their own rating box for each item and
The final score is the EM's rating
The final score is the EM's rating
Include the ability to rate Everyone has their own rating box for each item and
The final score can be granted to any role by permission.
Everyone has a rating box and sees his or her own rating box.
The final score can be granted to any role by field permission. Include the ability to rate Everyone shares one rating box for
each item
The form has only rating box for each item and you can set permis sions to determine which role can make the rating. It there are permis sions for more than one role, the last rating entered is the final score. Include the ability to rate Everyone shares one rating box for
each item and
Except the employee who has a self-assessment rating box
The form has a self-assessment box for the employee, plus a single rat ing box for which you can set per missions by role, and which be comes the final score.
Include the ability to enter a weight Selected Allow users to change the weight of a goal or competency on the Per formance Management form. This sometimes changes the weight in the goal plan, depending on configu rations for the synchronization of the Performance Management form and goal plan.
Include a comment for each item Selected Enable users to comment on each goal or competency item in the form. If not checked, no comment box is displayed.
Include an overall comment Selected Include a section-level comment Display the section in the summary Selected Display ratings and weights from
this section in the summary section Display calculated section rating Selected Display the calculated rating for this
section in the summary. Auto populate objective weights
from weights in the objective plan
Selected Bring the weights from the goal plan into the Performance Management form.
Allow users to add/remove Objec tives within the section
Selected You choose to allow users to add or remove objectives. You need to con figure action permissions.
Option Selection Result
Avoid Objective Plan State Change by Multiple Forms
Selected If goal plan is locked in the goals module, it cannot be modified in Performance Management. Synchronize objectives from an ob
jective plan and a review form
Selected Changes made to goal plan in the Goals module auto-synch to the goal section of the Performance Management form.
Changes to goals on a Performance Management form auto-synch to the goal plan in the Goals module. Use Metric Lookup Table Rating Selected If goal plan has a metric lookup ta
ble. This option is selected by de fault.
Include in overall Objective/Compe tency rating calculation
Selected Lets you do a calculated rating over the goal sections. This is particularly useful if you have multiple goal sec tions and want to leave one out of the calculation.
Display in Objective/Competency section
Selected Items from this section will be listed in the Objective/Competency sum mary section.
Lock item weights Selected Lock or unlock the item weights of a section. The user cannot change weights.
Include in overall performance sum mary section rating
Selected Can exclude a section from or in clude a section in overall rating of the form.
Minimum Goals Required Set a minimum number of goals a user is required to enter.
Maximum Goals Required Selected The maximum number of goals that are allowed to be in this section. Section Weight for Obj/Comp Sum
mary
Allows you to apply a relative weighting for that objective section relative to other objective sections in the Performance Management form.
Total Weight Set target total weight for items in that section
Rating Scale The name of the rating scale you want to be used.
Option Selection Result
Hide numeric rating values (only show text labels)
Selected Makes ratings appear as their text labels, for example, Excellent. Default Rating You can give the default rating for a
rating scale. Choose an alternate label for the
rating field
Enter the label of your choice, for example, Too New to Rate.
Section Permissions
For Roles and Route Steps
Action Permissions
Possible action permission are:
● Add item
● Remove item
● Both
Field Permissions
Field permissions can be None, Read, or Write. Fields are:
● Item Rating
● Unofficial User Rating
● Item Weight
● Section Weight
● Item Comments
● Subject Rating
● Section Comments
In this example, the employee cannot see item comments made by anyone other than himself and the manager for the signature step.
If you select Allow users to add/remove objectives within the section, you modify the action permissions for the section. If you select this option and do not specify permissions, all roles and add or remove objectives at all route steps. In this example, an action permission has been granted to the manager to add an objective at the EM route step.
Objective Plan State
You can change the goal plan state (Objective Plan State) based on the route map step. For example, a customer might set up a quick performance management form and route map to start a goal-setting process. You can configure the form so that once it has been sent to a certain step, the manager can edit or update an objective. In this example, the goal plan has been configured to that when the form reaches the EM route step, the manager can edit the form. Then, when the form moves to the completed step, the objective is updated to FINAL.
Required Field Permissions
This field sets a requirement before a form is sent to the next step. For example, if a manager wants to send a form to the next step, he must enter something in a particular field. In this example, the manager is required to enter a rating in the Item Rating field before sending the form to the next step.
Related Information
Converting Official Rating Configurations to Rating Options for Performance Management v12 Acceleration [page 54]
Auto-Synch and Auto-Populate [page 52]
5.3.1.1
Auto-Synch and Auto-Populate
The goals in a goal plan can be auto-populated on to a performance appraisal form. When the form is created, any goals already created in the Goals module will be included in the form. Goals can also be auto-synchronized between a goal plan and a performance appraisal form.
When goals are changed, added, or removed from a goal plan those changes automatically apply to the performance appraisal form.
Auto-Populate
Change Made on Goal
Plan Results on Goal Section in PM Form Change Made on Goal Section in PM Form Results on Goal Plan
Add a goal after form opened
New goal does not appear Add goal New goal appears
Add goal before form opened
New goal automatically appears, if configured Add target or task New target or task ap
pears
Add target or task New target or task ap pears
Change Made on Goal Plan
Results on Goal Section in PM Form
Change Made on Goal Section in PM Form
Results on Goal Plan
Edit target, task, goal name, and so on
Changes appear Edit target, task, goal name, and so on
Changes appear
Remove goal Goal still appears and is not deleted
Remove goal Goal still appears and is not deleted
Note
If new goals are created in the Goals module after a form has been created, the user must manually add any new goals created to the Performance Management form.
Auto-synchronize
Change Made on Goal Plan
Results on Goal Section in PM Form
Change Made on Goal Section in PM Form
Results on Goal Plan
Add a goal after form opened
New goal appears Add a goal New goal appears
Add goal before form opened
New goal automatically appears, if configured Add target or task New target or task ap
pears
Add target or task New target or task ap pears
Edit target, task, goal name, and so on
Changes appear Edit target, task, goal name, and so on
Changes appear
Remove goal Goal is deleted without warning message
Remove a goal Goal is deleted without a warning message
Note
5.3.1.2
Converting Official Rating Configurations to Rating
Options for Performance Management v12 Acceleration
In earlier versions of Performance Management, the designation of a role other than the direct manager (EM) role as the official rater of a form in Performance Management v12 templates was configured via a permission called official rating permission. This configuration is no longer supported in Performance Management v12 Acceleration
Rating Options in Performance Management v12 Acceleration
In Performance Management v12 Acceleration, the rating of record is stored in a separate data field from the rating considered to be a user’s personal rating. The configuration of who has influence over the final rating form has two layers. These layers are the selected Rating Option with, in some cases, the addition of Field Permissions.
Rating Options
There are 4 rating options supported in Performance Management v12 Acceleration that determine the first level of configuration:
Rating Option Description
0 Everyone rates in the same data field, each overwriting the previous ratings
1 Everyone but the form subject (employee) rates in the same data field, each overwriting the previous ratings. The form subject has a rating field to himself, though it is often displayed to other roles.
2 Everyone can rate in his or her own data field, and any roles who are to determine the final rating of record are granted access to the single rating of record data field. 3 Only the EM role and the form subject can rate the
form. The EM role determines the rating of record
Field Permissions
With Rating Option 2, configuration of the roles that determine the rating of record is accomplished by putting permissions on the rating of record data field.
Tip
To avoid confusion, we recommend hiding the personal rating field and displaying only the rating-of-record field for any role that has rating-of-record rights.
Note
Performance Management v12 customers whose templates include configurations for any role other than the direct manager (EM) role to determine the official rating of record will need to pay special attention to the Performance Management v12 Acceleration template validation template validation process.
5.3.1.2.1
How to Configure Rating Options in Performance
Management v12 Acceleration
While it may seem complex to convert Performance Management v12 official rating configurations to
Performance Management v12 Acceleration rating options, the Validation Tool in Manage Templates does most of the work for you. We recommend that you record your current rating configurations before using the Validation Tool. Locate the configurations by analyzing the configuration of the template as follows:
Procedure
1. Open the Performance Management v12 template for which you want to convert the rating configurations in the Manage Templates tool.
2. Select Analyze Configuration on the left side of the page.
The tool analyzes the most common configurations and shows you where there are potential configuration issues. You can see the
○ Route Step Name
○ Step Owner Role
○ Permissions
Roles with write permissions are official raters and roles with hidden permissions are not official raters. We recommend that you take note of the roles and steps that have hidden or write permissions.
Note
Sometimes a role may be granted write permission for the official rating in one step but not in another step. Doing so makes it possible for a role to assign a rating that affects the rating of record. If the rating of record is later changed by another role, the initial role can see only the rating of record.
3. Review all the configuration changes to be made by the Validation Tool, then click Update and Edit, which copies the template to a new, Performance Management v 12-compatible template.
The validation tool sets a baseline rating options configuration that can be further configured to match your previous settings. The baseline set is:
○ Rating Option 2: everyone can rate in his or her own data field and any roles who are to determine the final rating of record are granted access to the single rating of recorded data field.
○ Field permissions are set to grant access to the rating of record data field to the direct manager (EM) role. 4. Approve the form for launch.
5. Test all forms before launching.
5.4 Competencies Section: Advanced Options
Competency sections of forms are configurable to be either for core values you have set for your company, or job specific competencies. Creating and managing competencies is done in a separate administration tool. Job-specific competencies are dynamically pulled for each user based on the user's job code and role.
You can set the competency section of a form to gather comments only, gather ratings only, or gather both. If
You want to Select
Gather comments Include a comment for each item
Gather ratings Include the ability to rate
Gather both comments and ratings, Include a comment for each itemand
Include the ability to rate
Option Comments
Allow users to add competencies If you want users to be able to select competencies from the libraries and add them to the form.