CHAPTER
9
Social Network
Integration
IN THIS CHAPTER
. LinkedIn. Facebook . Twitter
M
icrosoft wanted to build a horizontal platform that developers could use to create their own systems. By provid-ing a solid, fully featured platform that was easy to develop on, organizations could create powerful CRM systems tailored to their own needs, and third-party companies could create deep, vertical-market CRM applications that they could host or sell. A typical approach for companies that build CRM products is a closed or black-box approach in which the product is self-contained. In today’s world, people are managing the contact information in social networks. Therefore, organizations can leverage this oppor-tunity to ensure that the internal systems are up-to-date. In addition to centralization, standardization, simplifica-tion, and integration of data, web service integration into Microsoft Dynamics CRM provides additional layers of content that proves useful in relating to handling an entity’s customer relationship database. There are many benefits to reap in terms of integrating many tools put out by Microsoft and others. Version 4 CRM enables you to integrate and leverage web services and other service-oriented architectures.In MS Dynamics CRM, the SDK used is the exact same web services SDK used internally by Microsoft developers. The product is infinitely modifiable and extensible at nearly any layer. Web services such as Facebook and LinkedIn create innovative services that previously would have been impos-sible or prohibitively expensive to deploy. With data and code effortlessly connected, businesses can rapidly adapt and take advantage of new opportunities. For example
. A sales team can try to establish a 360-degree view of customer interactions, behaviors, buying patterns, and sales opportunities to cultivate more profitable relationships. . The marketing team can plan ahead, observe trends, and track real-time results. . You can deliver high-value customer service with integrated interaction and
knowl-edge management and thus enable your service professionals to share answers and insight with customers with ease.
In today’s competitive business landscape, relationships have never mattered more. Whether you are in sales, business development, or some other role, you can gain an instant edge with information gained through these added CRM initiatives. In addition, you can support the development of marketing strategy by developing the organization’s knowledge in areas such as identifying customer segments, improving customer retention, and improving product offerings.
LinkedIn is a massive professional networking website, with more than 35 million regis-tered members and growing rapidly. It enables members to share contact information, knowledge, experiences, and new ideas. Specific contacts can be added on contact lists, and searching for contacts has never been easier. Members can control their profile and showcase their achievements, knowledge, and experience based on how they want to market themselves. This enables them to find the best possible opportunities in their professional careers. In short, LinkedIn is a networking website for professionals.
Entities with Microsoft Dynamic CRM architecture can seek to increase their productivity by leveraging LinkedIn’s influential network of professionals. At present, LinkedIn is slowly releasing application programming interfaces (APIs) to enable developers to inte-grate their popular business-networking site with external applications.
To integrate LinkedIn with your Microsoft Dynamic CRM environment, just follow these steps:
1. Create the iFrame.
2. Navigate to the Settings tab. 3. Click Customizations. 4. Select Customize Entities. 5. Click the Account record.
6. Click Forms and Views under the Details section. 7. Click the form record.
8. Add a Tab and name it LinkedIn. 9. Add a section and name it LinkedIn.
10. Add an IFrame and name it IFRAME_LinkedIn. 11. Uncheck the Restrict Cross-Frame Scripting box.
12. Select the Automatically Expand to Use Available Space box under the Row Layout section of the Formatting tab.
13. Click OK to save the IFrame changes.
14. Click the form properties under the Common Tasks section of the Account form. 15. Select OnLoad from the Event list.
16. Click Edit.
17. Enter the following code: var CRM_FORM_TYPE_CREATE = 1; var CRM_FORM_TYPE_UPDATE = 2; switch (crmForm.FormType) {
case CRM_FORM_TYPE_UPDATE:
crmForm.all.IFRAME_LinkedIn.src=”http://www.linkedin.com/search?search=&company
➥=” + crmForm.all.name.DataValue+ “
&searchLocationType=I&countryCode=us&postalCode=” +
crmForm.all.address1_postalcode.DataValue+ “&distance=50&sortCriteria=3”; break;
}
18. Click OK to close the Event Detail Properties window. 19. Click OK to close the Form Properties window. 20. Click the Save and Close button on the Account form.
21. Click Publish from the Action menu on the Account Entity form. The change is now available to your application.
To build a collaborative business environment, you integrate web services and thus lever-age the complexity of an existing IT enterprise infrastructure. Web service integration enables you to overcome internal barriers, exploit external prospective opportunities, and create new applications to add a competitive edge.
Facebook is a popular social networking website in which users connect and communi-cate with each other. Facebook features include the ability to send messages; update personal information and status; and notify friends, relatives, acquaintances, and so on. Initially, the website consisted of members of U.S. colleges, universities, and schools. Today, however, it has an open membership that consists of more than 100 million members worldwide.
Facebook detractors consider it merely a distraction that just connects people and enables them to kill time online. However, this web service represents amazing potential. If you leverage it appropriately, Facebook is an effective tool to reach new markets; to link up with customers, colleagues, and business relationships; and to generate opportunities. At present, Facebook has gone from the stage of being just another social networking tool
and is now a prevailing medium of communication for individuals, groups, and large businesses.
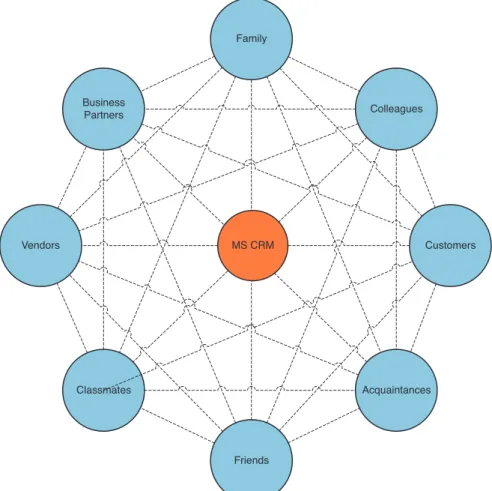
Figure 9.1 shows how CRM fits within social networking. And although CRM isn’t neces-sarily the only mechanism that people have to communicate with each other, you can use it to capture information about peer-to-peer interactions between constituents.
Integrating web services such as Facebook into Microsoft Dynamics CRM provides the management and the sales force with rich data pertaining to existing and prospective customer and other important business relationships.
This kind of integration provides several benefits, including the following: . Better assessment of opportunity management
. Tracking customer preferences, trends, and responses
Customers
Friends Family
Colleagues
Acquaintances Business
Partners
Classmates
Vendors MS CRM
. Generation of ideas for targeted marketing campaigns
. Analyzing customer behavior to make decisions about products and services . Assessing brand loyalty
. Target groups formed from client base according to selected criteria
Seeing the potential of growth, Facebook, Inc., created Facebook Connect, a platform that enables users to integrate Facebook into their own website, product, or service. Microsoft CRM can be integrated with Facebook Connector to utilize social media and CRM capabil-ities for the purpose of tracking, understanding, and contacting current and prospective customers and other key business relationships.
The main benefits derived from using Facebook Connect are as follows:
. Access to contact information of customers/contacts/business relationships/others . Leverage users’ personal interests to show more relevant information and surface
personalized content from friends such as reviews or comments
. Sharing content between profiles through personal messages, newsfeeds, blogs, or social group channels on Facebook
. Use of the Facebook API to develop applications for users
This section now reviews a basic example of the integration process. The example illus-trates the quick integration of the Contoso website with Facebook Connect. We set up the Connect application and add a small code section to the Contoso website. Upon comple-tion of the following steps, Contoso administrators can log in to Facebook and connect with other Facebook users whose information may be on the Contoso website:
1. Create an application with the Facebook Developer application.
You must first create a new application. To do so, navigate to www.facebook. com/developers/createapp.php.
Enter a name for your application in the Application Name field.
Accept the Developer Terms of Service, and then click the Save Changes button. On the Basic tab, enter a callback URL. (Make no changes to the defaults.) This URL points to the top-level directory of the site that will be implementing Facebook Connect. (This is usually your domain—for example, http://www.contoso.com—but could also be a subdirectory.)
Carefully note the API key; it will be required soon.
Display the Connect tab, and then click Change Your Facebook Connect Logo and browse to an image file (maximum of 99 pixels wide by 22 pixels tall and in JPG, GIF, or PNG format).
If your site is going to implement Facebook Connect across a number of subdomains of your site (for example, foo.contoso.com and bar.contoso.com), you need to enter a base domain (contoso.com in this case). Specifying a base domain enables you to make calls using the PHP and JavaScript client libraries and to get and store session information for any subdomain of the base domain. For more information about
subdomains, refer to “Supporting Subdomains in Facebook Connect” at http://devel-opers.facebook.com.
Click Save Changes to complete the first step.
2. Create a cross-domain communication channel file calledxd_receiver.htmand place it in a directory relative to the callback URL that you entered in the previous step. For instance, suppose you’re using http://www.contoso.com as your callback URL, but you want to store your Facebook Connect files in their own subdirectory (perhaps http://www.contoso.com/connect). You should create the xd_receiver.htm file in the directory in which you’ll be serving your Connect web pages
(http://www.contoso.com/connect in our example). Copy the following content into the file:
<!DOCTYPE html PUBLIC “-//W3C//DTD XHTML 1.0 Strict//EN” “http://www.w3.org/TR/xhtml1/DTD/xhtml1-strict.dtd”> <html xmlns=”http://www.w3.org/1999/xhtml” >
<body> <script
src=”http://static.ak.connect.facebook.com/js/api_lib/v0.4/XdCommReceiver.
➥js” type=”text/javascript”></script> </body>
</html>
NOTE
This file allows your application and Facebook to send data back and forth.
3. Create another HTML file in the same directory as the one you created in the preceding step (for instance, http://www.contoso.com/connect/test.html). Within the <html>tag for test.html, add xmlns:fb=”http://www.facebook.com/2008/fbml”, as in the following:
<html xmlns=”http://www.w3.org/1999/xhtml” xmlns:fb=”http://www.facebook.com/2008/fbml”>
4. Next, in your newly created test.html file, you need to refer to the Facebook JavaScript Feature Loader file. This allows your site access to all the features of Facebook Connect in JavaScript, such as XFBML, JavaScript API calls, and so forth. This script should be referenced in the body of your file, not in the head:
<script
src=”http://static.ak.connect.facebook.com/js/api_lib/v0.4/ FeatureLoader.js.php” type=”text/javascript”></script>
5. You can render a Facebook Connect login button using XFBML on your page, right alongside of your normal HTML. For instance, after the two lines that you just added, you could use a line of markup like this:
<fb:login-button></fb:login-button>
This renders the Facebook Connect login button, so that you can connect your Facebook account to your site. Optionally, you can add a JavaScript handler to the callback button to be called when the user has logged in, as follows:
<fb:login-button onlogin=”facebook_onlogin();”></fb:login-button> 6. Finally, you need to include the following script after the login button:
<script type=”text/javascript”>
FB.init(“<YOUR_API_KEY_HERE>”, “<path from web root>/xd_receiver.htm”); </script>
7. Try loading the test.html page you just created and try connecting to Facebook. You just implemented the first step of Facebook Connect!
Here are the entire contents of test.html: <html xmlns=”http://www.w3.org/1999/xhtml” xmlns:fb=”http://www.facebook.com/2008/fbml”> <head></head>
<body>
<script src=”http://static.ak.connect.facebook.com/js/api_lib/v0.4/
➥FeatureLoader.js.php” type=”text/javascript”></script> <fb:login-button></fb:login-button>
<script type=”text/javascript”>
FB.init(“<YOUR_API_KEY_HERE>”, “xd_receiver.htm”); </script>
</body> </html>
1. Open the Microsoft Dynamics CRM application. 2. Select Customizations from the left navigation. 3. Select Customize Entities.
4. Open the Accounts entity. 5. Select Forms and Views. 6. Open the form.
7. Select Add a Tab from the Common Tasks area.
8. Give it a name (for example, SharePoint Account Dashboard); then click OK. 9. Navigate to the new tab created.
10. Select Add a Section, and give it a friendly name (for example, SharePointSection). Then click OK.
11. Select the new IFrame created.
12. Select Add an IFrame with the following properties: Name: SharePointIFrame
URL: http://<SiteURL>/
13. Select Pass Record Object-Type Code and Unique Identifier as Parameters. 14. Click OK.
15. Click Save and Close to save the form modifications. 16. Click Save and Close to save the entity modifications.
17. To deploy the changes, click the Accounts entity and then select Publish.
Facebook integration opens a whole new world as far as connecting with and understand-ing key stakeholders of the business is concerned. CRM integration into this website generates a massive contact management structure. Because people are on the run and keep switching locations, jobs, or contacts, it can become quite tedious to regularly update such information. Facebook lessens this difficulty by showing regular updates to CRM users. Moreover, the blogs, discussion forums, and group activities contribute toward enhancing existing CRM information.
There are already several success stories of businesses building applications specifically aimed at the Facebook platform and market. One of the more popular applications is SplashCast, which has features similar to YouTube but is aimed at video content for private audiences and sharing among friends. Other applications help users to discover new music recommended by friends.
NOTE
Using the Connector, customers can submit tickets, suggestions, inquiries, and com-plaints directly through Facebook. They can follow up on them and their progress. Customers can also access their profiles and view a history of their submitted cases and interactions with the company. Companies can define their target clients through profile segmentation in Microsoft Dynamics CRM and then directly target them with their marketing campaigns through Facebook in the form of notification newsfeeds.
A simple way to achieve integration between Microsoft Dynamics CRM and Twitter is to embed an iFrame with an automatic lookup of the Account record on Twitter.
There are other ways to use web service calls to retrieve the data and store the response in the Microsoft Dynamics CRM directly. Here is one alternative:
1. Open the Microsoft Dynamics CRM application. 2. Select Customizations from the left navigation. 3. Select Customize Entities.
4. Open the Accounts entity. 5. Select Forms and Views. 6. Open the form.
7. Select Add a Tab from the Common Tasks area.
8. Give it a name (for example, Twitter conversations), and then click OK. 9. Navigate to the new tab created.
10. Select Add a Section, and give it a friendly name (for example, TwitterSection). Then click OK.
11. Select the new IFrame created.
12. Select Add an IFrame with the following properties: Name: TwitterIFrame
URL: https://twitter.com/search/users?q=<AccountName> 13. Click OK.
14. Click Save and Close to save the form modifications. 15. Click Save and Close to save the entity modifications.
16. To deploy the changes, click the Accounts entity and then select Publish.
Summary
Because users update their own private contact information on various websites such as LinkedIn and Facebook, integrating with the social networks enables companies to retrieve updated information directly from the end users. This rich source of data can help compa-nies minimize the effort required to maintain personal information about users.
Before the release of this book, but too late to be reviewed, Microsoft released its Social Networking Accelerator. This accelerator takes the integration concepts explored in this chapter to the next level and provides rich reporting interfaces and easy management of the applications. Be sure to check for this accelerator at www.codeplex.com/