IBM SPSS Data Collection Interviewer
Server Administration 6.0.1 User’s
Guide
This edition applies to IBM SPSS Data Collection Interviewer Server Administration 6.0.1 and to all subsequent releases and modifications until otherwise indicated in new editions.
Adobe product screenshot(s) reprinted with permission from Adobe Systems Incorporated. Microsoft product screenshot(s) reprinted with permission from Microsoft Corporation. Licensed Materials - Property of IBM
Licensed Materials - Property of IBM © Copyright IBM Corporation 2000, 2011 Licensed Materials - Property of IBM © Copyright IBM Corporation 2000, 2011
U.S. Government Users Restricted Rights - Use, duplication or disclosure restricted by GSA ADP Schedule Contract with IBM Corp.
Welcome to theIBM® SPSS® Data Collection Interviewer Server Administration 6.0.1 User’s Guide. This guide provides information on using IBM® SPSS® Data Collection Interviewer Server Administration . For information about installing the application, see theIBM SPSS Data Collection Server 6.0.1 Installation Guide.
Adobe Portable Document Format (.pdf) versions of the guides are available on theIBM SPSS Data Collection ServerDVD-ROM. Viewing and printing the documents requires Adobe Reader. If necessary, you can download it at no cost fromwww.adobe.com. Use the Adobe Reader online Help for answers to your questions regarding viewing and navigating the documents.
Notice: IBM® SPSS® Data Collection offers many powerful functions and features for use in the business of our customers. IBM is not responsible for determining the requirements of laws applicable to any licensee’s business, including those relating to Data Collection Program, nor that IBM’s provision of (or any licensee’s receipt of) the Program meets the requirements of such laws. All licensees shall comply with all laws applicable to use and access of the Program, whether such use or access is standalone or in conjunction with any third party product or service.
About IBM Business Analytics
IBM Business Analytics software delivers complete, consistent and accurate information that decision-makers trust to improve business performance. A comprehensive portfolio ofbusiness intelligence,predictive analytics,financial performance and strategy management, andanalytic applicationsprovides clear, immediate and actionable insights into current performance and the ability to predict future outcomes. Combined with rich industry solutions, proven practices and professional services, organizations of every size can drive the highest productivity, confidently automate decisions and deliver better results.
As part of this portfolio, IBM SPSS Predictive Analytics software helps organizations predict future events and proactively act upon that insight to drive better business outcomes. Commercial, government and academic customers worldwide rely on IBM SPSS technology as a competitive advantage in attracting, retaining and growing customers, while reducing fraud and mitigating risk. By incorporating IBM SPSS software into their daily operations, organizations become predictive enterprises – able to direct and automate decisions to meet business goals and achieve measurable competitive advantage. For further information or to reach a representative visit
http://www.ibm.com/spss.
Technical support
Technical support is available to maintenance customers. Customers may contact Technical Support for assistance in using IBM Corp. products or for installation help for one of the supported hardware environments. To reach Technical Support, see the IBM Corp. web site athttp://www.ibm.com/support. Be prepared to identify yourself, your organization, and your support agreement when requesting assistance.
Licensed Materials - Property of IBM © Copyright IBM Corporation 2000, 2011
1
IBM SPSS Data Collection Interviewer Server Administration
User’s Guide
1
Welcome to IBM SPSS Data Collection Interviewer Server Administration . . . 1
What’s new in IBM SPSS Data Collection Interviewer Server Administration 6.0.1 . . . 1
Starting IBM SPSS Data Collection Interviewer Server Administration . . . 2
Recommended browser settings for IBM SPSS Data Collection Interviewer Server Administration 3 IBM SPSS Data Collection Interviewer Server Administration in other languages . . . 4
The IBM SPSS Data Collection Interviewer Server Administration screen. . . 4
Changing your password . . . 7
Setting IBM SPSS Data Collection Interviewer Server Administration options . . . 8
The project list . . . 9
Navigating in the project list . . . 9
Expanding and collapsing project folders. . . .10
Moving existing projects into folders . . . .10
Renaming projects and folders . . . .11
Refreshing the project list . . . .11
Creating a new project . . . .11
Creating a new Interviewer Server project. . . .12
Creating a New Analysis Project . . . .14
Setting up a IBM SPSS Data Collection Interviewer project . . . .40
Modifying web service settings . . . .41
Custom project setup for IBM SPSS Data Collection Interviewer projects . . . .41
Deleting projects . . . .41
Locking and unlocking projects. . . .42
Unlocking other people’s projects . . . .43
Logging in as a different user . . . .43
Concurrent Usage report . . . .44
Web Explorer . . . .44
Edit Project. . . .45
Starting Edit Project. . . .46
Changing Project Details . . . .46
Changing Permissions . . . .46
Changing Connection Properties . . . .47
Working with Project Properties . . . .49
Adding Project Properties . . . .49
Deleting Project Properties . . . .50
Changing Project Properties . . . .50
Importing Properties from Another Project. . . .51
Project Properties . . . .51
Editing customer accounts . . . .71
Removing customer accounts . . . .71
Adding users . . . .71
Removing users . . . .75
Adding roles . . . .75
Removing roles . . . .78
Assigning users to roles. . . .78
Removing users from roles . . . .83
Modifying user accounts . . . .84
Creating user property groups . . . .86
Deleting user property groups . . . .88
Adding properties to user property groups . . . .89
Changing a user property’s definition . . . .92
Deleting a user property . . . .93
Importing users and roles . . . .95
Exporting users, roles, and permissions . . . 107
Assigning users or roles to activities . . . 107
Unassigning users or roles from activities . . . 111
Assigning users or roles to activity features. . . 113
Removing users or roles from activity features. . . 125
Assigning activities to a user or role . . . 127
Assigning users or roles to a project . . . 129
Unassigning users or roles from projects . . . 133
No Choice No Action . . . 135
Setting up global filters . . . 136
User Properties Report . . . 141
User Roles Report . . . 142
Configuring account lockout settings . . . 143
Files . . . 144
File Management: IBM SPSS Data Collection Interviewer Server . . . 144
File Management: IBM SPSS Data Collection Survey Tabulation . . . 145
Starting Files . . . 145
Viewing File Details . . . 145
Checking Files In to the Shared Folder . . . 146
Checking Files Out from the Shared Folder . . . 147
Undoing Check-outs . . . 147
When to Check Files In and Out . . . 148
Uploading Files from your Computer into your User Folder . . . 150
Uploading Files Created with IBM SPSS Data Collection Interviewer Server Desktop Applications . . . 153
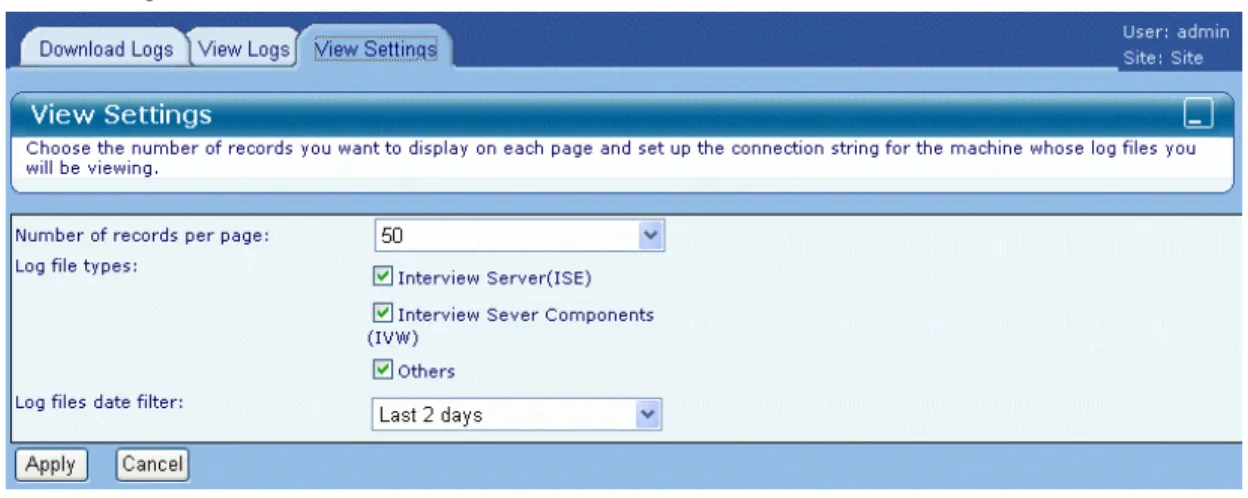
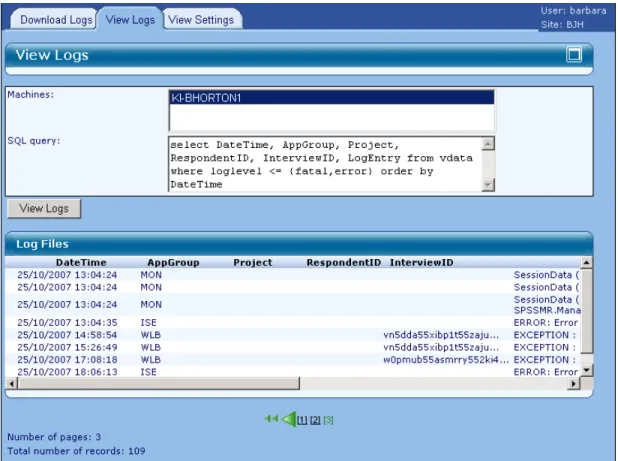
Manage Logs . . . 155
Starting Manage Logs . . . 155
View Settings . . . 155
Viewing Log Files . . . 156
Downloading Log Files . . . 158
What’s in the Zip File . . . 159
Appendix
A Notices
161
Index
164
1
IBM SPSS Data Collection Interviewer
Server Administration User’s Guide
Welcome to IBM SPSS Data Collection Interviewer Server
Administration
IBM® SPSS® Data Collection Interviewer Server Administration is an easy-to-use tool for running a variety of IBM® SPSS® Data Collection Web activities on a project of your choice. It also provides the following management and maintenance facilities:
EditProjectfor setting and changing project properties.
User Administrationfor maintaining user and group accounts, and for determining which user groups have access to a project and who can use certain features within an activity
Filesfor copying projectfiles between your working folder and the shared project folder and between Interviewer Server Administration and your computer.
Concurrent Usage reportprovides information on the number of users who have used the various Interviewer Server Administration activities during a particular time period.
Manage Logsfor viewing logfiles for Interviewer Server Administration and the activities that run inside it.
What’s new in IBM SPSS Data Collection Interviewer Server
Administration 6.0.1
This topic summarizes changes in IBM® SPSS® Data Collection Interviewer Server Administration 6.0.1.
Support for reserved names and keywords in metadata.IBM® SPSS® Data Collection now provides full support for SQL and mrScript reserved names and keywords in metadata variables. In previous releases, the use of reserved SQL keywords could cause issues when using the IBM® SPSS® Data Collection Data Model to query data for processes such as DMOM; the use of reserved mrScript keywords could cause syntax errors when referenced within a routing script. Refer to theReserved KeywordsandKeyword Summarytopics in the IBM® SPSS® Data Collection Developer Library for more information.
Concurrent Usage report
The new Concurrent Usage report provides information on the number of users who have used the various IBM® SPSS® Data Collection Interviewer Server Administration activities during a particular time period.For more information, see the topic Concurrent Usage report on p. 44. Licensed Materials - Property of IBM © Copyright
IBM Corporation 2000, 2011
User Administration
The following User Administration features and enhancements were implemented in version 6.0.1. Export Data activity feature. The following activity feature is new:
Export Data > Can alter data link connection propertiesThis feature allows you to provide inputs for custom properties, allowing you to define the mr Init Custom portion of both the input and output connection strings.
Customer accounts enhancements. You are now provided more customization options when working with customer accounts. You can now specify the following attributes:
Product name images
Logo images
Default page picture images
Banner images
Banner background tile images
Tab images .zipfiles
Rounded table images .zipfile
For more information, see the topic Adding customer accounts on p. 62.
x64 64-bit support.x64 64-bit editions are now provided for the Data Collection applications (note that IBM® SPSS® Data Collection Author Server Edition and IBM® SPSS® Data Collection Survey Reporter Server Edition are only provided as x86 32-bit). Refer to the appropriate Data Collection installation guide for more information.
Fix pack and hotfix information. You can now view information regarding whichfix packs and hotfixes are installed via the application’s Help menu.
Help > About Data Collection... > Details... What’s New Information for Previous Releases
What’s New information for previous Data Collection\Dimensions releases can be found in the Data Collection\Dimensions What’s Newdocument.
The document is in Adobe Portable Document Format (.pdf) Viewing and printing the document requires Adobe Reader. If necessary, you can download it at no cost fromwww.adobe.com. Use the Adobe Reader online Help for answers to your questions regarding viewing and navigating the document.
Starting IBM SPSS Data Collection Interviewer Server Administration
E In your browser typehttp://server_name/SPSSMR/DimensionNet/default.aspxThis displays the IBM® SPSS® Data Collection Interviewer Server Administration login page. E Enter your user name and password.
E Optionally, selectRemember my user name for future logins. With this selected, Interviewer Server Administration automatically displays your user name so you just have to enter your password. E ClickLogin.
The main Interviewer Server Administration page is displayed. E Do one of the following.
To work on an existing project, select the project in the project list.
To create a new project, click the New Project icon in the toolbar above the project list. Note: If you want to simultaneously login to separate Interviewer Server Administration sessions as different users, select the Internet ExplorerFile→New Sessionoption.
Recommended browser settings for IBM SPSS Data Collection
Interviewer Server Administration
Recommended browser settings for running IBM® SPSS® Data Collection Interviewer Server Administration are as follows:
Clear the browser’s cache (you should do this each time a new version is installed)
Load pages on each visit
Do not display friendly HTTP error messages
Cookies enabled Configuring your browser E Open your browser and select
Tools > Internet Options
This displays the Internet options dialog box. E Make some or all of the following changes.
Setting Action
Clearing the cache On the General tab, clickDelete Filesand confirm your request when asked to do so (it is up to you whether you also choose to delete offline content). Loading pages On the General tab, clickSettings. Then select
Every visit to the pageand clickOK. This makes the browser reload a page each time you visit it rather than loading the previous version of that page from its cache.
Friendly HTTP error messages On the Advanced tab, deselectShow friendly HTTP error messagesin the list of Browsing options and clickOK.
Enabling cookies The Privacy tab reports your security setting and what, if any, cookies your browser allows. If your browser disallows all cookies, clickAdvancedand select the options to allow cookies.
IBM SPSS Data Collection Interviewer Server Administration in other
languages
You can display the application in a language other than English. You can change the language at any time by following the appropriate instructions below. Close the application before making these changes. You can change the language back to English at any time or even switch back and forth between supported languages.
To change the display language 1. Open Internet Explorer and select:
Tools > Internet Options
2. Click theLanguagesbutton and select the appropriate language from theLanguage Preference list. If the desired language does not display in the list, clickAdd... and select the language in theAdd Languagedialog.
3. Use theMove upandMove downbuttons to control the language order preference. The language at the top of the list will be used as the default language.
4. ClickOKto save your changes.
The IBM SPSS Data Collection Interviewer Server Administration
screen
The IBM® SPSS® Data Collection Interviewer Server Administration screen is divided into two sections. On the left is the project list, showing the projects you may work on. On the right is the activity list for the project you have chosen.
The Project list
The project list displays all projects that exist in DPM and that you can access. An icon in front of each project name tell you about the project’s status.
Inactive. The project is not yet available for interviewing, or is a project that is for use in IBM® SPSS® Data Collection Survey Tabulation only. Test. The project can be used for running test interviews.
Active. The project can be used for live interviewing.
Inactive and locked. Test and locked. Active and locked.
If you hover over an icon or a project name, Interviewer Server Administration displays a pop-up showing the project’s type (IBM® SPSS® Data Collection Interviewer Server or Survey Tabulation) and status. If the project is locked, the pop-up tells you who has locked it.
The Activity Information panel
Whenever an activity starts, the Activity Information Panel is displayed in the upper right portion of the screen. It lists the name, ID and description of the current project and provides brief help about what to do next. You can shrink the panel so that only the title bar is visible by clicking the button on the right of the title bar. Clicking the button again reopens the panel.
The Activity list
The activities that are available for a project depend on which products are available, what you are allowed to access, whether the project is locked by another user and, for Interviewer Server projects, the project’s status and requirements:
You will not see Survey Tabulation in the list of activities if it has not been installed. Similarly, the Interviewer Server activities will not be shown if Interviewer Server has not been installed.
Access to Interviewer Server Administration activities is controlled by roles and each role has access to a different set of projects and activities. Some users may have one role and others several roles. How the roles are set up will vary. For example, users who belong to the ScriptWriterGroupArole might have access to a different set of projects and activities from a user who belongs to theAnalysisGroupBrole. TheProjectManagerGroupArole might have access to the same activities but a different set of projects from theProjectManagerGroupB, and so on.
When a project is locked by another user, some activities that you can normally access may not be available.
For Interviewer Server projects, if the project has not been activated, you will see the activities related to setting up a project, including Build, Launch, Participants, and Files, but not those associated with viewing or exporting data. Similarly, if the project has been activated but does not use Sample Management or Quota Control, there may be a link for the Survey Results activity so that you can view data for the project, but Quotas or Participant Rules will not be displayed because they are not relevant to this project.
Some activities work with certain browsers only. Activities that do not work with the browser you are using are marked with the following icon:
Figure 1-1
Icon for activities that do not work in the current browser
Icons common to all IBM SPSS Data Collection Interviewer Server Administration activities The following icons are available for all Interviewer Server Administration activities.
Close the activity
Open online help in a new browser window. Display project information: name and ID, status, description, connection string, who has locked the project, and notes. The information appears in a pop-up when you hover over the icon.
Changing your password
The administrator sets your password when he/she creates your IBM® SPSS® Data Collection Interviewer Server Administration user account, and can specify whether or not you may change it. Sometimes, you will be asked to change your password thefirst time that you log in.
If you are allowed to change your password at other times you will see an option in the Tools menu for doing so.
Administrators may change any user’s password, so if you have forgotten your password you can ask your administrator to assign you a new one.
E To change your password, choose Options > Change Password
This opens the Change Password dialog box.
E Enter your current password and the new password. Confirm the new password. E ClickChangeto make the change and close the dialog box.
Changing other peoples’ passwords
If you run Change Password as an administrator, the dialog box that is displayed has a User Name text box in which you select the name of the user whose password you want to change. There is no prompt for the user’s existing password as this may not be known. Just enter and confirm the new password.
Setting IBM SPSS Data Collection Interviewer Server Administration
options
IBM® SPSS® Data Collection Interviewer Server Administration options control the following aspects of Interviewer Server Administration behavior:
Project list. You can control which types of projects you see in your project list and the order in which they are shown. Folders are always sorted in alphabetical order, but within folders projects can be sorted by name or status, and you can choose to exclude projects with certain statuses from the list.
Activities list. You can sort activities by name or type, and can suppress their descriptions. Language. The text in the Interviewer Server Administration GUI is normally displayed in English, but translations in other languages are available. If your browser’s language is set to a language that is available in Interviewer Server Administration, then your Interviewer Server Administration language will be set to match the browser language.For more information, see the topic IBM SPSS Data Collection Interviewer Server Administration in other languages on p. 4.
If you have your browser set to work in one language but want to run Interviewer Server Administration in a different language, you may set the language within Interviewer Server Administration. For example, if your browser runs in Japanese, then Interviewer Server Administration will automatically run in Japanese too. If your browser runs in English and you want to run Interviewer Server Administration in Japanese, set the language to Japanese in Interviewer Server Administration.
Browser favorite. You can add Interviewer Server Administration to your browser’s Favorites. Controlling how Interviewer Server Administration displays projects and activities:
E Choose:
Options > Preferences
This opens the Project Options page.
E In “Select your preferred language”, choose the language in which you want the Interviewer Server Administration GUI texts such a menu names and error messages to be displayed. E UncheckShow Activity Descriptionsif you do not want to see descriptions for each activity. E If you want to add Interviewer Server Administration to your browser’s Favorites list, do the
following:
ClickAdd to Favorites. This opens the standard browser Add Favorite dialog box.
Choose where the link should appear in the favorites list and click OK. E ClickApply Changes.
The project list
The project list displays all the projects that you can access using IBM® SPSS® Data Collection Interviewer Server Administration activities. These may be projects that you have created yourself or projects that others have created and that you have permission to use. If you create projects that only certain people may access (for example, people who work on the same client’s projects) no one except those people will see those projects in their project list.
The project list may be a simple list of project names or it may be organized into a hierarchical structure in which similar or related projects are grouped within folders of by customer account. Folder creation and deletion is directly related to the creation and deletion of projects: you cannot create or delete empty folders. When you create a project, you can (if you have the appropriate permissions) create a new folder in which to place the project or you can place the project in an existing folder. When you delete projects in folders, Interviewer Server Administration automatically deletes the folder when you delete the last project from the folder.
The project list is sorted in alphabetical order, foldersfirst, similar to Windows Explorer. If you sort the list by project status, projects are sorted by name within their status groups.
Note: The hierarchical project list is a display feature only. It does not create a hierarchical structure on the disk. All projects are created in the user’s working folder (for example, in Users\ben\Projects) even if they are displayed as being in a folder in the project list.
The following permissions levels control how you can work with the project list:
Users with no special permissions can create projects at the top level of the hierarchy or in an existing folder, but cannot rename projects, move them to different folders, or delete them.
Users with “Can manage project folders” permission can create new folders when they create projects, can move projects into folders or from one folder to another, and can rename and delete project folders.
Your IBM® SPSS® Data Collection administrator will tell you what permissions you have.
Navigating in the project list
You can use standard Windows methods for navigating in the project list.
Using the mouse, scroll through the list and click to select a folder or project.
Using the keyboard, press↑and↓to move through the list and press the space bar to select a project or folder.
Expanding and collapsing project folders
Figure 1-2Expand All Folders icon
Figure 1-3
Collapse All Folders icon
If the project list contains folders, the list is shown fully collapsed thefirst time you start IBM® SPSS® Data Collection Interviewer Server Administration so that only the names of folders and projects that are not part of folders are visible. You can see more projects by expanding some or all folders. When you close Interviewer Server Administration, it remembers your project list settings and displays it that way in your next session.
To expand or collapse a single folder, click the small plus or minus icon next to the folder or double-click the folder icon. If you would rather use your keyboard, press→to expand a folder or←to collapse it.
To expand or collapse all folders, click the Expand All Folders or Collapse All Folders icon as appropriate.
Moving existing projects into folders
Figure 1-4Cut icon
Figure 1-5 Paste icon
If you have the right permissions, you can move projects into folders or from one folder to another. The easiest way to move a project is to drag it from its current location to the new one. Alternatively, proceed as follows:
E Select the project. E Click the Cut icon.
The project’s name is dimmed. E Select the new project location. E Click the Paste icon.
Renaming projects and folders
To rename a project, select it and click the Edit Project Properties icon.For more information, see the topic Changing Project Details on p. 46.
To rename a folder, double-click on the folder name and enter the new name in the box that appears around the folder name. Press Enter to save the change.
Note: If you rename a folder that contains some projects that you cannot access, IBM® SPSS® Data Collection Interviewer Server Administration creates a copy of the original folder with the new name you have given it and moves all the projects you can access from the original folder into the new one. The projects that you cannot access remain in the original folder. You will see only the new folder with the projects you can access. Users who can access all projects will see your new folder as well as the original folder with the projects that only they can access.
Refreshing the project list
Figure 1-6 Refresh icon
Normally, IBM® SPSS® Data Collection Interviewer Server Administration redraws the project list to reflect the changes you make. If this doesn’t happen, click the Refresh icon to refresh the project list manually.
Creating a new project
When you create a new project, you define what type of project it is, give it a name and description, specify a customer account, and define who may work on it. You may also place the project in a folder of similar or related projects — for example, in a folder of projects for a particular customer, or in a folder of projects to do with a particular topic.
Note: Folders are a visual management tool only. Placing a project in a folder does not create a subfolder in your projects folder on the disk.
There are two types of projects:
Interviewer Server.These are projects for which you will be using IBM® SPSS® Data Collection Interviewer Server to gather data. (Interviewer Server includes tools for building the questionnaire, running test interviews, and viewing topline tables.) If you also have IBM® SPSS® Data Collection Survey Tabulation, you can use Survey Tabulation to analyze the survey data that you collect using Interviewer Server.
Analyze existing data. These are projects for which you want to use Survey Tabulation to perform in-depth analysis of survey data after it has been collected (for example, using another data collection tool). The data can be in any format supported by the IBM® SPSS® Data Collection Data Model.
The instructions for setting up the Interviewer Server and analysis projects are given separately, because the procedures are somewhat different.
Creating a new Interviewer Server project
These instructions cover setting up a project for use with IBM® SPSS® Data Collection Interviewer Server. If you also have IBM® SPSS® Data Collection Survey Tabulation installed, the project will automatically be set up for use with Survey Tabulation. This means that you will be able to define your analyses in Survey Tabulation even before you start interviewing. It is safe to use Survey Tabulation to analyze your data while you are collecting it, because Survey Tabulation always opens the data in read-only mode. (When you create new variables in Survey Tabulation, they are stored separately from the main project data.)
Note: Project names are unique to each customer account. After deleting a project, other users will not be able to create a new project, with the same name as the deleted project, unless they are assigned to the same customer account in which the deleted project was created.
Project names and IDs
Every project has a name and an ID. The name is the name by which the project will be identified in IBM® SPSS® Data Collection Interviewer Server Administration. It is for display purposes only and you can change it at any point in the project’s life cycle. The ID is the name that the Interviewer Server Administration activities will use when creatingfiles associated with the project, so it is usual to make it the same as the project name if possible. Once the ID has been set you cannot change it even if you change the project name.
Because the project ID is used infilenames it has to be something that is valid forfilenames. The rules are these:
The ID must be unique.
It must start with an English letter (A to Z, a to z).
The rest of the name may contain English letters and the digits 0 to 9.
If the project name meets these criteria, Interviewer Server Administration uses it as the project ID (you can change this if you wish). If not, Interviewer Server Administration copies the name and then makes the following changes in an attempt to make it acceptable. Once an acceptable ID emerges, no further changes are made.
1. Remove invalid characters (non-English letters or punctuation, for instance). If this results in a zero-length ID, Interviewer Server Administration generates an ID based on your user name as described below.
2. If the ID starts with a number Interviewer Server Administration inserts the letter A at the start of the ID.
3. If the ID is longer than 64 characters it is truncated to that length.
4. If the ID is not unique Interviewer Server Administration appends a number in the range 1 to 999. Numbers are chosen in sequence starting with 1 so this allows for 999files with the same root to thefilename (ID_1 to ID_999, for instance). If adding a number would make the ID longer than 64 characters, Interviewer Server Administration removes characters from the end of the ID before appending the number.
If none of these changes results in a valid project ID, Interviewer Server Administration generates an ID based your user name and the date and time, modifying it to produce a unique and valid ID if necessary — for example,ben0501191226.
Note: When customer accounts are employed, the generated ID is prefixed by the customer account name (for example,customeraccountname_ben0501191226).
Creating a new Interviewer Server project
E Click the New Project icon. This opens the New Project dialog box. E In Project Type, chooseInterviewer Server (Data Collection).
E In Name, enter the project’s name as you want it to appear in the project list.
E In Customer Account, select a customer account for the project. If you are not using customer accounts, select theSystemaccount.
E Optionally, in Description, type a more detailed description of the project.
E If you want to do any of the following, clickAdvanced. If not, clickOKto create the project using the default settings.
Specify additional project details such as the project ID or the project folder.
Specify which roles may access the project. The default is for only the creator and members of the DPMAdmins and CustomerAccountAdmins roles to have access.
E To specify additional project details, select the Project tab.
E If you do not like the Project ID that Interviewer Server Administration has chosen, enter the name that you want to use as the basename for allfiles associated with this project.
E ClickCheckto verify that the name you have chosen is valid.
E The Project Folderfield allows you to group projects using characteristics of your choice. How you use thisfield depends on your permissions.
Everyone can choose an existing folder name to place the project in that folder, or <Top level> to create a project in the top level of the project hierarchy.
If you have permission to manage project folders, you may choose <Create new folder> to place the project in a new folder with a name of your choice (enter the folder name when prompted to do so).
Note: The hierarchical project list is a display feature only. It does not create a hierarchical structure on the disk. All projects are created in your user folder (for example, in
Users\ben\Projects) even if they are displayed as being in a folder in the project list. E To specify which roles may access the project, select the Permissions tab and then select roles
as appropriate.
E ClickOKto close the Advanced dialog box and then clickOKagain to create the project.
Creating a New Analysis Project
This section covers creating a non-IBM® SPSS® Data Collection Interviewer Server project. Before you set up a non-Interviewer Server project, you need to identify the datafiles you are going to use and, if necessary, prepare them foruploading. For more information, see the topic Preparing Your Data Files For Uploading on p. 15.
E Setting up a project involves three main steps: Create the new project
Check the uploadedfiles into the Shared folder Create and populate a test table
After you have followed these steps, your project will be available to all users who belong to the roles you selected as having access to the project.
Tip:Sample data is included with the IBM® SPSS® Data Collection Developer Library, which is available as a separate installation and as a free download. The samples include a backed-up relational MR (RDB) database and associated Metadata Document (.mdd)file, IBM® SPSS® Quanvert™ databases, IBM® SPSS® Data Collection XML data sets, IBM® SPSS® Statistics
.sav, and IBM® SPSS® Quancept™ .qdiand .drsfiles. The Data Collection Developer Library provides detailed step-by-step instructions for setting up IBM® SPSS® Data Collection Interviewer Server Administration projects for each of the main sample data sets. Preparing Your Data Files For Uploading
Before you create your (non-IBM® SPSS® Data Collection Interviewer Server) data analysis project in IBM® SPSS® Data Collection Interviewer Server Administration, you need to make sure that any datafiles that are required are ready foruploading. You can uploadfiles individually or in a .zipfile. Using a .zipfile is recommended when you upload largefiles. If you use a .zip file, Interviewer Server Administration will automatically unzip the .zipfile and delete it, after the upload isfinished. You can uploadfiles from your own machine or from any other suitable network location.
IBM® SPSS® Data Collection Survey Tabulation uses the IBM® SPSS® Data Collection Data Model to access the underlying data, which can be, for example, an SPSS .savfile, a IBM® SPSS® Quanvert™ database, a relational MR (RDB) database, IBM® SPSS® Quancept™ data stored in .qdiand .drsfiles, etc. The Data Model handlescase data(which stores the actual responses) andmetadata(which describes the case data and stores the question and category texts, etc.) separately. Survey Tabulation requires a metadata source as well as a case data source. The metadata source can be an IBM® SPSS® Data Collection Metadata Document (.mdd)file or any other metadata format for which a suitable read-enabled Metadata Source Component (MDSC) is available. The case data can be in any format for which a suitable read-enabled Case Data Source Component (CDSC) is available.
Although Survey Tabulation can read metadata in any format for which a suitable read-enabled MDSC is available, there are performance advantages in using metadata in an .mddfile. This is because when the metadata for the project is stored in an .mddfile, Survey Tabulation caches the metadata and this leads to significantly improved performance. The caching persists between sessions and is updated when you create and edit variables.
Survey Tabulation does not cache the metadata when it is stored in a proprietary format (such as Quanvert, Quancept .qdi, or SPSS .sav). However, you can use MDM Explorer to create an .mdd from the proprietary metadata for use in the Survey Tabulation project. You would then need to upload the .mddfile you create with the other datafiles for the project, and configure the project to use the .mddfile. MDM Explorer is a tool that comes with the IBM® SPSS® Data Collection Developer Library, which is available on the IBM SPSS Data Collection Server DVD-ROM and also as a free download from Data Collection Developer Library.
Here are some notes to help you prepare datafiles of the main data formats that are suitable for use with Survey Tabulation:
Quanvert database.Quanvert databases come in two formats—packedandunpacked. You can tell the difference between a packed and unpacked Quanvert database because a packed database consists of a singlefile with a .pkdfilename extension whereas an unpacked database consists of manyfiles including a headerfile calledqvinfo. Survey Tabulation can support both formats.
When using the unpacked format it is advisable to pack thefiles before uploading, but note that the packed format is not supported for Quanvert multiprojects.
There are some additional manual steps for setting up Quanvert multiprojects for use in Survey Tabulation.For more information, see the topic Setting up a IBM SPSS Quanvert Multiproject for Use in IBM SPSS Data Collection Survey Tabulation on p. 22.
SPSS .sav file.When you are using a .savfile that you created using the Data Model (for example, using IBM® SPSS® Data Collection Paper - Scan Add-on Transfer or exporting Interviewer Server data), it isalwayspreferable to read it using the .mddfile that was used when creating it (that is the output metadatafile if you created the .savfile using a DMSfile). This means that the variables (and their names) will match those in the .mddfile and will therefore be easier to understand. For example, several variables may be created in the .savfile from a single text variable in the .mddfile. When you access the .savfile in Survey Tabulation using the .mddfile, these variables will be recombined and presented as one variable.
Note:For some languages you will also need to upload a.sav.inifile specifying the language of the .savfile so that Survey Tabulation can read it, for example:
[mrSavDsc] SavLanguage=JPN
The name of thisfile must be<savfilename>.sav.ini, for example, myproject.sav.ini.
For further details, see theLanguage Handling by SPSS Statistics SAV DSCsection in the Data Collection Developer Library.
Quancept QDI/DRS file.When you are using Quancept data, generally the metadata is in the form of a .qdifile and the case data is in a .drs, .drzor .drufile.
Data Collection XML format.By default, Survey Tabulation uses the hierarchical view when you work with case data in the XML format. However, when you export data to XML, the data is generally written in theflat (VDATA) format. The Data Collection Developer Library comes with a sample mrScriptBasicfile (calledCdscHdataTransfer.mrs) that you can use to export hierarchical data to an XMLfile in the hierarchical (HDATA) format. Alternatively, you can select theflat view within Survey Tabulation. When you use case data in the XML format, the metadata is generally in the form of an .mddfile.
Relational MR database.When the case data is stored in a relational MR database, the metadata is generally stored in an .mddfile and is generally the onlyfile you need to upload. If the database is in the form of an SQL Server backup, you need to restore it.
Surveycraft QDT/VQ files.When you upload IBM® SPSS® Surveycraft™ data, you must upload both the.qdtand.vqfiles. You may also want to create a metadata (.mdd)file and upload that as well. This does not increase the initial speed of Survey Tabulation, but can improve performance when you next open the project in Survey Tabulation. You must have write access to the.qdt and.vqfiles that you want to upload.
For detailed information about theDSCsthat come with the Data Model and how they interpret the underlying data, see the Data Collection Developer Library.
Creating the New Project in IBM SPSS Data Collection Interviewer Server Administration This topic provides information about creating a IBM® SPSS® Data Collection Interviewer Server Administration project that uses data that is not part of an IBM® SPSS® Data Collection Interviewer Server project. For instructions on creating a new questionnaire project, seeCreating a New Questionnaire Project.
Project Names and IDs
Every project has a name and an ID. The name is the name by which the project will be identified in Interviewer Server Administration. It is for display purposes only and you can change it at any point in the project’s life cycle. The ID is the name that the Interviewer Server Administration activities will use when creatingfiles associated with the project, so it is usual to make it the same as the project name if possible. Once the ID has been set you cannot change it even if you change the project name.
Because the project ID is used infilenames it has to be something that is valid forfilenames. The rules are these:
The ID must be unique.
It must start with an English letter (A to Z, a to z).
The rest of the name may contain English letters and the digits 0 to 9.
If the project name meets these criteria, Interviewer Server Administration uses it as the project ID (you can change this if you wish). If not, Interviewer Server Administration copies the name and then makes the following changes in an attempt to make it acceptable. Once an acceptable ID emerges, no further changes are made.
1. Remove invalid characters (non-English letters or punctuation, for instance). If this results in a zero-length ID, Interviewer Server Administration generates an ID based on your user name as described below.
2. If the ID starts with a number Interviewer Server Administration inserts the letter A at the start of the ID.
3. If the ID is longer than 64 characters it is truncated to that length.
4. If the ID is not unique Interviewer Server Administration appends a number in the range 1 to 999. Numbers are chosen in sequence starting with 1 so this allows for 999files with the same root to thefilename (ID_1 to ID_999, for instance). If adding a number would make the ID longer than 64 characters, Interviewer Server Administration removes characters from the end of the ID before appending the number.
If none of these changes results in a valid project ID, Interviewer Server Administration generates an ID based your user name and the date and time, modifying it to produce a unique and valid ID if necessary — for example,ben0501191226.
Note: When customer accounts are employed, the generated ID is prefixed by the customer account name (for example,customeraccountname_ben0501191226).
To Create the New Project in Interviewer Server Administration:
E Make sure that your datafiles are ready for uploading. For more information, see the topic Preparing Your Data Files For Uploading on p. 15.
E On the toolbar at the top of theMy Projectslist, click the New Project button: Figure 1-7
New Project button
This opens the New Project dialog box.
E From the Project Type drop-down list, selectAnalyze existing data.
E In Name, enter the project’s name as you want it to appear in the project list.
E In Customer Account, select a customer account for the project. If you are not using customer accounts, select theSystemaccount.
E Optionally, in Description, type a more detailed description of the project.
E If you want to do any of the following, clickAdvanced. If not, clickOKto create the project using the default settings.
Specify additional project details such as the project ID or the project folder.
Specify which roles may access the project. The default is for only the creator and members of the DPMAdmins and CustomerAccountAdmins roles to have access.
E If you do not like the Project ID that Interviewer Server Administration has chosen, enter the name that you want to use as the basename for allfiles associated with this project.
E ClickCheckto verify that the name you have chosen is valid.
E The Project Folderfield allows you to group projects using characteristics of your choice. How you use thisfield depends on your permissions.
Everyone can choose an existing folder name to place the project in that folder, or <Top level> to create a project in the top level of the project hierarchy.
If you have permission to manage project folders, you may choose <Create new folder> to place the project in a new folder with a name of your choice (enter the folder name when prompted to do so).
Note: The hierarchical project list is a display feature only. It does not create a hierarchical structure on the disk. All projects are created in your user folder (for example, in
Users\ben\Projects) even if they are displayed as being in a folder in the project list. E To specify which roles may access the project, select the Permissions tab and then select roles
as appropriate.
E ClickOKto close the Advanced dialog box and then clickOKagain to create the project. This opens the Upload Existing Data dialog box.
E In File to upload, clickBrowse. Then browse to where your datafiles are located and double-click thefile you want to upload. Thefile begins to upload immediately. When the upload is complete, the name of thefile appears in theFile(s) uploadedlist.
You can upload only onefile at a time, but when eachfile has been uploaded, you have the option to upload another one. If you upload a .zipfile, Interviewer Server Administration automatically unzips thefile and deletes it when the upload is complete.
E After uploading an .mddfile whose name is different from the project ID, you will be asked whether you want to change the name of the .mddfile to match the project ID. SelectCancel. E If you want to check that Interviewer Server Administration can connect to the datafiles you have
uploaded, clickTest Connection. In most cases the connection will work straight away and you will see a message confirming this. If the connection fails, you will need to use EditProject to change the connection properties. For more information, see the topic Changing Connection Properties on p. 47.
E ClickFinish.
This creates the project and adds it to the list of Interviewer Server Administration projects. Checking the Uploaded Files into the Shared Folder
This topic provides information about a step that you need to perform to make a project available to other users. This step is not necessary if you do not want other users to have access to the project or when you are setting up an IBM® SPSS® Data Collection Interviewer Server projects that will also be used with IBM® SPSS® Data Collection Survey Tabulation.For more information, see the topic Creating a new Interviewer Server project on p. 12.
After you have uploaded your datafiles and created the IBM® SPSS® Data Collection Interviewer Server Administration project, you need to check the uploadedfiles into the shared folder in order for other users to be able to work with this project.
To Check the Uploaded Files into the Shared Folder:
E Select the new project in the Interviewer Server Administration project list and clickFiles. This opens the Files activity, which lists the uploadedfiles.
E Select eachfile that is required by the project. E Choose
Actions > Check In
This checks thefiles into the shared folder.
E Click the Home button on the Files toolbar to close the activity. E Select the project in the Interviewer Server Administration project list. E Click the Unlock Project button:
Your project will now be available to the users who have the roles you selected for the project. Creating and Populating a Test Table
After setting up a non-IBM® SPSS® Data Collection Interviewer Server project for use in IBM® SPSS® Data Collection Survey Tabulation, you should open the project in Survey Tabulation in order to test that the connection string has been set up correctly and the data is accessible. This step is not generally necessary when you are using an Interviewer Server project in Survey Tabulation, because the connection string is created for you.
To Create and Populate a Test Table in Survey Tabulation: E Select the new project and clickSurvey Tabulation.
There will be a short delay while Survey Tabulation initializes.
E If you see the message “Server error: Failed to load data”, it indicates that Survey Tabulation was not able to connect to the metadata. You will be returned to IBM® SPSS® Data Collection Interviewer Server Administration, where you shouldfirst check that you have checked the project’s datafiles into the shared folder. If thefiles have been checked in, use the project editor to check and, if necessary, correct the connection properties for the metadata source.For more information, see the topic Edit Project on p. 45.
E If you see the main Survey Tabulation screen, including the list of variables, it means that Survey Tabulation is able to connect to the project’s metadata correctly. You now need to create and populate a simple table (for example, one that crosstabulates two simple categorical variables) to check that Survey Tabulation is able to connect to the project’s case data. For information on creating and populating a table, see the Survey Tabulation documentation.
E If the table populates without a problem, it means that the project is set up correctly.
E If you get an error when you attempt to populate the table, you should make a note of the error message, return to Interviewer Server Administration, and then use the project editor to check and, if necessary, correct the connection properties for the case data source. For more information, see the topic Edit Project on p. 45.
Tips:
When there is an error populating a simple table immediately after setting up the project, it generally means that there is a problem connecting to the case data. This may be because there is an error in the connection properties for the case data, a problem with the case data itself, or incorrect access permissions.
Generally thefirst part of the error message comes from the Table Object Model (TOM) and the related Table Aggregator component. Sometimes there is an additional error message from the CDSC that is used to access the case data, and this can sometimes give a clue to the cause of the specific problem.
Aggregator Error 296: Input data doesn’t exist (neither VDATA nor HDATA found).This generally means the case data specified in the connection string cannot be found. If you are using afile-based case data format, check that you specified the correctfile and location and that thefile is present. Check that you specified the right type of data (that you didn’t select SPSS Statistics SAV DSC when you meant IBM® SPSS® Data Collection DRS DSC, etc.) If you are using RDB DSC 2, check the following:
In the OLE DB connection string specified for the Case Data Location, is theInitial Catalog property set to the name of the database?
In the OLE DB connection string specified for the Case Data Location, is theData Source property set to the name of the server on which the SQL Server database is located?
Is the Case Data Project correct? In a project that originated in Interviewer Server, this is typically the same as the database name.
Do you have appropriate access permissions for the SQL Server database?
Aggregator Error 239: Failed to initialize CDSC.This message is generally followed by a message from the CDSC that should provide more information about the problem. When attempting to connect to an XMLfile, this message may indicate that the specifiedfile does not exist. When attempting to connect to an RDB database, this message may indicate that you have specified the Case Data Project incorrectly.
Aggregator Error 278: Data table HDATA requested but not available.If you are attempting to connect to an XMLfile, this generally means that data is in theflat (VDATA) format. This means you need to change to use theflat view within Survey Tabulation. For more information, see the topic Preparing Your Data Files For Uploading on p. 15. Sometimes this error message also occurs when you have selected the wrong case data type (for example, if you accidentally select RDB DSC 2 instead of SPSS Statistics SAV DSC).
For detailed information about the CDSCs that come with the IBM® SPSS® Data Collection Data Model, their error messages, and known problems, see the IBM® SPSS® Data Collection Developer Library.
Setting up a IBM SPSS Quanvert Multiproject for Use in IBM SPSS Data Collection Survey Tabulation
Setting Up the Multiproject in IBM® SPSS® Quanvert™
If you want to use a Quanvert multiproject in IBM® SPSS® Data Collection Survey Tabulation, you need to make sure that the subprojects are in subfolders of the main folder you specify when you create the multiproject and that this folder is given the name you want to use for the project in IBM® SPSS® Data Collection Interviewer Server Administration. This means that you must make sure that the folder name you specify when you create the multiproject in Quanvert meets the requirements for a valid Interviewer Server Administration project name. For more information, see the topic Creating the New Project in IBM SPSS Data Collection Interviewer Server Administration on p. 17.
For example, suppose you create the multiproject in the following folder:
C:\QVTW\MYPROJECT
The subprojects would need to be located in:
C:\QVTW\MYPROJECT\MySubproject1
C:\QVTW\MYPROJECT\MySubproject2
C:\QVTW\MYPROJECT\MySubproject3
whereMYPROJECTis the name you are going to use for the Interviewer Server Administration project andMySubproject1,MySubproject2, andMySubproject3are the names of the subproject folders.
Note that this folder structure is not recommended for use in Quanvert, because it makes it easy to delete the subprojects accidentally. However, this folder structure is a requirement for using a Quanvert multiproject in Survey Tabulation.
Setting Up the Project in Interviewer Server Administration
Rather than uploading thefiles in Interviewer Server Administration, you need to ask your system administrator to copy thefiles manually to the shared folder for this project on the Interviewer Server Administration server so that the relative folder structure is maintained. The folder structure on Interviewer Server Administration should then look like this:
\\fmroot\Shared\Projects\MYPROJECT
\\FMRoot\Shared\Projects\MYPROJECT\MySubproject1 \\FMRoot\Shared\Projects\MYPROJECT\MySubproject2 \\FMRoot\Shared\Projects\MYPROJECT\MySubproject3
You can now follow the normal steps for setting up your Survey Tabulation project in Interviewer Server Administration, but skipping the steps for uploadingfiles and checking the uploaded files into the shared folder.
Data Link Properties Dialog Box
When you access data using the IBM® SPSS® Data Collection Data Model, there are a number of connection properties that need to be specified. The Data Link Properties dialog box makes it easy to set up the connection properties.
The Data Link Properties dialog box has three tabs—Connection, Advanced, and All. Data Link Properties Dialog Box: Connection Tab
You use the Connection tab to define the name, location, and type of the data to which you want to connect.
Metadata Type.Defines the type of metadata. The drop-down list shows the types of metadata for which you have a metadata source component (MDSC). The default options are:
None.Choose this option if you want to connect to case data only.
MR Metadata Document.Selects metadata that is in the standard IBM® SPSS® Data Collection Data Model format, which is a questionnaire definition (.mdd)file.
ADO Database.Selects metadata that is in an ActiveX Data Objects (ADO) data source. Data Collection Log File.Selects metadata in a standard IBM® SPSS® Data Collection logfile. Data Collection Participation Database. Selects metadata that is in a IBM® SPSS® Data
Collection Interviewer Server Administration project’s Sample and HistoryTable tables.
Data Collection Scripting File.Selects metadata that is in a mrScriptMetadatafile. In2data Database.Selects metadata that is in an In2data database (.i2d)file.
Quancept Definitions File (QDI).Selects metadata in a IBM® SPSS® Quancept™ .qdifile using the QDI/DRS DSC.
Quancept Script File.Writes the metadata in an MDM document to a Quancept script (.qqc)file. Quantum Specification.Writes the metadata in an MDM document to a IBM® SPSS®
Quantum™ specification.
Quanvert Database.Selects metadata that is in a IBM® SPSS® Quanvert™ database.
Routing Script File.Writes the routing section of an MDM document to a script that defines the routing required for interviewing.
SPSS Statistics File (SAV).Selects metadata that is in an IBM® SPSS® Statistics .savfile. Surveycraft File. Selects metadata that is in a IBM® SPSS® Surveycraft™ Validated
Questionnaire (.vq)file.
Metadata Location.The name and location of the metadata. The way you specify this depends on the type of metadata that you selected in the previous drop-down list:
Data Collection Metadata Document.The name and location of the.mddfile.
ADO Database.The name and location of a .adoinfofile, which is an XMLfile that specifies the connection string for the target data source and the name of the target table in that data source.
Data Collection Log File.The name and location of the logfile. Typically logfiles have a .tmpfilename extension. However, some logfiles may have anotherfilename extension. If necessary, you can rename thefile so that it has a .tmpfilename extension.
Data Collection Participation Database.The name and location of a Participants Report Document (.prd)file, which is an XMLfile that specifies the connection string and the names of the table and columns to be used.
Data Collection Scripting File.The name and location of the mrScriptMetadatafile. Typically thesefiles have an.mddor .dmsfilename extension.
In2data Database.The name and location of the .i2dfile.
Quancept Definitions File (QDI).The name and location of the.qdifile. Quancept Script File.The name and location of the.qqcfile.
Quantum Specification.The location of the Quantum specificationfiles. Quanvert Database.The name and location of theqvinfoor.pkdfile. Routing Script File.The name and location of the routing scriptfile. SPSS Statistics File (SAV).The name and location of the.savfile. Surveycraft File.The name and location of the.vqfile.
ClickBrowseto select thefile in the Open dialog box.
Open Metadata Read/Write.By default, the metadata is opened in read-only mode. Select this option if you want to be able to write to it. When you open some types of data (for example, a Quanvert database) the metadata is always opened in read-only mode.
Edit MDM Properties.Click this button to open the MDM Properties dialog box, in which you can specify the versions, language,context, andlabel typeto use.For more information, see the topic Data Link Properties: MDM Properties on p. 27.
Case Data Type.Defines the type of case data. The drop-down list shows all of the types of case data for which you have a case data source component (CDSC). The default options are:
ADO Database.Reads case data from an ActiveX Data Objects (ADO) data source. Delimited Text File (Excel).Writes case data in tab-delimited format to a .csvfile.
Data Collection Database (MS SQL Server).Reads and writes case data in a Data Collection relational database in SQL Server. This option can be used to read data collected using IBM® SPSS® Data Collection Interviewer Server.
Data Collection Log File.Selects the Log DSC, which enables you to read Data Collection logfiles.
Data Collection XML Data File.Reads and writes case data in an XMLfile. Typically, you use this option when you want to transfer case data to another location.
In2data Database.Reads case data from an In2data Database (.i2d)file.
Quancept Data File (DRS).Reads case data in a Quancept.drs,.drz, or.drufile using the QDI/DRS DSC.
Quantum Data File (DAT).Selects the Quantum DSC, which reads and writes case data in a Quantum-format ASCIIfile.
Quanvert Database.Selects the Quanvert DSC, which reads data in a Quanvert database. SPSS Statistics File (SAV).Reads and writes case data in an SPSS Statistics .savfile. Surveycraft File.Reads case data from a Surveycraft datafile.
Tip: If you have specified a Metadata Type and a Metadata Location, and the default data source in your metadata refers to the case data that you want to connect to, you don’t need to specify a Case Data Type or a Case Data Location.
Case Data Location.The name and location of the case data. The way you specify this depends on the type of case data that you selected in the previous drop-down list:
ADO Database.The OLE DB connection string for the ADO data source. To build this string, clickBrowse, which opens a second Data Link Properties dialog box in which you can choose the options for your data source. For example, to connect to a Microsoft Access database or a Microsoft Excelfile, selectMicrosoft OLE DB Provider for ODBC Driversin the Provider tab and click theBuildbutton in the Connection tab to build a connection string that uses the Machine Data Source called “MS Access Database” or “Excel Files” as appropriate. If your data source is a Microsoft SQL Server database that is not a Data Collection relational database, select Microsoft OLE DB Provider for SQL Serverin the Provider tab and enter the server name and database name in the Connection tab. Then clickOKto close the second Data Link Properties dialog box and return to the Connection tab of thefirst Data Link Properties dialog box.
Delimited Text File (Excel).The name and location of the .csvfile.
Data Collection Database (MS SQL Server).This must be an OLE DB connection string. For more information, see the topic Connecting to a Relational MR Database Using RDB DSC 2 on p. 31.
Data Collection Log File.The name and location of the logfile. Typically logfiles have a .tmpfilename extension. However, some logfiles may have anotherfilename extension. If necessary, you can rename thefile so that it has a.tmpfilename extension.
Data Collection XML Data File.The name and location of the.xmlfile. In2data Database.The name and location of the .i2dfile.
Quancept Data File (DRS).The name and location of the.drs,.drz, or.drufile.
Quantum Data File (DAT).The name and location of the.datfile. If a.daufile is created, it will have the same name, but with thefile name extension of.dau.
SPSS Statistics File (SAV).The name and location of the .savfile.
Surveycraft File.The name and location of the Surveycraft Validated Questionnaire (.vq)file. The Surveycraft .qdtfile, which contains the actual case data, must be in the same folder as the .vqfile.
ClickBrowseif you want to browse to the location of the case data in a dialog box. Case Data Project. This text box should be blank, unless you are connecting to one of the following case data types:
ADO Database.If you are connecting to a Microsoft SQL Server database (that is not a Data Collection relational database) or a Microsoft Access database, enter the name of the database table that you want to use. If you are connecting to a Microsoft Excelfile, enter the name of the worksheet that you want to use, for example,Sheet1. Depending on the version of Excel installed, you may have to add a dollar sign ($) after the worksheet name for the connection to be successful, for example,Sheet1$.
Data Collection Database (MS SQL Server).Enter the name of the project that you want to use. For detailed information about theDSCsthat come with the Data Model and how they interpret the underlying data, see the IBM® SPSS® Data Collection Developer Library.
Data Link Properties: MDM Properties
You use the MDM Properties dialog box to specify the version, language, context, and label type that you want to use when you connect to a questionnaire definition (.mdd)file (also known as IBM® SPSS® Data Collection Metadata Documentfile). You open this dialog box by clicking Edit MDM Propertieson the Connection tab in the Data Link Properties dialog box.
Questionnaire definition (.mdd)files typically containversions, which record any changes to the content of the questionnaire. Typically, when the questionnaire changes (for example, a question or category is added or deleted), a new version is created and when the changes are complete, the version is locked.
Using a combination of some or all of the versions is useful when, for example, you want to export case data for more than one version and there have been changes to the variable and category definitions that mean that case data collected with one version is not valid in another version. Selecting all of the versions for which you want to export the case data, means that generally you can export the case data collected with the different versions at the same time without encountering validity errors due to the differences between the versions. However, depending on the version changes, some validity errors may still be encountered.
Current version.Displays an expression that represents the selection you have chosen. You can optionally select the versions you want to use by typing an expression directly into the text box.
Syntax Description
.. Specifies all versions
v1,v2,v3,v4 Specifies individual versions
v1..v2 Specifies an inclusive range of versions
^v1..v2 Excludes a range of versions
Specifies the most recent version.
You can specify a combination of individual versions, and ranges to include or exclude. For example, the following specifies version 3:2 and all versions from 4:5 to 7:3 with the exception of versions 7 through 7:2: