Database Concepts 3.5
David M. Kroenke and David J. Auer
THE ACCESS WORKBENCH
Section 3
In the previous sections of “The Access Workbench,” we learned to create Microsoft Access
databases, tables, forms, and reports in multiple table databases. In this section, we will cover
the following objectives:
Learn how to use Access SQL.
Learn to run queries in single and multiple tables in using both SQL and Query By
Example (QBE).
Learn how to manually set table and relationship properties that Access SQL does
not support.
We will continue to use the WMCRM database we have been using. At this point, we have
created and populated (which means we’ve inserted the data into) the CUSTOMER and
CONTACT tables and set the referential integrity constraint between them.
Working with Microsoft Access SQL
Work with Microsoft Access SQL is done in the
SQL view
of a
Query window
. Let’s try a simple
query to see how this works. We’ll use the basic SQL query:
Opening an Access Query Window in Design View
1. Start Microsoft Access 2007.
2. Click the Microsoft Office Button to display the File Menu, and then click the Open
button.
3. The Open dialog box is displayed. Browse to the WMCRM.accdb file, click the file name
to highlight it, and then click the Open button.
4. The Security Warning bar appears with the database. Click the Security Warning Options… button to display Microsoft Office Security Options dialog box.
5. Click the “Enable this content” radio button to select this option, and then click the OK
button.
6. Click the Create command tab to display the Create Ribbon as shown in Figure AW-3-1.
Figure AW-3-1 — The Create Command Tab and Ribbon
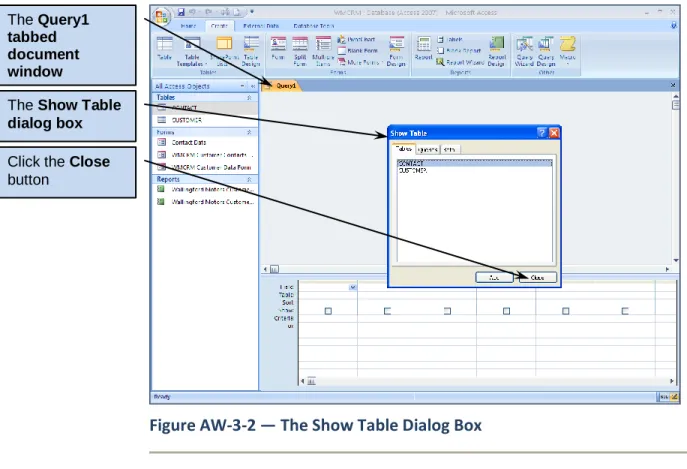
7. Click the Query Design button.8. The Query1 tabbed document window is displayed in Design view along with the Show Table dialog box as shown in AW-3-2 on the next page.
The Create
command tab and Ribbon The Query Design button
Figure AW-3-2 — The Show Table Dialog Box
9. Click the Close button on the Show Table dialog box. The Query1 document window appears as shown in Figure AW-3-3 on the next page. This window is used for creating and editing Access queries in Design view, which is used with Access QBE. This will be discussed later in this section.
Note that in Figure AW-3-3 on the next page, the
Select
button is selected in the Query Type
group on the Design Ribbon—we can determine this because active or selected buttons are
always shown in color on the Ribbon. This indicates that we are creating a query that is the
equivalent of an SQL SELECT statement.
Also note that in Figure AW-3-3 there is a View gallery available in the Results group of the
Design Ribbon. We can use this gallery to switch between Design view and SQL view. However,
we can also just use the displayed SQL button to switch to SQL view, which is being displayed
because Access considers that to be the view we would most likely choose in the gallery if we
used it. Access always presents a “most likely needed” view choice as a button above the View
gallery.
The Query1 tabbed document window
The Show Table dialog box Click the Close
Figure AW-3-3 — The Query Tools Design Ribbon
Opening an Access SQL Query Window and Running an Access SQL Query
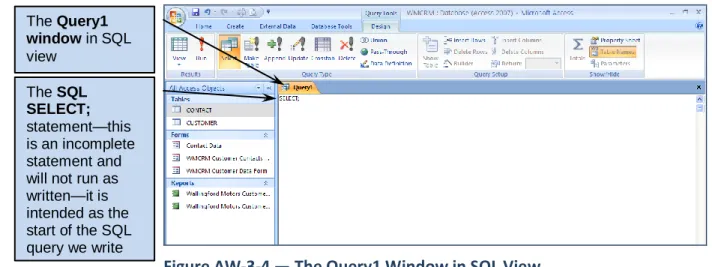
1. Click the SQL View button in the Results group on the Design Ribbon. The Query1 window switches to the SQL view, as shown in Figure AW-3-4. Note the basic SQL command of SELECT; in the window. This is an incomplete command, and running it will not produce any results.
Figure AW-3-4 — The Query1 Window in SQL View
The QueryTools contextual command tab The SQL View button The View Gallery arrow button
The Select query button
The Query1 tabbed document window in
Design View The Design
command tab and Ribbon
The Query1 window in SQL view
The SQL SELECT;
statement—this is an incomplete statement and will not run as written—it is intended as the start of the SQL query we write
2. Edit the SQL SELECT command to read SELECT * FROM CUSTOMER; as shown in Figure AW-3-5.
3. Click the Run button on the Design ribbon.
4. Click the Shutter Bar Open/Close Button to compress the Navigation Pane, and then click the Query1 document tab to select the Query1 window. The query results appear as shown in Figure AW-3-6.
Figure AW-3-5 — The SQL Query
Figure AW-3-6 — The Query Results
Just as we can save Access objects such as tables, forms and reports, we can save Access
queries for future use.
The Run button
The complete SQL query statement—
SELECT * FROM CUSTOMER;
Saving
an Access SQL Query
1. To save the query, click the Save button on the Quick Access Toolbar. The Save As dialog box appears as shown in Figure AW-3-7.
Figure AW-3-7 — The Save As Dialog Box
2. Type in the query name SQLQuery-AW-3-01, and then click the OK button. The query is saved, and the window is renamed with the query name as shown in Figure AW-3-8. 3. Click the Shutter Bar Open/Close Button to expand the Navigation Pane. As shown in
Figure AW-3-8, the query document window is now named SQLQuery-AW-3-01, and a newly created SQLQuery-AW-3-01 query object appears in a Queries section of the Navigation Pane.
Figure AW-3-8 — The Renamed and Saved Query
The Save buttonThe Save As dialog box
Type the query name
SQLQuery-AW-3-01 here The OK button
Type query window is now named
SQLQuery-AW-3-01
The Queries
section of the Navigation Pane The SQLQuery-AW-3-01 query object
4. Close the Query-AW-3-01 window by clicking the document window Close button. 5. If Access displays a dialog box asking “Do you want to save changes to the design of
query ‘SQLQuery-AW-3-01’?”, click the Yes button.
Working with Microsoft Access QBE
By default, MS Access does not use the SQL interface. Instead it uses a version of Query By
Example (QBE), which uses the Access GUI to build queries. To understand how this works, let’s
recreate the SQL query we just created using QBE.
Creating and Running an Access QBE Query
1. Click the Create command tab to display the Create Ribbon. 2. Click the Query Design button.
3. The Query1 tabbed document window is displayed in Design view along with the Show Table dialog box as shown in AW-3-2.
4. Click CUSTOMER to select the CUSTOMER table. Click the Add button to add the CUSTOMER table to the query.
5. Click the Close button to close the Show Table dialog box.
6. You can rearrange and resize the query window objects in the Query1 query document window using standard Windows drag-and-drop techniques. Rearrange the window elements until they appear as shown in Figure AW-3-9 on the next page.
7. Note the elements of the Query1 window shown in Figure AW-3-9. Tables and their associated set of columns—called a field list—that are included in the query are shown in the upper pane, while the columns (fields) actually included in the query are shown in the lower pane. For each included column (field), we can set whether or not this column’s data appears in the results, how the data is sorted, and the criteria for selecting which rows of data will be shown. Note that the first entry in the table’s field list is the asterisk (*), which has its standard SQL meaning of “all columns in the table.” 8. Columns are included in the query by dragging them from the table’s field list to a field column in the lower pane. Click and drag the asterisk (*) in CUSTOMER to the first field column as shown in Figure AW-3-10 on the next page. Note that the column is entered as CUSTOMER.* from the table CUSTOMER.
Figure AW-3-9 — The QBE Query1 Query Window
Figure AW-3-10 — Adding Columns to the QBE Query
This query is aSelect query Tables in the query appear in the top pane, together with a list of their columns (the ―field list‖) and an asterisk (*) meaning ―all columns‖ Columns in the query are called fields and appear in the bottom pane, together with related property values
To add a column to the query, click the column name and drag it to a cell in the Field: row in the lower window pane The asterisk (*) symbol was dragged and dropped here to add the
CUSTOMER.*
field to the query
The table name is automatically added to the query to specify the source of the column–this is important if there is more than one table in the query with the same column name
9. Click the Run button on the Query Design toolbar.
10. Click the Shutter Bar Open/Close Button to compress the Navigation Pane. Note that these results are identical to the results shown in Figure AW-3-06.
11. To save the query, click the Save button on the Quick Access Toolbar to display the Save As dialog box. Type in the query name QBEQuery-AW-3-02, and then click the OK
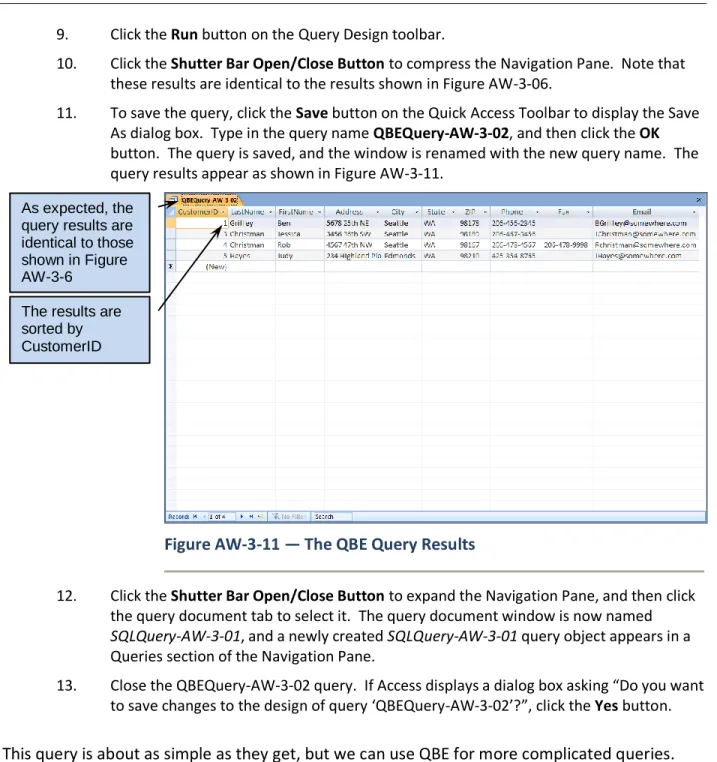
button. The query is saved, and the window is renamed with the new query name. The query results appear as shown in Figure AW-3-11.
Figure AW-3-11 — The QBE Query Results
12. Click the Shutter Bar Open/Close Button to expand the Navigation Pane, and then click the query document tab to select it. The query document window is now named SQLQuery-AW-3-01, and a newly created SQLQuery-AW-3-01 query object appears in a Queries section of the Navigation Pane.
13. Close the QBEQuery-AW-3-02 query. If Access displays a dialog box asking “Do you want to save changes to the design of query ‘QBEQuery-AW-3-02’?”, click the Yes button.
This query is about as simple as they get, but we can use QBE for more complicated queries.
For example, consider a query that uses only some of the columns in the table, includes the SQL
WHERE clause, and also sorts data using the SQL ORDER BY clause:
SELECT CustomerID, LastName, FirstName FROM CUSTOMER
WHERE CustomerID > 2 ORDER BY LastName DESC; As expected, the
query results are identical to those shown in Figure AW-3-6
The results are sorted by CustomerID
The QBE Query (named as
QBEQuery-AW-3-03
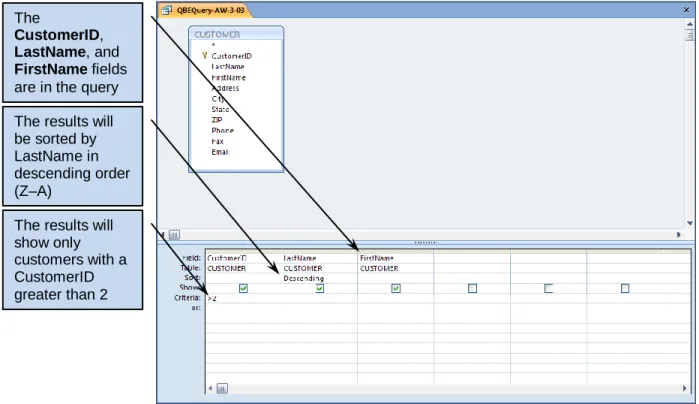
) is shown in Figure AW-3-12. Note that now we
have included the specific columns that we want used in the query instead of the asterisk, used
the Sort property for CustomerID, and included row selection conditions in the Criteria property
for LastName.
Figure AW-3-12 — The QBEQuery-AW-3-03 Query Window
Creating and Running QBEQuery-AW-3-03
14. Using the previous instructions for QBEQuery-AW-3-02, create, run, and save the QBEQuery-AW-3-03 as described previously.
And, of course, we can use more than one table in a QBE query. We’ll create the QBE version of
this SQL query:
SELECT LastName, FirstName, Date, Type, Remarks FROM CUSTOMER, CONTACT
WHERE CUSTOMER.CustomerID = CONTACT.CustomerID AND CustomerID = 3
ORDER BY Date; The
CustomerID,
LastName, and
FirstName fields are in the query The results will be sorted by LastName in descending order (Z–A)
The results will show only customers with a CustomerID greater than 2
Let’s build this one step by step:
Creating and Running an Access QBE Query with Multiple Tables
1. Click the Create command tab to display the Create Ribbon. 2. Click the Query Design button.
3. The Query1 tabbed document window is displayed in Design view along with the Show Table dialog box.
4. Click CUSTOMER to select the CUSTOMER table. Click the Add button to add the CUSTOMER table to the query.
5. Click CONTACT to select the CONTACT table. Click the Add button to add the CUSTOMER table to the query.
6. Click the Close button to close the Show Table dialog box.
7. You can rearrange and resize the query window objects in the Query1 query document window using standard Windows drag-and-drop techniques. Rearrange the window elements until they appear as shown in Figure AW-3-13. Note that the relationship between the two tables is already included in the diagram—this implements the SQL clause
WHERE CUSTOMER.CustomerID = CONTACT.CustomerID
Figure AW-3-13 — The QBE Window with Two Tables
Both theCUSTOMER
table and the
CONTACT table are in the query
The relationship and referential integrity constraint between the two tables is automatically included in the query—this means that the SQL clause
WHERE CUSTOMER.CustomerID = CONTACT.CustomerID
8. From the CUSTOMER table, click and drag the CustomerID, LastName, and FirstName
column names to the first three field columns in the lower pane.
9. From the CONTACT table, click and drag the Date, Type, and Remarks column names to the next three field columns in the lower pane.
10. In the field column for CustomerID, uncheck the Show: check box so that the data from this column is not included in the results display.
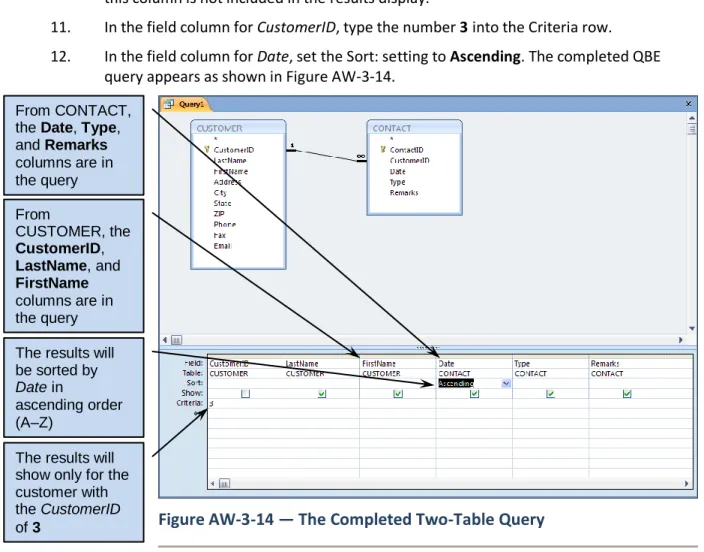
11. In the field column for CustomerID, type the number 3 into the Criteria row. 12. In the field column for Date, set the Sort: setting to Ascending. The completed QBE
query appears as shown in Figure AW-3-14.
Figure AW-3-14 — The Completed Two-Table Query
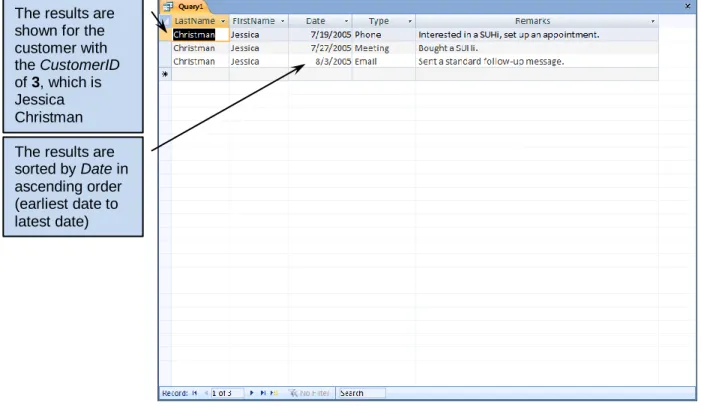
13. Click the Run button on the Design Ribbon. The query results appear as shown in Figure AW-3-15 on the next page.
14. To save the query, click the Save button on the Quick Access Toolbar to display the Save As dialog box. Type in the query name QBEQuery-AW-3-04, and then click the OK
button. The query is saved, the document window is renamed with the new query name, and the QBEQuery-AW-3-04 object is added to the Queries section of the Navigation Pane.
15. Close the QBEQuery-AW-3-04 window. From CONTACT,
the Date, Type, and Remarks
columns are in the query From
CUSTOMER, the
CustomerID,
LastName, and
FirstName
columns are in the query The results will be sorted by Date in
ascending order (A–Z)
The results will show only for the customer with the CustomerID of 3
Figure AW-3-15 — The Two-Table Query Results
Working with Microsoft Access Parameter Queries
Access allows us to construct queries that prompt the user for values to be used in the WHERE
clause of the query. These are known as
parameterized queries
, where the word
parameter
refers to the column for which a value is needed. And because reports can be created that are
based on queries, parameterized queries can be used as the basis of parameterized reports.
For an example of a parameterized query, we’ll modify
QBEQuery-AW-3-04
so that CustomerID
is the parameter, and the user is prompted for the CustomerID value when the query is run.
Creating and Running an Access Parameterized Query
1. In the Navigation Pane, right-click the QBEQuery-AW-3-04 query object to select it and open the shortcut menu, and then click the Design View button in the shortcut menu to open the query in Design View. Note that the CustomerID column, which was the first column, now appears as the last column in Design View. This occurred because we specified that the column would not be displayed.
2. Click the Microsoft Office Button, and then click the Save As button to display the Save As dialog box as shown in Figure AW-3-16.
The results are shown for the customer with the CustomerID of 3, which is Jessica Christman The results are sorted by Date in ascending order (earliest date to latest date)
Figure AW-3-16 — The Query Save As Dialog Box
3. In the “Save ‘QBEQuery-AW-03-04’ to:” text box of the Save As dialog box, edit the query name to read QBEQuery-AW-3-05.
4. Click the OK button to save the query.
5. Click the Shutter Bar Open/Close Button to compress the Navigation Pane.
6. In the Criteria row of the CustomerID column, delete the current number and enter the text [Enter the CustomerID Number:] in its place. You will need to expand the
CustomerID column width for all the text to be visible at the same time. The QBEQuery-AW-3-05 window now appears as shown in Figure AW-3-17.
Figure AW-3-17 — The Completed Parameterized Query
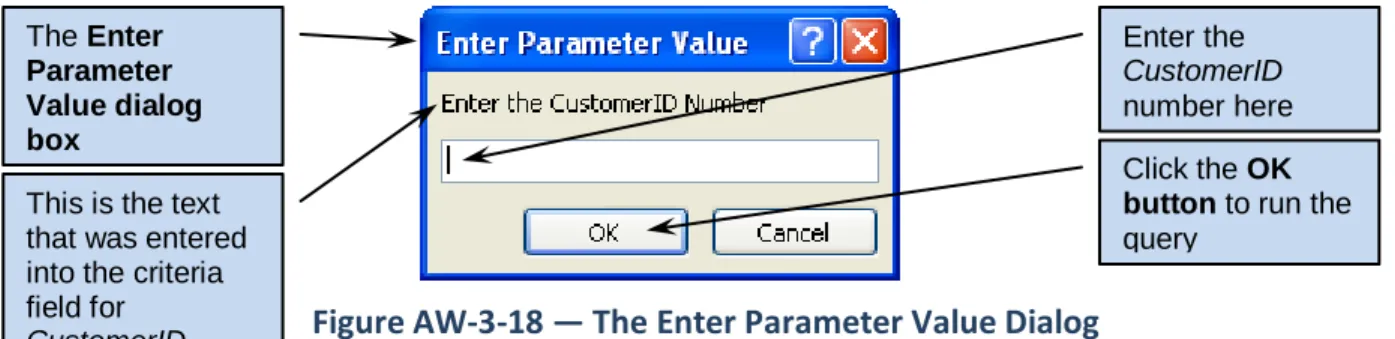
7. Click the Run button. The Enter Parameter Value dialog box appears as shown in Figure AW-3-18 on the next page. Note that the text we entered in the Criteria row now appears as a prompt in the dialog box.
The Save As dialog box
Type the new query name
QBEQuery-AW-3-05 in this text box
The OK button
The CustomerID column is now shown last because it is not displayed in the query results The Criteria for the CustomerID column now contains the text for a prompt to be displayed in the Enter
Parameter Value dialog box that will be displayed to get a
parameter value from the user
Figure AW-3-18 — The Enter Parameter Value Dialog
8. Enter the CustomerID number 3 as a parameter value, and then click the OK button. The query results appear—they are identical to those shown in Figure AW-3-15. 9. Click the Save button to save the changes to the design of the query and then close the
query.
10. Click the Shutter Bar Open/Close Button to expand the Navigation Pane.
Creating Tables with Microsoft Access SQL
Now let’s try creating and populating a table using Microsoft Access SQL as done in the SQL
View of a Query window. So far, our Wallingford Motors CRM has been for use by only a single
salesperson. Now we’ll add a SALESPERSON table. The sales staff members at Wallingford
Motors are identified by a nickname. The nickname may be their actual first name or a true
nickname, but it must be unique. We will assume that one salesperson is assigned to each
customer, and that only that salesperson makes contact with the customer.
The full set of tables in the WMCRM database will now look like this:
SALESPERSON (NickName, LastName, FirstName, HireDate, WageRate, CommissionRate, Phone, Email)
CUSTOMER (CustomerID, LastName, FirstName, Address, City, State, ZIP, Phone, Fax, Email, NickName)
CONTACT (ContactID, CustomerID, Date, Type, Remarks)
The referential integrity constraints are:
NickName in CUSTOMER must exist in NickName in SALESPERSON CustomerID in CONTACT must exist in CustomerID in CUSTOMER
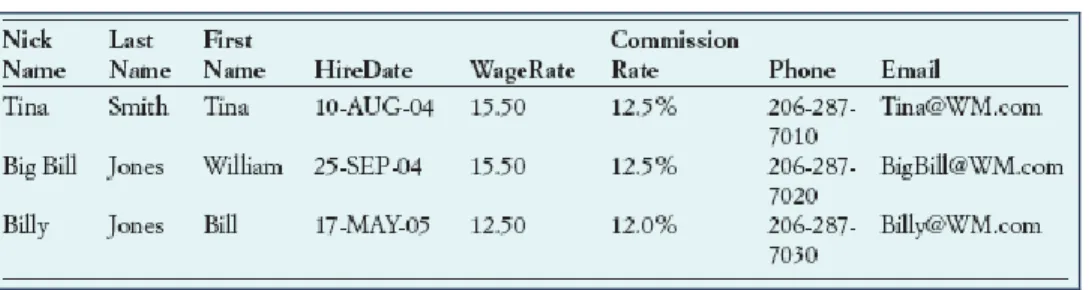
The database column characteristics for the
SALESPERSON
table are shown in Figure AW-3-19,
and
SALESPERSON
data is shown in Figure AW-3-20.
The Enter Parameter Value dialog box
Enter the CustomerID number here
This is the text that was entered into the criteria field for CustomerID
Click the OK button to run the query
Figure AW-3-19 — Database Column Characteristics for the
SALESPERSON Relation
Figure AW-3-20 — Data for the SALESPERSON Relation
Note that adding the
SALESPERSON
table will require alterations to our existing
CUSTOMER
table. We will need a new column for the foreign key
NickName
, a referential integrity
constraint between
CUSTOMER
and
SALESPERSON
, and new data for the column. First, we’ll
build the
SALESPERSON
table. The correct SQL statement is:
CREATE TABLE SALESPERSON(
NickName Char(35) NOT NULL,
LastName Char(25) NOT NULL,
FirstName Char(25) NOT NULL,
HireDate DateTime NOT NULL,
WageRate Numeric(5,2) NOT NULL DEFAULT(12.50), CommissionRate Numeric(5,3) NOT NULL,
Phone Char(12) NOT NULL,
Email Varchar(100) NOT NULL UNIQUE,
CONSTRAINT SALESPERSON_PK PRIMARY KEY (NickName) );
This statement uses standard SQL data types (specifically SQL Server data types), but this is not
a problem because Access will correctly read these and translate them into Access data types.
However, from the SQL discussion in this chapter, we know that Access does not support the
numeric data type with the (
m
,
n
) notation (where
m
= total number of digits, and
n
= number
of digits to the right of the decimal). Further, Access does not support the UNIQUE constraint
nor the DEFAULT keyword. Therefore, we have to create an SQL statement without these
items, and then fine-tune the table after it is created by using the Access GUI.
The SQL that will run in Access is:
CREATE TABLE SALESPERSON(NickName Char(35) NOT NULL,
LastName Char(25) NOT NULL,
FirstName Char(25) NOT NULL,
HireDate DateTime NOT NULL,
WageRate Numeric NOT NULL,
CommissionRate Numeric NOT NULL,
Phone Char(12) NOT NULL,
Email Varchar(100) NOT NULL,
CONSTRAINT SALESPERSON_PK PRIMARY KEY (NickName) );
Creating the SALESPERSON Table Using Access SQL
1. As described in a previous set of steps, open an Access query window in SQL view. 2. Type the SQL code into the query window. The query window now appears as shown in
Figure AW-3-21 on the next page.
3. Click the Run button on the Query Design toolbar. The statement runs, but since this statement creates a table, the only immediately visible results are that the
SALESPERSON table object is added to the Tables section of the Navigation Pane. 4. Save the query as Create-Table-SALESPERSON, and then close the query window. The
Create-Table-SALESPERSON query object now appears in the Queries section of the Navigation Pane Queries pane as shown in Figure AW-3-22 on the next page.
Figure AW-3-21 — Database Column Characteristics for the
SALESPERSON Relation
Figure AW-3-22 — The SALESPERSON Objects in the Navigation Pane
Modifying Access Tables to Add Data Requirements Not Supported by
Access SQL
To modify the SALESPERSON table to add the table requirements not supported by Access SQL,
we use the Access table Design View
1.
1 Although we will not fully discuss the matter in this book, we should mention that Access SQL confounds the
treatment of the SQL NOT NULL column constraint. When we use NOT NULL in defining a column, Access properly sets the column’s Required field property to Yes. We discussed how to do this manually in Section 1 when we created the CUSTOMER table. However, Access adds a second field property named Allow Zero Length, which it sets to Yes. To truly match NOT NULL, this value should be set to No. For a full discussion of setting the Allow Zero
The complete SQL CREATE TABLE
SALESPERSON statement
The
SALESPERSON
table The Create-
Table-SALESPERSON
query–note the Design icon that identifies this as a data definition query
First, recall that Access SQL does not support the
numeric(m,n)
syntax, where
m
is the number
of digits stored and
n
is the number of digits to the right of the decimal place. We can set the
number of digits to some extent by setting the
Field Size
field property (which is as close as
Access gets to setting the value of
m
). By default, Access sets a numeric value Field Size to
double
. We could change this, but a full discussion of this field property is beyond the scope of
this book—see the MS Access help system discussion of the Field Size Property for more
information.
We can, however, easily set the number of decimal places (which is the value of
n
) using the
Decimal Places
field property. In addition, MS Access does have the advantage of have a
Format
field property that allows us to apply formatting to a numeric value, so that the data
appears as currency, a percentage, or in other formats. We will leave the default Field Size
setting, and change the Format and Decimal Places property values.
Next, recall that Access SQL does not support the SQL
DEFAULT
keyword so we will have to add
any needed default values. We can do this using the
Default Value
field property.
Setting Number and Default Value Field Properties
1. To open the SALESPERSON table in Design View, right-click the SALESPERSON table object to select it and open the shortcut menu, and then click the Design View button in the shortcut menu. The SALESPERSON table appears in Design view as shown in Figure AW-3-23 on the next page.
2. Select the WageRate field. The WageRate field properties are displayed in the General tab as shown in Figure AW-3-24 on the next page.
Figure AW-3-23 — SALESPERSON Table in Design View
Figure AW-3-24 — The WageRate Field Properties
Move the mousecursor here, then click to select the WageRate column (field) The General Tab in the Field Properties section
The WageRate column is selected
The Format text box
The Decimal Places text box
The Default Value text box
3. Click the Format text field. A drop-down list arrow appears on the right end of the text field as shown in Figure AW-3-25. Click the drop-down list arrow to display the list and select Currency.
NOTE: When you do this, a small icon will appear to the left of the text field. This is the Property Update Options drop-down list. Simply ignore it, and it will disappear when you take the next action. Then it will reappear for that action! In general, ignore it and keep working.
Figure AW-3-25 — The Format Text Box
4. Click the Decimal Places text field (which is currently set to Auto). Again, a drop-down list arrow appears. Use the drop-down list to select 2 decimal places.
5. Click the Default Value text box. The Expression Builder icon appears as shown in Figure AW-3-26 on the next page. We do not need to use the Expression Builder at this point. Type 12.50 into the Default Value text box. This completes setting the Field Property values for WageRate, and the final values are shown in Figure AW-3-27 on the next page.
NOTE: Access will actually store this number as 12.5, which is the same value without the trailing zero. Just don’t be alarmed if you look at these property values again and notice the missing zero!
The WageRate column is selected
Click the Format text box drop-down arrow to display the drop-down list Select Currency
Figure AW-3-26 — The Default Value Text Box
Figure AW-3-27 — The Completed WageRate Field Properties
The PropertyUpdate Options
icon—you can simply ignore it Click in the
Default Value text box to select it
The Expression Builder icon— we will not use the Expression Builder in this situation
Data format is set to Currency
Number of decimal places is set to 2
The default value is set to 12.50
6. Click the Save button to save the completed changes to the SALESPERSON table. Leave the SALESPERSON table in Design View.
7. Select the CommissionRate field. The CommissionRate field properties are displayed in the General tab.
8. Set the Format value to Percentage. 9. Set the Decimal Places value to 3.
10. Click the Save button to save the completed changes to the SALESPERSON table. 11. Leave the SALESPERSON table open in Design View for more steps to follow.
The UNIQUE constraint is another SQL constraint that Access SQL does not support. To set a
UNIQUE constraint in Access, we set the value of the
Indexed
field property. Access initially sets
this value to
No
, which means that no index (a tool for making queries more efficient) is built
for this column. The two other possible values of this property are
Yes (Duplicates OK)
and
Yes
(No Duplicates)
. We enforce the UNIQUE constraint by setting the property value to
Yes (No
Duplicates)
.
Setting Indexed Field Properties
1. The SALESPERSON table should already be open in Design View. If not, open the table in Design View.
2. Select the Email field.
3. Click the Indexed text field. A drop-down list arrow button appears on the right end of the text field as shown in Figure AW-3-28 on the next page. Click the drop-down list arrow button to display the list, and select Yes (No Duplicates).
4. Click the Save button to save the completed changes to the SALESPERSON table. 5. Close the SALESPERSON table.
Finally, let’s consider how to implement the SQL CHECK constraint. When we created the
CONTACT
table, we noted that the only allowed data types for the Type column were Phone,
Fax, Email, and Meeting. The correct SQL statement to add this constraint to the
CONTACT
table would be
ALTER TABLE CONTACT
ADD CONSTRAINT CONTACT_Check_Type
Figure AW-3-28 — The Email Field Properties
To implement the CHECK constraint in Access, we set the value of the Validation Rule for the
Type column.
Creating the CHECK Constraint for the CONTACT Table
1. Open the CONTACT table in Design view. 2. Select the Type column.
3. Click the Validation Rule text box and then type in the text Phone Or Fax Or Email Or Meeting as shown in Figure AW-3-29 on the next page.
NOTE: Do not enclose the allowed terms in quotation marks. Access will add quotation marks to each term when it saves the changes to the table design. Adding our own set of quotation marks will result in each word being enclosed in two sets of quotes, and Access will not consider this a match to our existing data in the table when it runs the data integrity check discussed in step 4!
4. Click the Save button on the Quick Access Toolbar to save the CONTACT table. As shown in Figure AW-3-30 on the next page, Access displays a dialog box warning that existing data may not match the data integrity rule we have just established by setting a validation rule.
5. Click the Yes button on the dialog box. The Email
column is selected
The Indexed text box
Select Yes (No Duplicates)
Figure AW-3-29 — Specifying a Validation Rule
Figure AW-3-30 — The Data Integrity Warning Dialog Box
Inserting Data with Microsoft Access SQL
We can use Access SQL to enter the data shown in Figure AW-3-20 into the
SALESPERSON
table.
The only problem here is that Access will not handle multiple SQL commands in one query so
each row of data must be input individually. The SQL commands to enter the data are:
INSERT INTO SALESPERSON
VALUES('Tina', 'Smith', 'Tina', '10-AUG-04', '15.50', '.125', '206-287-7010', '[email protected]'); The Type
column is selected Enter the possible values for the column in the Validation Rule text box separated by the word Or
The Data Integrity warning dialog box
Click the Yes button
INSERT INTO SALESPERSON
VALUES('Big Bill', 'Jones', 'William', '25-SEP-04', '15.50', '.125', '206-287-7020', '[email protected]'); INSERT INTO SALESPERSON
VALUES('Billy', 'Jones', 'Bill', '17-MAY-05', '12.50', '.120', '206-287-7030', '[email protected]');
Inserting Data into the SALESPERSON Table Using Access SQL
1. As described previously, open an Access query window in SQL view.
2. Type the SQL code for the first SQL INSERT statement into the query window. 3. Click the Run button on the Query ribbon. As shown in Figure AW-3-31, the query
changes to Append Query and a dialog box appears asking you to confirm that you do want to insert the data.
Figure AW-3-31 — Inserting Data into the SALESPERSON Table
4. Click the Yes button in the dialog box. The data is inserted into the table.5. Repeat Steps 2, 3, and 4 for the rest of the SQL INSERT statements for the SALESPERSON data.
6. Close the Query1 window. A dialog box will be displayed asking you if you want to save the query. Click the No button—there is no need to save this SQL statement.
7. Open the SALESPERSON table in Datasheet View.
8. Click the Shutter Bar Open/Close Button to compress the Navigation Pane, and then arrange the columns so that all column names and data are displayed correctly.
9. The table appears as shown in Figure AW-3-32 on the next page. Note that the rows are sorted alphabetically ascending on the primary key (NickName) value—they do not appear in the order in which they were input.
The SQL
INSERT
command The dialog box confirming the INSERT Click the Yes
button to complete the INSERT
NOTE: This is not typical of a SQL DBMS. Normally, if you ran a SELECT * FROM SALESPERSON query on the table, the data would appear in the order in which they were input unless you added an ORDER BY clause.
Figure AW-3-32 — The Data into the SALESPERSON Table
10. Click the Shutter Bar Open/Close Button to expand the Navigation Pane.11. Click the Save button on the Quick Access Toolbar to save the change to the table layout.
12. Close the SALESPERSON table.
Let’s consider where we are in the process of adding the SALESPERSON table. The
SALESPERSON table has been created and populated. We also know that at Wallingford Motors
each customer is assigned to one and only one salesperson. Now, we need to create the
relationship between SALESPERSON and CUSTOMER. This will require a foreign key in
CUSTOMER to provide the needed link to SALESPERSON.
The problem is that the column needed for the foreign key—
NickName
—does not exist in
CUSTOMER! Therefore, before creating the foreign key constraint, we must modify the
CUSTOMER table by adding the
NickName
column and the appropriate data values.
Figure AW-3-33 shows the column characteristics for the
NickName
column in the CUSTOMER
table, and Figure AW-3-34 on the next page shows the needed data for the column.
Figure AW-3-33 — Column Characteristics for the NickName Column
As shown in Figure AW-3-33,
NickName
is constrained as NOT NULL. As discussed in this
chapter, however, adding a populated NOT NULL column requires multiple steps. First, the
column must be added as a NULL column, then the column values must be added, and then the
The data is sorted by NickName (the primary key value) in
Figure AW-3-34 — CUSTOMER NickName Data
column must be altered to NOT NULL. We could do this using Access’s GUI interface, but
because we are working with Access SQL in this section, we will do these steps in SQL. The
needed SQL statements are:
ALTER TABLE CUSTOMER
ADD NickName Char(35) NULL; UPDATE CUSTOMER
SET NickName = 'Big Bill' WHERE CustomerID = 1;
UPDATE CUSTOMER
SET NickName = 'Billy' WHERE CustomerID = 3;
UPDATE CUSTOMER
SET NickName = 'Tina' WHERE CustomerID = 4;
UPDATE CUSTOMER
SET NickName = 'Tina' WHERE CustomerID = 5;
ALTER TABLE CUSTOMER
Creating and Populating the NickName Column in the CUSTOMER Table Using Access
SQL
1. As described previously, open an Access query window in SQL view.
2. Type the SQL code for the first SQL ALTER TABLE statement into the query window. 3. Click the Run button on the Design ribbon.
NOTE: The only indication that the command has run successfully will be the fact that no error message is displayed.
4. Type the SQL code for the first SQL UPDATE statement into the query window.
5. Click the Run button on the Design Ribbon. When the dialog box appears asking you to confirm that you do want to insert the data, click the Yes button in the dialog box. The data is inserted into the table.
6. Repeat Steps 4 and 5 for the rest of the SQL UPDATE statements for the CUSTOMER data.
7. Type the SQL code for the second SQL ALTER TABLE statement into the query window. 8. Click the Run button on the Design ribbon.
NOTE: Again, the only indication that the command has run successfully will be the fact that no error message is displayed.
9. Close the Query1 window. A dialog box will be displayed asking you if you want to save the query. Click the No button—there is no need to save this SQL statement.
10. Open the CUSTOMER table.
11. Click the Shutter Bar Open/Close Button to compress the Navigation Pane, and then scroll to the right so that the added NickName column and the data in it are properly displayed. The table appears as shown in Figure AW-3-35.
Figure AW-3-35 — The CUSTOMER Table with NickName Data
12. Click the Shutter Bar Open/Close Button to expand the Navigation Pane, and then click the Design View button to switch the CUSTOMER table into Design view.
The Design View button
The added
NickName
13. Click the NickName field name to select it.
14. The table appears as shown in Figure AW-3-36. Note the added NickName column, and that the data is required in the column—this is Access equivalent of NOT NULL.
Figure AW-3-36 — The Altered CUSTOMER Table
15. Close the CUSTOMER table.Adding Referential Integrity Constraints Using Access SQL
Now that the NickName column is added and populated in the CUSTOMER Table, we can create
the needed referential integrity constraint by adding a foreign key constraint between
SALESPERSON and CUSTOMER. As NickName is not a surrogate key, we will want any changed
values of NickName in SALESPERSON to be updated in CUSTOMER. On the other hand, if a row
is deleted from SALESPERSON, we do
not
want that deletion to cause the deletion of
CUSTOMER data. Therefore, the needed constraint, written as an SQL ALTER TABLE statement,
is:
The added
NickName
column
Data in the column is
required, which is the Access equivalent of NOT NULL
ALTER TABLE CUSTOMER
ADD CONSTRAINT CUSTOMER_SP_FK FOREIGN KEY(NickName) REFERENCES SALESPERSON(NickName)
ON UPDATE CASCADE;
Unfortunately, as discussed in the chapter, Access SQL does not support ON UPDATE and ON
DELETE clauses. Therefore, we will have to set ON UPDATE CASCADE manually after creating
the basic constraint with the SQL statement:
ALTER TABLE CUSTOMER
ADD CONSTRAINT CUSTOMER_SP_FK FOREIGN KEY(NickName) REFERENCES SALESPERSON(NickName);
Creating the Referential Integrity Constraint Between CUSTOMER and SALESPERSON
Using Access SQL
1. As described previously, open an Access query window in SQL view.
2. Type the SQL code for the SQL ALTER TABLE statement into the query window. 3. Click the Run button on the Design Ribbon.
NOTE: As before, the only indication that the command has run successfully will be the fact that no error message is displayed.
4. Close the Query1 window. A dialog box will be displayed asking you if you want to save the query. Click the No button—there is no need to save this SQL statement.
Modifying Access Databases to Add Constraints Not Supported by
Access SQL
The ON UPDATE CASCADE constraint will be set using the Relationships window and the Edit
Relationships dialog box discussed in Section 2.
Creating the Referential Integrity Constraint Between CUSTOMER and SALESPERSON
Using Access SQL
1. Click the Database Tools command tab, and then click the Relationships button in the Show/Hide group. The Relationships window appears as shown in Figure AW-3-37 on the next page.
Figure AW-3-37 — The Relationships Window with the Current
Relationship Diagram
2. Click the Show Table button in the Relationships group of the Design ribbon. The Show Table dialog box appears as shown in Figure AW-3-38 on the next page.
3. In the Show Table dialog box, click SALESPERSON to select it, and then click the Add
button to add SALESPERSON to the Relationships window.
4. In the Show Table dialog box, click the Close button to close the dialog box. 5. You can rearrange and resize the table objects in the Relationships window using
standard Windows drag-and-drop techniques. Rearrange the SALESPERSON,
CUSTOMER, and CONTACT table objects until they appear as shown in Figure AW-3-39 on the next page. Note that the relationship between SALESPERSON and CUSTOMER that we created using SQL is already shown in the diagram.
6. Right-click the relationship line between SALESPERSON and CUSTOMER, and then click
Edit Relationship… in the shortcut menu that appears. The Edit Relationships dialog box appears. Note that the Enforce Referential Integrity check box is already checked—this was set by the SQL ALTER TABLE statement that created the relationship between the two tables.
The Show Table button
This is the relationship diagram as we created it in Section Two of ―The Access Workbench‖
Figure AW-3-38 — Adding the SALESPERSON Table to the Relationship
Diagram
Figure AW-3-39 — The Updated Relationship Diagram
7. We need to set ON UPDATE CASCADE. To do this, click the Cascade Update Related Fields check box. The Edit Relationships dialog box now appears as shown in Figure AW-3-40 on the next page.
The Show Table
dialog box—click a table name and then click the
Addbutton to add a table to the relationship diagram
The Add button
When you have added all the tables needed, click the Close button
The relationship between
SALESPERSON and CUSTOMER already exists—it was created using SQL—so right-click the
relationship line
and then click
Edit
Relationship in the shortcut menu that appears to display the Edit Relationships dialog box
Figure AW-3-40 — The Completed Edit Relationships Dialog Box
8. To close the Relationships window, click the Close button in the upper right corner ofthe Relationships window. An Access dialog box appears asking “Do you want to save changes to the layout of ‘Relationships‘?” Click the Yes button to save the changes and close the window.
Closing the Database and Exiting Access
Now we’re done adding the SALESPERSON table to the database. We created the SALESPERSON
table, added data, altered the CUSTOMER data with a new column and foreign key values, and
created the referential integrity constraint between the two tables. In the process, we saw
where Access SQL does not support the standard SQL language, and learned how to use the
Access GUI to compensate for the lacking SQL language features. That completes the work for
this section of “The Access Workbench.” As usual, we will finish by closing the database and
Access.
Closing the WMCRM Database and Exiting Access
1. To close the WMCRM : Database and exit Access window, click the Close button in the The Enforce Referential
Integrity check box is already selected because of the SQL CONSTRAINT FOREIGN KEY statement
Check the Cascade Update Related Fields check box to set the equivalent of the SQL ON UPDATE CASCADE statement
Leave the Cascade Delete Related Fields check box unchecked—this is equivalent to the SQL ON DELETE NO ACTION statement
Access Workbench Exercises
In the “Access Workshop Exercises” in Chapters 1 and 2, we created a database for the
Wedgewood Pacific Corporation (WPC) of Seattle, Washington. In this set of exercises, we will:
create and run queries against the database using Access SQL,
create and run queries against the database using Access QBE,
create tables and relationships using Access SQL, and
populate tables using Access SQL.
AW.3.1
Using Access SQL, create and run queries to answer the questions that follow.
Save each query using the query name format SQLQuery-AWE-3-1-## where the
## sign is replaced by the letter designator of the question. For example, the
first query will be saved as
SQLQuery-AWE-3-1-A
.
A.
What projects are in the PROJECT table? Show all information for each
project.
B.
What are the ProjectID, Name, StartDate, and EndDate values of projects
in the PROJECT table?
C.
What projects in the PROJECT table started before August 1, 2005? Show
all the information for each project.
D.
What projects in the PROJECT table have not been completed? Show all
the information for each project.
E.
Who are the employees assigned to each project? Show the ProjectID,
EmployeeID, LastName, FirstName, and Phone.
F.
Who are the employees assigned to each project? Show the ProjectID,
Name, and Department. Show the EmployeeID, LastName, FirstName,
and Phone.
G.
Who are the employees assigned to each project? Show the ProjectID,
Name, Department, and Department Phone. Show the EmployeeID,
LastName, FirstName, and Employee Phone. Sort by ProjectID in
ascending order.
H.
Who are the employees assigned to projects run by the Marketing
Department? Show the ProjectID, Name, Department, and Department
Phone. Show the EmployeeID, LastName, FirstName, and Employee
Phone. Sort by ProjectID in ascending order.
I.
How many projects are being run by the Marketing Department?
J.
What is the total MaxHours of projects being run by the Marketing
Department?
K.
What is the average MaxHours of projects being run by the Marketing
Department?
L.
How many projects are being run by each department?
AW.3.2
Using Access QBE, create and run new queries to answer the questions in
exercise AW.3.1. Save each query using the query name format
QBEQuery-AWE-3-1-## where the ## sign is replaced by the letter designator of the question. For
example, the first query will be saved as QBEQuery-AWE-3-1-A.
AW.3.3
WPC has decided to keep track of computers used by the employees. In order to
do this, two new tables will be added to the database. The schema for these
tables as related to the existing EMPLOYEE table is:
EMPLOYEE (EmployeeNumber, FirstName, LastName, Department, Phone, Email)
COMPUTER (SerialNumber, Make, Model, ProcessorType, ProcessorSpeed, MainMemory, DiskSize)
COMPUTER_ASSIGNMENT (SerialNumber, EmployeeNumber, DateAssigned)
The referential integrity constraints are:
SerialNumber in COMPUTER_ASSIGNMENT must exist in SerialNumber in COMPUTER EmployeeNumber in COMPUTER_ASSIGNMENT must exist in EmployeeNumber in EMPLOYEE