Acano solution
Acano Manager 1.0 Tutorial Guide
Acano
April 2015
76-1058-01-B
Contents
1
Document Purpose ... 9
2
What is Acano Manager? ... 11
2.1
Acano Manager conceptual view ... 11
2.2
Acano Manager overview ... 12
3
Introduction to using Acano Manager ... 13
3.1
Starting and stopping Acano Manager ... 13
3.2
Configuration and log files ... 15
3.2.1
Configuration files ... 15
3.2.2
Log files/diagnostics ... 16
3.3
SMTP settings ... 16
3.3.1
Admin From and To emails ... 16
3.3.2
SMTP Host ... 17
4
Getting started ... 18
4.1
Notes on users and creating coSpaces ... 18
4.2
Configuring a Call Bridge to use Acano Manager ... 19
4.3
Configuring Acano Manager to use the Call Bridge ... 19
4.4
Instructing Acano Manager to connect to the Call Bridge ... 21
4.5
Connectivity between Acano Manager and the Call Bridge ... 22
4.6
Testing calls into an existing coSpace ... 22
4.7
coSpace List page ... 23
4.8
Calls In Progress page ... 24
4.9
Has this all worked? ... 24
4.10
Incorrect Call Bridge CDR receiver settings ... 25
5
Integration with Directory Services ... 26
5.1
LDAP/Active Directory summary ... 26
5.2
LDAP/Active Directory overview ... 26
5.3
LDAP data structures ... 27
5.4
Acano Manager configures Acano Service LDAP settings ... 28
5.5
LDAP import sequence marble diagram ... 28
5.6
Details on synchronization ... 29
5.7
Call Bridge Sync completion ... 30
5.8
LDAP Importer logging ... 30
5.9
Acano Manager 1.1.2 LDAP process improvements ... 30
5.10
Starting the LDAP importer service ... 30
5.11
Controlling when the LDAP importer runs ... 32
5.12
Example LDAP/Active Directory walk-throughs ... 33
5.12.1
Single customer LDAP import ... 33
5.12.2
Multiple customers using LDAP import ... 37
5.13
Directory Services page with 3 entries ... 38
5.14
Re-running the Importer ... 38
5.16
Checking the Importer logs ... 41
5.17
LDAP bulk deleting users ... 41
6
coSpaces
6.1
coSpace List page ... 43
6.2
coSpace List – Start/Manage buttons ... 43
6.3
coSpace management ... 44
6.3.1
Creating and deleting a coSpace. ... 44
6.3.2
Creating a coSpace ... 44
6.3.3
Adding users as members to a coSpace ... 46
6.4
coSpaces and scheduled calls ... 46
6.5
coSpaces and VMRs ... 46
6.6
coSpace selection when scheduling a call ... 47
6.7
coSpaces and call marble diagram ... 47
7
Building out ... 49
7.1
Notes on customers ... 49
7.2
Customer Details ... 50
7.3
Customer Access Control management ... 50
7.4
ACL Usage by Operator type ... 51
7.5
Access Control Lists ... 51
7.6
Example Service ACL ... 52
7.6.1
“BigCo” ACL Service ... 52
7.6.2
“SmallCo” ACL Service ... 52
7.6.3
Global ACL Service ... 53
7.7
Example ACL settings for a user ... 55
7.8
Ringfencing users ... 56
7.9
Creating custom ACL’s ... 56
7.10
Finding users and endpoints ... 57
7.11
Events/alerts marble diagram ... 57
7.12
Who sees which event? ... 58
7.13
Alerts ... 58
7.14
Call confirmed alert ... 59
7.15
Notification scripts ... 60
7.16
MCU differences – limits and mechanics ... 60
7.17
MCU states ... 61
7.18
Scheduling resource assignment control ... 61
7.19
MCU list – port usage – current/forward ... 62
7.20
Notes on endpoints ... 62
7.21
Endpoint details ... 63
7.22
Endpoint billing options ... 64
7.23
User details ... 65
7.24
Customer billing settings ... 66
7.25
Creating a new endpoint ... 66
7.26
Notes on system-wide endpoints ... 67
7.27
Notes on endpoint addresses ... 68
7.28
Selecting an endpoint at call schedule ... 69
7.30
Endpoint filter set ... 70
7.31
Custom Text ... 70
7.32
Custom Text example ... 71
7.33
Useful Custom Text options ... 72
7.34
CDR/Billing marble diagram ... 72
7.35
Customer billing settings ... 73
7.36
Example customer billing settings ... 74
8
Operations (IT) ... 75
8.1
Configuring Acano Manager to use HTTPS ... 75
8.2
Outlook Plugin ... 76
8.3
Clustered Call Bridges ... 77
8.4
Configuring clustered Call Bridges ... 77
8.5
Adding Call Bridges in clustered mode ... 78
8.5.1
Adding Call Bridge Number 1 ... 78
8.5.2
Adding Call Bridge Number 2 ... 79
8.6
Clustered configuration checks ... 79
8.6.1
Making sure the system is working as expected ... 79
8.7
Using the WebRTC client from the Call Bridge ... 81
8.8
Incorrect Call Bridge CDR receiver settings ... 81
8.9
Deployment topologies ... 82
8.10
Monitor application (stand alone) ... 83
8.11
Monitor ... 83
8.12
Monitor (fail-over) ... 85
8.13
Failover model ... 85
8.14
Failover considerations ... 85
8.15
Configuration files ... 86
8.16
Log files/diagnostics ... 86
9
Operations (VNOC) ... 87
9.1
Where to calls come from? ... 87
9.2
How do I see coSpaces? ... 88
9.3
What’s the difference – calls/coSpaces? ... 89
9.4
coSpace List page ... 90
9.5
coSpace List – Start/Manage buttons ... 90
9.6
coSpace management ... 91
9.6.1
Deleting a coSpace ... 91
9.6.2
Creating a coSpace ... 92
9.7
coSpace members ... 93
9.8
coSpaces and scheduled calls ... 94
9.9
Scheduling a call – coSpace selection ... 94
9.10
Call lists ... 95
9.11
Call types ... 96
9.12
Call start modes ... 96
9.13
Call lifecycle ... 97
9.14
Notes on customer selection ... 97
9.16
Scheduling at VNOC ... 99
9.17
Port allocation mode ... 101
9.18
What do the options on Call Save mean? ... 102
9.19
Notes on Outlook scheduling ... 103
9.20
Scheduling a call via Outlook ... 103
9.21
How do I manage a call? ... 104
9.22
Calls in progress ... 105
9.23
Call layout ... 106
9.24
Call layout (non Acano) ... 107
9.25
Participant layout ... 108
9.26
Participant layout (non Acano) ... 109
9.27
Approving a call ... 109
9.28
Changing a call’s details ... 110
9.29
Removing participants ... 110
9.30
Notes on time ... 111
10
Reporting ... 112
10.1
Summary ... 112
10.2
CDR/Billing data marble diagram ... 112
10.3
Activity reports ... 113
10.4
Call data records (also known as Accounting data records) ... 113
10.5
Call quality ... 115
10.6
MCU port usage ... 115
10.7
Call summary data ... 118
10.8
Cancelled calls ... 119
10.9
Cancelled call report ... 119
10.10
No shows ... 119
10.11
Custom no show time ... 120
10.12
Alerts - on screen summary ... 120
10.13
Alerts - configured by user profile ... 121
10.14
Audit records ... 122
11
Billing
11.1
Summary ... 123
11.2
Call outcome configuration ... 123
11.3
Setting the cost of calls at the customer level ... 123
11.3.1
Inclusive video and audio ports ... 124
11.4
Call outcomes ... 125
11.5
Call outcome report ... 125
11.6
Call outcome sample ... 126
11.7
Billing export preparation ... 127
11.8
Sample billing export ... 127
11.9
Non-billable/pre-paid option ... 128
Appendix A
Frequently Used Terms ... 129
Appendix B
Useful Tips ... 130
Table 1: “Now what” list of actions and document reference ... 10
Table 2: Connecting Call Bridges and Acano Manager ... 18
Table 3: MCU details ... 21
Table 4: coSpace selection when scheduling a call ... 47
Table 5: Customer details ... 50
Table 6: MCU differences ... 61
Table 7: MCU differences ... 61
Table 8: Scheduling resource assignment control ... 62
Table 9: Endpoint details ... 64
Table 10: Endpoint billing options ... 64
Table 11: User details ... 65
Table 12: Endpoint filtering ... 70
Table 13: Custom text ... 71
Table 14: Customer billing settings ... 73
Table 15: coSpace selection when scheduling a call ... 95
Table 16: Call types ... 96
Table 17: Call start modes ... 96
Table 18: Call lifecycle ... 97
Table 19: Call scheduling process ... 98
Table 20: Scheduling at VNOC terms ... 100
Table 21: Port allocation mode ... 101
Table 22: Explanation of Call Save options ... 103
Table 23: Approving a call ... 110
Table 24: Changing a call’s details ... 110
1 Document Purpose
Acano Manager is a single point of management for collaboration infrastructure used by enterprises and service providers. This single interface brings together conferencing management, proactive monitoring and management of large call volumes, self-service scheduling, MCU management and multi tenancy and billing. This document is intended to provide the teams that will be using Acano Manager with the knowledge that will enable them to configure, test and ultimately use Acano Manager to deliver video conferencing services.
The document is written from the perspective of somebody who has purchased Acano Manager, installed it and is thinking “now what”? It guides the reader through the initial basic steps of getting the system up and running and validating that it is doing what it should; it provides guidance on what to look for and where to look when the expected results are not obtained. With a basic, functioning, system in place, the document than takes the reader through the process of importing users via LDAP (and in doing so, explains what is happening and what to look for). This is then built upon and we go through multiple LDAP configurations (multi-tenancy) and how the LDAP import process can be used to quickly provision/remove users. It covers call scheduling, call management, gives insight into how reporting and billing data is generated, the outlook plugin, billing etc.
Finally, it covers some of the more advanced features such as Access Control Lists, configuring clustered topologies and failover.
The “now what” list of actions to be performed, which are covered in this document are:
Actions Document Section
1. A basic understanding of what Acano Manager is 2. What is Acano Manager?
2. How to start it, stop it and location of log files 3. Introduction to using Acano Manager 3. Configuring a Call Bridge to use Acano Manager
4. Configuring Acano Manager to use the Call Bridge 5. Instruct Acano Manager to connect to the Call Bridge
4. Getting Started
6. Testing that the two systems are working together a) Add a participant into a coSpace and check that
Acano Manager detects the activity
b) Managing calls; simple navigation of the Acano Manager user interface
c) Reference checks to establish that the system does basic tasks correctly; what to look for and where
Table 1: “Now what” list of actions and document reference
7. LDAP; importing users from a single LDAP server 5. Integration with Directory Services 8. LDAP; creating multiple tenants and importing
multiple sets of users from LDAP
5. Integration with Directory Services 9. LDAP; bulk deletes of users 5. Integration with Directory Services 10. coSpaces.
a) creating new ones. b) coSpace management
6. coSpaces
11. Calls
a) Scheduling b) Management
9. Operations – Visual Network Operations Centre (VNOC)
12. The Outlook plugin 9. Operations (VNOC)
13. Reporting 10. Reporting
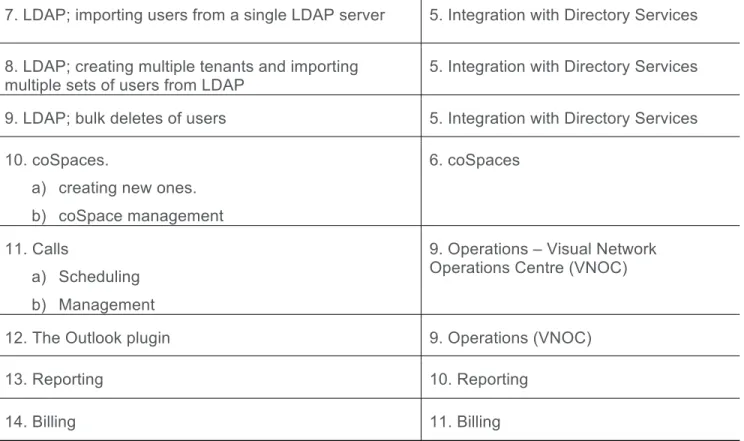
2 What is Acano Manager?
Figure 1: Acano Manager interface
Acano Manager is a video conferencing service delivery tool. Its purpose is to increase
productivity by enabling operators to schedule and manager more MCU calls. It automates many of the day to day processes, including call confirmation and billing. Acano Manager also works across a growing list of MCU’s, thus providing a single interface for call scheduling, management and monitoring.
2.1 Acano Manager conceptual view
The following diagram provides a conceptual view of Acano Manager
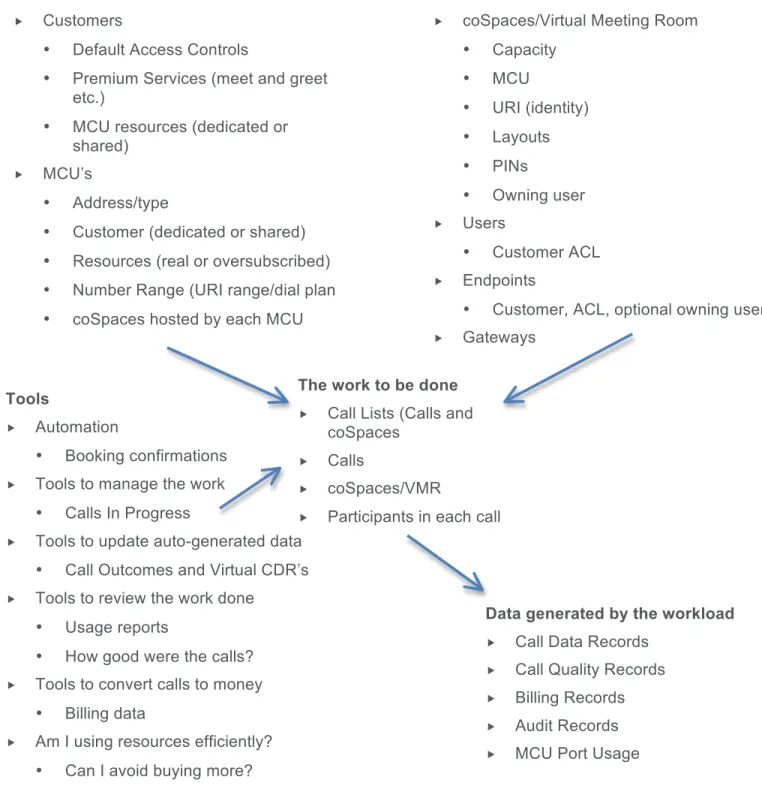
2.2 Acano Manager overview
The following diagram provides an overview of the Acano Manager.
Things created by Provisioning
Figure 3: Acano Manager overview
Tools
Automation
• Booking confirmations
Tools to manage the work
• Calls In Progress
Tools to update auto-generated data
• Call Outcomes and Virtual CDR’s
Tools to review the work done
• Usage reports
• How good were the calls?
Tools to convert calls to money
• Billing data
Am I using resources efficiently?
• Can I avoid buying more?
Customers
• Default Access Controls
• Premium Services (meet and greet
etc.)
• MCU resources (dedicated or
shared)
MCU’s
• Address/type
• Customer (dedicated or shared) • Resources (real or oversubscribed) • Number Range (URI range/dial plan • coSpaces hosted by each MCU
The work to be done
Call Lists (Calls and
coSpaces
Calls
coSpaces/VMR
Participants in each call
Data generated by the workload
Call Data Records Call Quality Records Billing Records Audit Records MCU Port Usage
coSpaces/Virtual Meeting Room
• Capacity • MCU
• URI (identity) • Layouts • PINs
• Owning user
Users
• Customer ACL
Endpoints
• Customer, ACL, optional owning user
Gateways
• Prefixes • Dial plans
Access Controls
3 Introduction to using Acano Manager
3.1 Starting and stopping Acano Manager
The Acano Manager Service runs as a Windows Service and can be started and stopped in a number of ways:
Using the Windows Service or the Windows Task Manager interface Using the Acano Manager “Monitor” application
Via the “SC” (service control) command using the Windows Command Processor
Each of the above options has the same result: it sends a start/stop command to the Aano Manager Service. You can use all three options in any combination.
1. Using Windows Service Manager or Windows Task Manager
Select the Services tab
Select Acano Manager Service Right-click and click Start Right-click and click Stop
NOTE: this requires administrator permissions. 2. Using Acano Manager Monitor
Acano Manager Monitor application
• Folder: Acano Manager\Monitor • File: VQMonitor.exe
• Acano Manager Service
• Acano Manager Importer Service
If you exit the Acano Manager Monitor application, the services keep running.
Starting the Acano Manager Service
• Click on Service Primary Start
Once the Service is started, the “Statistics” tab will show details of Acano Manager activity. This data updates every second.
SC start “Acano Manager” SC stop “Acano Manager”
SC sends a command to the Acano Manager Service (in the same way as option 1. and
option 2 do)
NOTE: Run the DOS shell as administrator.
3.2 Configuration and log files
All the Acano Manager configuration files are stored in the following directories:
• Program Files > Acano Manager> Service File Name: VQservice.exe.config • Program Files > Acano Manager> Monitor File Name: VQMonitor.exe.config • Program Files > Acano Manager> Importer File Name: VQImportor.exe.config) • Intepubs > wwwroot > am File Name: Web.config
After the initial setup you should not need to edit or alter these configuration files (apart from setting up email notification.)
If you do need to edit or alter these files, only do so with the guidance of an Acano Support Engineer.
Acano Manager performs extensive logging:
• in Program Files > Acano Manager > Service • File Name format: vqservice_startdate_at_time_000
In general, these messages are provided for information, but they are a good source of data when troubleshooting. The presence of such messages is not a cause for concern necessarily. If you are experiencing a specific problem with the operation or performance of the
Acano Manager software, Acano support can interpret logged messages and their significance for you.
3.2.1 Configuration files
Program Files/Acano Manager/Service
• VQ.Service.Exe.Config
• XML file which can be used to control a range of non-standard settings • Be careful to not break the XML; watch out for <, > and spaces
3.2.2 Log files/diagnostics
Logging:
• Acano Manager Service logs
• Program Files/AcanoManager/Service/ • “txt” files “vqservice….”
• NOTE: files wrap-around at 900mb (30 files at 30mb/file) • Windows Event viewer
• MCU logs
When contacting Support, supply:
• The time and effected coSpace, call name, endpoints, users • Description of the issue
• Steps to reproduce the issue • Relevant screen shots
3.3 SMTP settings
To setup email notification, you edit the VqService.exe.config
[We recommend that you do this in conjunction with an Acano Support Engineer] There are three lines you need to edit in the Vqservice.exe.config file to enable email The first two are towards the top of the file (details on pages that follow)
1. <add key="AdminFromEmail" value="[email protected]"/> 2. <add key="AdminToEmail" value=“[email protected]"/>
The next line to edit is towards the bottom of the file (details on pages that follow) 3. <network host=”SMTP details here” />
Save the changes.
Then stop and restart the Acano Manager service for the changes to take effect.
Use the Web User Interface (signed in as an Administrator) and use the Check Email menu item to test.
3.3.1 Admin From and To emails
<add key=”AdminFromEmail” [email protected]/>
Used to identify who the email came from and in most cases it is configured to identify the Acano Manager system, e.g.
3.3.2 SMTP Host
<network host=”stmp.mydomain.com”/> To specify a user account for SMTP forwarding use:
<network
• host=”smtp.mydomain.com" • port="25"
• userName="myUserName" • password="secret"
• defaultCredentials="true" />
For more examples see:
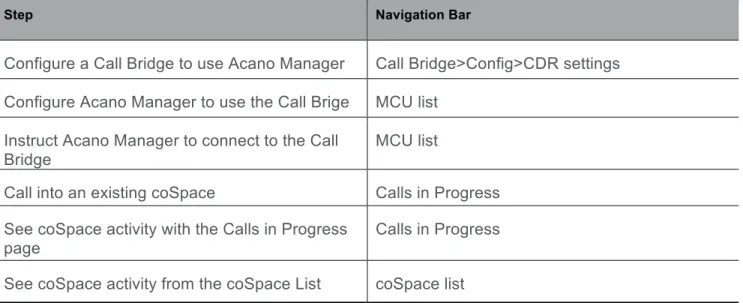
4 Getting started
This section discusses how to undertake the following tasks:
Table 2: Connecting Call Bridges and Acano Manager
4.1 Notes on users and creating coSpaces
The Call Bridge ONLY works with users created in LDAP. Active Directory is a version of LDAP.
Acano Manager can only create coSpaces on the Call Bridge AFTER users have been
imported from LDAP
Trying to create a coSpace in Acano Manager before running an LDAP import
• Results in the Call Bridge rejecting the request: “unknown User”
For that reason, initially, keep things simple:
• Use coSpaces created on the Call Bridge • Use coSpaces created on Acano clients
This enables you to check the basics
Step Navigation Bar
Configure a Call Bridge to use Acano Manager Call Bridge>Config>CDR settings Configure Acano Manager to use the Call Brige MCU list
Instruct Acano Manager to connect to the Call Bridge
MCU list
Call into an existing coSpace Calls in Progress See coSpace activity with the Calls in Progress
page
Calls in Progress See coSpace activity from the coSpace List coSpace list
4.2 Configuring a Call Bridge to use Acano Manager
Set the IP address of the Acano Manager server Set the port
• Acano Manager defaults the port to 5566 • HTTPS is not currently supported
WARNING
• Check that there are no firewalls between the Call Bridge and Acano Manager • External firewalls (e.g. Cisco)
• Windows Firewall on the server hosting Acano Manager
• Acano Manager gets all its state information via the events passed on this connection. • No connection: no state changes
Symptoms of a firewall/bad configuration problem
• Calls In Progress shows no inbound participants
• Outbound calls don’t connect and show “invite timeout” after approx.. 90 seconds
4.3 Configuring Acano Manager to use the Call Bridge
Customer; leave blank for system wide
• All customers/tenants can use it
Give it a name Select the type
• Selecting Acano results in default values loading
Configure its IP address and port Set username and password Set the URI range
• This defines the numeric URIs that will be used • Set the Listener Port: defaults to 5566
Set the MCU online
NOTE: The following details are required when configuring an MCU:
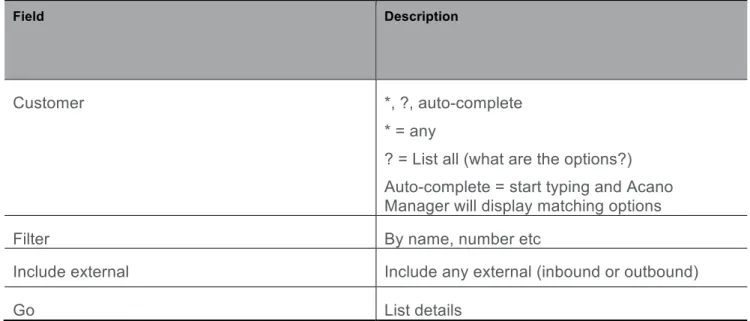
Field Description
Customer Customer Name or System wide
Make sure you have “has own MCU” set on the owning customer. This enables the customer in the MCU’s customer drop-down
Name/Type IP address/port
Capacity Video and Audio Only; real and usable
Gatekeeper Prefix Not used but allows Acano Manager to display the correct user to operators on in Confirmation emails
Table 3: MCU details
4.4 When Acano Manager connects to the Call Bridge
When Acano Manager connects to a Call Bridge, Acano Manager
• Saves the time
• Acano Manager checks all CDR events from the Call Bridge against this time. Any
CDR events generated before Acano Manager’s “online time” for this MCU are discarded.
• Remember: Acano Manager uses Acano CDR events (CallStarted, CallLegStarted)
to obtain state changes on the Call Bridge. If CDR events are discarded because the Call Bridge’s time is earlier than Acano Manager’s, no state changes are detected and therefore no Calls In Progress activity is seen
– Ensure that the Windows Server hosting Acano Manager has an NTP-synchronized clock
– Ensure Call Bridge’s default mode is to have an NTP-synchronized clock
• Gets the Tenant List from the Call Bridge
• Creates customers in Acano Manager for each newly discovered tenant
• Fetches each participant from the Call Bridge that Acano Manager thinks is in a current
active call
• This scenario happens if Acano Manager was restarted with active calls running on
the Call Bridge
• If the participant is no longer connected, changes the participant state to
disconnected. If there are no participants in the call, sets the call state stopped.
• Gets all of the participants from the Call Bridge who are in a call but unknown to Acano
Manager (participants who joined calls while Acano Manager was not running)
• If the coSpace is not known to Acano Manager
– Gets the coSpace details from Call Bridge
– Creates a coSpace within Acano Manager; sets the “created by” property to “Acano”
• Sets the participant state to connected
• Sets the call state to started; the call now appears in Calls in Progress
User Name/Password MCU Credentials (Administrator)
URI/Meeting Room Range Range of Ids that can be used for Conference IDs (NumericIds)
4.5 Connectivity between Acano Manager and the Call Bridge
Acano Manager and the Call Bridge connect over TCP/IP
• Acano Manager sends commands to the Call Bridge
• HTTP Commands from Acano Manager to the Call Bridge • Call Bridge sends state change events to Acano Manager
• HTTP POSTs sent from the Call Bridge to Acano Manager
Configure the Call Bridge to send the HTTP Post events to Acano Manager Remember to enable the firewall between them
• Without these events from the Call Bridge, Acano Manager is blind • You see no activity in Calls In Progress
• Endpoints don’t appear as connected in the Acano Manager Calls In Progress page
4.6 Testing calls into an existing coSpace
Use an existing coSpace on the Call Bridge
• Log in to your Call Bridge
• Go to the Configuration > coSpaces page (shown above)
If you don’t have a coSpace, create one
• Specify a name
• Specify a URI User Part (e.g. “mike”) • Click Add New
Check that it appears on the Call Bridge Dial into the coSpace
• Note; this example uses a phone and appears as an audio-only participant
You should:
• See the call in Calls In Progress (“CIP”) • See the call in coSpace List
• Active and All
• See a “participant Joined” alert
4.7 coSpace List page
Viewing and searching for coSpaces
Retrieve the current set of coSpaces from the Call Bridge using Search Admins can select the user whose coSpaces they want to find
Enter coSpace name to search for coSpaces with matching name Select Active
• Displays coSpaces that have participants
Select All
• Displays all coSpaces matching the criteria
Leaving filter criteria blank results in Acano Manager displaying all coSpaces known to it
NOTE THE DIFFERENCE: Specifying a filter results in the latest information being fetched from the Call Bridge.
4.8 Calls In Progress page
Dashboard view of call activity on the Call Bridge
Disconnect the participant (from the device)
• The call disappears from CIP
• coSpace List “active” does not show the call
Dial back into the coSpace
• The call reappears in CIP
• coSpace List “Active” will show the call. The Manage button is visible
Disconnect the participant from CIP
• Either via disconnect All (on call row)
• Or via the participant disconnect (participant row)
4.9 Has this all worked?
Yes, it has if…….
You dialed into your coSpace and saw it in CIP The good news is
• The Call Bridge can send events to Acano Manager
• Acano Manager is able to send commands to the Call Bridge • Therefore you don’t have any firewall problems!
• Your IP address configuration appears good
No, it hasn’t if…….
If you didn’t see your coSpace in CIP
• Check for firewalls, Acano Manager MCU settings and Call Bridge receiver settings (see
next page for what to check first…)
• Check that your Acano Manager and are using synchronized clocks (NTP servers) • If you still don’t see the coSpace in CIP, contact Acano Support
4.10 Incorrect Call Bridge CDR receiver settings
If you have dialed-into a coSpace and do not see it in Calls In Progress
Check you don’t have any filters set
• Customer, MCU etc.
Check the Call Bridge log. Does it show an error stating that the connection to the CDR
receiver has failed?
If you see the error:
• Check for firewalls (on the Windows server running Acano Manager and in the network) • Check for the correct IP address
• Does the Acano Manager server have multiple network cards? • Check the port. Does it match what is configured in Acano Manager?
5 Integration with Directory Services
5.1 LDAP/Active Directory summary
Import large numbers of users quickly
• Create users, coSpaces, endpoints
• Set properties such as name and email automatically
Equally useful
• Delete large numbers of users quickly
• Set a filter that results in the LDAP/AD server finding no matches
• Acano Manager deletes all users within Acano Manager that do not exist in
LDAP/AD
• Set the filter back to a value that results in LDAP/AD find matches • Re-run the Importer and reload all users
Users can be imported per customer/tenant (or system wide)
Users can be imported from multiple LDAP/AD servers (or from different locations on the
same LDAP/AD server)
Call Bridge and Acano Manager both use the same data
LDAP (X.500) – Lightweight Directory Access Protocol. Microsoft AD is a variant of LDAP (X 500)
Acano Manager supports Microsoft Active Directory (AD) and OpenLDAP.
All users on the Call Bridge are created from LDAP. Acano Manager can be configured to define LDAP settings; after which Acano Manager can then import users from LDAP and optionally create coSpaces. Acano Manager passes LDAP configuration to the Call Bridge. The Call Bridge then imports users from LDAP and optionally creates coSpaces.
5.3 LDAP data structures
Details Acano Manager
• Directory Configuration Details • Can be bound to a customer/tenant
or be system wide
• Specifies a LDAP server
• Multiple Directory Configurations
can be defined on the same LDAP server
• Use different OU, base or filters
to differentiate
• Specifies how Attributes map onto
Acano Manager fields
• E.g. User AD attribute
“$ipPhone$” as the value for coSpacesecondaryURI
• $$ indicates “substitute value” • ipPhone is an Attribute within
LDAP
• Allows transforms (via regular
expressions)
Call Bridge
• LDAP Sync
• Created each time an LDAP
Synchronize is performed
• References a LDAP Source (via
GUID)
• LDAP Source
• References a LDAP Server
Structure
• References a LDAP Mappings
structure
• LDAP Server
• Contains details of LDAP Server • Defines Field Mappings (In a
manner similar to that explained for Acano Manager)
5.4 Acano Manager configures Acano Service LDAP settings
5.5 LDAP import sequence marble diagram
The following diagram defines the sequence of events performed during an LDAP import. (Each “blob” being a marble.)
Acano Manager fetches users from LDAP
Acano Manager checks whether it needs to delete users no longer in LDAP Issues a Synchronize command to the Call Bridge etc.
Vertically, the diagram shows what happens on each MCU type;
the LDAP server the Call Bridge
NOTE: The term “marble diagram” has been borrowed from the world of Reactive Programming.
5.6 Details on synchronization
Step 3 of diagram below.5.7 Call Bridge Sync completion
5.8 LDAP Importer logging
The Acano Manager LDAP Importer generates the following log files;
Importer errors
• Summary of errors experienced during the import process
Importer Log
• Detailed log file of the import process
• Contains any errors; you will see them in the general context of the import process • Contains a summary of errors experienced during the Import process
The Acano Manager Importer service emails the Importer error and log files to the administrator email address.
5.9 Acano Manager 1.1.2 LDAP process improvements
It is important to note that Acano Manager 1.1.2 contained significant changes from earlier Acano Manager versions. These include:
improved logging and diagnostics
the point at which the Sync command is issued to the Call Bridge has changed; this now
happens BEFORE Acano Manager starts to create users and optionally, coSpaces. During testing, this significantly reduces the cases in which a second LDAP import was required because the Call Bridge had not yet completed its import process.
5.10 Starting the LDAP importer service
There are several ways of achieving this.i. Right-click Start or Stop b. Via the Windows Task Manager
i. Select the “Services” and then right click on “Acano Manager” tab
c. Via the Windows “SC” (service control) command line application
d. Via the Acano Manager Monitor application i. Go to
• Folder: Acano Manager\Monitor • Files: VQMonitor.exe
Acano Manager Monitor sends commands to the Acano Manager Service and the Acano Manager Importer Service.
If you exit the Acano Manager Monitor application, the services keep running ii. To start the Importer
• Click on Importer Start
iii. To inspect log files
• Refresh list and double click on Inspect a log file
5.11 Controlling when the LDAP importer runs
The Importer Process can be configured to run at regular intervals. Go to:• Folder: \Acano Manager\ImporterService • File: VQ.ImporterService.exe.config
IntervalMinutes
• Interval in minutes between Importer runs
• The Importer runs, completes and then waits this period before resuming and running
• Defaults to 24 hours (1440 minutes)
• <add key="IntervalMinutes" value="1440"/>
StartTimeHours
• The Importer runs at this time every day (values 0 thru 23). Defaults to 6 AM • This time is server local time
• <add key="StartTimeHours" value="6"/>
NOTE; StartTimeHours will be used in preference to “IntervalMinutes” if both values are set in the config file
5.12 Example LDAP/Active Directory walk-throughs
5.12.1 Single customer LDAP import
Create a new Directory Service definition
• Select customer “SmallCo” • LDAP server is on 192.168.1.6
• Filter: To pick up users from “group2” within the LDAP repository (this is a test set of
data; your LDAP server will have different schema. Please check with your LDAP system administrator to get the appropriate settings for your system)
Values in $$ are the attribute names to extract from LDAP/AD (think of them as columns in a
database)
If required, transforms can be applied to the values returned by using “pipe commands”
• “$mail|'/@.*/@mydomain.com/'$” • Decode:
• Import column mail and then apply a regex command to it; replace all characters
after ‘@’ with “mydomain.com”
Acano Manager will create the coSpaces
2. Check User and Endpoint Lists to confirm that you don’t have any users or endpoints for “SmallCo
User List page
• Select Any using “*” • Click Go
Page displays a single user
• Select Any using “*” • Click Go
No endpoints exist in the system (as expected)
3. Starting the Importer
Using Windows Service Manager or Using Windows Task Manager
• Select the Services tab
Select Acano Manager Importer
• Right-click and click Start
Or use the Acano Manager Monitor Application
Or use the Windows SC command
4. Check User and Endpoint Lists to confirm that there are users and endpoints for “SmallCo”
User List page
• Select Any using “*” • Click Go
The list now contains more users.
Endpoint List page
• Select Any using “*” • Click Go
NOTE: if you look on the Call Bridge, you will also find the coSpaces there 5. Checking the Import logs via the Acano Manager Monitor application
The log files confirm what was shown in the UI; the new accounts were created. They also give details of the import
The Import Log files are Acano Manager\ImporterService
5.12.2 Multiple customers using LDAP import
1. Adding another LDAP source
Add another Directory Services configuration
• Bind to customer “BigCo”
Select “Group6” from the repository
• On the systems being used to create this material, we have a test LDAP server with
several groups of users. We’ll select users in ‘Group6’; your LDAP system will be different
NOTE 1: Click Test connection to test you have the correct address and authentication details NOTE 2: Clicking Done without values for “base note” and “filter” results in you seeing and “LDAP Time out Error” (a bug has been filed)
5.13 Directory Services page with 3 entries
In this instance, the 3 entries are importing from the same LDAP server.
5.14 Re-running the Importer
Using Windows Task Manager, Select the Services tab and then select Acano Manager
Importer.
Right-click and click Start
All send a “start” command to the Importer process
The following is expected to happen ….
• “SmallCo” is up-to-date. No change • “BigCo” is imported
• The Users & Endpoints lists show additional entries
5.15 Checking after multi-customer import
Check User and Endpoint Lists to confirm that there are users and endpoints for “SmallCo” and “BigCo”
On the User List page
• Select Any using “*” • Click Go
On the Endpoint List page
• Select Any using “*” • Click Go
More endpoints are listed as expected.
5.16 Checking the Importer logs
Checking the Import logs via the Acano Manager Monitor application
The log files confirm what was seen in the UI; the new accounts were created Log files give details of the import
Import Log files
• Acano Manager\ImporterService • Note how “SmallCo” is imported • No change
BigCo then imported and created users
5.17 LDAP bulk deleting users
Use the LDAP import process to delete users, associated endpoints and coSpaces
The Acano Manager LDAP import process deletes any user (and associated Endpoints and , if created by Acano Manager, coSpaces and coSpace members) IF the user not found on AD during the LDAP import process.
Bulk delete can therefore be achieved by
Setting a filter that doesn’t match anything on the LDAP server
AM doesn’t get any users back from LDAP and therefore deletes all users(and associated
In the above example, we change “Group2” to “Group2x”
Click done to save the details Run the importer
• All users get deleted
To reload the users, change “Group2x” back to “Group2
Click done to save the details Run the importer
6 coSpaces
6.1 coSpace List page
See or search for coSpacesThe current set of coSpaces can be retrieved from the Call Bridge using Search. Administrators can select the user whose coSpaces they wish to find.
Enter coSpace name to search for coSpaces with a matching name Select Active
• This displays all coSpaces that have participants
Select All
• This displays all coSpaces matching the criteria
Leaving the filter criteria blank results in Acano Manager displaying the list of all coSpaces known to it.
NOTE THE DIFFERENCE: Specifying a filter results in the latest information being fetched from the Call Bridge.
6.2 coSpace List – Start/Manage buttons
What is the difference between Start and Manage? StartThe coSpace is “passive”; there are no participants in it. There is currently no call associated with the coSpace
Clicking Start creates a call on the coSpace; it allows you to then place outbound calls to participants. Without a Start button, the coSpace can only become active if a participant dials into it.
Manage
The coSpace is “active”; it has participants. Acano Manager has received a CallStart event from the Call Bridge and at least one CallLegStart event. Clicking Manage displays the Calls in Progress where you see this Call only.
6.3 coSpace management
6.3.1 Creating and deleting a coSpace.
Click Add New Click Delete Selected
What happens when you delete a coSpace? It depends…..
If Acano Manager created the coSpace, the coSpace is deleted from the Call Bridge and
from Acano Manager (because Acano Manager is deemed to be the authority on items it created)
If the coSpace was created on the Call Bridge (either via an LDAP import or as a result of a
user creating it via their Acano Client), Acano Manager simply deletes the coSpace from Acano Manager’s current view of the world
If, sometime later, Acano Manager receives events from the coSpace, it will re-discover the current state of the coSpace and present that information to users.
6.3.2 Creating a coSpace
Description of fields.
Customer
URI (number or name)
• Do not include the domain • Correct: “garageband.coSpace” • Incorrect: “[email protected]”
Description Owner
Other fields include:
• Audio and Video ports
• Default from configuration settings
Default Layout PIN #
CallId
Which other users are members of this coSpace?
6.3.3 Adding users as members to a coSpace
A coSpace is visible in the following to all users defined as members
• Acano Manager • Acano client
Permissions are defined via check boxes Click the Add button to add more users During the LDAP import process
• If Acano Manager creates the coSpace, it automatically sets the owning user as a
member
• If the Call Bridge creates the coSpace, it does the same
6.4 coSpaces and scheduled calls
A coSpace exists on the Call Bridge. It takes no resources and therefore, can be essentially an infinite number. coSpaces last forever, until they are deleted.
A scheduled call takes place at a given time and has a duration. Resources are assigned (reserved) for the call. Scheduled calls are created on the MCU seconds before they are due to start and are deleted from the MCU after they reach their end time. Scheduled calls can be extended, both in terms of capacity and duration, at any time, assuming that the resources are available. A scheduled call can exist as a temporary coSpace or on a coSpace that already exists. You can create a call to last for 2 hours from 10.00AM next Tuesday (for example). This call can be hosted on a coSpace you already have (e.g. on “mycoSpace”)
A scheduled call can exist as a temporary coSpace or on a coSpace that already exists. In this case, the call “inherits” all the properties from the coSpace, including the URI, which enables the users to dial into the call using a familiar URI – e.g. “mycoSpace”.
The call is terminated at it’s end time; the coSpace continues to exist as normal. The call can be hosted on a coSpace that Acano Manager dynamically creates and then destroys after the call has completed.
6.5 coSpaces and VMRs
Legacy MCUs have calls. These calls had properties such as number of participants, layouts etc. Typically MCUs had limited mechanisms to allow large numbers of Virtual Meeting Rooms (VMRs). For example, Codian: limited ot 200 calls/MCU. RMX: limited to several thousand.
Acano MCUs are designed to scale and introduce the concept of the coSpace. They have support for infinite numbers of coSpaces. The coSpaces consume no resources until they are used. These coSpaces have properties such as layouts. Other properties are defined by profiles. For example, the number of participants is controlled by Call Profile. The participant user
experience is controlled by Call Leg Profile, including mute on connect, bandwith etc.
Acano Manager Call Profile is not supported in Acano Manager 1.1.2. A future version of Acano Manager will support Call Profiles. Acano Manager supports coSpaces and, on legacy MCUs, Virtual Meeting Rooms.
6.6 coSpace selection when scheduling a call
Table 4: coSpace selection when scheduling a call
6.7 coSpaces and call marble diagram
The following diagram shows how calls within Acano Manager are created when activity takes place on a coSpace. It also shows how coSpaces are used as “carriers” to host scheduled calls. Across the top are a sequence of events.
coSpaces are created
Participants join the coSpace
Text aligned to each marble explains what happens
Vertically, it shows what happens on each MCU type.
The Call ADR table The Participant ADR table
Step Description
1 Click +Call to start process of scheduling a call 2 Provide the details of which customer (multi-tenant
environment) and who the call is for (Taniya in this case) 3a (option Either schedule the call on a temporary coSpace
(created by Acano Manager)
3b (option Or, schedule the call on one of the available coSpaces for this customer; e.g. Taniya’s
NOTE 1:
When a call is scheduled using a predefined coSpace, the basic properties for the call are obtained from the coSpace (e.g. the Call’s URI, default layouts, capacity.) These can only be changed via the coSpace Details page and not on the call.
The Call Quality table
7 Building out
7.1 Notes on customers
Multi-tenancy is an Acano Manager option; with it, you can host more than one customer. This is primarily intended for service providers. It allows them to host more than one user on the same system.
Concepts
Resources can be assigned to customers (called tenants on the Call Bridge)
• A customer can have their own dedicated MCUs (one or more; Acano and/or legacy) • Maximum call rates
• In billing mode:
• Limits can be defined that allow “bursting” port usage to be charged for • Billing rates for each call type can be defined
Services can be enabled and you can allow users to request premium services e.g.
• Meet and Greet (aka Concierge), Call Monitoring etc..
Users are grouped; users, calls, endpoints from one customer will be ring-fenced from other
customers
• Default properties for new users can be defined; Access Control Types • Directory Service (LDAP/Active Directory) can be defined per customer
The first customer in Acano Manager is labeled “Your Company Name” and is the root
customer
• Root customer cannot be deleted
• Root customer will, by default, not use the tenanting mechanisms on the Call Bridge • If you want/need to do this, please contact Acano Support
• For more details about customers/tenants see slide Ringfencing Users
• We suggest that you rename this customer to something more meaningful in your
environment.
7.2 Customer Details
Table 5: Explanatory notes for Customer details
7.3 Customer Access Control management
Acano Manager automatically manages a default set of Access Controls Each time you create a new customer, Acano Manager:
• Creates a new Access Control (ACL) Tag with the customer’s name • Creates a new Access Control Service with the customer’s name • Adds the customer’s ACL tag into the ACL Service definition • Sets the default User ACL Tag on the customer
• Sets the default Endpoint ACL Tag on the customer • Sets the default ACL Service on the customer • The result of this is:
• All new users and endpoints created on the customer should have the correct ACLs • The customer’s users are able to see other users, calls and endpoints for this
customer only
• The Global ACL Service will be updated
• The new Customer’s ACL tag will be added to the Global (“*”) Service
Field (mandatory fields are marked with a red asterisk) Description
Name Customer Name Theme Acano is the default
Access Controls Tag and Service ACL created automatically when customer is created
Default is for users of customer to only see users/calls within this tenant
Bandwidth Max and default
Cost Code Create new Cost Code in cost code table
Rates In billing mode, rates for the various call types can be defined
Has Own MCU? If yes, check. MCU can then be created and linked to this customer
Calls scheduled by customer’s users are placed on MCU’s) owned by this customer
Allow M&G, Monitor and 24hour premium services Options displayed on the New Call page Done Creates new customer
• This enables System Level Operators, Admins to see all users from all customers • If you delete the customer, the customer’s ACLs will be deleted
• The Global ACL service is then updated
7.4 ACL Usage by Operator type
System-wide Operators
• ACL Service includes all customer Tags
Customer-specific Operators
• ACL Service ONLY includes customer’s Tag
Result:
• System-wide Operators see all endpoints/calls
• Customer Operators only see customer’s endpoints and calls
7.5 Access Control Lists
Principals
• “ACL Tag”
• Define type of thing
– E.g. SmallCo, BigCo
• “ACL Service”
• What can somebody “see” • List of “things”
– Service (SmallCo and BigCo) – SmallCo see SmallCo things, BigCo see BigCo things
NOTE: If a tag is defined within a service level, users at that service level see ALL users with the Tag.
“Global”
• Automatically maintained; see everything • New customers created;
• Customer ACL Tag and Services created Automatically • Service created; Customer Tag added to Service ACL • Customer ACL Tag added to Global
7.6 Example Service ACL
7.6.1 “BigCo” ACL Service
In this example, the Service ACL “BigCo” (created for customer “BigCo” when the company was created – indicated by “system generated”) is shown.
The ACL service contains a single ACL Tag of type “BigCo”
The “BigCo” Service therefore “sees” all things tagged with the “BigCo” Tag
• Users • Endpoints
Use the toggle button to expand/contract
7.6.2 “SmallCo” ACL Service
In this example, the Service ACL “SmallCo” (created for customer “SmallCo” when the company was created – indicated by “system generated”) is shown.
The “SmallCo” Service therefore “sees” all things tagged with the “SmallCo” Tag
• Users • Endpoints
7.6.3 Global ACL Service
In this example, the Global Service ACL is shown
This ACL is maintained automatically and contains the ACL Tags for all customers The “Global” Service ACL therefore “sees” everything
• Users
• Note the mix of user names with different domain names indicating users across
multiple customers
7.7 Example ACL settings for a user
User: Anastasia [email protected]
• ACL Tag: SmallCo • ACL Service: SmallCo
Explanation
This User’s (Anastasia) Service ACL allows the user to “see” all other users with the Tag “SmallCo”.
7.8 Ringfencing users
7.9 Creating custom ACL’s
Why might you want to do this?Supposing you are a Service Provider and you want some of your operators to manage calls for customers 1, 2 and 3 whereas another set of operators should only see and manage calls for customers x, z and z.
What’s the process?
• Create a new Tag with a name that is meaningful. E.g., EastCoastOperator • We’ll later create Users with this Tag type
• Create a new ACL Service with a name that is meaningful, e.g., EastCoastOperator • Add the EastCoastOperator tag
• Add all the other tags required (for example, all customers located on the East
Coast)
• Use the “Service Level Users” panel on the Service ACL to see what Users at the
ACL will “see”
Call Bridge
Tenants created without a tenant
GUID contain users and coSpaces that are visible to all other tenants
Tenants created with a GUID contain
users and coSpaces that are visible to other users within the tenant AND to any tenants that don’t have a GUID set
Acano Manager sets a tenant GUID
on all non-root tenants (i.e. the 2nd and subsequent customer/tenants created)
• A tool can be supplied to set
tenant GUID on the root tenant if required
• It is intended that this maps onto
the ‘trust’ levels required on a server where the service provider uses the Acano Manager root-customer/tenant and want to have visibility into all tenants on the Call Bridge
Acano Manager
Customer/tenant specific ACL
• Users at the customer/tenant only
see tenant calls, coSpaces and devices from the same
customer/tenant
Global ACL
• Typically, this is reserved and
used by Service Provider Admins/Operators and allows them to see users, coSpaces and endpoints from all
customer/tenants
Custom ACLs
• Allows focused ringfencing of
user groups (e.g. specific
Operators seeing specific subsets of users, calls and coSpaces)
• Create your East Cost Operator Users • Set their ACL Tag to EastCoastOperator • Set their ACL Service to EastCoastOperator
7.10 Finding users and endpoints
Where did they all come from?
Historically, users and endpoints were created manually. However, tools can be custom produced to automate the import of large datasets. For example, again historically, endpoints have been imported from TMS, which is still possible with Acano Manager 1.1.
From Acano Manager 1.1, user management vial LDAP?AD has become the norm.
During the LDAP/AD import process Acano Manager
• deletes any users within Acano Manager that are no longer defined within LDAP/AD • Imports all users from LDA/AD
• Creates a user for each LDAP/AD user
• Creates an endpoint for each user (using the user’s name) • Optionally creates coSpaces and adds coSpace members
• Configures the Call Bridge and instructs it to perform an LDAP/AD sync • For more details, see the section “LDAP/AD”
Can I create more?
• Users can be created manually; however, only users imported from AD will be available
on the Call Bridge
• Therefore new Acano Manager users will typically be Admins
How do I delete users and re-fresh my lists?
• See the notes example imports of LDAP/AD data
7.11 Events/alerts marble diagram
Within Acano Manager, software ‘events’ fire when key things happen. Examples include: Call Scheduled, Call Updated, Call Starting, Call Started, Call Ended, Participant Joined. These events can be:
Displayed on the user interface in the Alert Panel at the top of the page (Admins/Operators) Sent to groups of users via email
• A script can be run against the event and custom emails sent. The email can either be in
text or HMTL
• Alerts can be managed via the Alerts List page and then click Configure (bottom of the
page)
The above diagram shows events firing:
Alerts being generated that appear in the user interface Alert Panel Emails being generated
7.12 Who sees which event?
Alert Configuration page
• Admins, Ops, Call Owner etc.
Emails set to all “matching” user types with an email address
• All admins with an email address • All operators with an email address • Call owner
Gotchas
• Alert configuration is saved at call creation time
• You do not see an alert if the configuration is changed AFTER scheduling a cal
7.13 Alerts
User-defined alerts to prioritise response Email – txt/html option
7.14 Call confirmed alert
7.15 Notification scripts
Automatically generate confirmations User-defined text
Text substitution (accessing Acano Manager’s object model) Very basic scripting language
• Conditions • Loops
See README in Acano Manager\Server\Email Templates
7.16 MCU differences – limits and mechanics
Mode Description
Acano State changes sent to Acano Manager (as
CDR events); posted to 5566 (make sure firewall is open!)
Infinite number of calls (coSpaces) coSpace = VMR on steroids
All Acano Manager calls are created on a
coSpace
Native support for coSpaces; calls created
when the first participant joins the coSpace Codian State information obtained via polling
200 calls per MCU (regardless of ports) Acano Manager creates VMRs as “always
Table 6: MCU differences
7.17 MCU states
Table 7: MCU differences
7.18 Scheduling resource assignment control
RMX State information obtained via “delta”s (xx
[call/participant] changed)
4000 calls per MCU
Acano Manager creates VMRs as “always
available” calls
Step Description
Online MCU online and Acano Manager communicates with it successfully. If any form of connection problem occurs, Acano Manager retries 5 times (timeout 5 seconds). After 5 attempts, state > beginOffline
beginOffline Transitory state; MCU going offline
Offline Acano Manager attempts to reassign any calls not bound to this MCU to other MCUs with resources available
beginOnline Transitory state; Acano Manager is bringing the MCU online (connecting to it) and then
“discovering” which calls are active on the MCU
Option Description
No MCU specified “Least Loaded” scheduling; call placed on least loaded MCU
Preferred MCU Call placed on defined MCU; if no resources available, schedule fails “no resources” Customers with their own MCU Calls will be assigned to the customer’s MCU
“Pooled MCU” mode allows “no resources” calls to be scheduled on system pool MCUs
Table 8: Scheduling resource assignment control
7.19 MCU list – port usage – current/forward
Acano Manager tracks the MCU ports currently allocated and those about to be consumed.
Current; ports currently allocated
Future; the port allocation 15 minutes in the future
Why is there a difference?
Scheduled calls have assigned resources
Activity on coSpaces is unplanned and could be outside “typical” ranges
• Puts scheduled calls at risk because of finite resource count
Future allows operators to monitor whether a problem is looming (in 15 minutes)
More coSpace activity than expected Potential to impact scheduled calls Allows scheduled calls to be moved
7.20 Notes on endpoints
Within Acano Manager, an endpoint represents a device
• Phone • Acano client • Lync client
• Classic room system
Devices have properties
• Names, addresses, contact details for people responsible for them
Online/Offline MCUs Calls can only be scheduled against OnLine MCUs; if no “preferred MCU” is specified and an offline event occurs then calls are reassigned to another MCU
An endpoint can be scheduled to participate in many calls
• Some MCUs allow the endpoint bandwidth to be managed (and details like initial mute
state)
• The properties used per call might be different
• Acano Manager uses “participant” to define an endpoint in a specific call
7.21 Endpoint details
Field Description
Customer Customer Name or system-wide
User Associate to user – Operator for launcher Endpoint name
Display Name override Display this name into video stream (Codian) Contact details
Exchange Leave blank; only used with Outlook plugin
Info/URL Leave blank
DTMF DTMF string <31 chars; injected into call on connect (,,,,#,,,888,,,#)
Audio Only
Recording Enables billing
Local and Time Zone Booking confirmation
MAC address Used when running TMS importer
TMS Id Set when importing from TMS
Primary Set protocol and number
Table 9: Endpoint details
7.22 Endpoint billing options
Table 10: Endpoint billing options
Rate Mode See next section
Date certified Set this to avoid seeing a non-certified warning in Calls In Progress. It can be set to today’s date. Additional certification notes can be added Notes
URL When set, allows direct link to device’s management console from icon in Calls In Progress
Option Description
Zero Rated No charges applied to this endpoint
Customer Apply customer’s rates when this endpoint joins a call.
NOTE; system wide endpoints (e.g. those belonging to the service provider) are not rated unless:
The device belongs to the launching
operator and is providing Meet and Greet(aka Concierge)/monitoring.
The device is marked as a recorder
Device Device-specific values can be entered and will be used when this endpoint joins a call
7.23 User details
Table 11: User details
Field Description
Customer Select customer or leave blank (system-wide)
LoginID Login user name
First Name/Last Name
Contact Details Email/Telephone
User Access Level Customer’s ACL (ACL Tag; who will see them) Service Access Level List of ACL Tags visible to this user
User Type User, Admin, Operator……..
Local En-US (MM/DD AM/PM), En-GB (DD/MM 24hr) Time Zone This will default to the customer’s default Max Endpoints How many endpoints will list
7.24 Customer billing settings
7.25 Creating a new endpoint
Customer not set, system wide
Access Level MUST be set for endpoint to be “visible”
If customer
selected, defaults to customer’s ACL
If system-wide,
set to the most appropriate ACL level
NOTE: System can be configured to not allow call to be scheduled if a non-certified device is selected.
7.26 Notes on system-wide endpoints
This is useful in Service Provider environments where you might have devices which are not bound to specific customers. This allows:
When adding participants to a call, you see all endpoints that belong to a specific customer
Set certified date to avoid warning symbol being displayed in CIP when this attendee joins a call
Primary & secondary network connections methods
Used from within CIP to allow operators to quickly switch to an alternative number