Direct Data Entry (DDE)
Sign-on Instructions
Direct Data Entry (DDE)
Sign-on Instructions -
Section 6
Table of Contents
Section 6 – Claim Correction 3
Online Claims Correction 3
Claim Summary Inquiry 3
Claims Correction Processing Tips 5
Corrective Revenue Code Lines 5
RTP Selection Process 6
Suppressing RTP Claims 7
Claims Sort Option 7
Claims and Attachments Corrections 8
Adjustments 8
Claim Voids/Cancels 9
Valid Claim Change Condition Codes 10
Table of Figures
Figure 44 – Claim and Attachments Correction Menu 3Figure 45 – Claim Summary Inquiry 4
Figure 46 – UB-04 Claim Entry, Page One 6
Direct Data Entry (DDE)
Sign-on Instructions -
Section 6
Section 6 – Claim Correction
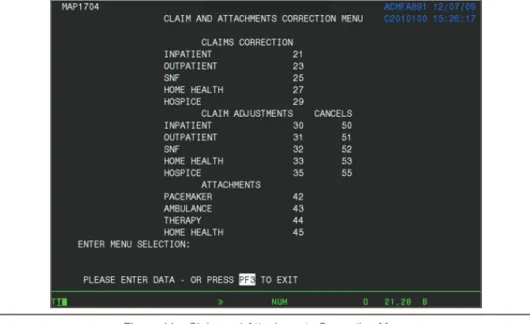
The Claim and Attachments Correction Menu displays (Figure 44) when “03” is chosen from the Main Menu..
Figure 44 – Claim and Attachments Correction Menu
Claim correction allows you to: y
y Correct Return To Provider (RTP) claims y
y Suppress RTP claims that you do not wish to correct y
y Adjust claims y
y Cancel claims
Note: The system will automatically enter your provider number into the PROVIDER field. If the facility has multiple provider numbers, the user will need to change the provider number to inquire or input information. [TAB] to the PROVIDER field and type in the correct provider number.
Online Claims Correction
If a claim receives an edit (FISS reason code), a Return to Provider (RTP) is issued. An RTP is generated after the transmission of the claim. The claim is returned for correction. Until the claim is corrected via DDE or hardcopy, it will not process. When an RTP is received, the claim is given a Status/Location code beginning with the letter “T” and routed to the Claims Summary Inquiry screen. Claims requiring correction are located on the Claim Summary screen the day after claim entry. It is not possible to correct a claim until it appears on the summary screen. Providers are permitted to correct only those claims appearing on the summary screen with status “T.” Claims that have been given “T” status have not yet been processed for payment consideration, so it is important to review your claims daily and correct them in order to avoid delays in payment.
CLAIM SUMMARY INQUIRY
Direct Data Entry (DDE)
Sign-on Instructions -
Section 6
Figure 45 – Claim Summary Inquiry
Certain information is already completed, including the provider number, the status/location where RTP claims are stored (T B9997), and the first two digits of the type of bill. To narrow the selection, enter any or all of the information in the following table.
Field Name Description
DDE SORT
Allows multiple sorting of displayed information. Valid values include:
• “ ” = TOB/DCN (Current default sorting process, S/LOC, Name)
• M = Medical Record number sort (Ascending order, HIC)
• N = Name sort (Alpha by last name, first initial, Receipt Date, MR#, HIC)
• H = HICN sort (Ascending order, Receipt Date, MR#)
• R = Reason Code sort (Ascending Order, Receipt Date, MR#, HIC)
• D = Receipt Date sort (Oldest Date displaying first, MR#, HIC) MEDICAL
REVIEW SELECT
Used to narrow the claim selection for inquiry. This will provide the ability to view pending or returned claims by medical review category. Valid values include:
• “ ” = Selects all claims
• 1 = Selects all claims
• 2 = Selects all claims excluding Medical Review
• 3 = Selects Medical Review only
To see a list of the claims that require correction, press [ENTER]. The selection screen will then display all claims that have been returned for correction (status/location T). To narrow the scope of the claims viewed, enter one of the following selection criteria, type of bill, from date, to date, and HIC number. If the claim you are looking for does not display on the screen, do the following:
y
y Verify the HIC number that you typed. y
y Verify the “from” and “through” dates. y
y Verify that the type of bill (TOB) is the same as the TOB on the claim you originally submitted. If not, [TAB] to the TOB field and enter the first two digits of the TOB for the claim you are trying to retrieve.
y
y If you still cannot find the claim, back out of Claims Correction (press [F3]) all the way to the Main Menu. Choose Inquiry (option 01), then Claims (option 12), and select the claim. Check the status/location (S/LOC). Only claims in status location T B9997 can be corrected. Status locations that cannot be corrected include:
Direct Data Entry (DDE)
Sign-on Instructions -
Section 6
y P 09998 – This claim was paid but due to its age, it has been moved to off-line history. Timeliness of filing will not allow you adjust this claim. y
P B9996 – This claim is waiting to be released from the 14-day payment floor (not showing on the RA). No correction allowed.
y
R B9997 – This claim was rejected. Submit a new claim or an adjustment. y
D B9997 – This claim was denied and may not be corrected or adjusted.
CLAIMS CORRECTION PROCESSING TIPS
y
y The Revenue Code screen has multiple sub-screens. If you have more Revenue Codes than can fit on one screen, press [F6] to go the next sub-screen. Press [F5] to go back to the first screen.
y
y You can also get from page to page by entering the page number in the top right hand corner of the screen (Claim Page).
y
y Reason codes will display at the bottom of the screen to explain why the claim was returned. Up to 10 reason codes can appear on a claim.
y
y Pressing [F1] will access the reason code file. y
y Press [F3] to return to the claim. y
y The reason codes can be accessed from any claim screen. y
y The inquiry screen can be accessed by typing the option number in the “SC” field in the upper left hand corner of the screen, for instance “10” for Beneficiary information. Press
[F3] to return to the claim.
CORRECTING REVENUE CODE LINES
To delete an entire Revenue Code line:
y
y [TAB] to the line and type zeros over the top of the Revenue Code to be deleted or type “D” in the first position.
y
y Press [HOME] to go to the Page Number field. Press [ENTER]. The line will be deleted. y
y Next, add up the individual line items and correct the total charge amount on Revenue Code line (0001).
To add a Revenue Code line:
y
y Tab to the line below the total line (0001 Revenue Code). y
y Type the new Revenue Code information. y
y Press [HOME] to go to the Page Number field. Press [ENTER]. The system will resort the Revenue Codes into numerical order.
y
y Correct the total charge amount of Revenue Code line (0001).
Changing total and non-covered charge amounts:
y
y [TAB] to get to the beginning of the total charge field on a line item. y
y Press [END] to delete the old dollar amount. It is very important not to use the spacebar to delete field information. Always use [END] when clearing a field.
y
y Type the new dollar amount without a decimal point. Example: for $23.50 type “2350.” y
y Press [ENTER]. The system will align the numbers and insert the decimal point. y
y Correct the totals line, if necessary. y
y To exit without transmitting any corrections, press [F3] to return to the selection screen. Any changes made to the screen will not be updated.
y
y Press [F9] to update/enter the claim into DDE for reprocessing and payment consideration. If the claim still has errors, reason codes will appear at the bottom of the screen. Continue the correction process until the system takes you back to the claim correction summary. y
Direct Data Entry (DDE)
Sign-on Instructions -
Section 6
When the corrected claim has been successfully updated, the claim will disappear from the screen. The following message will appear at the bottom of the screen:
‘PROCESS COMPLETED – ENTER NEXT DATA.’
RTP SELECTION PROCESS
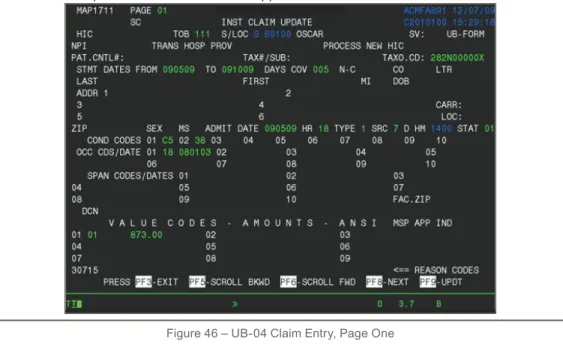
Select the claim to be corrected by tabbing to the “SEL” field for the first line of the claim to be corrected. Type a “U” or “S” and press [ENTER]. The patient’s original UB-04 claim will display. (This will be MAP 1711, the first page of the claim).
Type Information: y
y Use the Function keys listed at the bottom of the screen to move through the claim (i.e., [F8] to go to the next screen, [F7] to back up a screen).
y
y The Revenue Code screen has multiple sub-screens. If you have more revenue codes than can fit on one screen, press [F6] to go the next sub-screen. Press [F5] to go back to the first screen.
y
y You can also get from page to page by entering the page number in the top right hand corner of the screen (Claim Page).
Reason Codes will appear at the bottom of the screen (Figure 46) to explain why the claim was returned. Up to ten reason codes can appear on a claim.
Figure 46 – UB-04 Claim Entry, Page One
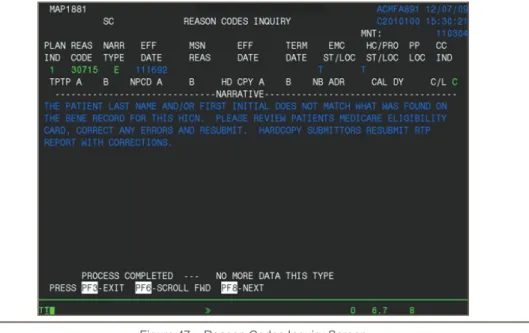
Press [F1] to access the Reason Code file (Figure 47). The system automatically pulls up the first reason code with its message. The message will identify the fields that are in error and will suggest corrective action. Press [F3] to return to the claim, or type in an additional reason code and press [ENTER].
Direct Data Entry (DDE)
Sign-on Instructions -
Section 6
Figure 47 – Reason Codes Inquiry Screen
Type Information: y
y The reason codes may be accessed from any claim screen. y
y The Inquiry screen can be accessed by typing the option number in the “SC” field in the upper left hand corner of the screen, for instance “15” for DX/PROC Codes. Press [F3] to return to the claim.
Press [F3] to return to the selection screen. Any changes made to the screens will not be updated. Press [F9] to update/enter the claim into DDE for reprocessing and payment consideration. If the claim still has errors, reason codes will appear at the bottom of the screen. Continue the correction process until the system takes you back to the Claim Correction Summary.
Note: The online system does not fully process a claim. It processes through the main edits for consistency and utilization. The claim goes as far as the driver for duplicate check. The claim will continue forward when the nightly production (batch) is run. Potentially, the claim could RTP again in batch processing.
When the corrected claim has been successfully updated, the claim will disappear from the screen. The following message will display at the bottom of the screen:
PROCESS COMPLETED - ENTER NEXT DATA.
SUPPRESSING RTP CLAIMS
A feature exists within DDE that allows a claim to be suppressed because RTP claims do not purge from the FISS for 60 days. This is a helpful function for RTP claims filling up unnecessary space under the Claim Correction Menu option. This action will hide from view the claims in the Claim Correction Menu option; however, all claims will continue to display through the Inquiry Menu option until they purge from the system.
Type a “Y” in the SV field located in the upper right hand corner of page 1 and then press
[F9]. The system will return you to the Claim Summary Inquiry screen.
Direct Data Entry (DDE)
Sign-on Instructions -
Section 6
provider to choose the sort order. To sort the DDE claims, type one of the following values in the DDE SORT field and press [ENTER]:
y
y M = Displays claims in Medical Record Number order. The dual-purpose field labeled PROV/MRN will display the provider number unless you choose this sort option. y
y N = Displays claims in the beneficiary last name order. y
y H = Displays claims in Health Insurance Claim (HIC) number order. y
y R = Displays claims in Reason Code order. y
y D = Displays claims in Receipt Date order.
Claims and Attachments Corrections
ADJUSTMENTS
When claims are keyed and submitted through DDE for payment consideration, the user can sometimes make entry mistakes that are not errors to the DDE/FISS system. As a result, the claim is processed through the system to a final disposition and payment. To change this situation, the on-line claim adjustment option can be used to submit adjustments for previously paid/finalized claims. After a claim is finalized, it is given a status/location code beginning with the letter “P” and is recorded on the claim status inquiry screen.
A claim cannot be adjusted unless it has been finalized and is reflected on the remittance advice.
Providers must be very careful when creating adjustments. If you go into the adjustment system and update a claim without making the right corrections, the adjustment will still be created and process through the system. Errors could cause payment to be taken back unnecessarily.
No adjustments can be made on the following claims: y
y R = Rejected claims y
y T = RTP claims y
y D = Medically denied claims y
y Type of Bill nnP (PRO adjustment) or nnI (intermediary adjustment)
If a claim has been denied with a full or partial medical denial, the provider cannot submit an adjustment. Any attempted adjustments will reject with Reason Code 30904 (a provider is not permitted to adjust a partially or fully medically denied claim).
To access the claim and make the adjustment:
1. Select the option on the Claim and Attachments Correction Menu for the type of claim to be adjusted and press [ENTER]. End Stage Renal Disease (ESRD), Comprehensive Outpatient Rehab Facilities (CORF), and Outpatient Rehab
Facilities (ORF) will need to select the outpatient option and then change the TOB.
2. Enter the HIC number and the FROM and TO dates of service, and then press
[ENTER]. The system will automatically default the TOB frequency to an nn7. The HIC number field is now protected and may no longer be changed.
3. Indicate why you are adjusting the claim by entering the claim change condition code, on Page 01 of the claim and a valid Adjustment Reason Code on Page 03. Valid Adjustment Reason Codes can be found typing ‘16’ in the ‘SC’ field in the upper right hand corner of the screen and pressing [ENTER] or see below.
4. Give a short explanation of the reason for the adjustment in the remarks section on Page 04 of the claim.
Direct Data Entry (DDE)
Sign-on Instructions -
Section 6
6. Press [F9] to update/enter the claim into DDE for reprocessing and payment consideration. Claims being adjusted will still show on the claim summary screen. Always check the inquiry claim summary screen (#12) to affirm location of the claim being adjusted.
7. Check the remittance advice to ensure that the claim adjusted properly.
CLAIM VOIDS/CANCELS
Using the Claim Cancels option, providers can cancel previously paid/finalized claims. After a claim is finalized, it is given a status/location code beginning with the letter “P” and is recorded on the claim status inquiry screen. A claim cannot be voided (canceled) unless it has been finalized and is reflected on the remittance advice.
Providers must be very careful when creating cancel claims. If you go into the adjustment system and update a claim without making the right corrections, the cancel will still be created and process through the system. Errors could cause payment to be taken back unnecessarily. In addition, once a claim has been voided (canceled), no other processing can occur on that bill.
Important notes on cancels:
y
y All bill types can be voided except one that has been denied with full or partial medical denial.
y
y Do not cancel TOB XXP (PRO adjustments) or XXI (Intermediary Adjustments). y
y A cancel bill must be made to the original paid claim. y
y Providers may not reverse a cancel. Errors will cause payment to be taken back by the Intermediary.
y
y Provider cannot cancel an MSP claim. Provider must submit an adjustment even if the claims are being changed into a “no-pay” claim.
y
y Providers may/should add remarks on Claim Page 04 to document the reason for the cancel.
y
y After the cancel has been “stored,” the claim will appear in Status/Location S B9000. y
y Cancels do not appear on provider weekly monitoring reports; therefore, use the Claim Summary Inquiry to follow the status/location of a cancel.
To access the claim and cancel it:
1. Select the option on the Claim and Attachments Correction Menu for the type of claim to be canceled and press [ENTER]. End Stage Renal Disease (ESRD), Comprehensive Outpatient Rehab Facilities (CORF), and Outpatient Rehab Facilities (ORF) will need to select the outpatient option and then change the TOB.
2. Enter the HIC number and the FROM and TO dates of service, and then press
[ENTER].
3. Select the claim to be canceled by typing an ‘S’ in the ‘SEL’ field beside the first line of the claim and then press [ENTER]. The HIC number field is now protected and may no longer be changed.
4. Indicate why you are voiding/canceling the claim by entering the claim change condition code (see list below) on Page 01 of the claim.
5. Give a short explanation of the reason for the void/cancel in the remarks section on Page 04 of the claim.
6. To back out without transmitting the void/cancel, press [F3]. Any changes made to the screens will not be updated.
Direct Data Entry (DDE)
Sign-on Instructions -
Section 6
VALID CLAIM CHANGE CONDITION CODES
Adjustment condition code will be needed to indicate the primary reason for initiating an on-line claim adjustment or void/cancel. Valid code values include:
y
y D0 = Changes to service dates y
y D1 = Changes to charges – Note: When there are multiple changes to a claim in addition to changes to charges, the D1 “changes to charges” code value will take precedence.
y
y D2 = Changes to Revenue Codes/HCPCS y
y D3 = Second or subsequent interim PPS bill y
y D4 = Change in GROUPER input y
y D5 = Cancel only to correct a HICN or Provider identification number – For nn8 TOB only y
y D6 = Cancel only to repay a duplicate payment or OIG overpayment (includes
cancellation of an outpatient bill containing services required to be included on the inpatient bill) – For nn8 TOB only
y
y D7 = Change to make Medicare the secondary payer y
y D8 = Change to make Medicare the primary payer y
y D9 = Any other change y