northamerica: 800 498-JDSU (5378) worldwide:+800 5378-JDSU website: www.jdsu.com
Power over Fiber
This technical note provides guidelines to ensure the proper operation and optimum performance of the JDSU power over fiber (PoF) product family, which consists of a photovoltaic power converter (PPC) and a photonic power module (PPM).
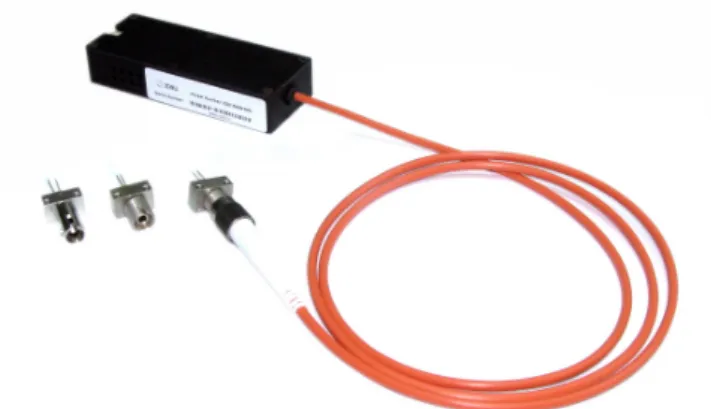
The combination of the PPC and the PPM, hereafter referred to as the PPM-K, can drive electronics in remote locations that are hazardous, electrically noisy, remote, inaccessible, or exposed to extreme weather. The PPM-K consists of a local laser module with drive electronics connected to a remote PPC using multimode fiber. Electrical power from an external source is provided at the PPM-K input to drive the diode laser. The PPC converts the optical power to electrical power at the remote location. Fiber lengths up to 1000 meters can be supported.
The fiber pigtail provided with the PPM-K is not intended for use directly with the PPC. Instead, a fiber patch cord, or jumper, should be inserted between the fiber pigtail and the PPC for optimum performance. It should have a minimum length of 10 meters (30 feet), preferably 50 meters (150 feet).
Figure 1. PPM-K with a selection of PPCs
The PPM-K is ideal for the following applications: • Electronic circuits operating in:
− High RF, EMI, and magnetic fields − High-voltage environments − Extreme environmental conditions • Sensors, gauges, and actuators • Data communication transceivers • GPS and wireless receivers
• Current transducers in high-voltage environments • IGBTs in high-voltage environments
• Photonic Power Module • Photovoltaic Power Converter • Fiber Contamination and Cleaning • Power Supply and Control
• Precautions in Dealing with Laser Light • Mounting Procedures
Photonic Power Module
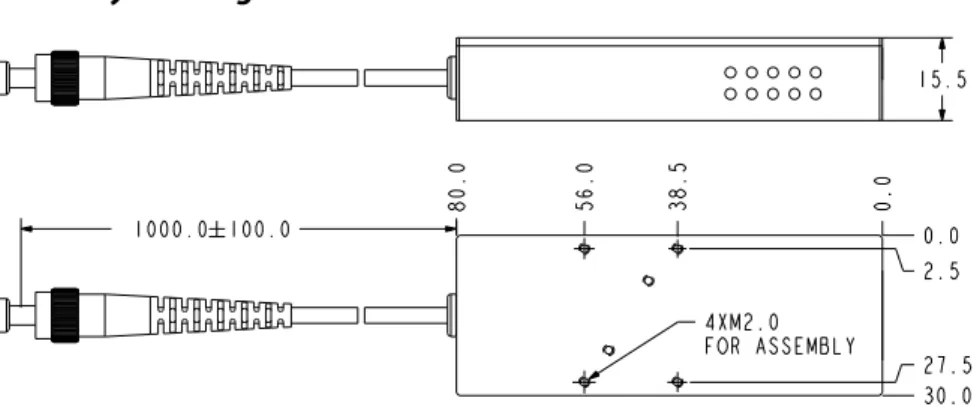
The PPM includes one diode laser and a driver control board with one 6-pin connector. The PPM provides up to 2 W of optical power output, which is launched into multimode fiber (60/125 µm, NA 0.22) at nominally 830 nm wavelength. An extra heat sink for the module is required as described in the Mounting section of this note. Figure 2 shows the locations of the 4 screw holes with threads on the bottom of PPM to attach the PPM to a heat sink.
Assembly Drawing
Figure 2. PPM mechanical drawing
Module Operation
External power must be applied to the module in accordance with the following table for proper operation of PPM. The module accepts a supply voltage in the range of 6 V to 12 V and the overall power consumption for the module is no higher than 6.5 W. The power supply should comply with the Power Supply and Control section in this note.
Figure 3. PPM pin configuration and connector socket
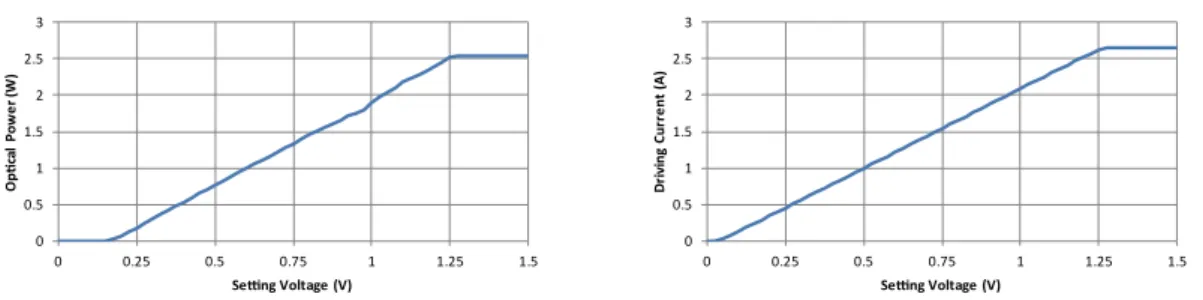
A voltage applied on pin #4 enables the module when the voltage is higher than 1.74 V and disables this module when the voltage is lower than 0.5 V. The output optical power can be adjusted through pin #5 with a voltage ranging from 0 to 1.25 V. The drive current increases linearly with the voltage applied on pin #5 until the voltage reaches 1.25 V, as shown in Figure 4. The drive current of the laser diode (ILD) can
be monitored by the voltage measured on Pin #3:
ILD = VPin3/(20×RSNS)
where RSNS is 50 mΩ.
Figure 4. Optical power and driving current
The manufacturer of the 6-pin connector is Samtec® p/n: IPL1-106-01-L-S-RA-K, and the recommended cable is MMSS-06-26-XX.XX-D-K-LUS, where XX.XX denotes the length of the cable. Refer to http://www.samtec.com/ for detailed schematics and drawings.
Photovoltaic Power Converter
The photovoltaic power converter (PPC) is a multi-segmented gallium-arsenide (GaAs) device. The output voltage is determined by the number of segments with each segment contributing roughly one volt. Output (open-circuit) voltages of 4 V, 6 V and 12 V are available in the PPC product family. The maximum electrical power output from a PPC is 500mW, depending on the input optical power, selected PPC, and load resistance. Two connector versions are available, FC and ST, with the FC being the most recommended by JDSU.
Pinout
Pin Description In/Out
1 Ground —
2 Power (+6V ~ +12V) Input 3 Laser Current Monitor Output
4 Module Enable Input
5 Laser Current Setting Input
6 Ground —
0 0.5 1 1.5 2 2.5 3
0 0.25 0.5 0.75 1 1.25 1.5
O pti ca l P ow er (W )
Setting Voltage (V)
0 0.5 1 1.5 2 2.5 3
0 0.25 0.5 0.75 1 1.25 1.5
Dr iv in g Cu rr en t ( A)
electrical power output is zero.
Each point on the I-V curve corresponds to an operational point and a proper load resistance is required in order to maximize the power output. The slope of the load line in the figure determines the load resistance.
Figure 5. PPC characteristic curves
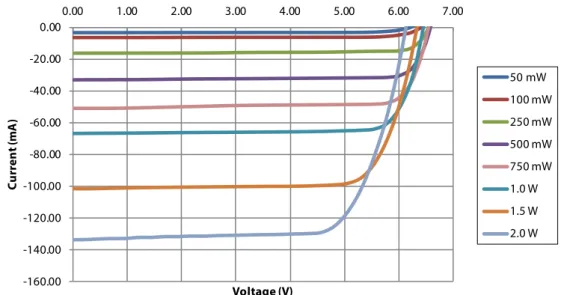
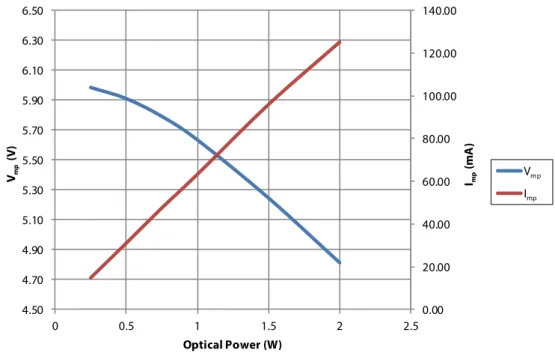
Figure 6 shows how the I-V curve evolves with different optical power input. Generally ISC is linearly
proportional to the optical power whereas VOC varies logarithmically with input power. However, due
to voltage losses stemming from resistance, VMP decreases for optical power levels higher than 500 mW
whereas IMP linearly increases, as shown in Figure 7.
Figure 6. Typical PPC-6E I-V curve with different optical power
VMP VOC
IMP
ISC
Voltage
Load line
PMAX
Op point
-160.00 -140.00 -120.00 -100.00 -80.00 -60.00 -40.00 -20.00 0.00
0.00 1.00 2.00 3.00 4.00 5.00 6.00 7.00
Cu
rr
en
t (
m
A
)
Voltage (V)
50 mW 100 mW 250 mW 500 mW 750 mW 1.0 W 1.5 W 2.0 W
Figure 7. Typical PPC-6E VMP and IMP at different optical power
Depending on the application, there are usually two ways of extracting power from the PPC. If constant output power delivery is preferred, one can design the load line to be around the value of Vmp/Imp to extract
the most power from the PPC with the input laser power to the PPC remaining constant. Another common mode of operation is to regulate the output voltage at a voltage level such as 5 VDC or 3.3 VDC. While this approach may sacrifice some conversion efficiency, it ensures no power variation with load resistance.
Application Examples
Overview
A typical PoF application using the PPM-K is shown in Figure 8. The PPM is at one end of the fiber and the PPC at the other.
Figure 8. Typical PoF use of the PPM-K
In system design, the loss induced by the fiber adapter and MMF should be taken into account, especially when the PPC is located far from the PPM. The pigtail fiber from the PPM has a core/cladding diameter of 60 µm/125 µm and an NA of 0.22. The extension fiber should be chosen to be compatible with the pigtail fiber, such as 62.5 µm/125 µm and an 0.22 NA, to achieve the lowest connection loss. Other MMFs with larger core diameter and the same NA are also applicable. However, the PPC should be optimized (in terms of optical alignment) to the type of fiber to which it will be connected. Hence, to ensure the best alignment when the PPC is mounted in the receptacle the fiber type must be specified.
0.00 20.00 40.00 60.00 80.00 100.00 120.00 140.00
4.50 4.70 4.90 5.10 5.30 5.50 5.70 5.90 6.10 6.30 6.50
0 0.5 1 1.5 2 2.5
Imp
(m
A
)
Vmp
(V
)
Optical Power (W)
Vmp Imp
Fiber adaptor PPC
Extension MMF
+ –
Customer electronics PPM
Parallel Connection
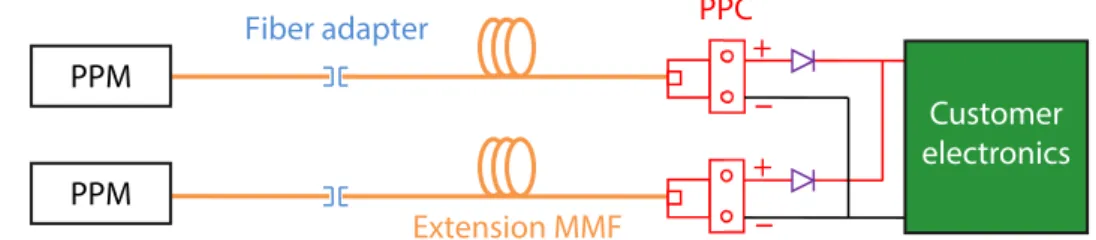
In case a single PPM-K cannot provide enough electrical power, two or more can be connected in parallel to increase the electrical power output. Each output from the PPC should be serially connected to a diode before feeding into a customer’s electronics. The diode prevents reverse current into the PPC. The diode should have a low forward voltage to reduce the power losses induced by it. Figure 9 shows an example where two PPM-K units are configured to supply the customer’s electronics with almost double the electrical power.
Figure 9. Parallel connection example of two PPM-K units
PPM Redundancy
PPM redundancy is recommended when a customer application requires a higher level of reliability. By using an optical power combiner, the optical output from the PPM can be switched when a failure occurs. A power combiner is a fused optical fiber device which can combine multiple input optical power into a single fiber output.
Figure 10. PPM redundancy configuration example
Optical Power Sharing
It is possible to share the optical power from a single PPM and feed it into multiple PPCs. This is especially cost effective when the electrical power requirement for each PPC is low. A power splitter (a fused optical fiber device which can split the input optical power evenly into multiple outputs) is used so that each of the PPCs can get a fraction of the optical power from the PPM.
Figure 11. Optical power sharing example
PPC +
– Customer
electronics +
–
Customer electronics Fiber adapter
Extension MMF
PPM PPM
Fiber adapter PPC
Extension MMF
+
–
Power combiner 2x1
Customer electronics
PPM PPM
PPC
+
–
Customer
electronics
+
–
1x2
Power splitter
Customer
electronics
Fiber adapter
Extension MMF
Precautions
Safety
The PPM provides an output optical power of up to 2 W in the infrared region. Be sure to follow standard safety protocol for eye and skin for Class IV IR lasers.
Electrostatic Discharge (ESD)
ESD damage to a laser diode is induced from the rapid flow of electrical charge between two bodies at different potentials, either through direct contact or through an induced electrical field. ESD can cause catastrophic or latent damage and is of particular concern for the module’s laser diode.
Latent ESD damage, which occurs when the energy of an ESD event is below the critical level required to produce a catastrophic failure, can result in defects which propagate during module deployment resulting in catastrophic failure over time.
A human body model (HBM) ESD test is used to determine the damage threshold of both PPM and PPC, which are tested in accordance with GR-468-CORE section 5.22 (MIL-STD-883, method 3015.7). A number of industry specifications are available to make the work area ESD safe (for example, EIA-625, JEDEC 108-A).
Below are common recommended guidelines for preventing ESD damages:
• Refer to PPM and PPC specification sheets for ESD voltage ratings (2000 V max)
• Use shorting clips or foam on the PPC pins when the modules are disconnected from the operational circuit
• Ground operators, equipment, WIP transport carts/trays, modules or systems, and work surface to eliminate static electricity
• Only use confirmed ESD dissipative coatings/surface finishes on fixtures/tooling used to assemble the modules
• When manipulating lasers or modules, use ESD protective smocks, gloves and shoes/covers, dissipa-tive bench-top mats and ESD protecdissipa-tive flooring or matting
• Remove or control static generating sources to voltages below the specified maximum for safe ESD handling • Install air ionizers as necessary for additional environmental control
• Use electrically grounded soldering irons for soldering the pump module to the mounting surface • Use electrostatic shielding containers and antistatic or dissipative carriers
• Avoid any contamination of fiber
• No dark color contamination with an area larger than 100 µm x 100 µm is allowed within the first ~2΄ of buffer and should be avoided along the entire length of fiber
Fiber cleaning materials and procedures shown here are for informational purposes only and are not meant to recommend, endorse, or discredit any existing procedures. It is recommended that users evaluate any procedure or product before using it in applications where damage or failure could result. As always, safety precautions must be exercised at all times when using glass, chemicals, and lasers.
There are many materials commercially available for fiber optic cleaning. Some are marketed specifically for the fiber optic industry, while others are considered “raw materials” or generic in nature but can be used for the same purpose.
Mounting
Mounting topics include: • Heat Sinks
• Thermal Interface Materials • Fiber Handling
Heat Sinks
The design of the receiving heat sink is crucial to PPM and PPC performance and reliability. The PPM requires a heat sink and will fail catastrophically if operated without one. It is not compulsory, but it will benefit conversion efficiency if the PPC is mounted on a heat sink.
The goal of the heat sink is to dissipate the heat from the package base with minimized thermal resistance. Heat sink performance is usually specified in terms of thermal resistance (Q):
ΘS = (Ts –Ta)/Q
where:
ΘS = Thermal resistance in °C per watt
Ts = Heat sink temperature in °C
Ta = Ambient or coolant temperature in °C
Q = Heat input to heat sink in watts
Each thermal cooling application will have a unique heat sink requirement and frequently there will be various mechanical constraints that may complicate the overall design. Because each case is different, there is no single heat sink configuration suitable for all situations.
A well-designed heat sink in combination with a high-performance thermal interface material and package mounting technique should guarantee that the module case temperature does not exceed the maximum temperature specified for each series (refer again to the absolute maximum characteristics). Failure to keep a package base below the specified maximum temperature will lead to the pump module overheating and result in module damage.
The following general heat sink guidelines are recommended:
• Mount the module on a heat sink with a surface finish of 0.8 microns or less
• The heat sink should be designed to handle at least maximum module heat dissipation through the life of the product. For total module power dissipation, refer to PPM specifications. Maximum mod-ule heat dissipation is approximately equal to the ex-fiber optical power.
• Design a heat sink that is capable of keeping the module case temperature below the maximum rated temperature for all operating conditions. For maximum package base temperature, refer to the PPM specification.
• The operation of a PPC generally does not require a heat sink, but we strongly recommend it, espe-cially when the PPC is operated at a high input optical power level (>500 mW)
Thermal Interface Materials
Ideally, thermally conductive materials are used as an interface between PoF products and the heat sink to account for any flatness/smoothness discrepancies between the two parts. Suitable thermally-conductive materials include phase-change materials, greases, thermal compounds, elastomers, and adhesive films. All are designed to conform to surface irregularities, thereby eliminating air voids to improve heat flow between thermal interfaces.
Use thermal grease to minimize thermal resistance. If semi-rigid thermal-interface materials (for example, phase-change material or thermal pads) are used, the thermal-interface material must cover the entire base plate including the bolt-hole area to avoid bending the base during bolt down.
The specific choice and implementation of a thermal interface material depends on the customer’s specific application and reliability considerations.
Failure to follow proper pump module mounting procedures to a properly prepared heat sink can result in high thermal resistances and module warpage, both of which can impact performance and may lead to catastrophic failure.
Fiber Handling
Both the fiber buffer and external furcation cable are heat sensitive as well as being susceptible to buffer damage. Care must be taken during the setup and qualification of any process used in the handling and assembly of pump modules as the buffer is readily susceptible to damage—even, for example, by coiling the fiber during product assembly and securing the coil with sections of solder or wire. This practice is commonly seen and is known to cause compression and delamination damage to the optical buffer. Maximum storage and exposure temperatures for the optical buffer are 85°C as recommended by fiber manufacturers. Exposure of the buffer to temperatures above 85°C will likely cause permanent damage to the pigtail. If temperature exposure beyond 85°C is required, it is critical to understand the risk associated to optical fiber reliability.
northamerica: 800 498-JDSU (5378) worldwide:+800 5378-JDSU website: www.jdsu.com
Product specifications and descriptions in this document subject to change without notice. © 2014 JDS Uniphase Corporation 30175827 000 0314 POWEROVERFIBER.WP.PV.AE March 2014 • Avoid a fiber contact with any sharp object
• Never use the fiber to pick up or support the weight of the module. Always handle modules with two hands, one holding a package and the other handling fiber coil to avoid fiber damage or breakage. • Do not allow kinks or knots to develop in the fiber. Carefully work out any tangles; pulling on the
fiber will cause any kinks or curls to tighten and exceed the minimum bend radius.
• Do not bend a fiber with a radius smaller than specified as minimum bending radius (30 mm for PPM) Bending the fiber to a smaller than specified minimum radius can result in an increased fiber temperature due to a bend loss and subsequent optical absorption by the fiber and its buffer. Catastrophic damage of the fiber can occur due to a crack growth induced by a temperature increase. In less severe bend situations, a temperature increase can lead to degradation of the coating and long-term reliability issues.
Power Supply and Control
General laser diode power supply requirements are applicable to high-power modules. Failure to follow these requirements may result in module degradation or failure. When designing or utilizing an LD power supply, designers should refer to the specified absolute maximum ratings specified for each series of high-power lasers.
Electrical overstress (EOS) damage occurs when a module is subjected to voltage or current levels beyond its surge-absorbing capacity. The location and degree of damage depends on the magnitude and duration of the voltage, current, total energy, polarity, and waveform of the electrical overstress.
Power supplies and test equipment can induce EOS. Recommended guidelines for preventing EOS of pump modules include:
• Transient electrical stress to the module should be avoided or minimized through operational life. The maximum specified transient current time for a module should never be exceeded while operat-ing a LD; refer to the absolute maximum ratoperat-ings (AMR) in the pump module specifications. • Use transient suppression for power supplies
• Use over-voltage protection for power supplies and fuses at critical locations
• Confirm modules are mounted with the correct electrical pin configurations as specified
• Ensure that all operational and assembly equipment is properly grounded with no loose connections (which can lead to intermittent connections)