IBM Security QRadar
Version 7.1.0 (MR1)
Adaptive Log Exporter Users Guide
Note: Before using this information and the product that it supports, read the information in “Notices and Trademarks” on page page 119.
© Copyright IBM Corp. 2012, 2013 All Rights Reserved US Government Restricted Rights - Use, duplication or disclosure restricted by GSA ADP Schedule Contract with IBM Corp.
C
ONTENTS
A
BOUTT
HISG
UIDEIntended Audience . . . 5
Conventions . . . 5
Technical Documentation. . . 6
Contacting Customer Support . . . .6
1
O
VERVIEW Using the Adaptive Log Exporter . . . .8Using the Menu. . . 9
Using the Toolbar . . . 9
Using the Preferences Window . . . 11
2
I
NSTALLING THEA
DAPTIVEL
OGE
XPORTER Before You Begin . . . 13Installing the Adaptive Log Exporter . . . .14
Installing and Configuring ALE Using the CLI . . . .15
Basic Adaptive Log Exporter CLI Installation . . . .16
Advanced Installation with Windows Event Log Monitoring . . . .17
Adaptive Log Exporter CLI Utility Examples . . . .19
Uninstalling the Adaptive Log Exporter . . . .21
3
C
ONFIGURINGA
DAPTIVEL
OGE
XPORTERU
PDATES Configuring the Update Site. . . .23Configuring Updates for Off-line Sites . . . .25
Scheduling Automatic Updates . . . .26
Configuring Automatic Update Preferences. . . .27
4
M
ANAGINGD
ESTINATIONS Configuring Destinations . . . .29Adding a Syslog TCP Destination. . . .30
Adding a Syslog UDP Destination . . . .31
Adding a Logger Destination . . . .32
Editing a Destination. . . 33
5
C
ONFIGURINGC
ISCOACS
Configuring Cisco ACS. . . 35 Configuring the Cisco ACS Device Plug-in . . . 35 Creating a Device Mapping. . . 36
6
C
ONFIGURING THEC
ISCOCSA D
EVICEConfiguring Cisco CSA. . . 39 Configuring the Cisco CSA Device Plug-in . . . 39 Creating a Device Mapping. . . 41
7
C
ONFIGURING AF
ILEF
ORWARDERD
EVICEConfiguring a File Forwarder . . . 44 Configuring the File Forwarder Device Plug-in . . . 44 Creating a Device Mapping. . . 46
8
C
ONFIGURING THEXML F
ILEF
ORWARDERD
EVICEConfiguring an XML File Forwarder . . . 47 Configuring the XML File Forwarder Device Plug-in . . . 48 Creating a Device Mapping. . . 50
9
C
ONFIGURINGJ
UNIPERS
TEEL-B
ELTEDR
ADIUS(SBR)
Configuring Juniper Steel-Belted Radius . . . 53 Configuring the Juniper SBR Device Plug-in. . . 53 Creating a Device Mapping. . . 55
10
C
ONFIGURING THEN
ETA
PPD
ATAONTAP D
EVICEConfiguring NetApp Data ONTAP . . . 57 Configuring the NetApp Data ONTAP Device Plug-in . . . 58 Creating a Device Mapping. . . 59
11
C
ONFIGURING THEW
INDOWSE
VENTL
OGD
EVICEConfiguring Windows Event Log . . . 62 Configuring the Windows Event Log Device Plug-in. . . 62 Creating a Device Mapping. . . 64
12
C
ONFIGURING THEM
ICROSOFTDHCP D
EVICEConfiguring a Microsoft DHCP Device . . . 67 Configuring the Windows DHCP Device Plug-in. . . 67 Creating a Device Mapping. . . 68
13
C
ONFIGURING THET
RENDM
ICROI
NTERS
CANV
IRUSW
ALLD
EVICE Configuring an Trend Micro Device . . . 71Creating a Device Mapping . . . .73
14
C
ONFIGURING THEM
ICROSOFTE
XCHANGES
ERVERD
EVICE Configuring Microsoft Exchange OWA. . . .76Enabling Exchange OWA Logs using IIS 6.x . . . .76
Enabling Exchange OWA Logs using IIS 7.x . . . .77
Configuring the Microsoft Exchange Server OWA Plug-in . . . .78
Creating a Device Mapping . . . .79
Forwarding Microsoft Exchange SMTP Logs. . . .79
Enabling Microsoft Exchange 2003 SMTP Logs . . . .80
Configuring the Microsoft Exchange Server SMTP Plug-in . . . .80
Creating a Device Mapping . . . .81
15
C
ONFIGURING THEM
ICROSOFTSQL S
ERVERD
EVICE Configuring a Microsoft SQL Server Device . . . .83Configuring the Microsoft SQL Device Plug-in . . . .84
Creating a Device Mapping . . . .85
16
C
ONFIGURING THEM
ICROSOFTIIS D
EVICE Configuring a Microsoft IIS Server Device . . . .88Configuring the Microsoft IIS Server Device Plug-in. . . .88
Creating a Device Mapping . . . .90
17
C
ONFIGURING THEM
ICROSOFTW
INDOWSIAS D
EVICE Configuring a Microsoft IAS Device . . . .91Configuring the Windows IAS Device Plug-in. . . .92
Creating a Device Mapping . . . .93
18
C
ONFIGURING THEM
ICROSOFTISA D
EVICE Configuring Windows ISA . . . .95Configuring the Windows ISA Device Plug-in. . . .96
Creating a Device Mapping . . . .97
A
A
DAPTIVEL
OGE
XPORTERT
ROUBLESHOOTING Troubleshooting Files. . . 99Enabling Debug Mode . . . 100
Enabling Debug Mode . . . .100
Restarting the Adaptive Log Exporter Service . . . .101
Update Site Unreachable. . . .101
Verifying Devices are Creating Events. . . .102
Creating a Logger Destination . . . .103
Deleting a Logger Destination . . . .104
Example: Remote Permissions . . . 106
Example: Event Per Second Overload . . . 107
Example: Unexpected Value in Payload . . . 107
Enabling the Print Spooler . . . 107
Launching the Adaptive Log Exported in Windows 2008R2. . . 108
B
U
PDATINGR
EMOTEW
INDOWSE
VENTL
OGD
EVICESU
SING THECLI
Patching the Windows Event Log Device . . . 109Updating a Windows Event Log Configuration . . . .110
Updating Examples . . . .112
C
S
UPPORTEDD
EVICEP
LUG-
INSD
N
OTICES ANDT
RADEMARKS Notices . . . .119A
BOUT
T
HIS
G
UIDE
The Adaptive Log Exporter Guide for IBM Security QRadar SIEM provides you with information for configuring device plug-ins and receiving events from Windows hosts within your network.
Intended Audience
This guide is intended for the system administrator responsible for setting up the Adaptive Log Exporter in your network. This guide assumes that you have QRadar SIEM administrative access and a knowledge of your corporate network and networking technologies.Conventions
The following conventions are used throughout this guide: Indicates that the procedure contains a single instruction.NOTE Indicates that the information provided is supplemental to the associated feature
or instruction.
CAUTION
Indicates that the information is critical. A caution alerts you to potential loss of data or potential damage to an application, system, device, or network.
WARNING
Indicates that the information is critical. A warning alerts you to potential dangers, threats, or potential personal injury. Read any and all warnings carefully before proceeding.
Adaptive Log Exporter User Guide
6 ABOUT THIS GUIDE
Technical
Documentation
For information on how to access more technical documentation, technical notes, and release notes, see the Accessing IBM Security QRadar Documentation Technical Note.(http://www.ibm.com/support/docview.wss?rs=0&uid=swg21614644)
Contacting
Customer Support
For information on contacting customer support, see the Technical Note. Support and Download (http://www.ibm.com/support/docview.wss?rs=0&uid=swg21612861)1
O
VERVIEW
The Adaptive Log Exporter is an independent application that runs on a
Windows-based host, that is capable of collecting Windows-based or third party device logs and forwarding events to your QRadar SIEM Console or Event Collector. Each installation of the Adaptive Log Exporter uses an Adaptive Log Exporter service to forward events to QRadar SIEM.
NOTE The Adaptive Log Exporter supports a maximum of 20 devices per installation.
The Adaptive Log Exporter supports two installation configurations:
• Local - The Adaptive Log Exporter is installed locally on every host in your network. Each individual host supporting the Adaptive Log Exporter is
responsible for collecting local event logs from the local host and forwarding the events to QRadar SIEM. Local installations require more effort to install and configure, but does not impact performance on the host system as much as collecting logs from remote Windows-based workstations.
• Remote - The Adaptive Log Exporter is installed on a single host and configured to poll remote Windows-based operating systems for their event logs. Remote event collection is only supported using the Windows Event Log device plug-in, but allows the collection of event logs from multiple Windows servers or workstations. Collecting logs from a Windows system requires using NETBIOS, which is a relatively slow method of communication. Therefore, remotely collecting logs from several Windows-based hosts can cause a significant performance impact for the server hosting the Adaptive Log Exporter.
NOTE The Window Event Log is the only Adaptive Log Exporter device plug-in that
Adaptive Log Exporter Users Guide
8 OVERVIEW
The Adaptive Log Exporter supports remote polling of event logs from the following operating systems:
- Microsoft Windows 2000 - Microsoft Windows 2003 server - Microsoft Windows 2008 server - Microsoft Windows XP
- Microsoft Windows 7
NOTE Remote event collection in a one-to-many configuration requires the Adaptive Log
Exporter to be configured with domain administration credentials to access remote event logs. Supplying these credentials can be considered a security risk. For more information, see Configuring Adaptive Log Exporter Service
Credentials.
Both methods of event collection result in information being transmitted to QRadar using syslog. By default, QRadar automatically discovers and normalizes Windows event logs.
After receiving events from the Adaptive Log Exporter, QRadar can analyze, report, and store the information. To verify that your Windows logs are being processed by QRadar, use the search function in the Log Activity tab to filter by the source or destination IP addresses of the devices configured in your Adaptive Log Exporter. For more information on filtering for events using the Log Activity tab, see the QRadar Users Guide.
Using the Adaptive
Log Exporter
The Adaptive Log Exporter provides a number of menu, tool bar, and preference options. This section provides information on the following topics:• Using the Menu • Using the Toolbar
Using the Adaptive Log Exporter 9
Using the Menu The Adaptive Log Exporter includes the following menu options:
Using the Toolbar The toolbar provides the following buttons: Table 1-1 Adaptive Log Exporter Menu Options
Menu Sub-Menu Description
File Save Allows you to save current changes.
Save All Allows you to save all changes made during the current session.
Deploy Allows you to deploy all changes made during the current session.
Preferences Allows you to configure Adaptive Log Exporter preferences. For more information, see
Configuring Adaptive Log Exporter Updates. Exit Allows you to exit the application.
Edit Edit Device Allows you to edit the settings for a currently saved device.
Edit Destination Allows you to edit the mapping destination for a device. For more information, see Managing Destinations.
Window Show Views Allows you to view the Destination or Devices tabs.
Help Software
Updates Allows you to check for software updates. For more information, see Configuring Adaptive Log Exporter Updates.
About Allows you to view the Adaptive Log Exporter version information.
Table 1-2 Toolbar Options
Icon Description
Save Allows you to save the current device or destination tab. Tabs with unsaved changes are indicated with an asterisks (*) symbol.
Save All Allows you to save all device or destination tabs that contain changes.
Tabs with unsaved changes are indicated with an asterisks (*) symbol.
Edit Device Allows you to edit the settings of the selected device.
This toolbar button is only available when you select a device that has been previously saved on the Devices tab.
Edit
Destination Allows you to edit the destination for a device. This toolbar button is only available when you select a destination that has been previously saved on the Destination tab.
Adaptive Log Exporter Users Guide
10 OVERVIEW
Deploy Allows you to deploy all changes made during the current session. This toolbar button is available after you have saved a device configuration or destination.
Add Plugins Allows you to manually check for updated device plug-ins using the Install/Update site you configured in the preferences for the Adaptive Log Exporter.
If you receive an error that states the update site is invalid, you must configure the update site in the Adaptive Log Exporter preferences. For more information, see Configuring the Update Site.
Table 1-2 Toolbar Options (continued)
Using the Adaptive Log Exporter 11
Using the
Preferences Window The Preferences window provides the following options:
NOTE If you change the default values of the Adaptive Log Exporter and you want to
restore default values, select File > Preferences, and then click Restore Defaults.
Table 1-1 Preference Options
Menu Sub-Menu Description
Help We recommend that you use the default
values for the Help options.
Install/Update Select this option to configure your update options. For more information, see
Configuring Automatic Update Preferences.
Automatic Updates Select this option to schedule device and application plug-in updates to your Adaptive Log Exporter. For more information, see Scheduling Automatic Updates.
Update Site Select this option to configure the directory path or website the Adaptive Log Exporter uses for updates to download updated plug-ins. For more information, see Configuring the Update Site.
2
I
NSTALLING THE
A
DAPTIVE
L
OG
E
XPORTER
The Adaptive Log Exporter supports two methods of installation:
• Standard - A standard Adaptive Log Exporter installation is a guided installation on the local host using an install wizard.
• Command Line - The command line installation (CLI) allows you to use advanced installation parameters for remotely installing the Adaptive Log Exporter or configuring Windows events.
Note: The Adaptive Log Exporter does not support packaging of a bulk installer, but does provide the command line for remote bulk installations, which can be scripted. If you require assistance on packaging methods, please contact IBM Professional Services.
This section includes the following topics: • Adaptive Log Exporter system requirements • Installing the Adaptive Log Exporter
• Installing and Configuring ALE Using the CLI • Uninstalling the Adaptive Log Exporter
Adaptive Log
Exporter system
requirements
Before you begin installing the Adaptive Log Exporter, you must ensure the Windows-based host of the Adaptive Log Exporter meets the following requirements:
• The Adaptive Log Exporter can be installed on the following 32-bit or 64-bit operating systems:
- Windows 2000 - Windows 2003 server - Windows 2008 server - Windows 2008R2 server - Windows XP
- Windows 7
• 8GB of RAM (2GB reserved for the WinCollect agent) • Intel Core 2 Duo processor 2.0 GHz or better
Adaptive Log Exporter Users Guide
14 INSTALLING THE ADAPTIVE LOG EXPORTER
• 3 GB of available disk space for software and log files • At minimum, 20% of the available processor resources
• The print spooler service must be enabled on each system that hosts an installation of the Adaptive Log Exporter software.
Installing the
Adaptive Log
Exporter
Before installing the Adaptive Log Exporter using the installation wizard, close all active applications.
Procedure
Step 1 Download the AdaptiveLogExporter_setup.exe file from the IBM Support website. https://www.ibm.com/support
Step 2 Copy the Adaptive Log Exporter setup file to your Windows-based host system.
Step 3 Double-click the setup file to launch the installation wizard.
Step 4 Click Next.
The End User License Agreement (EULA) is displayed.
Step 5 Read the license agreement information in the window and select I accept the agreement to continue.
If you select I do not accept the agreement, you cannot continue with the installation.
Step 6 Click Browse or type the installation location for the Adaptive Log Exporter.
Step 7 From the list box, select Full installation. This option installs the following components:
• ALE Windows Service - Mandatory. This option installs the Adaptive Log Exporter service, which is required to forward events to QRadar SIEM. • ALE Configuration User Interface - Select this check box to Install the
Adaptive Log Exporter user interface. Clearing this check box installs the Adaptive Log Exporter without the user interface and requires text-based configuration files.
Note: Installing the Adaptive Log Exporter without the user interface is intended for advanced users only. For additional information, see Installing and Configuring ALE Using the CLI.
Step 8 Click Next.
Step 9 Type a name for the Adaptive Log Exporter Start menu folder.
If you do not want to include an Adaptive Log Exporter folder in your Start menu, select the Don’t create a Start Menu folder check box.
Step 10 Click Next.
Installing and Configuring ALE Using the CLI 15
• Create a desktop icon - Select this check box to create an icon on your desktop for the Adaptive Log Exporter. You can also select one of the following options:
- For all users - Select this check box to install a desktop icon for all users. - For the current user only - Select this check box to install a desktop icon for
the logged in user.
• Create a Quick Launch icon - Select the check box to create an icon on your Quick Launch toolbar.
• Run service now - Select the Run Service Now check box to launch the Q1WindowsAgent service after the installation is complete.
Step 12 Click Next.
Step 13 Click Install.
Step 14 Click Finish.
Note: If an error occurs when attempting to launch the Adaptive Log Exporter, you must run the program using the Run as administrator option or set the
compatibility mode in Windows. For more information on troubleshooting your installation, see Adaptive Log Exporter Troubleshooting.
When the installation process completes, you must configure the location that the Adaptive Log Exporter uses for updates. These updates download the latest device plug-ins for the Adaptive Log Exporter. For more information, see Configuring the Update Site.
Installing and
Configuring ALE
Using the CLI
The command line interface (CLI) allows you to install, uninstall, and update devices for the Adaptive Log Exporter without the installation wizard. This
document provides information on using the command line interface (CLI) and the available options. The command line interface allows you to update or deploy your Adaptive Log Exporter to multiple remote systems using third-party products that provide remote or batch installs, for example, MSI Packaging Tools,
Message-Oriented Middleware (MOM), or System Center Configuration Manager (SCCM).
The procedures in this document assume an advanced knowledge of network administration.
This section includes the following topics: • Basic Adaptive Log Exporter CLI Installation
• Advanced Installation with Windows Event Log Monitoring • Uninstalling the Adaptive Log Exporter
Adaptive Log Exporter Users Guide
16 INSTALLING THE ADAPTIVE LOG EXPORTER Basic Adaptive Log
Exporter CLI Installation
To install the Adaptive Log Exporter using a CLI: Procedure
Step 1 Download the Adaptive Log Exporter setup file from the IBM support website:
https://www.ibm.com/support
After you download the Adaptive Log Exporter, you must decide on a distribution method to deploy the Adaptive Log Exporter to remote systems in your network.
Step 2 Close all other active applications before installing the Adaptive Log Exporter.
Step 3 From your desktop, select Start > Run.
Step 4 Type the following command:
cmd
Step 5 Click OK.
Step 6 Navigate to the download directory of the Adaptive Log Exporter. Step 7 In the CLI, type the following command:
AdaptiveLogExporter_setup.exe /SP- /VERYSILENT /SUPPRESSMSGBOXES
Note: For additional installation parameters, see Table 2-1.
The SP-, VERYSILENT, and SUPPRESSMSGBOXES parameters are required parameters for a silent installation without launching the installation wizard or when using optional installation parameters. Installation commands must be run from the directory containing the Adaptive Log Exporter setup file.
Step 8 Configure optional installation parameters. Table 2-1 Optional installation parameters
Parameter Description
/DIR Type the fully qualified path name to specify a non-standard
installation directory for the Adaptive Log Exporter. For example,
/DIR=”D:\Windows Event Tools”
If you do not specify a directory for the installation, the Adaptive Log Exporter is installed in the Program Files or Program Files (x86) directory.
Installing and Configuring ALE Using the CLI 17
Advanced Installation with Windows Event Log Monitoring
The default installation of the Adaptive Log Exporter only includes two device plug-ins: Windows Event Log and the File Forwarder plug-in.
The advanced installation parameters for the Adaptive Log Exporter command line allow you to configure a Windows Event Log device plug-in during the installation. The advanced installation commands are typically used to install the Adaptive Log Exporter on the remote Windows host to monitor Windows events from the installation location.
Procedure
Step 1 Copy the AdaptiveLogExporter_setup.exe to the remote location.
Step 2 From the desktop of the remote machine, select Start > Run. The Run window is displayed.
Step 3 Type the following command:
/COMPONENTS Type the following command to specify individual components
you want to install. The options include:
• main - Allows you to install the Adaptive Log Exporter service without the configuration wizard.
For example, /COMPONENT=main
• ui - Allows you to install the configuration wizard with the Adaptive Log Exporter service.
For example, /COMPONENT=main,ui
If you do not include the component parameter, then the service and configuration wizard are installed.
/NOICONS Type the following command if you do not want to include the
Adaptive Log Exporter icon to display in your Start menu options. For example,
/NOICONS
/GROUP By default, the Start menu displays the application in a folder
named Adaptive Log Exporter. The group parameter allows you to define a new group name or add the icon to an existing group. For example,
/Group=”System” or
/Group=”Accessories\System Tools”
Note: If you specify an existing group name, the Adaptive Log Exporter icon is added to the existing folder or sub folder. Table 2-1 Optional installation parameters (continued)
Adaptive Log Exporter Users Guide
18 INSTALLING THE ADAPTIVE LOG EXPORTER
Step 4 Click OK.
The command line interface (CLI) is displayed.
Step 5 Navigate to the directory containing the AdaptiveLogExporter_setup.exe file.
Step 6 Type the following command to install the Adaptive Log Exporter using additional parameters, if required.
For example,
AdaptiveLogExporter_setup.exe /SP- /VERYSILENT /SUPPRESSMSGBOXES /COMPONENT=main
/MONITOR=”Application”,”Security”,”System”
/MONITORDEST=10.100.100.100:514 /MONITORPROTO=TCP /DEVICEADDRESS=%computername%
The example above installs the Adaptive Log Exporter service on the remote Windows host and configures the Windows Event Log. The Windows Event log collects application, security, and system logs from the local installation and forwards the events to the QRadar SIEM Console or Event Collector at 10.100.100.100 using TCP on port 514.
Table 2-2 Windows Event Log Monitoring Parameters
Parameter Description
/MONITOR Allows you to specify the list of event logs you want to monitor
on the Windows operating system. The following Windows event logs can be monitored:
• Application • Security • System
• **Directory Service • **DNS Server • **File Replication
The event log types must be separated using a comma-separated list.
For example,
/MONITOR=”Application”,”Security”,”System”,”Di rectory Service”,”DNS Server”
Note: The ** indicates that these Windows Event Logs can be configured using the command line to collected events, but the check boxes for these event types are not displayed in the configuration until you update your Windows Event Log device plug-in.
Installing and Configuring ALE Using the CLI 19
Adaptive Log Exporter CLI Utility Examples
This section provides additional examples of using the CLI utility including: • Batch File Command Line Install Script
• Full Adaptive Log Exporter Installation
• Installing the Adaptive Log Exporter Service Only
• Service Only Installation Monitoring the Windows Security Log • Full Install Monitoring Windows Logs
Batch File Command Line Install Script
The following batch file contains an example script you can use to install the Adaptive Log Exporter on a remote Windows host. You must download the associated installation files and create a Windows share. The script copies the
/MONITORDEST Allows you to specify the syslog destination that you want to
receive the events. The IP address you type should be the address of your QRadar SIEM Console or Event Collector. For example,
/MONITORDEST=10.100.100.100:514
If you do not specify a port number, the default of port 514 is used for forwarding syslog events.
/MONITORPROTO Allows you to select the protocol to use when sending syslog
events to QRadar SIEM. The protocol can be specified as TCP or UDP.
For example,
/MONITORPROTO=TCP
or
/MONITORPROTO=UDP
If this parameter is not defined, the Adaptive Log Exporter service defaults to sending events using UDP.
/DEVICEADDRESS Type the hostname or IP address for the device providing the
Windows events to QRadar SIEM. For example, /DEVICEADDRESS=10.100.100.100 or /DEVICEADDRESS=workstation102 or /DEVICEADDRESS=%COMPUTERNAME%
Note: The device address field allows you to include system variables for bulk installations of the Adaptive Log Exporter. For example, %computername%.
Table 2-2 Windows Event Log Monitoring Parameters (continued)
Adaptive Log Exporter Users Guide
20 INSTALLING THE ADAPTIVE LOG EXPORTER
source files from a Windows share, installs the Adaptive Log Exporter and the Windows Event Plug-in, and configures the host to forward all Microsoft Windows events to QRadar SIEM.
copy \\SERVER\SHARE\AdaptiveLogExporter_setup.exe c:\
copy \\SERVER\SHARE\ALE_WindowsEventLogPlugin_setup.exe c:\ FOR /F "usebackq" %%i IN (`hostname`) DO SET MYHOST=%%i AdaptiveLogExporter_setup.exe /SP- /VERYSILENT
/SUPPRESSMSGBOXES /NOICONS /COMPONENTS=main,ui
/MONITOR="Application","Security","System","Directory Service","DNS Server","File Replication Service"
/MONITORDEST=<QRadar SIEM IP>:514 /DEVICEADDRESS=%MYHOST% ALE_WindowsEventLogPlugin_setup.exe /SP- /VERYSILENT /SUPPRESSMSGBOXES /PATCHONLY
del c:\ALE_WindowsEventLogPlugin_setup.exe del c:\AdaptiveLogExporter_setup.exe
Where <QRadar SIEM IP> is the IP address or hostname of your QRadar SIEM
Console or Event Collector.
Note: The Directory Service, DNS Server, and File Replication events are
collected by the Adaptive Log Exporter; however, the configuration interface does not display the check boxes until after you update your device plug-ins.
Full Adaptive Log Exporter Installation
Using the command for the full install requires that you update your device plug-ins and configure devices. The above command installs the Adaptive Log Exporter only. To fully install the Adaptive Log Exporter, including the service and the wizard interface, type the following command:
AdaptiveLogExporter_setup.exe /SP- /VERYSILENT /SUPPRESSMSGBOXES /COMPONENTS=main,ui
Installing the Adaptive Log Exporter Service Only
The Adaptive Log Exporter can be installed using the command line with or without the wizard interface. Installing the service only allows you to install the service remotely to forward events, but still requires additional parameters to forward Windows events to QRadar SIEM. To install the Adaptive Log Exporter service only, type the following command:
AdaptiveLogExporter_setup.exe /SP- /VERYSILENT /SUPPRESSMSGBOXES /COMPONENTS=main
Note: If you install the service without additional Windows Event Log parameters, you must update your devices using the
ALE_WindowsEventLogPlugin_setup.exe. For more information, see Updating a Windows Event Log Configuration.
Uninstalling the Adaptive Log Exporter 21
Service Only Installation Monitoring the Windows Security Log
To install the Adaptive Log Exporter service without the configuration wizard and monitor Windows security logs for the local host, type the following command:
AdaptiveLogExporter_setup.exe /SP- /VERYSILENT
/SUPPRESSMSGBOXES /COMPONENTS=main /MONITOR=”Security”
/MONITORDEST=10.10.100.100 /DEVICEADDRESS=Device hostname or IP address
Note: In the example above, QRadar SIEM is located at IP address 10.10.100.100.
Full Install Monitoring Windows Logs
To fully install the Adaptive Log Exporter, including the configuration wizard and preconfigure a Windows Security Logs, type the following command:
AdaptiveLogExporter_setup.exe /SP- /VERYSILENT
/SUPPRESSMSGBOXES /COMPONENTS=main,ui /MONITOR=”Security”, “Application”, “System” /MONITORDEST=10.10.100.100
/DEVICEADDRESS=%COMPUTERNAME%
The command line installs the Adaptive Log Exporter, and then configures the Security, Application, and System logs.
Uninstalling the
Adaptive Log
Exporter
To uninstall the Adaptive Log Exporter using a CLI:
Step 1 Close all active applications on the Windows host.
Step 2 On your desktop, select Start > Run. The Run window is displayed.
Step 3 Type the following:
cmd
Step 4 Click OK.
The command line interface (CLI) is displayed.
Step 5 Navigate to the download directory of the Adaptive Log Exporter.
Step 6 In the CLI, type the following:
unins000.exe /SILENT /VERYSILENT
Windows 2008 and Windows 7 Operating Systems can require user intervention to accept the User Account Control (UAC) prompt before the uninstall can complete. For more information about UAC settings, see your Microsoft Operating System documentation.
If the command fails to uninstall the Adaptive Log Exporter, you must verify the name of the uninstall file is correct. The uninstall can be named .
Adaptive Log Exporter Users Guide
3
C
ONFIGURING
A
DAPTIVE
L
OG
E
XPORTER
U
PDATES
After you have installed the Adaptive Log Exporter, you must complete the following configuration steps to update your device plug-ins:
1 Configure the update site to install device plug-ins for the Adaptive Log Exporter. If your host does not have Internet connectivity, see Configuring Updates for Off-line Sites.
2 Optional. Configure a schedule to look for updated device plug-ins.
3 Optional. Configure preferences for future plug-in updates.
Configuring the
update site
The update site allows you to specify a download location for device plug-in files required by the Adaptive Log Exporter. Device plug-ins are important because they contain updates for parsing events and can include new event types or event categories.Proocedure
Step 1 From the Start menu, select Programs > Adaptive Log Exporter > Configure Adapter Log Exporter.
Step 2 On the main menu, select File > Preferences.
Step 3 Click the + icon to expand the Install/Update navigation tree.
Step 4 On the navigation menu, select Update Site.
Step 5 In the Update Site URL field, type the location of your update site file. For example,
• To update from the Internet, type a URL:
http://downloads.q1labs.com/windowsagent
• To update from a Windows share, type the path to your server:
file://<SOMEWINDOWSSERVER>/ALE/UpdateSite
• To update from a local file, type the path to the file:
Adaptive Log Exporter Users Guide
24 CONFIGURING ADAPTIVE LOG EXPORTER UPDATES
Note: If you choose a Windows server or local file, you must download the ALEUpdateSite.zip file from the IBM Support website and extract the file to a Windows share or file repository. The update site file is located at the following address: http://www.ibm.com/support/fixcentral/. For more information, see Configuring Updates for Off-line Sites.
Step 6 Click Apply. Step 7 Click OK.
Step 8 On the toolbar, click Add Plugins.
Step 9 Click the + to expand the device list.
Step 10 Choose one of the following options:
a To install all available device plug-ins, select the top level check box.
b To install specific device plug-ins, select a check box for each device plug-in to install.
Note: The Show the latest version of a feature only and the Filter features included in other features on the list check boxes are for future development purposes only. We recommend that you use the default values for these check boxes.
Step 11 To install all dependent plug-ins, click Select Required.
If you selected device plug-ins that requires additional software an error can display. Click Error Details for additional information.
Step 12 Click Next.
Step 13 Read the license associated with the selected device. To continue, you must select the I accept the terms of the license agreement option.
Step 14 Click Next.
Note: You must install your device plug-ins to the default location.
Step 15 Click Finish.
Step 16 Click Install All to install all chosen devices.
After the device plug-in installations complete, you are ready to configure your syslog destination. For more information, see Managing Destinations.
Configuring
updates for off-line
sites
The Adaptive Log Exporter might be configured on a host that does not have Internet connectivity.
Hosts without Internet connectivity is often the case when the Adaptive Log Exporter is used on hardened network assets. For these systems we recommend you download and configure a local site for updating the Adaptive Log Exporter device plug-ins.
Configuring updates for off-line sites 25
Procedure
Step 1 From a system with Internet connectivity, download the ALEUpdateSize.zip file. http://www.ibm.com/support/fixcentral/
Step 2 Copy the file to the Adaptive Log Exporter host or a local Windows share.
Step 3 Extract the file.
You must keep the folder and directory structure intact when you extract the ALEUpdateSize.zip file.
Step 4 From the Start menu, select Programs > Adaptive Log Exporter > Configure Adapter Log Exporter.
Step 5 From the main menu, select File > Preferences.
Step 6 Click the + icon to expand the Install/Update navigation tree.
Step 7 From the navigation menu, select Update Site.
Step 8 In the Update Site URL field, type the location of your update site file.
For example,
• To update from a Windows share, type the path to your server:
file://<SOMEWINDOWSSERVER>/ALE/UpdateSite
• To update from a local file, type the path to the file:
file:///e:/UpdateSite
Step 9 Click Apply. Step 10 Click OK.
Step 11 From the toolbar, click Add Plugins.
Step 12 Click the + to expand the device list.
Step 13 Choose one of the following options:
a To install all available device plug-ins, select the top level check box.
b To install specific device plug-ins, select a check box for each device plug-in to install.
Note: The Show the latest version of a feature only and the Filter features included in other features on the list check boxes are for future development purposes only. We recommend that you use the default values for these check boxes.
Step 14 To install all dependent plug-ins, click Select Required.
If you selected device plug-ins that requires additional software an error can display. Click Error Details for additional information.
Step 15 Click Next.
The Feature License window is displayed.
Step 16 Read the license associated with the selected device. To continue, you must select the I accept the terms of the license agreement option.
Adaptive Log Exporter Users Guide
26 CONFIGURING ADAPTIVE LOG EXPORTER UPDATES
Step 17 Click Next.
Note: You must install your devices to the default location. Therefore, do not change the Install Location for your devices.
Step 18 Click Finish.
Step 19 Click Install All to install all chosen devices.
After the device plug-in installations complete, you are ready to configure your syslog destination. For more information, see Managing Destinations.
Scheduling
Automatic Updates
You can configure the Adaptive Log Exporter to automatically search for device plug-in updates. Device plug-in updates are important because they often contain event parsing updates and can include new event types or event categories. ProcedureStep 1 From the Start menu, select Programs > AdaptiveLogExporter > Configure Adapter Log Exporter.
Step 2 On the toolbar, select File > Preferences.
Step 3 In the navigation manu, click the + sign next to Install/Update.
Step 4 Click Automatic Updates.
Step 5 Select the Automatically find new updates and notify me check box.
Step 6 Select one of the following options to schedule automatic updates:
• Look for updates each time platform is started - Enables the system to search for updates each time you start your Adaptive Log Exporter. This is the default.
• Look for updates on the following schedule - Allows you to schedule a specific time for searching for updates.
Step 7 Select one of the following options for downloading updates:
• Search for updates and notify me when they are available - Enables notifications when device updates are available.
• Download new updates automatically and notify me when ready to install them - Enables the system to download updates automatically and notifies you when the updates are ready to install.
Step 8 Click Apply.
Step 9 Click OK.
Configuring automatic update preferences 27
Configuring
automatic update
preferences
After you have updated your device plug-ins, you can define the content installed in future device plug-in updates.
Procedure
Step 1 From the Start menu, select Programs > Adaptive Log Exporter > Configure Adapter Log Exporter.
Step 2 From the main menu, select File > Preferences.
Step 3 Click Install/Update.
Step 4 In the Maximum number of History configurations field, type the number of configuration changes you want the system to maintain. The default is 100.
Step 5 Select the Check digital signatures of downloaded archives check box. By default, this check box is selected to prevent unauthorized or unsigned signatures from being installed.
Step 6 Select one of the following update options:
• equivalent - Equivalent updates include device plug-ins that are at the same revision level as your Adaptive Log Exporter application.
• compatible - Compatible updates include any device plug-ins that work with your Adaptive Log Exporter regardless of the software revision of the device plug-in.
Step 7 To define a specific update policy, specify a URL in the Policy URL field. This update policy is useful if your deployment includes many Adaptive Log Exporters. If this is the case, you might need to schedule event uploads to
minimize the potential high load on the network. For assistance creating a custom update policy, contact IBM Corp. Customer Support.
Step 8 To define specific proxy settings for your updates:
a Select the Enable HTTP Proxy connection check box.
b In the HTTP proxy host address field, type the IP address of the desired proxy host.
c In the HTTP proxy host port field, type the port number of the proxy host.
Step 9 Click Apply.
4
M
ANAGING
D
ESTINATIONS
Destinations in the Adaptive Log Exporter allow you to create a syslog forwarding destination for events and map specific devices to the destination address. This allows you to create unique destinations for each of the device plug-ins in your network, but in most cases, you only need to map your devices directly to your QRadar SIEM Console or Event Collector. The Adaptive Log Exporter allows you to create three types of destinations:
• Syslog TCP - Allows you to forward syslog events using the TCP protocol on the port of your choosing.
• Syslog UDP - Allows you to forward syslog events using the UDP protocol on the port of your choosing.
• Logger - Allows you to log events to a local file on the Adaptive Log Exporter host.
Configuring
destinations
The destination provides the Adaptive Log Exporter with an event forwarding destination for event logs. You must configure the destination before you configure individual device plug-ins for the Adaptive Log Exporter. These destinations are then mapped to the device plug-in, which allows each device to forward events to the appropriate destination.This section includes the following topics: • Adding a Syslog TCP Destination • Adding a Syslog UDP Destination • Adding a Logger Destination • Editing a Destination
Adaptive Log Exporter Users Guide
30 MANAGING DESTINATIONS Adding a syslog TCP
destination The following instructions include the steps required to create a destination address or log file of events for the Adaptive Log Exporter. You can create an individual destination or multiple destinations and save them all simultaneously from the toolbar.
As you open tabs for devices or destinations, unsaved changes display the * character next to their name. If you select Save All from the toolbar, this saves all open tabs with changes. Issues that prevent the tab from saving generate an error message and the * character is still displayed on the tab.
Procedure
Step 1 From the Start menu, select Programs > Adaptive Log Exporter > Configure Adapter Log Exporter.
Step 2 Click the Destinations tab.
The Destinations tab is displayed showing the three destination types that can be created.
Step 3 Right-click on a destination type and select Add Destination.
Step 4 Configure the following values:
Step 5 Click Save.
Step 6 Click Deploy.
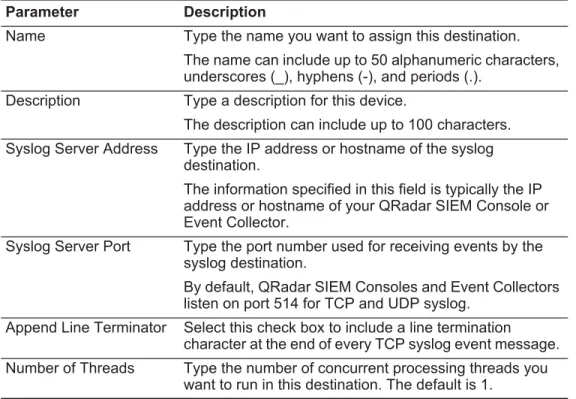
The configuration is complete for your TCP protocol destination. Table 4-1 Syslog TCP parameters
Parameter Description
Name Type the name you want to assign this destination. The name can include up to 50 alphanumeric characters, underscores (_), hyphens (-), and periods (.).
Description Type a description for this device.
The description can include up to 100 characters. Syslog Server Address Type the IP address or hostname of the syslog
destination.
The information specified in this field is typically the IP address or hostname of your QRadar SIEM Console or Event Collector.
Syslog Server Port Type the port number used for receiving events by the syslog destination.
By default, QRadar SIEM Consoles and Event Collectors listen on port 514 for TCP and UDP syslog.
Append Line Terminator Select this check box to include a line termination character at the end of every TCP syslog event message. Number of Threads Type the number of concurrent processing threads you
Configuring destinations 31
Adding a syslog UDP
destination The following instructions include the steps required to create a syslog destination for UDP events. You can create an individual destination or create multiple destinations, and then save them simultaneously from the toolbar.
As you open tabs for devices or destinations, unsaved changes display the * character next to their name. If you select Save All from the toolbar, this saves all open tabs with changes. Issues that prevent the tab from saving generate an error message and the * character is still displayed on the tab.
CAUTION: We recommend that you configure a TCP syslog destination if the event payload for your device exceeds 1024 bytes.
Procedure
Step 1 From the Start menu, select Programs > Adaptive Log Exporter > Configure Adapter Log Exporter.
Step 2 Click the Destinations tab.
The Destinations tab is displayed showing the three destination types that can be created.
Step 3 Right-click on Syslog UDP and select Add Destination.
Step 4 Configure the following values:
Step 5 Click Save. Step 6 Click Deploy.
The configuration is complete for your UDP protocol destination. Table 4-1 Syslog UDP parameters
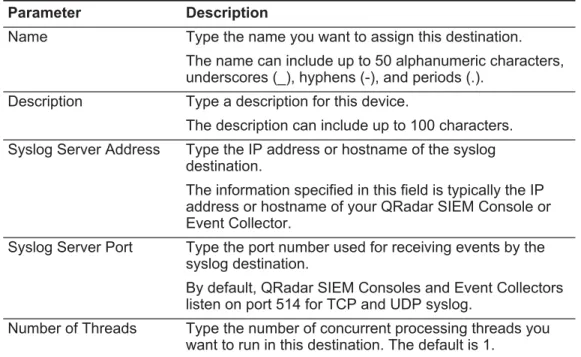
Parameter Description
Name Type the name you want to assign this destination. The name can include up to 50 alphanumeric characters, underscores (_), hyphens (-), and periods (.).
Description Type a description for this device.
The description can include up to 100 characters. Syslog Server Address Type the IP address or hostname of the syslog
destination.
The information specified in this field is typically the IP address or hostname of your QRadar SIEM Console or Event Collector.
Syslog Server Port Type the port number used for receiving events by the syslog destination.
By default, QRadar SIEM Consoles and Event Collectors listen on port 514 for TCP and UDP syslog.
Number of Threads Type the number of concurrent processing threads you want to run in this destination. The default is 1.
Adaptive Log Exporter Users Guide
32 MANAGING DESTINATIONS Adding a logger
destination The following instructions include the steps required to create a logger destination for the Adaptive Log Exporter. Note: As you open tabs for devices or destinations, unsaved changes display the * character next to their name. If you select Save All from the toolbar, this saves all open tabs with changes. Issues that prevent the tab from saving generate an error message and the * character is still displayed on the tab.
Procedure
Step 1 From the Start menu, select Start > Programs > Adaptive Log Exporter >
Configure Adapter Log Exporter.
Step 2 Click the Destinations tab.
The Destinations tab is displayed showing the three destination types that can be created.
Step 3 Right-click on Logger and select Add Destination.
Step 4 Configure the following values:
Step 5 Click Save. Step 6 Click Deploy.
The configuration is complete for your logger destination.
Editing a destination To edit a destination: Procedure
Step 1 From the Start menu, select Programs > Adaptive Log Exporter > Configure Adapter Log Exporter.
Step 2 Click the Destinations tab.
Step 3 Click the + sign to expand the menu tree for your destination.
Table 4-1 Logger parameters
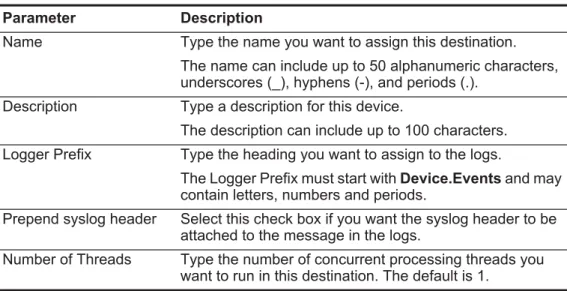
Parameter Description
Name Type the name you want to assign this destination. The name can include up to 50 alphanumeric characters, underscores (_), hyphens (-), and periods (.).
Description Type a description for this device.
The description can include up to 100 characters. Logger Prefix Type the heading you want to assign to the logs.
The Logger Prefix must start with Device.Events and may contain letters, numbers and periods.
Prepend syslog header Select this check box if you want the syslog header to be attached to the message in the logs.
Number of Threads Type the number of concurrent processing threads you want to run in this destination. The default is 1.
Configuring destinations 33
Step 4 Select your destination and click Edit Destination.
Step 5 Update your destination parameters.
Step 6 Click Save. Step 7 Click Deploy.
The new event destination changes are complete. The device plug-ins mapped to the edited destination should start arriving with the new parameters after the deploy process completes.
Deleting a
destination To delete a destination: Procedure
Step 1 From the Start menu, select Programs > Adaptive Log Exporter > Configure Adapter Log Exporter.
Step 2 Click the Destination tab.
Step 3 Click + to expand the menu tree for your destination.
Step 4 Right-click on the destination name and select Delete Destination.
Step 5 Click OK. Step 6 Click Save.
5
C
ONFIGURING
C
ISCO
ACS
The Adaptive Log Exporter monitors all comma-separated value log files from the root log directory you define when configuring the device plug-in.
Before you can configure any device plug-in for the Adaptive Log Exporter, you must complete the following steps from previous chapters:
1 Configure the Adaptive Log Exporter update site.
2 Configure a destination for your Cisco ACS events.
If these steps are complete, you are ready to configure your Cisco ACS device plug-in and map your device to a destination.
Configuring Cisco
ACS
The Cisco ACS device plug-in allows you to configure the root log directory for your comma-separated log files, configure polling options, and create a name and IP address to identify your device. After you configure your device, you can map your Cisco ACS to a syslog destination.To configure a Cisco ACS:
1 Add and configure a Cisco ACS device plug-in the Adaptive Log Exporter. For more information, see Configuring the Cisco ACS Device Plug-in.
2 Map the Cisco ACS device plug-in to a destination. For more information, see Creating a Device Mapping.
Configuring the Cisco ACS device plug-in
The Adaptive Log Exporter monitors all comma-separated value log files from the root log directory you define when configuring the device plug-in.
Procedure
Step 1 From the Start menu, select Programs > Adaptive Log Exporter > Configure Adapter Log Exporter.
Step 2 Click the Devices tab.
Step 3 Right click on Cisco ACS and select Add Device.
The device properties for adding new Cisco ACS device are displayed.
Adaptive Log Exporter Users Guide
36 CONFIGURING CISCO ACS
Step 5 Click Save.
You are now ready to map your Cisco ACS device to a syslog destination.
Creating a device
mapping After you have configured your device, you must map your device to a destination. Procedure
Step 1 Click the Destinations tab.
Step 2 Click + to expand the available destinations.
If no + exists, you need to create a destination. For more information, see Configuring Destinations.
Step 3 Right-click on a destination and select Add Device Mapping.
Step 4 A list of configured devices is displayed. Table 5-1 Cisco ACS plug-in parameters
Parameter Description
Name Type the name you want to assign this device.
The name can include up to 50 alphanumeric characters, underscores (_), hyphens (-), and periods (.).
Description Type a description for this device.
The description can include up to 100 characters.
Device Address Type the IP address or hostname for your Cisco ACS device. Root Log Directory Click Browse or type the location of the Cisco ACS log files. Cisco ACS monitors all comma-seperated value (csv) files in the Root Log Directory.
By default, Cisco ACS log files are located in <ACS Install Directory>\<Service Name>\Logs.
Where:
<ACS Install Directory> is the install directory of Cisco
ACS.
<Service Name> is the directory that identifies the Cisco
ACS service.
Note: Do not use the Cisco ACS device plug-in to monitor files that can only be accessed over the network, such as a file share.
Throttle timeout Type the delay between polling events, in milliseconds, for the Cisco ACS device. The default throttle timeout is 500 milliseconds. The minimum value is 10 milliseconds.
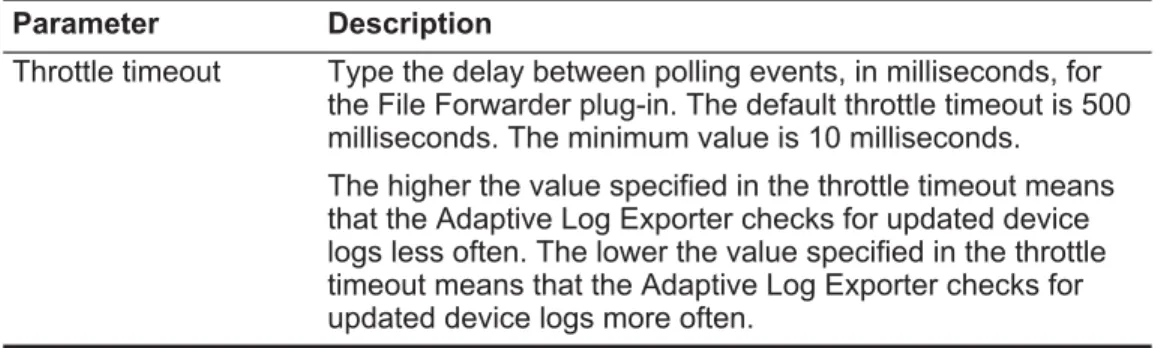
The higher the value specified in the throttle timeout means that the Adaptive Log Exporter checks for updated device logs less often. The lower the value specified in the throttle timeout means that the Adaptive Log Exporter checks for updated device logs more often.
Configuring Cisco ACS 37
Step 5 Select your Cisco ACS device.
A mapping is created for your Cisco ACS device to the destination.
Step 6 Click Save. Step 7 Click Deploy.
After the deploy process completes your events are forwarded from the Adaptive Log Exporter to QRadar SIEM. These events are automatically discovered and added as a log source using the name and IP address of your Cisco ACS device.
Step 8 Repeat this process to create and map additional Cisco ACS devices. The Cisco ACS configuration is complete.
6
C
ONFIGURING THE
C
ISCO
CSA
D
EVICE
Cisco Security Agents (CSA) provides security to your deployment to defend against the spread of attacks across networks and systems. These CSA devices enforce a set of policies provided by the Management Center (MC) for CSA devices and selectively applied to system nodes by the network administrator. Before you can configure any device plug-in for the Adaptive Log Exporter, you must complete the following steps from previous chapters:
1 Configure the Adaptive Log Exporter update site. 2 Configure a destination for your Cisco CSA events.
If these steps are complete, you are ready to configure your Cisco CSA device plug-in and map your device to a destination.
Configuring Cisco
CSA
The Cisco CSA device plug-in allows you to configure the root log directory for your active alert file, configure polling options, and create a name and IP address to identify your device. After you configure your device, you can map your Cisco CSA to a syslog destination.To configure Cisco CSA:
1 Add and configure a Cisco CSA device plug-in. For more information, see Configuring the Cisco CSA Device Plug-in.
2 Map the Cisco CSA device plug-in to a destination. For more information, see Creating a Device Mapping.
Configuring the Cisco CSA Device Plug-in
To configure your Cisco CSA in the Adaptive Log Exporter:
Step 1 From the Start menu, select Programs > Adaptive Log Exporter > Configure Adapter Log Exporter.
Step 2 Click the Devices tab.
Step 3 Right-click on Cisco CSA and select Add Device.
Adaptive Log Exporter Users Guide
40 CONFIGURING THE CISCO CSA DEVICE
Step 4 Configure the following parameters:
Step 5 Click Save.
Step 6 Repeat this process to create and configure additional Cisco CSA device plug-ins. You are now ready to map your Cisco CSA device to a syslog destination.
Table 6-1 Cisco CSA Plug-in Parameters
Parameter Description
Name Type the name you want to assign this device.
The name can include up to 50 alphanumeric characters, underscores (_), hyphens (-), and periods (.).
Description Type a description for this device.
The description can include up to 100 characters.
Device Address Type the IP address or hostname for your Cisco CSA device. Root Log Directory Click Browse or type the location of the CSA MC alert log
files. By default, the CSA alert log files are located in the following directory:
C:\alerts\
Note: Do not use the Cisco CSA device plug-in to monitor files that can only be accessed over the network, such as a file share.
Log Filename Type the name of the active alert log file. The Adaptive Log Exporter monitors this log file for events. The default value for the log file is logfile.txt.
Events are written to the active alert log file as a UTF-8 encoded text file in the Root Log Directory.
Note: This file data is encoded in UTF-8 format. Entry fields are separated by a comma. Event entries are separated by a carriage return/line feed (ASCII Hex 0D 0A). After a log file exceeds 1 MB in size, the file is closed and the file name is suffixed with a time stamp. A new file, using the same file name entered in the CSA MC Alerts Log file field, is then created. Events continue to be written to this new file until it reaches 1 MB.
Throttle timeout Type the delay between polling events, in milliseconds, for the Cisco CSA device. The default throttle timeout is 500 milliseconds. The minimum value is 10 milliseconds.
The higher the value specified in the throttle timeout indicates that the Adaptive Log Exporter checks for updated device logs less often. The lower the value specified in the throttle timeout indicates that the Adaptive Log Exporter checks for updated device logs more often.
Configuring Cisco CSA 41
Creating a Device
Mapping After you have configured your device, you must map your device to a destination. Procedure
Step 1 Click the Destinations tab.
Step 2 Click + to expand the available destinations.
If no + exists, you need to create a destination. For more information, see Configuring Destinations.
Step 3 Right-click on a destination and select Add Device Mapping.
Step 4 A list of configured devices is displayed.
Step 5 Select your Cisco CSA device.
A mapping is created for your Cisco CSA device to the destination.
Step 6 Click Save.
Step 7 Click Deploy.
After the deploy process completes your events are forwarded from the Adaptive Log Exporter to QRadar SIEM. These events are automatically discovered and added as a log source using the name and IP address of your Cisco CSA device.
Step 8 Repeat this process to map additional Cisco CSA devices. The Cisco CSA configuration is complete.
7
C
ONFIGURING A
F
ILE
F
ORWARDER
D
EVICE
The File Forwarder plug-in allows you to take an event log from an unsupported device or log type and forward the events to QRadar SIEM. The log files read by the File Forwarder device plug-in must be text based, single-line events. Multi-line events are not supported. After you configure the File Forwarded plug-in to forward the events to QRadar SIEM, you can create a Universal DSM to parse and categorize events.
We recommend you configure the File Forwarder device plug-in to use unique values of the Starts With and Ends With fields, if:
• Multiple devices are writing log files to the same root log directory.
• Your root log directory contains a mix of log files from devices that use the Continuously Monitor Files check box differently.
CAUTION
If a log file is copied to the Root Log Directory and overwrites an existing file, the events in the new file might not be properly forwarded to QRadar SIEM. The File Forwarder plug-in is intended to monitor existing files being appended or newly created event log files.
Before you can configure any device plug-in for the Adaptive Log Exporter, you must complete the following steps from previous chapters:
1 Configure the Adaptive Log Exporter update site. For more information, see Configuring the Update Site.
2 Configure a destination for your File Forwarder events. For more information, see Configuring Destinations.
If these steps are complete, you are ready to configure your Cisco CSA device plug-in and map your device to a destination.
Adaptive Log Exporter Users Guide
44 CONFIGURING A FILE FORWARDER DEVICE
Configuring a File
Forwarder
The File Forwarder device plug-in allows you to configure the root log directory for your file, select the starting and ending file identifiers, and create a name and IP address to identify your device. After you configure your device, you can map your File Forwarder to a syslog destination.To configure a File Forwarder:
1 Add and configure a File Forwarder device plug-in for the Adaptive Log Exporter. For more information, see Configuring the File Forwarder Device Plug-in.
2 Map the File Forwarder device plug-in to a destination. For more information, see Creating a Device Mapping.
Configuring the File Forwarder Device Plug-in
To configure a file forwarder in the Adaptive Log Exporter:
Step 1 From the Start menu, select Programs > Adaptive Log Exporter > Configure Adapter Log Exporter.
Step 2 Click the Devices tab.
Step 3 Right-click on File Forwarder and select Add Device.
The device properties for a adding new File Forwarder device are displayed.
Step 4 Configure the following parameters: Table 7-1 File Forwarder Plug-in Parameters
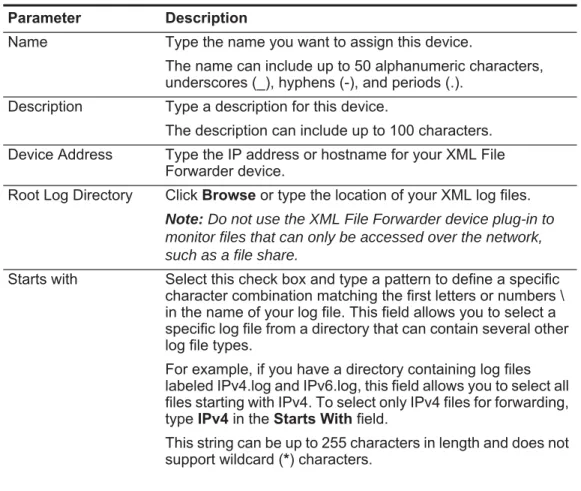
Parameter Description
Name Type the name you want to assign this device.
The name can include up to 50 alphanumeric characters, underscores (_), hyphens (-), and periods (.).
Description Type a description for this device.
The description can include up to 100 characters.
Device Address Type the IP address or hostname for your File Forwarder device.
Root Log Directory Click Browse or type the location of the log files to forward to QRadar SIEM.
Note: Do not use the File Forwarder device plug-in to monitor files that can only be accessed over the network, such as a file share.