SQL Server Protection
User Guide
BackupAssist User Guides explain how to create and modify backup jobs, create backups and perform restores. These steps are explained in more detail in a guide’s respective whitepaper. Whitepapers should be used as the main reference documents when planning your backups and your data protection strategy. Whitepapers include important considerations, configuration explanations and the implementation information needed to use BackupAssist effectively.
SQL Server Protection
© Cortex I.T. 2001-2014 User Guide: Version June 05 2014 1
Contents
1. Overview ... 2
Documentation ... 2
Licensing ... 2
Requirements ... 2
Backup considerations ... 2
Backup user identity ... 2
Email server Settings ... 2
SQL databases ... 3
System databases ... 3
User databases ... 3
SQL database restores ... 3
2. Creating an SQL Server Protection backup ... 4
3. Restoring an SQL Server Protection backup ... 7
4. SQL Server Protection backup management ... 11
Manually running a backup job... 11
SQL Servers ... 11
SQL Server Protection
© Cortex I.T. 2001-2014 User Guide: Version June 05 2014 2
1.
Overview
BackupAssist SQL Server Protection allows you to back up specific databases or complete servers. The backups can be daily or near-continuous (minimum every 15 minutes) for maximum data protection. BackupAssist System Protection, File Protection and File Archiving solutions can all back up SQL servers using the Volume Shadow copy Service (VSS), but these solutions have limitations in their ability to restore specific databases and to specific points in time.
SQL Server databases are dynamic, shared and critical. For these reasons, BackupAssist SQL Server Protection has been developed to perform live, online backups of SQL Server databases. The backups are stored in the standard SQL Server backup format (.bak file), which allows for the restoration of an entire SQL Server (including the master database) or individual databases. You can also perform advanced tasks such as migrating databases from one server to another.
Documentation
More information on SQL Server Protection can be found in theSQL Server Protection whitepaper. The whitepaper contains comprehensive information and should be referred to when planning a backup strategy using SQL Server Protection.
Other BackupAssist documentation can be accessed through the Documentation webpage
To learn more about the BackupAssist Recover tab, see the BackupAssist Recover Tab User Guide To learn more about the BackupAssist Settings tab, see the BackupAssist Settings Tab User Guide
Licensing
SQL Server Protection requires the SQL Add-on license, once the initial trial period has expired. Contact your local BackupAssist reseller or distributor for pricing information, or visit www.BackupAssist.com. For instructions on how to activate / deactivate license keys, visit our Licensing BackupAssist page.
Requirements
Windows 7, 8, Server 2008/R2 or Server 2012/R2 operating system.
SQL Server Protection can be used for Microsoft SQL Server 2005, 2008/R2, 2012 and 2014. (Including variants: SQL Express and MSDE).
Backup considerations
Backup user identityBackup jobs require an administrator account with read access to the data source, and full read-write access to the backup’s destination. It is recommended that a dedicated backup account is created for this purpose. The account’s details are entered using the Backup user identity option on the Settings tab, and your backup jobs will be launched using these credentials.
Email server Settings
An SMTP server must be configured if you want to have the email Notifications step enabled when you create a backup job. Use the Mail Server option on the Settings tab to enter the server’s details.
SQL Server Protection
© Cortex I.T. 2001-2014 User Guide: Version June 05 2014 3
SQL databases
System databasesSQL system databases are the databases used by the SQL Server itself. These need to be backed up in addition to the user databases, so that the entire SQL Server can be rebuilt in the event of system or database failure. System databases vary depending on the version of SQL, but include the following:
Master Records all the system-level information for an SQL Server instance. The master
database is composed of system tables and catalogs, and is critical to your SQL Server. If you are restoring your SQL Server after a disaster or new installation, it is advised that you restore the master database before restoring any other database.
Msdb Used by the SQL Server agent for scheduling alerts and jobs.
Model The model database is a template used by Microsoft SQL Server when creating other
databases, such as tempdb or user databases.
Resource A read-only database that contains system objects included with SQL Server 2005. The
resource database makes upgrading to a new version of SQL Server easier and faster.
Tempdb A workspace for holding temporary objects or intermediate results sets. It is important
to have regular backups of these system databases, however, it is not necessary to back up the tempdb system database because it is rebuilt each time SQL Server is started. When SQL Server is shut down, any data in tempdb is deleted permanently. For this reason, do not store any application specific data in the tempdb database. Leave it exclusively for the SQL Server to use.
User databases
User databases are the databases containing the information that you have used SQL to store and manage. This is the business data, shown in the below example, that is backed up to protect your company’s information. This information should be backed up on a regular basis so that it can be recovered in the event of data loss or corruption.
SQL database restores
Most SQL restores will be for SQL databases used by your business, but an SQL restore can also be used to recover an SQL Server. It is important to understand the difference before starting a restore. SQL database restoration: BackupAssist provides a tool for restoring one or more SQL databases to either a local or remote SQL Server. The tool also lets you restore an SQL database to a specific point in time, provided you have a transaction log backup to restore from. The databases restored for an SQL database restoration are the business related databases used to manage information.
Master database recovery: BackupAssist can restore a master database to a local SQL Server. The
master database is composed of important system tables and catalogues required to rebuild your SQL Server. If you are restoring your server after a disaster or performing a new installation, it is advised that you restore the master database before restoring any other databases. The databases restored for an SQL database restoration are system databases. You must select these system databases from the SQL database list when your backup is made.
SQL Server Protection
© Cortex I.T. 2001-2014 User Guide: Version June 05 2014 4
2.
Creating an SQL Server Protection backup
BackupAssist SQL Server Protection can back up SQL system databases for an SQL Server Master recovery, and use a transaction schedule to restore databases to a specific point in time, on both local and remote SQL machines.
Launch BackupAssist and follow the steps outlined below: 1. Select the Backuptab, and click Create a new backup Job
2. Select SQL Server Protection
If this is the first time you have created a backup job, you will be asked to provide a Backup user identity if one has not been defined. See the BackupAssist settings, whitepaper for guidance. 3. Selections: The selections screen is used to locate your SQL servers, authenticate them and select
the databases to be backed up.
a. Server selection
BackupAssist will scan your local machine for SQL servers. Any servers found will be selectable from the drop-down list. Select connect.
To select an SQL Server on your network, enter the name of the SQL Server or its IP address into the Server field. Select connect.
Figure 1: SQL Server connection
b. Server authentication
When you select Connect, you will be prompted to provide login credentials using the BA user identity, another user account (such as a Windows account), or an SQL Server user account.
Figure 2: SQL Server authentication credentials
The authentication account, BA user identity account (if different to the account used for this backup) and the SQL Server’s service account, ALL need access to the backup destination.
SQL Server Protection
© Cortex I.T. 2001-2014 User Guide: Version June 05 2014 5
c. Database selection
A list of databases will be displayed for each SQL Server. The databases displayed will be both system databases and user databases. It is important to understand the difference, and to select the correct databases for your backup.
User databases: These contain your business and user data. Select the databases you wish to backup. In the example below, the user databases are circled in purple.
System databases: These are used by the SQL Server to operate. If they are included in a backup, then that backup can be used to perform a master database restore. All SQL protection plans should include a backup cycle that includes system databases so that an SQL Server can be recovered. In the example below, 3 system database are circled in blue.
For a list of system databases, refer to the System Databases section.
For more information SQL databases, refer to the SQL Server Protection Whitepaper. Select the databases to back up, and click Next.
Figure 3: SQL Server backup - Server and database selection screen
4. Destination media: You will not be prompted to provide a destination. This step will be skipped.
SQL Server Protection backups use fixed media only, therefore, the media type does not need to be selected. The fixed media’s location and configuration will be entered at the, Set up Destination
SQL Server Protection
© Cortex I.T. 2001-2014 User Guide: Version June 05 2014 6
5. Schedule: There are two schedules available for SQL Server Protection, Basic and Transactional.
Basic: Runs a full daily backup of your SQL databases. A backup is run once per day at the
time set in this screen.
Transactional: Creates a full daily backup at the start of the day, and then runs transaction log
backups at pre-defined intervals (minimum of every 15 min) throughout the day.
This provides the functionality of an incremental backup because SQL can use the transaction log to recover data. Each day’s database backup is saved in the same location along with each transaction log.
Select an appropriate schedule. Click Next.
6. Set up destination. Enter the path of the directory where you want to store your SQL backup files. Once a backup has been created, you can configure how long backups are kept for, how many are retained and how much space to allocate. This is done using the Manage > Destination menu on the Backup tab.
The SQL backups are taken from .bak files (one for each database). The file name is given a suffix, indicating the day it was created on.
7. Notifications: Once a backup job has completed, BackupAssist can send an email to inform selected recipients of the result. This email notification can be enabled during the creation of a backup job, if the mail server has been configured.
To send email notifications, you will need to configure an SMTP mail server for BackupAssist. See
the Backup tab user guide for more information.
To enable email notifications:
a. Select, Add an email report notification.
b. Enter recipients into the Send reports to this email address field.
c. Enter recipients into the Also send reports to this email address field. You can then select the condition under which the email should be sent, using the drop-down box.
After a backup job has been created, you can modify the notifications by adding and removing recipients, setting additional notification conditions and including print and file notification types.
8. Prepare media: SQL Server Protection backups use fixed media only. This step will be skipped.
9. Name your backup: Provide a name for your backup job, and click Finish.
Your SQL Server Protection backup job has now been created.Important: Once a backup job has been created, it should be reviewed and run using the Manage menu. This menu provides additional options to configure your backup. See the section, SQL Server
Protection backup management, for more information.
Important: Once a backup job has been run and a backup created, a MANUAL test restore should be performed to ensure the backup is working as intended. To perform a test restore, refer to the section,
SQL Server Protection
© Cortex I.T. 2001-2014 User Guide: Version June 05 2014 7
3.
Restoring an SQL Server Protection backup
BackupAssist provides an inbuilt SQL restore tool that can be used to restore SQL databases to both local and remote SQL servers. If the backup used a transactional schedule, the databases can be restored to a specific point in time.
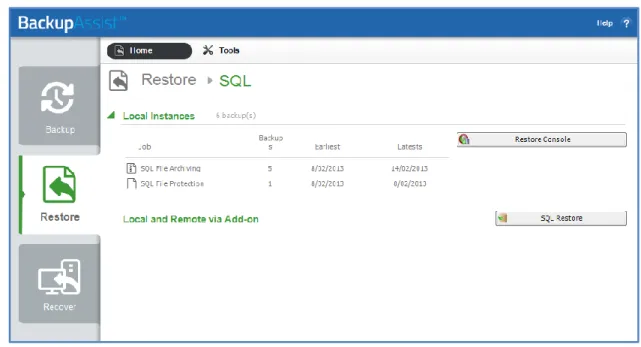
To restore data from an SQL Server Protection backup, start BackupAssist and follow these steps: 1. Select the Restore tab
The Restore tab has a Home page and a Tools menu. The Home page is the default screen and the recommended starting point for performing a restore.
2. From the Home page, select SQL.
3. The Home page will now display all backups that contain SQL data.
If you have SQL VSS backups created using File Protection or File Archiving, they will appear with the Restore Console.
Your SQL Server Protection backup will be associated with the SQL Restore tool. These backups are represented by the title Local and Remote via Add-on. The individual backups created using SQL Server Protection will be located and displayed within the SQL Restore tool.
Figure 4: Restore Home page – results screen
4. Select SQL Restore. This will open the SQL Restore tool.
Most SQL restores will be for SQL databases used by your business, but an SQL restore can also be used to recover an SQL Server. It is important to understand the difference.
a. An SQL database restoration: The databases restored are the business related databases that
are used to information.
b. A master database recovery: BackupAssist can restore a master database to a local SQL
Server. The master database is composed of system tables and catalogues required to rebuild an SQL Server. You must select these system databases from the database list when your backup is made. It is advised that you restore the master database before any other databases.
SQL Server Protection
© Cortex I.T. 2001-2014 User Guide: Version June 05 2014 8
5. Select Server.
This screen is used to locate and authenticate the SQL Server that you will restore to.
The databases you wish to restore must already exist on the SQL Server. If they do not, you can choose to either restore the master database first, which will result in recreating all databases on the server, or to manually recreate each database you wish to restore. If you are restoring your SQL Server after a disaster or new installation, it is advised that you restore the master database before restoring any other databases.
a. Server selection: Select the SQL Server to restore to.
Restore a local Server: The console will display a list of the SQL servers on your local machine. If an SQL Server is present but not running, you can click Start. Any servers that cannot be started may indicate a fault with the server itself. You can only restore to SQL servers that are running.
Restore a remote server: Any remote SQL servers detected will appear in the drop down list. If the server is not shown, select the Restore a remote server button, and enter the name of the SQL Server or its IP address.
Select the SQL Server to restore to and click Next.
Figure 5: SQL Restore tool – server selection
b. Server authentication
When you select Next, and you will be prompted to provide logon credentials. Use integrated authentication: Backup user identity.
Specify user identity: Another user account (such as a Windows account) or an SQL Server user account.
The authentication account, the BA account (if different to the account used for this backup) and the SQL Server’s service account, all need access to the backup destination. Some SQL servers are configured to accept only SQL authentication.
SQL Server Protection
© Cortex I.T. 2001-2014 User Guide: Version June 05 2014 9
6. Select Type
This screen is used to identify the type of restore you want to perform. Only select both if you wish to recover your SQL database, as well as restore your user databases.
Master Database recovery: Only select this if your SQL database is damage, missing or needs
to be replaced / recreated. This option will restore the system databases that the SQL Server uses to operate. This is not for user or business databases; it is only for SQL recovery scenarios. To restore the master database you need to have BackupAssist installed on the server itself.
Selected Databases: Select this option to restore your user / business databases to any point
in time for which you have backups. 7. Select backup file
If you selected Master database recovery in step 6, you will be asked to select a master database to restore. A list of backups containing master databases will be listed for selection.
8. Master restore
If you selected Master database recovery in step 6, you will now be asked to start the master database restore. After the master database recovery has finished, you can continue with the SQL database restore steps.
9. Find backups
This screen is used to enter the location of your SQL database backup files. This is typically the SQL directory used in your SQL backup job. Browse to the backups’ location or type in the path and press Add. If the location contains SQL databases, a confirmation tick and message will appear below the list. Add the location of your SQL Server Protection backups, and click next.
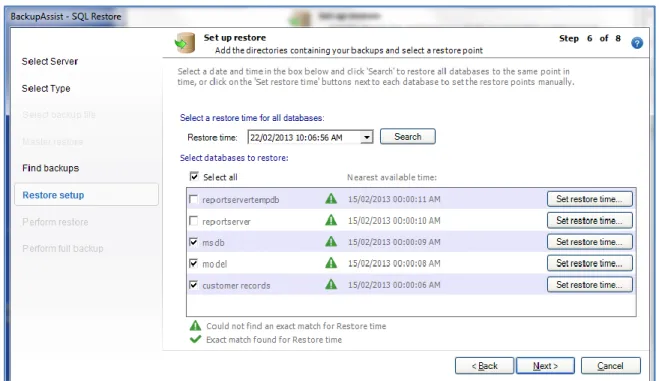
10. Restore setup
You will be presented with a list of databases that can be restored using the backups identified in step 9. The screen is used to select what databases to restore and what time to restore them from.
SQL Server Protection
© Cortex I.T. 2001-2014 User Guide: Version June 05 2014 10
Databases can be restored to a specific point in time if the Transactional scheme was selected (during the Schedule step) when the backup job was created.
a. Select the time that you want to restore your databases from using:
The Restore time field: Edit the data and time shown or select a date from the drop-down calendar, and select Search. This point in time will apply to all databases listed.
The backups that are closest to the selected time will appear next to each database, and show the time that the backup was made.
The Set restore time button: This button will select a restore point for only that database.
Select a date from the Calendar. Dates that have backups will be indicated in bold.
Select a time range will show a list of time ranges available for that date. You can
restore the database to any point in time between any of the time ranges listed. Select a time range from the list.
Select a time from within that range using the field at the bottom of the window. b. Select the databases that you want to restore using the tick-box next to each database, or the
Select all option.
If the restore time specified is not available from the supplied backup files, a warning icon will appear to the right of the database/ the closest available time to that specified (that the database can be restored to) will be indicated.
If the restore time selected is available, a success icon will appear to the right of the database.
c. Click Next. 11. Perform restore
Review the restore job settings, then select Start restore to the right of the window to restore all databases selected. Click Next once the restore process has completed.
12. Perform full backup
After restoring an SQL database, future transaction log backups cannot be used to restore a database to a specific point in time until a full backup runs. It is therefore recommended that you now run a full backup of the databases that were restored.
Click Start full backup.
Full backups of these databases will be stored in the same folder as the backup files you just restored from.
If your backup schedule already includes a full backup as the next SQL backup and you are certain you will not need to restore these databases to a specific point in time between the restoration and the next full backup, you can check Skip full backup and click Finish.
SQL Server Protection
© Cortex I.T. 2001-2014 User Guide: Version June 05 2014 11
4.
SQL Server Protection backup management
Once you have created a backup job, you can modify the settings and access advanced configuration options using the Manage menu.
To access the backup management screen: 1. Select the BackupAssist, Backup tab.
2. Select Manage from the top menu. A list of all backup jobs will be displayed. 3. Select the backup job you want to modify, and select Edit.
4. Select the required configuration item on the left. Key configurations are described below. To learn more about the backup management options, see the Backup tab whitepaper.
Manually running a backup job
All new and modified backup jobs should be manually run to ensure they work as intended. 1. Select the backup job, and select Run.
2. You will be prompted to Rerun a past backup or to Run a future backup now. 3. When the backup job starts, the screen will change to the Monitor view.
4. Once the backup has been completed, select the Report button and review the results.
SQL Servers
Use this screen to change the databases that have been selected for backup, and to remove and add SQL Servers.
Scheduling
Selecting Scheduling will display your Scheduling options. You can use this screen to change the default time and days of your scheme’s daily backups. If you are running a transactional scheme, you can also modify the Time between backups. The default time is every 15 minutes.
Select a new Schedule: This will display the Basic and Transactional backup schemes that you chose from during the creation of your backup job. You can change the current scheme using this option.
Basic: Runs a full daily backup of your SQL databases. A backup is run once per day at the time set
in this screen.
Transactional: Creates a full daily backup at the start of the day, and then runs transaction log
backups at pre-defined intervals (minimum of every 15 min) throughout the day.
This provides the functionality of an incremental backup because SQL can use the transaction log to recover data. Each day’s database backup is saved in the same location along with each transaction log.