Microsoft Dynamics
®GP
URL and other Internet Web site references, may change without notice. You bear the risk of using it.
Some examples depicted herein are provided for illustration only and are fictitious. No real association or connection is intended or should be inferred.
Intellectual property This document does not provide you with any legal rights to any intellectual property in any Microsoft product.
You may copy and use this document for your internal, reference purposes.
Trademarks Microsoft, Excel, Internet Explorer, and Microsoft Dynamics are trademarks of the Microsoft group of companies. FairCom and c-tree Plus are trademarks of FairCom Corporation and are registered in the United States and other countries.
All other trademarks are property of their respective owners.
Warranty disclaimer Microsoft Corporation disclaims any warranty regarding the sample code contained in this documentation, including the warranties of merchantability and fitness for a particular purpose.
License agreement Use of this product is covered by a license agreement provided with the software product. If you have any questions, please call the Microsoft Dynamics GP Customer Assistance Department at 800-456-0025 (in the U.S. or Canada) or +1-701-281-6500.
Chapter 1: Features and Requirements
4
Objectives ... 4
Introduction ... 4
Benefit Lifecycle Manager ... 5
Features ... 5
Release Requirements ... 6
Multi-User Access ... 6
Certification, License and Training Manager ... 7
Features ... 7
Release Requirements ... 7
Certification Feature ... 8
License Feature ... 8
Training Feature ... 8
Employee Health and Wellness ... 9
Features ... 9
Summary ... 10
Chapter 2: Advanced Human Resources Setup 11
Objectives ... 11Introduction ... 11
Security Setup for Advanced Human Resources ... 11
Setting up a Security Task ... 11
Setting up Alternate/Modified Forms and Reports Security ... 14
Setting up Security Roles ... 15
Benefit Lifecycle Manager - Setup... 16
Setting up a Future Effective Record ... 17
Editing and Viewing an Existing Future Effective Record ... 18
Saving in Payroll ... 19
Saving in Human Resources ... 20
Employee Dependents Window ... 21
Employee Beneficiaries Window ... 22
Employee Benefit Dependents Window ... 23
Plan Status Reasons Window ... 24
Benefit Options Window ... 25
Certification, License and Training Manager Setup... 26
Issued By Setup Window ... 27
Instructor Setup Window ... 28
Endorsement Setup Window ... 29
Certification Setup Window ... 30
Certification Endorsements Window ... 31
License Type Setup Window ... 32
License Type Endorsements Window ... 33
Health and Wellness Code Setup Window ... 37
Result Setup Window ... 38
Health and Wellness Template Setup Window ... 39
Source Setup Window ... 40
Category Setup Window ... 41
Summary ... 41
Chapter 3: Employee Maintenance 42
Objectives ... 42Introduction ... 42
Benefit Lifecycle Manager ... 42
Employee Dependents Window ... 43
Employee Beneficiaries Window ... 44
Assign Template Window ... 45
Employee Benefit Dependents Window ... 46
Future Effective Activation Window ... 47
Certification, License and Training Manager ... 49
Certification Entry Window ... 49
License Entry Window ... 51
Employee Training Window ... 52
Mass Training Update Window ... 54
Employee Health and Wellness Manager ... 55
Health and Wellness Entry Window ... 55
Injury and Illness Details Window ... 56
Assign Templates Window ... 58
Summary ... 59
Chapter 4: Inquiries and Reports 60
Objectives ... 60Introduction ... 60
Inquiries ... 60
Certification History ... 61
License History ... 62
Training History ... 63
Percent Current Inquiry ... 64
Employee Certifications, Licenses and Training ... 67
Health and Wellness History ... 68
Reports ... 69
Excel®-based Reports... 69
SmartList Builder ... 69
Summary ... 70
Chapter 5: Certification, License and Training Manager for Business
Portal 71
Objectives ... 71Introduction ... 71
Certification, License and Training Manager for Business Portal Configuration . 72 Enabling Manager Views within Business Portal ... 72
Direct Reports View ... 72
Internet Explorer® Browser Configuration ... 74
Launching Certification, License and Training Manager for Business Portal 74 Employee’s Training, Certification and License Tabs... 75
Employee Training Tab ... 75
Employee Certification Tab ... 75
Employee License Tab ... 76
Manager’s Training, Certification and License Tab ... 77
Manager Training Tab ... 77
Manager Certification Tab ... 77
Manager License Tab ... 77
Business Entities for Manager Queries ... 78
Column Headings Available ... 79
Status Definitions for “Required” Entities... 79
Training Required ... 79
Certification Required ... 80
License Required ... 80
CHAPTER 1: FEATURES AND REQUIREMENTS
Objectives
The objectives are:
• Understand the features, requirements and multi-user access criteria for Benefit Lifecycle Manager within Advanced Human Resources.
• Understand the features and requirements for the Certification, License and Training Manager component of Advanced
Human Resources.
• Understand the features available through the Employee Health and Wellness component of Advanced Human Resources.
Introduction
Microsoft Dynamics® GP Advanced Human Resources includes three components: Benefit Lifecycle Manager; Certification, License and Training Manager; and Employee Health and Wellness.
Benefit Lifecycle Manager integrates with the Microsoft Dynamics GP Payroll module. It is designed to create Human Resources, Payroll Benefit and Payroll Deduction setup records that are not immediately effective. At the appropriate time, the records can be activated and previous setup records are tracked in history.
Certification, License and Training Manager integrates with the
Microsoft Dynamics GP Human Resources module. Certification, License and Training Manager creates the link between the skills, training and certifications as well as provides a means to track employee certifications, licensing and training. It also enables the tracking of certifications or license to the extent of reporting on expiration, renewal periods and whether the certifications or licenses are required. You may query on required certifications, licenses, training and dates of expiration. In addition, a query can be created on a specific list of employees with a particular certification, license or training.
Employee Health and Wellness Manager integrates with the Microsoft Dynamics GP Human Resources module. The purpose of the Employee Health and Wellness Manager is to provide features for tracking all immunizations, vaccinations and tests required for each employee. The results for each test can also be recorded. Since codes can be defined to meet the company needs, this solution allows for additions or changes as business or job requirements change. The Employee Health and
Wellness Manager will enable the user to schedule follow-up
enable easy searches on who is past due or scheduled for a particular immunization, vaccination or test. The requirements per employee are more easily assigned and tracked by the utilization of health and wellness templates.
Benefit Lifecycle Manager
Benefit Lifecycle Manager is used to create Human Resources Benefit, Payroll Benefit and Payroll Deduction setup records that are not
immediately effective when creating employee level records or running payroll in Microsoft Dynamics GP. Benefit Lifecycle Manager then enables the user to activate the Future Effective setup records at the appropriate time, while tracking the past setup records in history.
By creating a Future Effective date to the record, this information can also be extended to the Benefit Self Service product on Business Portal. Benefit Lifecycle Manager integrates with the Microsoft Dynamics GP Payroll module. When creating Human Resources Benefit, Payroll Benefit or Payroll Deduction records, the user can easily create or modify the Future Effective record as well.
Features
The features and capabilities of Benefit Lifecycle Manager include:
• Create Human Resources Setup Future Effective records for:
o Miscellaneous Benefit
o Health Insurance
o Life Insurance
o Retirement Plans
• Create corresponding Payroll Setup Future Effective records for:
o Benefit
o Deduction
• Activate Future Effective Setup records
• Track History of previous Setup records
• Make Pending Changes available to Benefit Self Service for informational and enrollment purposes.
NOTE: This product is required for use with Benefit Self Service to
Release Requirements
Certain features and the use of this product must meet the following setup requirements to ensure proper functionality. Failure to use the Benefit Lifecycle Manager product as specified here will not currently be supported.
• Changes must be made from the Human Resources menu and rolled down to Payroll. There is NO reconciling functionality for future effective records.
• If creating a Future Effective Benefit, Payroll Deduction or Payroll Benefit record, the core record for that Benefit Code must exist before attempting to create the Future Effective record.
• Each individual must have the Payroll View for Human Resources option selected. To enable this option open the User Setup window, click the Administration series button, click System on the Setup content pane and then click User. Enter or select the User ID. Select the Payroll View for Human Resources checkbox. Click Save.
• Grant Security Access using the Security Setup window to grant individual security settings for each company.
Multi-User Access
Additional checks have been added to restrict access to Benefit Codes and Future Effective Benefit Codes when Benefit Lifecycle Manager is being used to ensure that benefit codes are modified correctly. The restrictions added include the following scenarios and if one of these scenarios is encountered, the system prompts with “This code is open by another user. Please try again later.”
Multi User Access Denied Scenarios:
• If the benefit code is opened in the Future Effective mode in the Human Resources Benefit Setup, Payroll Benefit Setup or Payroll Deduction Setup window, no other employee is able to open that benefit code in any of the three areas at the core setup level.
• If more than one employee currently has the benefit code open in the Human Resources Benefit Setup, Payroll Benefit Setup or Payroll Deduction Setup window and there is an attempt to create a new or display the existing Future Effective record in any of the three areas for that benefit code.
When the Human Resources to Payroll Integration is happening for a Future Effective record, if another employee would open that benefit code in one of the subsequent windows before the Human Resources to Payroll Integration gets to that level, when the Human Resources to Payroll Integration hits that level, the integration is stopped.
Certification, License and Training Manager
The Certification, License and Training Manager tracks all Certifications, Licensing and Training requirements. This product completes certain areas and fills additional areas that core Microsoft Dynamics GP skills and certification tracking does not currently handle.
Certification, License and Training Manager integrates with Microsoft Dynamics GP Human Resources. The Certification, License and Training Manager will create the link between the skills, training and certifications as well as provide a means to track employee certifications, licensing and training. It will also enable the tracking of certifications or licenses to the extent of reporting on expiration, renewal periods and whether the certifications or licenses are required. You may query on required certifications, licenses, training and dates of expiration. In addition, you may query on a specific list of employees with a particular certification, license or training.
Features
The features and capabilities of Certification, License and Training Manager include:
• Enter unlimited Certifications
• Certifications tracking for employees
• Enter unlimited Licenses
• License tracking for employees
• Enter unlimited Training
• Training tracking for employees
• Inquire for an employee on Certifications, Licenses and Training
• Set and View Requirements per Department and Position combinations for Certification, License and Training
• View Employee Percent Current per Department and Position combinations based on Worked or Home department/positions for Certification, License and Training
• SmartList Builder reporting options
Release Requirements
Certain features and the use of this product must meet the following setup requirements to ensure proper functionality. Failure to use the
Certification, License and Training Manager product as specified here will not currently be supported.
Certification Feature
The Certification feature of the Certification, License and Training Manager allows the user to enter Certification information specific to the company needs as well as track employee level Certification information as required within the industry or business. The Certification feature is easy to use and provides inquiry options to view the information employees are tracking more easily.
When a record for a Certification is entered where an expiration date is an attribute of that Certification whether the date is known at the time of entry or later, the expiration date will always be a future date to expire in
relationship to the current record, i.e. my current Certification will expire at a future date. When the Certification is renewed or completed, the user can pull up the record for the Certification and enter the current
renewal/completed date, the future expiration date and select Save. When it is the first year of a Certification, then the Original Issue Date = Date Renewed/Completed.
License Feature
The License feature of the Certification, License and Training Manager allows the user to enter License information specific to the company needs as well as track employee level License information as required within the industry or business. The License feature is easy to use and provides inquiry options to view the information an employee is tracking. When a record for a License is entered where an expiration date is an attribute of that License whether the date is known at the time of entry or later, the expiration date will always be a future date to expire in
relationship to the current record. When the License is renewed or completed, you should pull up the record for the License and enter the current renewal/completed date and the future expiration date and select Save. When it is the first year of a License, then the Original Issue Date = Date Renewed/Completed.
Training Feature
The Training feature of the Certification, License and Training Manager allows the user to enter Training information such as Courses and Classes specific to the company needs as well as track employee level Training information as required within the industry or business. The Training feature is easy to use and provides inquiry options to view the information the employee is tracking more easily.
When a record for the Training is entered where an expiration date is an attribute of that Training, the expiration date will always be a future in relationship to the current record. When the Training is renewed / completed, you will pull up the record for the Training and enter the
Save. When it is the first year of a Training, then the Original Issue Date = Date Renewed/Completed.
Employee Health and Wellness
Within Microsoft Dynamics GP Human Resources, you can track injury and illness information for each employee and generate the necessary OSHA reports. Employee Health and Wellness Manager enables
organizations to completely track all additional employee immunizations, vaccinations and test requirements that are related to the injury and illness cases, but not included on OSHA reports.
Employee Health and Wellness Manager is an enhancement that
integrates with Microsoft Dynamics GP Human Resources. The purpose of Employee Health and Wellness Manager is to provide features for tracking all immunizations, vaccinations and tests required for each employee. The results for each test can also be recorded. Since the codes can be defined, the product allows for additions or changes as business or job requirements change.
Employee Health and Wellness Manager enables the user to schedule follow-up vaccinations, immunizations and tests. Having all the data available will enable easy searches on who is past due or scheduled for a particular period for a particular immunization, vaccination or test. The requirements per employee are more easily assigned and tracked by the utilization of health and wellness templates.
Features
The features and capabilities of Employee Health and Wellness Manager include:
• Create Categories and associated Codes specific to the business needs
• Create unlimited Results types that can be associated with the Health and Wellness codes
• Create Health and Wellness codes for use in Health and Wellness and related to Injury and Illness tracking
• Assignment of multiple codes to employees via customized Templates
• Assignment of Health and Wellness codes to employees for informational and tracking purposes
• Additional information for tracking with Illness and Injury Cases, including Source tracking
Sensitive information related to the Health and Wellness of Employees and Sources is tracked using this product. Compliance with HIPPA regulations as it pertains to this data is the responsibility of the user.
Summary
The Advanced Human Resources module for Microsoft Dynamics GP is comprised of three components:
1. Benefit Life Cycle Manager
2. Certification, License and Training Manager and 3. Employee Health and Wellness
Key points to remember from this chapter:
• Benefit Life Cycle Manager provides the ability to assign future effective dates for Miscellaneous Benefits, Health Insurance, Life Insurance and Retirement Plans
• The user can enter an unlimited number of certifications, licenses and training data for employees.
• Employee Health and Wellness allows the organization to track various health-related categories, codes and tests, as well as the results of each.
CHAPTER 2: ADVANCED HUMAN RESOURCES
SETUP
Objectives
The objectives are:
• Use Security Task Setup window to set security tasks for Advanced Human Resources modules.
• User Security Roles Setup window to set security roles for Advanced Human Resources modules.
• Create a future effective record for a benefit plan such as health insurance, life insurance or a retirement plan.
• Learn to complete the various setup windows required to use Certification, License and Training Manager.
• Learn to set up various Health and Wellness windows to allow the organization to track health related information for
employees.
Introduction
Microsoft Dynamics GP Advanced Human Resources components (Benefit Lifecycle Manager; Certification, License and Training Manager and Employee Health and Wellness) require various setup tasks to be completed prior to connecting them with the employee records.
Planning what will be used within the various set up windows is critical. As categories, codes, types and templates are developed; keep in mind what information is required for outputs in the form of inquiries and reports.
Security Setup for Advanced Human Resources
Setting up a Security Task
Use the Security Task Setup window to select a default security task or modify the default security task. To open this window, click the
Administration series button, click System on the Setup content pane, and then click Security Tasks.
Enter a Task ID.
• Select the following from the Access List:
o Benefit Options
o Effective Date
o Employee Beneficiaries
o Employee Benefit Dependents
o Employee Dependents
o Future Effective Activation
o Plan Status Reason Lookup
o Plan Status Reasons
Change the Type to Reports
• Select the following from the Access List
o Future Effective Activation Reports
Change the Product to CertificationManager.
• Select Windows for the Type.
• Select 3rd Party for the Series.
• Select the following from the Access List:
o Certification Endorsement
o Certification Entry
o Certification History
o Certification Setup
o Certification, License and Training Required by Department and Position
o Certification, License and Training Inquiry
o Certifications
o Class Point
o Course and Class Employee Entry
o Employee Certification Endorsements
o Employee License Endorsements
o Employee Training
o Endorsement Setup
o Instructor Lookup
o Instructor Setup
o Issued By Lookup
o Issued by Setup
o License Entry
o License History
o License Type Setup
o License Types
o Percent Current Inquiry
o Training Course Definition Additional Information
o Training Courses
o Training History
Change the Type to Reports
• Select the following from the Access List
o CLM Certification History
o CLM Certification License and Training Inquiry Report
o CLM Certification Setup
o CLM Certifications
o CLM Course Setup
o CLM Instructor Setup
o CLM Issued By Setup
o CLM License History
o CLM License Setup
o CLM Licenses
o CLM Percent Current
o CLM Percent Current Totals
o CLM Required Report
o CLM Training History
Change the Product to Employee Health and Wellness.
• Select Windows for the Type
• Select 3rd Party for the Series
• Select the following from the Access List:
o Assign Templates
o Category Lookup
o Category Setup
o Health and Wellness Entry
o Health and Wellness History
o Health and Wellness Template Lookup
o Health and Wellness Template Setup
o Injury and Illness Details
o Result Lookup
o Result Setup
o Source Lookup
o Source Setup
Change the Type to Reports
• Select the following from the Access List
o EHW Category Setup
o EHW Code Setup
o EHW Health And Wellness Entry Report
o EHW Health and Wellness History Report
o EHW Injury And Illness Report
o EHW Result Setup
o EHW Source Setup
o EHW Template Setup
Click Save to save the selections and close the window.
Setting up Alternate/Modified Forms and Reports Security
Use the Alternate/Modified Forms and Reports window to set access to the alternate/modified forms for Advanced Human Resources. To open this window, click the Administration series button, click System on the Setup content pane and then click Alternate/Modified Forms and Reports.
Select the appropriate ID.
Select HRM Solutions Series for the Product. Select Windows for the Type.
Expand the Payroll folder and select the HRM Solution Series radio button for each of the following Alternate Core Dynamics GP windows.
• Benefit Setup
• Deduction Setup
Click Save to save the selections and close the window.
Setting up Security Roles
Use the Security Role Setup window to select a default security role for Advanced Human Resources or modify the default security role. To open this window, click the Administration series button, click System on the Setup content pane, and then click Security Roles.
Benefit Lifecycle Manager - Setup
Benefit Lifecycle Manager allows Future Effective Records to be created for any of the benefit plans. The Future Effective options are accessed the same way in the Human Resources Benefit Setup and in the Payroll Deduction and Benefit Setup windows.
To access a Future Effective Record window, click the HR and Payroll
series button, click Human Resources on the Setup content pane, click
Benefits and Deductions, click Miscellaneous Benefits, Health
Insurance, Life Insurance or Retirement Plans, enter or select a Code, click the Benefits icon and then click Future Effective.
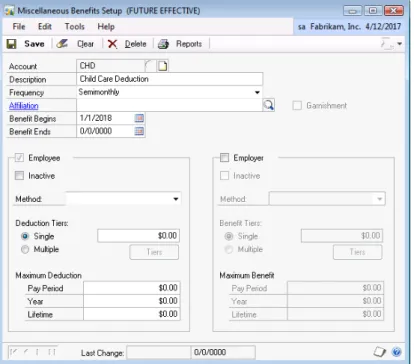
FIGURE 2.1 BENEFIT SETUP (FUTURE EFFECTIVE) WINDOW One of two options will be available on the drop down menu:
• Future Effective (New) – this option will be available if no future effective record currently exists for the benefit/deduction record currently open.
• Future Effective (Existing 00/00/0000) – this option will be available if a future effective record currently exists for the benefit/deduction record currently open. The 00/00/0000 represents the future effective date (or Benefit Begin Date) assigned to this future effective record.
Setting up a Future Effective Record
To create a new Future Effective record for the benefit or deduction record currently open, click the Benefits icon and then click Future Effective (New) option. The system prompts, “Create a Future Effective record using the current information?”
• Select Create to open the Future Effective window with the current core record values defaulted in the fields.
• Select Cancel to return to the current core record.
For Human Resources the system prompts to enter the Future Effective Date, enter a date greater than the current user date and select OK.
• Enter the future information for this benefit. The window name will be followed by “(FUTURE EFFECTIVE)”.
• Select Save. They system prompts, “Save future effective record?”
o Select Save to save the current Future Effective record. Refer to section “Human Resources and Payroll
Integration” for more information on subsequent messages that appear during the save process.
o Select Cancel to return to the current future effective record.
Roll down from HR/Payroll Setup level to existing Employee level HR/Payroll records exists so beware of the selection to this message when saving Future Effective records. Since the roll down feature is for employee records, answer this question No as Future Effective
functionality is for Benefit Setup windows only.
• Select Clear to clear the record form the window and set the window back to the core record.
• Select Delete and the system prompts, “Delete this Future Effective record?”
o Select Delete to delete the displayed Future Effective record. Then there are checks to determine if there are corresponding Future Effective records in Payroll, if there are then the system prompts a message asking if the corresponding Future Effective records from Payroll should be deleted. If the answer is yes, then select Yes, and then all Human Resources and Payroll Future Effective records are deleted for that code. If the answer is No and No is selected, then only the Human Resources Future Effective records are deleted for that code.
• Reports are only available if the Future Effective record is open.
NOTE: Future Effective amounts are not reported on the
Reports generated from the Reports > Human Resources menu.
If a Future Effective record is created for a Human Resources code that does not exist in Payroll and corresponding is set up in Payroll, the system prompts, “The Payroll Benefit must exist before a Future Effective Record can be created.” Select OK.
NOTE: When Future Effective records are created, you should not select
to roll down to Payroll or Human Resources. This roll down functionality does not apply to the future effective records.
Editing and Viewing an Existing Future Effective Record
To open an existing Benefits and Deduction Setup window, click the HR and Payroll series button, click Human Resources on the Setup content pane, click Benefits and Deductions, click Miscellaneous Benefits,
Health Insurance, Life Insurance or Retirements Plans, click the GoTo
menu and then click Future Effective.
The system prompts, “Display future effective record?”
• Select Yes to open the current Future Effective record in the Future Effective window. For Human Resources the system then prompts to verify the Future Effective Date, leave the date as entered or edit the date and select OK.
• Select No to return to the current core record.
• Select Save to save and the system prompts, “Save future effective record?”
o Select Save to save the current Future Effective record.
o Select Cancel to return to the current Future Effective record.
Roll down from HR/Payroll Setup level to existing Employee level HR/Payroll records exists so beware of the selection to this message when saving Future Effective records. Select No; Future Effective functionality is for the Benefit and Deduction Setup windows only.
• Select Clear to clear the record from the window and set the window back to the core record.
• Select Delete to delete the record, the system prompts “Delete this Future Effective record?”
o Select Delete to delete the displayed Future Effective record. Then there would be checks if there were
corresponding Future Effective records in Payroll, if so the system prompts with a message asking to delete
corresponding Future Effective records from Payroll. If Yes is selected, then all Human Resources and Payroll Future Effective records are deleted for that code. If No is
selected, then only the Human Resources Future Effective records are deleted for that code.
o Select Cancel to return to the current future effective record.
• Reports are only available while a Future Effective record is open.
Saving in Payroll
When saving a future effective record in Payroll, the system prompts, “Save future effective record?”
• Select Save to save the current future effective record.
o The system prompts, “The information for the Payroll deduction code is different than the Human Resources deduction code. Do you want to continue?”
• Selecting Yes prompts, “These changes must be saved in the Benefit Setup window to take effect across Human Resources with Integration to Payroll. When the Benefit Setup window opens, choose Save to save changes.” Click OK.
• Selecting No cancels the message and returns to the Future Effective record.
• Select Cancel to return to the current Future Effective record window.
Select Save to save this operation, the system prompts, “Save future effective record?”
• Select Save to save the current future effective record.
o The system prompts, “The information for the Payroll deduction code is different than the Human Resources deduction code. Do you want to continue?”
• Select Yes or
• Select No
• Select Cancel to return to the current Future Effective record window.
Saving in Human Resources
Next, the system prompts, “Do you want to set up the corresponding codes in Payroll so the integration is complete?”
• Select Yes to open the Payroll Deduction window and default all values from the Human Resources Future Effective record. Once the record is saved in this window, the Payroll Benefit window opens and defaults to save as well.
• Select No to save the Future Effective record only in Human Resources and return to the core window.
If this operation should NOT be saved, click Cancel. It returns to the Future Effective record.
Click OK when prompted, “These changes must be saved in the Benefit Setup window to take effect across Human Resources with Integration to Payroll.” When the Benefit Setup window opens, select Save to save changes.
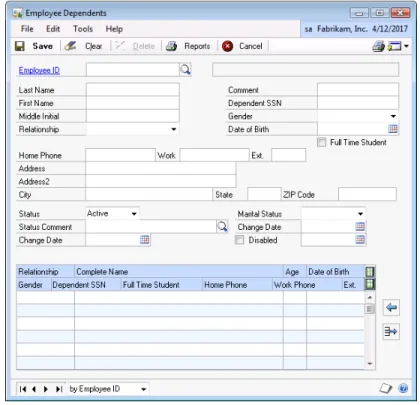
Employee Dependents Window
Within the Employee Dependents window data fields have been added to use to set up dependents associated with the employee. To open this window, click the HR and Payroll series button, click Human Resources
on the Cards content pane, click Employee and then click Dependents.
FIGURE 2.2 EMPLOYEE DEPENDENTS WINDOW The additional data fields are:
• Status - select Active or Inactive
• Status Comment - these options are defined in the Plan Status Reason window
• Change Date
• Marital Status - select Married, Single or N/A
• Change Date
• Disabled checkbox
Employee Beneficiaries Window
Within the Employee Beneficiaries window additional data fields are available, to define beneficiaries associated with the employee and specific benefit plan. To open this window, click the HR and Payroll
series button, click Human Resources on the Cards content pane, click
Employee - Benefits, select a Benefit, select an Employee ID, click the
Benefit icon, and click Beneficiary Definition.
The data fields are:
• Plan Status - select Active or Inactive
• State Change Reason - the lookup button allows information to be defaulted from existing Dependents.
• Status Comment - these options are defined in the Plan Status Reason window
• Change Date
• Marital Status - select Married, Single or N/A
• Change Date
• Disabled checkbox
• Disabled Date
Employee Benefit Dependents Window
The Employee Benefit Dependents window allows Human Resources to define the employee dependents associated with a specific employee benefit plan. To open this window, click the HR and Payroll series button, click Human Resources on the Cards content pane, click Employee - Benefits, select a Benefit, select an Employee ID, select a Benefit Code, click the Benefit icon, and click Dependents.
FIGURE 2.4 EMPLOYEE BENEFIT DEPENDENTS WINDOW
Complete the Plan Status and Status Change Reason fields as appropriate.
Plan Status Reasons Window
The Plan Status Reasons window allows Human Resources to define acceptable Reasons for why a particular dependent or beneficiary were activated or inactivated from a benefit plan. This information is necessary to provide to benefit carriers. To open the Plan Status Reasons window, click the HR and Payroll series button, click Human Resources on the Setup content pane and then click Plan Status Reasons.
FIGURE 2.5 PLAN STATUS REASONS WINDOW
Benefit Options Window
To open the Benefit Options window, click the HR and Payroll series button, click Human Resources on the Setup content pane, select a
Benefit window, select a Benefit Code, click the Benefits icon and then click Benefit Options.
FIGURE 2.6 BENEFIT OPTIONS WINDOW
Each of the Benefit Setup windows (Miscellaneous Benefits, Health Insurance, Life Insurance and Retirement Plans) has the Benefit Options item added to the Benefits button. When Benefit Options is selected this will allow the user to define the maximum number of dependents allowed for the specified benefit.
NOTE: A Benefit Setup record must be displayed within the window to
open Benefit Options.
This window allows the user to set the Maximum Dependents Allowed. The Maximum Dependents Allowed will be validated when enrollment changes are made to the benefit record.
By default, the number of dependents is set to zero which means unlimited if the Benefit Self Service module is not being used.
Certification, License and Training Manager Setup
There are several set up windows associated with Certification, License and Training Manager:
• Issued By Setup
• Instructor Setup
• Endorsement Setup
• Certification Setup
• License Type Setup
In addition, several other windows can be completed at this point in the process:
• Training Course Definition Additional Information window
• Class Points window
• Certification, License and Training Required by Dept and Position window
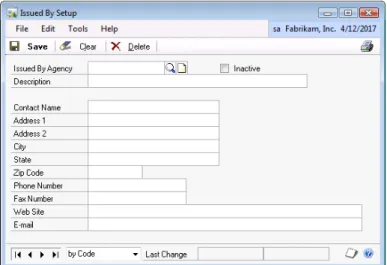
Issued By Setup Window
Use the Issued By Setup window to set up, assign an unlimited number of Issued By Agencies with description, contact and address information. An Issued By could be Agency or other organization. To open this window, click the HR and Payroll series button, click Human Resources on the Setup content pane, click Certifications, Licenses and Training and then click Issuers.
FIGURE 2.7 ISSUED BY SETUP WINDOW Enter or select an Issued By Agency. Enter the following information:
• Description
• Contact Name
• Address 1
• Address 2
• City
• State
• Zip Code
• Phone Number
• Fax Number
• Web Site
Select the Inactive checkbox to inactivate the current Issued By Agency code.
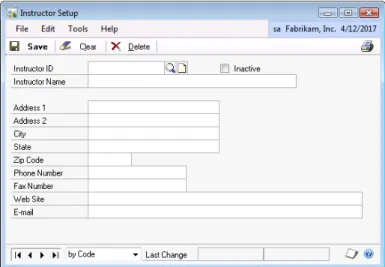
Instructor Setup Window
Use the Instructor Setup window to set up, assign unlimited number of Instructors with contact and address information. To open this window, click the HR and Payroll series button, click Human Resources on the Setup content pane, click Certifications, Licenses and Training and then click Instructors.
FIGURE 2.8 INSTRUCTOR SETUP WINDOW Enter or select Instructor ID.
Enter the following information:
• Instructor Name
• Address 1
• Address 2
• City
• State
• Zip Code
• Phone Number
• Fax Number
• Web Site
Endorsement Setup Window
Use the Endorsement Setup window to define the Endorsements by Certification or License. To open this window, click the HR and Payroll
series button, click Human Resources on the Setup content pane, click
Certifications, Licenses and Training and then click Endorsements.
FIGURE 2.9 ENDORSEMENT SETUP WINDOW Select the Type:
• Certification
• License
Enter the new Endorsement or edit the Endorsement for the selected Type.
Select OK to save the Endorsement Setup and close the window. To delete a row, select the Endorsement and then select the delete row button to delete this Endorsement.
Certification Setup Window
Use the Certification Setup window to set up and assign unlimited number of Certifications with descriptions. To open this window, click the HR and Payroll series button, click Human Resources on the Setup content pane, click Certifications, Licenses and Training and then click
Certifications.
FIGURE 2.10 CERTIFICATION SETUP WINDOW
When entering a new Certification Code, enter a Description and select any Required options.
• Issued By Agency
• Original Issue Date
• Expiration Date
• Certification Number
• Date Renewed
Selecting any of the Required options affects the Employee Certification Entry window by forcing entry of a value in the field prior to saving the record.
Certification Endorsements Window
Use the Certification Endorsements window to mark the appropriate Endorsement that was created during the Endorsement Setup. To open this window, click the Endorsements button on the Certification Setup window.
FIGURE 2.11 CERTIFICATION ENDORSEMENTS WINDOW
The Marked column indicates the Endorsements that are marked for the specific Certification Code. Use Mark All and Unmark All to mark or unmark all Endorsements at once.
License Type Setup Window
Use the License Type Setup window to set up and assign unlimited number of License Types with descriptions. To open this window, click the HR and Payroll series button, click Human Resources on the Setup content pane, click Certifications, Licenses and Training and then click
License Types.
FIGURE 2.12 LICENSE TYPE SETUP WINDOW Enter or select a License Type.
When entering a new License Type, complete the Description, select the appropriate Required options and assign Endorsements.
• Issued By Agency
• Date Renewed
• Expiration Date
• Issued By State
• Original Issue Date
Selecting any of the fields as Required affects the Employee License Entry window by forcing entry of a value in the field prior to saving the record.
License Type Endorsements Window
Use the License Endorsements window to select the appropriate
Endorsement that was created during the Endorsement Setup. To open this window, click the Endorsements button on the License Type Setup window.
FIGURE 2.13 LICENSE ENDORSEMENTS WINDOW
The Marked column indicates the Endorsements that are marked for the specific License Code. Use Mark All and Unmark All to mark or unmark all Endorsements at once.
Training Course Definition Additional Information Window
Use the Training Course and Class Definition window to set up a training course. The Certification, License and Training Manager has extended the Course set up with additional fields on the new Training Course Definition Additional Information window. To open this window, click the
HR and Payroll series button, click Human Resources on the Setup content pane, click Certifications, Licenses and Training and then click
Training Additional Info.
FIGURE 2.14 TRAINING COURSE DEFINITION ADDITIONAL INFORMATION WINDOW
Enter or select a Course ID. The description field displays from the Training Course and Class Definition window. Check the boxes for fields that are to be Required on the Employee Training window.
Select the Inactive checkbox to inactivate the current Course ID.
Class Points Window
Use the Class Points window to add points to the individual class combination. To open this window, click the HR and Payroll series button, click Human Resources on the Setup content pane, click
Training, select a Course ID, select a Class, click Additional from the menu and then click Class Points.
FIGURE 2.15 CLASS POINTS WINDOW
Enter a Points value for the selected class (ex: time length of class). Select OK to save and close the Class Points window.
Certification, License and Training Required by Dept and
Position Window
Use the Certification, License and Training Required by Department and Position window to assign to a specific Position and Department
combination and any required certifications, licenses or training. To open this window, click the HR and Payroll series button, click Human
Resources on the Setup content pane, click Certifications, Licenses and Training and then click Requirements.
FIGURE 2.16 CERTIFICATION, LICENSE AND TRAINING REQUIRED BY DEPARTMENT AND POSITION WINDOW
Use this window to add, update or remove from a list any required certifications, licenses or training.
Enter or select a Department and Position.
Required Certifications section within the scrolling window allows the user to assign any Certification Codes that are required for the currently selected Department and Position. Enter or delete the Certification Codes as required. To delete the Certification Code, select the code and then select delete row button.
Required Licenses section within the scrolling window allows the user to assign any License Types that are required for the currently selected Department and Position. Enter or delete the License Types as required. To delete the License Type, select the type and then select delete row button.
Required Training section within the scrolling window allows the user to assign any Course IDs that are required for the currently selected
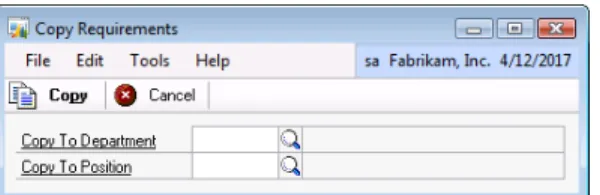
Once a Department and Position have been selected, the Copy button is enabled. Selecting Copy opens the Copy Requirements window and allows the user to copy all of the Required Certifications, Licenses and Training associated with the currently open Department/Position combination to another Department/Position combination.
FIGURE 2.17 COPY REQUIREMENTS WINDOW
Enter or select the Copy To Department and Copy To Position. Select
Copy to complete the copy process or select Cancel to cancel the copy process.
Employee Health and Wellness Manager - Setup
There are several set up windows associated with Employee Health and Wellness:
• Category Setup window
• Results Setup window
• Health and Wellness Code Setup window
• Health and Wellness Template Setup window
• Sources Setup window
Health and Wellness Code Setup Window
Use the Health and Wellness Code Setup window to set up and assign unlimited number of Codes with descriptions and be able to set the status of the code to Active or Inactive. To open this window, click the HR and Payroll series button, click Human Resources on the Setup content pane, click Health and Wellness and then click Codes.
FIGURE 2.18 HEALTH AND WELLNESS CODE SETUP WINDOW
Examples of Health and Wellness Codes are Rubeola, Rubella, Booster, Hepatitis C, Pertussis Exposure, Laser Screening, Hearing Protection and Eye Exams.
For each Code the user will be able to set up results, such as Positive or Negative. These results will then be available as choices on the
Employee Health and Wellness Entry window.
Enter or select a Code; enter or modify the Description and enter or select the Category.
The scrolling window allows the user to apply the Results that relate to the current Health and Wellness code.
• Checkbox will activate the Result
• Enter or select a Result Code
• The Description displays from the Result Setup window
Result Setup Window
Use the Result Setup window to set up and assign unlimited number of Result Codes with descriptions and be able to set the status of the code to Active or Inactive. To open this window, click the HR and Payroll
series button, click Human Resources on the Setup content pane, click
Health and Wellness and then click Results.
FIGURE 2.19 RESULT SETUP WINDOW
Enter or select a Result Code. Enter or modify the Description. Select the Inactive checkbox will inactivate the current Result Code. Select Save to save the Result Code.
Health and Wellness Template Setup Window
Use the Health and Wellness Template Setup window to set up and assign unlimited number of Templates with descriptions and be able to set the status of the Template to Active or Inactive. To open this window, click the HR and Payroll series button, click Human Resources on the Setup content pane, click Health and Wellness and then click
Templates.
FIGURE 2.20 HEALTH AND WELLNESS TEMPLATE SETUP WINDOW Employee defined templates can be used to assign defaults to
employees. One template setup assigned can easily establish all the tests required by a certain position, employee class or grouping specific to each facility.
Enter or select a Template Code and enter or modify the Description. The scrolling window allows the user to associate Health and Wellness Codes with a Template Code.
Enter or select a Health and Wellness Code.
The Description displays from the Health and Wellness Code Setup window.
The Category and Description displays from the Category Setup window.
Source Setup Window
Use the Source Setup window to create Source records. To open this window, click the HR and Payroll series button, click Human Resources
on the Setup content pane, click Health and Wellness and then click
Sources.
FIGURE 2.21 SOURCE SETUP WINDOW Enter or select a Source ID.
Enter the Last Name, First Name, Middle Name, Social Security Number and Medical Record Number.
Category Setup Window
Use the Category Setup window to set up an unlimited number of Category Codes with descriptions and be able to set the status of the code to Active or Inactive. The Category Code can be used for report grouping and restrictions. Example: Immunizations, Vaccinations, Blood Exposure, Injuries and Tests. To open this window, click the HR and Payroll series button, click Human Resources on the Setup content pane, click Health and Wellness and then click Categories.
FIGURE 2.22 CATEGORY SETUP WINDOW
Enter or select a Category Code. Enter or modify the Description. Select the Inactive checkbox to inactivate the current Category Code. Select Save to save the Category Code.
Summary
A variety of setup windows need to be completed prior to using the Advanced Human Resources module. Each of the components to Advanced Human Resources has dedicated windows for this purpose. Key points to remember from this chapter:
• Future Effective records can be set up to pre-enter information for upcoming changes to benefit plans.
• After completing the appropriate setup for Certification, License and Training Manager, certifications, licenses and training can be assigned to a department and position combination as required.
• Templates can be developed to assign predetermined health and wellness codes that will eventually be assigned on the employee level.
CHAPTER 3: EMPLOYEE MAINTENANCE
Objectives
The objectives are:
• Learn to effectively use Benefit Lifecycle Manager by
understanding (1) the changes on the employee dependents window, (2) the changes on the employee beneficiary window, (3) how to connect benefits to dependents and (4) how to activate Future Effective records.
• Assign certifications, licenses and training to employee records.
• Learn to assign Health and Wellness codes, categories and templates to employees and to track source information in the event of a work-related injury or illness.
Introduction
After completing the required setup in Chapter 2, the next step is to assign data to employee records. Advanced Human Resources allows the organization to input data for benefit plan changes in advance of the effective date by using future effective records, allows certifications, licenses and training courses and classes to be assigned to individual employees once attained or completed, and finally allows for the collection of additional data for a work-related injury or illness.
Benefit Lifecycle Manager
The first component of Advanced Human Resources is the Benefit Lifecycle Manager. This component has added additional fields to the employee dependent and beneficiary windows. In addition, benefits can now be assigned to dependents for better tracking of insurance
Employee Dependents Window
Within the Employee Dependents window, data fields have been added to set up dependents associated with the employee. To open this window, click the HR and Payroll series button, click Human Resources on the Cards content pane, click Employee and then click Dependents.
FIGURE 3.1 EMPLOYEE DEPENDENTS WINDOW The data fields are listed below:
• Status – Active or Inactive
• Status Comment – These options are defined in the Plan Status Reason window
• Change Date
• Marital Status – Married, Single or N/A
• Change Date
• Disabled checkbox
Employee Beneficiaries Window
Within the Employee Beneficiaries window, additional data fields are available to define beneficiaries associated with the employee and specific benefit plan. To open this window, click the HR and Payroll
series button, click the Human Resources on the Cards content pane, click Employee - Benefits, select a Benefit Enrollment option, select an
Employee ID, select a Benefit code, click the Benefit icon and then click
Beneficiary Definition.
FIGURE 3.2 EMPLOYEE BENEFICIARIES WINDOW The data fields are listed below:
• Plan Status – Active or Inactive
• Status Change Reason – lookup button now allows information to be defaulted from existing Dependents.
• Status Comment – These options are defined in the Plan Status Reason window
• Change Date
• Marital Status – Married, Single or N/A
• Change Date
• Disabled checkbox
Assign Template Window
Selecting a Template will create employee and code records for all codes associated with that Template. You can then assign any Dates and Results to those codes in this window.
Example: There may be a template for New Employees that would have listed 5 Immunizations, Vaccinations and Tests that a new employee would need. You could assign that template and the system would create the 5 records. If only 3 were needed, then you would uncheck the 2 that do not apply.
To open the Assign Template window, click the HR and Payroll series button, click Human Resources on the Cards content pane, click
Employee, click Health and Wellness, enter an Employee ID and then click the Assign Template button.
FIGURE 3.3 ASSIGN TEMPLATES WINDOW 4. Enter or select a Template Code.
5. The Description displays from the Health and Wellness Template Setup window.
6. The Scrolling window allows you to associate Health and Wellness codes with a Template Code.
Employee Benefit Dependents Window
The Employee Benefit Dependents window allows Human Resources to define the employee dependents associated with a specific employee benefit plan. To open this window, click the HR and Payroll series button, click Human Resources on the Cards content pane, click Employee - Benefits and select a Benefit Enrollment option, enter an Employee ID, select a Benefit code, click the Benefits icon and then click
Dependents.
Future Effective Activation Window
The Future Effective Activation window is used to activate the future effective date records. The following steps should be followed. To open this window, click the HR and Payroll series button, click Human Resources on the Utilities content pane and then click Activate Future Effective Benefits.
FIGURE 3.5 FUTURE EFFECTIVE ACTIVATION WINDOW
Within the Future Effective Activation scrolling window, the records can be sorted ascending or descending by columns. This window will display all Future Effective records that currently exist and will default sorted by Effective Date in ascending order.
• Select the Activate checkbox to process the Future Effective Activation for this benefit code. When selected, if
corresponding HR or Payroll Future Effective records exist the system prompts: “Do you want to select corresponding
HR/Payroll records?
– Yes prompts the user to select the Activate checkbox for all records that exist equal to the Benefit Code.
– No prompts the user to select the Activate checkbox for the one record.
Select Mark All or Unmark All to select or unselect all Future Effective records displayed in the scrolling window.
• Process validates that there are current records marked as ACTIVATE.
– If there are current records marked as ACTIVATE the process moves the current Microsoft Dynamics GP records to the Benefit Lifecycle Manager history tables, then moves the Benefit Lifecycle Manager Future Effective records into the core Microsoft Dynamics GP tables and remove them from the Benefit Lifecycle Manager pending tables. Remember to ACTIVATE the codes on or past the
Effective Date. By ACTIVATING before the Effective Date will make the changes current, regardless of the Effective Date.
Once the process is complete, the window will close.
The records in the window can be printed by selecting the Print icon on the window. The print will display the records in the order that they appear on the window.
Certification, License and Training Manager
The next component of Advanced Human Resources is Certification, License and Training Manager. Using this component, the user can assign certifications such as a Human Resources certification to a
particular employee. In addition, licenses with unique identifying numbers can be assigned. This could be as simple as a driver’s license or as complex as the DEA and other Medical Licenses required by a doctor. Another part of Advanced Human Resources enhances the Employee Training window allowing more information to be tracked. Finally, Advanced Human Resources allows the user to update multiple
employee training records with completion and expiration dates by using a course/class combination.
Certification Entry Window
Use the Certification Entry window to add or update the Certification data for a specific employee. Multiple certifications may be assigned to an employee. You will be able to quickly update the expiration date of a certification and retain the prior expiration date for historical purposes. To open the Certification Entry window, click the HR and Payroll series button, click Human Resources on the Cards content pane, click
Employee and then click Certifications.
FIGURE 3.6 CERTIFICATION ENTRY WINDOW
Enter or select an Employee ID to assign the Certification Code. The
Department and Position fields displays from the Employee Maintenance window.
The following fields may or may not be required based on the Training Course Required options selected on the Certification Setup window:
• Issued By Agency
• Original Issued Date
• Expiration Date
• Certification Number
• Date Renewed
Use the User Defined textboxes to track four additional pieces of Certification related information.
Select the Endorsements button to open the Endorsement Employee Certification Assignment window.
Select the History button to open the Certification History window to display the history information corresponding to the Certification Entry record currently open.
The Inactive checkbox will inactivate the current Certification Entry. Information on this window can be made available to employees and their managers by using Business Portal.
License Entry Window
Use the License Entry window to add or update License data for a specific employee. Multiple licenses may be assigned to an employee. You will be able to quickly update the expiration date of a license and retain the prior expiration date for historical purposes.
To open this window, click the HR and Payroll series button, click
Human Resources on the Cards content pane, click Employee and then click Licenses.
FIGURE 3.7 LICENSE ENTRY WINDOW
1. Enter or select an Employee ID to assign the License Number. The Department and Position fields displays from the Employee Maintenance window.
2. Enter a License Number. This number must be unique and not assigned to any employee.
3. Select or enter a License Type that corresponds to the
License Number.
4. Use the User Defined textboxes to track four additional pieces of License related information.
5. Select Endorsement to open the Endorsement Employee License Assignment window.
6. Select History to open the License History window to display the history information corresponding to the License Entry record currently open.
The Inactive checkbox will inactivate the current License Entry.
Information on this window can be made available to employees and their managers by using Business Portal.
Employee Training Window
The modified Employee Training window replaces the Core Employee Training window. To open the Employee Training window, click the HR and Payroll series button, click Human Resources on the Cards content pane, click Employee and then click the second Training option.
FIGURE 3.8 EMPLOYEE TRAINING WINDOW The additional fields include the following:
• Given By Organization - enter the name of the Organization led the class
• Instructor ID - enter the name of the instructor
• Expiration Date - enter the expiration date for this class
• Score - enter the score that the employee earned for this class
• Inactive - select the inactive checkbox if appropriate for the employee
Enter or select an Employee ID. The Department and Position fields displays from the Employee Maintenance window.
Enter or select the following if the field is Required based on the Training Course Definition Additional Information window:
• Given By Organization
• Instructor ID
• Score
Enter a Comment when applicable.
Enter or select a Completed Date and Expiration Date.
Select the Completed checkbox to select this Course ID/Class ID as completed when applicable.
Select the Inactivate checkbox to inactivate this Course ID/Class ID when applicable.
Select the History button to open the Training History window for the corresponding Employee Training record currently open.
Information on this window can be made available to employees and their managers by using Business Portal.
Mass Training Update Window
The Mass Training Update feature allows the user to access one window where any/all employee(s) can be updated for a Course and Class combination including the additional information made available in
Certification, License and Training Manager as it relates to the completion and expiration dates of their training.
To open the Mass Training Update window, click the HR and Payroll
series button, click Human Resources on the Utilities content pane and then click Mass Training Update.
FIGURE 3.9 COURSE AND CLASS EMPLOYEE ENTRY WINDOW Enter or select the Course ID, Class ID, Instructor ID, Given By Organization, Completed Date and Expiration Date.
Update Records will allow you to update multiple employee records by
Instructor ID, Given By Organization, Completed Date and/or
Employee Health and Wellness Manager
Health and Wellness information can be tracked for employees including additional information for work-related injuries and illnesses. For example in the health care industry an employee may be required to have certain vaccinations or immunizations and to keep them up to date during their employment. This information, along with results can be tracked by assigning the various categories and codes set up to an employee. There is also additional information that can be collected by employee for a work-related injury or illness. Source information can be added to the records allowing the user to simultaneously track ongoing treatment for both parties.
Health and Wellness Entry Window
Use the Health and Wellness Entry window to provide features for tracking all immunizations, vaccinations and tests required for each employee. The results for each test can also be recorded.
To open the Health and Wellness Entry window, click the HR and Payroll
series button, click Human Resources on the Cards content pane, click
Employee and then click Health and Wellness.
FIGURE 3.10 HEALTH AND WELLNESS ENTRY WINDOW
Enter or select an Employee ID. The Description displays from the Employee Maintenance window.
Enter or select the Health and Wellness Code that you wish to assign to employee. The Description and Category displays from the Health and Wellness Code Setup window.
Enter or select the Date Entered, Result and Renew Date. Select the History button to open the Health and Wellness History window for the current employee and code.
Injury and Illness Details Window
The purpose of the Injury and Illness Details window is to provide features for tracking injury information for each employee and sources. The results for each test can also be recorded.
The Injury and Illness Detail window will enable you to schedule follow-up vaccinations, immunizations and tests. The history will be tracked
indefinitely for each incident of immunizations, vaccinations and tests. To open the Injury and Illness Details window, click the HR and Payroll
series button, click Human Resources on the Cards content pane, click
Employee and then click Injury and Illness Details.
FIGURE 3.11 INJURY AND ILLNESS DETAILS WINDOW
Enter or select an Employee ID. The Description displays from the Employee Maintenance window.
Enter or select a Case #.
The scrolling window allows you to enter Injury and Illness data related to the Employee and Case Number selected.
The Source Information section allows you to enter the Source related to this Employee and Case Number.
Enter or select a Source ID. The Social Security Number, Last Name
and First Name displays from the Source Setup window.
The Source Health and Wellness Codes scrolling window allows you to enter Injury and Illness data related to the Employee and Case Number and Source ID selected.