USER
GUIDE
for Authentication
G
UIDE
© 2010 M86 Security All rights reserved.
Version 1.01, published March 2010
To be used with the M86 Web Filter User Guide version 1.01 for software release 4.0.00 or the M86 WFR User Guide ver-sion 1.01 for software release 2.0.00
Printed in the United States of America
This document may not, in whole or in part, be copied, photo-copied, reproduced, translated, or reduced to any electronic medium or machine readable form without prior written con-sent from M86 Security.
Every effort has been made to ensure the accuracy of this document. However, M86 Security makes no warranties with respect to this documentation and disclaims any implied war-ranties of merchantability and fitness for a particular purpose. M86 Security shall not be liable for any error or for incidental or consequential damages in connection with the furnishing, performance, or use of this manual or the examples herein. Due to future enhancements and modifications of this product, the information described in this documentation is subject to change without notice.
The latest version of this document can be obtained from http://www.m86security.com/support/wf/documentation.asp
C
ONTENTS
C
HAPTER1: I
NTRODUCTION... 1
About this User Guide ... 1
How to Use this User Guide ... 2
Conventions ... 2
Terminology ... 3
Filtering Elements ... 8
Group Types ... 8
Global Group ... 8
IP Groups . ... 9
LDAP Domain Groups . ... 10
Filtering Profile Types ... 11
Static Filtering Profiles . ... 13
Master IP Group Filtering Profile... 13
IP Sub-Group Filtering Profile ... 13
Individual IP Member Filtering Profile ... 13
Active Filtering Profiles . ... 14
Global Filtering Profile... 14
LDAP Filtering Profiles ... 14
Override Account Profile ... 15
Time Profile ... 15
Lock Profile ... 15
Filtering Profile Components ... 16
Library Categories . ... 17
M86 Supplied Categories... 17
Custom Categories ... 17
Service Ports . ... 18
Rules ... 18
Minimum Filtering Level ... 18
Web Filter authentication options . ... 25
Authentication Solution Compatibility ... 26
Authentication System Deployment Options ... 27
Ports for Authentication System Access ... 28
Configuring Web Filter for Authentication ... 29
Configuration procedures ... 29
System section... 29
Policy section ... 32
C
HAPTER2: N
ETWORKS
ETUP... 33
Environment Requirements ... 33
Workstation Requirements ... 33
Administrator ... 33
End User ... 34
Network Requirements ... 34
Set up the Network for Authentication ... 35
Specify the operation mode ... 36
Specify the subnet mask, IP address(es) ... 38
Invisible mode ... 38
Router or firewall mode . ... 39
Enable authentication, specify criteria ... 40
Net use based authentication ... 42
Web-based authentication . ... 43
Enter network settings for authentication ... 46
Create an SSL certificate ... 48
Create, Download a Self-Signed Certificate . ... 49
Create, Upload a Third Party Certificate ... 50
Create a Third Party Certificate... 50
Upload a Third Party Certificate ... 52
Download a Third Party Certificate ... 53
Specify block page settings ... 54
Block Page Authentication ... 54
Block page ... 56
Option 3 ... 62
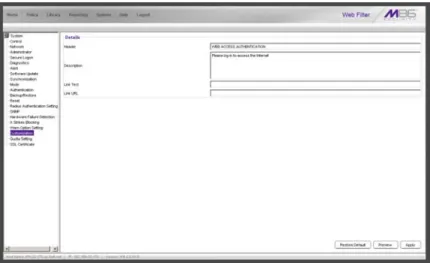
Common Customization ... 63
Enable, disable features ... 64
Authentication Form Customization ... 66
Preview sample Authentication Request Form ... 68
Block Page Customization ... 70
Preview sample block page ... 72
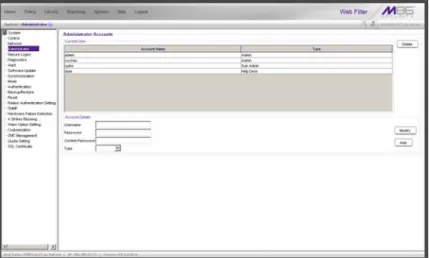
Set up Group Administrator Accounts ... 74
Add Sub Admins to manage nodes ... 74
Add a group administrator account ... 75
Update the group administrator’s password ... 75
Delete a group administrator account ... 76
View Log Results ... 77
C
HAPTER3: LDAP A
UTHENTICATIONS
ETUP... 79
Create an LDAP Domain ... 79
Add the LDAP domain ... 79
Refresh the LDAP branch ... 80
View, modify, enter LDAP domain details ... 80
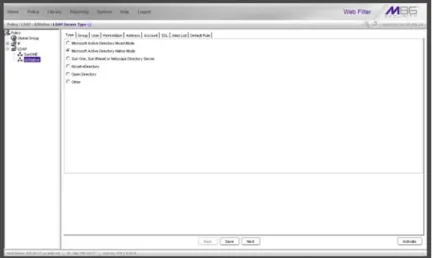
LDAP Server Type ... 81
Group Objects ... 82
User Objects ... 84
Workstation Objects ... 85
Address Info ... 86
Account Info ... 88
SSL Settings ... 90
Alias List ... 92
Default Rule ... 94
LDAP Backup Server Configuration ... 96
Configure a backup server... 96
Modify a backup server’s configuration ... 100
Apply a filtering rule to a profile ... 104
Delete a rule ... 105
Specify a group’s filtering profile priority ... 106
Manually add a workstation name to the tree ... 107
Manually add a user’s name to the tree ... 108
Manually add a group’s name to the tree ... 109
Upload a file of filtering profiles to the tree ... 110
C
HAPTER4: M
ANAGEN
ODES... 113
Assign Sub Admin to an LDAP Node ... 113
Create and Maintain Filtering Profiles ... 116
Add a group member to the tree list ... 117
Add or maintain a node’s profile ... 118
Category Profile . ... 119
Redirect URL . ... 122
Filter Options . ... 123
Add an Exception URL to the profile ... 124
Valid URL entries ... 125
Add URLs to Block URL or ByPass URL frame ... 126
Remove URLs from Block URL or ByPass URL frame . ... 128
Apply settings ... 129
Create a Time Profile for the node ... 130
Add a Time Profile ... 130
Remove a node’s profile from the tree ... 134
Verify that an LDAP Profile is Active ... 135
C
HAPTER5: A
UTHENTICATIOND
EPLOYMENT... 139
Test Authentication Settings ... 139
Test Web-based authentication settings ... 141
Step 1: Create an IP Group, “test” ... 141
Step 2: Create a Sub-Group, “workstation” ... 141
Test net use based authentication settings ... 149
Activate Authentication on the Network ... 150
Activate Web-based authentication for an IP Group ... 151
Step 1: Create a new IP Group, “webauth” ... 151
Step 2: Set “webauth” to cover users in range . ... 152
Step 3: Create an IP Sub-Group . ... 153
Step 4: Block everything for the Sub-Group ... 154
Step 5: Use Authentication Request Page for redirect URL . .. 155
Step 6: Disable filter options ... 156
Step 7: Set Global Group to filter unknown traffic . ... 157
Activate Web-based authentication for the Global Group ... 161
Step 1: Exclude filtering critical equipment ... 161
Step 1A: Block Web access, logging via Range to Detect . .... 162
Range to Detect Settings ... 162
Range to Detect Setup Wizard... 163
Step 1B: Block Web access via IP Sub-Group profile . ... 168
Step 2: Modify the Global Group Profile ... 170
Add Net Use command to Login Scripts ... 174
Step 1: Modify the 3-try login script ... 174
Step 2: Modify the Global Group Profile ... 175
C
HAPTER6: T
ECHNICALS
UPPORT... 177
Hours ... 177
Contact Information ... 178
Domestic (United States) ... 178
International ... 178
E-Mail ... 178
Office Locations and Phone Numbers ... 179
M86 Corporate Headquarters (USA) ... 179
M86 Taiwan ... 179
Tier 1: Single Sign-On Authentication ... 182
Net use based authentication process ... 182
Re-authentication process ... 183
Tier 1 authentication method ... 184
Name resolution methods ... 184
Configuring the authentication server ... 185
Login scripts ... 185
Enter net use syntax in the login script ... 185
View login script on the server console ... 186
Block page authentication login scripts ... 186
LDAP server setup rules ... 187
Tier 2: Time-based, Web Authentication ... 188
Tier 2 implementation in an environment ... 189
Tier 2 Script . ... 190
Tier 1 and Tier 2 Script . ... 191
Tier 3: Session-based, Web Authentication ... 193
M86 Authenticator ... 194
Environment requirements ... 195
Windows minimum system requirements ... 195
Recommended system requirements ... 195
Macintosh minimum system requirements ... 196
Workstation requirements ... 196
Work flow in environments ... 197
Windows environment ... 197
Macintosh environment . ... 198
M86 Authenticator configuration priority . ... 199
Windows... 199
Macintosh ... 200
M86 Authenticator configuration syntax . ... 201
Sample command line parameters ... 201
Sample configuration file ... 201 Sample Web Filter configuration update packet ‘PCFG’ .. 202
Client workstations . ... 207
Novell clients ... 207
Novell eDirectory setup ... 207
Web Filter setup and event logs ... 208
Active Directory Agent ... 209
Product feature overview ... 209
Windows server requirements . ... 210
Work flow in a Windows environment ... 210
Set up AD Agent ... 211
Step 1: AD Agent settings on the Web Filter ... 211
Step 2: Configure the domain, service account ... 213
Step 3: AD Agent installation on Windows server ... 214
Step 3A: Download DCAgent.msi ... 214
Step 3B: Run AD Agent installation setup... 214
Step 3C: Run AD Agent configuration wizard ... 217
Use the Active Directory Agent console ... 222
Activity tab ... 222
Sessions tab . ... 225
Session table spreadsheet... 227
Session Properties window ... 228
Workstation Interactive Probe window ... 229
Active Directory Agent Configuration window ... 231
Service page ... 233
Appliance page ... 234
Agent hosts page ... 235
Add a satellite ... 236
Remove a satellite ... 236
Configure a satellite ... 237
Check the status of a satellite... 239
Options page ... 241
Notifications page ... 243
Obtain a Sun One SSL Certificate ... 255
A
PPENDIXC: LDAP S
ERVERC
USTOMIZATIONS... 256
OpenLDAP Server Scenario ... 256
Not all users returned in LDAP Browser window ... 256
A
PPENDIXD: P
ROFILEF
ORMATANDR
ULES... 257
Username Formats ... 258
Rule Criteria ... 258
File Format: Rules and Examples ... 261
LDAP Profile List Format and Rules ... 262
Workstation profile list format ... 262
User profile list format ... 263
Group profile list format ... 264
Container profile list format ... 264
LDAP Quota Format and Rules ... 265
A
PPENDIXE: O
VERRIDEP
OP-
UPB
LOCKERS... 266
Yahoo! Toolbar Pop-up Blocker ... 267
If pop-up blocking is enabled ... 267
Add override account to the white list ... 267
Google Toolbar Pop-up Blocker ... 269
If pop-up blocking is enabled ... 269
Add override account to the white list ... 269
AdwareSafe Pop-up Blocker ... 270
If pop-up blocking is enabled ... 270
Temporarily disable pop-up blocking ... 270
Use the Internet Options dialog box ... 273
Use the IE toolbar . ... 274
Temporarily disable pop-up blocking ... 274
Add override account to the white list ... 275
Use the IE toolbar ... 275
Use the Information Bar ... 276
Set up the Information Bar ... 276
Access your override account ... 276
A
PPENDIXF: G
LOSSARY... 278
Definitions ... 278
C
HAPTER
1: I
NTRODUCTION
The M86 Web Filter Authentication User Guide contains information about setting up authentication on the network.
About this User Guide
This user guide addresses the network administrator desig-nated to configure and manage the Web Filter on the network.
Chapter 1 provides information on how to use this user guide, and also includes an overview of filtering compo-nents and authentication solutions.
Chapters 2 and 3 describe the Web Filter Administrator console entries that must be made in order to prepare the network for using authentication for LDAP domains.
NOTE: Refer to the M86 Web Filter Installation Guide or M86 WFR Installation Guide for information on installing the unit on the network. This document also provides information on how to access the Web Filter Administrator console to perform the initial installation setup defined in Chapter 2: Network Setup.
After all settings have been made, authentication is ready to be used on the network. Chapter 4 explains how to assign groups and members for management by Sub Admin group administrators, and how group administrators create and maintain filtering profiles for entities in their assignment. Chapter 5 outlines the step you need to take to test and to activate your settings before deploying authentication on the network.
file components and setup; tips on how to override pop-up windows with pop-up blocker software installed; a glossary on authentication terms, and an index.
How to Use this User Guide
Conventions
The following icons are used throughout this user guide:
NOTE: The “note” icon is followed by italicized text providing additional information about the current subject.
TIP: The “tip” icon is followed by italicized text giving you hints on how to execute a task more efficiently.
WARNING: The “warning” icon is followed by italicized text cautioning you about making entries in the application, executing certain processes or procedures, or the outcome of specified actions.
Terminology
The following terms are used throughout this user guide. Sample images (not to scale) are included for each item. • alert box - a message box
that opens in response to an entry you made in a dialog box, window, or screen. This box often
contains a button (usually labeled “OK”) for you to click in order to confirm or execute a command.
• button - an object in a dialog box, window, or screen that can be clicked with your mouse to execute a command. • checkbox - a small square in a dialog
box, window, or screen used for
indi-cating whether or not you wish to select an option. This object allows you to toggle between two choices. By clicking in this box, a check mark or an “X” is placed, indi-cating that you selected the option. When this box is not checked, the option is not selected.
• dialog box - a box that opens in response to a command made in a window or screen, and requires your input. You
must choose an option by clicking a button (such as “Yes” or “No”, or “Next” or “Cancel”) to execute your command. As dictated by this box, you also might need to make one or more entries or selections prior to clicking
• frame - a boxed-in area in a dialog box, window, or screen that includes a group of objects such as fields, text boxes, list boxes, buttons, radio buttons,
check-boxes, and/or tables. Objects within a frame belong to a specific function or group. A frame often is labeled to indi-cate its function or purpose.
• grid - an area in a frame that displays rows and columns of
data, as a result of various processes. This data can be reorganized in the Administrator console, by changing the order of the columns.
• list box - an area in a dialog box, window, or screen that accommo-dates and/or displays entries of items that can be added or removed.
• navigation panel - the panel that displays at the left of a screen. This panel can contain links that can be clicked to open windows or dialog boxes at the right of the screen. One or more tree lists also can display in this panel. When an item in the tree list is clicked, the tree list opens to reveal items that can be selected.
• pop-up box or pop-up window - a box or window that opens after you click a button in a dialog box, window, or screen. This box or window may display infor-mation, or may require you to make one or more entries.
Unlike a dialog box, you do not need to choose between options.
• pull-down menu - a field in a dialog box, window, or screen
that contains a down-arrow to the right. When you click the arrow, a menu of items displays from which you make a selection.
• radio button - a small, circular object in a dialog box, window, or screen used
for selecting an option. This object allows you to toggle between two choices. By clicking a radio button, a dot is placed in the circle, indicating that you selected the option. When the circle is empty, the option is not selected.
• screen - a main object of an appli-cation that displays across your monitor. A screen can contain panels, windows, frames, fields, tables, text
• sub-topic - a subset of a main topic that displays as a menu item for the topic. The menu of sub-topics opens when a
perti-nent topic link in the left panel—the navigation panel—of a screen is clicked. If a sub-topic is selected, the window for that sub-topic displays in the right panel of the screen, or a pop-up window or an alert box opens, as appro-priate.
• text box - an area in a dialog box, window, or screen that accommodates your data entry. A text box is a type of field. (See “field”.)
• topic - a topic displays as a link in the left panel— the naviga-tion panel— of a screen. By clicking the link for a topic, the
window for that topic displays in the right panel of the screen, or a menu of sub-topics opens.
• tree - a tree displays in the naviga-tion panel of a screen, and is comprised of a hierarchical list of items. An entity associated with a branch of the tree is preceded by a plus (+) sign when the branch is collapsed. By double-clicking the item, a minus (-) sign replaces the plus sign, and any entity within that branch of the tree displays. An item in the tree is selected by clicking it. • window - a window displays on
a screen, and can contain frames, fields, text boxes, list boxes, buttons, checkboxes, and radio buttons. A window for a topic or sub-topic displays in the right panel of the screen. Other types of windows include pop-up windows, login
windows, or ones from the system such as the Save As or Choose file windows.
Filtering Elements
Filtering operations include the following elements: groups, filtering profiles and their components, and rules for filtering.
Group Types
In the Policy section of the Administrator console, group types are structured in a tree format in the navigation panel. There are four group types in the tree list:
• Global Group • IP groups
• LDAP domain groups
NOTES: If authentication is enabled, the global administrator— who has all rights and permissions on the Web Filter—will see all branches of the tree: Global Group, IP, and LDAP. If authentica-tion is disabled, only the Global Group and IP branches will be seen.
A group administrator will only see entities assigned to him/her by the global administrator.
Global Group
The first group that must be set up is the global group, represented in the tree structure by the global icon . The filtering profile created for the global group represents the default profile to be used by all groups that do not have a filtering profile, and all users who do not belong to a group.
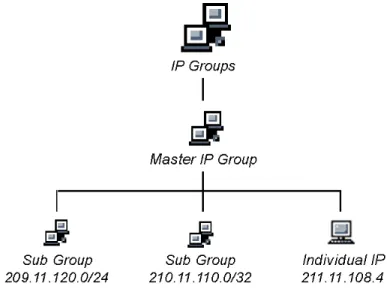
IP Groups
The IP group type is represented in the tree by the IP icon . A master IP group is comprised of sub-group members and/or individual IP members .
The global administrator adds master IP groups, adds and maintains override accounts at the global level, and estab-lishes and maintains the minimum filtering level.
The group administrator of a master IP group adds sub-group and individual IP members, override account and time profiles, and maintains filtering profiles of all members in the master IP group.
LDAP Domain Groups
An LDAP (Lightweight Directory Access Protocol) domain on a network server is comprised of LDAP groups and their associated members (users), derived from profiles on the network’s authentication server.
The LDAP group type is represented in the tree by the LDAP icon . This branch will only display if authentica-tion is enabled. Using the tree menu, the global adminis-trator adds and maintains LDAP domains , and assigns designated group administrators (Sub Admins) access to specific entities (nodes) within that domain. The group administrator creates and maintains filtering profiles for nodes assigned to him/her. For Active Directory or “Other” server types, these nodes include primary or static
groups , workstations , users , or containers . For Open Directory, nodes include groups and users. For Novell eDirectory, Sun One, Sun IPlanet, or Netscape Directory server types, these nodes also include dynamic groups . If users belong to more than one group, the global administrator sets the priority for group filtering.
Filtering Profile Types
A filtering profile is used by all users who are set up to be filtered on the network. This profile consists of rules that dictate whether a user has access to a specified Web site or service on the Internet.
The following types of filtering profiles can be created, based on the set up in the tree menu of the Policy section of the console:
Global Group
• global filtering profile - the default filtering profile posi-tioned at the base of the hierarchical tree structure, used by end users who do not belong to a group.
IP group (Master Group)
• master group filtering profile - used by end users who belong to the master group.
• master time profile - used by master group users at a specified time.
IP group member
• sub-group filtering profile - used by a sub-group member.
• individual filtering profile - used by an individual IP group member.
• time profile - used by a sub-group/individual IP group member at a specified time.
• LDAP member filtering profile - used by an LDAP group member.
• LDAP container filtering profile - used by an LDAP container in an LDAP domain.
• LDAP time profile - used by an LDAP entity at a speci-fied time.
Other filtering profiles
• override account profile - set up in either the global group section or the master group section of the console.
NOTE: An override account set up in the master IP group section of the Web Filter Administrator console takes precedence over an override account set up in the global group section of the
console.
• lock profile - set up under X Strikes Blocking in the Filter Options section of the profile.
• Radius profile - used by end users on a Radius accounting server if the Radius server is connected to the Web Filter and the Radius authentication feature enabled.
• TAR profile - used if a Threat Analysis Reporter (TAR) is connected to the Web Filter and an end user is locked out by TAR when attempting to access blocked content in a library category.
Static Filtering Profiles
Static filtering profiles are based on fixed IP addresses and include profiles for master IP groups and their members.
Master IP Group Filtering Profile
The master IP group filtering profile is created by the global administrator and is maintained by the group administrator. This filtering profile is used by members of the group— including sub-group and individual IP group members—and is customized to allow/deny users access to URLs, or warn users about accessing specified URLs, to redirect users to another URL instead of having a block page display, and to specify usage of appropriate filter options.
IP Sub-Group Filtering Profile
An IP sub-group filtering profile is created by the group administrator. This filtering profile applies to end users in an IP sub-group and is customized for sub-group members.
Individual IP Member Filtering Profile
An individual IP member filtering profile is created by the group administrator. This filtering profile applies to a speci-fied end user in a master IP group.
Active Filtering Profiles
Active filtering profiles include the global group profile, LDAP authentication profile, override account profile, time profile, and lock profile.
Global Filtering Profile
The global filtering profile is created by the global adminis-trator. This profile is used as the default filtering profile. The global filtering profile consists of a customized profile that contains a list of library categories to block, open, add to a white list, or assign a warn setting, and service ports that are configured to be blocked. A URL can be specified for use instead of the standard block page when users attempt to access material set up to be blocked. Various filter options can be enabled.
LDAP Filtering Profiles
A filtering profile for an LDAP group, workstation, member, or container is created by the group administrator assigned to that entity within a domain.
For group profiles, if users belong to more than one group, all groups to which they belong must be ranked to determine the priority each filtering profile takes over another.
For workstation profiles, the profile remains at a given work-station set up within an LDAP domain, so that any user who logs into that workstation will use the same profile as the previous user who logged onto that machine.
Override Account Profile
If any user needs access to a specified URL that is set up to be blocked, the global administrator or group administrator can create an override account for that user. This account grants the user access to areas set up to be blocked on the Internet.
Time Profile
A time profile is a customized filtering profile set up to be effective at a specified time period for designated users.
Lock Profile
This filtering profile blocks the end user from Internet access for a set period of time, if the end user’s profile has the X Strikes Blocking filter option enabled and he/she has received the maximum number of strikes for inappropriate Internet usage.
NOTE: Refer to the M86 Web Filter User Guide or M86 WFR User Guide for additional information on the Override Account Profile, Time Profile, and Lock Profile.
Filtering Profile Components
Filtering profiles are comprised of the following compo-nents:
• library categories - used when creating a rule, minimum filtering level, or filtering profile for the global group or any entity
• service ports - used when setting up filter segments on the network, creating the global group (default) filtering profile, or establishing the minimum filtering level • rules - specify which library categories should be
blocked, left open, assigned a warn setting, or white listed
• filter options - specify which features will be enabled: X Strikes Blocking, Google/Bing/Yahoo!/Ask/AOL Safe Search Enforcement, Search Engine Keyword Filter Control, URL Keyword Filter Control
• minimum filtering level - takes precedence over filtering profiles of entities who are using a filtering profile other than the global (default) filtering profile
• filter settings - used by service ports, filtering profiles, rules, and the minimum filtering level to indicate whether users should be granted or denied access to specified Internet content
Library Categories
A library category contains a list of Web site addresses and keywords for search engines and URLs that have been set up to be blocked or white listed. Library categories are used when creating a rule, the minimum filtering level, or a filtering profile.
M86 Supplied Categories
M86 furnishes a collection of library categories, grouped under the heading “Category Groups” (excluding the “Custom Categories” group). Updates to these categories are provided by M86 on an ongoing basis, and administra-tors also can add or delete individual URLs within a speci-fied library category.
Custom Categories
Custom library categories can be added by either global or group administrators. As with M86 supplied categories, additions and deletions can be made within a custom cate-gory. However, unlike M86 supplied categories, a custom category can be deleted.
NOTE: M86 cannot provide updates to custom categories. Main-taining the list of URLs and keywords is the responsibility of the global or group administrator.
Service Ports
Service ports are used when setting up filter segments on the network (the range of IP addresses/netmasks to be detected by the Web Filter), the global (default) filtering profile, and the minimum filtering level.
When setting up the range of IP addresses/netmasks to be detected, service ports can be set up to be open (ignored). When creating the global filtering profile and the minimum filtering level, service ports can be set up to be blocked or filtered.
Examples of service ports that can be set up include File Transfer Protocol (FTP), Hyper Text Transfer Protocol (HTTP), Network News Transfer Protocol (NNTP), Secured HTTP Transmission (HTTPS), and Secure Shell (SSH).
Rules
A rule is comprised of library categories to block, leave open, assign a warn setting, or include in a white list. Access to an open library category can be restricted to a set number of minutes. Each rule that is created by the global administrator is assigned a number. A rule is selected when creating a filtering profile for an entity.
Minimum Filtering Level
The minimum filtering level consists of library categories set up at the global level to be blocked or opened, and service ports set up to be blocked or filtered. If the minimum filtering level is created, it applies to all users in IP and LDAP groups, and takes precedence over filtering settings made
NOTE: If the minimum filtering level is not set up, global (default) filtering settings will apply instead.
If an override account is established at the IP group level for a member of a master IP group, filtering settings made for that end user will override the minimum filtering level if the global administrator sets the option to allow the minimum filtering level to be bypassed. An override account estab-lished at the global group level will automatically bypass the minimum filtering level.
Filter Settings
Categories and service ports use the following settings to specify how filtering will be executed:
• block - if a category or a service port is given a block setting, users will be denied access to the item set up as “blocked”
• open - if a category or the filter segment detected on the network is given an open (pass) setting, users will be allowed access to the item set up as “opened”
NOTE: Using the quota feature, access to an open category can be restricted to a defined number of minutes.
• always allowed - if a category is given an always allowed setting, the category is included in the user’s white list and takes precedence over blocked categories
NOTE: A category that is allowed will override any blocked settings except if the minimum filtering level is set to block that category.
• filter - if a service port is given a filter setting, that port will use filter settings created for library categories (block or open settings) to determine whether users should be denied or allowed access to that port
• ignore - if the filter segment detected on the network has a service port set up to be ignored, that service port will be bypassed
Filtering Rules
Individual User Profiles - A user in an LDAP domain can have only one individual profile set up per domain.
Filtering Levels Applied:
1. The global (default) filtering profile applies to any user under the following circumstances:
• the user does not belong to a master IP group • the user has not been assigned a domain default
profile from an LDAP authentication domain 2. If a minimum filtering level is defined, it applies to all
master IP groups (and their members) and LDAP groups who have been assigned filtering profiles after authenti-cating. The minimum filtering level combines with the user’s profile to guarantee that categories blocked in the minimum filtering level are blocked in the user’s profile. 3. For master IP group members:
a. A master IP group filtering profile takes precedence over the global profile.
b. A master IP group time profile takes precedence over the master IP group profile.
4. For IP sub-group members:
a. An IP sub-group filtering profile takes precedence over the master IP group’s time profile.
b. An IP sub-group time profile takes precedence over the IP sub-group profile.
6. For LDAP users, if a user is authenticated, settings for the user’s group or individual profile from the LDAP domain are applied and take precedence over any IP profile.
a. If the user belongs to more than one group in an authentication domain, the profile for the user is deter-mined by the order in which the groups are listed in the Group Priority list set by the global administrator. The user is assigned the profile for the group highest in the Group Priority list.
NOTE: In an LDAP domain, if a user belongs to a container, that profile takes precedence over the group profile for that user.
b. If a user has an individual profile set up, that profile supercedes all other profile levels for that user. The user can have only one individual profile in each domain.
c. A profile for a workstation takes precedence over a user’s individual profile.
d. If the user has a time profile, that profile takes prece-dence over other profiles. A group time profile takes precedence over a domain time profile, and a
container time profile takes precedence over a group time profile. An individual time profile takes prece-dence over a container time profile, and a workstation time profile takes precedence over an individual time profile.
NOTE: A Radius profile is another type of authentication profile and is weighted the same as LDAP authentication profiles in the precedence hierarchy.
7. A Threat Analysis Reporter (TAR) profile is a type of lockout profile. If using TAR with a Web Filter, the TAR
8. An override account profile takes precedence over a TAR lockout profile. This account may override the minimum filtering level—if the override account was set up in the master IP group tree, and the global adminis-trator allows override accounts to bypass the minimum filtering level, or if the override account was set up in the global group tree.
NOTE: An override account set up in the master IP group section of the Web Filter Administrator console takes precedence over an override account set up in the global group section of the
console.
9. An X Strikes lockout profile takes precedence over all filtering profiles. This profile is set up under Filter Options, by enabling the X Strikes Blocking feature.
Authentication Solutions
LDAP Authentication Protocol
The Web Filter supports the authentication protocol Light-weight Directory Access Protocol (LDAP).
LDAP authentication supports all versions of LDAP, such as Microsoft Active Directory, Novell eDirectory, Sun One, OpenLDAP, and Open Directory.
Web Filter Authentication Tiers and Options
Web Filter authentication tiers
The Web Filter authentication architecture for the LDAP authentication protocol is comprised of three tiers. When using LDAP authentication with the Web Filter, one of these three tiers is selected for use on the network, depending on the server(s) used on the network and the preferred authen-tication method(s) to be employed.
• Tier 1: Single sign-on, net use based authentication for Active Directory domains.
• Tier 2: Time-based, Web authentication for the LDAP authentication method.
• Tier 3: Session-based, Web authentication for the LDAP authentication method.
Web Filter authentication options
Depending on the setup of your network, any of the following authentication options can be enabled to ensure the end user is authenticated when logging into his/her workstation: M86 Authenticator, Active Directory Agent, and Novell eDirectory Agent.
NOTE: See Appendix A: Authentication Operations for informa-tion on using Tier 1, Tier 2, and Tier 3 on the network, and config-uring M86 Authenticator, Novell eDirectory Agent, and Active Directory Agent.
Authentication Solution Compatibility
Below is a chart representing the authentication solution compatibility for a single user:
KEY:
• N/A = Not Applicable • N/R = Not Recommended
Tier1 net use Tier 2 time based Tier 3 session based M86 Authen-ticator eDirec-tory Agent Active Directory Agent
Tier 1 -- Yes Yes N/R N/A N/R
Tier 2 Yes -- N/A Yes Yes Yes
Tier 3 Yes N/A -- Yes Yes Yes
M86 Authen-ticator
N/R Yes Yes -- N/R N/R
eDirectory Agent
N/A Yes Yes N/R -- N/A
Active Directory Agent
--Authentication System Deployment Options
Below is a chart representing authentication system deploy-ment options on a network:
Authentication
System Single Sign-On (SSO)
Force
Authentication
Sun One OpenLDAP
CommuniGate Pro (Stalker)
None Tier 2 or Tier 3
Windows 2000/2003 Server (both Mixed and Native modes)
Tier 1 “net use”
M86 Authenticator for Windows AD Agent
Tier 2 or Tier 3
Novell eDirectory M86 Authenticator for Windows Novell eDirectory Agent (for eDirectory server version 8.7 and higher)
Tier 2 or Tier 3
Windows 2000/2003 Server and Novell eDirectory Mixed environment
M86 Authenticator for Windows Novell eDirectory Agent AD Agent
Tier 2 or Tier 3
Ports for Authentication System Access
The following ports should be used for authentication system access:
Type No. Function
TCP 8081 Used between the Web Filter’s transmitting interface and the SSL block page for Tier 2 or Tier 3 authentication.
TCP 836 Used between the Web Filter’s Virtual IP address and Java applet for Tier 3 authentica-tion.
TCP 139 Used between the Web Filter and workstations requiring Tier 1 or Tier 3 authentication. TCP/
UDP
137 Used between the Web Filter and workstations requiring Tier 1 authentication.
LDAP 389 Used for communicating with domain control-lers in order to bind with them so that user/ group information can be queried/accessed. LDAPS 636 Used for communicating with domain
control-lers in order to bind with them so that user/ group information can be queried/accessed.
Configuring Web Filter for Authentication
Configuration procedures
When configuring the Web Filter for authentication, settings must be made in System and Policy windows in the Admin-istrator console.
NOTES: If the network has more than one domain, the first one you add should be the domain on which the Web Filter resides.
The entries described in this section represent entries to be made on a typical network.
System section
The first settings for authentication must be made in the System section of the Administrator console in the following windows: Operation Mode, LAN Settings, Enable/Disable Authentication, Authentication Settings, Authentication SSL Certificate (if Web-based authentication will be used), and Block Page Authentication.
1. Select “Mode” from the navigation panel, and then select “Operation Mode” from the pop-up menu.
The entries made in the Operation Mode window will vary depending on whether you will be using the invisible mode, or the router or firewall mode.
In the Listening Device frame, set the Listening Device to
“LAN1”.
In the Block Page Device frame:
The entries made in this window will vary depending on whether you are using the invisible mode, or the router or firewall mode. The LAN1 and LAN2 IP addresses usually should be in a different subnet.
• If using the invisible mode: For the LAN1 IP address, select 255.255.255.255 for the subnet mask.
• If using the router or firewall mode: Specify the appro-priate IP address and subnet mask in the applicable fields.
3. Select “Authentication” from the navigation panel, and then select Enable/Disable Authentication from the pop-up menu.
Enable authentication, and then select one of three tiers in the Web-based Authentication frame:
• Tier 1: Choose this option if you will only be using net use based authentication for Active Directory servers. • Tier 2: Choose this option if you wish to use timed
Web-based authentication for LDAP domains. This option gives the user a timed session for his/her Internet access. After the timed profile expires, the user will have to log in again if he/she wants to continue to have Internet access.
• Tier 3: Choose this option if you wish to use persistent Web-based authentication for LDAP domains. This option gives the user a persistent network connection via a pop-up window that keeps the user’s session open until the window is closed, so the user does not have to log in repeatedly.
If you wish to use the tier you specified as a fallback authentication solution, you have the option to enable
4. Select “Authentication” from the navigation panel, and then select “Authentication Settings” from the pop-up menu.
In the Settings frame, enter general configuration settings for the Web Filter such as IP address entries. From the NIC Device to Use for Authentication pull-down menu:
• If using the invisible mode: Select “LAN2” as the device to send traffic on the network.
• If using the router or firewall mode: Select “LAN1”.
5. Select “Authentication” from the navigation panel, and then select Authentication SSL Certificate from the pop-up menu. This option should be used if Web-based authentication will be deployed on the Web Filter. Using this option, you create either a self-signed certifi-cate or a Certificertifi-cate Request (CSR) for use by the Secure Sockets Layer (SSL). The certificate should be placed on client machines so that these machines will recognize the Web Filter as a valid server with which they can communicate.
6. Select “Control” from the navigation panel, and then select “Block Page Authentication” from the pop-up menu.
In the Block Page Authentication window, select the Re-authentication Options to be used. The items you select will be listed as options for re-authentication on the Options page, accessible from the standard block page. If the “Re-authentication” (NET USE) option is selected, enter the login script path to be used by the Web Filter for
group administrators will later be assigned to manage entities (nodes) in the LDAP branch of the Policy tree.
Policy section
In the Policy section of the Administrator console, choose LDAP, and then do the following:
1. Add a domain from the network to the list of domains that will have users authenticated by the Web Filter.
NOTE: If the network has more than one domain, the first one you add should be the domain on which the Web Filter resides.
2. Do either of the following as necessary:
• Assign a group administrator to oversee the newly-added domain and to set up filtering profiles for all groups and members within that domain
• Assign Sub Admin group administrators to specific groups and let them create filtering profiles for their group and its members
3. Set the group priority by designating which group profile will be assigned to a user when he/she logs in. If a user is a member of multiple groups, the group that is positioned highest in the list is applied.
C
HAPTER
2: N
ETWORK
S
ETUP
Environment Requirements
Workstation Requirements
Administrator
System requirements for the administrator include the following:
• Windows XP, Vista, or 7 operating system running: • Internet Explorer (IE) 7.0 or 8.0
• Firefox 3.5
• Macintosh OS X Version 10.5 or 10.6 running: • Safari 4.0
• Firefox 3.5
• JavaScript enabled • Java Virtual Machine
• Java Plug-in (use the version specified for the Web Filter software version)
• Java Runtime Environment, if using Tier 3 authentication
NOTE: Web Filter administrators must be set up with software installation privileges in order to install Java used for accessing the user interface.
End User
System requirements for the end user include the following: • Windows XP, Vista, or 7 operating system running:
• Internet Explorer (IE) 7.0 or 8.0 • Firefox 3.5
• Macintosh OS X Version 10.5 or 10.6 running: • Safari 4.0
• Firefox 3.5 • JavaScript enabled
• Java Runtime Environment, if using Tier 3 authentication • Pop-up blocking software, if installed, must be disabled
Network Requirements
• High speed connection from the Web Filter to the client workstations
• HTTPS connection to M86’s software update server • Internet connectivity for downloading Java Virtual
Machine—and Java Runtime Environment, if neces-sary—if not already installed
Set up the Network for Authentication
The first settings for authentication must be made in the System section of the console in the following windows: Operation Mode, LAN Settings, Enable/Disable Authentica-tion, Authentication Settings, Authentication SSL Certificate (if Web-based authentication will be used), and Block Page Authentication. Entries for customizing the block page and/ or authentication request form are made in the Common Customization, Authentication Form Customization, and Block Page Customization windows.
View Log File can be used for troubleshooting authentica-tion setup.
Specify the operation mode
Click Mode and select Operation Mode from the pop-up menu to display the Operation Mode window:
Fig. 2-1 Operation Mode window
The entries made in this window will vary depending on whether you will be using the invisible mode, or the router or firewall mode, and the mobile mode option.
1. In the Mode frame, select the mode to be used: “Invis-ible”, “Router”, or “Firewall”. Include the “Mobile” option if the Mobile Client will be used for filtering users outside of the organization.
NOTE: See the M86 Web Filter User Guide or the Web Filter section of the M86 WFR User Guide for information about config-uring and using the Mobile Client.
3. In the Block Page Device frame:
• If using the invisible mode, select “LAN2”.
• If using the router or firewall mode, select “LAN1”. If using the invisible mode, the Block Page Delivery Method frame displays. Choose from either of the two Protocol Methods:
• “Send Block Page via ARP Table” - this option uses the Address Resolution Protocol method to find the best possible destination MAC address of a specified host, usually the Web Filter gateway.
• “Send Block to Specified Host MAC Address” - using this preferred method, the block page will always be sent to the MAC address of a specified host, usually the Web Filter gateway.
Choose from either of the two Block Page Route To selections:
• “Default Gateway” - this option indicates that the default gateway on your network will be used for sending block pages.
• “Alternate IP Address” - this option should be used if block pages are not being served.
Enter the IP address of the router or device that will serve block pages.
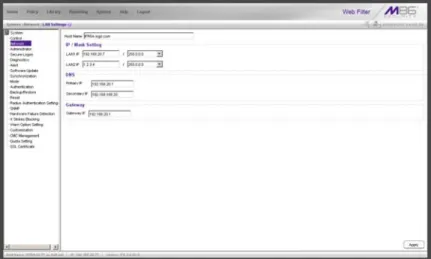
Specify the subnet mask, IP address(es)
Click Network and select LAN Settings from the pop-up menu to display the LAN Settings window:
Fig. 2-2 LAN Settings window
The entries made in this window will vary depending on whether you are using the invisible mode, or the router or firewall mode.
NOTE: If the gateway IP address on the network changes, be sure to update the Gateway IP address in this window.
Invisible mode
For the LAN1 IP address, select 255.255.255.255for the subnet mask, and click Apply.
Router or firewall mode
1. Enter the following information:
• In the LAN1 IP field of the IP/Mask Setting frame, enter the IP address and specify the corresponding subnet of the “LAN1” network interface card to be used on the network.
• In the LAN2 IP field, enter the IP address and specify the corresponding subnet of the “LAN2” network inter-face card to be used on the network.
TIP: The LAN1 and LAN2 IP addresses usually should be placed in different subnets.
• In the Primary IP field of the DNS frame, enter the IP address of the first DNS server to be used for resolving the IP address of the authentication server with the machine name of that server.
• In the Secondary IP field of the DNS frame, enter the IP address of the second DNS server to be used for resolving the IP address of the authentication server with the machine name of that server.
• In the Gateway IP field of the Gateway frame, enter the IP address of the default router to be used for the entire network segment.
2. Click Apply to apply your settings.
NOTE: Whenever modifications are made in this window, the server must be restarted in order for the changes to take effect.
Enable authentication, specify criteria
1. Click Authentication and select Enable/Disable Authenti-cation from the pop-up menu to display the Enable/ Disable Authentication window:
2. Click Enable to enable authentication.
3. Select one of three tiers in the Web-based Authentication frame:
Fig. 2-3 Enable/Disable Authentication window
NOTES: See information on the following pages for details about each of the tiers, and for steps that must be executed to enable your tier selection.
See Appendix A: Authentication Operations for more information about each tier and for configuring various authentication options.
4. Enable any of the following authentication options, as pertinent to your environment:
• If using LDAP authentication and workstation profiles, click “On” in the Map Workstation Name Across All Domain Labels frame to enable the Web Filter to search other domain labels if it can’t find the worksta-tion’s NetBIOS name under a specified domain label, based on the user’s full Distinguished Name.
• In the M86 Authenticator frame, be sure the M86 Authenticator is “On”—unless the Novell eDirectory Agent option will be used instead. When enabling the M86 Authenticator option, and then downloading and installing the M86 Authenticator for Windows (authen-ticat.exe) on a network share accessible by the domain controller or a Novell eDirectory server, the M86 Authenticator automatically authenticates the end user when he/she logs into his/her workstation. If down-loading the M86 Authenticator for Apple (Authenti-cator), an Open Directory server should be used. The end user will be automatically authenticated when logging into the workstation.
• If you have a Novell eDirectory server and the M86 Authenticator will not be used, turning “On” Novell eDirectory Agent will enable end user logon and logoff events to be logged. To use this option, the LDAP domain must be set up and activated in the Policy tree.
WARNING: When enabling Novell eDirectory Agent, the agent will immediately begin scanning Novell eDirectory-based domain labels.
• If using a Windows 2000 or Windows 2003 server for authentication, the Active Directory Agent option can
feature, turn “On” the AD Agent, and then specify settings for administrator computers authorized to configure the AD Agent via the Active Directory Agent console. Download and install the AD Agent
(DCAgent.msi) on the administrator workstation. 5. If using Tier 1, in the Sending Keep Alive frame, click
"On" to specify that keep alives should be sent on a connection to verify whether it is still active. Click "Off" to specify that the end user's session will be kept alive based on the number of minutes entered in the text box. 6. Click Apply.
Net use based authentication
Tier 1: Web-based Authentication disabled (Net Use enabled) – Choose this option if you will be using net use based authentication for Active Directory.
1. Click “Tier 1”.
2. In the Sending Keep Alive frame, click the radio button corresponding to the option to be used:
• “On” - This option specifies that keep alives should be sent on a connection to verify whether it is still active. • “Off” - This option specifies that the end user's session
will be kept alive based on the number of minutes entered in the text box.
In the Inactive session lifetime (in minutes) field, enter the number of minutes the end user’s session will be kept alive.
3. Click Apply to open the alert box that confirms your selection.
Web-based authentication
Choose either Tier 2 or Tier 3 if Web-based authentication will be used.
NOTE: If selecting either Tier 2 or Tier 3, please be informed that in an organization with more than 5000 users, slowness may be experienced during the authentication process. In this scenario, M86 recommends using a Web Filter with an SSL accelerator card installed. Please contact M86 for more information.
Tier 2: Use time-based profiles, with time-out (in minutes) – Choose this option if using LDAP authentica-tion, and you want the user to have a time limit on his/her Internet connection. This option uses an authentication servlet that lets the user log into either domain with no persistent connection between the client PC and the Web Filter.
1. Click “Tier 2”.
2. Enter a whole number for the duration of time the user will retain his/her Internet connection.
3. Click Apply to open the alert box that confirms your selection.
Tier 3: Use persistent logins via a Java Applet – Choose this option if using LDAP authentication, and you want the user to maintain a persistent network connection.
This option opens a profile window that uses a Java applet:
Fig. 2-4 Java applet
The profile window must be kept open during the user’s session in order for the user to have continued access to the Internet.
NOTE: Tier 3 Authentication requires a current version of Java Runtime Environment (JRE) on end-users' PCs. In some cases, a JRE will need to be downloaded and installed on workstations and the Web Filter will allow the JRE download at the time of login. However some operating systems may require this action to be performed manually.
1. Click “Tier 3”.
2. Click Apply to open the dialog box that informs you about the requirement of a current Java Runtime Envi-ronment (JRE) to be installed on each end user’s work-station:
3. To ensure that end-users are using the most current version of JRE, choose the method for distributing the current version to their workstations: “M86 automatically distributes JRE during user login” or the default selection, “Administrator manually distributes JRE to user worksta-tions”.
4. Click Continue to open the alert box that confirms your selection.
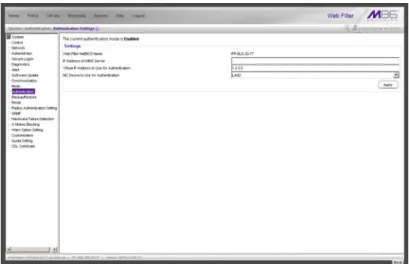
Enter network settings for authentication
1. Click Authentication and select Authentication Settings from the pop-up menu to display the Authentication Settings window:
Fig. 2-6 Authentication Settings window
In the Settings frame, at the Web Filter NetBIOS Name field the NetBIOS name of the Web Filter displays. This information comes from the entry made in the Host Name field of the LAN Settings window.
2. In the IP Address of WINS Server field, if using a WINS server for name resolution, enter the IP address of each Windows DNS server to be filtered by this Web Filter, with a space between each IP address.
3. In the Virtual IP Address to Use for Authentication field,1.2.3.5 displays by default. If using Tier 1 or Tier 3, enter the IP address that from now on will be used for
WARNING: If the IP address entered here is not in the same subnet as this Web Filter, the net use connection will fail.
4. From the NIC Device to Use for Authentication pull-down menu:
• if using the invisible mode, select “LAN2” for sending traffic on the network—in particular, for transferring authentication data.
• if using the router or firewall mode, select “LAN1”. 5. Click Apply to apply your settings.
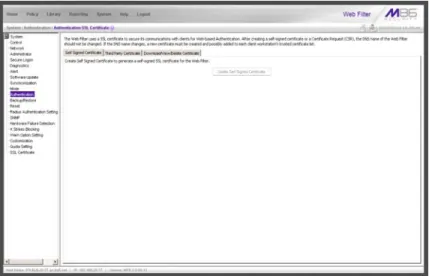
Create an SSL certificate
Authentication SSL Certificate should be used if Web-based authentication will be deployed on the Web Filter. Using this feature, a Secured Sockets Layer (SSL) self-signed certifi-cate is created and placed on client machines so that the Web Filter will be recognized as a valid server with which they can communicate.
Click Authentication and select Authentication SSL Certifi-cate from the pop-up menu to display the Authentication SSL Certificate window:
Fig. 2-7 Authentication SSL Certificate window
This window is comprised of three tabs: Self Signed Certifi-cate, Third Party CertifiCertifi-cate, and Download/View/Delete Certificate. These tabs are used to create, view, upload, and/or delete self-signed or third party SSL certificates.
Create, Download a Self-Signed Certificate
1. On the Self Signed Certificate tab, click Create Self Signed Certificate to generate the SSL certificate. 2. Click the Download/View/Delete Certificate tab:
Fig. 2-8 Download/View/Delete Certificate tab
3. Select the type of certificate from the pull-down menu: “SSL Certificate” or “Intermediate Certificate”. An inter-mediate certificate is a signing certificate for an SSL certificate.
4. Click Download/View Certificate to open the File Down-load dialog box where you indicate whether you wish to Open and view the file, or open the Save As window so that you can Save the certificate to a specified folder on your workstation.
Once the certificate is saved to your workstation, it can be distributed to client workstations for users who need to be authenticated.
TIP: Click Delete Certificate to remove the certificate from the server.
Create, Upload a Third Party Certificate
Create a Third Party Certificate
1. Click the Third Party Certificate tab:Fig. 2-9 Third Party Certificate tab
NOTE: If a third party certificate has not yet been created, the Create CSR button is the only button activated on this tab.
2. Click Create CSR to open the Create CSR pop-up window:
Fig. 2-10 Create CSR pop-up window
The Common Name (Host Name) field should automat-ically be populated with the host name. This field can be edited, if necessary.
3. Enter your Email Address.
4. Enter the name of your Organization, such as M86 Security.
5. Enter an Organizational Unit code set up on your server, such as Corp.
6. Enter Locality information such as the name of your city or principality.
7. Enter the State or Province name in its entirety, such as
California.
8. Enter the two-character Country code, such as US. 9. Click Create to generate the Certificate Signing Request.
NOTE: Once the third party certificate has been created, the Create CSR button displays greyed-out and the Download/View CSR, Upload Certificate, Delete CSR buttons are now activated.
Upload a Third Party Certificate
1. In the Third Party Certificate tab, click Upload Certifi-cate to open the Upload Signed SSL CertifiCertifi-cate for Web Filter pop-up window:
Fig. 2-11 Upload Signed SSL Certificate box
The Message dialog box also opens with the message: "Click OK when upload completes."
NOTE: Do not click this button until performing the actions in the following steps.
TIP: Click Cancel in the dialog box to cancel the procedure.
2. In the Upload Signed SSL Certficate for Web Filter pop-up window, do one of the following, as appropriate: • Click Browse... in the Upload Signed SSL Certificate
for Web Filter section if the certificate to be uploaded is an SSL certificate.
• Click Browse... in the Upload Intermediate Certificate for Web Filter if Any, if an intermediate certificate is
3. Select the file to be uploaded.
4. Click Upload File to upload this file to the Web Filter. 5. Click OK in the Message dialog box to confirm the upload
and to close the dialog box.
Download a Third Party Certificate
1. In the Third Party Certificate tab, click Download/View CSR to open a pop-up window containing the contents of the certificate request:
Fig. 2-12 Download CSR pop-up window
2. Click the “X” in the upper right corner of the window to close it.
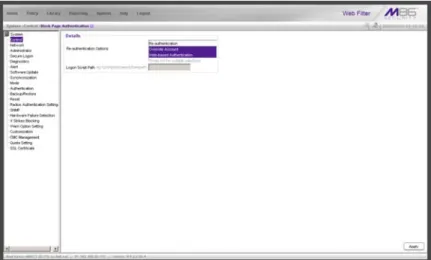
Specify block page settings
Click Control and select Block Page Authentication from the pop-up menu to display the Block Page Authentication window:
Fig. 2-13 Block Page Authentication window
Block Page Authentication
1. In the Re-authentication Options field of the Details frame, all block page options are selected by default, except for Web-based Authentication. Choose from the following options by clicking your selection:
• Web-based Authentication - select this option if using Web authentication with time-based profiles or persistent login connections for the LDAP authentica-tion method.
re-• Override Account - select this option if any user has an Override Account, allowing him/her to access URLs set up to be blocked at the global or IP group level.
TIP: Multiple options can be selected by clicking each option while pressing the Ctrl key on your keyboard.
NOTE: See the M86 Web Filter User Guide or M86 WFR User Guide for information about the Override Account feature.
2. If the “Re-authentication” option was selected, in the Logon Script Path field, \\PDCSHARE\scripts displays by default. In this field, enter the path of the logon script that the Web Filter will use when re-authenticating users on the network, in the event that a user's machine loses its connection with the server, or if the server is rebooted. This format requires the entry of two backslashes, the authentication server’s computer name (or computer IP address) in capital letters, a backslash, and name of the share path.
Block page
When a user attempts to access Internet content set up to be blocked, the block page displays on the user’s screen:
Fig. 2-14 Block page
NOTES: See Block Page Customization for information on adding free form text and a hyperlink at the top of the block page. Appendix B: Create a Custom Block Page from the M86 Web Filter User Guide or M86 WFR User Guide for information on creating a customized block page using your own design.
User/Machine frame
By default, the following data displays in the User/Machine frame:
• User/Machine field - The username displays for the LDAP user. This field is blank for the IP group user. • IP field - The user’s IP address displays.
• Category field - The name of the library category that blocked the user’s access to the URL displays. If the content the user attempted to access is blocked by an Exception URL, “Exception” displays instead of the library category name.
• Blocked URL field - The URL the user attempted to access displays.
Standard Links
By default, the following standard links are included in the block page:
• HELP - Clicking this link takes the user to M86’s Tech-nical Support page that explains why access to the site or service may have been denied.
• M86 Security - Clicking this link takes the user to M86’s Web site.
Optional Links
By default, these links are included in the block page under the following conditions:
• For further options, click here. - This phrase and link is included if any option was selected at the Re-authentica-tion OpRe-authentica-tions field in the Block Page AuthenticaRe-authentica-tion window. Clicking this link takes the user to the Options window, described in the Options page sub-section that follows.
• To submit this blocked site for review, click here. - This phrase and link is included if an email address was entered in the Submission Email Address field in the Common Customization window. Clicking this link launches the user’s default email client. In the composi-tion window, the email address from the Submission Email Address field populates the “To” field. The user’s message is submitted to the global administrator.
Options page
The Options page displays when the user clicks the following link in the block page: For further options, click here.
Fig. 2-15 Options page
The following items previously described for the Block page display in the upper half of the Options page:
• BACK and HELP links • User/Machine frame contents