HansaWorld University
HansaWorld SQL
Training Material
HansaWorld Ltd.
January 2008
Version 5.4
TABLE OF CONTENTS:
TABLE OF CONTENTS:...2
OBJECTIVES...4
INTRODUCTION...5
Relational Databases...5
Definition...5
MS SQL...5
How HansaWorld works with SQL...5
These are covered in detail below...5
SQL Native...5
Shadowing...6
Benefits and Disadvantages...7
Benefits of using SQL with HansaWorld...8
Disadvantages/Dangers...8
SQL NATIVE Vs SHADOWING...9
SETUP & INSTALLATION...10
Express Edition vs. Full Edition...10
CREATING SQL DB...11
Installation of MS SQL Server...11
Starting the SQL Service...11
Starting the SQL Management Studio...12
Connecting to the Server and opening the Management Studio...13
Connecting to Server and opening the Management Studio...14
Creating the SQL Server Database...15
Creating the SQL Server Database (continued)...15
SETTING UP THE ODBC CONNECTION...17
Creating the ODBC DSN...17
Creating the ODBC DSN (Continued)...17
Creating the ODBC DSN (Continued)...18
Creating the ODBC DSN (Continued)...19
Creating the ODBC DSN (Continued)...19
PREPARATION...22
Preparation:...22
SQL NATIVE SETUP...22
HR.INI...22
Recover HDB from relational database...23
Importing Data...23
1: Starting Hansa... ...23
2: Importing data from a Text backup... ...24
Viewing the data in the SQL database...24
3: Viewing data in SQL... ...25
SQL SHADOWING SETUP...26
Preparation...26
Listing of Tables/Registers...26
Settings...28
Relational DB Registers...28
Use relational database...29
Database name...29
Username...29
Password...29
Activate Shadowing: Restart HansaWorld...29
HansaWorld Log...30
Loading of data into SQL from HansaWorld...30
Testing...31
QUERIES AND HANSAWORLD DATA...34
HansaWorld Tables and Registers...34
Intro to SQL language, create and run basic queries...34
Using the Criteria Pane SQL Server...34
REPORTING OPTIONS...37
Reporting from MS Excel using HansaWorld data...37
OBJECTIVES
This course material covers the basics of installation and setup of relational databases, specifically MS SQL Server.
After this course you should be able to ● Setup HansaWorld with SQL
● Understand the HansaWorld relational database ● Access the HansaWorld data using ODBC
● Create basic queries on HansaWorld data
INTRODUCTION
Relational Databases
Definition
A relational database is a collection of data items organized as a set of formally-described tables from which data can be accessed or reassembled in many different ways without, having to reorganize the database tables. The relational database was invented by E. F. Codd at IBM in 1970.
The standard user and application program interface to a relational database is the structured query language (SQL). SQL statements are used both for interactive queries for information from a relational database and for gathering data for reports.
MS SQL
SQL Server is a relational database management system (RDBMS) from Microsoft that's designed for the enterprise environment. SQL Server runs on T-SQL (Transact -SQL), a set of programming extensions from Sybase and Microsoft that add several features to standard SQL, including transaction control, exception and error handling, row processing, and declared variables.
How HansaWorld works with SQL
HansaWorld can work with SQL in 3 different ways. 1. SQL Native
2. Shadowing
3. ODBC Links (not recommended)
These are covered in detail below SQL Native
This method involves storing all of HansaWorld data in a SQL Server database. Some system data is stored in the Hansa.HDB database.
In the above diagram the data is read from and written to the SQL database by the HansaWorld Server application. The Hansa.hdb database is still used to store data indexes.
IMPORTANT
When using SQL Native, the data is read from the SQL Database. i.e. all reports will report on Hansa.hdb data. Any data changes made in the SQL database can be reflected in reports from the HansaWorld application. However, data changes to the SQL database directly is not supported by HansaWorld.
Shadowing
This method involves storing all of HansaWorld data in the HansaWorld Hansa.hdb database and some user selected data in MS SQL. Please refer to the diagram below.
In the above diagram the data is written to the Hansa.HDB database and the SQL Server database by the HansaWorld Server application. Data is only read from the Hansa.HDB application.
IMPORTANT
When using shadowing, the data is only read from the Hansa.hdb database. i.e. All reports will report on data stored in the Hansa.hdb database. Any data changes made in the SQL database will not be reflected in reports from the HansaWorld application.
Benefits and Disadvantages
Benefits of using SQL with HansaWorld
1. Data availability: Flexible use of ERP data by other applications. One might want to run external applications that require data from the HansaWorld registers.
2. Easy Reporting: HansaWorld information can be easily reported on and presented in a variety of ways.
3. Reporting Skills: One can leverage in house skills in reporting tools such as Crystal Reports, MS Access. This reduces any training costs that may be incurred.
4. Business Intelligence: The HansaWorld data can be used by Business Intelligence tools such as Qlikview. Please contact your local HansaWorld representative for the further details.
5. HAL Reports: There is no reliance on HansaWorld Application Language (HAL) developers to create reports on HansaWorld data.
6. Backups: The Hansa.HDB database encrypts the data stored. The HansaWorld backups are also stored in an encrypted format. The customer might want to supplement these backup measures with the SQL backup procedures.
Disadvantages/Dangers
1. External Reports: Reports created in third party applications have to be run outside the HansaWorld application.
2. Security: Access to the data is no longer controlled by HansaWorld. HansaWorld accesses the data via an ODBC connection. Access to the data is controlled by the setup of the ODBC DSN and if not controlled this can lead to open access to the HansaWorld data.
3. Extra skills needed: Extra skills in MS SQL Server and other reporting tools are required.
4. Licence Costs: The MS SQL Server software needs to be purchased. There are limitations to Express version of the software. These are covered further on.
5. Microsoft Windows: MS SQL Server databases can only be installed and setup on a Windows machine.
6. Performance: As data has to be written to and with SQL Native, read from the SQL database, there will be a performance loss. This loss is negligible with SQL Shadowing.
SQL NATIVE Vs SHADOWING
The table below is a comparison of SQL Native to Shadowing.
SQL NATIVE SHADOWING
HansaWorld
Reports Speed Slower
Data is read from the SQL database
Normal
Data is read from the Hansa.hdb
Cost Higher
Hardware requirements are higher as a high performance server is required.
HansaWorld licence keys are higher
Lower
Hardware requirements are lower
HansaWorld licence keys are lower
Risk Higher
Access to Data: All data is maintained in SQL and therefore requires security and maintenance outside of HansaWorld
Lower
Access to Data: All master data is maintained by HansaWorld. Data that is changed in MS SQL will not be reflected in HansaWorld
Complexity High
All HansaWorld registers and blocks are stored in MS SQL. There are hundreds of tables in the MS SQL database.
Low
Only selected registers and blocks are stored in MS SQL. The average number will be 5 – 20 depending on the data requirements
SETUP & INSTALLATION
Express Edition vs. Full Edition
SQL Server Express Edition is free to download, free to redistribute, free to deploy, has a subset of the overall SQL Server 2005 features, and has no time limit on usage.
SQL Server has no limits on database size or scalability. Please refer to the table below for a comparison
SQL Server 2005 Express SQL Server
Number of CPUs 1 no limit
RAM 1 GB operating system
maximum
64-bit Support Microsoft Windows on Windows (WOW)
Maximum Database
Size 4 GB no limit
IMPORTANT
HansaWorld strongly recommends the use of SQL Server (full version) as the functionality of the SQL Server Express cannot be guaranteed in future releases.
CREATING SQL DB
Installation of MS SQL Server
The installation of the SQL Server software is not covered in this training material. Please refer to the installation guidelines provided by Microsoft for details on how to install the SQL Server software.
ASSUMPTIONS
From this point on it will be assumed that the installation of the SQL server has been completed in full.
It is assumed that the relevant services have been installed correctly and are started automatically on start up.
It is assumed that the SQL Server Management Studio has been installed and can be run from the Start>Programs menu
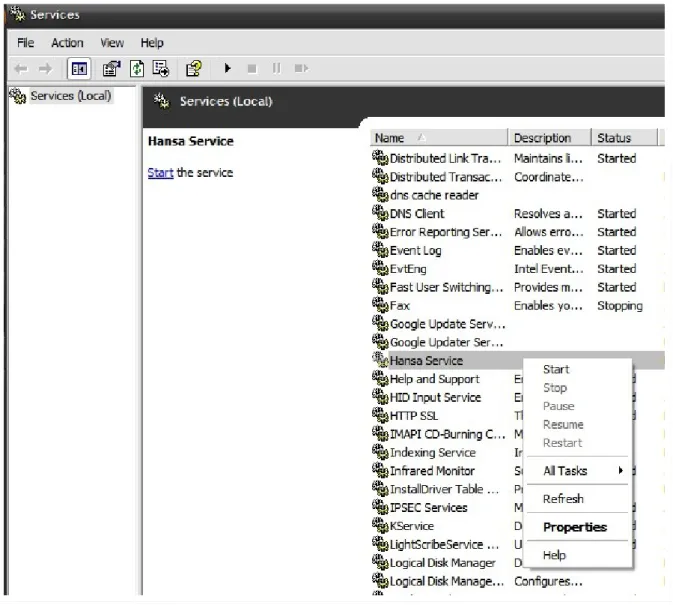
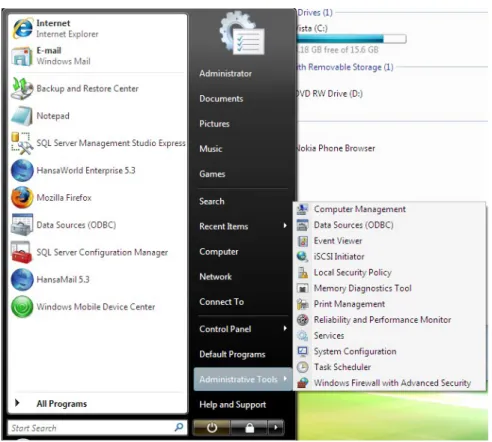
Starting the SQL Service
1. To start the service go to Control Panel>>Administrative Tools>>Computer Management.
2. Click on the Services and Applications>>Services node to list the all the services.
3. Select the SQL Server Service.
Figure 1: Starting the SQL Service
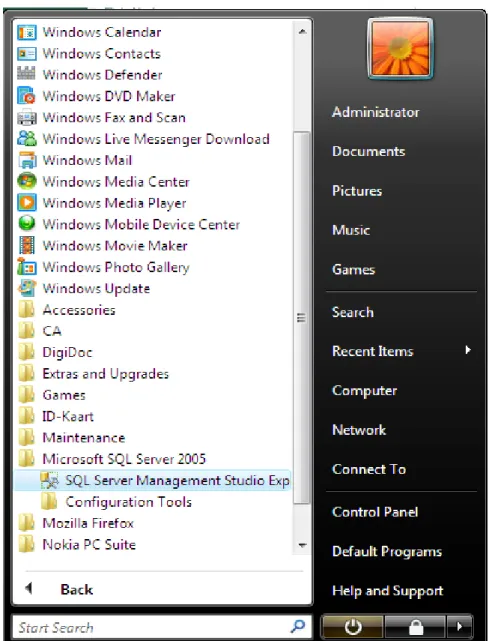
Starting the SQL Management Studio
Microsoft SQL Server Management Studio Express (SSMSE) is a free, easy-to-use graphical management tool for managing SQL Server 2005 Express Edition and SQL Server 2005 Express Edition with Advanced Services.
Microsoft SQL Server Management Studio is installed by default when installing Microsoft SQL Server Management Express.
To start the SQL Management Studio click on Start>Programs>Microsoft SQL Server 2005>SQL Management Studio
Figure 1: Starting SQL Server Management Studio
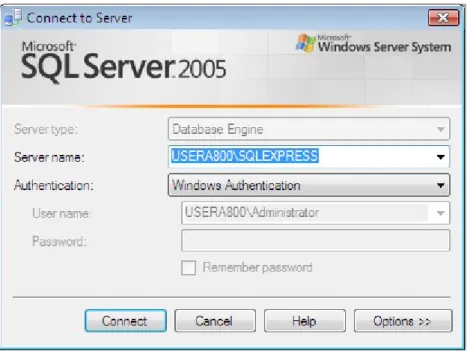
Connecting to the Server and opening the Management Studio
In the Connect to Server window Enter/Select the relevant server that you are connecting to.
Figure 1: Login into SQL Server Management Studio – SQL Server Authentication
Connecting to Server and opening the Management Studio
In the Connect to Server window change the authentication method to SQL Server Authentication.
The default login and password is ‘sa’ and password is blank. This default password is defined during the installation of SQL Server
Figure 1: Login to SQL Server Management Studio - Username and Password
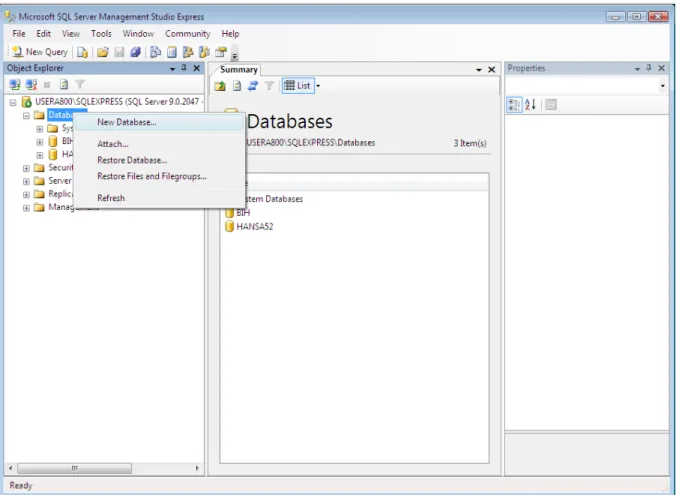
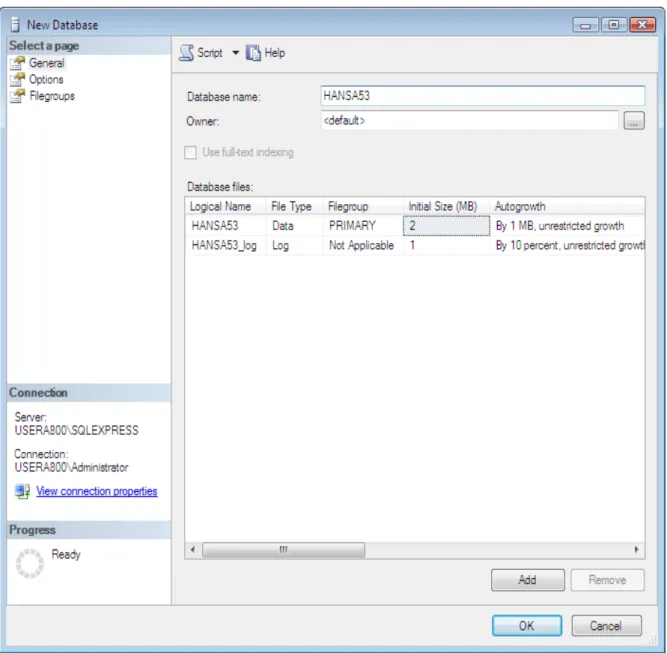
Creating the SQL Server Database
Within the SQL Server Management Studio create a new database.
Right click the ‘Databases’ node on the tree on the left and click ‘New Database’.
Figure 1: Creating a new SQL Database
Creating the SQL Server Database (continued)
Give the database a name, such as Hansa or Hansa53 Click on ‘Ok’
SETTING UP THE ODBC CONNECTION
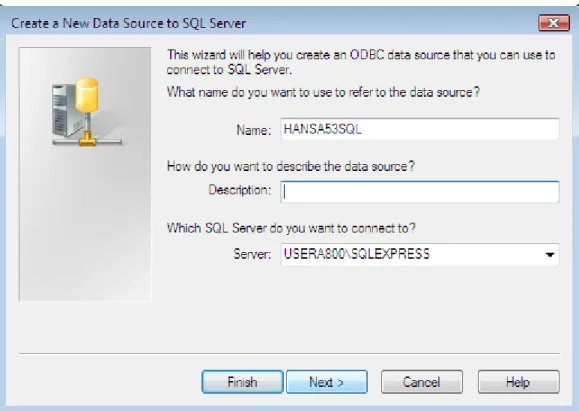
Creating the ODBC DSN
To open the ODBC Data Source Administrator Click on Control Panel>Administrative Tools>Data sources.
Figure 1: Starting ODBC Administrator
Creating the ODBC DSN (Continued)
Click on the System DSN tab
1: Creating a new System DSN
Creating the ODBC DSN (Continued)
Select the SQL Server driver Click ‘Finish’
Figure 1: Setting a new SQL Server DSN
Creating the ODBC DSN (Continued)
Give the DSN a name. This name can be the same name as the SQL Server database. Note that this the name that will be used on the setting up of the link from HansaWorld to SQL.
Enter a description of the DSN and database (optional)
Select the server that stores the database. If the server name is not included in the list then you can type in the name of the server as shown in the diagram below.
Creating the ODBC DSN (Continued)
Change the default database to the database that was created earlier. Click ‘Next’
Click the ‘Test Data Source’ button to test the connectivity to the database.
The test will fail if there are any problems with the setup. Please go back to the previous windows and make any required changes.
PREPARATION
Preparation:
A text backup with the latest HansaWorld data.
SQL NATIVE SETUP
The connection to SQL is controlled by 2 files which are stored in the main HansaWorld server folder. These files are
1. Hr.ini: This is configuration file defining the link to the relevant SQL database DSN
2. EnRelDB: This is the enabler file for the SQL functionality
HR.INI
Open the HR.ini file and enter the following line rdb = “HANSA53SQL”;
Recover HDB from relational database
After starting HansaWorld for the first time, you will be asked if you would like to ‘Recover HDB from relational database’.
This function is needed if the SQL database has been setup and populated in the past.
This function will populate the necessary settings in the local HANSA.HDB and establish the connection with the existing database. Click ‘No’ if this is the first time that you are setting up HansaWorld with SQL.
Importing Data
In the Welcome to HansaWorld window, select the ‘Import Text backup’ This will prompt you to select the relevant text backup with your data
2: Importing data from a Text backup Viewing the data in the SQL database
To test if the data has been imported correctly view the imported data in the SQL database.
1. Open the SQL Server Management Studio.
2. Navigate to the Database>>Tables>>Table Name. 3. Right Click and select Open.
4. The contents of the table will be displayed on screen. 5. If data is displayed then the process has been successful.
SQL SHADOWING SETUP
SQL Shadowing is the process by which HansaWorld writes data to a relational database and the proprietary Hansa.hdb database.
Preparation
The following is required before starting the setup of SQL Shadowing. These have been covered earlier in this document.
1. Text backup
2. SQL Database setup 3. ODBC DSN
Listing of Tables/Registers
One of the benefits of SQL Shadowing over SQL Native is the simplicity of being able to select and use only the required data. This selection involves the following processes
Understanding the data requirements
Usually this can be done by reviewing the reporting requirements Understand where in HansaWorld the data is stored
Create a list of registers and blocks which are required in SQL
The Export/Import Format Report
A listing of all data stored in the HansaWorld Hansa.hdb database is listed in the Export/Import Format Report.
This report is found in Technics>>Reports>>Export/Import Format.
1. Leave the Vc (View Code) field blank 2. Tick the Include Blocks checkbox 3. Select Screen radio button 4. Click Run
The report will display all registers and blocks stored in HansaWorld. Use the Search in the report feature within the Export/Import Format Report to find the registers and blocks that are required. Make a list of all registers and blocks and store these in text file.
Note, this list will be used many times in the future and it is therefore important that the list is store in a convenient place.
IMPORTANT
The list of all register and block names will be used many times in the future and it is therefore important that the list is stored in a convenient place.
See the example list below CuVc CCatVc IVVc VEIVVc OPVc IPVc INVc ActVc TRVc ObjVc CClassVc DIVc ITVc AT2UnitVc ForecastUserVc SalesForecastVc PIVc PLDefVc PLVc ProdOrderVc ProdVc
Settings
There are 2 Relational DB Registers settings which can be found in the Technics module.
Relational DB Registers
The Relational DB Registers setting can be found in the Technics module under Settings. i.e. Module>>Technics>>Settings>>Relational DB Registers.
This setting is specific to the current company. You are able to define different registers per company.
Enter here all the Registers and Blocks that you listed before.
DID YOU KNOW THAT ...
To avoid typing the register names on each line, copy and paste the list from the text document created previously
Relational DB Settings
The Relational DB Settings setting can be found in the Technics module under Settings. i.e. Module>>Technics>>Settings>>Relational DB Settings.
This is setting is applicable to all HansaWorld companies.
Use relational database
This checkbox activates the Shadowing functionality. This will only be applied when the application has been restarted.
Database name
This is the name of the ODBC DSN
Username
This is the username to login into SQL Server
Password
HansaWorld Log
Once you have restarted the system, you can confirm that HansaWorld has connected to the database by looking for the “Connected to Relational Database” entry.
Loading of data into SQL from HansaWorld
At this stage, HansaWorld is linked to the SQL database and any new records will be created in the SQL database. This however is not what is required. Instead, all data in the selected registers and blocks should be both the SQL database and Hansa.hdb and not only the new data. To do this, you will need to import the data into a blank SQL connected HansaWorld system
To load your data into both HansaWorld and SQL do the following 1. Ensure you have a text backup of HansaWorld data. 2. Shut down your HansaWorld system
3. Rename the Hansa.hdb database to effectively delete it.
4. Restart the system and cancel the window to display the company inspect window.
5. Enter a 1 in the first 3 columns and click ok 6. Login into the company 1.
7. Setup the Relational database as per the previous instructions.
IMPORTANT
The Technics>>Settings>>Relational Database Registers setting is specific to the current company. When you have multiple companies, the register/block list needs to be populated in all companies if all company data is required in SQL.
After restarting the system and connecting to the SQL database, Import the text backup.
IMPORTANT
After importing the text backup, you have to remember to activate the Relational database settings in Technics>>Settings>>Relational Database settings and restart the HansaWorld System
Testing
HansaWorld Shadowing will populate data in both the Hansa.hdb and SQL database. To test that the shadowing is working correctly do the following
1. Create a new contact in the HansaWorld 2. Login into the SQL Management Studio
3. Open the database that you have connected to. 4. Click on Tables and select the CuVc table
3. Enter the following in line 2
1. Column CODE 2. Alias Expr1
3. Table CUVc
4. Output tick
5. Sort Type Descending 6. Sort Order 1
4. Click the “!” button to run the query
5. The test. The new contact which you created should be displayed in line 1 (See Below)
QUERIES AND HANSAWORLD DATA
HansaWorld Tables and Registers
HansaWorld registers and blocks are stored within the SQL as tables. For a listing of all tables and blocks that the fields, please refer to the Export/Import Format report.
Intro to SQL language, create and run basic queries
SQL stands for structured query language. SQL is the language by which data can be extracted and presented from a relational database.
The structure and creation of SQL statements is not covered by this material. There are many resources available on the internet covering SQL and the statements
Using the Criteria Pane SQL Server
SQL Server make it possible to create relatively complex sql select statements using the criteria pane.
The Criteria pane allows you to specify query options — such as which data columns to display, how to order the results, and what rows to select — by entering your choices into a spreadsheet-like grid. In the Criteria pane you can specify:
1. Columns to display and column name aliases. 2. The table that a column belongs to.
3. Expressions for calculated columns. 4. The sort order for the query.
5. Search conditions.
6. Grouping criteria, including aggregate functions to use for summary reports.
7. New values for Update or Insert Into queries. 8. Target column names for Insert From queries.
The table below explains how each part of the criteria pane works
Column Query type Description
Column All Displays either the name of a data column used for the query or the expression for a computed column. This column is locked so that it is always visible as you scroll horizontally. Alias Select, Insert
From, Update, Make Table
Specifies either an alternate name for a column or the name you can use for a computed column.
Column Query type Description
Table Select, Insert From,
Update, Make Table
Specifies the name of the table or table-structured object for the associated data column. This column is blank for
computed columns. Output Select, Insert
From, Make Table
Specifies whether a data column appears in the query output.
Sort
Type Select, Insert From Specifies that the associated data column is used to sort the query results and whether the sort is ascending or descending.
Sort Order
Select, Insert From
Specifies the sort priority for data columns used to sort the result set. When you change the sort order for a data column, the sort order for all other columns is updated accordingly. Group
By Select, Insert From, Make Table
Specifies that the associated data column is being used to create an aggregate query. This grid column appears only if you have chosen Group By from the Tools menu or have added a GROUP BY clause to the SQL pane.
By default, the value of this column is set to Group By, and the column becomes part of the GROUP BY clause.
When you move to a cell in this column and select an
aggregate function to apply to the associated data column, by default the resulting expression is added as an output column for the result set.
Criteria All Specifies a search condition (filter) for the associated data column. Enter an operator (the default is "=") and the value to search for. Enclose text values in single quotation marks. If the associated data column is part of a GROUP BY clause, the expression you enter is used for a HAVING clause.
If you enter values for more than one cell in the Criteria grid column, the resulting search conditions are automatically linked with a logical AND.
Column Query type Description
query, the Query and View Designer attempts to match the source to an appropriate target data column. If the Query and View Designer cannot choose a match, you must provide the column name.
New
REPORTING OPTIONS
Once you have the data in the SQL database there are many reporting options available. The data is made accessible via the ODBC DSN created earlier.
There are many reporting tools used and each have their strengths and weaknesses. Crystal Reports is a common reporting tool used reporting tool.
In this section 2 options are explained in further detail
Reporting from MS Excel using HansaWorld data
You are able to access the HansaWorld data in the MS SQL database from Excel.
To access the data do the following
Data>>From Microsoft Query (See image below). Note, this is Excel 2007. In earlier versions of Excel a similar option can be found under the Data menu option
In the Choose Data Source window select the relevant ODBC DSN
In the Query Wizard window Select the table that you wish to report on and click the arrow button to select the data that you would like to be brought from the SQL database
Go through the remaining options by clicking Next
Select the sheet that you would like the data to be brought into The data will be brought into Excel (See below)
You are able to now use the standard functionality within Excel to report on the data. Pivot tables are particularly powerful.
IMPORTANT
There is a danger of writing back to the database in Excel. This is dependent on how the ODBC DSN has been setup and how the authentication to the database is managed. It is therefore highly recommended that the these issues be dealt with before giving access to the database via Excel.
Reporting from MS Access using HansaWorld data
You are able to access the HansaWorld data in the MS SQL database from MS Access.
To access the data do the following
1. Create a new database in MS Access
2. Click on External Data>More>ODBC Database (see image below)
3. Select either to import data from the data source or to link to the data by creating a linked table. The advantage of creating a linked table is that the data is always up to date and does not need to be refreshed.
5. Select the tables that you wish to import or link to
6. The tables will be made available in Access (See below)
7. The query designer can be used to easily create new queries (see below). The interface is similar to the criteria pane available through the SQL Server Management Studio. Please refer to the MS Access Help for further detail