NetVault 10 Backup Quick Start Guide
A reference for setting up and evaluating Dell’s enterprise backup and
recovery software solution
Contents
Abstract 3
Architecture 3
NetVault Backup Server 4
NetVault Clients 4
NetVault Application Plug-ins 5
NetVault WebUI 5
NetVault Command-Line Interface 6
New Features in NetVault Backup 10 7
Web-based user interface 7
Performance and scalability 8
Version comparison 8 Installation requirements 8 Operating systems 8 Browsers 9 Windows requirements 9 Linux requirements 9
Installing the NetVault Backup server on Windows 11
Installing a NetVault client on Windows 19
Installing a NetVault client on Linux (x86 and x86-64) 23
Command Line Client (CLI) Installation 25
Configuring a NetVault Client using the NetVault WebUI 26
NetVault WebUI First Look 30
Storage configuration 33
Adding a storage device 33
Creating and adding a virtual standalone drive 34
Creating a Backup Job 38
Recovering Data 43
Abstract
NetVault™ Backup simplifies backup and recovery across your IT environment, helping to ensure the availability of critical applications and databases such as Oracle, SQL Server, Exchange, SharePoint, MySQL and DB2. NetVault Backup 10 includes valuable enhancements, including a new web-based user interface and features that deliver better scalability and improved performance. This guide describes NetVault’s core components, details the system requirements, and explains how to install and configure NetVault, as well as navigate the new WebUI.
Architecture
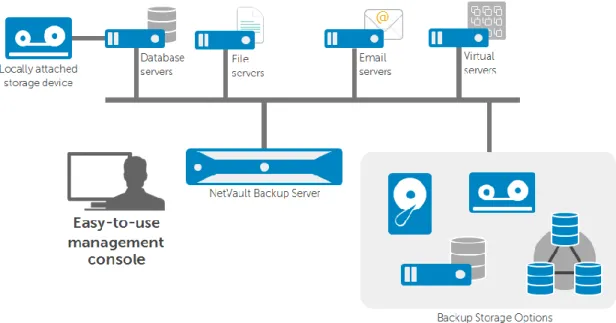
NetVault Backup is based on a client-server architecture, which includes a central NetVault Backup server, NetVault clients application plug-ins, a web-based user interface, and support for a wide range of storage targets, including different types of physical tape drives and libraries, VTLs, and
deduplication appliances.
Figure 1. A typical NetVault Backup deployment consists of a NetVault Backup Server, the NetVault WebUI, NetVault Clients and backup storage.
NetVault Backup Server
The NetVault Backup Server is the main component of the NetVault solution. It provides a variety of backup management functionality, including job management, media management, device
management, client management, reporting, notifications, and logging functions. The NetVault Backup Server maintains a history of backups in the NetVault database, so administrators can quickly identify one or more objects they want to restore. Target disk storage and physical or virtual tape libraries can be attached directly to the NetVault Backup Server (or elsewhere within the backup domain using SmartClients).
The NetVault Backup Server can be deployed on a Windows or Linux server.
NetVault Clients
NetVault Clients are the machines that will be protected by NetVault Backup. The NetVault Client software is installed on each machine designated as a NetVault Client.
NetVault Clients can be deployed on the following operating platforms: Linux Windows Solaris Mac OS X FreeBSD AIX HP-UX
There are two types of NetVault Clients for server backup/recovery: heterogeneous clients and SmartClients.
Heterogeneous Clients
NetVault heterogeneous clients are used to protect any server, including file servers, database servers, email servers, application servers and web servers. The NetVault heterogeneous client includes several built-in plug-ins that are automatically installed when the administrator installs the client software package. These plug-ins enable the administrator to perform several operations, including
backup/restore file-system data, copy backup data, and consolidate incremental backups. Additional characteristics of the NetVault heterogeneous client include:
Heterogeneous clients include support for NetVault Backup application plug-ins and NetVault bare metal recovery.
Heterogeneous clients include support for locally attached tape-based backup devices with a NetVault Backup SmartClient license.
Heterogeneous clients are support by all NetVault Backup Server editions.
Heterogeneous clients require continuous connectivity to NetVault Backup Server for all backups. The NetVault Plug-in for File System enables the administrator to create multiple backup jobs that protect any or all of the file-system data that is visible to the plug-in, including network-attached storage.
All client-initiated backup jobs are visible in the NetVault Backup Jobs window. Administrators must perform all restores from the NetVault WebUI.
Each NetVault Backup Server edition includes some heterogeneous clients. Additional heterogeneous clients can be added to the backup domain as required. The number of heterogonous clients that can be connected to a single backup server is dependent on the type of hardware used to host the NetVault Backup Server and whether other resource intensive applications are also using the same machine.
NetVault SmartClients
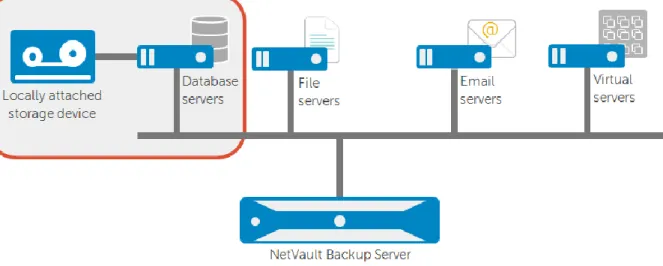
NetVault SmartClients give you the freedom to attach storage wherever you like. Both virtual and physical tape libraries can be easily distributed throughout the backup domain. Backup data no longer needs to pass over the network and through a NetVault Backup Server in order to be written to a target storage device.
Figure 3. Using a NetVault SmartClient, an administrator can attach a storage device directly to a protected system, bypassing the NetVault Backup Server.
NetVault Application Plug-ins
NetVault Backup uses specialized plug-ins to protect data in business-critical applications such as Oracle, SQL Server, Exchange, SharePoint, MySQL, PostgreSQL, Lotus Domino, Informix and Sybase. These plug-ins improve native options offered by these applications to reduce time-consuming integration efforts. With these improvements, administrators can protect their application investments and help close the gap between corporate application recovery and database protection requirements.
NetVault WebUI
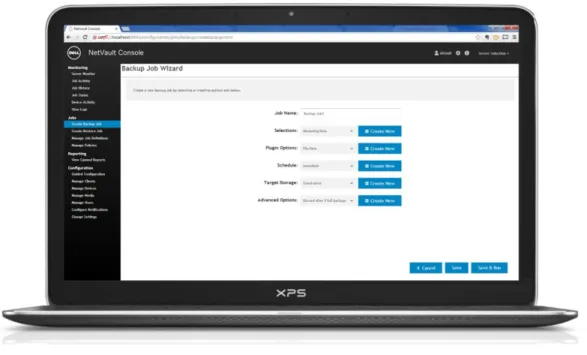
NetVault Backup offers a web-based user interface, called the NetVault WebUI (see Figure 2), to configure, manage, and monitor your NetVault Backup system. You can access the NetVault WebUI from any standard browser to perform various tasks such as the following:
Manage clients, storage devices, and storage media Perform backups and restores
Monitor jobs, device activities, and logs Set up notifications
Generate and view reports
Figure 2. The NetVault WebUI enables remote administration of a NetVault Backup Server from any browser.
NetVault Command-Line Interface
NetVault Backup’s Command-Line Interface (CLI) allows administrators to perform various operations from a terminal session using predefined executables. Using these commands, they can:
Start or stop the NetVault Backup service
Create and submit jobs — This includes creating, modifying and submitting backup and restore jobs for any NetVault Client controlled by the NetVault Backup Server. NetVault also provides
command-line executables to create and modify the selection sets required for these jobs. Manage backup devices and media—This includes importing and exporting media items, blanking
media items, reviewing drive and library status, marking media items for re-use, and several other functions.
Create and view canned and custom reports — This includes various reports for clients, devices, media and jobs.
All CLI scripts are non-blocking. This means that a response to the script command is returned before the action has actually completed. This allows for continuous running of various scripts without interrupting NetVault Backup operations.
New Features in NetVault Backup 10
Web-based user interface
NetVault Backup 10 includes a web-based user interface, called the NetVault WebUI, to help you easily configure, manage and monitor your NetVault Backup system. The NetVault WebUI is automatically installed on the NetVault Backup server and client machines. You can access it from any standard browser and use it to perform tasks such as the following:
Start and stop the NetVault Backup Service
Configure performance, security and other options Manage clients, storage devices and storage media Perform backups and restores
Monitor jobs, device activities and logs Set up notifications
Generate and view reports
Configuration wizard
The configuration wizard guides you through the process of performing common tasks, such as adding clients and storage devices, and creating backup jobs.
Streamlined process for creating backup jobs
NetVault will memorize each of your choices and create shortcuts (called NetVault Backup Sets) that you can use in the future. The shortcuts will be stored in a dropdown menu for quick retrieval. This eliminates the need to manually select the data items each time a backup is performed, and ensures that the same data set is selected for the subsequent backups.
Backup policies that can be used to administer backup strategies
Backup policies can be used to administer backup strategies such as following: Daily incremental and weekly full backups of file servers
Full backups of multiple Windows workstations Full and incremental backups of multiple databases
Easy monitoring of backup activities
“Server Monitor” lets you view the overall status of the NetVault Backup system. “Job Activity” lets you monitor the jobs that are currently active.
“Job Status” lets you view the status of regular and policy jobs.
Performance and scalability
A new PostgreSQL back-end database makes NetVault much more scalable—one backup server can protect 1,000 clients instead of ~300.
Optimized specific algorithms in the Scheduler and Media Manager services improve responsiveness.
Parallelism for “data copy” jobs improves performance when duplicating backup savesets to store a secondary copy offsite (D2D2T).
NetVault Backup offers tight integration with the Dell DR Series of deduplication appliances via Rapid Data Access (RDA) 3.0. The new DR6000 offers a capacity of up to 240TB and support for 64:1 replication.
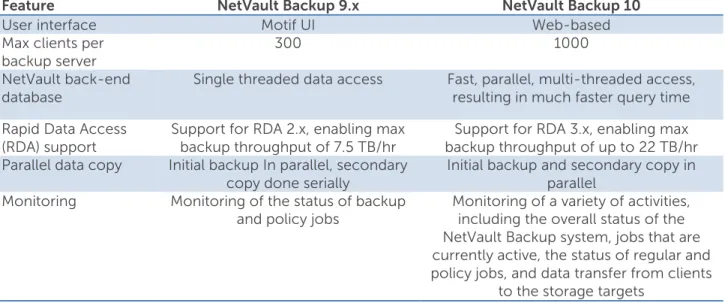
Version comparison
Table 1 NetVault Backup version comparison
Feature NetVault Backup 9.x NetVault Backup 10
User interface Motif UI Web-based
Max clients per
backup server 300 1000
NetVault back-end
database Single threaded data access Fast, parallel, multi-threaded access, resulting in much faster query time Rapid Data Access
(RDA) support Support for RDA 2.x, enabling max backup throughput of 7.5 TB/hr backup throughput of up to 22 TB/hr Support for RDA 3.x, enabling max Parallel data copy Initial backup In parallel, secondary
copy done serially Initial backup and secondary copy in parallel Monitoring Monitoring of the status of backup
and policy jobs Monitoring of a variety of activities, including the overall status of the NetVault Backup system, jobs that are currently active, the status of regular and policy jobs, and data transfer from clients
to the storage targets
Installation requirements
Before you begin the installation procedure, make sure the following requirements are met:
Operating systems
The NetVault Backup server supports the following operating systems: Linux (x86 and x86-64)
CentOS 6.x, 5.x Debian 7.x, 6.x RHEL 6.x, 5.x
Windows (x86 and x86-64)
The NetVault client supports the following operating systems: Linux (x86 and x86-64)
Windows Mac OS X
Solaris (SPARC and IA) AIX
HP-UX
Browsers
The NetVault web UI supports the following browsers: IE 11, IE 10, IE 9
Firefox 20 and later Chrome 28 and later Safari 6
Windows requirements
MS Visual C++ 2010 SP1 required
Before you install the NetVault Backup server, the Microsoft Visual C++ 2010 SP1 Redistributable Package (x86) must be installed on the system. If it is missing, the following error is displayed during installation:
The Program can't start because MSVCR100.dll is missing from your system computer. Try reinstalling the program to fix this problem.
This package is available from the following path:
NetVault Backup Installation folder\netvault\postgres\vcredist_x86.exe
Linux requirements
Selecting the correct installation package on Linux
Starting with version 10.0, NetVault Backup offers separate client-only and server-only installation packages for Linux-based systems. Both the server and client packages are available in hybrid and pure 64-bit versions.
Hybrid server and client packages – The hybrid packages (LinuxX86HybridServer and
LinuxX86Hybrid) are intended for Linux users who do not have a pure 64-bit-only requirement. These packages let you upgrade from pure 32-bit as well as hybrid installations of NetVault Backup. The hybrid packages retain binary compatibility with all previous versions of plug-ins, including
those marked as 32-bit and those designated as 64-bit. These packages also work on 32-bit systems that do not have 64-bit capability.
Pure 64-bit server and client packages – The pure 64-bit packages (LinuxX86Pure64Server and LinuxX86Pure64) packages are intended for pure 64-bit Linux distributions. If you have a specific reason that you cannot use any 32-bit components (for example, you are using a Linux distribution that does not run 32-bit code), use these packages. The pure 64-bit packages cannot be used to upgrade existing pure 32-bit or hybrid NetVault Backup installations. You must remove the existing pure 32-bit or hybrid version and install the pure 64-bit version separately. To reduce confusion, warning messages have been added to both the upgrade and installation packages to ensure that you understand that they are not compatible.
Depending on you OS type, make sure that you select the correct installation package to install the NetVault Backup Server or Client software.
LinuxX86HybridServer – Use this package to install or upgrade NetVault Backup Server on 32- or 64-bit Linux systems.
LinuxX86Hybrid – Use this package to install or upgrade NetVault Client on 32- or 64-bit Linux systems
LinuxX86Pure64Server – Use this package to install or upgrade NetVault Backup Server on pure 64-bit Linux systems.
LinuxX86Pure64 – Use this package to install or upgrade NetVault Client on pure 64-bit Linux systems.
Note: For Linux installations there are further requirements dependent on the Linux flavor and build that is being used. Please refer to the NetVault Backup Installation guide for further information.
Recommendations
Compatibility – Review the NetVault Backup Compatibility Matrices (available from
www.dellsoftware.com/support) to verify the platforms, operating system versions, devices and
application versions supported by the current release of NetVault Backup.
Set OS permissions – Set appropriate OS permissions on the target machines to allow users to install software components.
Ensure availability of adequate system memory – The amount of system memory required can vary based on the intended use. Make sure that the server and client machines have adequate amount of memory to run the NetVault Backup processes
Disable anti-virus software – We recommend that you disable the anti-virus software before installing or upgrading NetVault Backup. The installation process may conflict with the anti-virus software and cause NetVault Backup operations to fail to function properly after installation. Verify TCP/IP connectivity – NetVault Backup requires good TCP/IP connectivity between the
server and client systems. For “name resolution” to be used, a host name must uniquely resolve to an IP address.
Installing the NetVault Backup server on Windows
To install Dell NetVault Backup Server on a Windows machine, first log into the system as an Administrator level user. If you are installing NetVault via a CD, make sure that it is in the drive and browse to <CD Drive\netvault\windows\netvault>. If you are installing NetVault from a download package, please extract the files and browse to the extracted destination folder.
Double Click “install.exe” to begin the installation wizard.
These instructions will walk you through installing the English localized version of NetVault. However, if you wish to install a different language then you can select that language here.
Using the drop-down box, select the desired installation language. Click “Ok” to continue.
At the welcome screen, click “Next” to continue.
On the License Agreement screen, read through the License Agreement.
If you agree with the License Agreement, click the “I Agree” radial button.
Click “Next” to continue
In this section we will be installing the NetVault Backup Server so we will use the “Server” option. If you were installing the NetVault Client then you would use the “Client” option.
Select the “Server” radial button. Click “Next” to continue.
On the “Machine Name” screen, give the Server an identifying name to be shown within the NetVault WebUI.
Click “Next” to continue.
Type in a password for the NetVault Backup machine.
The password is used while adding a NetVault Backup machine to a server.
Click “Next” to continue.
Select the installation folder. In this example we will leave the installation folder as default. Click “Next” to continue.
Select the NetVault Backup Database folder. In this example we will leave the installation folder as default.
Click “Next” to continue.
Enter in the PostgreSQL superuser password. Click “Next” to continue
Click “Next” to confirm the installation process.
The installer will begin the installation process. The progress bar displayed in the Installation Progress dialog box indicates the progress of the installation process.
Once the installation completes successfully, the Completion dialog box is displayed. Click “Close” to close the dialog box.
To install NetVault Backup Server on Linux x86 and x86-64 1. Log on to the system with root-level account.
2. If you are using the installation CD, insert the CD in the drive, and mount the drive. Navigate to the directory in which the installation files reside:
cd /cdrom/netvault/<LinuxX86HybridServer or LinuxX86Pure64Server>/netvault
If the auto mount operation reports an error (“bash: ./install: /bin/sh bad interpreter: Permission denied”), manually mount the drive without the noexec mount option.
Example
umount /cdrom/
mount -t iso9660 /dev/cdrom /cdrom
3. If you are using the downloaded package, extract the installation files using a native tool. Start a terminal session, and navigate to the directory in which the extracted files reside.
4. To start the installer, type: ./install
Follow the instructions to complete the installation steps. 5. Select a Language English Japanese EUC Chinese Simplified Korean French German Select language? [1]:
Select the language for your NetVault Backup installation. To select English, press 1 or Enter. To select another language, press the corresponding key.
6. Have you read and agreed to the terms of the license? (y = yes, n = no, d = display license) (y n d) [d]:
a. Press y to accept the license agreement and continue. The license agreement is not displayed when you press this key.
b. Press n to reject the license agreement. The installation process is terminated when you press this key.
c. Press d to display the license agreement. This is the default value. When you press d, the agreement is displayed in parts. The percentage of text displayed is shown at the bottom of the screen. To display the next part, press Enter.
7. Where should NetVault be installed? [/usr/netvault]:
The default installation path for NetVault Backup is /usr/netvault. To use the default path, press Enter.
To change the location, type the new path, and press Enter. The parent directories in this path must exist on the server. The installation directory is automatically created during installation. For example, if you specify the path “/usr/software/netvault”, the directory “/usr/software” must exist on the server; the sub-directory “netvault” is automatically created during installation.
Note: If the installation directory already exists, a warning is displayed. In this example, if the “netvault” sub-directory already exists on the server, the following warning is displayed:
The directory ‘/usr/software/netvault’ already exists. All contents of this directory will be destroyed. Are you sure you want to continue? (y n) [n]
Press y to continue.
8. Where should NetVault Database be installed? [/usr/netvault/db]
The default installation path for the NetVault Database is /usr/netvault/db. To use the default path, press Enter.
To change the location, type the new path, and press Enter. The parent directories in this path must exist on the server. The installation directory is automatically created during installation. For example, if you specify the path “/usr/software/netvaultdb”, the directory “/usr/software” must exist on the server; the sub-directory “netvaultdb” is automatically created during installation.
9. Please enter a NetVault machine name using A-Z, a-z, _ and 0-9
By default, NetVault Backup uses the OS-assigned machine name. To select the default name, press Enter.
To assign a different name, type the name, and press Enter. For more information about machine names, see Determining NetVault Backup name and password.
10. Please enter the NetVault password for this machine
Specify a password for the NetVault Backup machine, and press Enter.
The password is used while adding a NetVault Backup machine to the server. If no password is set during installation, NetVault Backup uses the system’s root or administrator password. 11. Please confirm password
Re-type the password for the NetVault Backup machine, and press Enter. If no password was set in the previous step, press Enter.
12. Please enter the password for the NetVault PostgreSQL database superuser
Specify a password for the PostgreSQL database super user.
13. Please confirm password
Re-type the password for the PostgreSQL database super user, and press Enter.
The installer begins the installation process. The status messages displayed in the terminal window indicate the progress of the installation. When the installation completes successfully, a message is displayed in the terminal window.
For further information regarding installing on Linux platforms or installing on other operating systems, please refer to the NetVault Backup Installation guide.
Installing a NetVault client on Windows
To install Dell NetVault client on a Windows machine, first log into the system as an Administrator level user. If you are installing NetVault via a CD, make sure that it is in the drive and browse to <CD
Drive\netvault\windows\netvault>. If you are installing NetVault from a download package, please extract the files and browse to the extracted destination folder.
Double Click “install.exe” to begin the installation wizard.
These instructions will walk you through installing the English localized version of NetVault. However, if you wish to install a different language then you can select that language here.
Using the drop-down box, select the desired installation language.
At the welcome screen, click “Next” to continue.
On the License Agreement screen, read through the License Agreement. If you agree with the License Agreement, click the “I Agree” radial button. Click “Next” to continue
In this section we will be installing the NetVault Client so we will use the “Client” option. If you were installing the NetVault client then you would use the “Client” option.
Select the “Client” radial button. Click “Next” to continue.
On the “Machine Name” screen, give the Server an identifying name to be shown within the NetVault UI. Click “Next” to continue.
Type in a password for the NetVault Backup machine.
The password is used while adding a NetVault Backup machine to a server. Click “Next” to continue.
Select the NetVault Backup Database folder. In this example we will leave the installation folder as default.
Click “Next” to continue.
Click “Next” to confirm the installation process.
The installer will begin the installation process. The progress bar displayed in the Installation Progress dialog box indicates the progress of the installation process.
Once the installation completes successfully, the Completion dialog box is displayed. Click “Close” to close the dialog box.
Installing a NetVault client on Linux (x86 and x86-64)
1. Log on to the system with root-level account.
2. If you are using the installation CD, insert the CD in the drive, and mount the drive. Navigate to the directory in which the installation files reside:
cd /cdrom/netvault/<LinuxX86Hybrid or LinuxX86Pure64>/netvault
If the auto mount operation reports an error (“bash: ./install: /bin/sh bad interpreter:Permission denied”), manually mount the drive without the noexec mount option.
Example
umount /cdrom/
mount -t iso9660 /dev/cdrom /cdrom
3. If you are using the downloaded package, extract the installation files using a native tool. Start a terminal session, and navigate to the directory in which the extracted files reside.
4. To start the installer, type: ./install
Follow the instructions to complete the installation steps. 5. Select a Language
•
English
•
Japanese EUC
•
Chinese Simplified
•
Korean
•
French
•
German
Select language? [1]:Select the language for your NetVault Backup installation. To select English, press 1 or Enter. To select another language, press the corresponding key.
6. Have you read and agreed to the terms of the license? (y = yes, n = no, d = display license) (y n d) [d]:
Press y to accept the license agreement and continue. The license agreement is not displayed when you press this key.
Press n to reject the license agreement. The installation process is terminated when you press this key.
Press d to display the license agreement. This is the default value. When you press d, the agreement is displayed in parts. The percentage of text displayed is shown at the bottom of the screen. To display the next part, press Enter.
7. Where should NetVault be installed? [/usr/netvault]:
The default installation path for NetVault Backup is /usr/netvault. To use the default path, press Enter.
To change the location, type the new path, and press Enter. The parent directories in this path must exist on the server. The installation directory is automatically created during installation. For example, if you specify the path “/usr/software/netvault”, the directory “/usr/software” must exist on the server; the sub-directory “netvault” is automatically created during installation.
If the installation directory already exists, a warning is displayed. In this example, if the “netvault” sub-directory already exists on the server, the following warning is displayed:
The directory ‘/usr/software/netvault’ already exists. All contents of this directory will be destroyed. Are you sure you want to continue? (y n) [n]
Press y to continue.
8. Please enter a NetVault machine name using A-Z, a-z, _ and 0-9
By default, NetVault Backup uses the OS-assigned machine name. To select the default name,press Enter.
To assign a different name, type the name, and press Enter. For more information about machine names, see Determining NetVault Backup name and password.
9. Please enter the NetVault password for this machine
Specify a password for the NetVault Backup machine, and press Enter. The password is used while adding a NetVault Backup machine to a server. If no password is set during installation, NetVault Backup uses the system’s root or administrator password.
10. Please confirm password
Re-type the password for the NetVault Backup machine, and press Enter.
If no password was set in the previous step, press Enter.
The installer begins the installation process. The status messages displayed in the terminal window indicate the progress of the installation. When the installation completes successfully, a message is displayed in the terminal window.
For further information regarding installing on Linux platforms or installing on other operating systems, please refer to the NetVault Backup Installation guide.
Command Line Client (CLI) Installation
The Windows install package is made using standard MSI installation technology. As such, it is possible to install NetVault Backup using the command line interface, both locally and from an UNC path. For installation via UNC path, the following command will start the NetVault installer.
“\\remotemachine\<shared folder location>\netvault\setup.exe”
For installations via command line please see the following two examples and table of parameters. Example 1: This command line will install NetVault Backup using all the default options for everything except the password.
‘run’ msiexec /quiet/i \\remotemachine\share\netvault\netvault.msi PASWORD=”pwd”
Example 2: This command line will install NetVault Backup to the standard location but have the database installed on a separate drive. The password is set to “mypwd”
msiexec /quiet /i “c:\nvinstall\netvault.msi TARGETDIR=c:\netvault” DB_DIR=”e:\nvdb” PASSWORD=”mypwd”
The following table documents each of the possible parameters that can be used as part of a MSI CLI install:
Parameter Default Value Meaning
PASSWORD ““ - no
password Machine level password used when add- ing the client to the server. A password must be specified, the default blank password will not allow the client to be accessed.
TARGETDIR c:\program
files\bakbone soft-
ware\netvault
Directory where NetVault: Backup will be installed into. DB_DIR <TARGETDIR>\
db Directory the NetVault: Backup data- base will use. CLIENTSER
VER Client (1) Use a value of 1 to install as a client or 2 to install as a server. LOGICAL_N
AME Name of machine The name of the NetVault: Backup installation. NVLANGUA
GE English Language to install. Possible values
are: French, Japanese, Korean, Chinese, ChineseSimp.
Note that these values are case sensitive.
Configuring a NetVault Client using the NetVault WebUI
Click “Manage Clients” from the left under “Configuration”
Select the client you want to add from the list of machines.
If the client is not listed then you can search for the machine by clicking “Find Machine”. This will allow you to search by IP or FQDN.
Click “Next” once you have selected the machine to add to the NetVault Backup server.
Enter the password for the client.
Enter a description for this client. Click “Next” to continue.
If the client is outside the firewall then there may be some additional configuration steps required. If your client is inside the firewall then click “Next”
If your client is outside the firewall then click “Client is outside firewall” and fill in the appropriate information.
The client is now added to the NetVault Backup server.
Click “Server Monitor” from the left under “Monitoring”.
NetVault WebUI First Look
The easiest way to open the NetVault WebUI is by going to the following address in your web browser. https://localhost:8443/index.html
You will get the following warning screen until the site’s security certificate is added to the trusted certificates list.
Click the “Proceed anyway” button to continue to the NetVault WebUI.
There are two predefined user accounts in NetVault Backup, “admin” and “default”. Both user accounts are assigned all privileges. These accounts cannot be deleted and by default have no password
assigned to them.
By default, NetVault will bring you to the “Server Monitor” screen. As this is a completely fresh install, our “Client Status” is 1/1 and “Storage Devices” 0/0. This means that we have one client being managed by NetVault Backup Server (the server itself) and have no storage devices connected. The first thing we want to do is add passwords to the default accounts.
Click “Manage Users” under the “Configuration” section on the left.
From this screen you edit everything for the user accounts. This includes the password, account details like username and email addresses, group memberships, privileges and more. Spend a little time familiarizing yourself with the options here before moving on.
Click “Password” to edit the password for the selected account.
Since the user “default” is one of the two default accounts created, the option to reset the password to blank is available.
Leave the “Current Password” box blank.
Enter in a “New Password” and matching “Confirm Password” Click “Done” on the bottom right when ready to proceed.
Click “Done” again to finish editing this user and return to the “Manage User Accounts” screen. To create a new user, click “Add” from the bottom right. This will bring you back to the previous screen allowing you to edit the account information. Refer to the NetVault Backup 10 Administrators Guide for more detailed information concerning user account management.
Take a minute now and familiarize yourself with the layout of the WebUI. Under the reporting section you can view canned reports and job history. Under Monitoring you can view logs, events, device activity and job status. When ready, let’s move on and configure the storage.
Storage configuration
NetVault Backup supports a wide range of devices for storing backups. These include: Physical tape libraries, autoloaders, and tape drives
NetVault Backup Virtual Tape Libraries (VTLs) and Shared Virtual Tape Libraries (SVTLs) Dell NetVault SmartDisk, optional software-based, target-side deduplication
Deduplication appliances, including Dell DR Series Systems and EMC Data Domain Systems You can attach the storage devices to the NetVault Backup Server, Clients, or NAS filers within a NetVault Backup Domain. The physical storage devices can be configured for single or shared use, and connected through SCSI, iSCSI, IP, SAS, or Fibre Channel SAN interfaces.
To use a storage device in a backup or restore operation, you must first add the device to the NetVault Backup Domain. A device attached to a NetVault Backup Client is only recognized after you add the client to the NetVault Backup Server. Similarly, a device attached to a filer is only recognized after you add the filer to the server using Dell™ NetVault™ Backup Plug-in for NDMP (Plug-in for NDMP). NOTE: On Windows-based machines, you must disable the Removable Storage Service before adding a device to the NetVault Backup Server. For more information about disabling this service, refer to the Dell NetVault Backup Installation Guide.
Adding a storage device
First, disable Windows Remote Storage Manager for systems with locally attached backup devices. Log on as an Administrator-level user.
Right-click My Computer, and select Manage to open the Computer Management window. Expand the Storage node to display the local device.
Right-click the device, and select Properties.
On the General tab, clear the Enable library check box. Click Apply, and then OK to close the dialog box.
Creating and adding a virtual standalone drive
Click “Manage Devices” from the left in the Configuration section
Click “Add Device” from the bottom right in the resultant screen.
Click “Single virtual disk device” if it is not already selected. Click “Next”
Select the machine you wish to contain the virtual disk device from the list
In this example we have a second disk(H:\) on the NVBUTSTING machine that we will use as a virtual disk device.
Click “Next” to continue.
We now need to specify the parameters to allow a new virtual disk to be created.
Note: A single large media file of the specified size will be created at the location chosen. Also, when choosing a location, it must exist already. (Example: H:\Backups\ must be created in the folder tree
Enter the Configuration Parameters and Click “Next” to continue when ready.
Creating and adding a Virtual Tape Library (VTL) is very similar to this process with the major difference being step 2, the configuration screen.
Be careful to adjust the capacity, number of drives and number of slots to coincide with the available space on the destination selected. Configure the VTL settings for your environment and click “Next” to create the drive.
Clicking “Manage Devices” under the configuration tab shows the list of devices that you have added for storage to this NetVault server.
Creating a Backup Job
Click “Create Backup Job”
Give the backup job a name.
As this is the first time creating a backup job there are no preconfigured selection sets that we can use. To the right of the “Selections” box, click the blue “Create New” box.
For this example we are selecting the “C:\” drive for the NVBU-003 client machine. To do this we expand the following: “CLIENT-003”, “File System”, “Fixed Drives” and select “C:\”. For your machine do the following:
Drill down through the options selecting what you want to back up. Click “Save” when ready to proceed.
You will be prompted to give the new set a name, we named our example set “C:\-Drive backup”. Note: You can also back up individual files and folders, system state, removable drives as well as many other options.
Some of the options that can be changed by editing “Plugin Options” are- to change the Backup Method (Standard or VSS) or the Backup Type (Full, Incremental, and Differential). In this example we will leave these as default and edit the schedule.
In this example, we are editing the backup schedule to occur every week day at one AM.
Edit the Backup Schedule to your desired schedule and click “Save” when finished. You will be prompted to give the new schedule set a name so it can be reused later.
We now need to select where the backup will be stored.
To the right of “Target Storage”, Click the blue “Create New” button.
By default, NetVault is set to use any device as storage. In this example we will specify the
“H:\NVBUTSTING-2nd_Disk” storage location created earlier in this guide as the designated storage target.
If you wish to use any device, leave these settings unchanged and click “Cancel”. Otherwise, select the desired backup storage target and click “Set”.
Enter a “Target Set Name” Click “Save”
You’ve now completed creating a backup job. Click “Save” to save this job but not submit
Note: The screen will stay in the same location after clicking “Save” or “Save & Run”.
Recovering Data
To begin a recovery task with NetVault:
Click “Create Restore Job” from the “Jobs” list on the left.
Select the Saveset that you wish to recover from.
In this example, this is a fresh install and we only have two savesets. If you have many savesets then you can use the filters at the top.
Select what you want to recover. Click “Next” when ready to proceed.
Give the recovery job a name at the top.
Take a minute to familiarize yourself with the options presented here. “Target Client” allows you to restore to any client recognized by NetVault.
“Schedule” allows you to schedule the recovery. This means you can recover the data at a later date/time or even configure a reoccurring recovery of the data.
Advanced Options allows the recovery to specify from the latest backup or a specific backup. To use compression, scripting or control event notifications.
Click “Submit” to submit the Recovery job. If you chose immediately for the schedule then it will begin recovering the chosen data.
Conclusion
Installing and configuring NetVault Backup version 10 takes only a few minutes, making it easy for you to safeguard your data and applications. For more information, please see the following resources:
Dell NetVault documentation: http:// support.software.dell.com/netvault-backup/release-notes-guides
Sales and pricing information: www.dellsoftware.com/products/netvault-backup/ Twitter: @DellDP
Facebook: facebook.com/delldataprotection
About Dell Software
Dell Software helps customers unlock greater potential through the power of technology—delivering scalable, affordable and simple-to-use solutions that simplify IT and mitigate risk. The Dell Software portfolio addresses five key areas of customer needs: data center and cloud management, information management, mobile workforce management, security and data protection. This software, when combined with Dell hardware and services, drives unmatched efficiency and productivity to accelerate business results. www.dellsoftware.com.