Improving Performance in Windows
Embedded Standard 7
Contents
Prerequisites ... 1
Summary ... 1
Improving Boot Time in Windows Embedded Standard 7 ... 1
Superfetch ... 2
Using Superfetch with Write Filters ... 3
Services ... 3
Improving Runtime Performance ... 5
Runtime Performance Improvement Example ... 5
Superfetch and Processes ... 9
Summary ... 9
Prerequisites
Read Measuring Performance on Windows Embedded Standard 7
Summary
With the ability to do powerful performance analysis using the Windows Performance Analysis Toolkit, it is now easier to improve the performance of a system. This paper covers the technologies that provide better performance in Windows Embedded Standard 7 and the Windows Embedded Standard 7 specific performance issues which have been identified to this point.
Improving Boot Time in Windows Embedded Standard 7
There are several key pieces of information that will help you improve the boot time of your embedded system. The first is that the “Superfetch” service is very important for a short boot time. Even if you are using write filters you should enable this service. By default the service is turned off if you have installed write filters. To understand why it is turned off by default you should know a bit about what the
Superfetch
The Superfetch service is a very important service to the performance of Windows Embedded Standard 7. It serves two primary functions. The first is to improve the boot time by learning what the system will need during boot, and creating a plan based on that information for intelligent prefetching the next time that the system boots. The second primary function is to make applications start faster. It does this much as it makes the system boot faster; by learning what information is needed during the loading of an application and creating a plan for that process.
In order to create these plans it creates files on the disk and entries in the registry. The files sizes vary but will not grow indefinitely in number. There is a limit to how many of these file the Superfetch system creates. It is because the Superfetch service writes files to disk that the Superfetch service is disabled when write filters are installed. Whether you have File Based Write Filtering (FBWF) or Enhanced Write Filtering (EWF) enabled, you will lose the information being stored every time that you restart, and space will be used in your overlay. If you are using RAM as your overlay you will be using RAM resources to store these files. With FBWF you can make an exception for the
%systemdrive%\windows\prefetch folder and those files will persist, but then you will also have to make an exception for the registry by installing the registry filter package.
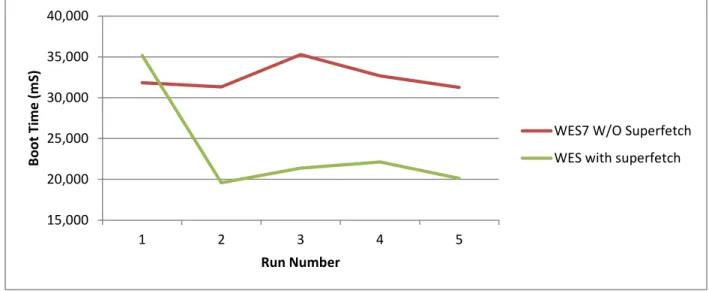
Figure 1 is an example a typical rotational media based embedded system booting with and without Superfetch enabled:
Figure 1 Boot Time Comparison with and without Superfetch (rotational HDD based)
As you can see from Figure 1, the Superfetch service clearly makes a significant difference in boot times. The Superfetch service is designed with consideration for rotational media. It solves a problem of the generally slower random access read times of a traditional spinning disk HDD. Therefore, the Superfetch service is turned off when the random read access throughput is measured (by the Windows System Assessment Tool) to be more than about 8 Mb/second.
15,000 20,000 25,000 30,000 35,000 40,000 1 2 3 4 5 B o o t Ti m e ( m S) Run Number
WES7 W/O Superfetch WES with superfetch
Using Superfetch with Write Filters
Currently you cannot tell the Superfetch service to stop creating plans for each application and for each boot. Therefore a decision has to be made on whether having these files written to the overlay during typical operation is acceptable. If so, you can have write filters and as Superfetch running at the same time. Here’s the process for doing this:
1. Make a list of the primary applications which are important to the system. These will be started later to teach the Superfetch system.
2. As soon as your build which includes write filters is installed, you have to enable the Superfetch service before you enable the write filters. Do not enable the write filters at this point!
a. Modify the HKLM/SYSTEM/CurrentControlSet/Control/Session Manager/Memory Management/PrefetchParameters/EnablePrefetcher value to be 0x3.
b. Modify the HKLM/SYSTEM/CurrentControlSet/Control/Session Manager/Memory Management/PrefetchParameters/EnableSuperFetch value to be 0x3.
3. Restart the system 3 times, and let the system sit idle for at least 5 minutes after the last restart. 4. Start all the applications (up to 123) from the list from step 1 at least one time. (see Superfetch
and Processes in the following section for more information) 5. Enable Write filters and restart the system.
Now the system should be optimized with Superfetch, and protected with the
write filters at the same time.
Be aware that the Superfetch service will continue to monitor applications and boot, and will occasionally write files to your overlay.Services
Frequently packages contain services which are important to part of that packages functionality, but may not apply to your system. In these cases the developer should change the default start behavior of that service to prevent unnecessary boot and startup delays. Some of them have little effect on
performance. However, some of them can have a severe effect. Generally if a specific service is not required, it should be set to either “disabled” or to “demand”. A service which is set to demand will only start when it is called for. A service which is set to disabled will not start under any circumstances. You can also set a service to start after boot by setting its start configuration to “delayed-auto”. In this configuration the service will not start until 2 minutes after all the other “auto” services have started, and will be set to a reduced priority. Here are some examples of services to examine.
Investigations continue as to the effects of the various services upon boot time. One service in
particular has been identified as having a potentially severe effect on boot time while typically not being needed. This service is the “NFS for Client” service. NFS signifies Network File System. If you do not have to connect to a Network File System we recommend that you disable this service. It has been shown to cause an intermittent 20 to 45 second addition to the boot time of various systems. The NFS for Client service is installed with the SMB (Simplified Message Block) package. This service can be disabled by running “sc config nfsclnt start= disabled” from an elevated command prompt.
Every service that is started can be easily analyzed for its effect on boot using the Windows Performance Analysis Toolkit. To capture a boot trace follow the instructions in “How to measure performance on Windows Embedded Standard 7”. When you have a boot trace and run the “boot” action on it, you can see all the services which are started in addition to their performance effect. Under the <services> section the “autoStartDuration” displays the total time that is spent starting services. The start time for each service is indicated by the “totalTransitionTimeDelta” value. From this you can determine the effects of each service upon boot and decide whether to delay or disable that service. Here is an example from a boot trace converted to XML using the xperf “boot” action.
<services autoStartStartTime="8531" autoStartEndTime="13146" autoStartDuration="4614"> <serviceTransition name="PlugPlay" group="PlugPlay" transition="start"
totalTransitionTimeDelta="621" firstCheckpointTimeDelta="122"
processingTimeDelta="499" container="DcomLaunch svchost (536)" startedAt="8532"
firstCheckpointedAt="8654" endedAt="9153" />
<serviceTransition name="Power" group="PlugPlay" transition="start"
totalTransitionTimeDelta="80" firstCheckpointTimeDelta="0" processingTimeDelta="80"
container="DcomLaunch svchost (536)" startedAt="9154" firstCheckpointedAt="9154"
endedAt="9235" />
<serviceTransition name="DcomLaunch" group="COM Infrastructure" transition="start"
totalTransitionTimeDelta="31" firstCheckpointTimeDelta="0" processingTimeDelta="31"
container="DcomLaunch svchost (536)" startedAt="9246" firstCheckpointedAt="9246"
endedAt="9278" />
<serviceTransition name="RpcEptMapper" group="COM Infrastructure" transition="start"
totalTransitionTimeDelta="65" firstCheckpointTimeDelta="47" processingTimeDelta="17"
container="RPCSS svchost (604)" startedAt="9247" firstCheckpointedAt="9295"
endedAt="9313" />
<serviceTransition name="RpcSs" group="COM Infrastructure" transition="start"
totalTransitionTimeDelta="68" firstCheckpointTimeDelta="0" processingTimeDelta="67"
container="RPCSS svchost (604)" startedAt="9313" firstCheckpointedAt="9314"
endedAt="9381" />
<serviceTransition name="eventlog" group="Event Log" transition="start"
totalTransitionTimeDelta="292" firstCheckpointTimeDelta="217"
processingTimeDelta="74" container="LocalServiceNetworkRestricted svchost (692)"
startedAt="9382" firstCheckpointedAt="9599" endedAt="9674" />
We can see from the example that was mentioned earlier that the “PlugPlay” service took 621mS to start.
Be aware that some services are very important and are required for correct booting. One way to determine whether a particular service is critical is by typing “sc qc <nameofservice>” at an elevated command prompt. This will list the services attributes including the “ERROR_CONTROL” and
“START_TYPE” flags. If the error flag is set to “3 CRITICAL” and the start type is “0 BOOT START” the system will not boot without it. Also notice that if the “ERROR_CONTROL” is not “3 CRITICAL” it is not conclusive that the service can be delayed or disabled.
C:\Users\dev>sc qc rdyboost [SC] QueryServiceConfig SUCCESS SERVICE_NAME: rdyboost TYPE : 1 KERNEL_DRIVER START_TYPE : 0 BOOT_START ERROR_CONTROL : 3 CRITICAL BINARY_PATH_NAME : \SystemRoot\System32\drivers\rdyboost.sys LOAD_ORDER_GROUP : PnP Filter TAG : 2 DISPLAY_NAME : ReadyBoost DEPENDENCIES : SERVICE_START_NAME :
USB devices can have a big effect on your boot time. The initialization of USB devices is frequently not optimized by the device manufacturer for performance. If you are seeing longer boot times, try unplugging all USB devices to see how that changes your boot performance.
Improving Runtime Performance
The Windows Performance Toolkit is also used to analyze and improve runtime performance issues.
Runtime Performance Improvement Example
Because the boot process is fairly defined it can be more easily detailed with regard to improving performance. This is not true of runtime performance issues as they are basically infinite. In order to demonstrate runtime performance improvement we will examine an example. In this example I will examine a device that is intermittently slow when opening and playing songs in Windows Media Player. Scenario:
1. Boot computer from power off
2. As soon as the desktop is available, open Windows Media Player 11 3. Select one song and play
It has been observed on a particular computer that these steps frequently produce slow response to the user. It is up to us to determine how to fix it.
Analysis:
In order to fix the problem we first must discover what is causing the problem. To do this we run through our scenario with xperf collecting performance trace events as described in “How to measure performance in Windows Embedded Standard 7”. Here’s a recap:
2. As soon as the desktop is available, from an elevated cmd prompt type: “c:\Program
Files\Microsoft Windows Performance Toolkit\xperf –on DiagEasy”. (This can even be a script run as a startup process)
3. Execute steps 2 and 3 from the scenario that was discussed earlier
4. From the elevated command prompt type: “c:\Program Files\Microsoft Windows Performance Toolkit\xperf –d MyTrace.etl”
5. Open the MyTrace.etl file by typing: “c:\Program Files\Microsoft Windows Performance Toolkit\xperf MyTrace.etl”
Step 5 will open the GUI for the performance toolkit and let the user view important performance data. In order to troubleshoot general slowness we look to the system resources for answers. These include the CPU usage, Disk IO, and Memory usage. With a paging file memory performance issues will manifest themselves in the form of too much Disk IO so we really only have to examine CPU and Disk activity to start with.
Figure 2 Windows Media Player Scenario Example Overview
From Figure 2 we can see that the biggest resource concern appears to be the disk usage. It is frequently pegged to 100% usage. There is a significant CPU usage also but we willl look at disk usage first as that
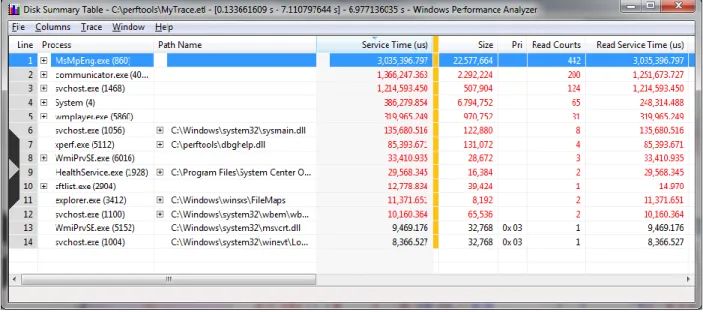
seems to be worse. By selecting the time period at the beginning, right-clicking and clicking “Summary Detail” we can examine what is going on to disk.
Figure 3 Windows Media Player Scenario Example Disk Usage
From Figure 3 we see that there are 4 processes using more disk resources than wmplayer.exe, our target scenario’s primary process. By far the biggest consumer of disk IO usage is MsMpEng.exe. A quick search on www.bing.com shows us that this process is related to the Windows Defender Anti-Malware scanner. If this process is not needed then we might consider disabling or removing this particular feature. We also seem to have Communictor.exe running which may not be needed for this scenario. After shutting off both features we can try again.
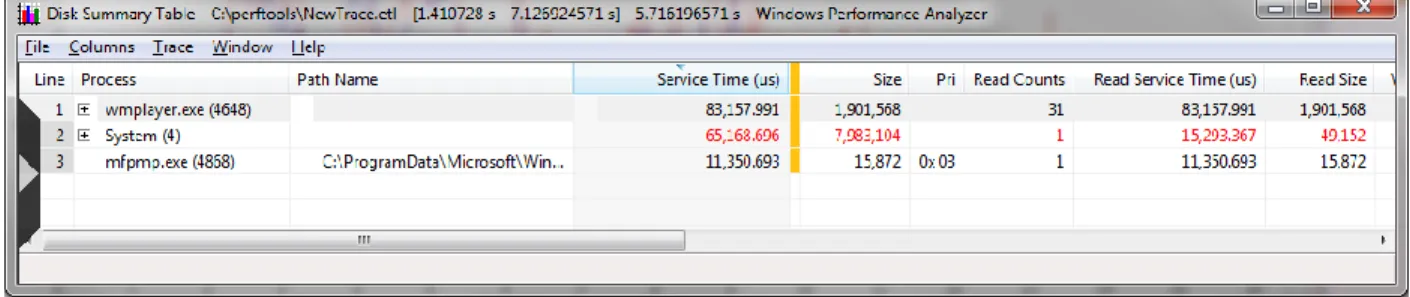
Figure 4 Windows Media Player scenario example after fix
The response of Windows Media Player was much better, and as you can see Disk usage is much better with these other features disabled. Of course frequently you will not want to disable these services and features as they provide a value. However, many times there are things running that were not intended to run by the developer. Here is a quick examination of disk activity.
As you want, we see in Figure 5 that wmplayer.exe is the primary consumer of the disk now.
Superfetch and Processes
Superfetch is also important for process start performance in basically the same way it is important for boot performance. Without the Superfetch service that is running you can expect approximately double the start times for most processes. The Superfetch service will keep up to 123 process launch plans so if you are locking down the system with write filters you must make sure that you execute the most frequently used processes and applications before you enable write filters and rebooting. You only have to execute each process one time as the plan does not change over time unless the files being accessed to start the process change (such as with an update).
Summary
Although there are many aspects to any complex system which make up its perceived and actual performance, Windows Embedded Standard 7 contains several key technologies that should be understood in order to optimize the performance of a system. Superfetch is a suite of technologies including the Superfetch service (sysmon) . Together they make any Windows Embedded Standard 7 image run much faster. The Windows Performance Analysis Toolkit can be used to find performance problems. It enables the developer to make decisions about which technologies should be included in their build.