- - -
-- -- -- --
- -
-
-
- - -
--
---- ----
-
---
---_
.-IBM 5110
BASIC Introduction
- - -
-- -- -- --
- -
-
-
- - -
--
---- ----
-
---
---_
.-IBM 5110
Preface
This manual introduces the IBM 5110 Computer and its BASIC programming capability. It is intended to provide the users of these products with the information necessary to operate the 5110 using the BASIC language.
Related Publications
• IBM 5110 BASIC Reference Manual, SA21-9308 • IBM 5110 BASIC User's Guide, SA21-9307 • IBM 5110 BASIC Reference Handbook,
GX21-9309
• IBM 5110 General Information and Physical Planning Manual, GA21-9300
• IBM 5110 Computing System Setup Procedure, SA21-9318
First Edition (January 1978)
Changes are continually made to the specifications herein; any such changes will be reported in subsequent revisions or technical newsletters. Requests for copies of IBM publications should be made to your IBM representative or the IBM branch office serving your locality.
A Reader's Comment Form is at the back of this publication. If the form has been removed, address your comments to IBM Corporation,
Publications, Department 245, Rochester, Minnesota 55901. Comments become the property of IBM.
o
(~)
Preface
This manual introduces the IBM 5110 Computer and its BASIC programming capability. It is intended to provide the users of these products with the information necessary to operate the 5110 using the BASIC language.
Related Publications
• IBM 5110 BASIC Reference Manual, SA21-9308 • IBM 5110 BASIC User's Guide, SA21-9307 • IBM 5110 BASIC Reference Handbook,
GX21-9309
• IBM 5110 General Information and Physical Planning Manual, GA21-9300
• IBM 5110 Computing System Setup Procedure, SA21-9318
First Edition (January 1978)
Changes are continually made to the specifications herein; any such changes will be reported in subsequent revisions or technical newsletters. Requests for copies of IBM publications should be made to your IBM representative or the IBM branch office serving your locality.
A Reader's Comment Form is at the back of this publication. If the form has been removed, address your comments to IBM Corporation,
Publications, Department 245, Rochester, Minnesota 55901. Comments become the property of IBM.
o
Contents
CHAPTER 1. INTRODUCTION. 1 CHAPTER 4. HOW TO WRITE A PROGRAM 49
(~
~'" About This Manual The LET Statement 49About BASIC Using Remarks 50
About the 5110 Listing Program Contents 52
Alphameric Keys 4 Branches . 52
Numeric Keys 4 The GOTO Statement 52
Operating Keys 5 The I F Statement 53
("'"
I;, BASIC Command Keywords 6 Loops 57BASIC Statement Keywords 6
Arithmetic Operator Keys 6 CHAPTER 5. OTHER WAYS TO PUT
Getting Started 6 VALUES INTO PROGRAMS 67
Entering and Displaying Data 7 The READ, DATA, and RESTORE Statements. 67
Entering Lowercase Alphabetic The I N PUT Statement 69
Characters 12 Prompting Your Input 70
Correcting Keying Errors . 13 Entering Character Variables
Into Programs 71
CHAPTER 2. HOW YOUR SYSTEM HANDLES A Review of What You've Done. 72
ARITHMETIC 19
Arithmetic Operators. 19 CHAPTER 6. MAKING CHANGES TO YOUR
Variables 21 PROGRAMS. 73
Variables That Stand For Numbers 21 Correcting Keying Errors 73
C
Performing Several Functions in the Same Expression . 24 Inserting New Lines Replacing One Line With Another 73 75The Sequence of Arithmetic Operations 24 Removing a Line 76
Positive / Negative Operators 27 Renumbering Statement Lines . 77
Variables That Stand For Characters . 29
Using Calculation Results 30 CHAPTER 7. MORE ABOUT THE PRINT
STATEMENT 79
CHAPTER 3. ENTERING, RUNNING, AND Making Headings 80
STORING A PROGRAM 33 Math Calculations in Print Statements 81
Entering a Program 33
Correcting Your Keying Errors 34 CHAPTER 8. SETTING UP YOUR OWN
FORMAT-Running the Program 34 PRINT USING AND IMAGE STATEMENTS 83
Automatic Statement Numbering 38 Example of Printing 86
Sample Run 38
C:
Using Tape or Diskette Storage (Your Library) 39 CHAPTER 9. DATA FILES. Activating and Deactivating Files 89 89Marking Your Media. 42 Creating a Tape or Diskette File 90
SAVE Command 43 Retrieving a File . 91
LOAD Command 44 Repositioning Files . 92
Listing a Directory of Programs 44
A Review of What You've Done. 47
C
c
iii
Contents
CHAPTER 1. INTRODUCTION. 1 CHAPTER 4. HOW TO WRITE A PROGRAM 49
(~
~'" About This Manual The LET Statement 49About BASIC Using Remarks 50
About the 5110 Listing Program Contents 52
Alphameric Keys 4 Branches . 52
Numeric Keys 4 The GOTO Statement 52
Operating Keys 5 The I F Statement 53
("'"
I;, BASIC Command Keywords 6 Loops 57BASIC Statement Keywords 6
Arithmetic Operator Keys 6 CHAPTER 5. OTHER WAYS TO PUT
Getting Started 6 VALUES INTO PROGRAMS 67
Entering and Displaying Data 7 The READ, DATA, and RESTORE Statements. 67
Entering Lowercase Alphabetic The I N PUT Statement 69
Characters 12 Prompting Your Input 70
Correcting Keying Errors . 13 Entering Character Variables
Into Programs 71
CHAPTER 2. HOW YOUR SYSTEM HANDLES A Review of What You've Done. 72
ARITHMETIC 19
Arithmetic Operators. 19 CHAPTER 6. MAKING CHANGES TO YOUR
Variables 21 PROGRAMS. 73
Variables That Stand For Numbers 21 Correcting Keying Errors 73
C
Performing Several Functions in the Same Expression . 24 Inserting New Lines Replacing One Line With Another 73 75The Sequence of Arithmetic Operations 24 Removing a Line 76
Positive / Negative Operators 27 Renumbering Statement Lines . 77
Variables That Stand For Characters . 29
Using Calculation Results 30 CHAPTER 7. MORE ABOUT THE PRINT
STATEMENT 79
CHAPTER 3. ENTERING, RUNNING, AND Making Headings 80
STORING A PROGRAM 33 Math Calculations in Print Statements 81
Entering a Program 33
Correcting Your Keying Errors 34 CHAPTER 8. SETTING UP YOUR OWN
FORMAT-Running the Program 34 PRINT USING AND IMAGE STATEMENTS 83
Automatic Statement Numbering 38 Example of Printing 86
Sample Run 38
C:
Using Tape or Diskette Storage (Your Library) 39 CHAPTER 9. DATA FILES. Activating and Deactivating Files 89 89Marking Your Media. 42 Creating a Tape or Diskette File 90
SAVE Command 43 Retrieving a File . 91
LOAD Command 44 Repositioning Files . 92
Listing a Directory of Programs 44
A Review of What You've Done. 47
C
c
CHAPTER 10. ARRAYS . . . . Defining an Array . . . . DIM Statement for One-Dimensional
Arrays
DI M Statement for Two- Dimensional Arrays . . . . DIM Statement for Character
Variables . . . . Elements of Arrays
Assigning Values to Array Elements Another Way to Assign Values
to Arrays . . . . Assigning Values to an Entire Array
at Once . . . . Working With Elements of Arrays. Printing Arrays . . . . Putting One- Dimensional Arrays
Together in a Program
Two- Dimensional Array . . . . Arithmetic With Arrays . . . .
Addition and Subtraction With Arrays Multiplication and Division . . . . . Averaging Two Sets of One- Dimensional
Arrays
Averaging Two- Dimensional Arrays Matrix Multiplication. . .
Taking a Matrix Transpose . . The Identity Matrix . . . . . Taking the Inverse of a Matrix
CHAPTER 11. MORE THINGS YOU CAN DO WITH BASIC
Finding Square Roots . . . . . Some General System Functions Arithmetic Constants . . Conversion Functions Array / Matrix Functions . Record File Functions Trigonometric Functions
Logarithms and Exponents Other Functions . . . . .
93 95 95 96 96 97 98 100 101 102 103 104 105 106 107 107 108 109 109 109 110 110 111 111 112 114 115 115 116 116 117 117
CHAPTER 12: IF YOU HAVE TROUBLE 119
Forgetting to Save Corrected Programs. 119
0
Endless Loops or Output 119
Numbers Are Not What They
Seem To Be . 119
How Can A Vague Idea Become
A Program? 121
,~-JI
CHAPTER 13. EXERCISES 123
...
".
Exercises for Chapter 2. BASIC
Arithmetic. 124
Exercises for Chapter 4. How to
Write a Program . 128
Exercises for Branching (Chapter 4) 131 tf-~,
Exercises for Loops (Chapter 4) . 134
"
i
Exercises for Chapter 5. Other Ways
to Put Values into Programs . 137
Exercise for Chapter 8. Setting Up Your Own Format-PRINT USING
and Image Statements 139
Exercise for Chapter 10. Arrays . 140
Exercises for Chapter 11. More Things
You Can Do With BASIC 143
APPENDIX A. BASIC STATEMENTS AND
COMMANDS 147
BASIC Statements. 147
BASIC System Commands 150
Editing Function . 151 J~, )'
APPENDIX B. CUSTOMER SUPPORT
FUNCTIONS . . . 153
,Ii' -'-,
~tp/
()
CHAPTER 10. ARRAYS . . . .Defining an Array . . . . DIM Statement for One-Dimensional
Arrays
DI M Statement for Two- Dimensional Arrays . . . . DIM Statement for Character
Variables . . . . Elements of Arrays
Assigning Values to Array Elements Another Way to Assign Values
to Arrays . . . . Assigning Values to an Entire Array
at Once . . . . Working With Elements of Arrays. Printing Arrays . . . . Putting One- Dimensional Arrays
Together in a Program
Two- Dimensional Array . . . . Arithmetic With Arrays . . . .
Addition and Subtraction With Arrays Multiplication and Division . . . . . Averaging Two Sets of One- Dimensional
Arrays
Averaging Two- Dimensional Arrays Matrix Multiplication. . .
Taking a Matrix Transpose . . The Identity Matrix . . . . . Taking the Inverse of a Matrix
CHAPTER 11. MORE THINGS YOU CAN DO WITH BASIC
Finding Square Roots . . . . . Some General System Functions Arithmetic Constants . . Conversion Functions Array / Matrix Functions . Record File Functions Trigonometric Functions
Logarithms and Exponents Other Functions . . . . .
93 95 95 96 96 97 98 100 101 102 103 104 105 106 107 107 108 109 109 109 110 110 111 111 112 114 115 115 116 116 117 117
CHAPTER 12: IF YOU HAVE TROUBLE 119
Forgetting to Save Corrected Programs. 119
0
Endless Loops or Output 119
Numbers Are Not What They
Seem To Be . 119
How Can A Vague Idea Become
A Program? 121
,~-JI
CHAPTER 13. EXERCISES 123
...
".
Exercises for Chapter 2. BASIC
Arithmetic. 124
Exercises for Chapter 4. How to
Write a Program . 128
Exercises for Branching (Chapter 4) 131 tf-~,
Exercises for Loops (Chapter 4) . 134
"
i
Exercises for Chapter 5. Other Ways
to Put Values into Programs . 137
Exercise for Chapter 8. Setting Up Your Own Format-PRINT USING
and Image Statements 139
Exercise for Chapter 10. Arrays . 140
Exercises for Chapter 11. More Things
You Can Do With BASIC 143
APPENDIX A. BASIC STATEMENTS AND
COMMANDS 147
BASIC Statements. 147
BASIC System Commands 150
Editing Function . 151 J~, )'
APPENDIX B. CUSTOMER SUPPORT
FUNCTIONS . . . 153
,Ii' -'-,
~tp/
(
'''"' " ~,./
c
c
Chapter 1. Introduction
ABOUT THIS MANUAL
This manual will show you how to operate the 5110 using the BASIC language. If you are already familiar with the BASIC language, you may be able to skip most of the language-only topics and simply learn how to operate the 5110. If you are not familiar with the BASIC language, you should read the manual from cover to cover while performing the suggested keying operations or examples on your 5110. Not all of the features and functions of the BASIC language are discussed in this manual. For more information about the 5110 or the BASIC language, see the IBM 5110 BASIC Reference Manual,
SA21-9308, or the IBM 5110 BASIC User's Guide, SA21-9307. This manual assumes that your 5110 has been installed and checked out. If this is not the case, use the IBM 5110 Customer Setup Manual, SA21-9318, to install your system.
ABOUT BASIC
BASIC is an interactive computer language; that is, whatever you enter into the system is processed immediately. BASIC has many built-in functions that allow you to effectively solve your problems. BASIC also allows you to write programs using BASIC language statements and facilities. These programs can be stored on the tape cartridge or diskette for later use.
BASIC is a good language to experiment with. Nothing you do from the keyboard can damage the system; and the more you experiment, the more you will learn about BASIC and the system.
ABOUT THE 5110
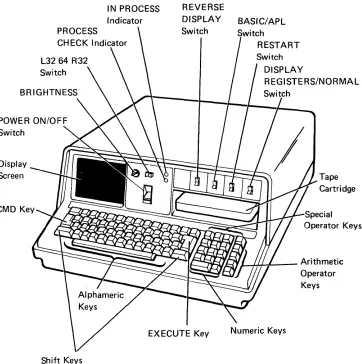
The 5110 Model 1 (Figure 1) is a computer designed to help solve your business problems. The display screen and indicator lights
communicate information to you, and the keyboard and switches allow you to control the operations the system will perform. The 5110 Model 2 is identical to the 5110 Model 1 except that it does not contain the built-in tape unit.
Before you begin to use the 5110, you should become familiar with the keys and the control panel {Figure 1}. The control panel consists of a series of switches, which will be explained later.
Introduction
(
'''"' " ~,./
c
c
Chapter 1. Introduction
ABOUT THIS MANUAL
This manual will show you how to operate the 5110 using the BASIC language. If you are already familiar with the BASIC language, you may be able to skip most of the language-only topics and simply learn how to operate the 5110. If you are not familiar with the BASIC language, you should read the manual from cover to cover while performing the suggested keying operations or examples on your 5110. Not all of the features and functions of the BASIC language are discussed in this manual. For more information about the 5110 or the BASIC language, see the IBM 5110 BASIC Reference Manual,
SA21-9308, or the IBM 5110 BASIC User's Guide, SA21-9307. This manual assumes that your 5110 has been installed and checked out. If this is not the case, use the IBM 5110 Customer Setup Manual, SA21-9318, to install your system.
ABOUT BASIC
BASIC is an interactive computer language; that is, whatever you enter into the system is processed immediately. BASIC has many built-in functions that allow you to effectively solve your problems. BASIC also allows you to write programs using BASIC language statements and facilities. These programs can be stored on the tape cartridge or diskette for later use.
BASIC is a good language to experiment with. Nothing you do from the keyboard can damage the system; and the more you experiment, the more you will learn about BASIC and the system.
ABOUT THE 5110
The 5110 Model 1 (Figure 1) is a computer designed to help solve your business problems. The display screen and indicator lights
communicate information to you, and the keyboard and switches allow you to control the operations the system will perform. The 5110 Model 2 is identical to the 5110 Model 1 except that it does not contain the built-in tape unit.
Before you begin to use the 5110, you should become familiar with the keys and the control panel {Figure 1}. The control panel consists of a series of switches, which will be explained later.
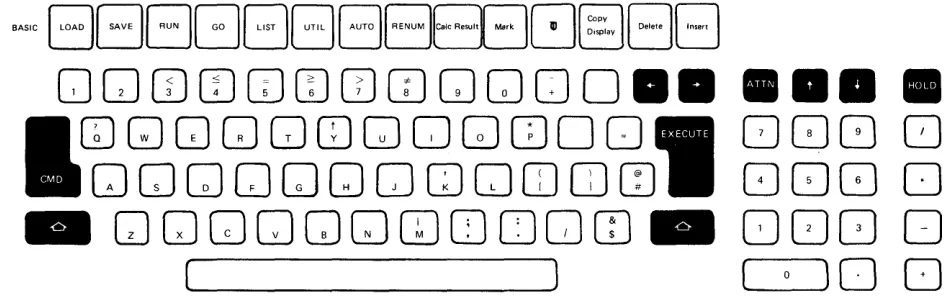
What follows is a brief description of the keys. How you use the keys will be described later. For now, familiarize yourself with the names and locations of keys on the system. Figure 2 shows a BASIC-only keyboard, and Figure 3 shows a combined BASIC/ APL keyboard.
If your system is equipped to operate either BASIC or APL programs, you may be unfamiliar with the symbols appearing at the top and on the front of the alphameric keys (Figure 3). For BASIC operations, even on a BASIC-only machine (Figure 2) where they are not shown on the key top, these symbols can be displayed or printed, although their APL functions do not apply to BASIC operations. See the IBM 5110 BASIC Reference Handbook, GX21-9309, for the APL characters and their locations.
Switch
Display Screen
CMD Key
PROCESS
Switch
IN PROCESS Indicator
REVERSE
DISPLAY BASIC/APL Switch
Switch DISPLAY
REGISTERS/NORMAL
Tape Cartridge
1--4+~--Arithmetic Operator Keys
EXECUTE Key
Shift Keys
Figure 1. IBM 5110 Model 1 Computer
()
;(" )
-\
...
\,4 ').\
~.",_f
()
What follows is a brief description of the keys. How you use the keys will be described later. For now, familiarize yourself with the names and locations of keys on the system. Figure 2 shows a BASIC-only keyboard, and Figure 3 shows a combined BASIC/ APL keyboard.
If your system is equipped to operate either BASIC or APL programs, you may be unfamiliar with the symbols appearing at the top and on the front of the alphameric keys (Figure 3). For BASIC operations, even on a BASIC-only machine (Figure 2) where they are not shown on the key top, these symbols can be displayed or printed, although their APL functions do not apply to BASIC operations. See the IBM 5110 BASIC Reference Handbook, GX21-9309, for the APL characters and their locations.
Switch
Display Screen
CMD Key
PROCESS
Switch
IN PROCESS Indicator
REVERSE
DISPLAY BASIC/APL Switch
Switch DISPLAY
REGISTERS/NORMAL
Tape Cartridge
1--4+~--Arithmetic Operator Keys
EXECUTE Key
Shift Keys
Figure 1. IBM 5110 Model 1 Computer
()
;(" )
-\
...
\,4 ').\
~.",_f
[image:6.612.146.508.284.648.2]c:
c
~"BBBGGBB[","MI~·"··" ~" 8[~;:"IEJEJ
QOOJOJCD[)(IJCDOG]CJO • • • • • •
CDGJGJGJGJCDGJQGJCDOO
[JOG
CJ
[J
GJ
GJ GJ GJ
GJ
CJ
GJ
[J
OJ OJ
CfJ
GJ
GJ
GJ 0
_
GJGJGJGJGJGJCDO[JQCO _
DOC] 0
Figure 2. BASIC-Only Keyboard
BASIC C§J ~~G£:J ~ G!!:U~( RENUM J[CaIC ReSUI.]~
D:](7c;Ir:::Ir::l
APL ()LOAD)(§D@§.)~~~(2§)~()OUTSEL)~CD~~L:J
( 0
)0 []
OCJOJOJCD[)(IJCDCDCDCJCO • • • • • •
CD
CD
CD CO CD
CD
(l)
OJ
(J]
CD
GJ
0
[J 0 G G
CD
OJ
CD
GJ
CO CD CJ
GJ
rn
OJ OJ
CfJ
GJ
GJ
GJ G
_
[[)(IJGJGJCDCDCDO[JOJcoa DOC] 0
( ( 0
)0 []
Figure 3. Combined BASIC/ APl Keyboard
Introduction 3
c:
c
~"BBBGGBB[","MI~·"··" ~" 8[~;:"IEJEJ
QOOJOJCD[)(IJCDOG]CJO • • • • • •
CDGJGJGJGJCDGJQGJCDOO
[JOG
CJ
[J
GJ
GJ GJ GJ
GJ
CJ
GJ
[J
OJ OJ
CfJ
GJ
GJ
GJ 0
_
GJGJGJGJGJGJCDO[JQCO _
DOC] 0
Figure 2. BASIC-Only Keyboard
BASIC C§J ~~G£:J ~ G!!:U~( RENUM J[CaIC ReSUI.]~
D:](7c;Ir:::Ir::l
APL ()LOAD)(§D@§.)~~~(2§)~()OUTSEL)~CD~~L:J
( 0
)0 []
OCJOJOJCD[)(IJCDCDCDCJCO • • • • • •
CD
CD
CD CO CD
CD
(l)
OJ
(J]
CD
GJ
0
[J 0 G G
CD
OJ
CD
GJ
CO CD CJ
GJ
rn
OJ OJ
CfJ
GJ
GJ
GJ G
_
[[)(IJGJGJCDCDCDO[JOJcoa DOC] 0
( ( 0
)0 []
Figure 3. Combined BASIC/ APl Keyboard
[image:7.612.78.550.76.229.2]Alphameric Keys
The alpha keys are similar to those on a standard typewriter, except that there are no lowercase characters. The alpha characters are all uppercase, even though they are in the lowercase position on the keys. Thus, you
do not
use the shift key for alpha characters.If you want to enter an upper-shift character, you must hold down the shift key and then press the key to enter the character, just as you would to type an uppercase character on an ordinary typewriter.
You can also enter lowercase alphabetic characters from the keyboard. How you enter lowercase alphabetic characters is discussed later in this chapter.
Numeric Keys
Either the top row of alphameric keys or the special calculator
arrangement of numeric keys on the right of the keyboard can be used to enter numbers.
o
Alphameric Keys
The alpha keys are similar to those on a standard typewriter, except that there are no lowercase characters. The alpha characters are all uppercase, even though they are in the lowercase position on the keys. Thus, you
do not
use the shift key for alpha characters.If you want to enter an upper-shift character, you must hold down the shift key and then press the key to enter the character, just as you would to type an uppercase character on an ordinary typewriter.
You can also enter lowercase alphabetic characters from the keyboard. How you enter lowercase alphabetic characters is discussed later in this chapter.
Numeric Keys
Either the top row of alphameric keys or the special calculator
arrangement of numeric keys on the right of the keyboard can be used to enter numbers.
c:
c
c
Operating Keys
The dark gray keys with the legend names CMD, EXECUTE, ATTN, and HOLD, and the dark gray keys with the arrows are special
operating keys (Figure 4). The dark gray keys with the arrows and the spacebar (used to enter blank characters) automatically repeat the operation they perform when held down.
Forward Space Key
Backspace Key
/
IfYOU get an error, press .this key to mak:
Attention Key the dIsplay stop flash mg.
Scroll Up Key
Scroll Down Key
.HO.
EXECUTE Key
Shift Key
Space Bar
Figure 4. Special Operating Keys
Introduction 5
c:
c
c
Operating Keys
The dark gray keys with the legend names CMD, EXECUTE, ATTN, and HOLD, and the dark gray keys with the arrows are special
operating keys (Figure 4). The dark gray keys with the arrows and the spacebar (used to enter blank characters) automatically repeat the operation they perform when held down.
Forward Space Key
Backspace Key
/
IfYOU get an error, press .this key to mak:
Attention Key the dIsplay stop flash mg.
Scroll Up Key
Scroll Down Key
.HO.
EXECUTE Key
Shift Key
Space Bar
Figure 4. Special Operating Keys
[image:9.612.158.503.170.464.2]BASIC Command Keywords
The words listed above the top row of alphameric keys (1-0) are BASIC command keywords that you can enter by holding down the CMD key and then pressing the key below the desired command. For example, to enter the LOAD command keyword, hold down the CMD key and press 1. These commands and their use are described later.
BASIC Statement Keywords
Notice the special character combinations of BASIC keywords
engraved on the front of the alphabetic keys. If you have a combined APL/BASIC machine, there is also an APL special character
combination on the front of the key. You can enter the BASIC keywords by holding down the CM D key and then pressing the appropriate key. You will see how these BASIC keywords are used as you become familiar with the BASIC language.
BASIC Statement Keyword
APL Special Character Combination
Note: You can use the APL special character combination only when you are using your system as an APL machine.
Arithmetic Operator Keys
The four keys to the right of the calculator arrangement of numeric keys are the arithmetic operator keys that are used to perform
division, multiplication, subtraction, and addition. These operator keys also appear on the alphameric keyboard. In BASIC the symbol/is used for division, and the symbol
*
is used for multiplication. GETTING STARTEDMake sure the switches on your control panel are set as follows:
Switch Setting
L32 64 R32 64
DISPLAY REGISTERS/NORMAL NORMAL
BASIC/ APL (combined machines only) BASIC
\~
...)1
,r-- ".
,...'
BASIC Command Keywords
The words listed above the top row of alphameric keys (1-0) are BASIC command keywords that you can enter by holding down the CMD key and then pressing the key below the desired command. For example, to enter the LOAD command keyword, hold down the CMD key and press 1. These commands and their use are described later.
BASIC Statement Keywords
Notice the special character combinations of BASIC keywords
engraved on the front of the alphabetic keys. If you have a combined APL/BASIC machine, there is also an APL special character
combination on the front of the key. You can enter the BASIC keywords by holding down the CM D key and then pressing the appropriate key. You will see how these BASIC keywords are used as you become familiar with the BASIC language.
BASIC Statement Keyword
APL Special Character Combination
Note: You can use the APL special character combination only when you are using your system as an APL machine.
Arithmetic Operator Keys
The four keys to the right of the calculator arrangement of numeric keys are the arithmetic operator keys that are used to perform
division, multiplication, subtraction, and addition. These operator keys also appear on the alphameric keyboard. In BASIC the symbol/is used for division, and the symbol
*
is used for multiplication. GETTING STARTEDMake sure the switches on your control panel are set as follows:
Switch Setting
L32 64 R32 64
DISPLAY REGISTERS/NORMAL NORMAL
BASIC/ APL (combined machines only) BASIC
\~
...)1
,r-- ".
C
\'\·
.'c
If your system has the BASIC/ APL switch, it can execute either BASIC or APL language statements. The language used is selected only during the power up procedure or when the RESTART switch is pressed. Make sure your system is plugged in and turn the power on. If the power is already on, press RESTART and wait a few seconds. During this time, the system performs internal checks to make sure it is operating correctly. Do
not
press any keys while these internal checks are being made. If you inadvertently press a key, you must press RESTART to continue.If an error is detected during these checks, the PROCESS CHECK indicator may come on. If the PROCESS CHECK indicator comes on, press RESTART. The system will again perform the internal checks. If the light comes on again, call for maintenance service.
The IN PROCESS indicator comes on whenever the display screen is blank, which indicates that the system is doing internal processing.
ENTERING AND DISPLAYING DATA
Next, let's look at the display screen. Your display screen should look like this:
(I (·.lr·,!(.!i\1 0 U 1
If the READY message does not appear, press RESTART again, and wait a few seconds. If the READY message still does not appear, call your maintenance personnel.
Introduction 7
C
\'\·
.'c
If your system has the BASIC/ APL switch, it can execute either BASIC or APL language statements. The language used is selected only during the power up procedure or when the RESTART switch is pressed. Make sure your system is plugged in and turn the power on. If the power is already on, press RESTART and wait a few seconds. During this time, the system performs internal checks to make sure it is operating correctly. Do
not
press any keys while these internal checks are being made. If you inadvertently press a key, you must press RESTART to continue.If an error is detected during these checks, the PROCESS CHECK indicator may come on. If the PROCESS CHECK indicator comes on, press RESTART. The system will again perform the internal checks. If the light comes on again, call for maintenance service.
The IN PROCESS indicator comes on whenever the display screen is blank, which indicates that the system is doing internal processing.
ENTERING AND DISPLAYING DATA
Next, let's look at the display screen. Your display screen should look like this:
(I (·.lr·,!(.!i\1 0 U 1
If the READY message does not appear, press RESTART again, and wait a few seconds. If the READY message still does not appear, call your maintenance personnel.
The LOAD 0 (zero) message indicates that the system has a clear work area. The flashing underline (_) between the LOAD 0 and READY messages is called a cursor. It tells you where the next character you enter will be displayed. The READY message indicates that the system is ready to receive your instructions. The number in the lower right corner, indicated by the NNNNN on the display screen drawing, is the number of character positions (bytes) in the work area available for your instructions and data. This number changes during
processing. The number is omitted on the remaining display screen drawings in the manual. The number following NNNNN (001) indicates the cursor position on the screen.
The display screen can contain up to 16 lines of data. The bottom line indicates the status of the system and specifies the number of bytes available in the work area (NNNNN) and current cursor position. The line next to the bottom displays the input you are entering from the keyboard. The remaining lines display the preceding 14 lines that have been entered and processed. When the data on the input line is processed, that line is moved up one line, leaving the input line empty so that more data can be entered. Up to 64 characters of data can be entered per line.
Before you start entering data into the system, press the •
key and then hold down the key and press the
0
key (located on the right side of the keyboard). This places your system in the same character set used for the examples in this manual. See the IBM 5110 BASIC Reference Manual for a description of the character sets available with your 5110. Also, for some 5110
systems, the same character might appear on several keys on the keyboard. When doing the keying operations in this manual, always use the key with the character engraved in white on the top of the key.
Now let's enter some data into the system. Enter the following problem using the numeric keys and arithmetic operator keys:
Notice that the characters are displayed as each key is pressed. To process the data you just entered, you must press the EXECUTE key. Press EXECUTE now.
o
,'f""\
\,,/
; ( ' " "'>,
I
' .. )1 The LOAD 0 (zero) message indicates that the system has a clear work
area. The flashing underline (_) between the LOAD 0 and READY messages is called a cursor. It tells you where the next character you enter will be displayed. The READY message indicates that the system is ready to receive your instructions. The number in the lower right corner, indicated by the NNNNN on the display screen drawing, is the number of character positions (bytes) in the work area available for your instructions and data. This number changes during
processing. The number is omitted on the remaining display screen drawings in the manual. The number following NNNNN (001) indicates the cursor position on the screen.
The display screen can contain up to 16 lines of data. The bottom line indicates the status of the system and specifies the number of bytes available in the work area (NNNNN) and current cursor position. The line next to the bottom displays the input you are entering from the keyboard. The remaining lines display the preceding 14 lines that have been entered and processed. When the data on the input line is processed, that line is moved up one line, leaving the input line empty so that more data can be entered. Up to 64 characters of data can be entered per line.
Before you start entering data into the system, press the •
key and then hold down the key and press the
0
key (located on the right side of the keyboard). This places your system in the same character set used for the examples in this manual. See the IBM 5110 BASIC Reference Manual for a description of the character sets available with your 5110. Also, for some 5110
systems, the same character might appear on several keys on the keyboard. When doing the keying operations in this manual, always use the key with the character engraved in white on the top of the key.
Now let's enter some data into the system. Enter the following problem using the numeric keys and arithmetic operator keys:
Notice that the characters are displayed as each key is pressed. To process the data you just entered, you must press the EXECUTE key. Press EXECUTE now.
o
,'f""\
\,,/
; ( ' " "'>,
I
(
""'." ':.c'·
c
The display screen shows:
:~:.~ +:.':)
I::'
. • ..1
Notice that the instruction you entered, 2+3, is on the left margin of the display screen, while the answer, 5, is indented one position from the left margin on the next line. The indentation allows a sign (- or +)
to be displayed.
Enter and execute 125+75 by pressing the following keys:
0080[JO
This display screen shows:
L C) (::0 II
The appearance of your display can be changed by switches on the control panel. The REVERSE DISPLAY switch allows you to change from black characters on a white background to white characters on a black background, or vice versa. Change the switch settings and select the type of display you feel most comfortable with. You may have to adjust the BRIGHTNESS control switch as you change from one background to the other.
Introduction 9
(
""'." ':.c'·
c
The display screen shows:
:~:.~ +:.':)
I::'
. • ..1
Notice that the instruction you entered, 2+3, is on the left margin of the display screen, while the answer, 5, is indented one position from the left margin on the next line. The indentation allows a sign (- or +)
to be displayed.
Enter and execute 125+75 by pressing the following keys:
0080[JO
This display screen shows:
L C) (::0 II
The appearance of your display can be changed by switches on the control panel. The REVERSE DISPLAY switch allows you to change from black characters on a white background to white characters on a black background, or vice versa. Change the switch settings and select the type of display you feel most comfortable with. You may have to adjust the BRIGHTNESS control switch as you change from one background to the other.
Now watch the display as you set the L32 64 R32 switch to the L32 position. With the switch in this position, the leftmost 32 characters on each line are displayed with a space between characters. With the switch in the L32 position, your display screen shows:
I... () ,:\ It 0 "-, + -7.
.,' .. .. J
~.:.i
:I.
:?
r.~ .. I .~ .. { r::' ._!"-, 0 0 A' ••
p [" ti D y
Now set the switch in the R32 position and notice that the display is blank (except for the storage number and cursor position). In the R32 position, the rightmost 32 characters are displayed with a space between characters.
Return the switch to the 64 position, and notice that all characters are displayed without the space in between. For the exercises in the remainder of this book, keep the switch in the 64 position.
There are two dark gray keys with narrow white arrows above the numeric keyboard. These keys move the display lines (except the status line) up or down. The scroll up k e y . moves the display
lines up one line, and the scroll down k e y . moves the
display lines down one line. Both keys continue to move the display lines if they are held down. Now use the scroll down k e y . to move the display down two lines.
The display screen shows:
I...D (I fl (I
::.?+?:
.• ' ) 1::' + '~:.o I:.; The value 200 is now on the input line and
.I. '::: ":: .. I .... can be used as input .
.... :.::: U U
PFi:;D"{
o
/-)
~~,-.j
'."'"-
'''\
~,
I'
/ ".
"',-jf
:(~)
Now watch the display as you set the L32 64 R32 switch to the L32position. With the switch in this position, the leftmost 32 characters on each line are displayed with a space between characters. With the switch in the L32 position, your display screen shows:
I... () ,:\ It 0 "-, + -7.
.,' .. .. J
~.:.i
:I.
:?
r.~ .. I .~ .. { r::' ._!"-, 0 0 A' ••
p [" ti D y
Now set the switch in the R32 position and notice that the display is blank (except for the storage number and cursor position). In the R32 position, the rightmost 32 characters are displayed with a space between characters.
Return the switch to the 64 position, and notice that all characters are displayed without the space in between. For the exercises in the remainder of this book, keep the switch in the 64 position.
There are two dark gray keys with narrow white arrows above the numeric keyboard. These keys move the display lines (except the status line) up or down. The scroll up k e y . moves the display
lines up one line, and the scroll down k e y . moves the
display lines down one line. Both keys continue to move the display lines if they are held down. Now use the scroll down k e y . to move the display down two lines.
The display screen shows:
I...D (I fl (I
::.?+?:
.• ' ) 1::' + '~:.o I:.; The value 200 is now on the input line and
.I. '::: ":: .. I .... can be used as input .
.... :.::: U U
PFi:;D"{
o
/-)
~~,-.j
'."'"-
'''\
~,
I'
/ ".
"',-jf
(
"""',,".,'
c
Use the forward space key and move the cursor to the right
of 200. Notice that the cursor (the underline) is replaced by a flashing character as you space the cursor through the numeric characters. The flashing character serves the same function as the cursor; it indicates the position in the line where input from the keyboard will be
displayed. Now, press the following keys:
o
GJ
[_0
___ )
The display screen shows:
You are now familiar with the format of the display screen. From this point on, only the line or lines being discussed will be shown.
Introduction 11
(
"""',,".,'
c
Use the forward space key and move the cursor to the right
of 200. Notice that the cursor (the underline) is replaced by a flashing character as you space the cursor through the numeric characters. The flashing character serves the same function as the cursor; it indicates the position in the line where input from the keyboard will be
displayed. Now, press the following keys:
o
GJ
[_0
___ )
The display screen shows:
You are now familiar with the format of the display screen. From this point on, only the line or lines being discussed will be shown.
Entering lowercase Alphabetic Characters
Although only the standard BASIC alphabetic characters are shown on the 5110 keyboard, you can enter lowercase alphabetic characters by changing the 5110 to lowercase character mode. One way to change the 5110 to lowercase character mode is to press the HOLD key (the characters HOLD are displayed in the lower left corner of the screen), then hold down the SHIFT'key and press the scroll down
II
key,The 5110 is now in lowercase character mode. For example, press the
Q
key. The display screen looks like this:k
Now, hold down the shift key and press the
Q
key. Thedisplay screen looks like this:
kK
Finally, hold down the command key and press the
Q
key. The display screen looks like this:
kK'
In this example, you are
not
going to execute the data just entered from the keyboard, Instead, press the scroll upII
key once toremove the data from the input line. Now, to return the 5110 to the standard BASIC character mode, press the HOLD key, and then hold down the shift key and press the scroll up . . key, The
5110 is now in standard BASIC character mode.
Note:
All the entries in this manual are entered in standard BASICcharacter mode.
()
,\, ...
,,'
,.()
Entering lowercase Alphabetic Characters
Although only the standard BASIC alphabetic characters are shown on the 5110 keyboard, you can enter lowercase alphabetic characters by changing the 5110 to lowercase character mode. One way to change the 5110 to lowercase character mode is to press the HOLD key (the characters HOLD are displayed in the lower left corner of the screen), then hold down the SHIFT'key and press the scroll down
II
key,The 5110 is now in lowercase character mode. For example, press the
Q
key. The display screen looks like this:k
Now, hold down the shift key and press the
Q
key. Thedisplay screen looks like this:
kK
Finally, hold down the command key and press the
Q
key. The display screen looks like this:
kK'
In this example, you are
not
going to execute the data just entered from the keyboard, Instead, press the scroll upII
key once toremove the data from the input line. Now, to return the 5110 to the standard BASIC character mode, press the HOLD key, and then hold down the shift key and press the scroll up . . key, The
5110 is now in standard BASIC character mode.
Note:
All the entries in this manual are entered in standard BASICcharacter mode.
()
,\, ...
,,'
c···
Correcting Keying Errors
The system has a number of very useful functions that allow you to correct errors made while entering data. On a line-by-line basis, at any time, you can
• Replace a character
• Delete a character
• Insert a character
Replace a Character
To replace a character, move the cursor with the backspace key
II
or forward space key
II
until it is at the incorrect character. Thecursor moves one character space in the direction of the arrow each time the appropriate arrow key is pressed. These keys will continue to move the cursor if they are held down. The incorrect character is then replaced simply by keying the correct character over the incorrect character. (In some instances, characters can be combined to form a character not on the keyboard; for example, the period and quotation mark combine to make an exclamation mark. If you want to replace one of these characters (the. or ') with the other, you should
backspace to the character, press the spacebar to blank the character, backspace again, then enter the desired character.}
For example, you want to do the problem 22+12, but you press the following keys:
88088
The display screen shows:
Introduction 13
c···
Correcting Keying Errors
The system has a number of very useful functions that allow you to correct errors made while entering data. On a line-by-line basis, at any time, you can
• Replace a character
• Delete a character
• Insert a character
Replace a Character
To replace a character, move the cursor with the backspace key
II
or forward space key
II
until it is at the incorrect character. Thecursor moves one character space in the direction of the arrow each time the appropriate arrow key is pressed. These keys will continue to move the cursor if they are held down. The incorrect character is then replaced simply by keying the correct character over the incorrect character. (In some instances, characters can be combined to form a character not on the keyboard; for example, the period and quotation mark combine to make an exclamation mark. If you want to replace one of these characters (the. or ') with the other, you should
backspace to the character, press the spacebar to blank the character, backspace again, then enter the desired character.}
For example, you want to do the problem 22+12, but you press the following keys:
88088
The display screen shows:
To correct
this error, the cursor must be moved back one position (under the second 1) so that character can be rekeyed. Now, pressthe backspace key
II
once. To correct the keying error andexecute the problem, press the following keys:
Delete a Character
To delete a character, you also use the backspace k e y . or the
forward space key
II
to position the cursor. Once the cursor is inthe position of the character to be deleted (the character is flashing),
hold down the CMD key and press the backspace k e y . once.
The character is then deleted, and any characters to the right are shifted one position to the left to close up the space left by the deletion.
For example, you want to do the problem 13+45, but you press the following keys:
CJOOCJ08
The display screen shows:
o
,"----'"
" .. ,,1
To correct
this error, the cursor must be moved back one position(under the second 1) so that character can be rekeyed. Now, press
the backspace key
II
once. To correct the keying error andexecute the problem, press the following keys:
Delete a Character
To delete a character, you also use the backspace k e y . or the
forward space key
II
to position the cursor. Once the cursor is inthe position of the character to be deleted (the character is flashing),
hold down the CMD key and press the backspace k e y . once.
The character is then deleted, and any characters to the right are shifted one position to the left to close up the space left by the deletion.
For example, you want to do the problem 13+45, but you press the following keys:
CJOOCJ08
The display screen shows:
o
,"----'"
(":~"'
'"
(
~'c
c
Press the backspace key to move the cursor (flashing character) back to the 2. Look at the labels that appear above the backspace and forward space keys: Delete and Insert. To perform the delete function, hold down the CMD key while you p r e s s . once.
The display screen shows:
" " " This character " fl h" IS as mg.
Now press EXECUTE to execute the problem. Pressing the EXECUTE key processes the entire line regardless of the position of the cursor.
You can also use the • key to delete all the characters from the
cursor position to the end of the line. For example, you press the following keys:
8 0 8 0 0 0 0 8
The display screen looks like this:
However, you only want to do the problem 8+6. Now, press the backspace key and move the cursor back to the -. then press.
The display screen looks like this:
Press the EXECUTE key to execute the problem.
Introduction 15
(":~"'
'"
(
~'c
c
Press the backspace key to move the cursor (flashing character) back to the 2. Look at the labels that appear above the backspace and forward space keys: Delete and Insert. To perform the delete function, hold down the CMD key while you p r e s s . once.
The display screen shows:
" " " This character " fl h" IS as mg.
Now press EXECUTE to execute the problem. Pressing the EXECUTE key processes the entire line regardless of the position of the cursor.
You can also use the • key to delete all the characters from the
cursor position to the end of the line. For example, you press the following keys:
8 0 8 0 0 0 0 8
The display screen looks like this:
However, you only want to do the problem 8+6. Now, press the backspace key and move the cursor back to the -. then press.
The display screen looks like this:
Press the EXECUTE key to execute the problem.
Insert a Character
To insert a character, position the cursor using the backspace key
II
or the forward space key
II'
then hold down the CMD key and press the forward spaceII
key once. This operation movesthe flashing character (and all other characters to the right of it) one position to the right, creating the space you need to insert one character. The cursor is not moved and is now displayed as an underline. To insert the character, simply press the character key. If a character is in the last (64th) position of the line, the insert function is ignored.
For example, you want to do the problem 123*6, but you press the following keys:
OO~8
'l
The display screen shows:
To correct the error, press the backspace key to move the cursor (flashing character) back to the 3. Look at the labels that appear above the backspace and forward space keys: Delete and Insert. To perform the insert function with the cursor position at the 3, hold down the CMD key while you press
II
once.The display screen shows:
o
i""
'\..",.,,/
o
Insert a Character
To insert a character, position the cursor using the backspace key
II
or the forward space key
II'
then hold down the CMD key and press the forward spaceII
key once. This operation movesthe flashing character (and all other characters to the right of it) one position to the right, creating the space you need to insert one character. The cursor is not moved and is now displayed as an underline. To insert the character, simply press the character key. If a character is in the last (64th) position of the line, the insert function is ignored.
For example, you want to do the problem 123*6, but you press the following keys:
OO~8
'l
The display screen shows:
To correct the error, press the backspace key to move the cursor (flashing character) back to the 3. Look at the labels that appear above the backspace and forward space keys: Delete and Insert. To perform the insert function with the cursor position at the 3, hold down the CMD key while you press
II
once.The display screen shows:
o
i""
'\..",.,,/
C
"'~/
C
'"
-,(~:
C:
c
To correct the keying error and execute the problem, press the following keys:
[]
There is one more way to correct a keying error. If you make several errors halfway through the line, you can backspace the cursor to the character following the last correct character and then press the ATTN (attention) key. This causes everything from the cursor position to the end of the line to be cleared from the display screen.
Because the data from the input line is not processed until the EXECUTE key is pressed, you can visually verify any input before it is processed. However, if you do press EXECUTE before you notice a mistake, you can simply enter the input again, or you can use the
scroll down key . . to move the input back to the input
line and correct it. When the corrections have been made, press EXECUTE again.
For example, you want to do the problem 135+280, but you entered and executed 134+280. The display screen shows:
J 311,:--:::'>::;::0
'-I·ll.!·
To correct the original input, press the scroll down key
a
threetimes to get the original input back to the input line. The display screen shows:
i ":; LI .. ( .. ~:);.:::
n
·~~h~S
character is flashing.You may now correct the error, and then process the data again by pressing EXECUTE.
Introduction 17
C
"'~/
C
'"
-,(~:
C:
c
To correct the keying error and execute the problem, press the following keys:
[]
There is one more way to correct a keying error. If you make several errors halfway through the line, you can backspace the cursor to the character following the last correct character and then press the ATTN (attention) key. This causes everything from the cursor position to the end of the line to be cleared from the display screen.
Because the data from the input line is not processed until the EXECUTE key is pressed, you can visually verify any input before it is processed. However, if you do press EXECUTE before you notice a mistake, you can simply enter the input again, or you can use the
scroll down key . . to move the input back to the input
line and correct it. When the corrections have been made, press EXECUTE again.
For example, you want to do the problem 135+280, but you entered and executed 134+280. The display screen shows:
J 311,:--:::'>::;::0
'-I·ll.!·
To correct the original input, press the scroll down key
a
threetimes to get the original input back to the input line. The display screen shows:
i ":; LI .. ( .. ~:);.:::
n
·~~h~S
character is flashing.You may now correct the error, and then process the data again by pressing EXECUTE.
o
/ ' ) ,
(, .. }I
".~,. ,Ii
o
/ ' ) ,
(, .. }I
(
'""
c
C
y'"
Chapter 2. How Your System Handles Arithmetic
The following examples show some common, simple arithmetic operations you can do on your system.
ARITHMETIC OPERATORS
Arithmetic
Add 5 and 8
Before you begin these simple operations, you should know that some of the arithmetic signs (called operators) you are accustomed to using are different when you use the BASIC language. For example, the multiply sign (x) is not used in BASIC. Instead, the asterisk (*) is used for multiplication. Similarly, the divide sign (t) is replaced by the slash (/) in BASIC. The sign for exponentiation (raising to a power) in BASIC is t (the upper shift character on the Y key) or **. Now enter these problems:
You Press The Display Screen Shows
80G]
Subtract 8 from 5
[JOG]
Multiply 5 times 8
[JOG]
How Your System Handles Arithmetic 19
(
'""
c
C
y'"
Chapter 2. How Your System Handles Arithmetic
The following examples show some common, simple arithmetic operations you can do on your system.
ARITHMETIC OPERATORS
Arithmetic
Add 5 and 8
Before you begin these simple operations, you should know that some of the arithmetic signs (called operators) you are accustomed to using are different when you use the BASIC language. For example, the multiply sign (x) is not used in BASIC. Instead, the asterisk (*) is used for multiplication. Similarly, the divide sign (t) is replaced by the slash (/) in BASIC. The sign for exponentiation (raising to a power) in BASIC is t (the upper shift character on the Y key) or **. Now enter these problems:
You Press The Display Screen Shows
80G]
Subtract 8 from 5
[JOG]
Multiply 5 times 8
[JOG]
Arithmetic You Press The Display Screen Shows
Divide 5 by 8
5 to the power of 2
GJii8
4 to the power of 2
(Hold dlwn the shift key and press the Y key to get
t symbol.)
Problems: Using Addition, Subtraction, Multiplication, and Division
I.~ oj(' ':11:' :~:,:~ 1 (:'
1. Find the total number of cars that a dealer sold during one week if his daily sales were 3, 5, 2, 6, 7, 3 and 4.
2. Find the net number of cars removed from the same dealer's lot if 20 people had trade-ins.
3. Find the dealer's average profit per car if he made a total profit of $2700 for the sales in problem 1.
4. Find the dealer's total earnings if he made $20 on each car sold.
Possible Solutions Problem 1:
:3 + ~::.; +
::?
+ (':,,:., '~! -+- :,:::' + 1+:::) 0
o
,I~, I
(~)
Arithmetic You Press The Display Screen Shows
Divide 5 by 8
5 to the power of 2
GJii8
4 to the power of 2
(Hold dlwn the shift key and press the Y key to get
t symbol.)
Problems: Using Addition, Subtraction, Multiplication, and Division
I.~ oj(' ':11:' :~:,:~ 1 (:'
1. Find the total number of cars that a dealer sold during one week if his daily sales were 3, 5, 2, 6, 7, 3 and 4.
2. Find the net number of cars removed from the same dealer's lot if 20 people had trade-ins.
3. Find the dealer's average profit per car if he made a total profit of $2700 for the sales in problem 1.
4. Find the dealer's total earnings if he made $20 on each car sold.
Possible Solutions Problem 1:
:3 + ~::.; +
::?
+ (':,,:., '~! -+- :,:::' + 1+:::) 0
o
,I~, I
(
"""" .;"-L.L~~//
C~
c'
Problem 2:
.:'; U .... : .. :.: U
:1.0
Problem 3:
::.:.:: .. ? 0 0 ,'" :.":' 0
()
Problem 4:
)(-;;\',
(~:. 0
VARIABLES
You can store data, either direct input that you enter from the
keyboard or the result of a calculation. These stored items are called variables. Each variable has a name associated with it. Whenever you use the name of a variable, BASIC supplies the value associated with that name.
Variables That Stand for Numbers
You can name a variable in BASIC with a single character of the extended BASIC alphabet (A-Z, @, $, and
#).
A BASIC variable can also be named with one of the preceding letters or symbols followed by a single digit (0 through 9). Typical variable names are A2, #9, and B1. You can name a maximum of 319 different numeric variables in BASIC.Assigning Values to Variables
Variables are assigned values by means of the equal (=) sign. The value to the right of the
= sign is assigned to the name to the left of
the= sign. After you assign a value to a variable, you can use the
variable in a calculation.How Your System Handles Arithmetic 21
(
"""" .;"-L.L~~//
C~
c'
Problem 2:
.:'; U .... : .. :.: U
:1.0
Problem 3:
::.:.:: .. ? 0 0 ,'" :.":' 0
()
Problem 4:
)(-;;\',
(~:. 0
VARIABLES
You can store data, either direct input that you enter from the
keyboard or the result of a calculation. These stored items are called variables. Each variable has a name associated with it. Whenever you use the name of a variable, BASIC supplies the value associated with that name.
Variables That Stand for Numbers
You can name a variable in BASIC with a single character of the extended BASIC alphabet (A-Z, @, $, and
#).
A BASIC variable can also be named with one of the preceding letters or symbols followed by a single digit (0 through 9). Typical variable names are A2, #9, and B1. You can name a maximum of 319 different numeric variables in BASIC.Assigning Values to Variables
Variables are assigned values by means of the equal (=) sign. The value to the right of the
= sign is assigned to the name to the left of
the= sign. After you assign a value to a variable, you can use the
variable in a calculation.Examples
To illustrate the use of variables, enter the following:
~ooo
r::
~:: t,·}.; :I (:!. :.:.: 0
and
After you press the EXECUTE key, you have created a variable named A with a value of 12.
The result of a calculation can also be assigned to a variable.
o
Examples
To illustrate the use of variables, enter the following:
~ooo
r::
~:: t,·}.; :I (:!. :.:.: 0
and
After you press the EXECUTE key, you have created a variable named A with a value of 12.
The result of a calculation can also be assigned to a variable.
mOGJ8008
morn
0 []
[_0_)
til
:',:·:·,::':""··::
, , ' , ' 0.:,'.:.:: ... :."' I . ... , ' . . . '.'.' ""'.'.1 . , , ' . , " ..
c
I ':'.
' _ ' I~
c
I ::
C ... ' ( ":-'i~
c
You can change the value of a variable the same way you assigned the original value.
You can also use the variable and change its value in the same instruction.
This is a useful programming tool that will be explained further in a later chapter of this book.
If you want to know the current value of a variable, you simply enter the name of the variable.
If you use the name of a variable to which you have not previously assigned a value, the system automatically assumes its value is zero (0).
How Your System Handles Arithmetic 23
mOGJ8008
morn
0 []
[_0_)
til
:',:·:·,::':""··::
, , ' , ' 0.:,'.:.:: ... :."' I . ... , ' . . . '.'.' ""'.'.1 . , , ' . , " ..
c
I ':'.
' _ ' I~
c
I ::
C ... ' ( ":-'i~
c
You can change the value of a variable the same way you assigned the original value.
You can also use the variable and change its value in the same instruction.
This is a useful programming tool that will be explained further in a later chapter of this book.
If you want to know the current value of a variable, you simply enter the name of the variable.
If you use the name of a variable to which you have not previously assigned a value, the system automatically assumes its value is zero (0).
Performing Several Functions in the Same Expression
In the preceding examples, only one arithmetic function was used in each example. However, you are not restricted to writing instructions with only one function. Any number of functions can occur in the same instruction. As soon as you use more than one function, however, you must be concerned about the order in which they are used.
The Sequence of Arithmetic Operations
BASIC has a prescribed order of arithmetic execution called arithmetic hierarchy. When two or more operators such as +, -,
*, /,
or tare used, arithmetic is performed according to this hierarchy. That is, operators with higher priorities are performed first, while operators with the same priority are performed as they are encountered from left to right.. The arithmetic hierarchy in BASIC is:1. Operations enclosed in parentheses (highest priority)
2. Mathematical functions (for example, sine, cosine, or square root)
3. Exponentiation (t or **)
4. Positive/ negative operations (described later)
5. Multiplication and division (*, /)
6. Addition and subtraction (+, -) (lowest priority)
When an operation is enclosed in parentheses, it is performed first, even though the operator enclosed in the parentheses may have a lower priority than the operators outside the parentheses. As a result, the prescribed order of execution can be changed if you use
parentheses. Operations enclosed in parentheses are executed in BASIC before operations outside parentheses, regardless of the hierarchy of the operators.
Some examples of arithmetic hierarchy are:
3+4/5
4/5+3
In both of these examples, the 4 is first divided by the 5 because the divide operation has the highest priority. The .8 result is then added to the 3, giving a final result of 3.8.
o
f~\
'""._
.. )"()
Performing Several Functions in the Same Expression
In the preceding e