Chapter 8--Fixed Prosthodontics
Overview
IntroductionMany excellent crown and bridge tests and courses are available, with some of them expressing seemingly contradictory opinions and approaches. This chapter of the manual is not intended to compete with any of them, but rather help you in applying concepts that you have acquired from them. The procedures described in this chapter are the result of the evolution of adopting
techniques that most general practitioners can learn quickly.
New materials can make significant changes in the way dentistry is practiced. Recent advances in adhesive resin technology have had, and will continue to have, a profound effect on fixed prosthodontics. Their effect will be a recurring theme throughout this chapter.
This chapter will cover the following topics:
Section Topic Page
A Principles of Fixed Prosthodontics 8-1
Patient Selection 8-5
Fixed Prosthodontics vs. Operative 8-6
Fixed Prosthodontics vs. Removable Partial Dentures 8-9
Ante's Rule of Abutment 8-11
Problem Areas in Fixed Prosthodontics 8-12
B Impression Technique 8-15
Packing the Retraction Cord 8-15
Removing the Packing Cord 8-16
Injecting Impression Material 8-18
C Standardized Tooth Preparation Sequence 8-23
Determining Indicated Amount of Tooth Reduction 8-23
Depth Guides 8-27
Working in a Prescribed Logical Sequence 8-32
Opening the Interproximal Spaces 8-34
Establishing Midtooth Depth Cuts 8-36
Reducing Occlusal/Incisal Surface 8-38
Reducing the Lingual Surface (Anterior and Posterior Teeth) 8-42
Reducing the Labial/Buccal Surface 8-46
Establishing the Final Gingival Margin Configuration and Depth 8-51 Smoothing the Proximal Surfaces of Adjacent Teeth 8-52
Smoothing Line and Point Angles of Preparation 8-54
D Finish Line Configuration 8-56
Margin Configurations 8-56
Suggested Margin Configurations 8-62
Margin Discrepancies 8-64
E Variations in Tooth Preparation Sequence 8-68
Using Full Metal Crowns 8-68
Using the Porcelain Jacket Crown and Bonded Porcelain Jacket Crown 8-70
Using Porcelain Veneer 8-72
F Resin Bonded Fixed Partial Dentures 8-78
Historical Development 8-78
Indications/Contraindications for Maryland Bridges 8-79 8-
Anterior Maryland Bridges 8-81
Posterior Resin Bonded Fixed partial Dentures 8-83
Cementation 8-85
G Dowel Cores 8-87
Patient Selection 8-87
Custom Dowel Core versus Prefabricated 8-88
Preparation of a Dowel Space 8-89
Prefabricated Patterns and Post 8-90
Cementation of the Custom Dowel 8-90
H All Ceramic Restorations 8-91
Dicor 8-92
Procera 8-92
IPS Empress I 8-92
IPS Empress II 8-93
In-Ceram 8-93
General Preparation for All Ceramic Crowns 8-94
I Implants 8-97
General Policy 8-97
Basic types of Endosseous Implants 8-97
Endosseous Implant Identification 8-99
Contacting the surgeon 8-99
Maintenance 8-100
There are three variables in restorative dentistry: • operator variables
• material variables • patient variables
Without denying the importance of material and patient variables, the operator and the skill that must be applied in selecting and treating prosthodontic patients is by far the most important. The best materials available today can be misused and fail. No one can successfully place a
prosthodontic restoration without the patient's cooperation in maintaining it. Responsibilities
An attitude of being a continuous student and making a commitment to excellence will go a long way in making your restorative dentistry rewarding. There is a very strong correlation between one's interest and skill in operative dentistry and in fixed prosthodontics. One is an extension of the other.
Every dentist capable of preparing and placing sound composite and amalgam restorations is capable of preparing and placing sound fixed prosthodontic restorations. Not every IHS clinician can or should be providing a significant amount of prosthodontics treatment. The clinician should be able to practice enough prosthodontics to maintain and improve all skills to a desired level.
Attention to detail seems to be one of the main ingredients in achieving long-lasting restorations. This does not equate to spending a long time to accomplish a procedure. It does equate to spending time up front to master the mechanics of the procedure. To do this you should--
• participate in hands-on courses • practice
• Read
Section A--Principles of Fixed Prosthodontics
Introduction
This section discusses some of the basic principles of fixed prosthodontics to help you in the decision-making process. Most of this information will serve as a review to you. Although new technology and materials have impacted on the choices available to you, the guidelines presented in this section should hold true with or without these new materials. However, some interesting variations are occurring already as the fact and fiction of these materials are sorted out.
Patient Selection
IntroductionGiven that the need for treatment grossly exceeds the ability to provide it, the decision on who should receive treatment must be made. On a clinical level, it seems appropriate to direct our efforts toward including as many people as possible and getting the maximum service life out of the treatment we do provide.
General Guidelines
The following general guidelines will assist you in your case selection decision making:
• The prognosis for a restoration is better for a patient that already demonstrates good oral hygiene.
• Well-aligned teeth and well-designed restorations require less effort to achieve good oral hygiene.
• The simpler the restorative needs of the patient the better the prognosis.
• Other considerations being equal, the long range usefulness of a prosthesis decreases as the patient's age increases.
• In general, prosthodontics should not be started prior to the completion of other needed preventive and corrective services.
• The potential effect of dental aesthetics on a person's self-esteem deserves recognition. It is fully appropriate that aesthetics receive due deliberation with function in treatment planning.
treatment to single crowns and three-unit bridges for young patients with good oral hygiene and who are missing one front tooth.
Fixed Prosthodontics vs. Operative
IntroductionThere are many factors that you must weigh when deciding between fixed prosthodontics and operative procedures. You must weigh each carefully, considering the functional and aesthetic impacts of each.
Decision-Making Considerations
The following considerations will assist you in deciding between fixed prosthodontics and operative procedures:
• Apply as many sound operative procedures as are practical prior to committing to crown treatment for a tooth. Well-placed amalgam and composite restorations can provide excellent service life and in many cases outlast a crown.
• Consider not crowning a complex amalgam just because of its size, especially if it has some history of successful function and adequate deep subgingival margins. Achieving good crown margins on sound tooth structure apical to a deep proximal box is not easily accomplished, nor are crown lengthening procedures if there are approximating teeth. The service life of amalgam restorations with adequate subgingival margins can be extended greatly by dressing down the accessible margins, recontouring as appropriate, and polishing the margins with an abrasive rubber cup.
If marginal breakdown is more severe than polishing will correct, localized repair of the margin is feasible with sealant, amalgam, or composite.
In vital teeth with existing complex amalgam restorations, an isolated natural tooth cusp in danger of fracture--
- can be reduced and polished - probably will not fracture
- probably will result in a nonrestorable fracture right after you tell the patient not to worry
• Consider a cusp-protecting amalgam in preference to a crown. There are far more teeth that would benefit from cusp protection than we can provide with crowns. The literature supports their longevity and most clinicians have more experience with amalgam than they do with crowns. This suggestion is very important to consider on endodontically treated teeth. If a crown is done even years later, these restorations provide an excellent buildup for the crown preparation.
The amount of cusp reduction required to achieve sufficient bulk/strength in amalgam is significant. If you are not familiar with the requirements of a cusp-protecting amalgam, you should seek advice from clinicians who use them.
• Bonded amalgams are one of the areas that will be receiving significant attention in dental literature. While these bonding agents are not going to negate sound principles of operative dentistry, they may be of great benefit in the complex and cusp-protecting amalgam situations. The author suggests that all amalgams be bonded.
• Where aesthetics will allow, indirect metal restorations will last longer than tooth-colored restorations. Additionally, you should be aware that--
- Two composites, notably Herculite and Heliomolar, have established long-term records for resistance to wear. There is no reason to believe that other composites are not capable of achieving similar resistance-to-wear records.
- The major concerns relative to current composites involve their high coefficient of thermal expansion and contraction, questionable bond to dentin, and
polymerization shrinkage. All of these concerns are being addressed at this time. In aesthetics situations, where crown and bridge are difficult to provide and where all of the restoration margins can be placed on well-isolated tooth structure, nonstandard composite restorations can provide a very adequate service life. Caution: It is easy for many of these restorations to become more difficult
and time consuming than placing a crown.
• Partial coverage restorations (e.g., onlays, 3/4, and fractional crowns) are initially more conservative of tooth structure. They are technically more difficult to perform and are frequently associated with a high rate of failure. Full-coverage crowns constitute the majority of crowns provided by the IHS. Given the IHS's emphasis on exhausting
• In contrast, the remarkable retention and resistance to dissolution provided by resin cements bonded to etched enamel are bringing about the increased use of very conservative preparations to bond partial coverage indirect restorations to the tooth. This includes such restorations as--
- tooth-colored veneers and onlays - bonded porcelain jacket crowns
- sandblasted or etched base metal inlays, onlays, fractional crowns, and bridge retainers
The use of such restorations in the IHS is complicated by the necessary inclusion of a laboratory service and the associated fees.
Also, the need to preserve sufficient enamel with which to bond requires an early commitment to prosthodontics rather than extensive operative procedures.
• The classic G.V. Black Class II preparation should be put aside, since hydrophilic
sealants, preventive resin restorations, bonded amalgams, composites, aesthetic and metal inlays, and retainers do work. We need to accept and use them. The resin-bonded bridge retainer (Maryland Bridge) is one of these restorations that can be of great value in the IHS.
• The final consideration prior to committing to a crown involves how complicated it will be to provide the crown and how important it is to keep the tooth.
- The decision to extract rather than crown the tooth is simple if you can provide a Maryland Bridge and keeping the tooth might involve--
o endodontics
o post and core treatment o crown lengthening
- Considerable effort to keep the tooth is justified if the tooth is-- o a cuspid
o only remaining distal abutment in a mandibular arch
Fixed Prosthodontics vs. Removable Partial Dentures
IntroductionThere are also many factors that you must weigh when deciding between fixed prosthodontics and operative procedures. You must weigh each carefully, considering the functional and aesthetic impacts of each.
Decision-Making Considerations
The following considerations will assist you in deciding between fixed prosthodontics and removable partial dentures:
• When a fixed bridge is possible, it usually becomes the restoration of choice. • The most easily agreed upon indications for removable partial dentures involve--
- long-span situations where support for a bridge is questionable
- cases where the restoration must replace both missing teeth and substantial amounts of alveolar tissue
• Removable partial dentures that replace only one or two teeth are generally not desirable appliances. Unilateral partial dentures (Nesbitt Bridges) have significant risk associated with possible aspiration or swallowing of the appliance. Their use is generally
discouraged.
• Considerable disagreement over fixed versus removable can be generated in cases involving multiple areas of missing teeth. It has been estimated that there are over 65,000 possible combinations of teeth and edentulous spaces in a single arch.
- Prior to evaluating fixed versus removable, consider if any restoration is indicated at all.
- Second bicuspid occlusion, while far from ideal, has support in literature as being acceptable.
- Removable appliances that do not replace aesthetically important teeth, or make a significant improvement in the patient's ability to masticate, usually end up in a drawer rather than in the mouth.
- If the posterior occlusion is such that the remaining teeth already are, or likely will be stable, the patient may be better served without restoration of the posterior edentulous space.
- Many patients will accept a compromised posterior occlusion if their anterior aesthetic needs can be met. Be aware that frequently the posterior occlusion must be corrected in order to properly fabricate anterior restorations.
- As a matter of practicality, we favor partials to treat arches with multiple edentulous areas. However, to the extent that modification spaces can be eliminated and the partial designed to treat the spaces not amenable to fixed restoration, the better the partial will function.
- The use of the Maryland Bridge concept to fully restore many of these cases with fixed prosthodontics in two to three appointments is one of the most dramatic demonstrations of their potential.
- The mandibular alveolar ridge can be expected to incur significant loss of bone when removable prostheses oppose maxillary natural dentition. Maxillary ridges can be expected to do better than the mandibular ridge in supporting removable prostheses opposing natural dentition, but it is important to design the partial for maximum palatal support. Cantilevered Maryland-style bridges have been used very successfully to aid in solving some of these situations (especially in the mandibular arch).
- Level and improve the plane of occlusion as often as you can. This applies to both fixed and removable prosthodontics.
Note: Too often prostheses are fabricated to accommodate an existing occlusal problem, i.e., an opposing supraerupted tooth. For fixed restorations in particular, this can result in a worse situation than if no prosthodontics had been provided.
Even with well-aligned arches, the occlusion and performance of a prosthesis generally will be improved by recontouring and polishing opposing restorations and teeth before the prosthesis is fabricated.
Ante's Rule of Abutment
IntroductionMost clinicians are familiar with Ante's Rule of Abutment. It is a useful guide in determining-- • the number of abutments to use
• fixed versus removable
It is only a generalization, and it is not the only factor to consider. Ante's Rule
Ante's Rule states: The combined pericemental area of the abutment teeth should be equal to or greater than the pericemental area of the teeth being replaced.
Implications
Because of the length of the lever arm and the direction of forces, maxillary bridges replacing teeth 7, 8, 9, and 10 should frequently utilize four abutments (canines and first bicuspids). Mandibular bridges replacing teeth 23, 24, 25, and 26 will usually do well with bilateral single canine abutments.
When utilizing multiple abutments, it is critical that the gingival embrasure area be kept open and properly contoured. When this is done, teeth anterior to the molars (bicuspids, canines, and incisors) seem to perform well and tolerate the condition without bone loss. Molars do not do well in multiple abutment situations, and they are frequently associated with periodontal bone loss from double abutting. An exception to double abutting with molars is the postperiodontal surgery patient with wide open gingival embrasures who is maintaining good oral hygiene.
Problem Areas in Fixed Prosthodontics
Introduction
Dental laboratories are in a unique position to identify trends common to clinicians. It is clear from their perspective that clinicians share two major problems that seriously impede the fabrication of sound restorations:
• inadequate reduction of tooth structure
Other problems exist, but these are the most frequent and important to address. Each of these problems is discussed on this and the following pages.
Problem Area 1: Poor Impressions and Hemorrhage
Poor impressions of the preparation margin are probably the main source of recurrent decay and failure of fixed prosthodontic restorations. Fortunately, they are also one of the easiest problems to solve.
Lack of hemorrhage control is the primary difficulty. Solutions for Problem Area 1:
The following solutions are provided for these related problems:
• Poor impressions. To obtain high-quality, bubble-free impressions, try the technique described in this chapter. (See Injecting Impression Material)
• Hemorrhage. Use any packing technique that you prefer as long as hemostasis is properly attained prior to final packing. (See Packing the Retraction Cord) The easiest solution to hemorrhage control is virtually product specific.
Contact: Ultradent Products, Inc. 505 West 10200 South South Jordon, UT 84065 (800) 552-5512
(801) 572-4200
Their "Tissue Management Infusion Technique" is highly effective and easily mastered. The technique is clearly presented in their catalog and videotape. The tape is especially useful and recommended.
Supplies can be purchased as kits or separately. The essential items are-- - Astringedent solution (ferric sulfate solution)
- Ultrapak knitted retraction cord [purchase kit first (UP#1030) then buy individual refills]
- plastic Leur-Lock syringe (UP#0124)
- Brasseler cord packing instrument (250N113-SR) (Ultradent's is also good.) Caution: Astringedent is sometimes listed as one of the many possible contaminants
to cause a surface nonset of polyvinyl siloxane impression materials. It is actually blood products combined with almost any of the hemostatic agents that can cause the surface nonset. Surface nonset can be prevented by thoroughly washing the prepared tooth and sulcus till free of coagulum. This is easily done. Also since Astringedent is acidic, there is minor concern that it may inadvertently etch the tooth, opening the dentinal tubules and increase the pulpal trauma/ sensitivity.
Problem Area 2: Inadequate Tooth Reduction
No matter what kind of prosthodontic preparation is being cut, conservative clinicians almost universally under prepare the tooth. This is usually done with the best intention--desiring to preserve tooth structure and avoid pulpal exposures. In almost every instance, under preparation works to the detriment of the restoration and the tooth. The norm for underprepared teeth is unaesthetic, easily broken, and overcontoured restorations with poor gingival response which result in a loss of periodontal support.
Conservation of tooth structure is well ingrained in most dentists as they leave dental school. Prosthodontics by nature is not conservative. Conservative treatment has already failed by the time a tooth requires a crown. If a crown is indicated, the tooth should be fully reduced consistent with the restoration being provided.
Solutions for Problem Area 2:
The following steps to adequate tooth reduction are recommended:
• Determine the amount of tooth reduction required for the intended restoration. • Use some form of depth guide to ensure sufficient reduction.
Section B--Impression Technique
Overview
This section details the impression technique that residents and Continuing Dental Education (CDE) participants have found the easiest to use.
It is highly suggested that you master this technique prior to employing variations. This
addresses Problem Area 1--Poor Impressions and Hemorrhage. It is probably the most important area to resolve first.
Packing the Retraction Cord
IntroductionProper packing is obtainable using any of the following techniques that you prefer: • prepreparation packing
• postpreparation packing • one-cord packing • two-cord packing
• aluminum chloride on one cord and Astringedent on the other
As long as hemostasis is properly attained prior to final packing, any of the techniques will work. Procedures for Packing the Retraction Cord
The following clinical technique has been well accepted consistently by residents and CDE participants:
Step Action
1 Remove all prepacked cords prior to using the infuser tip.
Note: Use water, Visine, or aluminum chloride to dampen prepacking cords. Astringedent (ferric sulfate) offers no advantage at this point.
2 Select the diameter of cord that you estimate will fill the smallest most delicate area of the sulcus, i.e., the labial or buccal aspect of anterior preparations (usually Ultradent size #1)
3 Use one long (approximately 2 inches) cord for each preparation.
5 Allow cord to soak
6 Use the infuser tip as directed.
Note: Angle the tip toward the gingiva (not the tooth) and gently rub the sulcus while slowly expressing Astringedent solution.
7 When bleeding stops, wash all coagulum off the tooth and out of the sulcus. 8 Continue to use the syringe and Astringedent until the sulcus can be vigorously
washed with the three-way syringe without bleeding.
Caution: Do not pack retraction cord prior to obtaining this degree of
hemorrhage control. If necessary, localized areas of persistent bleeding can be infiltrated with anesthetic containing epinephrine.
9 Begin packing where the sulcular tissue is least likely to be damaged, i.e., palatal aspect of maxillary preparations or deepest part of sulcus.
10 Start packing at the end of the cord (not in the middle of the cord).
11 Pack the soaked cord once around the tooth in a deliberate manner so that all (not just portions) of the sulcus receives and is displaced by cord.
Note: This is a critical step. A frequent error is attempting to pack too rapidly and leaving portions of the sulcus unpacked
12 Use the extra length of cord to double pack and displace those areas of the sulcus not adequately displaced while avoiding those areas already adequately displaced by the single first layer of the cord.
Note: Portions of the sulcus are not adequately displaced since the diameter of the cord was selected to fill the smallest most delicate area of the sulcus. 13 Cut off any remaining excess length of cord leaving an unpacked tag at the end to aid
removal.
14 Wait approximately 5 minutes.
Note: Approximately 5 minutes is adequate time for the tissues to be displaced and yet short enough to minimize ischemic damage. While not promoting extended waiting times, waiting beyond 5 minutes may still result in successful tissue recovery.
15 Obtain bite records or allow the patient to take a break.
Note: After completion of packing, it is not necessary to maintain isolation.
Removing the Packing Cord
Introduction
There are several variations in the techniques used to remove the packing cord depending on the number and types of preparations:
• partial coverage preparations • multiple preparations
• preparations separated by edentulous areas
Removing the Packing Cord (Partial Coverage Preparations)
For impressions of partial coverage preparations (e.g., veneers with minimal subgingival involvement) one short length of cord will usually expose all of the margins as well as some tooth structure apical to the margin.
In this case, rinse, dry, isolate, and take the impression with the cord in place. Remove the cord after inspecting the impression for accuracy.
Removing the Packing Cord (Multiple Preparations)
For multiple preparations choose one of the following two techniques:
• The first technique involves pulling the cord prior to final rinsing, drying, and isolating. If any bleeding does occur when the cord is pulled, reenter the sulcus with the syringe and infuser tip until hemorrhage is controlled, then rinse, dry, isolate, and take the impression. This technique can be used for multiple preparation impressions, but it probably is at its best for one or two preparations. It is an excellent technique to use when first gaining confidence that you do have some control over the situation. Since bleeding rarely occurs, and since the technique involves a protracted waiting time to maintain isolation while the impression material is mixed, the next technique may be preferable.
• In the second technique, prior to pulling the retraction cord for the impression, wash and thoroughly dry the entire arch, re-isolate the preparation area, and specifically dry the sulci of the prepared teeth (including the cord).
Removing the Packing Cord (Multiple Adjacent Preparations)
the impression material.
Removing the Packing Cord (Preparations Separated by Edentulous Areas)
For preparations separated by edentulous areas, it is often more convenient to start with the most distal preparation and work anteriorly pulling the cord and injecting impression material, one preparation at a time.
You may also lightly dry the sulci with an air syringe after pulling the cord to ensure that moisture is not left apical to the cord (especially in areas containing two layers of cord).
Injecting Impression Material
Introduction
Injection of the impression material is another critical step. With all of the techniques that are advocated by various clinicians, the technique described on this and the following pages has been consistently one of the easiest ones to use with excellent results.
Procedures for Injecting Impression Material
The following technique has consistently produced bubble-free impressions:
Step Action
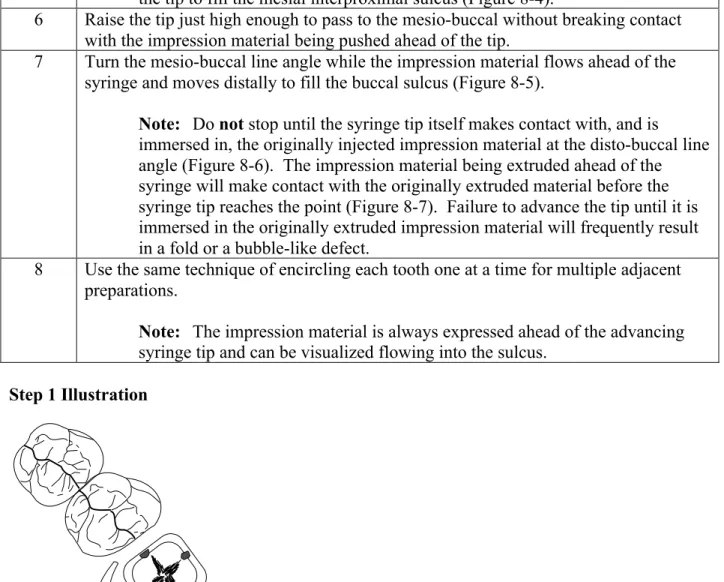
1 Beginning at the disto-lingual line angle of the most distal preparation, place the injection tip into, or just barely above, the sulcus touching both the prepared tooth and the distal approximating tooth (Figure 8-1).
2 With the curve of the tip angled toward the buccal, express enough impression material to fill the distal interproximal sulcus to the disto-buccal line angle (Figure 8-2).
3 Continue to express the impression material.
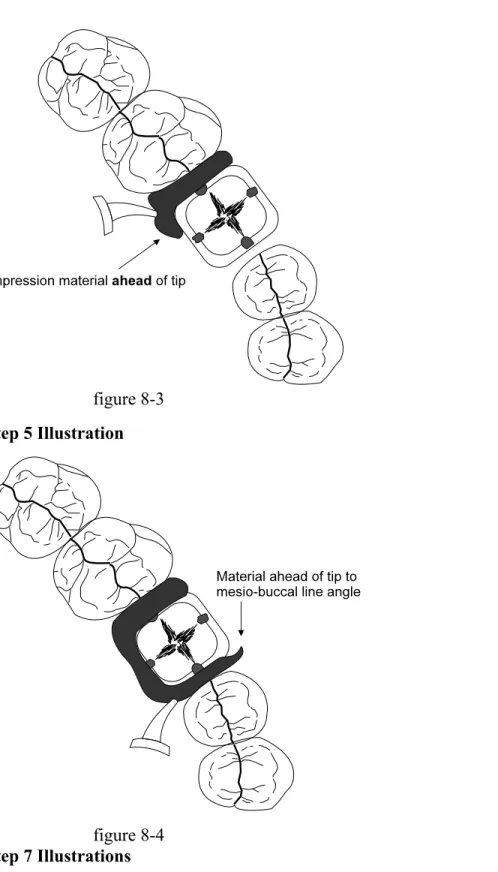
4 Without raising the tip, turn the syringe and begin advancing the tip mesially along the lingual sulcus (Figure 8-3).
Note: Impression material is being expressed into the sulcus ahead of the injection tip. Always keep the impression material flowing ahead of the tip. 5 Advance the tip along the lingual surface and into the mesial interproximal area until
blocked by the mesial approximating tooth.
the tip to fill the mesial interproximal sulcus (Figure 8-4).
6 Raise the tip just high enough to pass to the mesio-buccal without breaking contact with the impression material being pushed ahead of the tip.
7 Turn the mesio-buccal line angle while the impression material flows ahead of the syringe and moves distally to fill the buccal sulcus (Figure 8-5).
Note: Do not stop until the syringe tip itself makes contact with, and is
immersed in, the originally injected impression material at the disto-buccal line angle (Figure 8-6). The impression material being extruded ahead of the syringe will make contact with the originally extruded material before the syringe tip reaches the point (Figure 8-7). Failure to advance the tip until it is immersed in the originally extruded impression material will frequently result in a fold or a bubble-like defect.
8 Use the same technique of encircling each tooth one at a time for multiple adjacent preparations.
Note: The impression material is always expressed ahead of the advancing syringe tip and can be visualized flowing into the sulcus.
Step 1 Illustration
figure 8-1 Step 2 Illustration
figure 8-2
figure 8-3 Step 5 Illustration
figure 8-4 Step 7 Illustrations
figure 8-5
figure 8-7 Limitations
This technique is easier to master than other techniques such as blowing the impression material into the sulcus with an air syringe. Although this is a good technique, unless you are familiar with blowing air on polyvinyl siloxanes, there is a strong tendency to blow them completely off the tooth.
On the occasions that bleeding does occur when the cord is pulled, this technique does not allow time to reuse the Astringedent and infuser tip since the impression material is already mixed. Blowing air into the sulcus at the bleeding site can be used quite successfully at this time. However, the emphasis is on blowing the blood out of the sulcus while still using the same injection technique rather than blowing the impression material in.
Section C--Standardized Tooth Preparation Sequence
Overview
This section addresses Problem Area 2--Inadequate Tooth Reduction. Emphasis is placed on rapid bulk reduction of roughed in tooth preparation followed by refinement of the details of the preparation.
The description is for a porcelain fused to metal (PFM) restoration. The principles apply to all restorations. Section E of this chapter describes variations related to full metal crowns, porcelain veneers, and bonded porcelain jacket crowns.
Determining Indicated Amount of Tooth Reduction
IntroductionMost clinicians are familiar with the indicated amount of reduction as described in textbooks. The difficulty is in actually achieving the stated amount of reduction, even though you will rarely cause yourself or the tooth harm by taking slightly more reduction.
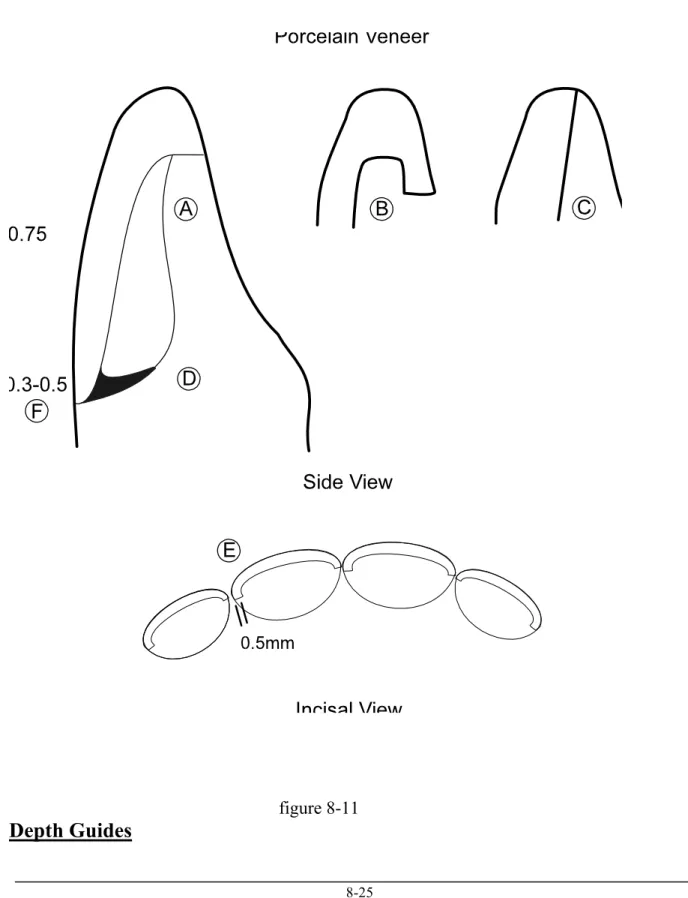
Porcelain fused to metal restorations are perhaps the most frequently underprepared restorations and the least forgiving. Figures 8-8 through 8-11 are presented for review. Remember the depths listed in texts usually represent the minimum required reduction.
Full Metal Crown
Porcelain Fused to Metal Crown (With Margin Configurations)
figure 8-9
figure 8-10
Note: Reductions for Bonded Porcelain Jacket Crown (BPJC) are indicated in parentheses.
figure 8-11
Depth Guides
Introduction
You should use some form of depth guide to ensure sufficient reduction and to maintain relative position of the preparation.
Preparation depth guides generally involve--
! cuts placed with a bur of known diameter at appropriate or convenient locations
! uncut tooth structures compared (or referenced) to sections of the tooth prepared to full reduction
! combination of the above two techniques
With all three techniques, you must know the diameter of the bur you are using. Keep a measuring gauge available and measure the burs you use until you are familiar with their dimensions. For example, the--
! 1557L carbide bur is 1 mm in diameter with a rounded tip
! 5856-016 tapered cylinder diamond (Brasseler) is 1.6 mm at its greatest diameter and tapers to just over 1 mm at the rounded tip
Both make excellent depth guide burs and can be used to rough in tooth preparations without necessitating a bur change. The 1 mm size is an easy reference by which to judge the depth of a cut.
Placement of Depth Guide Cuts
The most critical areas for placing depth guide cuts are-- ! occlusal/incisal surfaces
! any surface to be covered with porcelain (generally labial or buccal surfaces) Types of Depth Cuts
The following types of depth cuts are described in this section: ! multiple-depth guide cuts
! gingival crest and midtooth depth cuts ! midtooth and incisal depth cuts
! one midtooth depth cut
! depth cut in grooves and fossa Multiple Depth Cuts
Multiple depth cuts (Figure 8-12) have the advantage of forcing the timid operator to achieve adequate reduction. The system has the disadvantages of making it more difficult to stabilize the handpiece during preparation, encouraging lumpy preparations, and consuming time.
figure 8-12
Gingival Crest and Midtooth Depth Cuts
or diamond bur, can be a very useful approach. The gingival crest cut can establish a well contoured rough-in of a deep chamfer finish line as well as indicate gingival crest position. The deep cut does, however, complicate placement of prepreparation retraction cord.
figure 8-13
Incisal and Midtooth Depth Cuts
Perhaps the ultimate in combining depth guide cuts with using uncut tooth structure as a reference is presented by Dr. John W. McLean in his Monographs on the Science and Art of Dental Ceramics. After placing incisal and midtooth depth cuts (Figure 8-14A), Dr. McLean fully prepares one half of the tooth leaving the uncut half of the tooth as a depth guide reference (Figure 8-14B). You must work rapidly and use a minimum number of bur changes to employ this technique.
figure 8-14A
One Midtooth Depth Cut
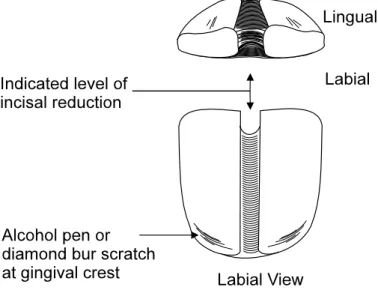
The technique recommended by the author is the one midtooth depth cut (Figure 8-15).
! Its apical extension is placed at the operator's desired reference point to the free gingival margin (above, at, or below).
! The incisal meeting point of the labial and lingual depth cuts indicates the level of necessary incisal reduction. It also maintains the proper labio-lingual position of the incisal edge of the preparation.
! Gingival crest information can be supplemented by scribing a line with an alcohol pen or the tip of a diamond bur.
Note: Prepreparation packing techniques result in differing amounts of gingival retraction even within the same sulcus. It may be necessary to prepare the tooth to the level of the prepacked cord. The scribed or scratched line will provide that information.
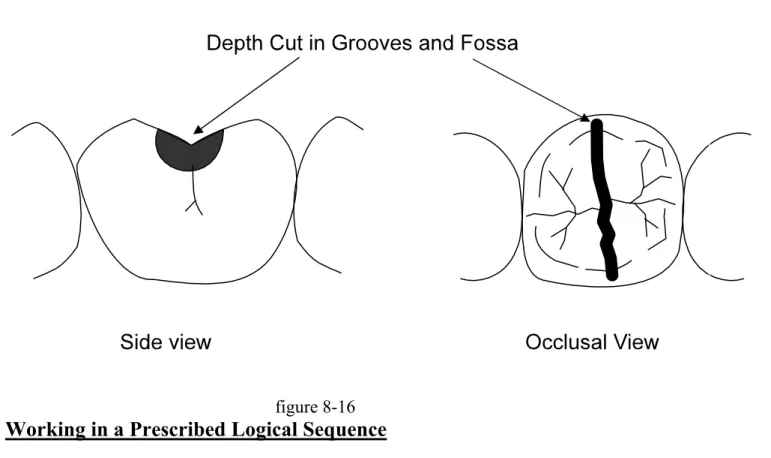
figure 8-15 Depth Cut in Grooves and Fossa
For molars, the occlusal portion of the depth cut should be placed in the grooves and fossa, rather than on cusp tips, to ensure adequate reduction in these areas.
figure 8-16
Working in a Prescribed Logical Sequence
IntroductionWhile most operators have a reasonably good mental image of the final preparation they want to achieve, how to create it often is not clear. Working in a logical sequence each time simplifies the procedure to a routine.
The following lengthy discussion of crown preparation sequence is sincerely not meant to insult anyone's intelligence. The vast majority of CDE participants and residents have found the use of this sequence to be of value. Practicing the sequence a few times on extracted teeth is highly encouraged.
Procedures for Reducing Teeth
The following procedures are for reducing teeth in a prescribed logical sequence. The
technique is intended to employ both depth cuts and reference to uncut tooth structure. Details of each of these steps are provided on following pages of this section.
Step Action
Note: For posterior teeth with deep interproximal alloys, find the tooth structure at the gingival floor of the proximal box.
2 Establish midtooth depth cuts. 3 Reduce occlusal/incisal surface.
4 Reduce the axial wall (parallel walls, cervical 2/3 to 3/4 of tooth).
5 Reduce the lingual surface of the anterior teeth (nonparallel lingual wall). 6 Reduce the second plane labial or buccal surface (nonparallel walls,
occlusal/incisal 1/4 to 1/3 of tooth). 7 Check the line of draw/path of insertion.
8 Establish final gingival margin configuration and depth. 9 Smooth proximal surfaces of adjacent teeth.
10 Round off/smooth line and point angles of preparation. Reduction of Preparation Time
Working in the sequence just described for full-coverage restorations will reduce preparation time by--
! isolating the tooth to be prepared from adjacent teeth
! dividing the tooth in half to allow visualization of the preparation by tooth sections (reference to uncut tooth structure)
! encouraging full-depth, rough-in cuts rather than nonproductive paint brush strokes of the bur
! organizing occlusal reduction of molars and bicuspids into 1/4 of the occlusal surface at a time (or one cusp at a time)
! organizing occlusal reduction of incisors and cuspids into mesial and distal cuts off the incisal edge
! dividing axial wall reduction into parallel wall reduction first, in the cervical 2/3 to 3/4 of the tooth, and then second plane or tapered reduction of the occlusal 1/4 to 1/3 of the wall later
! dividing circumferential reduction into full depth cuts by sections of tooth
placement and configuration can be addressed as one separate step. Full attention can be given to creating definite continuous margins.
Note: The 1557L carbide bur or the 5856-016 super coarse round-end tapered diamond (Brasseler) are the "workhorse" burs for roughing in the preparation. Make changes as desired; the concept, not the instrument, is the important item. Generally carbide burs will cut more rapidly than diamonds, but will result in a rougher outline form in need of more refinement. Most operators will prefer to use the carbide bur to open the
interproximal spaces and then use the diamond bur for the remainder of the preparation.
Opening the Interproximal Spaces
Introduction
Isolating the teeth to be prepared from adjacent teeth will minimize damage to adjacent
interproximal surfaces and allow the operator to concentrate on the tooth being prepared. During this step in reducing teeth, no attempt is made at establishing an interproximal gingival margin. The goal is only to open the interproximal areas and isolate the tooth to be prepared (Figure 8-17).
figure 10-17
Note: The rounded end of the 1557L is useful in not involving the start of any sort of gingival cut.
Finding the Apical Tooth Structure for Teeth with Interproximal Alloys
Attempting to place a gingival margin on sound tooth structure apical to a proximal box, without first locating the depth of the box usually leads to carrying the margin much further apically than necessary. Therefore, it is highly recommended that for any box that does not clearly
figure 8-18
Note: Flat-ended burs (#57 and #557) are most useful for this purpose.
Finding Sound Tooth Structure Apical to a Proximal Box
Three basic approaches can be used to locate sound tooth structure apical to a proximal box: ! Approach 1. Remove part (or all) of the restorative material only in the proximal box to
the gingival floor, and then proceed with crown preparation. The resulting box can be used as a retentive feature of the crown preparation if necessary.
! Approach 2. Remove all of the old restoration and base it back out using dentin bonding agents, composite, glass ionomer, or new amalgam. Leave the cavosurface of the floor of the box uncovered and visible.
Note: This approach is time consuming but indicated if you question the adequacy of the old restoration.
! Approach 3. Rough in the crown preparation with the margin intentionally left occlusal to the gingival floor of the box. Then remove part (or all) of the old restoration to identify sound tooth structure. This approach offers the best visibility and access to the box. Remember to modify the roughed-in crown margins to be continuous with the floor of the box prior to proceeding further when using this approach.
Every effort should be made to end crown margins on sound tooth structure. It should be rare that a crown margin ends on an existing restoration, i.e., crown margin occlusal to amalgam
margin.
Establishing Midtooth Depth Cuts
IntroductionThe next step in reducing teeth is to establish midtooth depth cuts. The midtooth depth cut-- ! provides depth guide information
! divides the tooth in half making visualization of the tooth sections more meaningful Procedures for Establishing Midtooth Depth Cuts
The following procedures are for establishing midtooth depth cuts (Figure 8-19):
Step Action
1 Starting at the midfacial of the tooth (at or just above the free gingival crest), scribe a depth cut up the labial/buccal surface and across the incisal/occlusal surface.
2 Use a 1 mm diameter bur to accurately judge and vary the depth of the cut. Note: View the bur laterally.
3 Make a lingual depth cut extending from the intended finish line location and connecting with the first cut at the occlusal/incisal surface.
figure 8-19
Reducing Occlusal/Incisal Surface
IntroductionThe next step in reducing teeth is to reduce the occlusal/incisal surface. The following pages provide procedures and details to consider when reducing the occlusal/incisal surface of-- ! molars
! incisors and cuspids
Procedures for Reducing Occlusal Surface of Molars
Step Action
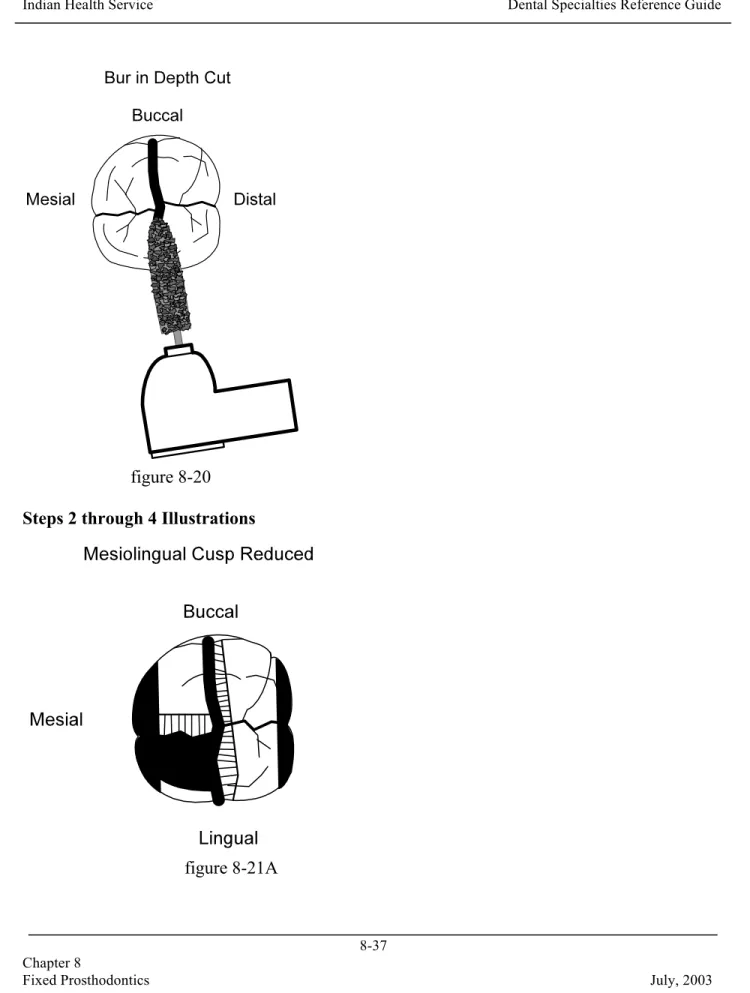
1 From the buccal or lingual turn the bur horizontally to match the contour of the occlusal surface and place it into the depth cut with the tip of the bur extending to the central groove (Figure 8-20).
2 Following cusp contours reduce one cusp (mesial or distal) in a deliberate full-depth cut (Figure 8-21A).
3 Refer to uncut walls of remaining tooth structure to judge adequacy of reduction (Figures 8-21A and 8-21B).
4 Reduce remaining (same side) cusp still using deliberate full-depth cut following cusp contours (Figure 8-21B).
5 Refer again to the uncut walls of the remaining cusps and make further reduction for the entire 1/2 of the occlusal surface if indicated.
6 When reduction appears adequate, turn the bur horizontally in the other direction, and starting at the depth cut, reduce the remaining cusps one at a time.
Note: The tip of the bur should simply rest on the already established surface in the central groove area. Full depth, contour following cuts are still used. 7 Verify that there is adequate occlusal reduction.
Note: The confirmation of occlusal reduction is best accomplished after axial wall reduction but is described here for convenience
figure 8-20 Steps 2 through 4 Illustrations
figure 8-21B
Verification of Adequate Occlusal Reduction Verify adequate reduction by--
! visually inspecting with the teeth occluded
! using a feeler gauge concept whereby you draw a soft material of known thickness between the occluded teeth and the preparation
- Belle de Saint Claire markets these type of gauges.
- Rubber bands of known thickness can be cut in pieces and the pieces held with cotton pliers.
! having the patient close into soft boxing or tray wax placed over the preparation and then examining the thickness of the wax
Note: In general, over reduction of the occlusal surface will be a far better error to make than under reduction.
Reducing the Occlusal Surface of Bicuspids
The midtooth depth cut will essentially divide bicuspids in half at the cusp tips. By the time the interproximal surfaces have been opened and the midtooth depth cut made, little remains of the occlusal surface.
Each cusp can be reduced in one cut, but bur placement and angulation should be done in the same manner as just described for molars.
Reducing the Incisal Surface of Incisors and Cuspids
The midtooth depth cut for incisors and cuspids dramatically demonstrates that the recommended incisal reduction of approximately one-third of the tooth length is not an overstatement, but in fact is the level at which the labial and lingual depth cuts meet (Figure 8-22). The depth cut also tends to keep the incisal edge of the preparation properly located labio-lingually for support and proper placement of the restoration.
Incisal edge reduction is accomplished by placing the bur in the depth-cut groove, angled slightly toward the lingual and cutting the incisal edge off following the incisal contour (Figures 8-23A and 8-23B).
figure 8-23A
Reducing the Lingual Surface (Anterior and Posterior Teeth)
IntroductionThe next step in reducing teeth is to perform a second plane lingual reduction. The procedures used for anterior and posterior teeth differ.
Lingual Reduction in Posterior Teeth
For posterior teeth, lingual reduction is simply planing off the second plane of the axial wall (Figure 8-23).
! For mandibular posterior teeth this wall may no longer exist (although, it should). ! For maxillary teeth, the bur is placed into the remaining portion of the depth cut, and the
wall is reduced at that angle following cusp configuration. Since this is a centric holding cusp, adequate reduction should be verified as previously described for occlusal
reduction.
Note: Err on the side of overpreparation if any error is to be made. Under preparation leads to a wide occlusal table in the restoration or to having a thin area in the casting that is subject to perforation when doing occlusal adjustments.
For occlusal coverage in porcelain, 2 mm of space is advisable.
Lingual Reduction in Anterior Teeth
For anterior teeth, lingual reduction necessitates a bur change to a football- or wheel-shaped diamond.
! Similar to the porcelain jacket crown, the lingual surface is reduced prior to the labial surface to encourage adequate reduction of the lingual surface.
! Using the depth cut as an initial guide to depth of reduction, reduce the lingual surface while preserving the parallel lingual axial wall and the relative labio-lingual position of the incisal edge (Figure 8-24).
figure 8-24
! After removal of the tooth structure to the depth indicated by the depth cut guide, check the actual reduction with the teeth occluded. For full porcelain coverage 1.5 mm
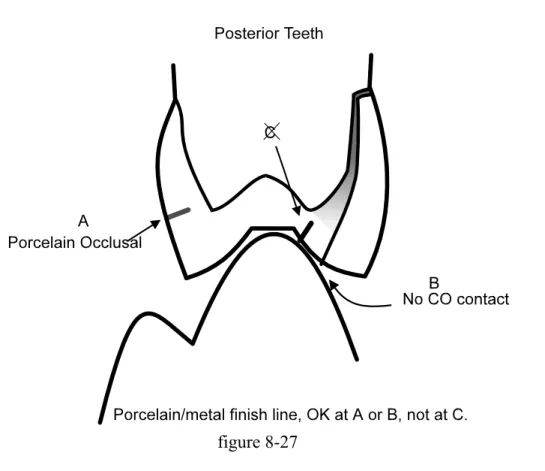
clearance in the CO contact area is indicated; 1 mm is indicated for metal coverage of the contact area (Figure 8-25).
the CO contact area, but not at it. Since this can be difficult to judge clinically, give yourself as much clearance as is reasonably available (Figures 8-26 and 8-27).
figure 8-27
Reducing the Labial/Buccal Surface
IntroductionThe next step in reducing teeth is to perform a second plane reduction of the labial/buccal surface (occlusal/incisal one-third to one-fourth). This step is frequently overlooked in the mistaken attempt to incorporate the reduction in the parallel axial wall reduction. Failure to make this second plane reduction results in--
! the "halo effect" of opaque showing through the labio-incisal porcelain on anterior teeth (Figure 8-28)
! weakening the porcelain on posterior teeth ! widening the occlusal table (Figure 8-29) ! thin areas in full-metal crowns (Figure 8-30)
figure 8-28
figure 8-30
Second Plane Reduction of the Labial/ Buccal Surface
If the parallel axial wall reduction was accomplished as described, there should still be visible the remnant of the original labial depth cut. Simply place the bur into the depth cut and reduce the second plane at the indicated depth and angle. (See Figures 8-31, 8-32, and 8-33.)
figure 8-32
figure 8-33
Checking the Line of Draw/Path of Insertion
IntroductionThe next step in reducing teeth is to check the line of draw/path of insertion. Tips for Checking the Line of Draw/Path of Insertion
! Intraoral photographic mirrors, or the large 1 1/2-inch mouth mirrors, greatly simplify checking line of draw (Figure 8-34).
figure 8-34
! Pencil or alcohol pen can be used to highlight the shoulder/ chamfer area if desired. ! If you have a tendency to undercut or significantly alter the parallel axial walls during
final margin placement, this check should be delayed until after margin placement. ! For most operators, the gingival margin will only be moved 1 mm or less apically, and
this is a convenient, bloodless, and lower stress time to check alignment.
! Most three-unit bridges (prepared in this fashion) will already draw with little or no modification of the preparations.
! The more abutments involved in a bridge, the more the axial walls will need to be tapered. Thankfully, retention also increases as the number of abutments increases. ! Severely divergent abutments will hopefully have been apparent prior to preparation and
accommodations made.
more reasons than just path of insertion).
Establishing the Final Gingival Margin Configuration and Depth
IntroductionThe eighth step in reducing teeth is to establish the final gingival margin configuration and depth. A discussion of margin configurations is found in Section D. Distinct continuous margins, accurately recorded in the impression, are more important than their configuration. Tips for Establishing the Final Gingival Margin Configuration and Depth
The following tips will assist you in establishing the gingival margin configuration and depth: ! Any margin that can be placed supragingivally, should be placed supragingivally. ! Caries, aesthetics, retention, and previous restorations are the primary reasons for
subgingival margin placement.
! It is generally taught that the gingival margin should never enter the sulcus by more than half the depth of the sulcus. In the average case this equals a depth of 1.0 mm or less, with less being favored.
! The final subgingival margin placement should be as atraumatic to the gingiva as possible.
! Packing a small length of retraction cord (dampened with water, Visine, or aluminum chloride solution) in the area of the sulcus to receive the subgingival margin works very well.
! Final margin placement should be accomplished with a slow-speed handpiece and friction grip contraangle attachment. If you have magnification available, use it. ! Considerable heat can be generated even at slow speed. Water spray coolant via the
three-way syringe is important.
! If the roughed-in margin was placed at or near gingival crest height, apical placement with the slow-speed handpiece is quite easy. If the margin is in the range of 1 mm above the gingiva, bring it down with the high speed and finish with slow speed.
! The lingual and approximately half of the interproximal margins should remain supragingival (if possible).
! The labial and labial one-half of the interproximal margins are brought down to or near the level of the retraction cord. Be specifically aware of keeping the interproximal margin subgingival until it will no longer be visible when viewed at an angle. This is a frequent area of margin visibility, especially for porcelain veneers.
! Although the Ultrapak knitted cord is uniquely resistant to entanglement in a diamond rotating at high speed, it will entangle on a bur operating at slow speed. Tuck it in firmly, including both ends to reduce entanglement.
! Make a mental note of the relative relationship of the free gingival margin and roughed-in finish line prior to packing the cord. Even small cords often achieve remarkable gingival retraction. You may not need to place the margin as far apically as the level of the cord.
Smoothing the Proximal Surfaces of Adjacent Teeth
Introduction
The next step in reducing teeth is to smooth proximal surfaces of adjacent teeth. It is very
difficult to cut an entire crown preparation and not touch an adjacent tooth. There is a significant risk of caries if the abraded enamel is left rough.
Smoothing and polishing proximal surfaces should be considered one of the routine steps of crown preparation. An approximating amalgam restoration, nicked or not, will benefit from some smoothing and polishing.
Tips for Smoothing Proximal Surfaces of Adjacent Teeth
The following tips will assist you in smoothing proximal surfaces of adjacent teeth:
! A 7/8-inch medium grit emery, paper-backed Moore's disc, followed by a large brown polishing cup (Brasseler, 204-100) works very well.
! The medium grit 3M polishing disc is flexible and works very well if it will reach. Frequently the 1/2-inch diameter is too small to reach the gingival aspect of posterior teeth.
surface of posterior teeth. If you do not do this, you will not be able to angle the disc to reach the gingival portion of the tooth.
! For the Moore's disc, place a mirror handle against the paper back and run the disk briefly while applying pressure with the mirror handle (Figures 8-35 and 8-36). This will "break the back" of the disc making it flexible enough to adapt to those hard to reach places like the mesial of second molars.
! Follow the disc briefly with the large brown polishing cup (with water spray) and you will have done a lot to assure the integrity of the approximating tooth surface (Figure 8-37).
figure 8-35
figure 8-37
Smoothing Line and Point Angles of Preparation
IntroductionThe last step in crown preparation is smoothing the line and point angles of the prepared tooth. All of the line and point angles should have been blended or smoothed with a diamond by this time.
Tips for Smoothing the Line and Point Angles
The following points will assist you in smoothing the line and point angles:
! Pay particular attention to the occluso-axial angles. They are a frequent area for a casting to bind when sealing.
! Use the brown polishing cup (still mounted from the previous step), light pressure, and water spray.
Section D--Finish Line Configuration
Overview
Although finish line configuration is an area of generalized agreement, it is also an area of confusing terminology, contradictory research results, and dogma. After eight years of reviewing both incoming and completed cases at the dental laboratory level, the author is convinced that the presence of any accurately recorded margin is more important than its configuration.
Although the technicians may be required to make adjustments in their techniques to
accommodate some configurations, they are capable of accurately reproducing virtually any margin in metal, if the margin is there in the first place.
For aesthetic restorations, the presence of another material, usually porcelain, and the need to accommodate its properties, complicates the entire matter. If the technician is given 1.0 mm of axial reduction, and an identifiable margin, a mechanically acceptable restoration can be fabricated. Given another 0.5 mm of axial reduction (1.5 mm total) and a clear margin, a very sound and aesthetic restoration can be produced.
Clinicians generally carry in their minds a good concept of the margin configuration taught at school. They vary tremendously in their ability to--
! produce that configuration on a tooth ! record the margin in the impression
Margin Configurations
Introduction
Surveys indicate that approximately six or seven different margin configurations for porcelain fused to metal restorations are taught in U.S. dental schools. If you are reasonably successful and comfortable with the configuration you were taught, you should stay with that design and concentrate your efforts on refining your ability with that design. If you are not happy with the design you were taught, strongly consider using some form of the chamfer configuration. It is the easiest to produce, readily identifiable, and can be accurately reproduced.
The following considerations may provide you with some valuable information to use in choosing a margin configuration:
! The shoulder with bevel, deep chamfer with bevel, and "disappearing metal margin" are the configurations most frequently associated with problems.
! In reviewing the basic finish line configurations available, the terminology rapidly becomes cloudy (Figure 8-39).
! From an engineering, stress, and just plain fit standpoint, all point and line angles should be rounded. You can therefore eliminate the figure 8, the shoulder with 90! internal line angle from the discussion.
! At what point one configuration becomes another is not always clear. (At what point does a shallow or long chamfer become a chamfer, a deep chamfer, or a shoulder with rounded internal line angle?)
! One person's feather edge is another person's chisel, is another's shallow chamfer.
! Some generalities seem to be reasonably well accepted, even though each of them can be argued.
! The feather edge is discouraged as being indefinite, produces a weak restoration if improperly contoured, and is conducive to overcontouring of the restoration. It is probably the configuration of choice for Maryland Bridge retainers on posterior teeth. ! The feather edge is described as having the best closing angle configuration in that as a
crown is seated, the gap measured horizontally between axial wall and casting closes rapidly.
! If one compares a feather edge and shoulder margin (Figure 8-40), both possessing an equal vertical discrepancy between crown margin and actual finish line, the feather edge margin will have closed the gap between the casting and axial wall, making the vertical discrepancy of less consequence. Whereas, the shoulder margin presents an open gap directly to the axial wall equal to the amount of vertical discrepancy.
figure 8-40
! An error involving a vertical discrepancy in which the crown margin fails to fully reach the actual finish line, but closes the gap at the axial wall is probably the most forgiving error that can be made in finish line discrepancies.
! For metal restorations the chisel, steep bevel, and shallow chamfer are all attempts at compromises between the strengths and weaknesses of the feather-edge configuration. ! For aesthetic restorations, the beveled shoulder or beveled deep chamfer are the most
direct attempts at retaining this closing angle phenomenon while accommodating the increased axial reduction required for aesthetic material.
! For the average operator, who does not place enough crowns to maintain proficiency, the beveled shoulder configuration rapidly deteriorates to an indistinct shoulder with an imaginary bevel configuration.
! The beveled shoulder or beveled deep chamfer has traditionally been the primary configuration taught at the graduate level.
! The dividing line between displaying metal or encroaching on the epithelial attachment, while still retaining enough of a bevel to be of value, is a fine one. "Traditional
prosthodontic thought" by proponents of the beveled shoulder has been that if the marginal adaptation between crown and tooth are excellent, some encroachment on the epithelial attachment could be tolerated and/or adjusted to by the sulcus.
! This thought has some validity. However, the excellent gingival response to even some fairly poorly developed porcelain margins placed 0.5 mm subgingivally is bringing about some rethinking of margin placement.
! Adding fuel to this rethinking is the increasing popularity of insoluble resin cements and dentin bonding agents. (This is not advocating poor margins filled in with resin cement.) ! At the other end of the spectrum from the "shoulder bevelers" are the folks maintaining
that the sulcus does not have room for all this hoopla, the closing angle effect is never realized for angles less than 70!, and even then, only for an exact fit with vertical displacement only.
! The deep chamfer, shoulder, and sloped shoulder are the advocated preparations here. ! The most abused preparation in this group is the "disappearing metal margin" (Figure
8-41). As originally presented, the configuration was advocated for porcelain fused to base metal. The shoulder sloped at approximately 135! with a rounded internal line angle, and 90o cavosurface line angle. The metal at the gingival margin is tapered from
approximately 0.5 mm at the internal line angle out to nothing at the cavosurface margin. Thus, tooth, metal, and porcelain all meet at the cavosurface margin. The term seems to have evolved to be applied to any degree of shoulder inclination displaying the tapered configuration of metal thinning to nothing at the cavosurface margin.
figure 8-41
! This configuration has not been well applied for the most part, and it receives a great deal of criticism in prosthodontic literature.
! For most, the decision needs to be made to either put a metal collar at the margin or to put a porcelain margin, but not to waffle in the middle.
! In spite of major advances in the ability to use porcelain margins, they remain technically demanding at both the clinical and laboratory levels.
! Probably the safest approach is to consider the metal collar as your standard and use the porcelain margin in those cases where the metal cannot be adequately hidden.
! In evaluating the character of the sulcus to determine metal versus porcelain margins, it is fortunate that most Native Americans have gingiva of sufficient thickness to
accommodate a metal collar without greying or show through. Prominent cuspids are the most frequent exception.
! On probing the labial sulcus, if the periodontal probe is visible through the tissue, awkward to insert, or causing noticeable blanching, consider the porcelain margin. ! A 3 mm sulcus with average thickness tissue will easily allow a metal collar. A sulcus 2
mm (or under) should probably get a porcelain margin. The sulci between 2 and 3 mm puts most of us back in the waffle mode.
! Most 2 to 3 mm sulci, with average tissue, will accept a metal collar. However, consider the risks of the metal showing. Consider whether it is an anterior or posterior tooth, maxillary or mandibular tooth, high lip line or low lip line. Think about what the patient is like. Will you hear about "your mistake" every time the patient everts the entire buccal mucosa to expose the visible margin at the distal of #31, or will the patient tell you that you did a good job with a stainless steel crown on #8?
Suggested Margin Configurations
IntroductionMargin configuration is an area of debate. Research papers discuss metal distortion during various firing cycles and measure margin discrepancies in microns; whereas, what is observed clinically and at dental laboratories are discrepancies measured in tenths of millimeters--not microns.
In fairness to the patient, be honest with yourself. If you cannot see the margin in the impression, it is not there. The laboratory cannot make it be there in anything approaching micron accuracy and neither can you. Modify the preparation and/or take the impression over again (even if it means reappointing the patient).
Open margins account for the vast majority of crown and bridge failures. The following discussion includes some recommendations to help you avoid open margins.
Recommendation for Full Metal Crown
The following choices are recommended for full metal crowns:
! shallow or long chamfer as developed by flame-shaped diamond ! chamfer as developed by round-end diamond
! chisel as developed by diamond of your choice
Recommendation for Porcelain Fused to Metal (PFM) Crown The following choices are recommended for PFM crowns--
chamfer on interproximal and lingual
! with porcelain margin: very gentle to no slope shoulder on labial, blending to chamfer on interproximal and lingual (The labial shoulder for a porcelain margin should be extremely smooth and benefits from final finishing with a brown point and water spray.) Suggested diamonds are discussed later.
Recommendation for Diamonds for PFM Crown
The following diamonds are highly suggested (and are capable of developing any of the suggested PFM finish configurations) for metal or porcelain margins:
! 5856-016 round-end diamond (This diamond is used for the rough-in preparation. It develops an excellent chamfer.)
! 35005-series of KS modified shoulder diamonds ! 10839-series of tissue protective end-cutting diamonds
Note: The KS or end-cutting diamonds can be used to develop the entire margin. Also, they can be used only for the labial margin and will blend easily into the chamfer created by a round-end diamond.
! 0874-009 RCB diamond (This diamond is perhaps the best one available for placing a bevel on a deep chamfer or shoulder.)
Note: Brasseler nomenclature for burs has been used because of the author's familiarity with that brand. Use any quality brand that has a helpful representative in your area. Advantages and Disadvantages of Beveled Shoulder/Beveled Deep Chamfer for PFM Crown
This PFM configuration is discussed in detail because of its unique advantages and disadvantages:
! Most operators cannot develop this configuration accurately unless they cut enough crown preparations to maintain proficiency.
! However, the author remains convinced that this configuration (properly developed) provides the best adaptation to the tooth and is the most "forgiving" of minor marginal discrepancies.
Indications for Beveled Shoulder/Beveled Deep Chamfer for PFM Crown
For those operators interested in the beveled shoulder/beveled deep chamfer for PFM crowns, the following are indications for its use:
! any place the patient will accept metal display at the gingival margin, e.g., mandibular bicuspids
! teeth with buildups requiring the ferrule effect of extending crown margins 1.5 to 2 mm onto sound tooth structure apical to the buildup
! short teeth with questionable length for retention
! any teeth with apically deep interproximal alloys (After sound tooth structure is identified at the gingival floor of the proximal box, a bevel is frequently the best configuration for the box area. Unless there are strong indications against it, bevel the entire tooth and employ only one margin configuration for the entire crown.)
Recommendation for Porcelain Jacket Crown (PJC), Bonded Porcelain Jacket Crown (BPJC), and Porcelain Veneer
The porcelain jacket crown, the bonded porcelain jacket crown, and the porcelain veneer all require the very gentle to no slope shoulder in that cloudy area of nomenclature that could be called a deep chamfer. They vary in depth of cut, but not by much. Veneers currently receive 0.50 to 0.75 mm when possible.
Margin Discrepancies
IntroductionAlthough the goal is to create a crown with no discrepancies between restoration and tooth, both horizontal and vertical discrepancies do exist.
Types of Discrepancies