.
I--
AT&T
I:.:.:. :.:.:
~:~:_:.:.:.
:.:.:.:~ :~:~.1 • • • • • • • 11 • • • • • • • • • - .
II • • • • • • • • • • • • • • • •
I • • • • • , . • II • • • • • • • • • • • II • • • • • • • • • • • • • • • • • •
I • • • • • ,. • (I • • • • • • • • • - .
II • • • • • • • • • • • • • • • • • •
I • • • • • , . • (I • • • • • • • • • •
II • • • • • • • • • • • • • • • • • •
I • • • • • ,. • (I • • • • • • • • •
II • • • • • • • • • • • • • • • • •
: II:.:. :.:. :.: .:.:.:.:.:.:.:.:.: .:.:.:
·
... .
:.:.:.:.:.:.: .:.:.:.:
.:. :.:.:
.:.:.:.:-I:.:.:.:. :.:.
:.:~:.:.:.:.:.:.:.:.:;:.
I
·
• • • • • • • • • • • • • • • • • •... .
I·
• • • • • • • • • • • • • • • • • •... .
I·
• • • • • • • • • • • • • • • • • •... .
I·
• • • • • ,I • • • • • • • • • • • •... .
I • • • • • • • • • • • • • • • • • • •.
:.:.:.:. :.:. :.:.:.:.:. :.:.: .:.:.:.:.:.
,.
·
...
~..
...
·
... .
,.
·
·
... .
... .
·
·
...
...
:::"::
.
-.-.
• • • • • • • • • • • • • • • • • a a
...
· . . . .
.
.
.
. . .
.
..
_.
..
".
:.:
·
... .
.:.:.:.:.: .:.:.: .:.:. :.:.
:.:.:.:.:;
• • • • • • • • • • • • • • • • • • _a
.:.:.:.:.
:.:. :.:.:.:.:.:
.:.:.:.:.:.:.-·
... .
·
·
...
...
.. .
AT.T UNIX™ PC
Tape Backup
User's Guide
©1985 AT&T
All Rights Reserved
Printed in USA
NOTICE
WARNING
This equipment has been certified to comply with the limits for a Class B computing device, pursuant to Subpart J of Part 15 of FCC Rules. Only peripherals
(computer input/output devices, terminals, printers, etc.) certified to comply with the Class B limits may be attached to this computer, when installed in a resjdential environment. Operation with peripherals that are not certified to comply with Class B Subpart J
of Part 15 of FCC Rules is likely to result in
interference to radio and TV reception, if installed in a residential environment.
When this equipment is utilized in a commercial environment, the rules of FCC Part 15-J, Class A,
apply. Connection and operation of this equipment with other equipment that is verified to comply with the Rules applicable to Class A (Commercial) use, is
typically acceptable in the commercial-use environment. Refer to the instructions supplied with the FCC Class A systems intended for interconnection to this equipment for direction.
This equipment generates and uses radio frequency energy and i f not installed and used properly, that is, in strict accordance with the manufacturer's
instructions, may cause interference to radio and television reception. I t has been type tested and found to comply with the limits for a class B computing device in accordance with the speCifications in Subpart
j of Part 15 of FCC Rules, which are designed to
provide reasonable protection against such interference in a residential installation. However, there is no guarantee that interference will not occur in a
particular installation. If this equipment does cause interference to radio or television reception, which can be determined by turning the equipment off and on, the user is encouraged to try to correct the
interference by one or more of the following measures:
o Reorient the receiving antenna.
o Move the computer away from the receiver.
o Plug the computer into a different outlet so that computer and receiver are on different branch circuits.
If necessary, the user should consult the dealer or an experienced radio/televison technician for additional suggestions. The user may find the following booklet prepared by the Federal Communications Commission helpful:
"How to Identify and Resolve Radio-TV Interference Problems"
This booklet is available from the U.S. Government Printing Office, Washington, D.C. 20402.
Preface
Welcome to the AT&T UNIXTM PC Tape Backup User's Guide. This guide'describes how to install and use the UNIX PC Tape Backup system. This guide is organized in the following sections:
o Introducing Tape Backup describes the
features and capabilities of the UNIX PC Tape Backup system.
o Setting Up describes how to install the tape controller board, the tape drive, and the tape backup software.
o Using Tape Backup gives detailed instructions on using all of the Tape Backup features.
Other UsefUl Manuals
You should already be familiar with the basics of the UNIX PC. If you're not, turn to the AT&T UNIXTM PC Gettjnq Started Guide before continuing with this guide.
1
3
A
Contents
Introducing Tape Backup Requirements
Materials and Documentation Conventions
Setting Up
Tools You Will Need Tape Controller Board Installing the Tape Drive Installing the Tape Backup
Software
Using Tape Backup Introduction
Command Summary Chart
Using Tapes and the Tape Drive Selecting Tape Operations
Formatting and Testing Your Tapes Backing Up
Showing the Tape Contents Restoring Your Files Maintaining the Tape Drive
Technical Specifications
Contents
I Index
Figures
2-1 Rear View of the UNIX PC
2-2 Inserting the Tape Controller Board
2-3 Connecting the Tape Drive 3-1 Write-Protected Tape 3-2 Tape Drive Power Switch 3-3 Inserting a Tape
3-4 Location of Reset Button 3-5 Locating Points Inside
Tape Drive
I-I
2-2
2-3 2-5 3-6 3-7
3-8
3-57
1 Introducing Tape Backup
Requirements
Materials and Documentation Conventions
1-1
Introducing Tape BaCkup
The UNIX PC Tape Backup system makes i t fast and easy
to protect your data in case of operator error or equipment failure. Using the Tape Backup system, you can copy the information kept on your hard disk to a tape. This is called backing \~. If you experience a problem and need to replace the files on your hard disk, you can copy information from the tape to the hard disk. This is called restoring.
With the Tape Backup system, you can:
o Format the tape for use with your UNIX PC
o Back up your information from hard disk to tape
o List the files stored on a tape
o Restore files from tape to your hard disk
o Transfer information to and from a 3B2 computer and a UNIX PC.
Req!lirements
Introducing Tape Backup
Materjals and Documentation
When you purchase the Tape Backup system, you receive this manual along with the following items:
o Tape controller board
o Tape drive with connector cable and power cord
o TAPE BACKUP disk
o TAPE BACKUP DIAGNOSTIC disk.
Conventions
This manual uses the following conventions:
Information you type or information displayed on the screen is shown in boldfaced type. For example:
/u/userlogin/folder/filename
Items to select (highlight) from menus are shown enclosed in I I I S . For example:
ITape Operations I
Keys on the keyboard are shown enclosed in <>'s. For example:
<Enter>
The mouse buttons are represented as follows:
2 Setting Up
Tools You Will Need Tape Controller Board Installing the Tape Drive Installing the Tape Backup
Software
2-1
2-1 2-1
2-4
Setting Up
This section tells you how to set up the three parts of the UNIX PC Tape Backup system. You install the system in this order:
1 The tape controller board
2 The tape drive
3 The software.
Tools You Will Need
You will need a small Phillips-head screwdriver and a standard flat-head screwdriver.
Tape Controller Board
The tape controller board must be installed in your UNIX PC before you can perform a tape backup.
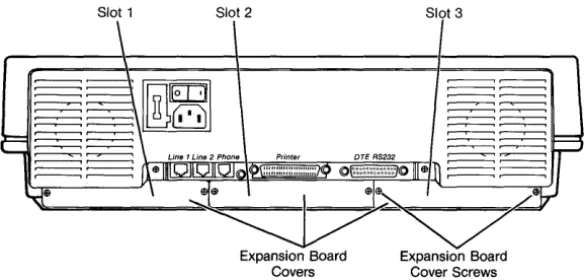
Setting Up
Slot 1 Slot 2 Slot 3
,----,.---~ ,----,.---~
,----,.---~
,----,.--, .--...,..-~
Figure 2-1 Rear View of the UNIX PC
Installing the Tape Controller Board
To install the tape controller board:
1 Shut down the UNIX PC using the Shutdown
command from the Command menu and turn the system off before you begin the installation process.
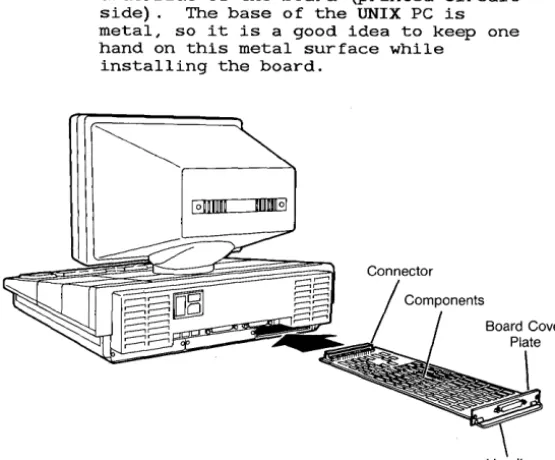
Leave the UNIX PC plugged in. Since the tape controller board is static sensitive, this keeps the equipment continually grounded.
[image:15.401.26.318.110.250.2]Setting Up
Caution
Ground yourself by touching an
electronically grounded metal surface before handling the tape controller board. A static charge could damage the equipment. Also avoid touching the underside of the board (printed circuit side). The base of the UNIX PC is metal, so i t is a good idea to keep one hand on this metal surface while
installing the board.
lomm UIIUliliol
Handle
Figure 2-2 Inserting the Tape Controller Board
3 Grasp the board from the component side, allowing your fingers to rest on the edges only.
[image:16.403.81.359.172.402.2]Setting Up
It should slide in easily. If i t binds, reposition the board and try again. (If you continue to have trouble, there may be a defect in the board or the slot.)
5 Gently push the board into place by pressing on the board's cover plate.
The screw holes in the board's cover plate will line up with the holes on the UNIX PC when the board is properly seated.
6 Place the screws in the board cover plate and tighten them.
7 Turn on the power.
Removing the Board
To remove the tape controller board:
1 Shut down the system and turn off the UNIX PC.
2 Remove the screws from the board cover plate.
3 Grasp the handle of the tape controller board and pull gently to unseat the board.
4 Slide the board out of the slot.
5 Replace the expansion board cover plate.
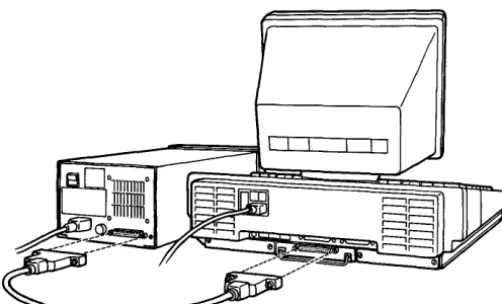
Insta]]jng the T~e Driye
To install the tape drive:
1 Make sure that the power to the tape drive is turned OFF.
2 Plug one end of the tape drive power cord into the tape drive.
Setting Up
4 Locate the tape drive interface cable.
5 Connect one end of the interface cable to the tape drive; connect the other end of the cable to the connector near the handle of the tape controller board.
6 Turn on the tape drive power.
Figure 2-3 shows a tape drive connected to the UNIX PC.
Figure 2-3 Connecting the Tape Drive
Installjng the Tape Backup Software
Before you begin to install the Tape Backup software, locate the following floppy disk:
o TAPE BACKUP (Disk 1 of 1)
[image:18.401.93.344.213.365.2]Setting Up
3 Type install
This is the System Administrator login.
4 Press <Enter>.
After a few seconds, you see the Office window.
5 Select I Administration I .
6 Press <Enter>.
If you see a selection for Tape Operations on the Administration menu, the software is already installed, and you can skip the rest of this section.
7 Select ISoftware Setup I .
8 Press <Enter>.
You see the Software window:
1i!I,
Confi!1ure loadable Deyice DriYers
Inm6· ..
gi;ijeiOWnmw
1ri1!JmlInstall Software sent by Electronic Hail Remoye Installed Software
Show Installed Software
9 Select IInstall Software from Floppy I and press <Enter>.
You are asked to insert the first floppy disk.
10 Insert the TAPE BACKUP disk into the floppy drive and secure the latch.
11 Press <Enter>.
Setting Up
12 Remove the floppy disk from the drive when you are told i t is safe to do so.
You now select which users can operate the Tape Backup system:
151
Select Installationill
Select Installation
Restrict operations to ltId4Q.II@ ....
13 You can select:
o ExPert. If you select Expert, only those users whose Office contains the UNIX system object will be able to perform tape operations. Users are identified as being expert or not expert when their login is created.
o Administrator. In this case, you must be logged in as install to use the tape backup system.
o All users.
Note
After the software installation is complete, you can change the user restrictions only by removing the software and installing i t again.
14 Press <Slect> to change from one user type to the next.
Setting up
A message appears when the installation is complete.
16 Press <Enter>.
The message window is removed from the screen, and the Software window is shown.
17 Press <Exit> until all Administration windows are closed.
18 Press <Exit> once again to log out.
The system asks you to confirm the logout.
19 Press <Enter>.
After a few moments, you see the following:
Welcome to the AT&T UNIX pc
P1ease 1ogin:
3 Using Tape Backup
Introduction
Command Summary Chart
Using Tapes and the Tape Drive Data Tapes
The Tape Drive
Selecting Tape Operations
Formatting and Testing Your Tapes Formatting Tapes
Performing a Surface Test Running the Tape Backup
Diagnostics
Backing Up
Different Methods of Backing Up Backup-Sets
Keeping a Full Copy of Your Data Exchanging Information with 3B2
Computers Backing Up
Starting the Backup
3-1
3-1
3-3
3-5 3-5
3-7
3-11
3-13 3-13 3-13
3-14
3-19 3-19 3-20 3-21
Showing the Tape Contents Overview
Showing the Tape Contents
Restoring Your Files Backup-Sets
Different Methods of Restoring Exchanging Information with 3B2
Computers
Deciding What to Restore Restoring Backup-Sets Restoring Files and Folders Restoring a Complete System
Maintaining the Tape Drive Routine Cleaning
When Repairs are Required
3-35 3-35 3-36
3-39 3-39 3-39
3-40 3-41 3-42 3-46 3-53
Introduction
This section is a step-by-step reference guide to the Tape Backup system. Use the Command Summary Chart that follows this Introduction, or the Index, to locate the information you need.
This section is divided into the following chapters:
o Command Summary Chart provides a lookup table for the Tape Backup functions.
o "Using Tapes and the Tape Drive" explains the brand of tape you should use, how to handle tapes, and how to insert them into the tape drive.
o "Selecting Tape Operations" tells you how to select the Tape window and explains when to insert tapes and when you can remove them.
o "Formatting and Testing Your Tapes" explains how to format new tapes and how to run a surface test on a tape.
o "Backing Up" explains how to copy vital data from your hard disk to tape.
o "Showing the Tape Contents" tells you how to list the names of the files and folders stored on a tape.
o "Restoring Your Files" describes how to copy your information from a tape to your hard disk.
Command Summary Chart
The following chart lists the functions of the Tape Backup found in this section.
The functions are arranged alphabetically by name, with a brief description of the feature and the page number where you can find related information.
If you are looking for information about a function but do not know its name, look in the Description column for a brief explanation of the task you want to perform.
Action
Backup
Backup by File
Command Summary Chart
Description
Copies data from hard disk to tape
Lists files in your Filecabinet and lets you select which ones to copy to tape
Backup by Folder Lists folders in your Filecabinet and lets you select which ones to copy to tape
Backup by Names Copies specified files or folders to tape
Backup by User Copies files belonging to selected users to tape
Complete Backup Copies all data on hard disk to tape (except the Foundation Set)
Page
3-19
3-20
3-20
3-20
3-20
Command Summary Chart
Command Summary Chart (Continued)
Action
Format Tape
Partial Backup
Restore
Restore All
Restore Backup-set (s)
Restore by Name
Show and Restore Files
Show and
Restore Folders
Show Tape Contents
Surface Test
Description Page
Prepares tape for use (use 3-13 TAPE BACKUP DIAGNOSTIC
disk)
Copies just the files that 3-20 have been added or changed since the last Complete Backup
Copies files from tape to 3-39 the hard disk
Copies every file on the 3-45 tape to the hard disk
Copies all files from tape 3-42 to hard disk that had been backed up in one operation
Copies specified files or 3-47 folders from tape to hard
disk
Lists files that are 3-47 stored on tape and lets
you select which ones to copy to the hard disk
Lists folders that are 3-47 stored on tape and lets
you select which ones to copy to the hard disk
Lists files stored on a 3-35 tape
Tests the tape to see i f 3-13 i t is in good condition
Using Tapes and the Tape Drive
This chapter tells you the brand of tape that you can use, how to handle the tapes, and how to insert a tape into the tape drive.
Data Tapes
The kind of data tape to use with the Tape Backup system is the 3M DC600A, the 3M DC600XTD, or a compatible tape.
Handling Data Tapes
Follow the manufacturer's instructions on caring for data tapes. The procedures below are recommended for handling and storing most tapes:
o Keep contaminants such as food, beverages, and dust away from data tapes.
o If a tape becomes soiled, do not use it. If you do, the contaminant can be spread to the tape drive and then passed on to clean tapes.
o Avoid high temperatures outside the normal office range. For example, the inside of your car can easily become too hot for a data tape.
o The tape should be approximately the same temperature as the tape drive. If the tape is exposed to very high or very low
temperatures, keep i t at the same temperature as the tape drive for at least eight hours before use.
o Keep magnets away from data tapes since they can erase your data. Your telephone receiver has a magnet in it. Telephones should never be placed on or close to tapes. Paper clips kept in magnetic holders can become
Using Tapes and the Tape Drive
o Return each tape to its protective box when you are finished using it.
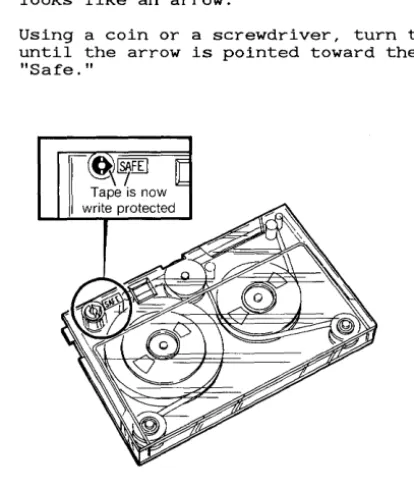
Write-Protecting Y~ur Tapes
If you want to prevent the information on a tape from being erased accidentally, you can write-protect the tape.
To write-protect a tape:
1 Look at the upper-left corner of the tape for a small black disk labeled "Safe."
There is a pointed section of the disk that looks like an arrow.
[image:28.403.73.280.248.492.2]Using Tapes and the Tape Drive
Now your tape is write protected. If you try to write data to the tape, an error window is displayed.
If you want to reuse a tape that has been write protected, you can easily remove the protection.
To remove the write protection:
1 Turn the disk until the arrow is pOinted in the opposite direction from the word "Safe."
The Tape Driye
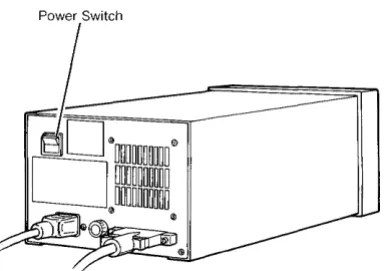
The power switch is located on the back panel of the tape drive. Be sure to turn the power OD before you
insert a tape cartridQe.
Power Switch
[image:29.398.128.321.292.428.2]Using Tapes and the Tape Drive
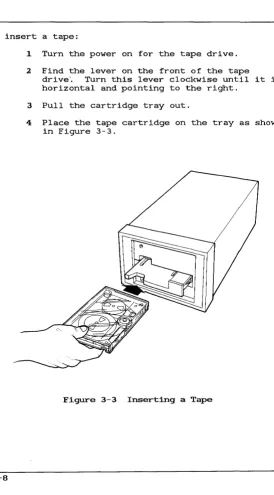
To insert a tape:
1 Turn the power on for the tape drive.
2 Find the lever on the front of the tape drive'. Turn this lever clockwise until i t is horizontal and pointing to the right.
3 Pull the cartridge tray out.
4 Place the tape cartridge on the tray as shown in Figure 3-3.
[image:30.398.37.312.74.570.2]Using Tapes and the Tape Drive
5 Push the tray in.
6 Turn the tape lever counterclockwise until i t points up.
Selecting Tape Operations
You use Tape Operations to select three major functions:
o Backing up your information
o Viewing the contents of tapes
o Restoring your information.
Note
Before you can use a tape, i t must be formatted. Formatting tapes is done using the TAPE BACKUP DIAGNOSTIC disk; i t is not selected from the Tape menu. Although the Tape menu has a selection
for formatting tapes, i t simply tells you how to shut down and insert the TAPE BACKUP DIAGNOSTIC disk.
Before the Tape window is displayed, you must insert a formatted tape and the system must read the tape information. Once you enter Tape Operations, the door to the tape drive is locked. In order to remove the tape cartridge, you must exit from Tape Operations and return to the Administration window.
To select Tape Operations:
1 Log in using a login with permission to perform tape operations.
2 Point to I Administration I and press <Enter> or <Bl>.
3 Point to ITape Operations I and press <Enter>.
You are asked to insert a formatted tape.
Selecting Tape Operations
You hear a whirring sound as the tape is being retensioned.
iii
Please wait for the tape to finish retensioning.
When the tape has been retensioned, the system reads the tape and you see the Tape menu:
iiliG!I!ItiUl1I
Format Tape Restore fro. Tape Show Tape Contents
The tape door is now locked.
When you exit the Tape window, you are permitted to remove the tape.
I t is safe to re.ove the tape cartridge.
Formatting and Testing Your Tapes
Before you can use a new tape, you must format i t . Formatting prepares the tape to accept information that you want to store. Once a tape is formatted, i t does not have to be formatted again. Formatting takes approximately 20 minutes.
The format process performs one additional function: i t performs a surface test to make sure the tape is in good condition. After a tape has been used many times, you can run a surface test without formatting again.
Formatting Tapes
To format tapes, you use the TAPE BACKUP DIAGNOSTIC disk. (The Format Tape option from the Tape menu simply gives you instructions on using the TAPE BACKUP DIAGNOSTIC disk.)
Formatting erases all information contained on a tape. Be careful not to format tapes containing information you want to keep.
Note
You might have other tape drives (for example HP or QIC devices) that use the same brand of tape. If so, you must bulk-erase tapes used on other drives before you format them on the UNIX PC Tape Backup system. (You can purchase bulk erasers at your local computer or electronics shop.)
Performing a Surface Test
Formatting and Testing Your Tapes
Caution
The surface test destroys the data on the tape. Do not run a surface test if you want to keep the information on the tape.
Runnj ng the Tape Backup piagnosti cs
To use the Tape Backup diagnostics:
1 Ask all users to log out of the system.
2 Shut down the system using the Shutdown command in the Office Commands menu.
You see the message:
Ready to power off or reset the machine. Press RETURN to reboot.
3 Insert the TAPE BACKUP DIAGNOSTIC disk.
4 Press <Return>.
Your system configuration is displayed on a screen similar to the following:
SYSTEM CONFIGURATION
xx bytes On-board memory xx bytes Expansion memory
Tape Controller board at slot x. Type any key to continue.
Formatting and Testing Your Tapes
A test message is displayed briefly:
Testing Floppy Tape Controller Circuitry.
Checking DMA data chip R/W . . . . OK. Checking DMA address operation . . . . OK. Checking WD2797 reg R/W •... OK.
Seek to segment 0 of stream 1 is successful.
Floppy tape controller test is successful.
If you see an error message instead of this message, contact your service representative
for help.
After the test is completed, you see the diagnostic menu:
UNIX PC FLOPPY TAPE DIAGNOSTIC
1) Format Tape 2) Tape Surface Test 3) Tape Functional Test 4) Reboot System
Choice( 1-4):
6 Select <1> to format a tape, or <2> to perform a surface test.
Note
The tape functional test detects possible operational problems. It should be performed only by your service representative when a problem is
Formatting and Testing Your Tapes
7 To format a tape, type 1 and press <Enter>.
You are asked to insert the tape:.
FORMAT TAPE
Please insert tape and wait for the retension pass to finish then hit any key to start
formatting. (Tape must be unprotected.)
8 Press any key.
The system confirms that you want to proceed with the format or surface test.
Continue with Tape Format (ALL DATA WILL BE ERASED and i t takes about 20 minutes) Yes or No?
9 Type Yes and press <Enter>.
The formatting or surface testing begins. While formatting is being done, you will see a message similar to the following:
Formatting Segment xxx in Stream X
Note
Formatting and Testing Your Tapes
When the process is finished, you see this message:
This tape is defect free. Eat RETURN to continue.
Note
You may see other messages i f the tape has some bad segments. You can s t i l l use the tape, but i t is better to reformat i t or discard i t and use another.
10 Press <Return>.
You see the diagnostic menu.
You can format another tape, run another surface test, or reboot the system.
Backing Up
This chapter tells you how to perform the different kinds of backups.
Different Methods of Backing Up
There are six ways to back up information to tape:
o Complete Backup copies all system software (except the Foundation set) and all data files from your hard disk to the tape.
o Partial Backup copies all files that have been modified since the last Complete Backup.
o Backup User copies all folders and files belonging to the user(s) you select.
o Backup Folders lists the folders in your Filecabinet and lets you select which ones to copy.
o Backup Fjles lists the files in your
Filecabinet and lets you select which ones to copy.
o Backup by Names lets you copy specific folders and files to the tape.
Complete Backup
A Complete Backup copies all system software and data files on your hard disk (except the Foundation set) . It copies all the files you have created as well as some of the system files.
Complete Backups should be done after you install your software and every time you update your system
Backing Up
Partial Backup
A Partial Backup copies all files that have been added or modified since the last Complete Backup. These backups are smaller than Complete Backups and should be performed more frequently. For example, if you do a Complete Backup once a month, you might perform a Partial Backup once a week or once a day.
Backup User
With this selection, you can back up all files and folders belonging to one user. This selection backs up files and folders in the Filecabinet, Wastebasket, and Clipboard.
Backup Folders or Files
These two selections list the folders or files stored in your Filecabinet. You can choose the objects in the list to be copied to tape.
Backup by Names
This is an advanced selection that lets you type in the names of files and folders that you want to back up. The selected files and folders can belong to any user.
Badrup-Sets
Backing Up
Keeping a Full Copy of Your nata
If you experience a system failure, you might need to restore ~ of your files to the hard disk. To keep a copy of all of your data and software, be sure you have:
o The Boot Set disks
o The disks containing the Foundation set
o The Tape Backup disk
o The most recent Complete Backup
o The most recent Partial Backup (performed after the last Complete Backup)
o User backups or backups of specific files and folders performed after the most recent Partial Backup
o All of your application software.
Exchanging Information with 3B2 Computers
An easy way to move information from your UNIX PC to a
3B2 computer is to back up files on the UNIX PC and restore them on a 3B2 system. You can also back up information on a 3B2 computer and restore i t on a UNIX PC. All types of files can be transferred between the UNIX PC and a 3B2 computer. However, only ASCII
formatted files are directly usable.
To transfer information to a 3B2 computer, you simply back up the information on the UNIX PC using 3B2
format. Backing up in 3B2 format is similar to the UNIX PC backup, but there are two functions that the
3B2 backup cannot perform:
o In 3B2 format, each backup operation requires its own tape. You cannot place two or more backup-sets on the same tape.
Backing Up
Once a tape has been used for a 3B2 backup, you cannot use i t for a UNIX PC backup without erasing the
contents of the tape. Similarly, a UNIX PC tape is erased before a 3B2 backup is performed.
See your 3B2 documentation for instructions on restoring files from tape onto the 3B2 computer.
Backing Up
The instructions for backing up are divided into three parts:
o Starting the Backup
o Choosing What to Back Up
o Finishing the Backup.
Starting the Backup
To start the backup:
1 Tell all other users that you are about to start a backup, and ask them not to change any files you intend to back up.
2 Insert a tape and select ITape Operations I as described in the chapter called "Selecting Tape Operations."
3 If you want to see what is already on the tape and how full i t is, use the Show Tape Contents selection explained later in this section. Remember, one tape can hold a maximum of nine backup-sets.
Note
Backing Up
4 Select IBackup to Tape 1 from the Tape menu.
5 Press <Enter>.
You see the following menu:
~ Select Backup Format [111
Select Backup Format
IlIflgU_I!!1IIifiiiliilii!i!!EDiJ 382 - Single Backup-set
6 Select IUNIX PC - Multiple Backup-sets 1 if you intend to restore the information back to the UNIX PC in case of problems, or
Select 13B2 - Single Backup-set 1 if you intend to restore the information onto a 3B2 computer.
Note
If your tape is full, and you select UNIX PC - Multiple Backup-sets, you see an error message. To complete the backup, use a tape that is not full.
If you later restore a Complete or Partial Backup, or select system files to restore, you must shut down and reboot the system when the restore is complete.
Backing Up
8
You see the Backup to Tape menu:
~ Backup to Tape (1]
partia1 Bockllp jnc111des files changed sjnce Oct 31
~m.:m@'Mm.Uii!.niil!ilWl'
artial Backup - last done on Hoy 1.
Backup User Backup Folders Backup Files Backup by "a.e.
Notice that the system tells you the date the last Complete Backup was performed. Partial Backups include all files added or changed since that date.
Note
If you are performing a backup in 3B2 format, you, see a slightly different menu. The options for Complete Backup and Partial Backup are not available in 3B2 format.
Select the type of backup you want to perform:
Backing Up
Choosj ng What to Back Up
If you are performing a Complete Backup or a Partial Backup, the system selects the files to be backed up. If you chose a Complete or Partial backup, turn to "Finishing the Backup" in this chapter.
If you are backing up by user, by folder, by file, or by name, a window appears for you to select the objects you want.
Backup User
Backup User lets you back up all files and folders belonging to one or more users. You choose the user
files to back up from a Backup User menu similar to the following:
~ Backup to Tape
~a~tjal Backup jccludlls files cbacged sicce Oct 31
Complete Backup - last d 11)1:
!
Partial Backup - last do •
~
Backup Folders lW:u
Backup Files
mm
Backup by Hallles
install betty
tJ 1'511,
1 Select the first user login whose files you want to back up.
2 Press <Mark> or <B3>.
3 Continue pointing to and marking user logins.
4 Press <Enter>.
Backing Up
Backup Folders and Files
These selections list the folders or files currently stored in your Filecabinet. You choose the files or folders to back up from a window similar to:
5J
F ilecabinet FilesITl
Complete Backup - last d Partial Backup - last do Backup User
~rs
Backup by Names
Filecabinet contents
;~@t·tf4~mlb Helllos/Headqtrs Helilos/SalesResults Orders /August Orders/July Orders/June Orders /October Orders /September Sales/database Sales /Reports /June Sales /Reports / July Sales /Reports /August Sales/Reports/September Sales/Reports/October
1 Select the first file or folder appearing on the list that you want to back up.
2 Press <Mark> or <B3>.
3 Continue selecting and marking files or folders that you want to back up.
4 Press <Enter>.
To continue, turn to "Finishing the Backup" in this chapter.
Note
Backing Up
Backup by Names
Backup by Names is for experienced users who know exactly what they want to back up. This option lets you type the names of the files and folders you want to back up. These files or folders can belong to the
system or to any user. Since you do not select the names from a list, you must understand how to use pathnames.
What is a Patbname7
A pathname is a way of specifying the location of an object contained in a folder. A pathname tells the system where to find the files and folders. The different parts of a pathname are separated by slashes
(/)
.
Note
Be sure to use the forward slash (/) found near the Shift key, not the back slash (\) found near the Back Space key.
Pathnames for Your Own Filecabinet
To find a folder in your own Filecabinet, the pathname consists of the folder name as in the example below:
sample folder
To find a file in a folder in your Filecabinet, type the folder name, then a slash, then the file name:
foldername/filename
Pathnames Outside of Your Filecabinet
To find folders or files in other users' offices you must start the pathname with
lu.
Backing Up
The third part of the pathname tells where i t is found in the user's Office. Examples are: /Filecabinet, /Wastebasket, and /Clipboard.
The fourth part of the pathname gives the name of the file or fold~r that you want. An example is /filename.
A complete example of a pathname is shown below:
/u/user/Filecabinet/filename
Optionally, the pathname can identify folders or subfolders like the examples below:
/u/user/Filecabinet/foldr/subfolder/file
/u/george/Clipboard/meetings/August27
/u/pam/Filecabinet/memos/toATT/tapes
Wild Cards in UNIX Pathnames
If you are unsure of the exact pathname, or if you want to back up several files with similar paths, you can use wild cards in the UNIX pathnames. There are two types of wild cards:
o The question mark (7) represents any single character. For example, the following pathname:
/u/userlogin/s?mple
backs up both of the following:
/u/userlogin/sample /u/userlogin/simple
o The asterisk (*) matches no character, one character, or several characters. For example, the following pathname:
Backing Up
backs up all of the following:
/u/userlogin/help /u/userlogin/ohelp /u/user1 ogin/backuphelp
Wild cards can appear anywhere in the userlogin, folder names, and file names.
Using the Backup by Names SelectjoD
You will type the pathnames into the following form:
t!l
Backup listIT!
Backup Jiit of WeI
1: _ _ _ _ _ _ _ _ _
2: 3: 4: 5: 6: 7:
B:
9:
1 Type the UNIX pathname of the first file or folder you want to back up. The pathname can be up to 40 characters.
Note
If the pathname you need to type is longer than 40 characters, use wild cards to shorten the path. A perfectly acceptable path is:
/u/pam/Filec*/fold*/subf*/filen*.
Backing Up
2 Press <Return> to move the cursor to the next line.
3 Continue typing pathnames and pressing <Return>. You can type a maximum of nine pathnames.
4 Press <Enter> when you have entered the names of all folders and files you want to back up.
Fini shing the Backup
When you have chosen what you want to back up, you see the Backup Options form:
ckup 0
Backup Opti ODS
Tape Name (optional): mmm1'!l Backup-set Name: COlAment for this backup-set:
Place data at: Next free space Perfon verify pass? Yes
Overwrite existing data? Con fir.
Note
In 3B2 format, you do not have some of the options shown above.
1 If you want to change the name of your tape, type a new Tape Name. The Tape Name can be up to eight characters.
BaCking Up
3 Type a name for this backup-set.
The backup name can state the name of the system or user being backed up, the scheduled interval, or some other piece of information.
Note
This is a required step. If you do not type in a backup-set name, an error message appears, and you are returned to the Backup Options form.
4 Press <Return>.
5 Type in a comment for this backup-set. Since the comment holds 24 characters, you can briefly describe what you are backing up.
(This is an optional step.)
6 Press <Return>.
7 Select where the information should be placed on the tape by pressing <Slect> or <B3>. You have two choices:
o Place the data at INext free space I if you want to put more than one backup-set on a tape. This keeps the information that already exists on the tape.
o Place the data at IStart of tape I i f you want to erase any information on the tape before starting the backup. This puts only one backup-set on the tape.
8 Press <Return>.
9 Select whether you want to perform a verify pass on the tape during the backup by pressing <Slect> or <B3>.
o When you select IYesl, the system checks the information being backed up and informs you of any errors. It is
Backing Up
o When you select INol, the system does not look for errors.
10 Press <Return>.
11 If the information will be placed at the start of the tape, you must select whether you want to overwrite existing information on the tape.
o If you select IConfirml, the system tells you i f the tape has been used before and asks i f you want to go ahead and erase eXisting information.
o If you select IYesl, the system erases any existing information without asking first.
o If you select I No I, the system does not erase existing information and does not proceed with the backup i f the tape has been used before.
12 Press <Enter>.
The system looks for the files and folders i t must back up:
•
Backing Up
The system then estimates how many formatted tapes are necessary to complete the backup. If more than one tape is required, a message appears.
iii·
This backup will require 2 formatted tapes to complete. If the~ are not now available I stop here.
Touch EHTER to continue or CAHCl to stop.
Note
If your backup continues onto a second tape, you cannot add any more backup-sets to the second tape.
13 Press <Enter> to proceed with the backup, or
Press <Cancl> to leave the backup selection.
If you pressed Enter to proceed, the backup starts. You may be prompted to insert the next tape if more than one is required.
The system tells you when the backup is finished.
14 Press <Enter> to return to the Tape menu.
Showing the Tape Contents
This chapter tells you how to view the names of the files that are, stored on your tapes.
Oyeryjew
Showing the contents of a tape has two basic steps:
o Choosing the backup-set
o Viewing the list of file names.
Choosing the Backup-Set
A backup-set is a group of files that were backed up in one operation. A backup-set is either a Complete Backup, a Partial Backup, a Backup by User, a Backup by File, a Backup by Folder, or a Backup by Names.
When you back up information, you must choose where the data will be placed on the tape: at the next empty space, or at the beginning of the tape. If you place the information at the next empty space, you can have several backup-sets on the same tape.
You can list the names of files stored in all the backup-sets on the tape, or you can select just the backup-sets you want to see.
Viewing the List of File Names
The file names are listed by their UNIX pathnames. The pathnames look like this:
/u/userlogin/folder/subfolder/filename
Showing the Tape Contents
Showing the Tape Contents
1 Insert a tape and select ITape Operations I as described in the chapter called "Selecting Tape Operations."
2 Select I Show Tape Contents I
3 Press <Enter>.
If the tape is in UNIX PC format, a list of all backup-sets on the tape appears.
If the tape is in 3B2 format, skip to step 6 of this chapter.
51
Tape Safecopyen
Name Illpe of Backup Date & !ime Comment
I; .. Complete Partial Betty
UItUSED UItUSED UItUSED UItUSED UItUSED UNUSED
it:4i1-ihLUiiLI
Complete 28% 19/31/85 19:21 Oct. lonth end backup Partial 19% 11/91/85 17: 13 Friday partial backup User 16% 11/81/85 17:25 Bettys files
The line below the headings shows the word All and indicates what percent of the tape has been used. Subsequent lines give
information about each backup-set on the tape. The screen shows:
o The Name assigned to each backup-set
o The Types of Backup are: Complete, Partial, Users, Folders, Files, or Names
Showing the Tape Contents
o The Date
&
Time that each backup was startedo The Comment about each backup-set.
Note
A tape can hold a maximum of nine backup-sets. Any unused places on the tape are shown on the screen as UNUSED. If the tape is full, you see the word FULL.
4 Select the word All to list the file names in all backup-sets stored on the tape, or
Mark each backup-set you want to view by pointing to a backup-set, pressing <Mark> or
<B3>, pointing to the next backup-set, marking, and so on.
5 Press <Enter>.
A new window appears and you are asked how you want to view the file names: on the screen, on a printout, or both.
i!ttiiM-m;444ii
Output to Printer
6 Select IOutput to screen I to view the tape contents on the screen, or
Showing the Tape Contents
Note
You can print the names and view them on the screen simultaneously i f you Mark both selections.
7 Press <Enter>.
You see a window showing the pathnames of all files stored in the backup-sets you selected:
pe contents [l]
Tape contents
mmm!l
lu/betty/.pl'ofile lu/betty/.phdil' lu/betty/Envil'onlllent lu Ibet ty I F ilecabinet lu Ibet ty I F ilecabinet IPl'ofiles
lu Ibet ty I F ilecabinet IPl'o files 112BBbps : A. lu Ibet ty I F ilecabinet IPl'o files 13BBbps: All lu Ibet ty I F ilecabinet IPl'o files 196BBbps : A2 lu Ibet ty IF ilecabinet IOl'del's
lu/bet ty IF ilecabinet/Ol'del's/August
lu Ibet ty IFilecabinet/Ol'del's / July .. lu/betty/Filecabinet/Ol'del's/June ... lu/betty/Filecabinet/Ol'del's/Octobel'
lu/bet ty / F ilecabinet/Ol'del's ISeptembel'
If there are many files, the window shows the beginning of the list of files. To view the rest of the files, use the arrow keys or use the mouse with the arrow icons in the window border.
8 Press <Enter> to return to the Tape menu when you have finished viewing the list, or
Restoring Your Fi1es
If you lose files due to operator error or system failure; you need to restore these files to the hard disk. This chapter explains the different methods of restoring, helps you determine what you need to restore, and gives procedures to fo1low for each type of restore.
Backup-Sets
The Restore function always starts by listing all backup-sets stored on the tape. A backup-set is a group of files that were backed up in one operation. A backup-set is either a Complete, Partial, User, Folder, or File Backup, or a Backup by Name. The first step in restoring files is to determine which backup-sets you need.
Different Methods of Restorjng
To help you restore just the files you need, there are four ways to restore:
o Restore Backup-Sets
o Restore by Names
o Show and Restore Folders
o Show and Restore Files.
Restore BaCkup-Sets
Restoring Your Files
Restore by Names
This is an advanced selection that lets you type in the pathnames of the ·files you want to restore.
Show and Restore Folders
This option lists all folder names that were backed up in selected backup-sets. You can select folders from this list that you want to restore.
Show and Restore Files
This option lists file names in selected backup-sets and lets you select files from the list that you want to restore.
Exchanging Informatj on with 3»2 Computers
You can use the Tape Backup system to transfer information from 3B2 computers to UNIX PC's. You simply back up data on a 3B2 computer and restore i t to a UNIX PC. All types of files can be transferred between the UNIX PC and a 3B2 computer. However, only ASCII formatted files are directly usable. See your 3B2 documentation for information on backing up data on a 3B2 computer.
Restoring Your Files
Deciding What to Restore
Before you restore files, determine exactly what you lost. The table below will help you select the restore method to use, and refers you to the appropriate
section of this chapter.
Condition
A specific file or group of files, or a specific folder is missing.
A user is not sure which files are missing.
Files present when the system was last backed up are missing or damaged.
You want to restore files from a 3B2 computer onto your UNIX pc.
The system will not start up.
Solution
Restore just the missing files or
folders. See
"Restoring Files and Folders."
Restore the appropriate backup-set for the user. See "Restoring Backup-Sets."
Restore the most recent partial backup-set. See "Restoring Backup-Sets."
Follow the procedures for "Restoring Backup-Sets."
Restoring Your Files
Restoring Backup-Sets
Use this method of restoring when you want to restore all files in a backup-set. For example, you may want to restore all of the files belonging to a particular user, or you may not be certain which files you need to restore from a particular backup-set. This is also the method you use to restore 3B2 files onto your UNIX PC.
Note that if you restore a partial backup, or other backup-set that contains system files, you will need to shut down and restart the system when the restore is complete.
To restore backup-sets:
1 Tell all other users that you are starting the restore, and ask them not to change any files you intend to restore.
2 Insert a tape and select Tape Operations as described in the "Selecting Tape Operations" chapter.
3 Select IRestore from Tape I on the Tape menu.
4 Press <Enter>.
You see the Restore menu:
51
Restore from Tape (1]13"iII13·~m!;'i!ii£i!Wl
RESTORE by Naliles
SHON and RESTORE Folders
SHON and RESTORE Files
Restoring Your Files
6 Press <Enter>.
You see the following message:
III
IHPORTRHT Before restoring froll a complete or partial backup, see the Restore instructions in the doculllentation.
Please touch EHTER to continue.
This message is presented to remind you that there are additional steps to follow when restoring from a Complete backup-set or a Partial backup-set. These steps are explained later in this procedure.
7 Press <Enter>.
You see the Restore Options form:
16]
RestOl'e OptionsIII
Restore Optigns
Retain newest version of file? ~
Restoring Your Files
8 Press <B3> or <Slect> i f necessary to indicate Select whether you want to retain the newest version of each file on your hard disk:
o Select IYesl to prevent an old file on the tape from replacing the current file on your hard disk. Use this selection when you want to keep information that you have added to files since you made the backup.
o Select INol if you want to replace current files with older files on the tape. Use this selection when the newer versions of files on your disk are incorrect, and you want to restore the correct versions from the backup-set.
9 Press <Return> to move the cursor to the next question.
10 Press <B3> or <Slect> i f necessary to choose whether you want to restore files from the tape to a different folder on your hard disk:
Select INol i f you want files restored to their original folders.
11 Press <Return>.
12 If you are restoring files to a different folder in the Filecabinet, type the folder name.
If the folder already exists, the files are added. If the folder does not exist, i t is created. However, i f a file by that name exists, a folder by the same name cannot be added and an error message is displayed.
13 If you are restoring from a tape in 3B2 format, skip to step 15.
Restoring Your Files
A window appears that lists all of the backup-sets stored on the tape, as in this example:
51
Tape SafecopyITI
Hame wpe of Backup Date a Tilo COlient
';11 Complete Partial Betty UNUSED UNUSED UNUSED UNUSED UNUSED UNUSED
Complete 28% 18/31/85 19:21 Oct •• onth end backup Partial 19% 11/81/85 17:13 Friday partial backup User 16% 11/81/85 17:25 Bettys files
This is the same information that appears when you show tape contents, and includes information about each backup-set on the tape.
Note
A tape can hold a maximum of nine backup-sets. Any unused portions of the tape are shown on the screen as UNUSED. If the tape is full, you see the word FULL.
14 Select the word All to restore all the backup-sets on the tape, or
Mark each backup-set you want to restore by selecting a backup-set, pressing <Mark> or <B3>, selecting the next backup-set, marking, and so on.
15 Press <Enter>.
Restoring Your Files
If the backup-set was stored on more than one tape, you are told when to remove one tape and insert the next.
The system tells you when the restore is complete:
Restore is now complete.
Touch ENTER to continue.
16 Press <Enter> to return to the Tape menu.
17 Press <Exit> until you have returned to the Office.
18 Remove the tape from the unit.
19 If you have chosen not to return the newest version of your files from a Complete or Partial Backup. log out of the office and reboot the system.
You have completed the Restore procedure.
Restoring Fjles and Folders
Use this type of restore when you know exactly which files or folders are missing. First locate the tape that contains the copy of the files or folders you want. See "Showing the Tape Contents" in this section i f you need to determine which tape contains the files or folders.
Restoring Your Files
Follow these steps to restore files or folders:
1 Tell all other users that you are starting the restore, and ask them not to change any files you intend to restore.
2 Insert a tape and select Tape Operations as described in the "Selecting Tape Operations" chapter.
3 Select to IRestore from Tape I from the Tape menu.
4 Press <Enter>.
You see the Restore menu:
II '-
,-;a*:tnI3w:mUII!&iiiJj
RESTORE by Hames
SHOH and RESTORE Folders
SHOH and RESTORE Files
5 Select the type of restore you want.
If you want to restore files by selecting from a list of files in a backup-set, select
ISHOW and RESTORE Filesl.
If you want to restore folders by selecting from a list of folders in a backup-set, select ISHOW and RESTORE Folders I .
Restoring Your Files
6 Press <Enter>.
You see the following message:
i-~---IHPORTAnT Before restoring fro. a co.plete or partial backup J see the Restore instructions in the docu.entation.
Please touch EnTER to continue.
This message is presented to remind you that there are additional steps to follow when restoring from a Complete backup-se~ or a Partial backup-set. These steps are explained later in this procedure.
7 Press <Enter>.
You see the Restore Options form:
~ Restol'e Options
CD'
Restore Optjons
Retain newest version of file? ~
Restore files to a different folder? no Folder nallle:
8 Press <B3> or <Sleet> i f necessary to choose whether you want to retain the newest
Restoring Your Ei1es
o Select IYesl to prevent an old file on the tape from replacing the current file on your hard disk. Use this selection when you want to keep information that you have added to files since you made the backup.
o Select INol i f you want to replace current files with older files on the tape. Use this selection when the newer versions of files on your disk are incorrect, and you want to restore the correct versions from the backup-set.
9 Press <Return> to move the cursor to the next question.
10 Press <B3> or <Slect> i f necessary to choose whether you want to restore files from the tape to a different folder on your hard disk:
Select INol i f you want files restored to their original folders.
11 Press <Return>.
12 If you are restoring files to a different folder in the Filecabinet, type the folder name.
Restoring Your Files
13 Press <Enter>.
A window appears that lists all of the backup-sets stored on the tape, as in this example:
Name Tune of Rackun Date & Time Comment
1;1. Complete Partial Betty
UNUSED UNUSED UNUSED UNUSED UNUSED UNUSED
Complete 28% 18/31/85 19:21 Oct. month end backup Partial 19% 11/81/85 17: 13 Friday partial backup User 16% 11/81/85 17:25 Bettys ·files
This is the same information that appears when you show tape contents, and includes information about each backup-set on the tape.
Note
A tape can hold a maximum of nine backup-sets. Any unused portions of the tape are shown on the screen as UNUSED. If the tape is full, you see the word FULL.
14 Select the word All to restore files from all the backup-sets on the tape, or
Mark each backup-set from which you want to restore files by selecting a backup-set, pressing <Mark> or <B3>, selecting the next backup-set, marking, and so on.
Restoring Your Files
The window you see now depends on the type of restore you chose:
o If you chose to show and restore files or folders, a window appears for you to select the objects you want, as in the
following example:
I~
Iape contents
~
lu/betty/F ilecabinet
lu Ibet ty IF ilecabinet/Pl'o files lu/betty/Filecabinetlrtotes lu/betty/Filecabinet/Ol'del's lu/betty/Filecabinet/Sales
lu Ibetty IF ilecabinet/Sales/Repol'ts lu/betty/F ilecabinet/He.os lu/betty/Filecabinet/Hisc
lu Ibet ty IWastebasket
lu Ibet ty IClipboard
I_~
________________
m
Point to each file or folder you want to restore and press <Mark> or <B3>. If there are many files or folders, you can display the names by using the arrow keys or the mouse with the scrolling icons in the window border.
Note
Restor~ng Your F~les
o If you chose to restore files by name, a form appears for you to enter the names:
51
Restol'e list -~~---ITl-Restore list of file.
1: _ _ _ _ _ _ _ _ _
2: 3: 4:
5:
6: 7: 8: 9:
~---Type the UNIX·pathname of the first file
you want to restore. Press <Return> and
enter the next pathname in the second field. Type the pathnames exactly as described in "Backing Up" in this section. Continue until you have typed up to nine pathnames.
Note
If the pathname you need to type is longer than 40 characters, use wild cards to shorten the name. A perfectly acceptable pathname is:
/u/pam/Filec*/fold*/subf*/filen*.
16 When you have finished marking or typing your selections, press <Enter>. The restore begins.
Restoring Your Files
The system tells you when the restore is complete:
Restore is now complete.
Touch BiTER to continue.
17 Press <Enter> to return to the Tape menu.
18 Press <Exit> until you have returned to the Office.
19 Remove the tape from the unit.
20 If you have chosen not to retain the newest version of system files from a Complete or Partial Backup, log out of the office and
reboot the system.
You have completed the Restore procedure.
Restoring a Complete System
If your system does not start up (boot) or i f i t does boot but you suspect disk problems, you must restore the Foundation Set as well as your data files. Note: If you can boot up, save any files you have modified since your last backup. Then follow these steps to restore your system:
1 Initialize your hard disk as described in the AT&T UNIXTM PC System Software Installation ~.
2 Install the Boot Set disks as described in the AT&T UNIX PC System Software Installation ~.
Restoring Your Files
4 Install the Tape Backup software as described in this manual.
5 Locate the tape or tapes containing the following backup-sets:
o The most recent complete backup of the system.
o The most recent partial backup of the system that was done after the most recent complete backup.
o Any user backup, folder backup, file backup, or name backup performed after the most recent partial backup.
6 Log in as install.
7 Select I Administration I and press <Enter>.
8 Insert the tape containing the most recent complete backup and select Tape Operations as described in the "Selecting Tape Operations" chapter.
9 Select IRestore from Tape I from the Tape menu.
10 Press <Enter>.
You see the Restore menu:
I;J"III;J·~mg91'!iiiDiii
RESTORE b~ Haaes SHON and RESTORE Foldel's SHON and RESTORE Files
18J _ _ _ _ _ _
e:J
11 Select IRESTORE Backup-set(s) I .
Restoring Your Files
You see the following message:
III
IMPORTAnT Before restoring fro. a co.plete 01'
partial backup J see the Restore instructions in the docu.entation.
Please touch EnTER to continue.
This message is presented to remind you that there are additional steps to follow when restoring from a Complete backup-set or a Partial backup-set. These steps are explained later in this procedure.
13 Press <Enter> to display the Restore Options form. <