Trademark Acknowledgments
Proprietary Statements and Notices
Copyright Notice
Manual Notice
FCC
Compliance
This manual and the digitally encoded software in-cluded with the printer is Copyrighted 1988 by QMS, Inc., Mobile, Ala., All Rights Reserved. This manual may not be copied in whole or in part, nor transferred toanyothermediaorlanguage, without the express written permission of QMS, Inc.
QMS, Inc. reserves the right to make changes to this manual and to the equipment described herein without notice. Considerable effort has been made to insure that this manual is free of inaccuracies and omissions. However, QMS, Inc. makes no warran-ty of any kind including, but not limited to, any im-plied warranties of merchantability and fitness for a particular purpose with regard to this manual. QMS, Inc. assumes no responsibility for, or liability for, errors contained in this manual or for inciden-tal, special, or consequential damages arising out of the furnishing of this manual, or the use of this manual in operating the equipment, or in connec-tion with the performance of the equipment when so operated.
This equipment generates, uses, and can radiate radio frequency energy and if not installed and used in accordance with the Instruction Manual may cause interference to radio communications. It has been tested and found to comply with the limits for a Class B computing device pursuant to Subpart
J
of Part 15 of FCC Rules, which are designed to provide reasonable protection against such inter-ference in a residential environment. However, there is no guarantee that interference will not occur in a particular installation. If this equipment does cause interference to radio or television reception,
-which can be determined by turning the equipment off and on, the user is encouraged to try to correct the interference by one or more of the following measures:
1. Reorient the receiving antenna.
2. Relocate the computer with respect to the receiver.
3. Move the computer away from the receiver. 4. Plug the computer into a different outlet so that
the computer and receiver are on different branch circuits.
5. If necessary, the user should consult the dealer or an experienced radio / television technician for additional suggestions. The Federal Com-munications Commission has prepared a help-ful booklet: "How to Identify and Resolve Radio-TV Interference Problems." This booklet is available from the U.S. Government Printing Office, Washington, DC 20402. Stock No.
004-000-00345-4.
A SHIELDED INTERFACE CABLE IS REQUIRED TO COMPLY WITH THE CLASS B LIMITS. W'.r1;J~II~teD To prevent electrical shock, do not remove any
covers from your printer. No user-serviceable parts are in-side. Any servicing should be referred to a qualified tech-nician.
Electronics Your printer complies with the Electronics
Emis-Emissions sions Requirements of the West-German Federal Minister for Postal and Telecommunication Tech-nology regulation:
Safety
VFG. 1046/1984
Your printer complies with the Electronics Emis-sions Requirements of the European Economic Council directive:
82/499/EEC
A shielded cable is required to comply with VFG 1046, 82/499/EEe.
This printer is certified as a Class 1 laser product under the U.S. Department of Health and Human Services (DHHS) Radiation Performance Standard according to the Radiation Control for Health and Safety Act of 1968. This means that the printer does not produce hazardous laser radiation.
Since radiation emitted inside the printer is com-pletely confined withing protective housings and external covers, the laserbeam cannot escape from the machine during any phase of user operation.
-About This User's Guide
This user's guide is divided into these major parts:
Primer
Font Setup
Page Setup
Emulations Setup
Interface Setup
Miscel-laneous Setup
Buffer Setup
-The Primer should be read first. It offers important basic information necessary to fully utilize the user's guide.
Fonts are the typefaces the printer uses. Chapter 3 describes what they are and how to change them.
You can control page margins, how many copies of each page are printed, and how the text is oriented on the page. You can also print using the manual feed feature. Chapter 3 tells you how.
Your printer works easily with the different software packages because it emulates (imitates) several popular printers. In chapter 4 the features of these emulations are explained.
The two available interfaces (Centronics and RS232) have several important options which match the printer to your computer. Chapter 5 lists these op-tions.
Chapter 6 describes several important printer op-tions.
The Buffer Setup menu is used to assign and view the available space in the user-defined storage areas (buffers) in the printer. Chapter 7 explains the buf-fers and how to change them.
Trouble-shooting and
Maintenance
Appendices
Chapter 8 dicusses simple maintenance and troubleshooting you can do.
The Appendices contain additional information not contained in the rest of the user's guide.
-________ ---l_"O'j·II'.';i'j;ili
Primer
Font Setup
Introduction . . . . Key Concepts of Laser Printing The Printer Control Panel Changing Printer Setup . . Emulation . . .
· . 1-1 · . 1-2 · . 1-4 · . 1-6 .1-7 Page Orientation. . . . 1-12
Page Margins 1-14
Paper Size . . . . 1-17
Copy Count . . . 1-18 Saving the Changes to Printer Setup 1-19 When You Have Finished . . . 1-20
FontSetup . . . . Selecting Fonts by Name . . . Selecting Fonts by Number .
· .2-1 · .2-4 · .2-7 Printing Font Examples . . . . 2-8 Font Examples Software Command . 2-9 Download Fonts . . . 2-10
-Page Setup
Emulation Setup
-Optional Font Cartridges . . . 2-11 Font Selection Software Command 2-12 Font Deletion Software Command . 2-14
Page Setup . . . . . . . 3-1 Printing Multiple Copies . . . . 3-2 Setting Copy Count by Software
Command . . . 3-3 Page Orientation . . . . 3-4 Page Orientation Software Command 3-5 Selecting Paper Size . . . . 3-6 Setting Page Margins . . . . 3-7 Engine Alignment Margins . . . 3-9 Manual Feed Operation . . . 3-10 Paper Size and Source
Software Command . . . 3-15
Emulation Setup . . . . 4-1 Changing the Emulation Mode . . . . 4-3 Emulation Mode Software Command 4-6 Shared Emulation Setup . . . 4-9 Special Setup for ANSI X3.64 . . . . 4-13 Special Setup for Diablo 630 . . . 4-16 Special Setup for Epson FX-80 . . . . 4-19 Special Qume Sprint Setup . . . 4-23 Special mM Proprinter Setup 4-26 Special Tektronix 4014 Setup 4-27 Special HPGL 7475A Setup . . . 4-30
Interface Setup
Miscella-neous Setup
Buffer Setup
Interface Setup . . . . Interface Selection . . . . . Shared Interface Setup .. RS232 Setup . . . . Centronics Setup
Miscellaneous Setup Stopping the Printer
· . . 5-1
· .. 5-2
· .. 5-4
· .. 5-7
· .. 5-9
.6-1 .6-3
Suppressing Pages . 6-4
Page Eject Delay . . . . 6-5 Manual Delay . . . . 6-6 Printing a Status Page . . . . 6-7 Status Page Software Command . 6-8 Resetting Printer Setup . . . . .. . 6-9 Diagnostic Options . . . 6-10 Hex Dump Software Command . . . 6-11 Pausing the Printer . . . 6-12
Buffer Setup . . . . 7-3 Page Buffer . . . . 7-5 Full Page/Window Memory. . . 7-6 Displaying Buffer Sizes . . . . 7-7 Changing the Host Input Buffer . 7-8 Changing the Download Buffer . 7-9 Number of Sequences . . . 7-10
- Trouble-shooting/ Maintenance
Font Width
Tables
ASCII Tables
Specifications
Advanced User Information
-Printer Troubleshooting . . . 8-1 Clearing Paper Jams . . . 8-6 Replacing the Print Cartridge . . . 8-9 Adjusting Print Contrast . . . 8-10 Cleaning the Primary Corona Wire . 8-11 Cleaning the Transfer Corona Wire and Transfer Guides . . . 8-13 Troubleshooting with Hex Dump
Mode . . . 8-17
Font Width Tables . . . . A-1
ASCII Conversion Table . . . B-2
Printer Specifications . . . . C-1 Parallel Interface Cable . . . . C-4 Addressable/Printable Areas
of Page . . . C-S Serial Interface Cable Specifications . C-6
Advanced UserInformation . . . .0-1
______________ -.l.';"r'Q'I
Primer
Contents
Introduction
Your laser printer represents the latest in printer technology. It fits conveniently on a desktop and quietly prints at eight pages per minute. Its 30Ox300 dot resolution (a measure of its ability to print images on the page) produces text and graphics that are crisp and smooth. It uses normal copier or bond paper (in five possible sizes) and can also print on envelopes, labels, and transparencies. It also offers several fonts (typefaces) to choose from.
The printer is quickly adaptable to your specific requirements by selecting the appropriate options through the control panel. You can, for example, print spreadsheets or charts longways on the page, print multiple copies of a single document, or fine tune the character or line spacing to fit a specific form. Your printer is easy to use with most popular applications software packages because it emulates several different line printers. Or, you can program it yourself using the ANSI X3.64 programming language.
Maintenance of your printer is simple. The printer contains no ribbons or daisy wheels. The dry ink (toner) used in printing is contained in an easily replaceable cartridge. The only other maintenance is an occasional cleaning.
--Key Concepts of Laser Printing
Laser printing is a relatively new technology and has a few unique concepts that you may not be very familiar with. Read-ing through these concepts will help you better understand the remainder of this manual and therefore allow you to fully util-ize your new laser printer.
Page Printing Laser printers are page printers. They store data sent by the computer until an entire page of the data is received and then print and eject the page. Compare this to the more familiar "impact" or line printers (those that print like a very fast typewriter, striking the page with a hammer through an inked ribbon). Impact printers store only one line of charac-ters before printing. The process of storing a line and then printing that line before storing the next makes a printer slow. More detailed technical information on how your laser printer goes about printing a page can be found in Appendix E of this manual.
Printer Setup You may have a setup or configuration
program for your computer. This program se~ operating con-ditions that the computer reads whenever it is turned on. Likewise on your laser printer, you will use the control panel to setup certain conditions (power up settings) that the printer will use whenever it is turned on. Almost all the instructions in this manual concern printer setup in some way.
Default Settings When you first unpack your laser printer, its setup conditions have been "pre-set." These settings (referred to in this manual as "manufacturer's defaults") provide a base from which you will make setup changes to enable the printer to work to your requirements. There is an option that will return the printer setup to the manufacturer's defaults if you ever need to start from scratch.
Online/Offline Online and offline are convenient terms that describe whether or not the printer is ready to receive data from your computer. When it is online, the printer is ready. Offline is the opposite. On the control panel, a small indicator lights when the printer is online.
Fonts Fonts are typefaces. You can think of each font as a dif-ferent daisy wheel on an impact printer or a new set of typebars on a typewriter (if you could change them). Detailed information about fonts and how to use them will be presented later in this manuaL
Page Orientation If you were using a typewriter to type a let-ter to a friend, you would load the paper narrow edge first into the carriage. In your laser printer, this orientation of the paper is called "portrait." If you wanted to use the typewriter to type a wide table of columns of numbers, you would load the wider edge of the paper first. In your laser printer, this orientation is called "landscape." Paper can only be loaded into your laser printer in one direction. The switching from one orientation to the other is done electronically through the control paneL
The Printer Control Panel
The printer control panel (fig. 1.1) allows you to view and change the printer setup and other printer features. The mes-sage window displays the choices from the many setup menus. It also displays status and error messages to let you know if
something has gone wrong.
•
• • 0 oU
•••
~-IBrn
SCROLLam
Fig. 1.1. The printer control panel.
Control Panel Keys The Online key allows you to put your
computer "on hold" by taking the printer "offline" (temporari-lyinterrupting communication). None of the other keys on the control panel will function until the printer is offline. The four Setup keys (Menu, Select and two Scroll keys) are used when making changes to the printer setup. The Manual Feed key lets you switch from using the paper cassette to using the manual feed (feeding one sheet at a time by hand into the printer) fea-ture. The Form Feed key ejects a page out of the printer .
Control Panel Indicators Also on the control panel are two indicators: a data light and a low toner light. The data light comes on whenever the printer receives data from the com-puter. The low toner light comes on after about 4,000 sheets have been printed. This warns you that the cartridge is almost empty and should be replaced soon.
Changing Printer Setup
Your laser printer is a very versatile tool. Through the printer setup menus, you can easily adjust the printer's capabilities to suit your specific needs. But before you change anything, you need to know what to change.
Take a look at the status page that printed when you first turned on the printer. Under the heading "Printer Setup" you'll find the current settings (highlighted in reverse text) for "Emulation," "Page Orientation," "Page Margins," "Paper Size," and "Copy Count," Use the instructions that follow to learn how to use the printer control panel as you change the setup for your needs.
Emulation
Your laser printer is capable of emulating anyone of the dif-ferent printers listed under "Emulation" on the status page. This feature enables you to print to the laser printer from al-most any software package that you may want to use. In any software package is a list of supported printers. Make a note of any printers listed in your software package that match those listed under "Emulation." You will have to decide which of the matching supported printers you want your laser printer to emulate.If the highlighted printer listed under "Emulation" on the status page is not the printer you wish to use, you can use the control panel to change the current emula-tion setting.
-Press the Online key on the printer control panel. Notice that the green light in the key goes out. The printer is now offline and the other keys on the control panel may be used. Press the Menu key and notice that the message window changes to "Font Setup."
You are now in the top level printer setup menu. Within this menu (or any other menu) you may use the Scroll keys to move up or down (fig. 1.2).
Fig. 1.2
The top level
setup menu.
8-Use Scroll keys to move up or down Inside the top level menu.
I
Buffer Setupr
Setup ontI
Page SetupEmulation Setup
I
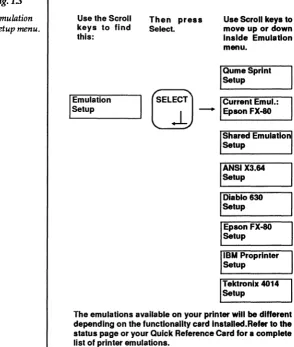
Interface Setup Miscellaneous SetupPress either one of the Scroll keys on the printer control panel until you see "Emulation Setup" in the message window. Notice the small arrow icon in the lower right comer. This icon means that the message in the window is the name of a lower level menu (sub-menu). Press the Select key now to open the Emulation Setup menu (fig. 1.3). Within the Emulation Setup menu you may use the Scroll keys to move up or down in the menu.
Fig. 1.3
Emulation Setup menu.
Use the Scroll keys to find this:
Emulation Setup
Then press Select.
Use Scroll keys to move up or down Inside Emulation menu.
QumeSprlnt Setup
lELE~j c.""~ Em~.,
..l
-L.E_p_so_n_FX_-80 _ _ - l
Shared Emulation Setup
IANSIX3.64 Setup Diablo 630 Setup
I
~pson FX-80 . SetupIBM Proprlnter Setup Tektronix 4014 Setup
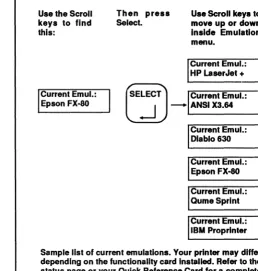
[image:23.425.87.382.163.510.2]Press either one of the Scroll keys on the printer control panel until you see "Current Emulation" in the message window. Press Select to open the Current Emulation menu (fig. 1.4). The Current Emulation menu differs depending on the functionality card installed in the printer.
Fig. 1.4
Current Emulation menu.
Use the Scroll keys to find this:
Current Emul.: Epson FX-80
Then press
Select.
Use Scroll keys to move up or down Inside Emulation menu.
Current Emul.: HP LaserJet +
(ELi
.-J -
J
CwNn'Emu'.'
ANSI X3.64Current Emul.: Diablo 630
Current Emul.: Epson FX-80 Current Emul.: QumeSprlnt Current Emul.: IBM Proprlnter
Sample list of current emulations. Your printer may differ depending on the functionality card Installed. Refer to the status page or your Quick Reference Card for a complete list of printer emulations.
Note the icon showing in the lower right comer of the printer's message window. This icon means that the selection in the message window is one choice of several possible selections. When this icon is showing in the window, you may use the Scroll keys to move up or down through the possible selec-tions.When the printer that you wish to emulate is showing in
[image:24.425.83.342.130.401.2]the message window, press Select. This changes the Current Emulation setting.
Press the Menu key once. Note that the icon in the comer has changed back to the arrow. The Menu key can be used to move up (or horne) through the different levels of menus. Continue pressing the Menu key until you return to Emulation Setup (the top level menu). Figure 1.5 reviews the control panel keys you used to change Current Emulation and the icons that ap-peared in the message window.
Fig.l.S
Summary of
setup keys and
icons.
EJ
..
•
Press the Online key before using any other key on the printer control panel. The green light In the key goes out when the printer Is offline.
Press the Menu key after pressing the Online key to move to the top level printer setup menu. When you are In the setup menus, press the Menu key to move up to the next higher menu level.
Press the Select key to open a menu or to make a change to printer setup. Always note which icon Is showing In the lower right corner of the message window. This Icon Indicates what action will be taken when you press the Select key.
When this Icon Is showing In the lower right corner of the message window, the message In the window Is the name of a menu. Press Select to open this menu.
When this Icon Is showing In the lower right corner of the message window, the message In the window Is one of aeveral choices for the option you are changing. Press Select when the choice you want appears In the window.
--Page Orientation
Earlier in this chapter, you read about the concept of portrait and landscape orientation. You should decide which orienta-tion you want to use. If the highlighted choice for orientation on the status page is not the setting you want, you can use the printer control panel to change it. (Landscape orientation re-quires using landscape fonts. More detailed information about using fonts will be presented later in this manual.)
Press either one of the Scroll keys until "Page Setup" is show-ing in the message window. Notice the icon in the lower right comer that represents a sub-menu. Press Select to open the Page Setup menu (fig. 1.6).
Fig. 1.6
Page Setup
menu.
w._
Use the Scroll Then press keys to find Select. this:
Use Scroll keys to move up or down Inside Page Setup menu.
Engine Allgnmen Margins
I
PageSetup
LELEi)
I
Copy Count:I
.-J -::;:_
0=0 =0
1::;;:::;:::~::::::_
Page Orientation: Portrait
Paper Size: Letter
I
Page Margins [image:26.423.43.345.227.557.2]Press either one of the Scroll keys until you see "Page Orienta-tion" in the window. Notice that a new icon is in the comer. This icon means that the selection shown in the window is one of two possible choices. Pressing Select when this icon is in the window changes the current setting (in this case, the current setting of the Page Orientation). You may continue to press Select to switch back and forth between the two choices. The selection that appears in the window at any time is the current setting.
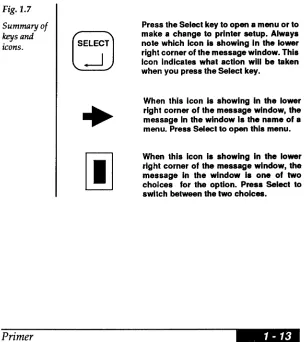
Figure 1.7 reviews the control panel keys you used and the icons that appeared in the message window when you set Page Orientation. The next three setup changes are in the Page Setup menu. You do not need to press the Menu key.
Fig. 1.7
Summary of keys and icons.
Press the Select key to open a menu or to make a change to printer setup. Always note which Icon Is showing In the lower right corner of the message window. This Icon Indicates what action will be taken when you press the Select key.
When this Icon Is showing In the lower right corner of the message window, the message In the window Is the name of a menu. Press Select to open this menu.
When this Icon Is showing in the lower right corner of the message window, the message in the window is one of two choices for the option. Press Select to switch between the two choices •
[image:27.423.76.383.229.571.2]-Page Margins
Press either one ofthe Scroll keys until "Page Margins" appears in the message window. Press Select to open the Page Margins menu (fig. 1.8).
Fig.l.B
Page Margins
menu.
Use the Scroll keys to find this:
I
Page MarginsThen press Select.
Use Scroll keys to move up or down Inside Page Mar-glnsmenu.
Bottom Margin: 0.00 Inches
LELj)
.-J -
~ft U.~n,
0.25 inches Right Margin: 0.00 Inches Top Margin: 0.00 Inches
The current page margin settings are displayed in inches. Make a note of the page margins you want to use (if different from those already set). Most word processors and similar software packages provide a means to set page margins through the software. If you wish to use the software package to set page margins, you will want change these printer setup page margins to 0.00" for top and left margins, 8.5" for the right margin, and 11" for the bottom.
Notice the icon in the lower right comer of the message win-dow. This icon means that the option in the message is a numeric setting and that each digit of the option may be changed.
Press either one of the Scroll keys until you see "Left Margin: 0.25 Inches" in the message window. (NOTE: This example will set a new left margin of 1.00 inch. If you do not want to use this setting, substitute the numbers you want in the ex-ample.) Press Select and the first digit of the left margin setting is highlighted (fig. 1.9).
Fig.l.9
Setting page margins.
Use the Scroll keys to change the first Left Margin: digit to "1." (Note that you cannot go 1.25lnches higher than "4." This Is the built-In limit
for the margin.) Press Select and the second digit begins to flash.
Use the Scroll keys to change the Left Margin: second digit to "0." Press Select and 1.05 Inches the third digit begins to flash.
Use the Scroll keys to change the third Left Margin: digit to "0." When finished, press 1.00 Inches Select.
Press either one of the Scroll keys until the number "1" is lighted (fig. 1.9). Press Select and the second digit is high-lighted. Press the Scroll keys until "0" is highhigh-lighted. Press Select again and the third digit is highlighted. Press the Scroll keys until "0" is highlighted. Press Select after you have set all the digits. This changes the Left Margin setting (fig. 1.9). All other page margins may be changed in the same manner. Press the Menu key to return to "Page Margins."
Figure 1.10 reviews the control panel keys and the icons that appeared in the message window when you changed the page margins.
Fig. 1.10
Summary of keys and
icons.
#
Press the Select key to open a menu or to make a change to printer setup. Always note which Icon la showing In the lower right corner of the measage window. This Icon Indlcatea what action will be taken when you preas the Select key.
When this Icon Is In the lower right corner of the message window, you can use the Select and Scroll keys to change each digit of the option In the window.
NOTE: Due to limitations imposed by the mechanical opera-tion of the printer, you cannot print inside of an approximate 0.25" border around all edges of the paper. Remember to take this border into account when setting margins either through the control panel or through your software package.
Paper Size
The paper size you set must match the paper cassette installed in the printer. The size of the cassette is printed on its front edge.
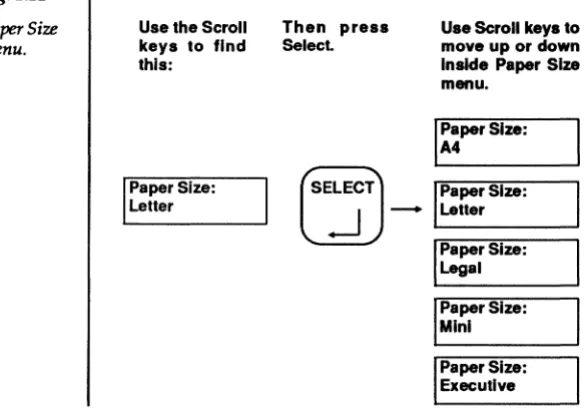
Press either one of the Scroll keys until you see ''Paper Size" and the current paper size setting in the message window. Press Select to open the Paper Size menu (fig. 1.11).
Fig. 1.11
Paper Size
menu.
Use the Scroll Then press keys to find Select. this:
Use Scroll keys to move up or clown Inside Paper Size menu.
I::per Size:
Paper Size:
Letter
tELj
.J - ...
J
I
Paper Size: Le_t_te_r _ _ _ ....JI
Paper Size: . Legal I Paper Size:Mini Paper Size: Executive
[image:31.424.89.382.169.373.2]Copy Count
Copy count is the number of duplicate copies your printer will print for every single job you send to it.
Press either one of the Scroll keys until you see "Copy Count" and the current copy count setting in the message window. Notice the icon in the lower right comer. The copy count is a numeric setting. You may set any number of copies from 1 to
sooo.
Press Select to highlight the first digit. Use the Scroll keys to set the number you want for the first digit of the copy count (fig. 1.12). Press Select to highlight the second digit and repeat until you have set the copy count.
Fig. 1.12
Changing copy count.
Use the Scroll keys to change the first digit to "2." (Note that you cannot go above "5." this Is the built-In limit for the copy count.) Press Select and the second digit begins to flash.
Use the Scroll keys to change the second digit to "4." Press Select and the third digit begins to flash.
Use the Scroll keys and the Select key to change the third digit to "6" and the last digit to "9." Press Select when finished. (Be sure to change the copy count back to "1.")
I
Copy Count: 2001I
Copy Count: 2401I
Copy Count: 2469Saving the Changes to Printer Setup
All changes to printer setup that you make through the con-trol panel take effect as soon as you press Select. However, these changes must be "saved" into the printer's memory before they will take effect after the printer is turned off and back on (see "Printer Setup" discussed earlier).
After you have made all changes to printer setup that you want to make, press the Online key. The message window will dis-play "Select to Save, Online Otherwise" (fig. 1.13). If you press Select when this message is in the window, all changes you made to printer setup will be stored as power up settings in the printer's memory. Power up settings are not erased from memory when the printer's power is turned off. If you press Online, the changes will be in effect only until you tum off the printer's power.
Fig. 1.13
Saving
chan-ges.
After you press Online key this Select to Save message will appear In the Online Otherwise message window.
Press Select If you want to save the Printer Active changes and store them as power Download Present up settings. Press Online If you
When You Have Finished
You have now learned how to use the control panel keys to make changes to the printer setup. Your printer should now be ready to work with your computer and software package. The remaining chapters of this manual are organized around the different setup menus. As you become more proficient, you may want to read these and learn more about the details of printer setup.
One other icon that will appear in the message window is the question mark (?). When you see this icon in the lower right comer of the message window, the message in the window describes an "action" that the printer will perform when you press the Select key.
Some chapters of this manual contain information about software commands that may be sent to the printer to make changes to printer setup that would otherwise require using the printer control panel. After you feel comfortable with the printer, you might want to try working with some of these commands.
Font Setup
Contents
Font Setup
Your laser printer contains various styles and sizes of typefaces (fonts). A laser printer font is made up of a complete alphabet including all letters, numerals, and punctuation marks in a particular style, weight, and size. Each member of a font is called a character. Each font also has a number. The status page lists each font number, the name of the font (which includes size and style information), the orientation of the font, and the number of bytes of memory that the font uses.
Although the status page lists all the available fonts, some of the fonts are best used only in certain emulations. Depending on the functionality card installed in your printer, you mayor may not have the printer emulations that these fonts require. The "Tektronix" fonts work best when the printer is using Tektronix 4014 emulation. Font numbers 300 and 301 work best when the printer is using HP LaserJet+ emulation.
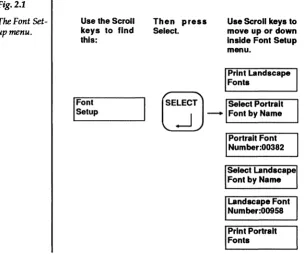
The Font Setup menu is shown in Figure 2.1. Fig.2.t
The Font
Set-up menu.
Use the Scroll keys to find this:
Then press Select.
Use Scroll keys to move up or down Inside Font Setup menu.
Print Landscape Fonts
I
FontSetup
rEL"7
.-J -
J
Font by Name _ p _ 1 tUse the Font Setup menu when you want to: • Select a font by name.
• Select a font by number.
• Print sample pages of the available fonts .
•••
Portrait Font Number:00382
Select Landscape Font by Name
Landscape Font Number:00958 Print Portrait Fonts
Selecting Fonts by Name
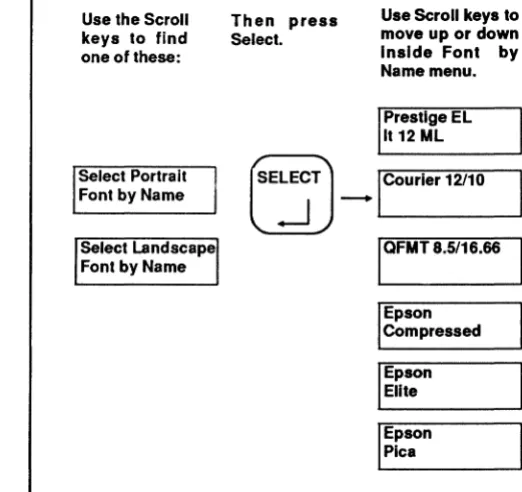
[image:39.424.122.383.135.381.2]Two options in the Font Setup menu allow you to select a portrait or a landscape font by name (fig. 2.2). Use the Select key to open the menus. The font names that you may choose from are the same as those printed on the status page.
Fig. 2.2
Selecting Fonts by Name.
Use the Scroll keys to find one of these:
Then press Select.
Use Scroll keys to move up or down Inside Font by Name menu.
Prestige EL It 12 ML
Seled
Po"~it
tE~"7
J
_ICourier 12/10Font by Name .
Select Landscape IQFMT 8.5116.66
Font by Name .
Epson Compressed
I Epson Elite
I Epson . Pica
• When a font is picked from the Landscape Font by Name menu, it will be downloaded (copied) into memory from the portrait font of the same name. When the status page prints, a D will indicate fonts that are downloaded.
• Character spacing and height values are included in the font names. The characters per inch (CPI) and point (PT) size may be read directly from some of the fonts. "Com-pressed," "Elite," and "Pica" describe 17.6 CPI, 12 CPI, and 10 CPI fonts, respectively. "Points" are units of measure that describe a font's height. One point is equal to 1 172nd inch. • Fonts selected from your software application will override
the fonts selected from the control paneL
• If you are using HPGL 7475A emulation, you will not be able to select fonts from the control panel.
• If you are using HP LaserJet+ emulation and wish to print in landscape page orientation, use the control panel to select (Le., rotate to landscape) all the fonts you want to use
before you begin printing .
Selecting Fonts by Number
Two options in the Font Setup menu allow you to select a portrait or a landscape font by number (fig. 2.3). Use the Select and Scroll keys to choose a font number. The font numbers that you may choose are listed on the status page.
Fig. 23
Selecting font by number.
Use Select and Scroll keys to change each digit of the font number. After last digit, press Select to lock in change.
Portrait Font Number: 0 0 3 8 2
Portrait Font Number: 0 7 5 0 6
• When a font is selected by the Landscape Font Number op-tion, it will be downloaded (copied) into memory from the PQrtrait font of the same name. When the status page prints, a D will indicate fonts that are downloaded.
• Fonts selected from your software application will override the fonts selected from the control panel.
• If you are using HPGL 7475A emulation, you will not be able to select fonts from the control panel.
• If you are using HP LaserJet+ emulation and wish to print in landscape page orientation, use the control panel before you begin printing to select (i.e., rotate to landscape) all the fonts you want to use.
Printing Font Examples
Two options in the Font Setup menu allow you to print samples (character sets) of the available fonts in each orienta-tion (fig. 2.4). Use the Select key to print the font examples. Fig. 2.4
Printing font
examples.
Use the Scroll Then press keys to find Select. one of these:
Print Portrait Fonts
Print landscape Fonts
rElE~TJ
..J
-..
-An example of each font in the selected
orientation will
print. Each example will be on a separate page .
Font Examples Software Command
Use this software command to print the font example pages of portrait or landscape fonts.
Syntax: <ESC>[p1<SP>r <ESC>[
P1
<SP>r
Command initiator.
3 = Print portrait fonts. 4 = Print landscape fonts.
Command terminator «SP> = Decimal 32; lower case "r").
Download Fonts
Downloaded fonts are fonts that have been copied into the printer's memory. Once a font has been downloaded to the printer, it may be selected and used for printing. On the status page, downloaded fonts are identified by a D after the num-ber of bytes.
There is always at least one downloaded font in the printer. This font is the default landscape font. All the factory-installed fonts are in portrait orientation. When you turn on the printer, one font is downloaded into landscape orientation. This downloaded landscape font is a rotated copy of a portrait font of the same name.
The printer can accommodate up to 128 fonts (factory-installed plus downloaded) in its memory depending on the size of the fonts and the amount of download memory allocated. (See chapter 7, "Buffer Setup," for information on allocating memory.) If, while downloading a font, the download memory is exceeded, a page with the message "Download memory exceeded" will print. If, while rotating a font, the download memory is exceeded, a page with either "Insuffi-cient download RAM to rotate requested font" or "Insuffi"Insuffi-cient download RAM to rotate all characters in requested font" will
print. In either case, you should delete some fonts from memory or increase the size of the download memory. Download fonts may be purchased from your dealer on various media .
Optional Font Cartridges
Optional font cartridges (available from your dealer) provide you with additional fonts in an easily accessible form. Whenever a font cartridge is installed, its fonts are immediate-ly available for printing (like factory-installed fonts) and do not take up memory (like download fonts). When font cartlidges are installed, the maximum number of available fonts (factory-installed, downloaded, and cartridge) must not exceed 128.
To Install a Font Cartridge Press the Online key to put the printer offline. The indicator in the key will go out when the printer is offline.
Insert a font cartridge into either of the two cartridge slots on the front of the printer (under the paper cassette). Two dif-ferent font cartridges may be used at the same time. When the cartridge is installed, press the Online key.
To Remove a Font Cartridge Press the Online key to put the printer offline. The indicator in the key will go out when the printer is offline. Carefully pull the cartridge out of the slot. Press the Online key to put the printer back online.
NOTE: Do not insert or remove a cartridge when the printer in on-line.
Font Selection Software Command
Use this software comand to select, delete or rotate a font without leaving your application software. Refer to your ap-plication software documentation for instructions on "escape sequences" or "printer commands."
Syntax: <ESC>[pl;P2;P3S
<ESC>[
PI
P2
p3
S
Command initiator.
Number of font or overlay (from status page). Valid values range from 0 to 32767 (default value is number of font currently highlighted on status page).
0= Portrait orientation font (default) 1 = Landscape orientation font 2 = Overlay
o
= Delete font or overlay1 = Select font or overlay (default) 2 = Rotate font to opposite orientation Command terminator (lower case).
This command also allows you to select an overlay or "macro" that you can program and download to the printer's memory. (For more information about overlays, see the ANSI X3.64
Programming Manual
available from your dealer.)• A font selection made with this command (or from any ap-plication software) overrides selections made from the printer control panel.
• Any downloaded font or overlay may be deleted from memory by using this command .
• Fonts may be rotated from one orientation to another by using this command. (However, the download memory must have enough room for the rotated copy of the font or an error message will print.)
• Separators (;) must be included between parameters. • If you are using HPGL 747SA emulation, you will not be
able to select fonts using the software command.
• If you are using HP LaserJet+ emulation and wish to print in landscape page orientation, use this software command before you begin printing to rotate to landscape orientation all the fonts you want to use.
Font Deletion Software Command
Use this command to delete all fonts or overlays from the printer's memory at one time.
Syntax: <ESC>[p1<SP>{ <ESC>[
P1
Command initiator.
o
= Delete all downloaded portrait orientation fonts from printer memory.1
=
Delete all downloaded landscape orientation fonts from printer memory.2 = Delete all downloaded overlays from printer memory.
3 = Delete all downloaded fonts and overlays from printer memory.
<SP>{ Command terminator «SP>
=
Decimal 32) .Page Setup
Contents
Page Setup
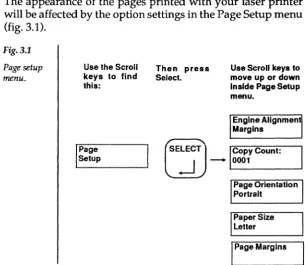
The appearance of the pages printed with your laser printer will be affected by the option settings in the Page Setup menu (fig. 3.1).
Fig. 3.1
Page setup menu.
Use the Scroll keys to find this:
I
Page SetupThen press Select.
Use Scroll keys to move up or down Inside Page Setup menu.
Engine Alignmen Margins
LELE~j
Copy Count,.-J -
'-0_0_01 _ _ _ _ -'Page Orientation Portrait
Paper Size letter
I
Page MarginsUse the Page Setup menu when you want to: • Print more than one copy of a document • Change page orientation
• Change paper size • Set new page margins
• Check or adjust the alignment of the printer
[image:51.426.76.381.65.330.2]Printing Multiple Copies
You can set the printer to print up to 5000 duplicates of a single document. If you want to change the copy count (number of copies), open the Page Setup menu and use the Scroll keys to find the copy count option (fig. 3.2). Each digit of the copy count option may be changed using the printer setup keys. Refer to chapter 1, "Primer," for a complete explanation of the setup keys.
Fig. 3.2
Copy Count option.
Use the Scroll Then press Use Scroll and Select keys to change the copy count (from 1 to 5000 copies). keys to find Select.
this:
I
Copy Count:0001
l
EL~ --~_0_09_97
J \
Copy Count: ______ ~• The copy count option will multiply any copy count setting that you may have made within your software package. • During a job, you can stop the printer from printing
multi-ple copies by using the Multimulti-ple Copy Abort option from the Miscellaneous Setup menu (see chapter 6).
• The control panel has a built-in limit that prevents you from selecting more than 5000 copies.
Setting Copy Count by Software Command
Use this command to temporarily change the copy count to any number from 1 to 5000.
Syntax: <ESC>[pIU
<ESC>[
PI
U
Command initiator.
Number of copies (1 to 5(00). Any number greater than 5000 will cause the current (power-up setting) number of copies to be used.
Command terminator (lower case).
Page Orientation
When the printer is set for portrait orientation, text prints along the shorter dimension of the paper. When it is set for landscape orientation, text prints along the longer dimension. If you want to change orientation, open the Page Setup menu and use the Scroll keys to find the page orientation option (fig. 3.3). Press Select to change orientation. Refer to chapter 1, "Primer," for a complete explanation of the setup keys.
Fig. 3.3
Page Orienta-tion OOrienta-tion
Use the Scroll Then press The current page orientation changes to landscape. keys to find Select.
this:
Page Orientation
Portrait
tELE~J
.-J -
P
Landscape...
Orien,.tion• Whenever you change page orientation, remember the page margin settings. The same margins will apply to either landscape or portrait but the length of a line will be greater in landscape orientation.
• If you are using HP LaserJet+ emulation, use the correct HP LaserJet+ software command to change orientation. • If you are using HP LaserJet+ emulation, use the software
command described in Chapter 2 to rotate the fonts you will need before you begin printing .
Page Orientation Software Command
Use this command to temporarily change the page orientation.
Syntax: <ESC>[pIp
<ESC>[ Command initiator.
PI
o
= portrait orientation. 1 = landscape orientation.P Command terminator (lower case).
Selecting Paper Size
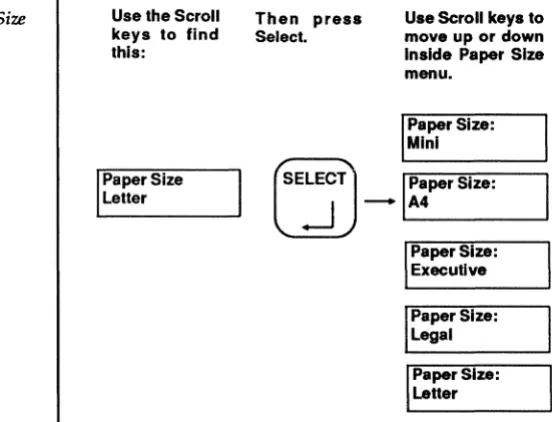
You may set your laser printer for letter (8.S"xll"), legal (8.5"x14"), A4, Executive (7.25"xlO.S") or Mini (3.9"xS.S") paper size. H you want to change paper size, open the Page Setup menu and use the Scroll keys to find the Paper Size menu (fig. 3.4). Open the Paper Size menu and use the Scroll keys to find the paper size you want to use. Refer to chapter 1, "Primer," for a complete explanation of the setup keys.
Fig. 3.4
Paper Size menu.
Use the Scroll Then press keys to find Select. this:
Use Scroll keys to move up or down Inside Paper Size menu.
Paper Size Letter
I
Paper Size: .MlnlL
ELE,J
I
Paper Size:--1 -
L-.A_4 _ _ _ ....JPaper Size: Executive
I
Paper Size: LegalI
Paper Size: Letter• The paper size you select must match the paper cassette you are using with your printer.
• Remember to check page margins whenever you change paper sizes.
[image:56.424.70.346.173.384.2]Setting Page Margins
You may set page margins either from the control panel or from your software package. Before setting page margins for the first time, check the page alignment and adjust it if neces-sary. See "Engine Alignment Margins" later in this chapter.
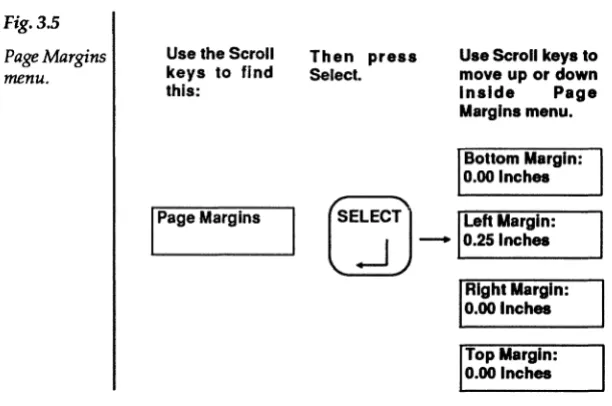
If you want to set the page margins from the printer control panel, open the Page Setup menu and use the Scroll keys to find the Page Margins menu (fig. 3.5). Open the Page Margins menu and use the Scroll keys to find the margin you want to change. Each digit of the left, right, top and bottom margin set-ting may be changed using the printer setup keys. Refer to chapter I, "Primer," for a complete explanation of the setup keys.
Fig. 3.5
Page Margins
menu.
Use the Scroll Then press keys to find Select. this:
Use Scroll keys to move up or down Inside Page Margins menu.
Bottom Margin: 0.00 Inches
I
Page Marginsl
EL7
J
Left
~~,.:
.-J -
O.25lnchesRight Margin: 0.00 Inches
Top Margin: 0.00 Inches
• The maximum setting for each of the four margin options is 4.00". The control panel will not allow you to set margins greater than this.
• Any page margins set from within your software package will override margins set from the control panel.
[image:57.424.75.381.230.433.2]---• Page margins are not recognized in HP LaserJ et+ emula-tion.
• Your laser printer cannot print within approximately one-quarter inch of the top, bottom, left and right edges of the page. For best results, always use a minimum of 0.25" for all margins .
Engine Alignment Margins
Page alignment varies slightly with each printer. The Engine Alignment options let you adjust the printer so that the center of the page (and, consequently, the page margins) align with the paper.
Print an alignment test page before making any changes to the printer alignment (or before making changes to page margins the first time). To print an alignment test, open the Page Setup menu and use the Scroll keys to find the Engine Alignment menu. Open the Engine Alignment menu, use the Scroll keys to find the "Print Alignment Page" option and press the Select key. A quick way to check the alignment is to fold the test page in half twice. When you unfold the page, the creases intersect at the center. The cross-hairs show where the printer is plac-ing the center ofthe page (fig. 3.6). The distance from the cross-hairs to the actual center of the page may be adjusted by setting the Left Alignment and Top Alignment options in the Engine Alignment menu.
TOP
[image:59.426.76.378.291.495.2]Manual Feed Operation
Although you may use automatic paper feed most of the time, there will be jobs that require manual feed operation. You will use the Manual Feed key on the control panel to change the paper source from cassette (automatic feed) to manual (hand-feeding one sheet at a time) and back again.
"First Page" Manual Feed You will probably want to keep the paper cassette filled with the type of paper you use most often. When you need to print a single page on a different type of paper (for example, the first page of a business letter on com-pany stationery), setthe paper guides (fig. 3.7) to the size paper you are using and insert the page into the printer between the guides. (Insert the page face up and top edge first.) Now, give the command to begin printing from your computer. The printer will pull the page from the paper guides and print the first page of your letter on it. If there is more than one page to your letter, the printer will pull the paper for the remaining pages from the paper cassette.
Fig. 3.7. Setting the paper guides .
[image:60.425.43.346.310.511.2]Full-Time Manual Feed If you need to print more than one page on a different type of paper from whatever is loaded in the paper cassette, you should switch the printer to manual feed.
With the printer offline, press the Manual Feed key on the con-trol panel. A small indicator in the key lights to let you know that the printer is switched to manual feed. Now put the printer back online and give the command to start printing from your computer. Watch the message window. When the message "Paper Out" appears, insert a page (face up and top edge first) into the printer between the paper guides (fig. 3.8). Continue inserting paper into printer until all pages have printed.
111111 1111111
Fig. 3.8. Manually feeding paper.
Switching Back to Automatic Feed Your printer has a built-in feature that switches back to automatic (cassette) feed after a specified number of seconds. This "timeout" is pre-set to 60 seconds. After your last page has printed, the printer will switch off the manual feed indicator and return to automatic feed after 60 seconds. You may change the timeout value to 30
[image:61.423.73.377.102.433.2]:-or 120 seconds. You may also disable the timeout so that the printer will stay in manual feed until you switch it back to automatic feed.
If you wish to change the manual feed delay, open the Miscel-laneous Setu p menu and use the Scroll keys to find the Manual Delay menu (fig. 3.9). Open the Manual Delay menu and use the Scroll keys to find the setting you want. Refer to chapter 1, "Primer," for a complete explanation of the setup keys. Fig. 3.9
Manual Delay menu.
Use the Scroll Then press keys to find Select. this:
Use Scroll keys to move up or down Inside Manual Delay menu.
Manual Delay 120 Seconds Manual Delay
30 Seconds
LELE~
.-J - ....
)
M.no.'
N_o_S_w_ap Del.y _ _ ____ Manual Delay 30 SecondsManual Delay 60 Seconds
If you want to switch the printer back to automatic feed before the timeout takes effect, put the printer offline, press the Manual Feed key, and then press the Online key to put the printer back online. The indicator in the Manual Feed key goes out and the message window changes to "Printer Idle Download Present" to let you know the printer is back in automatic feed. When you put the printer back online it will be ready to print from the paper cassette .
Printing Two-Sided Pages You can print two-sided pages by using manual feed operation and sending the paper through the printer twice. Always feed the paper into the paper guides face up (the side to be printed) and top edge first. To print the second side, tum the page over and feed it into the printer face up and top edge first.
Printing Transparencies; Labels, and Envelopes
[image:63.424.75.380.204.433.2]Trans-parencies for overhead projectors, sheets of self-adhesive labels and envelopes of almost any size may be printed with your laser printer using manual feed operation. All these spe-cial materials require using the face-up collating tray at the rear of the printer (fig. 3.10).
Fig. 3.10. Face-up collating tray.
When printing on envelopes, use landscape orientation and feed the envelope into the printer as shown in Figure 3.11.
II \
Fig. 3.11. Printing on envelopes.
• Landscape orientation fonts need to be used when printing on envelopes. Refer to chapter 2, "Font Setup," for a com-plete explanation of landscape and portrait orientation fonts .
[image:64.423.47.346.75.285.2]Paper Size and Source Software Command
Use this command to temporarily change paper size and paper source (manual feed or cassette feed). You may change both size and source simultaneously or change just one of the fea-tures.Syntax: <ESC>[pl;P2X <ESC>[
Pl
P2
x
Command initiator.
o
= cassette feed 1 = manual feedO=A4 1 = Executive 2 = Legal 3 = Letter 4 = Mini
Command terminator (lower case).
To change just one of the features (paper size or paper source), omit the parameter for the feature you do not want to change. The current setting for the omitted feature will be selected.
• The paper size you select through this command must match the paper cassette installed in the printer (even if you are using manual feed).
• The separator (;) between the two parameters must be in-cluded even if you omit one of the parameters.
• The manual feed "timeout" feature will take effect after the last page has been printed. See "Switching Back to Automatic Feed" earlier in this chapter .
Emulation Setup
Contents
Wrap at Right Margin . . . 4-21 Special IBM Proprinter Setup ...4-22
Emulation Setup
Your laser printer makes it easy to work with the different software packages you may use. The options in the Emulation Setup menu let you customize the laser printer to emulate any one of several other popular printers.
The Emulation Setup menu is shown in Figure 4.1. Your printer may have different emulations than those shown here. Refer to the printer's status page or your Quick Reference Card for a list of emulations.
Fig. 4.1
Emulation setup menu.
Use the Scroll keys to find this:
Emulation Setup
Then press Select.
Use Scroll keys to move up or down Inside Emulation menu.
QumeSprlnt Setup
t
EL7
J
CUnen. Emul.,.-J -
L.E_p_so_n_FX_-80 _ _ ...IShared Emulation Setup
I
ANSIX3.64 . Setupl
~iabI0630. Setup
I
Epson FX-80 . SetupIBM Proprlnter Setup
Tektronix 4014 Setup
[image:69.424.95.379.189.560.2]Use the Emulation Setup menu when you want to: • Pick a printer to emulate
• Change from one emulation to another
• Change how the printer responds to carriage returns and line feeds
• Make the tilde character represent <ESC> if needed by your software.
• Reset the Translation Tables
Changing the Emulation Mode
When you want to print something created with your applica-tion software, you must select (through the software program's setup) the printer that you are using. Although your software may support a number of different printers, the printer that you are using may not be one of them.
Your laser printer has several emulation modes. This feature enables you to set the printer to work with the software pack-age(s) you are using. In your software package is a list of sup-ported printers. Make a note of any printers that match those listed under "Emulation" on the status page. Once you have decided which printer you want the laser printer to emulate, you can make the change through the Emulation Setup menu. Open the Emulation Setup menu and use the Scroll keys to find the Current Emulation option. Open the Current Emula-tion menu and use the Scroll keys to find the printer emula-tion mode you want to use (fig. 4.2). Use the Select key to make the change to printer setup. Refer to chapter 1, "Primer," for a complete explanation of the setup keys.
• Whenever you change emulation modes, ensure that the options in the Shared Emulation Setup menu and in the other special setup menus are set correctly for your needs. • Character spacing is affected by the emulation mode you use. Form best results, use your software package to adjust characters per inch (CPI) or lines per inch (LPI).
• Your printer may not have all the emulations shown in Figure 4.2. Refer to the status page or the
Quick Reference
Card for a complete listing of emulation modes available on your printer.
Fig. 4.2
Current
Emu-lation menu.
Use the Scroll keys to find this:
Current Emul.: Epson FX-80
Then press Select.
Use Scroll keys to move up or down Inside Emulation menu.
Current Emul.: Tektronix 4014
(se~J
.-J - '---'
Current Emul.: Diablo 630
Current Emul.: Epson FX-80 Current Emul.: QumeSprlnt Current Emul.: IBM Proprlnter Current Emul.: HP LaserJet+ Current Emul.:
HPGL 7475A
• Whenever you change emulation modes, ensure that the options in shared emulation setup and other "special" setup menus are set correctly for your needs .
[image:72.424.80.344.116.417.2]Emulation Mode Software Command
Use this command to temporarily change the printer emulation mode.
Syntax: <ESC>[PliP2r
<ESC>[
PI
P2
r
Command initiator.
0= Use current setting for emulation mode (default)
1 = ANSI X3.64
2 = Diablo 630
3 = Epson FX-80
4 = Qume Sprint 5 = HP LaserJeH 6 = Tektronix 4014 7 = IBM Proprinter 8 = HPGL 7475A
99 = Return to previous selected emulation mode.
o
= Reset printer to power-up settings for the emulation mode selected by PI (default) 1 =NoresetCommand terminator Gower case).
Whenever you change emulation modes, ensure that the op-tions in the Shared Emulation Setup menu and in the other special setup menus are set correctly for your needs.
• Character spacing is affected by the emulation mode you use. For best results, use your software package to adjust characters per inch (CPI) or lines per inch (LPI).
• Your printer may not have all the emulations listed for this command. Refer to the status page or the
Quick Reference
Card for the emulation modes available on your printer.
• Separators (;) must be included between parameters even if one parameter is omitted.
• Reset (p2 = 0) returns the current font selection, page mar-gins, horizontal tabs, vertical tabs, character spacing, line spacing, absolute horizontal position, and absolute vertical position to their power-up settings for the emulation mode selected by pl.
• When PI = 99, the printer returns to the last emulation mode that was in use. This parameter allows you to use the software command to switch between two emulation modes .
Shared Emulation Setup
The options in the Shared Emulation Setup menu take effect regardless of the emulation mode used. The Shared Emulation Setup menu is shown in Figure 4.3.
Fig. 4.3
Shared Emu-lation Setup Menu
Use the Scroll Then press keys to find Select. this:
Use Scroll keys to move up or down Inside Emulation menu.
Force Reset of Trans.: YES
~:: Emu~lk>n lE~7
J
_I<CR. =eCR.
I
<LF>=><LF><CRjUnefeed Repeat: NO
I
Lower Case => lowerCase Command Trans. ResetFont Trans. Reset
The options "Command Translation Reset," "Font Translation Reset," and "Force Reset of Translation" in the Shared Emula-tion Setup menu concern the Font and Command TranslaEmula-tion Tables. Redefining and resetting the Translation Tables are ad-vanced user features and are discussed in Appendix D,
[image:75.428.81.380.111.411.2]Carriage Returns If your files are overprinting on one line, you may need to set the <CR>=><CR> option to <CR>=><CR><LF>. Doing so will add a linefeed to every car-riage return. Use the Select key to make the change to printer setup. Refer to chapter I, "Primer," for a complete explanation of the setup keys.
Linefeeds If the lines of text in your files do not align at the left margin, you may need to set the <LF>=><LF> option to <LF>=> <LF> <CR>. Doing so will add a carriage return to every linefeed. If you are using Diablo 630 or Qume Sprint emulation mode, set this option to <LF>=><LF>. If you are using Epson FX-80 emulation mode, set this option to <LF>=><LF><CR>. Use the Select key to make the change to printer setup. Refer to chapter I, "Primer," for a complete ex-planation of the setup keys.
Linefeed Repeat Set this option to Yes if you want double-spaced lines. You can also change line spacing through your software package. Use the Select key to make the change to printer setup. Refer to chapter I, "Primer," for a complete ex-planation of the setup keys.
<ESC> Character The <ESC> character is used in each software command explained in this User's Guide. Do not con-fuse the <ESC> character with the Esc key on your computer's keyboard. Some software packages allow you to transmit an <ESC> character to the printer. (Refer to "Escape sequences" or "Printer commands" in your software documentation.) If your software package does not provide a means to transmit <ESC>, you may want to set this option to -=><ESC>. You can then transmit the character - to the printer and the printer will interpret it as the <ESC> character. Use the Select key to make the change to printer setup. Refer to chapter I, "Primer," for a complete explanation of the setup keys. (For a complete
explanation of all supported printer commands, order the Technical Reference Manual and the ANSI X3.64 Programming Manual from your dealer.)
Special Setup for ANSI X3.64
If you are using ANSI X3.64 emulation mode, the options in the ANSI X3.64 Setup menu control character spacing, line spacing, units of measure, and line overflow. Figure 4.4 shows the ANSI X3.64 Setup menu. Refer to chapter 1, "Primer," for a complete explanation of the setup keys. If you are not using ANSI X3.64 emulation mode, you do not need to change these options.
Fig. 4.4
ANSIX3.64 Setup Menu
Use the Scroll Then press keys to find Select. this:
Use Scroll keys to move up or down Inside ANSI X3.64 menu.
Print Past Right Margin: YES ANSIX3.64
Setup
tE~) a.,.s~~
~- L..F_o_nt_P_ro_p_._----J Une Spacing: Font Spacing
Unit of Measure: Inches
Character Spacl ng If you are using proportional spacing in your software package, set this option to Font Proportional. If you are not using proportional spacing, keep this option set to Font Fixed. Use the Select key to make the change to printer setup. Refer to chapter 1, "Primer," for a complete explanation of the setup keys .
[image:78.424.47.351.138.345.2]Line Spacing Set this option to the number of lines per inch you want the printer to print. Any line spacing set by your software package will override this option. Figure 4.5 shows the ANSI X3.64 Line Spacing menu. Use the Select key to make the change to printer setup. Refer to chapter 1, "Primer," for a complete explanation of the setup keys.
Fig. 4.5
ANSIX3.64
Line Spacing
Menu
Use the Scroll keys to find this:
Une Spacing: Font Spacing
Then press Select.
lEL7J
..J-Use Scroll keys to move up or down Inside Une Spac-Ingmenu.
Une Spacing: 8 Unesllnch Une Spacing: Font Spacing
,.,....,.-,,----.,....--.,
Une Spacing: 4 Unesllnch
Unit of Measure The printer interprets any ANSI measure-ment command (such as margin commands) in terms of the unit of measure set by this option. Figure 4.6 shows the Unit of Measure menu. Use the Select key to make the change to printer setup. Refer to chapter 1, "Primer," for a complete ex-planation of the setup keys.
Fig. 4.6
Unit of
Meas-ure Menu.
Use the Scroll Then press keys to find Select. this:
Use Scroll keys to move up or down Inside Unit of Measure menu.
Unit of Measure: Centimeters
LELE~
J
Uru' of M .... '...J -
L-ln_c_h_88 _ _ _ -' Unit of Measure:Inches
Unit of Measure: Dots
Unit of Measure: Declpolnts
Print Past Right Margin This option controls whether or not data that extends past the right margin will print. Use the Select key to make the change to printer setup. Refer to chap-ter 1, "Primer," for a complete explanation of the setup keys .
Special Setup for Diablo 630
If you are using Diablo 630 emulation mode, the options in the Diablo 630 Setup menu control character spacing and type of proportional spacing. Figure 4.7 shows the Diablo 630 Setup menu. Refer to chapter 1, "Primer," for a complete explanation of the setup keys. If you are not using Diablo 630 emulation mode, you do not need to change these options.
Fig. 4.7
Diablo 630
setup menu.
Use the Scroll Then press keys to find Select. this:
Use Scroll keys to move up or down Inside Diablo 630 Setup menu.
Prop. Type: FontCtrl. D