qvm: a command line tool for the provisioning of
virtual machines
Abstract—The purpose of this paper is to create and demonstrate a command line utility that uses freely available cloud images—typically intended for deployment within public and private cloud environments—to rapidly provision virtual machines on a local server, taking advantage of the ZFS file system. This utility, qvm, aims to provide syntactical consistency for both potential contributors and users alike—it is written in Python and uses YAML for all user configuration; exactly like cloud-init, the post-deployment configuration system featured in the cloud images used by qvm to allow its rapid provisioning. qvm itself does not use the libvirt API to create virtual machines, instead parsing pre-defined templates containing options for the commonly used virt-install tool, installed alongside virt-manager, the de facto graphical libvirt client. The utility is capable of importing cloud images into zvols and creating clones for each virtual machine using the pyzfs Python wrapper for the libzfs_core C library, as well as a custom recreation of pyzfs based on the zfs command line utility. qvm aims to introduce some basic IaC constructs to the provisioning of local virtual machines using the aforementioned common tools, requiring no prior experience beyond the usage of these tools. Its use of cloud-init allows for portability into existing cloud infrastructure, with no requirements on common Linux distributions, such as Red Hat Enterprise Linux, Debian, or SUSE, and their derivatives, beyond their base installation with virtualisation server packages and the prerequisite Python libraries required by qvm.
1
I
NTRODUCTIONITH computers being as powerful as they are today and technologies such as hardware assisted virtualisation being commonplace, virtualisation has become an integral component of the testing and development processes for developers and system administrators alike. Whether this be to rapidly provision a software environment consistently as required, or to provide a temporary environment to test applications, virtualisation is a more cost and resource effective manner of providing a flexible development environment.
Tools such as Vagrant are aimed at developers for the exact use case described above. However, such a tool could be argued to be limited and somewhat inaccessible for system administrators or “homelab" users who may not have experience coding in Ruby as Vagrant requires, may have cloud-init scripts that they currently deploy in cloud environments that they want to provision locally, or simply may briefly look at a tool like Vagrant and conclude it is too complicated for their use case.
Such users frequently end up using graphical tools and installing operating systems on test virtual machines from scratch; just to complete an installation can take more than ten minutes, without factoring in any post-installation configuration.
A solution for this problem is commonly used in the world of cloud computing. Cloud-init is a first-boot configuration system that allows users to configure a new virtual machine instance with new user and group configurations, automatic software installations, and even run user scripts. If the administrator is willing to do so, it is possible to use cloud-init exclusively for all post-installation setup tasks, without the use of external configuration management or remote execution tools such as Ansible or Puppet.
Increasingly common is the use of the ZFS file system: an extremely high performance, highly resilient file system with
built-in volume management, redundant array of
independent/inexpensive disks (RAID)-like redundancy and virtual block device capabilities. Such a backing file system is ideal for hosting virtual machine images, however at present there is no
framework for managing virtual machines and ZFS volumes concurrently—all configuration must be performed manually by the administrator.
This project aims to resolve this issue. Quick Virtual Machine (qvm) is a utility that takes advantage of preinstalled cloud images running cloud-init—available from all the major enterprise Linux distributions—ZFS volumes (zvols) (detailed in Appendix A) and the virt-install command line virtual machine provisioning utility, allowing system administrators to provision virtual machines in as little as fifteen seconds, all from a single configuration file.
2
R
ESEARCH2.1 Virtualisation fundamentals
This section covers content not directly related to the project itself. However, this content is directly connected with the domain in which qvm is used: QEMU/KVM and libvirt. As a result, this content is likely a better fit for core research than as appendices.
In this project we consider the term "virtualisation" in its modern context, generally referring to the emulation of real hardware devices in order to run an operating system. By implication, this means that we do not refer to containerisation technologies such as Linux Containers (LXC), Docker, FreeBSD jails, or systemd-nspawn. These function by replicating user space software environments and may take advantage of kernel features, such as Linux’s cgroups, to control access to system resources. These technologies all use the host operating system’s kernel directly, as opposed to running their own kernel. In practice, this means running an application in a containerised environment is not the same as on a native environment; if there are kernel features required by an application that are present in the containerised environment but not present in the native environment and vice versa, the application will fail to behave in the same way.
since the advent of modern computing. Popek and Goldberg [1] conceptualised two types of virtual machine based on IBM technologies of the time:
Virtual machine monitor (VMM) A piece of software that has three key characteristics: “the VMM provides an environment for programs which is essentially identical to the original machine"; “programs run in this environment show at worst only minor decreases in speed" (with performance being impacted due to the mandatory intervention of the control program); “the VMM is in complete control of system resources" [1]. The paper later explains three related properties that are desirable for programs running under such an environment, efficiency being the only one of these that does not have direct equivalence to the three aforementioned fundamental characteristics: “all innocuous instructions are executed by the hardware directly, with no intervention at all on the part of the control program" [1]. This is not realistically feasible due to the aforementioned impact.
Hybrid virtual machine (HVM) A similar system that interprets virtual machine instructions rather than directly executing them, catering for the many architectures of the time that could not be virtualised. The instruction set architecture of the given example, the DEC PDP-10, used a non-privileged instruction to switch between protection levels. However, its user mode was privileged, making it suitable for running HVMs [1].
While these definitions have developed over time, the principles fundamentally remained the same. Modern virtualisation typically considers the type of hypervisor, and the virtualisation technique.
2.1.1 Hypervisors
The control program that Popek and Goldberg discuss (covered in section 2.1) is, in terms of responsibilities, directly equivalent to a hypervisor in the modern interpretation: a computing entity, typically a piece of software, that runs virtual machines. We loosely consider there to be two types of hypervisor:
Type 1 A "thin" bare-metal software layer that runs on the host hardware, providing the same services as the virtual machine monitor concept. VMware ESXi is one of the most well known proprietary examples of a Type 1 hypervisor. This is, in its most basic interpretation, similar to the VMM concept. Type 2 A user space application that runs a guest operating system
as a process, akin to any other typical user space application. Oracle’s VirtualBox is a well known, crossplatform type 2 hypervisor. Modern instruction sets do
not run user applications in a privileged ring, however the fundamental concept of running a virtual machine in line with user applications is the same as the HVM concept. Due to modern virtualisation techniques, implementation techniques and modern instruction set and operating system architectures, these hypervisor types should not be considered beyond a superficial context. QEMU/KVM virtualisation (covered in section 2.2) serves as an example that blurs the lines between these hypervisor types.
2.1.2 Virtualisation techniques
While translation was a requirement for hybrid virtual machines, the capabilities of modern software and hardware offer increased granularity in their techniques, whether this be to compensate for missing capabilities or to improve performance. High level examples of these techniques include:
Emulation Guest operating systems run unmodified in the virtualised environment. The virtual machine runs at the same privilege level as any other user application. The host performs on-the-fly binary translation of every instruction to emulate another CPU instruction set or device. QEMU is one of the better known hypervisors capable of emulation, however due to the availability of more better performing virtualisation techniques and the lack of need for emulation of platforms other than x86-64, it is rarely used in the contexts that apply to this project.
Paravirtualisation Guest operating systems have the necessary drivers to hook into the hypervisor layer, and are exposed to a similar, though not the same environment as the host machine. System calls are made directly to the hypervisor rather than an emulated processor that requires translation, at the same privilege level as the host kernel. This is one of the most best performing options for machines with processors missing hardware virtualisation extensions. Xen is one of the more well known hypervisors with paravirtualisation capability, and is the sole hypervisor for Amazon Elastic Compute Cloud (EC2). It is frequently claimed that the guest operating system must be "modified" in order to be paravirtualised; paravirtualisation is implemented using the pvops driver suite included in the Linux kernel. Support for paravirtualisation isn’t available for all virtualised devices. Building support is timely and may not be worth the effort.
Full virtualisation Guest operating systems run unmodified in the virtualised environment, running at a lower privilege level than the host kernel. The host machine is required to use dynamic recompilation to translate guest operating system calls to native calls. Performance is poorer than with paravirtualisation as system calls by the guest require expensive operations for context switching and privilege level escalation. It is rarely used as a result.
Hardware-assisted virtualisation Guest operating systems run unmodified in the virtualised environment. Hardware virtualisation extensions such as Intel’s VT-x allow for virtual machine system calls to run directly on the processor without translation. In the case of x86compatible processors, this is achieved using protection
ring -1, dedicated to hypervisor instructions. There are also technologies for hardware passthrough to a virtual machine: input-output memory management unit (IOMMU) passthrough and single root I/O virtualisation (SR-IOV). These are beyond the scope of this report.
2.2 QEMU/KVM
It is common for even experienced professionals to be unsure of the distinction between QEMU and Kernel-based Virtual Machine (KVM). KVM is often used synonymously to describe QEMU/KVM solutions—indeed the use of KVM implies this combination—but in themselves they are very different pieces of software. qvm, the utility produced in this project, deploys QEMU/KVM virtual machines through the virt-install utility, briefly covered in section 2.4.2.
QEMU is described on its website as a "generic and open source machine emulator and virtualizer" [2]. This isn’t entirely true; QEMU alone has emulation capabilities, however it is capable of using Xen as its backend hypervisor, or KVM kernel modules, for the purpose of virtualisation.
Unlike VirtualBox, which as a product is a hypervisor packaged with graphical user interface (GUI) and command line interface (CLI) management tools, QEMU is purely a standalone type 2 hypervisor. It provides no management components or frameworks aside from its provisioning tool
(qemu-system-architecture) This means that all virtual machines created with a
standalone QEMU install are transient by default; they exist until their termination, at which point any references to their creation cease to exist.
KVM is a collection of Linux kernel modules that enable the use of hardware virtualisation extensions, such as Intel VT-x, for the purpose of hardware-assisted virtualisation.
While it’s possible to share CPU time between virtual machines and the host, it isn’t feasible to do the same with hardware devices. It isn’t logically possible to simply pass a host network adaptor directly to a virtual machine on a temporary basis, for example. Paravirtualisation of virtual devices is the common approach to this. For QEMU/KVM and a number of other virtualisation solutions, the Virtio project—extended from the KVM project—provides drivers in the guest and paravirtualised virtual devices on the host are used in conjunction with hardware-assisted execution of the guest. These Virtio drivers are included in the Linux kernel by default, allowing for full compatibility on installation.
2.3 libvirt
It is possible to manage the lifecycle of QEMU/KVM virtual machines manually, using common system utilities such as such as the ip command in conjunction with scripting to create and destroy virtual networks—or a network manager such as
NetworkManager or systemd-networkd to automate this
process—and systemd services or custom startup scripts to recreate virtual machines on system boot.
However, doing so is generally time consuming and requires custom configuration files (such as systemd units) to be created for every virtual machine that the user wishes to create. Therefore, libvirt is typically installed alongside
QEMU for management purposes. It is a management framework supporting a number of popular operating systems, hypervisors and containerisation solutions: VMware ESXi, QEMU, VirtualBox, Xen, and LXC amongst others. Its API is accessible in a number of
languages, the best supported being Python [3]. libvirt and its included tools introduce a number of capabilities:
Management of virtual machines, through the aforementioned API or through the virsh CLI utility. This includes the ability to create persistent virtual machines, i.e. those that can be restored as and when required, often on host reboot.
Management and creation of virtual network bridges, firewalls, and NAT-based networking. Management and creation of storage volumes in numerous formats (of which QEMU Copy-on-Write 2 (qcow2) and raw are within the context of this project), snapshots and pools (file systems or directories for the purpose of organisation). Quality of Service, benchmarking and tuning for shared system resources such as CPU, disk and network I/O. Polkit integration to allow selective or full administration by unprivileged users.
Unconventionally, virsh does not provide an argumentative CLI method for creating domains (libvirt’s terminology for virtual machines) and networks. Without the use of a third-party utility, users are required to build Extensible Markup Language (XML) files manually. For networks this is generally acceptable and convenient, as most use cases are simple enough to not require particularly complicated or lengthy configuration files. However, for domains this is rarely viable for direct usage; creating a usable virtual machine can result in a lengthy XML file. As a result, it is common to use the virt-install utility, detailed in section 2.4.2.
2.4 Current approaches
There are a number of software utilities, both CLI and GUI based, that provide the ability to provision virtual machines. All the examples covered in this section interact with libvirt; the differences lie in their intended user base, their capabilities, and their primary method of deployment: either configuring pre-built operating system images, or requiring a full operating system installation from scratch. This section covers the most prevalent of these options and their typical advantages and disadvantages.
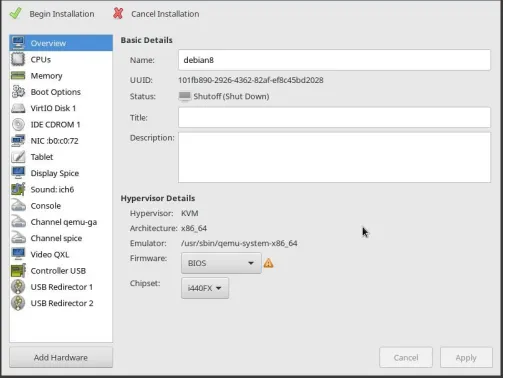
2.4.1 virt-manager
Fig. 1. virt-manager
providing the capability of managing the full lifecycle of virtual machines, networks and storage pools. It provides access to the graphical output and input devices of virtual machines via Virtual Network Computing (VNC) or Simple Protocol for Independent Computing Environments (SPICE)
(with the latter additionally providing local and remote USB redirection, allowing USB mass storage devices to be attached to a guest) using its virt-viewer counterpart.
Most users of virt-manager usually install operating systems to virtual machines from scratch using a standard installation disk image. However, as virt-manager is effectively an interface for libvirt rather than being a specialised deployment tool in itself, it is possible to use other image types (such as cloud images using cloud-init for first-boot configuration commonly used in cloud services, and as used by this project—see section 2.4.3). However, to configure these images as intended requires the manual creation of a configuration image outside of virt-manager and mounting the image as a CD; it is not possible to paste the contents of a cloud-init user-data file as it would be in an OpenStack private cloud environment, for example. qvm performs this task for the user.
virt-manager provides configuration presets for a number of different operating systems, ranging from present day releases back to long-unsupported releases of Ubuntu, Red Hat Enterprise Linux and CentOS, Fedora and Windows, among others. However, during testing as part of the research process for this project, it was discovered that for recent releases of many of the aforementioned distributions these templates are sub-optimal, or at the very least conservative for the sake of stability: for example, the use of Serial ATA virtual disk devices as opposed to Virtio paravirtualised disk devices, the latter of which offer better performance and lower overheads compared to the former. As a result, before creation users will most likely need to change a number of settings for their virtual machines before creation.
Testing for this paper found that creating a running virtual machine with virt-manager and installing the operating system takes around 7–12 minutes. This process is interactive (requires
user input), requiring the following steps if they haven’t already been performed:
1) Create storage pool for ISO images
2) Create storage pool for virtual machine images 3) Download installation ISO image to ISO pool
These steps are then followed by these mandatory steps:
1) Create new virtual machine
2) Configure new virtual machine, possibly correcting options that have been defined by templates
3) Install operating system, configuring users, networking, and storage in the virtual machine
4) Run any post-installation configuration that the user desires within the installed operating system, such as adding users, setting user group membership, changing default Secure Shell (SSH) configurations.
2.4.2 virt-install
virt-install is the de facto CLI virtual machine provisioning tool installed alongside virt-manager; it is only capable of this, with the intention being that any other required configuration tasks for the virtualised environment, such as the management of networks or storage pools, are performed using libvirt’s virsh utility; as stated in section 2.3. As with virt-manager, it is capable of connecting to remote hosts. It supports installation from remote, PXE and image sources, and its configuration options for provisioning virtual machines (or domains in libvirt’s terminology) are closely aligned with the options that can be specified in domain XML configuration files [4]. As stated in section 2.3, the primary advantage of virt-install is that users do not need to deal with these complicated XML configurations.
virt-install has access to the same templates as virtmanager, and thus suffers the same limitations. However, being a CLI utility it is perhaps best suited to being incorporated into a scripted workflow or other CLI application. Its input format is extremely well suited to being mapped using a YAML or Python dictionary; it is used for qvm for this reason (detailed further in section 5).
2.4.3 Cloud-init
Cloud-init is described in its documentation as “the de facto multi-distribution package that handles early initialization of a cloud instance" [5]. In simple terms, cloud-init is a system that allows administrators and users to configure a new virtual machine instance on first deployment. It provides a variety of modules, ranging from updating the installation and configuring users through to configuring the instance for management by an external configuration management system such as Puppet, or even install software packages such as Spacewalk (a data centre management and provisioning tool).
capability that qvm relies upon to rapidly configure the virtual machines it provisions.
2.4.4 Vagrant
Vagrant is “a tool for building and managing virtual machine environments in a single workflow" [7]. It is primarily aimed at developers to rapidly create entire virtual environments— potentially constructed from multiple virtual machines and virtual networks—to allow consistent development environments across multiple machines and developers. Vagrant supports multiple
providers: its terminology for the entity that runs the
environment, whether this be officially supported (VirtualBox, VMware, Docker and Hyper-V) [8] or third-party providers such as vagrant-libvirt or even cloud services such as AWS.
Vagrantfiles, used to build these environments, are written in Ruby. This is both a benefit and a drawback: Vagrantfiles may be provider-agnostic or at the very least multi-provider compatible due to the capability of including logic, however most system administrators are likely to be unfamiliar with Ruby altogether; Python is usually the primary choice after shell scripting.
Vagrant boxes are pre-configured images used as a base for machines created by Vagrant. These images are created especially for Vagrant: this means that aside from using them as Vagrant providers, it is not possible to reuse Vagrant images or Vagrantfiles with other deployment solutions.
2.4.5 Virtual machine storage
There are three commonly used storage solutions for QEMU/KVM virtual machines:
QEMU Copy-on-Write 2 (qcow2) The default and native image format for QEMU/KVM virtual machines. It provides full support for snapshotting, using raw or other qcow2 images as underlying base images (for example, a cloud image use case as used in this project), sparse (as needed) or full allocation of space on creation. The main benefit of this is portability: no matter the underlying file system, the same features can be used.
raw This refers a disk image or block device, whether virtual or real, that is passed directly to the virtual machine with no additional metadata layers unlike qcow2, and thus no support for advanced features such as snapshotting and using underlying base images. For LVM storage detailed here, or ZFS volumes (zvols) as used in this project, raw images will be used. It is up to the underlying storage layers to provide snapshotting, portability of functionality or other functionality.
Logical Volume Manager (LVM) Use of LVM volumes directly as block devices (used raw), providing snapshotting and cloning functionality below file system level (and skipping any host file system layers altogether).
For the application of this project, where snapshotting and cloning of pre-built images is used for rapid virtual machine provisioning, layered copy-on-write (CoW) solutions such as qcow2 and LVM suffer from significant performance degradation. This is covered in (Appendix A). This content has been placed in the appendix to this report as it was originally taken from another
piece of work. However, it should be considered an integral part to the research and design for this project.
2.5 Chosen approach
From the above research it is possible to conclude that:
Installation-based approaches are too time consuming for rapid testing.
System administrators with limited programming experience will find tools such as Vagrant too difficult to approach in a rapid fashion, ruling it out as a viable option. ZFS offers superior performance, file system-level resiliency and data integrity and volume capabilities (see Appendix A) that users may wish to leverage, without the additional layers of functionality required by other storage solutions.
Readily available cloud images are necessary to rapidly deploy virtual machines. Cloud-init uses easily readable YAML Ain’t Markup Language (YAML) documents for its configuration files, and provides portability between cloud environments and this tool.
For the sake of consistency with cloud-init, YAML is a mandatory requirement for any additional configuration files required for this tool. While cloud-init requires multiple documents for the NoCloud datasource suitable for this utility, having three separate documents for a single virtual machine (and potentially a directory to hold them) is cumbersome. Thankfully, YAML provides the ability to store multiple documents in a single file. The details of these documents are detailed in section 3.1.2.
Ansible, a remote execution and configuration management utility that is becoming increasingly popular among enterprise users, was considered for thie project. However, the ZFS module was deemed too unreliable to be suitable. Fabric, a remote execution library for Python, was also considered, however this implementation would be too complicated given that ZFS does not offer remote management built-in, but virt-install, used by qvm to deploy virtual machines, does have this capability.
This chosen approach is detailed further in the following Requirements (3), Design (5) and Implementation (8) sections.
3
R
EQUIREMENTSThe requirements covered here are prioritised using the MoSCoW method: Must or Should, Could or Won’t. These priorities are designated by the bracketed letters at the end of each requirement title. They are then grouped into related categories in the following sections: Basic functional requirements (3.1), Error
state requirements (3.2), ZFS functional requirements (3.3).
3.1 Basic functional requirements 3.1.1 Importing of cloud images (M)
The utility must be able to import an uncompressed cloud image in raw disk format to a new ZFS volume (zvol) specified by the user. This process must involve the automatic creation of the specified zvol, the creation of a base snapshot in the following format:
The process will not allow a user-definable set of zvol properties. Virtual machine zvol properties will be inherited from their parent cloud image zvols; thus allowing users to input unsuitable values will impact the performance of all virtual machines. The following defaults will be used:
volblocksize: 16K The fixed block size of the zvol (the smallest transactional unit). This provides a reasonable balance between compression ratio and performance.
refreservation: none Sparse allocation—only space consumed within the image will be allocated, rather than the full size of the raw image.
Handling of error conditions must conform to the requirements specified in section 3.2.
3.1.2 Virtual machine provisioning file format (M)
All the required configuration documents for provisioning a virtual machine must be contained in a single YAML file. The file must contain three documents:
vm A document containing a single top-level YAML dictionary. This dictionary must contain top-level options for virt-install as per its manual page [9]. Second-level options must be specified in a nested dictionary in the same manner. The top-level dictionary must contain a lower-level dictionary specifying disk settings as per the virt-install manual, and a further nested zvol dictionary containing valid dictionary options as per the zfs CLI utility manual page. user-data A document containing the cloud-init user-data document as per the cloud-init documentation [6].
meta-data A document containing the cloud-init meta-data document as per the cloud-init documentation [6]. Each document shall be separated as per the YAML specification [10]: using “- - -" on a new line to mark the beginning of a new document and, optionally aside from the end of the final document, “. . ." on a new line to mark the end of a document.
Each top-level document shall have a single identifier for the qvm utility; a key-value entry, where the key is “qvm" and the value is one of either “vm", “user-data" or “metadata" for each respective matching document.
An example of this file format can be found in the root of the included CD.
3.1.3 Provision new virtual machine (M)
The utility must be able to provision a new virtual machine from the provided input file as specified above. A new zvol must be created from an exist cloud image snapshot, under the name specified by the user, conforming with the requirements specified in ZFS volume clone creation (M), section 3.3.
Handling of error conditions must conform to the requirements specified in section 3.2.
3.2 Error state requirements
3.2.1 Atomicity (M)
During the occurrence of a failure after a persistent modification (i.e. one that is not temporary) has been made, the utility must either revert these changes, or if this fails or cannot be performed, inform the user which changes failed to be reverted. Once the
utility exits, it must leave the system in an unchanged persistent operational state on failure, or leave the system in the state changed by the successful completion of the intended task.
The utility will be capable of making four types of change to a system in total:
1) The creation of a zvol and snapshot for the purpose of importing a cloud image.
2) The creation of a zvol cloned from an imported cloud image snapshot for the purpose of creating a disk for a new virtual machine.
3) The creation of a new virtual machine.
4) The creation of a cloud-init configuration image to be attached to the virtual machine for post-creation configuration.
Of these changes, only changes 1 and 2 shall be revertable by the utility. Change 3 is validated before being made; if validation fails, the virtual machine won’t be created. Change 4 places cloud-init configuration data and creates the image in a subdirectory under /tmp, which will not impact the operational state of the system, and will be deleted on system reboot automatically. However, if change 3 or 4 fail, changes 1 and 2 will be reverted.
3.2.2 Error reporting and return codes (S)
The utility should print errors in the following format: Error task description: error description
Errors should be written to the standard error stream, and error events should cause the utility to return 1 (nonzero). For all successful runs, the utility should return 0.
While accurate error messages must be reported, this requirement is treated as “should" within the MoSCoW framework as certain external utilities used, such as the output of failed validation or the output of the ZFS CLI utility on failure will output errors in a different format.
3.3 ZFS functional requirements 3.3.1 ZFS volume creation (M)
The utility must be able to create ZFS volumes (zvols) as specified by the user for the top-level requirement Import cloud image specified in section 3.1. The zvol creation process must be able to configure new zvols with the properties specified by the processes defined by these requirements, or fall into an error state conforming to the requirements specified in section 3.2.
Handling of error conditions must conform to the requirements specified in section 3.2.
3.3.2 ZFS volume snapshot creation (M) To meet the top-level
requirement Import cloud image specified in section 3.1, the utility must be able to create a snapshot of the zvol by the process outlined in this top-level requirement. A zvol cannot be directly cloned; a snapshot is required to define a set, read-only state on which a clone can be based. As snapshots inherit properties from their source zvols, the utility will not accept any properties to fulfil this requirement. See the aforementioned top-level requirement for specific details of the fulfilment of this requirement.
3.3.3 ZFS volume clone creation (M)
To meet the top-level requirement Provision new virtual machine specified in section 3.1, the utility must be able to clone the snapshot specified in the Import cloud image top-level requirement of the aforementioned section, provided that the specified cloud image snapshot exists. This process must be able to accept valid properties to be applied to the newly created clone.
Handling of error conditions must conform to the requirements specified in section 3.2.
4
N
ON-
FUNCTIONAL REQUIREMENTSDue to the nature of this utility—a purely technical CLI utility that facilitates a technical process—the non-functional requirements are limited, and tie in closely with a number of functional requirements.
4.0.1 Simple command line input format
The utility should have a command line input format that is intuitive to follow. This means minimising configurable options that provide no realistic benefit, such as the capability of selecting zvol properties for the Import cloud image functional requirement specified in section 3.1. This will likely manifest as providing singular options on the command line, such as providing only “import" and “vm" top-level options, and only allowing the relevant sub-options, such as the target zvol and the path of the image file to be imported in the aforementioned functional requirement.
4.0.2 Simple virtual machine provisioning file format
For the user, the only point of complexity should exist in the virtual machine provisioning file; these complexities are introduced by cloud-init and virt-install as opposed to the utility itself. The utility should existing cloud-init user-data and meta-data documents to be simply copied into the file without any modification beyond adding the required qvm key/value entries specified in the Virtual
machine provisioning file format requirement (section 3.1).
5
D
ESIGNThere are a number of factors that ultimately make qvm’s design process fairly straightforward:
Classes There is no specific requirement in Python to use classes, unlike a language like Java where they are mandatory. Misuse of classes in Python is unfortunately extremely common; rather than using modules (files holding functions for the sake of modularity), many developers integrate these functions as methods of a class with no unique attributes, thus performing tasks that don’t apply to that class. The general consensus for class usage is to use them “where and when they make sense". In the case of qvm, the only scenario where this makes sense is when provisioning a new virtual machine, as the utility iterates over the same dictionaries in order to validate and create the components required for the virtual machine, namely the zvol and the virtual machine
itself. As a result, there is only a single class in this utility (see section 6).
Simplicity qvm doesn’t aim to be an entirely new virtual machine lifecycle management tool. The primary caveats of virsh for the intended use case of qvm, which are covered in the Introduction (section ) are the lack of ZFS support, the difficulty in creating XML files to define a libvirt domain (virtual machine), and the lengthy installation and post-installation setup times of virtual machines. qvm successfully alleviates these issues. There is little room for interpretation regarding the tasks it is required to perform, and the order in which these tasks are executed. qvm is therefore best considered as an automation tool for a particular workflow required by a common use case.
“Vertical" interaction qvm doesn’t recursively or iteratively interact with external entities (or actors in Unified Modelling Language (UML) terminology) and process data from them. Taking the most complicated use case as an example, provisioning a new virtual machine: qvm imports all the data that it requires from a single file at the beginning of the process. Processing is performed iteratively on this data internally, only communicating with external subsystems to validate the virt-install command used to create the virtual machine, to run this command, to create the required zvols and cloud-init directories, files and images.
As a result of the last point, tools such as sequence diagrams aren’t well suited to conveying the design of qvm, as the design would be conveyed as interacting almost entirely with itself aside from the interactions described above.
5.1 Use cases
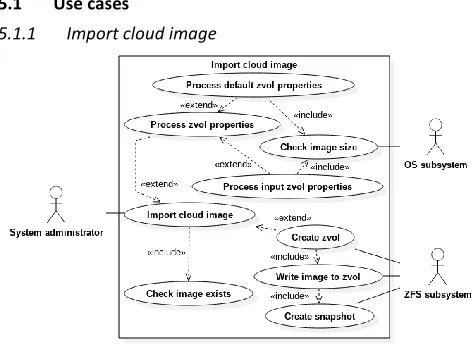
[image:7.567.290.526.413.588.2]5.1.1 Import cloud image
Fig. 2. System-level UML use case diagram: Import cloud image
Provided that Check image exists is successful (the image is found) the actions represented by the rest of the use cases will be performed: first Process zvol properties (which can be fulfilled by one of either Process default zvol properties or Process input zvol
properties) then Create zvol. Note that Process input zvol properties was not implemented as it was deemed to be
The use case does not cover the failure of any stage. However, as stated in Error state requirements (3.2), the only possible change that is required to be reverted in this use case is the creation of the zvol and snapshot for the cloud image. As all of the functionality required to implement this use case is exclusive (i.e. not conveniently implementable for use in other use cases), this use case will be implemented in a single function (import_cloud_img).
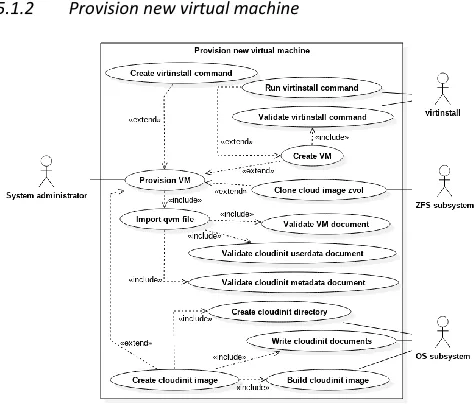
[image:8.567.27.265.164.371.2]5.1.2 Provision new virtual machine
Fig. 3. System-level UML use case diagram: Provision new virtual machine
The Provision new virtual machine use case detailed in Fig. 3 is the most prevalent use case in this project, representing the core functionality that gives the project value over existing approaches to virtual machine deployment.
Aside from the Import qvm file secondary-level use case, to be implemented in the import_yaml function, all of the functions required to implement this use case are part of the
VirtualMachine class; these functions are detailed in section 6 that
follows.
import_yaml will take the file path of a qvm file as an
argument. It will extract the three documents (detailed in Virtual
machine provisioning file format in section 3.1), remove any qvm
identifiers, and return a dictionary containing four nested dictionaries:
userdata and metadata Cloud-init user-data and meta-data dictionaries respectively.
vm Dictionary containing arguments to virt-install to create a virtual machine.
zvol Dictionary containing zvol options for the cloned zvol to be created for the new virtual machine. Originally stored in the
vm dictionary but separated as the entries here are not valid
arguments for virt-install.
The import_yaml function could be implemented as a factory (an object that instantiates a class). Alternatively, Python’s special __new__ method could be used, though this is best avoided
where possible as it overrides the default functionality of instantiating a new class. However, it will implemented as a separate function as the output it will return is not proprietary to the VirtualMachine class.
6
V
IRTUALM
ACHINE CLASSqvm features only a single class: the VirtualMachine class. Classes in Python are not mandatory, but they are frequently overused. Such a class is suitable in this scenario because:
The class methods perform tasks operating only within the context of the class (i.e. reading and occasionally modifying data based on instance variables). It is desirable to simply interaction with an instance of a class to simple method calls (detailed below). Simply, the use of a class in the manner detailed below is easily understandable by those reading the code.
The class methods, in order of execution, are briefly covered in the following sections.
6.1 __init__()
In addition to the four dictionaries detailed in section 5.1.2 being imported as self.dict, the following variables will be set:
self.zvol_base A variable to hold the name of the cloud image snapshot that will be used as the base for the cloned zvol for the virtual machine, allowing this entry to be removed from the zvol dictionary, which will then be parsed for valid zvol properties.
self.zvol_vm The name of the zvol that will be created from cloning the cloud image base snapshot (the above item). This is used for the zfs_cli.clone function (see section 8.2.1), and to set the disk path for the virtual machine (see below). For virt-install validation to pass, the following variables in the
vm dictionary will need to be set in advance:
cdrom The path to the cloud-init image to be attached to the virtual machine.
disk > path The path to the actual zvol block device to be used by the virtual machine, located at
/dev/zvol/self.zvol_vm.
6.2 create_cloudinit_iso()
A subdirectory will be created in /tmp/ of the format “qvmrandint". The contents of the self.userdata and
self.metadata dictionaries will be written to user-data and meta-data files respectively. The genisoimage utility (in reality a symlink
to mkisofs in most Linux distributions) will be called to create an image named “seed.iso" as per cloudinit’s instructions [6].
6.3 clone_base_zvol()
All of the functions including and succeeding this one will be required to destroy the zvol created here on failure in order to meet the Atomicity requirement specified in section 3.2.
6.4 build_cmd()
This function will iterate over the self.vm dictionary, creating and populating the self.cmd list of arguments as required by the subprocess module that will run the validation and creation virt-install commands. This function will need to handle three types of virt-install options:
Basic functional booleans - -switch Basic functional options - -switch option
Bottom-level options switch=option,...,switch-n=option-n This will process regardless of the input without returning errors, as any errors will be validated in the following function.
6.5 create()
This function will perform two runs of virt-install with self.cmd: the first with the --dry-run option, which will validate and return errors if any invalid options have been specified; the second without the
--dry-run option provided that validation has passed.
7
T
ESTSIt has been ensured that the submitted utility has passed all of the tests specified in this section prior to submission. Tests have been divided into two types: Success states (7.1) and Error states (7.2), with descriptions of passing criteria specified below for each test. As many of the failure tests are identical in nature, merely running at different points in execution, the conditions for these tests have been grouped together.
Performance tests have not been created for this project, as the performance of the utility is entirely dependent on the performance of external utilities and the system on which qvm is executed.
7.1 Success states
7.1.1 Import cloud image
A new zvol with the name specified by the user must be created along with a snapshot of the same name named “base". The zvol must contain a bootable cloud image, tested with either a manually provisioned virtual machine running a clone of the base snapshot, or a virtual machine provisioned with qvm. The utility must provide clear messages of the current activity being executed, and a message on completion, written to the standard out stream.
7.1.2 Provision new virtual machine
A new zvol with the name and properties specified by the user must be created. A virtual machine matching the specifications input by the user in the qvm file must be created. The virtual machine must boot, and the machine must be configured or show evidence of execution of the tasks specified by the user (found running ps -ef once logged in to the virtual machine).
The virtual machine must provide clear messages of the current activity being executed, and notify the user on completion.
7.2 Error states
7.2.1 Error importing cloud image
The utility should return 1 and provide relevant error messages provided the following conditions are met while attempting to import a cloud image:
Image could not be found. Image size could not be retrieved. zvol could not be created.
The utility should additionally destroy the zvol created if the following errors occur:
zvol device could not be opened. zvol device file does not exist.
zvol snapshot could not be created.
If any of the above destruction attempts fail, the utility should inform the user that manual deletion of the zvol is required.
7.2.2 Error importing qvm file
The utility should return 1 and provide relevant error messages provided the following conditions are met while attempting to import a qvm file:
qvm file not found. qvm file is any userdata, metadata or vm documents. vm dictionary is missing a nested disk dictionary. disk dictionary is missing a nested zvol dictionary. zvol dictionary is missing a base key and value.
7.2.3 Error provisioning virtual machine
The utility should return 1 and provide relevant error messages provided the following conditions are met while attempting to provision a virtual machine:
Cloud-init directory could not be created. Command to create cloud-init image failed. zvol clone failed.
The utility should additionally destroy the zvol created if validation for the virtual machine has failed.
7.2.4 Invalid command line input format
If invalid, too many or too few command line options are entered when executing the utility, a message describing how to use the utility should be written to the standard error stream.
8
I
MPLEMENTATION8.1 Development environment
reliability. The only issue that occurred was the release of libvirt 3.0.0, which broke support for using symbolic links to block devices as disks for virtual machines [11]. However, this was fixed in the following 3.1.0 release, and would have been easy to workaround in this utility by passing the disk file path to the
os.readlink() Python function [12].
Python was the chosen language for this project primarily as Python is the de facto scripting language for system administrators after shell scripting. Many projects, such as libvirt (section 2.3, prioritise their Python library over their API implementations in other languages. This project was implemented using Python 2 (specifically the latest release, 2.7.13). The only reason for this was pyzfs’ lack of support for Python 3 [13].
The project uses the PyYAML library for importing the virtual machine document and exporting the cloud-init user-data and meta-data files for the configuration image. It uses the pyzfs library for some operations: this is detailed in the ZFS challenges (8.2) section below.
8.2 ZFS challenges
The original intention for this project was to use the pyzfs Python bindings for the libzfs_core C library. However, while testing as part of the research phase of this project became apparent that the C library was incomplete. pyzfs’ documentation portrays the library as featurecomplete, with no reference to any particular capabilities not being implemented. This is to be expected; pyzfs aims to provide a stable interface, with immediate compatibility if the C library provides an implementation later. pyzfs provides the
libzfs_core.is_supported() function to determine whether the C
library provides a corresponding implementation, but not whether this implementation is featurecomplete.
Testing prior to implementation for this project using pyzfs to perform numerous operations on zvols (create, clone, and snapshot) raised a NotImplementedError exception. There have been several updates to ZFS on Linux (ZOL) since this project was implemented, and it seems that these capabilities have been implemented in the C library. However, this project still uses a workaround reimplementation (created as part of this project) of the required subset of functions in the pyzfs library using the zfs CLI utility. Its library can be found in the zfs_cli directory of the provided CD, and is implemented as the zfs_cli library.
8.2.1 zfs_cli
zfs_cli aims to replicate the functionality of the pyzfs library as
closely as possible. Thus, arguments it accepts are mostly the same. However, the properties dict can use the same strings as the command line argument, allowing users to specify size-based properties such as volblocksize and volsize in abbreviated 2x size
formats (e.g. “K" for kibibyte, “M" for mebibyte, “G" for gibibyte and so on; note that these units differ from 10x units—gigabyte,
megabyte and so on— with these latter units often being misused to represent the former).
The library raises the same exceptions as pyzfs, and thus requires it as a dependency. zfs_cli module is made up of four parts:
Command builders The create, clone and destroy functions build valid commands for the zfs CLI utility.
run_cmd Function that uses subprocess.checkoutput() to run the command and handle the CalledProcessError exception during an error, passing the output to the raise_exception function.
raise_exception Parses the output of run_cmd. Raises pyzfs’ ZFSIntializationFailed error if the user doesn’t have the
appropriate permissions to perform an action (i.e. they aren’t root or they have not been given adequate permissions using
zfs allow). Otherwise, passes the output to
exception_mapper. Raises the error, or raises
ZFSGenericError with the output from the zfs CLI utility. exception_mapper Maps the errors returned by the zfs CLI utility
to the appropriate pyzfs errors, or returns ZFSGenericError if no mapping could be found.
The use of the zfs CLI utility allows for more verbose, accurate output than would otherwise be presented by pyzfs. However, this does mean that the error output of zfs_cli is inconsistent; if this library were to be completed, developers would be required to parse strings to handle certain specific errors rather than exceptions or error codes, which is theoretically detrimental for performance and would make development with it a frustrating experience. However, for this particular project this is sufficient; on error, qvm will simply destroy the create zvol.
9
E
VALUATIONThis project successfully provided a solution to the outlined problem, and the solution for the end user is as elegant as envisioned. However, it would have been desirable to have implemented pyzfs properly as opposed to relying on a fragile custom API reimplementation; this would have simplified the code base even further, and allowed for more accurate error reporting from the ZFS C API itself as opposed to having a collection mappings, which is created effectively using guess work during testing.
There are a couple of features that would have been worth considering:
Automatic configuration of the selected virtual network to provide network configuration settings via Dynamic Host Configuration Protocol (DHCP), allowing the host, or any system using the host for Domain Name Service (DNS) resolution. Ability to delete virtual machines and their corresponding zvols within the utility.
Integrating this tool within a workflow that configures an external DHCP and DNS service such as dnsmasq, perhaps driven by Ansible, is a possible solution.
For the latter of the aforementioned features—the deletion of virtual machines and zvols—as libvirt does not provide zvol support, the disk device path would need to be parsed separately from the virtual machine, outside of libvirt. If the zvol directory were to be changed (by the ZFS on Linux project), this method would fail. Regardless, it is inconsistent, and it is possible to instead simply delete a virtual machine using the following command:
for i in destroy undefine; do virsh $i VM_NAME done zfs destroy VM_ZVOL
This fits in well with the overall aim of this utility: to provide a convenient method of creating virtual machines, rather than providing a full management solution.
There is also an argument as to whether YAML dictionaries are suitable for describing virtual machines in this project. The use of dictionaries means that only a single entry for a particular device type can be specified, leaving users with only a single network device or disk. However, there is a strong argument that such configurations should be substituted for Virtual LANs (VLANs) on a single interface, and disk partitioning and/or Virtio’s file sharing capabilities should be used instead. The former two of these features can be deployed within qvm. Additionally, virt-install makes certain presumptions when it comes to creating virtual machines with multiple disks; the first disk will be used as the boot disk. This introduces ambiguity into the tool; an inexperienced user is unlikely to realise these implications, nor the dictionary behaviour in these circumstances. These complexities stretch beyond this tool: network configuration with multiple interfaces becomes increasingly difficult to manage unless addressing is specified statically within qvm.
A
PPENDIXA–ZFS
ZFS is a file system originally created by Sun Microsystems. Originally open-sourced as part of OpenSolaris in 2005, contributions to the original ZFS project were discontinued following Oracle’s acquisition of Sun Microsystems in 2010 [14]. The OpenZFS project succeeds the original open-source branch of ZFS, bringing together the ports for illumos, FreeBSD, Linux and OS X [15]. While OpenZFS and ZFS are distinct projects, the term ZFS may refer to either or both of them depending on context. However, there are no guarantees to maintain compatibility between the on-disk format of the two [16]. In this instance and indeed most instances, ZFS refers to the ZFS on Linux (ZOL) port. The OpenZFS project is still in its infancy, however its ZFS ports have already been proven to successfully address a large number of issues with current storage solutions.
A.1 Overview
Unlike traditional file system, RAID and volume manager layers, ZFS incorporates of these features. Some ZFS primitives relevant to the discussion of the proposed solution include:
Virtual Device (VDEV) Built from one or more block devices, VDEVs can be standalone, mirrored, or configured in a RAID-Z array. Once created a VDEV cannot be expanded aside from adding a mirror to a single disk VDEV.
RAID-Z ZFS has built-in RAID functionality. In a basic configuration it has the same caveats by default. However, the biggest difference is the capability of triple parity (RAID-Z3), with an additional performance cost still.
zpool Built from one or more VDEVs, a ZFS file system resides on a zpool. To expand a zpool, we can add VDEVs. ZFS will write data proportionately to VDEVs in a zpool based on capacity; the trade-off is space efficiency versus performance. Datasets A user-specified portion of a file system. Datasets can
have individual settings: block sizes, compression, quotas and many others.
Adaptive Replacement Cache (ARC) In-memory cache of data that has been read from disk, with the primary benefits being for latency and random reads, areas where mechanical disk performance suffers greatly.
Level 2 Adaptive Replacement Cache (L2ARC) SSD-based cache, used where additional RAM for ARC becomes cost-prohibitive. As with ARC, the primary benefit is performance; a single decent SSD will be capable of random read I/O operations per second (IOPS) hundreds to thousands of times higher and latency hundreds to thousands of times lower than a mechanical disk.
ZFS Intent Log (ZIL) and Separate Intent Log (SLOG) ZFS approximate equivalents of journals; the differences are briefly detailed in A.4.
Other ZFS features include: compression, recommended for most modern systems with hardware-assisted compression usually being of inconsequential CPU performance cost with the benefit of marginally reduced disk activity; dynamic variable block sizing; ZFS send/receive, which creates a stream representation of file system or snapshot, which can be piped to a file or command (such as ssh), allowing for easy and even incremental backups.
A.2 Basic operations
[image:12.567.25.277.112.241.2]ZFS’ on-disk structure is a Merkle tree [17], where a leaf node is labelled with the hash of the data block it points to, and each branch up the tree is labelled with the concatenation of the hashes of its immediate children (Fig. 4), making it self-validating.
Fig. 4. Merkle Tree [18]
During write operations, the block pointers are updated and the hashes are recalculated up the tree, up to and including the root node, known as the uberblock. Additionally, ZFS is a CoW file system—for all write operations, both metadata and data are committed to new blocks. All write operations in ZFS are atomic; they either occur completely or not at all.
As detailed in the following text, these three attributes are directly responsible for many of the benefits in performance and data integrity that ZFS offers.
A.3 Consistency
On modification, traditional file systems overwrite data in place. This presents an obvious issue: if a failure—most commonly power—occurs during such an operation, the file system is guaranteed to be in an inconsistent state and not guaranteed to be repaired, i.e. brought back to a consistent state. When such a failure occurs, non-journalled file systems require an file system check (fsck) to scan the entire disk to ensure metadata and data consistency. However, in this instance, there is no reference point, so it is entirely possible and common for an fsck to fail.
Most of the file systems used today use journaling in order to ensure file system consistency. This involves writing either metadata alone or both metadata and data to a journal prior to making commits to the file system itself. In the occurrence described previously, the journal can be “replayed" in an attempt to either finish committing data to disk, or at least bring the disk back to a previous consistent state, with a higher probability of success.
Such a safety mechanism isn’t free, nor does it completely avert risks. Ultimately, the heavier the use of journalling (i.e. for both metadata and data) the lower the risk of unrecoverable inconsistency, at the expense of performance.
As mentioned previously, ZFS is a CoW file system; it doesn’t ever overwrite data. Transactions are atomic. As a result, the on-disk format is always consistent, hence the lack of fsck tool for ZFS.
The equivalent feature to journalling that ZFS has is the ZIL. However, they function completely differently; in traditional file systems, data held in RAM is typically flushed to a journal, which is then read when its contents is to be committed to the file
system. As a gross oversimplification of the behaviour of ZFS, the ZIL is only ever read to replay transactions following a failure, with data still being read from RAM when committed to disk [19]. It is possible to store replace the ZIL with a dedicated VDEV, called a SLOG, though there are some important considerations to be made.
A.4 Silent corruption
Silent corruption refers to the corruption of data undetected by normal operations of a system and in some cases unresolvable with certainty. It is often assumed that servergrade hardware is almost resilient to errors, with errorcorrection code (ECC) system memory on top of common ECC and/or cyclic redundancy check (CRC) capabilities of various components and buses within the storage subsystem. However, this is far from the case in reality. In 2007, Panzer-Steindel at CERN released a study [20] which revealed the following errors under various occurrences and tests (though the sampled configurations are not mentioned):
Disk errors Approximately 50 single-bit errors and 50 sector-sized regions of corrupted data, over a period of five weeks of activity across 3000 systems
RAID-5 verification Recalculation of parity; approximately 300 block problem fixes across 492 systems over four weeks CASTOR data pool checksum verification Approximately “one bad
file in 1500 files" in 8.7TB of data, with an estimated “byte error rate of 3 10 7"
Conventional RAID and file system combinations have no capabilities in resolving the aforementioned errors. In a RAID-1 mirror, the array would not be able to determine which copy of the data is correct, only that there is a mismatch. A parity array would arguably be even worse in this situation: a consistency check would reveal mismatching parity blocks based on parity recalculations using the corrupt data.
In this instance, CASTOR (CERN Advanced STORage manager) and it’s checksumming capability coupled with data replication is the only method that can counter silent corruption; if the checksum of a file is miscalculated on verification, the file is corrupt and can be rewritten from the replica. There are two disadvantages to this approach: at the time of the report’s publication, this validation process did not run in real-time; and this is a file-level functionality, meaning that the process of reading a large file to calculate checksums and rewriting the file from a replica if an error is discovered, will be expensive in terms of disk activity, as well as CPU time at a large enough scale.
As stated in A.2, ZFS’s on-disk structure is a Merkle tree, storing checksums of data blocks in parent nodes. Like CASTOR, it is possible to run a scrub operation to verify these checksums. However, ZFS automatically verifies the checksum for a block each time it is read and if a copy exists it will automatically copy that block only, as opposed to an entire file.
![Fig. 4. Merkle Tree [18]](https://thumb-us.123doks.com/thumbv2/123dok_us/581497.557836/12.567.25.277.112.241/fig-merkle-tree.webp)