© 2018, IRJET | Impact Factor value: 6.171 | ISO 9001:2008 Certified Journal | Page 1622
Wireless Home Automation System Using OpenHAB
Noorul Hamitha B
1, Manojkumar R
2, Jeya Prakash S
3, Yogesh D
4, Bala Murugan VJ
51Assistant Professor, Kamaraj College of Engineering & Technology, Madurai, Tamilnadu, India
2, 3, 4, 5UG Scholars, Kamaraj College of Engineering & Technology, Madurai, Tamilnadu, India
---***---Abstract - The home automation is increasing day by day.
But the products differ from each other in its implementation and they need different tools for their control. So an integrated platform is needed to control all these products and should provide an easy way to make the things to be integrated into home automation. OpenHAB serves this purpose. In OpenHAB there are a lot of bindings available to control the smart devices. In this paper, we create an automation setup which is connected wirelessly via the Wi-Fi module ESP8266. The controlling of devices and automation is done by the OpenHAB and its event bus. The OpenHAB is an open source, platform independent, vendor-neutral, integrate with other smart home projects and several other in-built features which makes it a wise choice for home automation.
Key Words: OpenHAB, ESP8266, Arduino UNO, HTTP
Binding, Home Automation
1. INTRODUCTION
The development of technologies makes it possible to introduce automation in every aspect of our life. In that home automation is an important thing to be considered because of our lifestyle change. We like to control the devices from a single place whether it may be within our home or out of the home in order to ensure safety and for our comfort too. We have already achieved this by the invent of new smart devices and home automation system. But they face a common problem that a product of a vendor doesn't integrate with another vendor product. For these things to be controlled we need separate applications for each kind just like considering an example of two ACs of two different vendors which need two different remote controls or different mobile apps of the vendor. Because their internal working configurations differ. Also, we can't develop our own smart devices to work along with other smart devices or other home automation systems. The smart home automation system integrates only with certain devices and not all. So we need a different method to communicate with our devices. Moreover, we need the assistance of the persons from that firm to set up these devices.
To overcome this openHAB helps us with a big deal of facilities. It acts as a common communicative language among the devices. It makes the communication between the users and the devices, vendor neutral. If we want to add our own devices which are not a product of any vendor to be a part of this home automation, it is also possible because of openHAB.
OpenHAB (Open Home Automation Bus) is an open source software that provides a common language to communicate with different automation systems, devices and technologies. It provides uniform user interfaces and a common approach to automation rules regardless of the number of manufacturers. It can run on any platform which is capable of running JVM. It is easily extensible to integrate with new systems and devices. It provides APIs for being integrated into other systems.
In this paper to demonstrate its usefulness and automation, we have made a device which consists of two switches for controlling a light and a fan which is connected via Wi-Fi and a sensor module to sense the room conditions based on which the automation rules come into play.
[image:1.595.314.551.396.510.2]2. METHODOLOGY
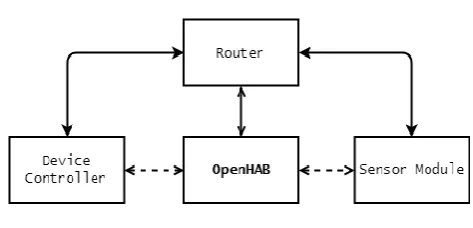
Fig 1: Block Diagram
Fig 1 shows the blocks which we are going to deal with. The dashed arrows denote the interactions between the blocks and the complete arrows show the actual or physical connection (wireless). Before starting, the initial setup of the devices and openHAB is needed.
2.1 OpenHAB setup
We work in Windows OS. So in the following steps, Windows file path is used. For the openHAB to run, JVM is needed. Currently, Java 8 is only supported for OpenHAB 2.2. After installing Java, include the java path in the system variable JAVA_HOME.
© 2018, IRJET | Impact Factor value: 6.171 | ISO 9001:2008 Certified Journal | Page 1623 Fig 2: Karaf Console
Then visit http://localhost:8080 in the browser. Then install standard package. After few minutes, the installation will complete. Then click Paper UI. In the Paper UI, most of the configurations can be done. Click on Add-ons. In the Add-ons section, many bindings are available. These bindings provide ways to link Items to physical devices. Here the word Items denotes capabilities of an application which is used in user interfaces or automation logic. Items have States which may receive commands. Some more terminologies are used in openHAB. But as of now, these are mostly used here.
2.2 ESP8266
The next important thing which we have used to achieve wireless communication is ESP8266. It is a low-cost Wi-Fi module with full TCP/IP stack and microcontroller capability. There are various versions in which we use ESP-01 version. This is enough for communicating with the devices and openHAB. This module is directly connected to Arduino UNO by which the commands and data are passed and received for further processing and controlling. The ESP8266 is made to work in server mode.
For the ESP8266 to function correctly a 3.3V regulated supply is needed. For which we use a 3.3V voltage regulator. To ensure the safety, the RX terminal of ESP8266 is secured by a 3.3V Zener diode from the 5V signal of Arduino TX pin.
2.3 Device Controller
This is the main part which we have designed to control the devices and make them be a part of our home automation system. The devices we use are a light and a fan. Switching ON and OFF is demonstrated here for these devices. For this switching purpose, 5V relay is used. The central controller of this device controller is chosen as Arduino UNO to which the ESP8266 is also connected.
Arduino is a microcontroller board based on the ATmega microcontroller. It has digital input/output pins, a USB connection, a power jack and so. It contains everything needed to support the microcontroller; simply connect it to a computer with a USB cable or power it with an AC-to-DC adapter or battery to get started. It uses C++ style
programming with a large set of libraries and examples. The program can be load directly from the IDE without the need for any external programmer. These features make the Arduino the first choice in embedded system development. Here we use Arduino UNO. Arduino NANO can also be used since it resembles most of the UNO characters and NANO may be preferred because of its size.
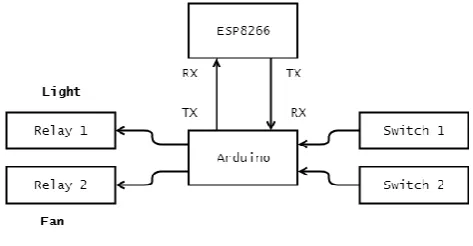
Fig 3: Device Controller
The devices are controlled by the device controller in two modes. One is through openHAB (remote mode) and another one is manual mode. For the manual mode, two switches are used for their respective devices. The switch on press gives a trigger signal instead of continuous circuit closed connection. This can be compared to a push button switch or a doorbell switch. At the time of pressing the connection gets closed and after release, the connection gets opened. So here we have programmed the Arduino to respond only after the switch is released. The purpose of the switch is as follows considering only the light(same follows for the fan also). If the light is OFF, after the first press, the light should ON and vice versa. This switching is made based on the state of the device. Because from the openHAB also we can change the state of the light. So the state change should not be affected by these modes of control. For this reason, the switch is not chosen as normal ON/OFF switch. To read the state of the switch two digital pins of Arduino have been used.
As it has already been mentioned, 5V relays are used to switch ON/OFF the light(fan). Another two digital pins have been used for the excitation of the relays. The excitation is given based on the previous state of the devices.
2.4 Sensor Module
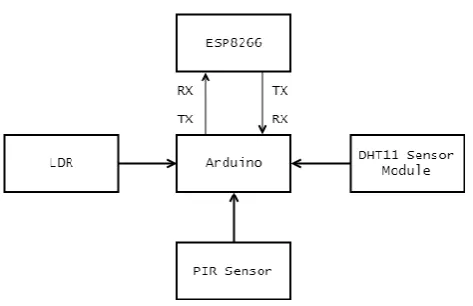
[image:2.595.315.552.179.302.2]© 2018, IRJET | Impact Factor value: 6.171 | ISO 9001:2008 Certified Journal | Page 1624 Fig 4: Sensor Module
The sensors we have used are PIR(Passive Infra Red) sensor, LDR (Light Dependent Resistor) and DHT11(Temperature and Humidity Sensor).
The PIR sensor is an electronic sensor that measures infrared radiation from objects. The PIR gives HIGH signal to the Arduino whenever a movement of the object is detected. The PIR consists of three pins: VCC, GND and OUT. 5V is given to the VCC, GND is grounded and OUT is connected to the digital pin of Arduino.
The LDR is a light controlled variable resistor which changes its resistivity based on the light intensity. The resistivity decreases with increase in light insensitivity. By connecting the LDR with 5V in series with a high resistance (voltage divider circuit connection), the resistance variance is calculated from the voltage variance which is measured using Arduino analog pin. For convenience, the voltage is converted into percent. The analog pin converts 0 to 5V into 0 to 1023 integer value.
Light intensity (in %) = analog value / 1023 * 100
Using the above formula the light intensity is converted into percentage.
Next is the temperature and humidity sensor module (DHT11). It has three pins: VCC, DATA and GND. VCC is connected to 5V, GND to GND of Arduino and DATA to the analog pin of Arduino. Using the DHT.h library we can directly convert the analog value into temperature and humidity value.
2.5 HTTP Binding
This binding is available in openHAB Add-ons section which has already been mentioned in the OpenHAB setup section. In the Add-ons section click the BINDINGS tab. Install the HTTP Binding. This binging is used to send and receive the commands and data to the ESP8266 which is working in server mode. The working is same as that of visiting a web page in the browser. We request the data from the ESP8266 by using its IP address. This will be discussed later in this paper.
2.6 Javascript Transformation
In the Add-ons section, TRANSFORMATION tab can be found. Install the Javascript Transformation. This is used to convert the data from the ESP8266 to the required format in which it should be employed in openHAB.
2.7 Building Sitemap
To manipulate the devices in openHAB, we have to create items which show the states of the devices and are used in automation logic. We have used textual configuration to create items. For the textual configuration, we have to create a file named filename.items, filename.sitemap and filename.rules. we have used default as the filename for items and rules. For sitemap, the file name is based on the name given to the sitemap configuration. The .items file contains the items we are going to work. The .sitemap is for creating a structure of device placement in the home. This sitemap shows the final controlling page of our home automation system. The .rules page contains the automation rules.
[image:3.595.44.281.82.235.2]It is easy to create the files using Home Builder available in the openHAB. Go to the Home Builder page in openHAB and select the home construction as required. We have chosen the below configurations.
Table 1: Home Builder Configurations
Number of floors 1
Rooms Living Room (Ground Floor)
Objects Light, Fan, Motion Sensor,
Temperature, Humidity, Light Intensity (created own)
Generate Items, Sitemap
In the right side Items, Sitemap tabs will be available. Click and copy the code. Paste the Items code in default. items file and place the file in C:\openhab\conf\items folder. Similarly, copy the Sitemap code into our_home.sitemap file and place it in C:\openhab\conf\sitemaps folder. Now the home setup can be viewed in Basic UI page of openHAB.
2.8 Communication between ESP8266 and OpenHAB
The ESP8266 will send the message request to the Arduino in string format. So the data we require can be retrieved easily from the ESP. The data format is like below
+IPD,0,117:POST /?Command=11 HTTP/1.1
User-Agent: Jakarta Commons-HttpClient.3.1
© 2018, IRJET | Impact Factor value: 6.171 | ISO 9001:2008 Certified Journal | Page 1625 Content-Length: 0
The highlighted part is the data we want. Before going to what is Command=11 in the above data, it is better to explain how the command to ON/OFF the devices is made. The light is given a number and fan is given a number 2. Further devices will get the numbers in the increasing order. The state ON is considered as 1 and OFF as 0. So, to switch ON the light the command 11 is passed, for switch OFF 10 is passed. Similarly, the fan will have the commands 21 and 20 for ON and OFF respectively. Now the Command=11 can be understood as the command to switch ON the light.
Now this part will explain how to send the HTTP request to the ESP. First, the ESP should be connected to the same network as the openHAB is connected. The ESP IP address can be found by using the command AT+CIPSTA?. Let the IP address of ESP be 192.168.43.134. Go to default. items file. Replace the {channel=} in the light item syntax with the following.
{http=">[ON:POST:http://192.168.43.134/?Command=11 ] >[OFF:POST:http://192.168.43/?Command=10"}
The same applies to the fan with the change in command word. Next for sensor module another ESP with IP address 192.168.43.184 is used. It only sends the data back on request. The data is in the format
movement-0,temp-55,hum-34,light-55
The value of movement is either 0 or 1 which denotes the absence or presence of objects. The temp represents temperature in °C, hum represents humidity in percentage and light represents light intensity in percentage. This data is transformed to the equivalent Items states by javascript.
{http="<[roomWeatherCache:5000:JS(getMovementDetec tion.js)]"}
Change the {channel=} of motion sensor into the above code. The roomWeatherCache specifies the cache obtained
from the url mentioned in
C:\openhab\conf\services\http.cfg.
Change #<id1>.url and #<id1>.updateInterval by
roomWeatherCache.url=http://192.168.43.184/
roomWeatherCache.updateInterval=10000
The getMovementDetection.js is the Javascript file which is used for transformation. The .js file is placed in C:\openhab\conf\transform\ and having a function inside for this format
(function(input) {
...
...
return itemState
})(input)
Similarly getTemperature.js, getHumidity.js and getLightIntensity.js are used to get the respective values from the data string. Cache is used here instead of IP address to reduce the multiple requests of the ESP server for the same data. The value between the cache URL and transformation type is the refresh interval in milliseconds.
2.9 Automation Rules
This is the final part of this work. The automation made based on the following conditions. The detection of PIR sensor is considered as ON/OFF since it is considered as a switch type in openHAB. ON - presence & OFF - absence. Here the humidity conditions are neglected for making the rules simple and understandable.
Table 2: Actions when Motion Sensor is ON
Conditions Actions
Light Intensity >= 70 % Light OFF Light Intensity < 70 % Light ON Temperature >= 23 °C Fan ON Temperature < 23 °C Fan OFF
If motion sensor is OFF, Light and Fan both are in OFF state. To frame the rules create a .rules file in the folder and place it in C:\openhab\conf\rules\ folder. The rules syntax is
rule "<RULE_NAME>"
when
<trigger_condition> [or] <trigger_condition2> [or ...]]
then
<script_block>
end
The states of the items can be found using the property My Item. state. To send commands use My Item. Send Command (command) or My Item. Post Update (new_update) to change the values without triggering any actions. The trigger conditions in the when block changes with type. Here we use the trigger condition received update and received command as in the example
© 2018, IRJET | Impact Factor value: 6.171 | ISO 9001:2008 Certified Journal | Page 1626 There is an another facility in openHAB to create rules
using graphical editor. This editor is available in HABmin page which can be installed from the Paper UI.
2.10 Outcome
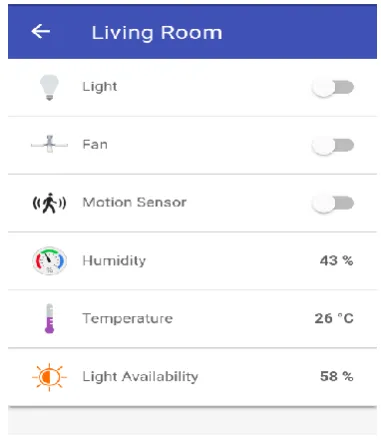
[image:5.595.337.528.77.299.2]The final control can be done through the Basic UI. For these views go to the Basic UI page. We can create many sitemaps. Hence these sitemaps are listed at the start of the page. We here only use one sitemap named Our_home. After clicking on this sitemap, the page showing the Living Room and other rooms will appear. The following images show the items state inside the Living Room group.
[image:5.595.67.257.301.574.2]Fig 5, 6 and 7 show the change of states of the items based on the condition discussed earlier. The states get refreshed at an interval of 5 seconds as we have made in the configurations.
[image:5.595.68.254.440.732.2]Fig 5: When Temperature > 23 °C
Fig 6: When Light Intensity < 70 %
Fig 7: When Motion Sensor is in OFF State
The above figures show the state change of the devices based on our automation rules. These figures screenshots are taken from the OpenHAB mobile app. It can be viewed in browsers too by using the IP address of the device which has openHAB installed.
Apart from these home views, there is an another view in which it provides both the views and the controls for the users. The HABPanel gives these features of designing a home automation more than the Basic UI. Here we can create dashboards for the control of things. We can group the devices and items as we like ,which is not like in the case of Basic UI.
3. CONCLUSION
OpenHAB is a very much useful in designing a home automation system by ourselves easily. Since it is open source, it is supported and developed by a large set of contributors and developers. We can integrate the smart devices using this integrated platform. A demonstration of its working is considered here. But it is not easy for a newbie to do all these things at the beginning. They have to spend some time in understanding the openHAB. Great efforts are being put to make the openHAB an easier one. This results in the Home Builder page which makes the sitemap creation an easier job. But the rules designing is not easy. It takes a lot of time to design the rules and debugging it. A new graphical rule editor has been added to HABmin page. But it needs more improvement at this time. Visual Studio Code Editor helps us in many aspects of designing and testing. The openHAB extension is available for VS Code.
REFERENCES
© 2018, IRJET | Impact Factor value: 6.171 | ISO 9001:2008 Certified Journal | Page 1627 [2] A. Z. Alkar and U. Buhur, “An Internet Based
Wireless Home Automation System for Multifunctional Devices”, IEEE Transactions on Consumer Electronics, Vol. 51, No. 4, NOVEMBER 2005
[3] A. R. Al-Ali and M. AL-Rousan , “Java-Based Home Automation System”, IEEE Transactions on Consumer Electronics, Vol. 50, No. 2, MAY 2004
[4] Meensika Sripan, Xuan Xia Lin, Ponchan Petchlorlean and Mahasak Ketcham, “Research and Thinking of Smart Home Technology”, International Conference on Systems and Electronic Engineering (ICSE 2012) December 18-19, 2012 Phuket (Thailand)