COPYRIGHT 2013 – SKYLITE SYSTEMS PAGE 1
SideKick365 xRM Enterprise
SideKick365 xRM Enterprise (SideKick365) is a new App for SharePoint that helps you manage your customers, leads, opportunities, tasks, and Contacts. It keeps you focused on important tasks and improves your productivity so you can spend time growing your business instead of looking for a lost business card, email, or quote. Best of all, SideKick365 is built on top of SharePoint 2013, so it can be deployed on premise or in Office 365. Features like workflow, state-of-the-art searching, document management, and security are all included in SideKick365. Best of all, SideKick365 will continue to improve as SharePoint adds new capabilities and functionality.
We have developed a series of 3 videos that demonstrate all the steps required to set up security in SideKick365 and how security settings determine what a particular user can view and edit. They can be seen by following this link –
https://skylite-web.sharepoint.com/Pages/SideKick365xRMEnterpriseVideos.aspx
SideKick365 –Introduction to Security
SideKick365 xRM Enterprise lets you create and manage security profiles that let you control who can “Read” or “Edit” Accounts, Opportunities, or Contacts. SideKick365 lets you set up sales teams, sales regions, divisions, or multiple companies within a single installation. The security profile is also automatically applied to all the items like Notes and Documents associated with an Opportunity or Account. Security profiles are easy to set up and help keep you focused on your deals and customers.
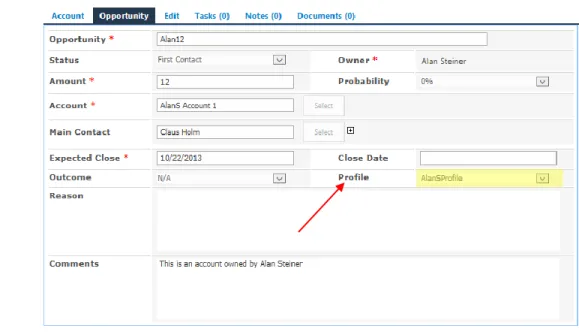
The screenshot below shows an Opportunity with an assigned security profile called “AlanSProfile”. Once a security profile has been applied to Accounts, Opportunities, or Contacts, only those users that have been explicitly given access to read or edit this Opportunity will be able to access this record.
Illustration 1 - The Security Profile Field is highlighted in the Opportunity
Tip - You can change the security profile at any time and the new profile will be applied to the associated records like Tasks, Notes, Opportunity, and Documents as well.
What are Security Profiles and how do they work?
A security profile stores a groups of users that have been granted permissions to read or edit an Account, Opportunity, or Contact. If you do not assign a security profile to an Account, Opportunity, or Contact, then everyone with access to SideKick365 can view it.
Tip – Make sure to assign a security profile to an Account, Opportunity, or Contact if you want to limit who can access it. If no profile is assigned, then all users can view the Account, Opportunity, or Contact. If a security profile is not assigned, then a user can edit or read the item based upon the permission you have been assigned within the SharePoint site that hosts SideKick365.
Tip – When you create a new Opportunity, SideKick365 automatically assigns the security profile of the Account
associated with the Opportunity. Opportunities are always associated with an Account – they are considered children of an Account meaning they inherit the security profile of the Account they are associated with. The security profile in the Opportunity can be changed. This means you could have different salespeople working on opportunities in an Account and ensure that the salespeople only see Opportunities they are supposed to see. You can also support territories or product lines and limit which salespeople have access to certain Opportunities within an Account.
NOTE – The next few sections of this documents are meant for SharePoint administrators and those responsible for setting up security in SideKick365. If that’s not you, then skip head to the section called “Assigning a Security Profile”
Getting Ready to Set up Security Profiles
SideKick365 is a SharePoint-hosted App. It is installed into a SharePoint team site that you create in your SharePoint farm. While not required, we recommend you set up a new Site Collection and create a new team site to host
SideKick365. You can install SideKick365 by adding the app into you app catalog and then installing the app into a host SharePoint team site using the Site Contents option in the site admin settings (the gear). You can read how to install a SharePoint hosted app into your organization’s app catalog by following the instructions here
http://office.microsoft.com/en-us/sharepoint-help/use-the-app-catalog-to-make-custom-business-apps-available-for-your-sharepoint-online-environment-HA102772362.aspx
Once you have installed SideKick365, it is time to set up security profiles.
TIP – You don’t have to use security profiles. You only use them if you need to limit “who” can see “what”
SideKick365 security uses groups stored in in a list called Security Profiles to assign permissions on Accounts, Contacts, and Opportunities and their associated Notes and Documents. Each security profile contains two fields that hold the names of a “Read” and an “Edit” group. These groups can be SharePoint groups, Active Directory groups, Windows Azure Identity Groups, or any other group that is recognized by SharePoint. These groups can contain nested groups as needed – just remember you cannot nest SharePoint groups so plan accordingly. A quick description of the permissions of the required group for each security profile follows:
Read – Can view list items and download documents
Edit – Can add, edit and delete lists; can view, add, update and delete list items and documents
As a best practice, we recommend creating two SharePoint groups for each security profile – an Edit group and a Read group. Before proceeding further, it is important to review SharePoint groups to get a deeper understanding what they are and how they are used by SideKick365 xRM Enterprise.
COPYRIGHT 2013 – SKYLITE SYSTEMS PAGE 3 SharePoint groups are objects in SharePoint that hold a list of users. When you create a SharePoint group, it does not have any permissions assigned by default – you, the SharePoint administrator must assign permissions to the group by defining unique permissions when you create the group, or by inheriting permissions from an existing SharePoint group. Best Practice Recommendation - When you create the site that holds SideKick365 Enterprise, you have the option to either inherit permissions from the site above the new team site or to break permissions so the site has unique permissions. You should choose Unique Permissions.
IMPORTANT – All users that needs access SideKick365 should be added to the Site Members group in the SharePoint site that hosts SideKick365.
IMPORTANT –We suggest you break inheritance in the new site by selecting the option to use Unique Permissions as illustrated below.
When you break permissions, SharePoint gives you the option to set permissions every time you create a new
SharePoint group under the Site Settings “People and Groups Option”. If you do not choose to break permissions in the host site for SideKick365, then you will not see the option to set permissions when you create a new SharePoint group. That is because you must inherit the permissions on these new groups from a group in the parent site when you choose to have the team site hosting SideKick365 inherit permissions. Breaking permissions on the team site that hosts
SideKick365 lets you set up SharePoint groups that are scoped to SideKick365 with permission settings that are appropriate for Read and Edit in each security profile.
Tip – Make sure to select “Use Unique Permissions” in the settings for the new team site you create to host SideKick365. This breaks permissions on the site that hosts SideKick365.
Creating a Security Profile
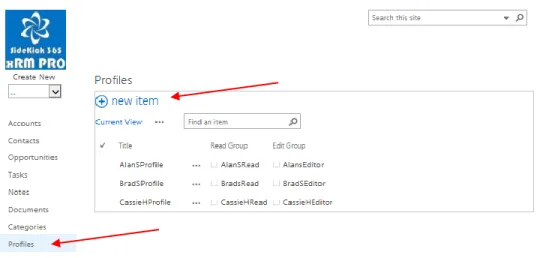
The Profiles module is used to set up security profiles that can be used throughout SideKick365 xRM Enterprise. It’s easy to set up security profiles, but you do need to do some planning to make sure they work as desired. Let’s get started…. to add a security profile, select the Profiles menu and then select the “new item” option.
Illustration 2 – List of Security Profiles When you add a new security profile, you must add values into all fields:
Profile Name – the name of the security profile that appears in the profile dropdown
Read Group – the name of the group (can be a SharePoint, AD, or Windows Azure Active Directory) you created for users that can only read the item
Edit Group - the name of the group (can be a SharePoint, AD, or Windows Azure Active Directory) you created for users that can only edit the item
COPYRIGHT 2013 – SKYLITE SYSTEMS PAGE 5 Tip: The Read and Edit fields in the Security Profile set-up screen only let you put in one group.
Setting up SharePoint Security Groups
As previously mentioned, we recommend that you set up two SharePoint groups for each security profile in the team site that hosts SideKick365. We suggest the following naming conventions for these groups:
“Profile Name”Read – this is a SharePoint group of SideKick365 xRM Enterprise who can read but not edit the items assigned to this profile. Assign “Read” permissions to this group.
“Profile Name”Edit - this is a SharePoint group of SideKick365 xRM Enterprise who can edit the items assigned to this profile. Assign “Edit” permissions to this group.
Illustration 4 – List of typical SharePoint Security Groups
Tip: Microsoft recommends a maximum number of 10,000 SharePoint security groups per site collection – see
http://technet.microsoft.com/en-us/library/cc262787.aspx . This means you can have up to 5000 security profiles per
instance if you choose to set up SideKick365 in its own site collection and use a single SharePoint group to hold the Readers and another to hold the Editors within a profile. If you need more than 5000 security profiles, consider using Active Directory groups or Windows Azure Active Directory Security groups.
Security Group Strategies
SharePoint groups do not support nesting – meaning you can’t put another SharePoint group within a SharePoint Read or Edit security group. What if you want to create a common group – say the executives or a regional management team – and nest them within many Read or Edit SharePoint security profile groups? You don’t want to type these individual members into every Read and Edit SharePoint group because it can be difficult to maintain membership across many different SharePoint groups. So what is a best practice?
We recommend that you create Active Directory or Windows Azure Active Directory groups of users that often share similar security rights across many Edit and Read SharePoint groups - like executives or management team members – and add these Active Directory or Windows Azure Active Directory groups into the Read or Edit groups for each security profile. This make it easy to maintain a single group of these common users across many security profiles. Changing the members in these Active Directory or Windows Azure Active Directory groups makes it easy to maintain access across many security profiles. A change in any of these group members will automatically trickle into the SharePoint security profile group using these common Active Directory or Windows Azure Active Directory groups.
Tip – IMPORTANT – If an Account, Contact, or Opportunity has been assigned a security profile, then the only users allowed to read or edit these items are those users that have explicitly been given permission within the Read or Edit group in the Security profile assigned to that item, and the site administrator. It is important to make sure you add the user identified in the Owner field in an Account, Contact, or Opportunity to the Edit or Read SharePoint group associated with the security profile assigned to that Account, Contact, or Opportunity, or the owner will not be able to access the Account, Contact, or Opportunity even though they have been named as an owner!
xRM Permission Owners– A Required Full Control Group in SideKick365
SideKick365 has a required group for users that create and manage security profiles and SharePoint groups, or assign a security profile to an Opportunity, Account, or Contact. This group must be created in the SharePoint site that hosts SideKick365 and it must be assigned “full permissions”.
IMPORTANT - You must to create a SharePoint group that has “Full Control” permissions within the site that hosts SideKick365 xRM Enterprise to assign security profiles. We suggest calling that group “xRM Permission Owners”. Add all users to this group if they need to create or set security profiles.
IMPORTANT – Make sure that at least one member of the xRM Permission Owners group belongs to either the Read or Edit group within the security profile that is applied to an Opportunity, Account, or Contact if you want that user to be able to assign a security profile.
If you decide to apply a security profile to an Account, Opportunity, or Contact, SideKick365 is smart enough to only grant access to users given explicit access through the Read or Edit group you create for each security profile. Adding a user to the xRM Permission Owners group described within this section does not give them access to a particular Accounts, Opportunities, or Contacts. Make sure you add a user that is a part of the “xRM Permission Owners” group into either the Read or Edit group within each security profile that you set up if you want that user to be able to assign permissions.
Tip – Be careful who can add users to the xRM Permissions group. We suggest you let the Site Admin add or delete users in this group.
NOTE – if you do not choose a security profile in an Account, Contact, or Opportunity, then all users have access to it based upon the permissions they have been granted in the SharePoint site that hosts SideKick365.
Assigning a Security Profile
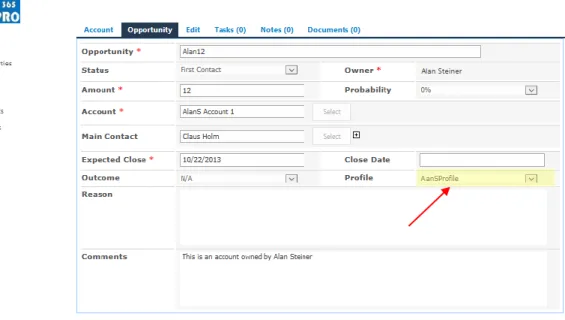
Adding a security profile to an Account, Opportunity, or a Contact is easy. You simply choose the security profile you want to assign to the item from the dropdown within the Profile field. (Note – the Profile field shown below shows a list of all security profiles that have been defined in the Profiles module). You will only be able to assign a security profile if you belong to the xRM Permission Owners group previously described within this guide.
COPYRIGHT 2013 – SKYLITE SYSTEMS PAGE 9 TIP – If you don’t assign a Security Profile to an Account, Opportunity, or Contact then all users can view or edit the item.
TIP – Create Security Profiles BEFORE adding Contacts, Accounts and Opportunities
Checklist
Use the following checklist to plan your security in SideKick365 xRM Enterprise:
Create a SharePoint group with Full Control permissions in the site that hosts the SideKick365 xRM Enterprise App. Add anyone that can create, manage and/or assign permissions to Accounts, Opportunities, and Contacts into this group. We suggest you call this group “xRM Permission Owners”
Create a SharePoint read group and a SharePoint edit group within the site that hosts the SideKick365 xRM Enterprise App for each security profile that you create. Assign “Read” permissions to the read group and “Edit” permissions to the edit group. The illustration below shows the creation of a read-only SharePoint group. Make sure the user identified as the Owner in the Account, Contact, or Opportunity is included in either the edit
or read group in each security profile. Assigning a user as an owner does NOT give them any permission to see the Account, Contact, or Opportunity.
Make sure at least one user named in the xRM Permission Owners group is included in either the edit or read group in each security profile
Put users that have similar access permissions across many security profiles into Active Directory groups or Widows Azure Active Directory groups. Nest these groups into the read and edit groups as required for each security profile.
COPYRIGHT 2013 – SKYLITE SYSTEMS PAGE 11
Quick Setup Guide
Use the steps outlined to set up security in SideKick365
Step 1 – Create a site to host SideKick365 and break permissions so the SharePoint site has unique permissions Step 2 – Add all users that need to access SideKick365 into the members group that is presented when setting
up the new team site that will host SideKick365.
Step 3 – Create a group in the new team site created to host SideKick365 called xRM Permission Owners. Assign full permissions to this group and add all users that should be able to assign and create security profiles.
Step 4 – Create Active directory or Windows Azure Identity groups for common groups that will be shared across many security profiles. Examples include senior executives or sales managers that should be able to see
everything.
Step 5 – Create a Read Group and an Edit SharePoint group for each Security profile within the SharePoint site that hosts SideKick365. Assign Read or Edit permissions to each of these groups. Add users and common groups created in step 4 to these groups as needed. Make sure to include at least 1 member of the xRM Permission Owners group in the Edit group.
Step 6 – Create a security profile in SideKick365 and add the Read and Edit SharePoint group for each security profile.
Step 7 – Start adding data and assign security profiles as needed.
Common Problems and Troubleshooting
The following are common mistakes you may encounter. Studying these may help you troubleshoot issues when you set up security in SideKick365.
The user named in the Owner field can’t access the Opportunity, Account, or Contact – A user cannot access a record in SideKick365 that has been assigned a security profile unless they a member of the Edit or Read group named in the security profile. Simply adding the user as an owner does not grant them any specific permissions when a security profile is assigned to the Opportunity, Account, or Contact. Make sure the owner is a member of the Edit or Read group in the assigned security profile.
A user can view or edit an Opportunity, Account, or Contact and you want block that user from that record – Make sure that you have assigned a security profile to the Opportunity, Account, or Contact. If you have assigned a security profile, then check to see how the user you want to block is associated with the Edit or Read groups in the security profile.
You can’t create groups in the SharePoint site that hosts SideKick365 – You must have the SharePoint permission called “Create Groups” in the SharePoint site that hosts SideKick365. Create Groups is part of the Full Control site permission. You can also create a custom permission and include the permission to Create Groups within the custom group. Make sure you have been assigned permissions to create groups in the SharePoint site that hosts SideKick365 or you cannot add SharePoint groups.