Service and Troubleshooting Guide
58
0
0
Full text
(2) Service and Troubleshooting Guide. Information in this document is subject to change without notice. 2002 InSciTek Microsystems, Inc. Reproduction in any manner whatsoever without the written permission of InSciTek Microsystems, Inc. is strictly forbidden. Trademarks and trade names may be used in this document to refer to either the entities claiming the marks and names or their products. InSciTek Microsystems, Inc. disclaims any proprietary interest in trademarks and trade names other than its own. March 2003 Client Release 3.0.0.3. 032603. ii. Doc No. 5000130.
(3) Service and Troubleshooting Guide. Table of Contents 1. Safety Instructions. 1. 1.1. Electrical...................................................................................................................1. 1.2. Electrostatic Discharge .............................................................................................1. 2. Packaging. 3. 3. System Description. 5. 4. 3.1. System Features........................................................................................................5. 3.2. Front and Rear Panel Descriptions ...........................................................................7. 3.3. Technical Support.....................................................................................................8. Installation and Set Up. 9. 4.1. Table Top or Shelf Placement ..................................................................................9. 4.2. Rack Mount Installation ...........................................................................................9. 4.3. Wall Mount Installation............................................................................................9. 4.4. Power Connection.....................................................................................................10. 4.5 Telephony Connections ............................................................................................11 4.5.1 Connecting Analog Telephone Extensions........................................................11 4.5.2 Connecting SIP Telephone Extensions..............................................................11 4.6 Data Network Installation.........................................................................................12 4.6.1 Local Area Network (LAN) Connection ...........................................................13 4.6.2 Wide Area Network (WAN) Broadband Connection........................................13 4.7 Accessories Installation ............................................................................................13 4.7.1 Adding a Fax Machine.......................................................................................13 4.7.2 Connecting Music and Paging ...........................................................................13 5. 6. Preventive Maintenance. 15. 5.1. Exterior Cleaning......................................................................................................15. 5.2. Telephony Surge Protection .....................................................................................15. Troubleshooting. 17. 6.1. Start-up Failure .........................................................................................................17. 6.2. Power Failure............................................................................................................20. 6.3. Disk Drive Failure ....................................................................................................21. iii.
(4) Service and Troubleshooting Guide. 7. Component Removal and Replacement. 23. 7.1. Top Cover Removal and Replacement.....................................................................23. 7.2. Mirrored Disk Drive Field Installation.....................................................................24. 7.3. Disk Drive Removal and Replacement ....................................................................26. 7.4. Power Supply Removal and Replacement................................................................28. 7.5. Motherboard Removal and Replacement .................................................................29. 8. Data Back-up and Recovery Procedures. 33. 8.1. Data Recovery for Mirrored Disk Systems ..............................................................33. 8.2. Data Recovery Procedure for Single Disk Drive Systems .......................................36. Appendixes A.. System Specifications. 43. B.. Replacement Parts List. 45. C.. Factory Default Settings. 47. D.. Warranty. 49. E.. Allworx Office Configuration Example. 51. iv.
(5) Service and Troubleshooting Guide List of Figures Figure 3-1 −Allworx Server Rear and Front Panel Views. 7. Figure 4-1 – Rack Mount Bracket Installation. 10. Figure 4-2 – Wall Mount Bracket Installation. 10. Figure 4-3 – Earth Connection and Voltage Selection. 10. Figure 6-1 – Safe Mode Administration Screen. 18. Figure 6-2 – System Events Log. 19. Figure 6-3 – Mother Board Power Indicators. 21. Figure 8-1 – System Reset Dialog Box. 33. Figure 8-2 – Initial Safe Mode Window. 35. Figure 8-3 – Safe Mode Window after Disk Mounting. 36. Figure 8-4 –Safe Mode Window after Disk Mounting. 38. Figure 8-5 –Command Prompt Window. 39. Figure 8-6 –Restore Status Information. 40. v.
(6) Service and Troubleshooting Guide. vi.
(7) Service and Troubleshooting Guide 1 1.1. Safety Instructions Electrical To avoid damaging the Allworx server or associated system components, be sure the voltage switch on the rear of the unit is set to the appropriate setting for your location. The unit is shipped in the United States with the switch set to 115 VAC. Before working inside the Allworx server, unplug the unit to help prevent electrical shock or system damage. To help prevent electrical shock, the separate protective earthing terminal located next to the power receptacle on the rear panel must be permanently connected to earth using 18 AWG wire or larger. The power cable is also equipped with a three-pronged plug to help ensure proper grounding. Do not use adapter plugs or remove the grounding prong from the cable. If an extension cord is required, use a three-wire cable with properly grounded plugs. To reduce the risk of fire, use only 26 AWG or larger UL listed or CSA certified telecommunications line cord. To help protect the Allworx system from sudden, transient increases and decreases in voltage, use a surge suppressor, line conditioner, or uninterruptible power supply (UPS). Be sure nothing rests on or interferes with the system’s power cables and that the cables are not located where they can be stepped on or tripped over. Do not spill food or liquids on the Allworx server. If the server gets wet refer to Preventive Maintenance cleaning instructions in Chapter 4. Do not push any objects into the openings of the server. Doing so can damage the unit or cause electrical shock. Keep the Allworx server away from heat sources such as radiators. Do not block the cooling fan opening on the rear panel.. 1.2. Electrostatic Discharge. Static electricity can harm the components inside the Allworx server. To prevent static damage, discharge electricity from your body before you touch any of the unit’s electronic components. You can do this by touching an unpainted metal surface on the unit’s chassis, such as the rear panel. As you continue to work inside the unit, periodically touch an unpainted metal surface to remove any static charge your body may have accumulated. You can also take the following precautions to prevent damage from electrostatic discharge: When unpacking a static-sensitive component, do not remove the component from its anti-static packing material until you are ready to install the component. Be sure to discharge static electricity from your body just before unwrapping the component. Continued on next page. 1.
(8) Service and Troubleshooting Guide When transporting a static-sensitive component, first place it an anti-static container or packaging. Handle all sensitive components in a static-safe area. If possible, use anti-static floor pads, straps and workbench pads.. 2.
(9) Service and Troubleshooting Guide 2. Packaging NOTE: Save all shipping and packaging materials. Verify all items against the parts list. If any items are missing, contact your distributor or InSciTek Microsystems customer support.. Packaging Components Quantity. Item. Part Number. 1. Shipping Container. 4410100. 2. Foam End Caps. 4430100. 1. Protective Plastic Bag. 4420100. 3.
(10) Service and Troubleshooting Guide. 4.
(11) Service and Troubleshooting Guide 3. System Description. The Allworx system replaces several separate pieces of hardware with one to improve phone system and data network reliability – and simplifies their administration. Allworx integrates phone system, PC network, Internet access, faxing, data storage, and data backup functionality. The system reduces the number of IT equipment purchases and vendors required to keep your business up and running. It operates within the facility, and optionally connects to a set of centrally hosted Internet services. The fully integrated solution also adds the following key capabilities: PBX telephony with auto attendant and digital voice mail Unified messaging of email, voicemail and fax WAN access (DSL and cable modem) with firewall/NAT and internal LAN support Internal and external web server, email server, and file server Group collaboration services 3.1. System Features. The Allworx server comprises the following major systems: System. Network. Description. Supports LAN services to enable file sharing and web-site hosting.. Key Components. Windows file server Intranet web server External web server Email server (SMTP and POP3) Domain server with DNS Domain Server/Cache Local area network (4 RJ-45 10/100 Base T ports) Wide Area Network access (1 RJ-45 10/100 Base T port) Mirrored disk option. 5.
(12) Service and Troubleshooting Guide. Telephone. Fully featured PBX capabilities.. Call control functions 3-way conferencing Call hunt groups Auto-attendant SIP (Voice over IP) and analog telephone set compatibility Voicemail Caller ID (Name and number) Distinctive ringing Music on hold Overhead paging Intercom support Call detail reports Fax machine support Power fail analog phone 6 RJ-11 Universal telephony ports (loop start or ground start option) 9 RJ-11 Central office trunk lines (3 dedicated FXO, 6 FXS). Secured Internet Access. Industry standard firewall provides secured connectivity. WAN access (DSL, Cable Modem, T1 via channel bank Stateful Pack Inspection (SPI) security Connection sharing using NAT. Group Productivity Tools. Teaming and organizational productivity tools and applications. Calendaring Scheduling Personalized reminders Administrative controls Universal messaging. 6.
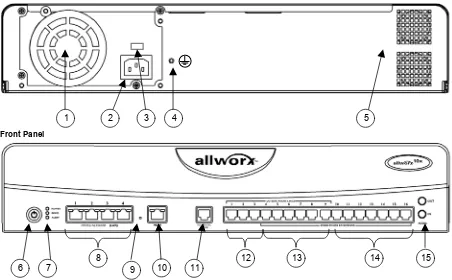
(13) Service and Troubleshooting Guide 3.2. Front and Rear Panel Descriptions. Figure 3-1 provides an illustration of the Allworx exterior components and connections.. Rear Panel. 1. 2. 3. 4. 5. Front Panel. 6. 7. 8 9. 10. 12. 11. 13. 14. Figure 3-1 −Allworx Server Rear and Front Panel Views Front and Rear Panel Feature Descriptions 1. Exhaust fan cover. 2. Power cord connector. 3. Voltage selection switch. 4. Permanent protective earthing connection. 5. Air intake and exhaust vents. 6. Power switch. 7. Front panel LEDs. Power — Indicates system start up activity Drive — Indicates drive activity Alert — Indicates 1) drive or other system fault condition, 2) system has booted in Safe Mode.. 7. 15.
(14) Service and Troubleshooting Guide 8. RJ-45 10/100 Base T switched Local Area Network Ethernet ports. Accommodates up to 40 Standard Internet Protocol (SIP) digital telephones and local PCs through a LAN hub or switch. Each port contains two LEDs as follows: Green — Steady green indicates connectivity is established. Blinking indicates transmission activity. Amber — On indicates 100 MB bandwidth, off indicates 10 MB bandwidth.. 9. Safe Mode Reset Button. 10. RJ-45 10/100 Base T Wide Area Network port. Each port contains two LEDs as follows: Green — Steady green indicates connectivity is established. Blinking indicates transmission activity. Amber — On indicates 100 MB bandwidth, off indicates 10 MB bandwidth.. 3.3. 11. RJ-11 Power Fail analog phone connector that connects to FXO RJ-11 port #1 during power failure. 12. RJ-11 dedicated loop-start FXO ports for central office connection (Ports 1-3). 13. RJ-11 loop-start FXO for central office connection or FXS universal telephone autosensing ports for analog extension connection (Ports 4-9). 14. RJ-11 FXS ports for analog or fax extension (Ports 10-16). 15. 3.5 mm audio mini jacks for music-on-hold and overhead paging. Technical Support. Contact the Allworx service advisor at 1-866-Allworx (1-866-255-9679) for technical assistance.. 8.
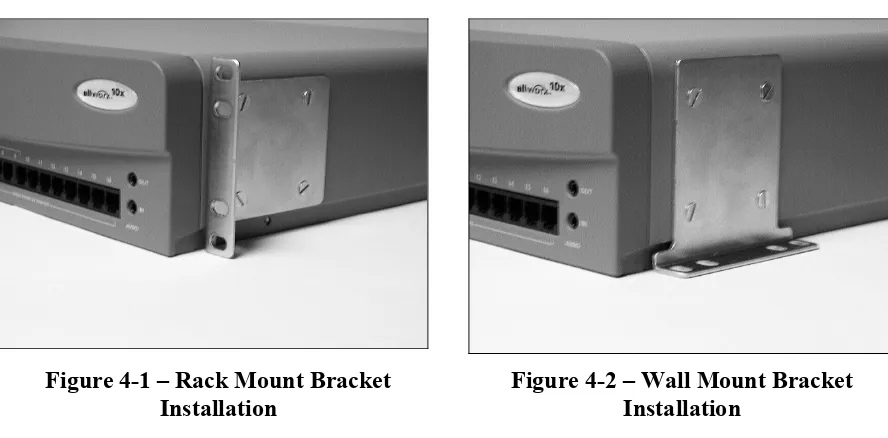
(15) Service and Troubleshooting Guide 4. Installation and Set Up Remove all parts from the shipping container. NOTE: Save all shipping and packaging materials. Verify all items against the parts list. If any items are missing, contact your distributor or InSciTek Microsystems customer support.. 4.1. Table Top or Shelf Placement Install the four rubber feet on the bottom of the Allworx server. Remove the paper backing from each rubber foot. Place one foot on the circle at each corner on the bottom of the chassis.. 4.2. Rack Mount Installation Install the mounting brackets on each side of the server chassis using the four 8-32 flat head screws. Place the brackets so that the smaller ears extend away from the front of the unit to accommodate installation into the rack (Figure 4-1). Proceed to the Power Connection instructions below and perform the steps appropriate for your installation before placing the system into the rack. Install the server into the rack using appropriate hardware.. 4.3. Wall Mount Installation NOTES: Be sure there is enough clearance between the server’s front and rear panels and any walls or other equipment to allow power, network and telephony connections. Install the mounting brackets on each side of the server chassis using the four 8-32 flat head screws. Place the brackets so that the smaller ears are facing the bottom of the unit (Figure 4-2). Secure the unit to the wall using appropriate hardware. WARNING: The Allworx server must be securely mounted to the wall to avoid equipment damage or personal injury. Be sure to use suitable mounting hardware and anchors for the wall material. A minimum hardware size of #8 is highly recommended.. 9.
(16) Service and Troubleshooting Guide. Figure 4-1 – Rack Mount Bracket Installation. 4.4. Figure 4-2 – Wall Mount Bracket Installation. Power Connection WARNING: Failure to follow the steps below may result in equipment damage, personal injury, and void the product warranty. Permanently connect the unit to earth using the protective earthing screw located next to the power receptacle on the rear panel (Figure 4).. Voltage setting switch. Protective earthing screw. Figure 4-3 – Earth Connection and Voltage Selection. Be sure the voltage switch on the rear of the unit is set to the appropriate setting for your location. The unit is shipped in the United States with the switch set to 115 VAC (Figure 4). Insert the female end of the power cord into the receptacle on the rear of the unit. Connect the other end to the power source. The Allworx server will automatically begin to power up. As the Allworx server progress through the power up sequence, the front panel lights will respond as follows (Figure 4-3):. 10.
(17) Service and Troubleshooting Guide. 4.5. Power. Flickers as the power up sequence progresses. Lights steady green when the unit is ready.. Drive. Flickers as the power up sequence progresses.. Alert. Lights orange momentarily when the unit initially powers on, then turns off immediately.. Telephony Connections Connect the RJ-11 cables from your telephone service provider’s central office to the Outside Lines ports on the front panel starting with port number 1. CAUTION: To reduce the risk of fire, use only 26 AWG or larger UL listed or CSA certified telecommunications line cord. NOTES: A maximum of 9 central office lines can be connected to the Allworx server using the standard loop-start or optional ground-start service. If you expect to have central office lines directly connected to specific internal extensions, begin making central office the connections at port 16 and work towards port 4 to maintain the option of using ports 4-9 as either internal extensions or central office lines. Connect an analog telephone device to the Power Fail port on the front panel. NOTE: This connection provides telephone service in the event the Allworx server loses power or fails. 4.5.1. Connecting Analog Telephone Extensions. Connect the RJ-11 cables from each analog telephone to the Inside Phone Extensions ports on the front panel using the first available port beginning with port 4. 4.5.2 Connecting SIP Telephone Extensions Connect the RJ-45 cables for each IP telephone to the Office Network ports on the front panel. NOTE: Although the Office Network ports are labeled 1-4, connections can made be to any available port in any order. If you have more IP telephones than can be accommodated by the available ports, you will need to use a switch or hub to concentrate the connections to the server. Appendix G shows an example of an Allworx office network configuration.. 11.
(18) Service and Troubleshooting Guide 4.6. Data Network Installation Before connecting the data network to the Allworx server, some pre-planning is required. Consider the following network configuration guidelines: DHCP Server. The Allworx server includes a LAN-side DHCP server that is enabled by default. If the Allworx server is being connected to another local area network, one of the DHCP servers needs to disabled. If IP telephones are being installed, refer to the Allworx System Administrator’s Guide for more complete information on IP telephone and DHCP server configuration.. The Allworx server includes an enterprise class firewall. If the Firewall Configuration Allworx WAN is being connected directly to the Internet, be sure to select one of the NAT firewall options before making the physical connection. Refer to the System Administrator’s Guide for this and other firewall configuration options. Domain Name Server. If a local domain name server is available on a LAN, use that IP address when configuring the Allworx server. Otherwise, contact your Internet Service Provider for the proper IP address. If the Allworx server will be used as a public host: • Be sure there is a direct connection from the Allworx WAN to the Internet. • Be sure to update your domain name registrar name server record with the Allworx public server address. • Be sure your Internet Service Provider assigns a static IP address. Do not use dynamic addressing.. Mail Server. You must decide whether inbound email will be routed through the Allworx server. If the Allworx server is to be the primary inbound mail server, be sure there is a connection from the Allworx WAN to the Internet. If using an external mail server to support the Allworx All-in-One™ unified messaging, you must add an account to the email client to download POP3 email from the Allworx server (Refer to the Allworx System Administrator’s Guide). For outbound mail, the Allworx server can be the SMTP server if it is on a LAN and the WAN is connected to the Internet.. Internet Web Server. Be sure to connect the Allworx WAN to the Internet. Additional guidelines for web server configuration can be found in the Allworx System Administrator’s Guide.. 12.
(19) Service and Troubleshooting Guide NOTE: Cross-over cables are not required in the following sections. The Allworx Office Network ports provide automatic cross-over. 4.6.1. Local Area Network (LAN) Connection. Connect the RJ-45 cables for the PC network to the Office Network ports on the front panel (Figure 5). The green LED will come on indicating end-to-end connectivity, and flicker indicating transmission activity. The amber LED indicates port speed: On = 100MB/S, Off = 10MB/S. NOTE: Although the Office Network ports are labeled 1-4, connections can made be to any available port in any order. 4.6.2. Wide Area Network (WAN) Broadband Connection. Connect a cable from your broadband service modem to the WAN port on the front panel (Figure 5). The green LED will come on indicating end-to-end connectivity, and flicker indicating transmission activity. The amber LED indicates port speed: On = 100MB/S, Off = 10MB/S. NOTE: The WAN port may also be used to connect one Allworx server to another through a LAN. 4.7. Accessories Installation 4.7.1 Adding a Fax Machine Connect the RJ-11 cable from your fax machine to the first available FXS RJ-11 analog port on the front panel. Refer to the Allworx System Administrator’s Guide to complete the setup and configuration. 4.7.2. Connecting Music and Paging. 4.7.2.1 Music-on-Hold Connect the output from your music system to the Allworx server using the Line-in Audio Adapter Cable provided with your Allworx system. Insert the male cable end into the audio connector labeled “In” on the front panel (Figure 1). 4.7.2.2 Paging Connect the Allworx server to the input of your paging system using the audio connector labeled “Out” on the Allworx front panel (Figure 3-1). The Allworx server is now ready for user set up. Proceed to the Allworx System Administrator’s Guide.. 13.
(20) Service and Troubleshooting Guide. 14.
(21) Service and Troubleshooting Guide 5 5.1. Preventive Maintenance Exterior Cleaning. Recommended Tools Use the following tools and supplies to clean the exterior of the Allworx server: Antistatic strap Liquid dish washing detergent Soft lint-free cleaning cloth Small vacuum with brush attachment Cleaning Procedures Place the antistatic strap around your wrist and attach the other end to the earthing connection on the rear of the Allworx server. Use the vacuum to remove dust and debris from the fan area and intake/exhaust vents on the rear panel (Figure 1). Moisten the cloth with a solution of three parts water and one part liquid dish washing detergent. CAUTION: Do not soak the cloth in the solution. Do not let the solution drip inside the unit or into any of the ports on the front panel. Wipe the exterior surfaces of the unit with the moistened cloth. 5.2. Telephony Surge Protection Surge protection is provided internally on all telephony interfaces (ports 1-16 and the Power Fail Phone port), and is designed to be compliant with Telcordia specification GR-1089.. 15.
(22) Service and Troubleshooting Guide. 16.
(23) Service and Troubleshooting Guide 6 6.1. Troubleshooting Start-up Failure. Follow the steps below to determine if the system failed to start-up properly. Step. Action. 1. Observe the front panel LEDs. Normal operating conditions are as follows:. 2. Response. The following conditions indicate a possible system start-up fault.. Power. Solid green. Power. Solid red. Drive. Not illuminated or flashing. Drive. Not illuminated or solid green. Alert. Not illuminated. Alert. Solid amber. Prepare for Safe Mode operation. a. Disconnect all network connections from the Allworx server. b. Be sure the PC used for this process has its DHCP client mode enabled. c. Connect the PC directly into any Allworx Office Network port. Note: The Allworx DHCP Server is automatically enabled in Safe Mode. The IP address on the LAN is set to the factory default.. 3. Press the Safe Mode button on the front The front panel LEDs will flicker indicating the unit is restarting. Restart panel by inserting a paper clip into the is finished when the Power and Alert hole in the front panel (Figure 3-1). LEDs become steady.. 4. Open your PC’s browser. Enter the Allworx server URL in the address field using the format:. The Safe Mode window in Figure 6-1 will appear.. http://admin.allworx.inscitek.com:8080 or http://192.168..2.254:8080/ Continued on next page.. 17.
(24) Service and Troubleshooting Guide. 5. Click Open System Events Window.. 6. Read through the events log for messages indicating Hard Disk Problem. These messages should be near the end of the log as they are likely the last events to occur before the system failed.. 7. Replace the failed disk. Refer to Section 7.3.. The report in Figure 6-2 will appear.. Figure 6-1 – Safe Mode Administration Screen. 18.
(25) Service and Troubleshooting Guide. Figure 6-2 – System Events Log. 19.
(26) Service and Troubleshooting Guide 6.2. Power Failure. The following steps provide diagnostic procedures for isolating and correcting problems in the event the Allworx server fails to power on. Diagnostic Procedures Step. Action. Response. 1. Confirm that the green Power indicator on the front panel does fully illuminate within 2 seconds of pressing the power switch on the front panel. Refer to Figure 1.. The power indicator does not light.. 2. Confirm that the power cord is connected to the rear panel and to an active power outlet.. The power cord is properly connected and the power outlet is active.. 3. Confirm that the Power Selection switch on the rear panel is set correctly for your location.. This switch should be set to 115 VAC for all locations in the United States.. 4. Remove the top cover assembly. Refer to section 8.1. WARNING: Power may be active in the unit. Avoid touching any internal components during the following steps. Failure to follow this precaution may result in personal injury or equipment damage.. 5. Visually locate the amber (LED 5)and green (LED 4) power indicator LEDs located on the motherboard (Figure 63).. 6. Press and hold the power switch on the front panel. The amber LED should light and stay lit while the switch is depressed, indicating that the power supply is operating properly.. If the amber LED does not light, replace the power supply. Otherwise proceed to the next step.. 7. Confirm that the green LED is also illuminated verifying that the power supply is operating properly.. If the green LED does not light, replace the motherboard. Otherwise, proceed to the next step.. 8. Confirm that the fan is spinning and the If the Alert light is not on, replace the power supply. Otherwise, proceed to Alert light on the front panel is the next step. illuminated. 9. Confirm that the Power light on the front panel is not illuminated. 20. Replace the motherboard..
(27) Service and Troubleshooting Guide. Rear. Power Indicator LEDs. Front. Figure 6-3 – Mother Board Power Indicators. 6.3. Disk Drive Failure. Follow the steps below to determine if the system has a faulty disk drive. NOTE: The Allworx server will automatically restart into Safe Mode if: •. it cannot access disk drive information,. •. there is a system configuration conflict preventing the network from functioning properly.. Step. Action. 1. Observe the front panel LEDs. Normal operating conditions are as follows:. The following conditions indicate a possible drive fault.. Power. Solid green. Power. Solid green. Drive. Not illuminated or flashing. Drive. Not illuminated. Alert. Solid amber. Alert. 2. Response. Not illuminated. Check the system administrator’s Event If drive fault messages are recorded, Log for drive fault messages. replace the drive. 21.
(28) Service and Troubleshooting Guide. 22.
(29) Service and Troubleshooting Guide 7. Component Removal and Replacement. Refer to Appendix B for a list of replacement parts and part numbers. 7.1. Top Cover Removal and Replacement CAUTION: Power off the Allworx server then disconnect it from the power source. Failure to follow this precaution may result in personal injury or equipment damage and void the product warranty.. Required Tools Antistatic strap #2 Phillips screw driver Removal Procedure 1. Power off the unit by pressing the front panel Power switch. 2. Wait for the front panel Power indicator to go off, then unplug the Allworx unit from the power source. Rack and wall mount installations: 1. Place the antistatic strap around your wrist and connect the other end to the earthing screw on the rear panel of the server. 2. Remove the unit from the rack or wall. 3. Disconnect any network, telephony and audio connections from the front panel. CAUTION: Failure to follow this step may result in personal injury or equipment damage and void the product warranty. NOTE: Label all cables and record the port numbers and locations of all connections to facilitate re-installation. 4. If installed, remove the four screws holding each mounting bracket. Cabinet removal: 1. Remove two screws on each side of the chassis at the bottom. 2. Carefully slide the top cover towards the back of the unit about one (1) inch. 3. Using your thumb and first finger, grasp the front and rear of one side of the top cover at the bottom, and pull outward about ¼ inch to release the top cover from the chassis. 4. Lift up and remove the top cover.. 23.
(30) Service and Troubleshooting Guide. Replacement Procedure 1. Place the antistatic strap around your wrist and connect the other end to the earthing screw on the rear panel of the server. 2. With one hand holding each side of the top cover, place the top cover over the chassis and lower the bottom edge of one side to the work surface. Pull the lower edge of the opposite side slightly outward and lower the top cover in place. 3. Slide the top cover forward, being sure the tongue of the top cover rests under the plastic front bezel. 4. Replace the two top cover retaining screws on each side of the unit. 5. If required, install the mounting brackets on each side using the 8 mounting bracket screws. 6. Install the server in the rack or on the wall. 7. Reconnect all network, telephony and audio connections. 8. Reconnect the Allworx server to the power source. The unit will automatically begin the power up sequence. 7.2. Mirrored Disk Drive Field Installation. When selecting a disk drive for installation as a mirrored disk, be sure the disk drive is the same size or larger than the original single disk drive. Further, the usable data space on the drives is limited to the capacity of the smaller disk of the pair. Required Tools Antistatic strap #2 Phillips screw driver Removal Procedure CAUTION: Power off the Allworx server then disconnect it from the power source. Disconnect all telephony, network and audio connections from the front panel. Failure to follow this precaution may result in personal injury or equipment damage and void the product warranty. 1. Place the antistatic strap around your wrist and connect the other end to the earthing screw on the rear panel of the server. 2. Remove the top cover as described in section 8.1. 3. Attach the disk drive assembly bracket to the disk drive using the four retaining screws. Be sure the ribbon cable connector and 4-wire connector on the drive are facing the rear. 24.
(31) Service and Troubleshooting Guide of the unit. Be sure the tab on the disk drive assembly bracket is positioned towards the front of the unit. 4. Install the 2 disk drive bracket retaining screws in the chassis shelf approximately 2-3 turns. 5. Place the disk drive and bracket assembly over the retaining screws on the chassis shelf so that the tab on the bottom of the bracket is fully inserted into the opening in the chassis shelf. 6. Slide the disk drive assembly forward until it is stopped by the retaining screws in the slot. 7. Tighten the disk drive assembly retaining screws. 8. Connect one end of the ribbon cable to connector J7 on the mother board. Connect the other end to the disk drive. NOTE: The connector is keyed to insure proper orientation. 9. Connect the 4-wire connector P5 to the disk drive. 10. Replace the top cover. 11. Install the server in the rack or on the wall. 12. Reconnect all network, telephony and audio connections. 13. Reconnect the Allworx server to the power source. The unit will automatically begin the power up sequence. 14. Monitor the front panel LEDs as the system starts up. A successful restart is indicated by the following conditions of the front panel LEDs: Power. Flashes momentarily then remains solid green. Drive. Not illuminated or flashing. Alert. Not illuminated. If the conditions above are not observed, check the Administrator’s Event Log for fault messages. NOTE: When a new mirrored drive is installed, it may take an extended period of time to replicate the data on the new disk from the original. You can estimate the replication time by assuming it takes approximately 1 minute per gigabyte of disk size. For example, a 40 MB disk could take about 40 minutes to replicate.. 25.
(32) Service and Troubleshooting Guide 7.3. Disk Drive Removal and Replacement. When replacing a disk drive in a mirrored disk system, be sure the replacement disk drive is the same size or larger than the other disk drive. Further, the usable data space on the drives is limited to the capacity of the smaller drive of the pair. Required Tools Antistatic strap #2 Phillips screw driver Removal Procedure CAUTION: Power off the Allworx server then disconnect it from the power source. Disconnect all telephony, network and audio connections from the front panel. Failure to follow this precaution may result in personal injury or equipment damage and void the product warranty. 1. Place the antistatic strap around your wrist and connect the other end to the earthing screw on the rear panel of the server. 2. Remove the top cover as described in section 7.1. 3. Locate the disk drive assembly(ies) at the front left corner (as viewed from the front of the unit) of the chassis. NOTE: The primary disk drive is located farthest to the left. The optional mirrored disk is located on the right. 4. Disconnect the ribbon cable connector and the 4-wire connector (P6 on the primary drive or P5 on the mirrored drive) from the drive. 5. Loosen (do not remove) the disk drive assembly retaining screws on each side of the disk drive assembly. 6. Slide the disk drive assembly towards the rear of the unit until the retaining screws are clear. Lift up and remove the disk drive assembly. 7. Locate and remove the four screws on the bottom of the disk drive holding it to the assembly bracket. Save the screws and the bracket for replacement.. 26.
(33) Service and Troubleshooting Guide Replacement Procedure 1. Place the antistatic strap around your wrist and connect the other end to the earthing screw on the rear panel of the server. 2. Attach the disk drive assembly bracket to the disk drive using the four retaining screws. Be sure the ribbon cable connector and 4-wire connector on the drive are facing the rear of the unit. Be sure the tab on the disk drive assembly bracket is positioned towards the front of the unit. 3. Place the disk drive assembly over the retaining screws on the chassis shelf so that the tab on the bottom of the assembly bracket is fully inserted into the opening in the chassis shelf. 4. Slide the disk drive assembly forward until it is stopped by the retaining screws in the slot. 5. Tighten the disk drive assembly retaining screws. 6. Reconnect the ribbon cable connector and the 4-wire connector (P6 or P5). 7. Replace the top cover. 8. Install the server in the rack or on the wall. 9. Reconnect all network, telephony and audio connections. NOTE: If this is a single drive system, go to section 6.4 and complete the Data Recovery Procedure. 10. Reconnect the Allworx server to the power source. The unit will automatically begin the power up sequence. If the Mirrored Disk option is installed, the system will automatically copy data to the new drive. NOTE: When a new mirrored drive is installed, it may take an extended period of time to replicate the data on the new disk from the original. You can estimate the replication time by assuming it takes approximately 1 minute per gigabyte of disk size. For example, a 40 MB disk could take about 40 minutes to replicate. 11. Monitor the front panel LEDs as the system starts up. A successful restart is indicated by the following conditions of the front panel LEDs: Power. Flashes during startup then remains solid green. Drive. Not illuminated or flashing. Alert. Not illuminated. If the conditions above are not observed, check the Administrator’s Event Log for fault messages. 27.
(34) Service and Troubleshooting Guide 7.4. Power Supply Removal and Replacement. Required Tools Antistatic strap #2 Phillips screw driver Removal Procedure CAUTION: Power off the Allworx server then disconnect it from the power source. Disconnect all telephony, network and audio connections from the front panel. Failure to follow this precaution may result in personal injury or equipment damage and void the product warranty. 1. Place the antistatic strap around your wrist and connect the other end to the earthing screw on the rear panel of the server. 2. Remove the top cover as described in section 7.1. 3. Locate the power supply assembly at the rear right corner of the chassis (as viewed from the front of the unit). 4. Disconnect connector P1 from the motherboard by releasing the latch on the connector and gently pulling it away from the motherboard socket. 5. Disconnect connectors P6 on single drive systems and P5 on dual drive systems by gently pulling the connectors away from the drive(s). 6. Disconnect the power cord from the back panel. 7. Remove the four power supply retaining screws on the rear panel. 8. Remove the power supply. Replacement Procedure 1. Place the antistatic strap around your wrist and connect the other end to the earthing screw on the rear panel of the server. 2. Place the power supply in the chassis and fit snugly against the rear panel. 3. Install the four power supply retaining screws on the rear panel. 4. Reconnect connector P1 on the motherboard Be sure the latch is secured. 5. Reconnect connectors P6 on single drive systems and P5 on dual drive systems into the drive(s).. 28.
(35) Service and Troubleshooting Guide 6. Replace the top cover. 7. Install the server in the rack or on the wall. 8. Reconnect all network, telephony and audio connections. 9. Reconnect the Allworx server to the power source. The unit will automatically begin the power up sequence. 10. Monitor the front panel LEDs as the system starts up. A successful restart is indicated by the following conditions of the front panel LEDs: Power. Flashes during startup then remains solid green. Drive. Not illuminated or flashing. Alert. Not illuminated. If the conditions above are not observed, check the Administrator’s Event Log for fault messages. 7.5. Motherboard Removal and Replacement. Required Tools Antistatic strap #2 Phillips screw driver Removal Procedure CAUTION: Power off the Allworx server then disconnect it from the power source. Disconnect all telephony, network and audio connections from the front panel. Failure to follow this precaution may result in personal injury or equipment damage and void the product warranty. 1. Place the antistatic strap around your wrist and connect the other end to the earthing screw on the rear panel of the server. 2. Disconnect all telephone line and network connections from the front panel. 3. Remove the top cover as described in section 7.1. 3. Disconnect the disk drive ribbon cable connector(s) from the motherboard (J6 and optionally J7). 4. Disconnect disk drive connectors P6 and optionally P5. 5. Disconnect power supply connector P1 from the motherboard. 6. Remove the two retaining screws at the rear corners of the chassis shelf.. 29.
(36) Service and Troubleshooting Guide 7. Slowly lift the back edge of the chassis shelf until it is almost vertical. 8. Slide the shelf backward until the front tabs are clear of the slots in the front panel. 9. Set the chassis shelf on an anti-static surface. 10. Locate and remove the three front and four rear motherboard retaining screws. 11. Remove the motherboard. Replacement Procedure 1. Place the motherboard in the chassis, carefully aligning the front panel connectors and the light pipe into their slots. Be sure the retaining screw holes in the motherboard are centered over their mounts. NOTE: The front of the motherboard should be tight against the front of the enclosure. 2. Replace all seven retaining screws. 3. Holding the chassis shelf at about a 45° angle to the main chassis, insert the front panel tabs into the front panel slots and carefully lower the chassis shelf into position. 4. Replace the two retaining screws. 5. Reconnect power supply connector P1. 6. Reconnect connectors P6 and optionally P5. 7. Reconnect the disk drive ribbon cable connector(s) to the Motherboard (J6 and optionally J7). 8. Replace the top cover. 9. Install the server in the rack or on the wall. 10. Reconnect all network, telephony and audio connections. 11. Reconnect the Allworx server to the power source. The unit will automatically begin the power up sequence. 12. Monitor the front panel LEDs as the system starts up. A successful restart is indicated by the following conditions of the front panel LEDs:. 30.
(37) Service and Troubleshooting Guide. Power. Flashes during startup then remains solid green. Drive. Not illuminated or flashing. Alert. Not illuminated. If the conditions above are not observed, check the Administrator’s Event Log for fault messages.. 31.
(38) Service and Troubleshooting Guide. 32.
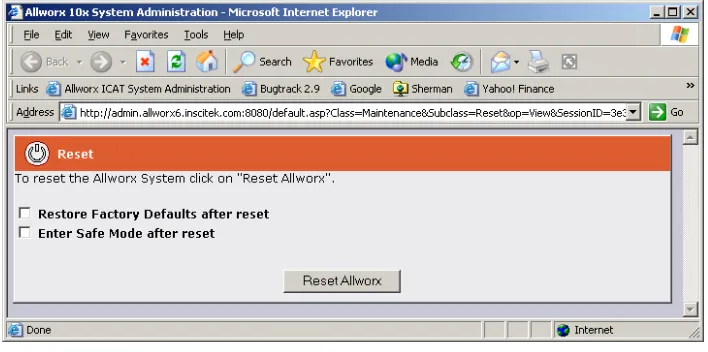
(39) Service and Troubleshooting Guide 8 8.1. Data Back-up and Recovery Procedures Data Recovery for Mirrored Disk Systems. The Allworx mirrored disk option provides a second disk drive that is constantly running in parallel with the primary drive. Any system information written to one drive is automatically stored on the second drive. Data is replicated between the two drives to ensure there is a complete image to do a full recovery. In the event one drive fails, the system automatically looks to the second drive for information. Drive faults are recorded in the System Administrator’s Event Log, accessed through the Allworx Communications Center or a browser. Drive faults are also the indicated by the system by blinking the Alert LED on the front panel. Refer to section 7 for disk drive troubleshooting procedures. When a drive has been replaced, or the mirrored disk option is being installed in the field, follow the procedures below to transfer data from one drive to the other. NOTE: Although a system may have the mirrored disk option installed, it is highly recommended that regular backups be performed. 1. If installing a mirrored disk for the first time, complete the installation instructions in section 7.2 of this manual (also provided in the mirrored disk option kit). If replacing a drive, complete the installation instructions in section 7.3 of this manual. 2. After the Allworx unit has powered up, open the Allworx Communications center and log in as the System Administrator. 3. Click the System Mgt button on the Allworx Communication Center. Drag the icon to the Information pane and click again. 4. Click the System tab. 5. Click the System Reset button to shut down and restart the Allworx system. The window in Figure 8-1 will appear.. Figure 8-1 – System Reset Dialog Box 33.
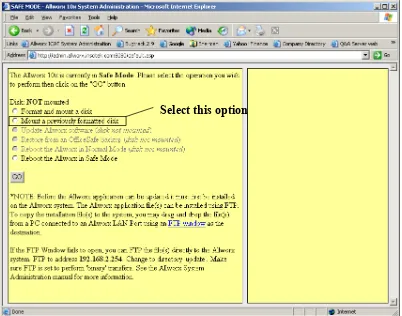
(40) Service and Troubleshooting Guide 6. Check Enter Safe Mode after reset. 7. Click Reset Allworx. A message indicating the reset process will take about 60 seconds will appear. Click OK. The Allworx admin login screen will appear in your browser. 8. Monitor the front panel LEDs as the system starts up. A successful restart is indicated by the following conditions of the front panel LEDs: Power. Flashes momentarily then remains solid green. Drive. Not illuminated or flashing. Alert. On solid for Safe Mode. 9. While the Allworx server is rebooting, prepare for Safe Mode operation. a. Disconnect all network connections from the Allworx server. b. Be sure the PC used for this process has its DHCP client mode enabled. c. Connect the PC directly into any Allworx Office Network port. Note: The Allworx DHCP Server is automatically enabled in Safe Mode. The IP address on the LAN is set to the factory default. 10. When the Allworx server has finished rebooting, connect the PC directly to one of the Allworx network ports. 11. Open your PC’s browser. In the address field of the browser, type the Safe Mode address as follows and press Enter: http://admin.allworx.inscitek.com:8080/ or http://192.168.2.254:8080/ 12. The system is now in Safe Mode and the window in Figure 8-2 will appear. 13. Click the button to select Mount a previously formatted disk. CAUTION: Never select Format and mount a disk as this completely erases the database. 14. Click Go. A message indicating the time to complete the process will appear. NOTE: The time to completion for newly installed or replaced disk can be estimated by assuming 1 minute per megabyte of disk size. For example, a 40MB drive might take about 40 minutes. 15. Click OK. Disk mounting will begin with status of the process displayed in the right Status pane of the Safe Mode window. New options will appear in the left pane (Figure 8-3). 16. Click the button to select Reboot the Allworx in Normal Mode. 17. Click Go to reboot the Allworx server. A green solid light on the server front panel will indicate that rebooting is done. 18. Close the Safe Mode window.. 34.
(41) Service and Troubleshooting Guide 19. Close the Allworx Communications Center window. 20. Reopen the Allworx Communications Center and login as the System Administrator.. Select this option. Figure 8-2 – Initial Safe Mode Window. 35.
(42) Service and Troubleshooting Guide. Status information Select this option.. Figure 8-3 – Safe Mode Window after Disk Mounting. 8.2. Data Recovery Procedure for Single Disk Drive Systems NOTE: If data will be restored from a local device, be sure the device is connected to the local area network and the network is connected to the Allworx server.. 1. If replacing a drive, complete the installation instructions in section 7.3 of this manual. 2. The system will automatically select the storage device from which to download the data based on the system configuration prior to the repair. 3. The download process will begin automatically. You can monitor the progress of the download through the dialog box on the screen.. 36.
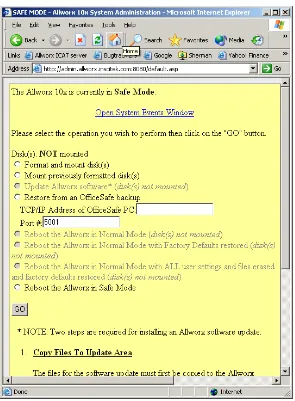
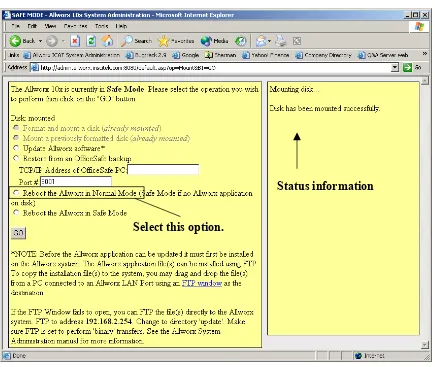
(43) Service and Troubleshooting Guide 4. After the Allworx unit has powered up, open the Allworx Communications center and log in as the System Administrator. 5. Click the System Mgt button on the Allworx Communication Center. Drag the icon to the Information pane and click again. 6. Click the System tab. 7. Click the System Reset button to shut down and restart the Allworx system. The window in Figure 8-1 will appear. 8. Check Enter Safe Mode after reset. 9. Click Reset Allworx. A message indicating the reset process will take about 60 seconds will appear. Click OK. The Allworx admin login screen will appear in your browser. 10. Monitor the front panel LEDs as the system starts up. A successful restart is indicated by the following conditions of the front panel LEDs: Power. Flashes during startup then remains solid green. Drive. Not illuminated or flashing. Alert. On solid for Safe Mode. 11. While the Allworx server is rebooting, prepare for Safe Mode operation. a. Disconnect all network connections from the Allworx server. b. Be sure the PC used for this process has its DHCP client mode enabled. c. Connect the PC directly into any Allworx Office Network port. Note: The Allworx DHCP Server is automatically enabled in Safe Mode. The IP address on the LAN is set to the factory default. 12. When the Allworx server has finished rebooting, connect the PC directly to one of the Allworx network ports. 13. Open your PC’s browser. In the address field of the browser, type the Safe Mode address as follows and press Enter: http://admin.allworx.inscitek.com:8080/ or http://192.168.2.254:8080/ 14. The system is now in Safe Mode and the window in Figure 8-2 will appear. 15. Click the button to select Mount a previously formatted disk. CAUTION: Never select Format and mount a disk as this completely erases the database. 16. Click Go. A message indicating the time to complete the process will appear. 17. Click OK. Disk mounting will begin with status of the process displayed in the right Status pane of the Safe Mode window. New options will appear in the left pane (Figure 8-4). 37.
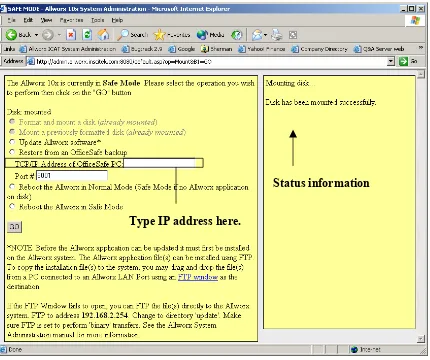
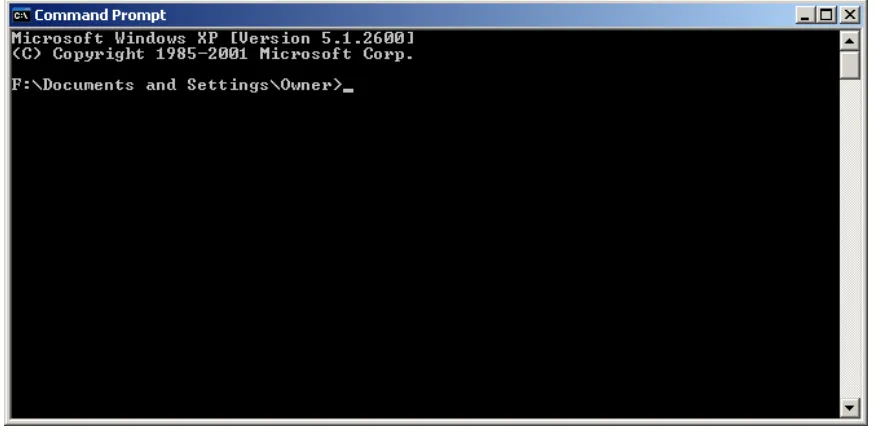
(44) Service and Troubleshooting Guide 18. Click the button to select Restore from an OfficeSafe back up. 19. Enter the IP address of your PC in the field TCP/IP Address of OfficeSafe PC. To get your PC’s IP address: NOTE: The following procedure may vary depending on your PC’s Windows environment. a. Click your PCs Start button. b. Select Programs, then Accessories, then Command prompt. The Command Prompt window in Figure 8-5 will appear. c. After the prompt F:\Documents and Settings\Owner>, type ipconfig and press Enter. d. Record the IP address (including the periods between the numbers). e. Close the Command Prompt window.. Status information Type IP address here.. Figure 8-4 –Safe Mode Window after Disk Mounting. 38.
(45) Service and Troubleshooting Guide. 20. Type the IP address into the field TCP/IP Address of OfficeSafe PC (Figure 8-4). 21. Click Go. A warning message will appear. Click OK to start the data recovery process. NOTE: The time to complete the data recovery process will depend on the amount of data on the disk and the speed of the PC’s network card. You can estimate the recovery time using following assumptions: •. 1 MB/second for a 10MB network card. •. 5 MB/second for a 100MB network card. 22. The middle green light on the Allworx server front panel will flicker as the process progresses. A message will appear in the Status pane when the process is done. (Figure 8-6). 23. Click to select Reboot the Allworx in Normal Mode. 24. Click Go to reboot the Allworx server. A green solid light on the server front panel will indicate that rebooting is done. 25. Close the Safe Mode window. 26. Close the Allworx Communications Center window. 27. Reopen the Allworx Communications Center and login as the System Administrator.. Figure 8-5 –Command Prompt Window. 39.
(46) Service and Troubleshooting Guide. Restore Status information. Figure 8-6 –Restore Status Information. 40.
(47) Service and Troubleshooting Guide. Appendixes. 41.
(48) Service and Troubleshooting Guide. 42.
(49) Service and Troubleshooting Guide A. System Specifications Physical Dimensions 17.5” W (43.5 cm) x 15” D (33 cm) x 3.5” H (9 cm) Base model weight – 17 lbs 19” rack mount or 24” high wall mountable Power Requirements AC100-127/200-240, 2/4A 60/50Hz Environmental Requirements Temperature:. 0 to 40 degrees Centigrade. Relative Humidity:. 15 - 90% non-condensing.. 43.
(50) Service and Troubleshooting Guide. 44.
(51) Service and Troubleshooting Guide B. Replacement Parts List Item. Part Number. Motherboard. 2001002. Power Supply. 2100100. Disk Drive. 2200100. Disk Drive Kit Ground Start Option. Future Feature. Battery Backup Option. Future Feature. Batteries. Future Feature. 45.
(52) Service and Troubleshooting Guide. 46.
(53) Service and Troubleshooting Guide C. Factory Default Settings The following are factory default settings for the Allworx 10x subsystems. WAN Port - DHCP Client Mode: Disabled - IP Address: 192.168.1.1 - Netmask: 255.255.255.0 - Gateway: 192.168.1.254 LAN Port - IP Address: 192.168.2.254 - Netmask: 255.255.255.0 - DHCP Server: Enabled with range of 100 addresses - Dynamic DNS: Enabled Windows File Sharing - Workgroup: WORKGROUP Domain Settings - Domain Name: inscitek.com - Host Name of Allworx: allworx - Remote DNS Server: 192.168.181.252 Time Source - SNTP Server: time.inscitek.net - Poll Period: 4 hours Router Settings - Firewall: NAT/Firewall (DMZ mode disabled) OfficeSafe Backup Settings - Mode: Disabled. 47.
(54) Service and Troubleshooting Guide. 48.
(55) Service and Troubleshooting Guide D. Warranty InSciTek warrants that the Products will be free from defects in materials and workmanship under normal use for a period of 12 months from the date of delivery to Reseller at the F.O.B. point. InSciTek does not warrant that the Products will meet end users' requirements or that the operation of the Products will be uninterrupted or error-free. This limited warranty is limited to repair, replacement, or refund of the purchase price, at InSciTek's option, with reasonable promptness after its being returned to InSciTek with transportation charges prepaid. This limited warranty does not extend to any Product which in the sole judgment of InSciTek, has been subject to neglect, improper installation or accident, nor does it extend to any Product which has been repaired or altered by other than a InSciTek authorized representative. Installation of replacement components acquired from a source other than InSciTek will void the warranty. EXCEPT AS STATED ABOVE, THE PRODUCTS ARE PROVIDED “AS IS” WITHOUT WARRANTY OF ANY KIND, EITHER EXPRESS OR IMPLIED OR STATUTORY, INCLUDING, WITHOUT LIMITATION, IMPLIED WARRANTIES OF MERCHANTABILITY AND FITNESS FOR A PARTICULAR PURPOSE. THE REMEDIES PROVIDED HEREIN ARE EXCLUSIVE AND IN LIEU OF ANY OTHER RIGHTS OR REMEDIES. IN NO EVENT WILL INSCITEK BE LIABLE FOR ANY DAMAGES, INCLUDING, WITHOUT LIMITATION, INCIDENTAL AND CONSEQUENTIAL DAMAGES AND DAMAGES FOR LOST DATA OR PROFITS ARISING OUT OF THE USE OR INABILITY TO USE THE PRODUCT, EVEN IF INSCITEK HAS BEEN ADVISED OF THE POSSIBILITY OF SUCH DAMAGES. IN NO EVENT SHALL INSCITEK’S LIABILITY FOR ANY REASON WHATSOEVER EXCEED THE AMOUNTS PAID BY RESELLER FOR THE PRODUCTS. ALL CLAIMS OF ANY TYPE BY PURCHASER AGAINST INSCITEK MUST BE BROUGHT WITHIN ONE YEAR OF ACCEPTANCE OR BE FOREVER BARRED.. 49.
(56) Service and Troubleshooting Guide. 50.
(57) Service and Troubleshooting Guide E. Allworx Office Configuration Example. “Unlimited” number of SIP. SIP Phone SIP Phone SIP Phone. Network Device. 10/100 E-net. E-net Switch or Hub. 10/100 E-net 10/100 E-net. E-net Switch or Hub. 10/100 E-net. Allworx Server 10/100 E-net. 10/100 E-net. LAN WAN. N et. 10/100 E-net. Line level audio input. In. Line level audio output. Paging Amplifier Analog Phone Analog Phone Analog Phone FAX Machine. DSL or Cable Modem. 10/100 E-net. Network Server Music on Hold Source. 10/100 E-net. Up to 13 outside DID lines*. Out. Up to 13 inside extensions*. RJ-11. * Maximum of 16 analog. 51. Up to 9 outside FXO lines*. PSTN Central Office.
(58) Service and Troubleshooting Guide. 52.
(59)
Figure

+7

Related documents