SERVER
INSTALLATION GUIDE
NEC America, Inc.
NDA-30009-003
Revision 3.0
December, 1996
LIABILITY DISCLAIMER
NEC America reserves the right to change the specifications, functions, or features in this document at any time without notice. NEC America has prepared this document for use by its employees and customers. The information contained herein is the property of NEC America and shall not be reproduced without prior written approval from NEC America.
Copyright 1996
NDA-30009 Revision 3.0 Page i
Server Installation Guide CONTENTS
TABLE OF CONTENTS
Page
Chapter 1: Introduction . . . 1
Chapter 2: Application Configuration . . . 3
Step 1: Application Characteristics (All Components) . . . 3
Step 2: Primary Configuration Parameters (All Components) . . . 4
Step 3: Facilities (Messenger and Logical Monitor only) . . . 5
Step 4: Secondary OAI Configuration Parameters (Messenger and Logical Monitor only) . . . 5
Step 5: User-defined Parameters (All Components) . . . 6
Chapter 3: MAT Assignments . . . 9
Mode Set Facility (MSF) And Terminal Multi-Transfer Facility (TMF) . . . 9
AOKC: Assignment of OAI Key Codes . . . 10
AKYD: Assignment of Dterm Function Key . . . 10
Key Transfer Facility (KTF) . . . 12
Restriction Control Facility(RCF) . . . 12
ARSC: Assignment of Route Restriction Class . . . 12
ASFC: Assignment of Service Feature Class . . . 12
ASDT: Assignment of Station Data . . . 12
Switch Control Facility(SCF) . . . 12
AADT: Assignment of Announcement or Dictation Trunk . . . 12
Status Monitor Facility – Request (SMFR) . . . 13
AMNO: Assignment of Monitored Number . . . 13
Chapter 4: Initialization and Termination . . . 15
Initialization . . . 15
Page ii NDA-30009 Revision 3.0
CONTENTS Server Installation Guide
NDA-30009 Revision 3.0 Page iii
Server Installation Guide FIGURES
LIST OF FIGURES
Figure Title Page
Page iv NDA-30009 Revision 3.0
FIGURES Server Installation Guide
NDA-30009 Revision 3.0 Page 1
Server Installation Guide Introduction
Chapter 1
Introduction
This guide provides specific field entries that need to be made in the process of installing and configuring Server. In addition to this guide, use the following manuals for this installation:
• Applications Manager (APM) Installation Manual – Contains step-by-step instructions for installing the software from the release media.
• Applications Manager (APM) Operations Manual – Explains how applications like Server are configured in the APM environment, using the entries and values provided in this guide.
• NEAX2400 System Manuals – Give very detailed explanations about the assignments that need to be made through the Maintenance Administration Terminal (MAT) commands on the NEAX2400.
Briefly, the installation and set up of Server involves the following processes:
• Software Installation – Server software must first be loaded from the release media. Log in to the APM Platform Management Menu, select the Installation of Applications/Packages option, and follow the instructions provided in the APM Installation Manual to complete this part of the installation.
• Application Configuration – Server is internally supported by the APM and must be configured in the APM environment. This section provides the information that must be entered into this APM configuration file. Use the instructions provided in the APM Operations Manual for the entries provided in this section.
Page 2 NDA-30009 Revision 3.0
Introduction Server Installation Guide
The installation process and a list of reference manuals are shown in the diagram below:
Step 1: Software Installation Software Release Media
Step 2:
Application Configuration
Application Characteristics Primary Parameter Configuration OAI Facilities (Optional)
OAI Configuration Parameters (Optional)
User-Defined Parameters
Step 3: NEAX2400 IMS Maintenance Administration Terminal (MAT) Assignments
Illustrated Relationships Between
NEAX2400 Facilities and NEAX2400 MAT Commands.
SERVER INSTALLATION
Introduction
MAT Assignments Application Configuration
Discussed in chapter: Instructions in:
APM Installation Manual
NEAX2400 IMS System Manuals APM Operations
NDA-30009 Revision 3.0 Page 3
Server Installation Guide Application Configuration
Chapter 2
Application Configuration
Server is configured into the APM system using the Add function of the Application Configuration option on the APM System Administration menu.
• Enter the APM option from the APM Platform Management Menu.
• Enter the System Administrator password at the APM password screen.
• Enter the Application Configuration option from the System Administration menu.
This section contains the information that should be entered to the configuration file for Server. For specific instructions on what these parameters mean and how to make these entries, refer to the APM Operations Manual.
The following components must be configured for Server:
• The Command Controller, the background process that manages Server functionality.
• Each Facility Messenger supported by Server. There must be one per PBX served.
• The Logical Monitor for each Facility Messenger. The Logical Monitor component is only required if Server commands #60 and #61 are used.
Note: Fully configure one component at a time (steps 1-5), rather than attempting to configure all components at each step.
Step 1: Application Characteristics (All Components)
In this step, each component is characterized. This characterization determines what other parameters must be configured for the component. Characterize each component as follows:
Parameter Facility Messenger Command Controller Logical Monitor Description
OAI Application (Y,N) Y N Y Indicates whether or not (Yes or No)
this component communicates with the NEAX2400 using OAI processes.
CRT Application (Y,N)
N N N Indicates whether or not (Yes or No)
this component requires a terminal screen that is of the same type as the one used by the APM.
Communication Queue (Y,N)
N Y N Indicates whether or not (Yes or No)
Page 4 NDA-30009 Revision 3.0
Application Configuration Server Installation Guide
Step 2: Primary Configuration Parameters (All Components)
On the Configuration Entry screen, make the entries shown below to the parameters indicated.
Note: It is assumed that the Facility Messengers are all configured alike except for their names (e.g., Messenger 1, Messenger 2, etc.).
Parameter Definitions:
• Application Name – Indicates the name to be displayed in the APM menus.
• Executable Filename – Contains the path name of the executable file.
• Group – Indicates the group to which the components areassociated.
• Response Mode – Indicates the action that APM is to take with the component should a member of the group terminate.
• Initialization Batch – Indicates whether or not the component is to be initialized automatically when the OAI system is initialized.
• Termination Mode – Indicates how the APM is to tell the application to terminate.
• Standard Output – Designates the file into which component output is redirected.
• Number of Restarts – Indicates the number of times that the APM may restart the component after it terminates erroneously.
• Queue Key – Indicates the queue key to be assigned to that component.
Parameter Facility
Messenger
Command Controller
Logical Monitor
Application Name Messenger Controller Logmon
Executable Filename /oai/app/svr/messenger /oai/app/svr/controller /oai/app/svr/logmon
Group --- ---
---Response Mode I(gnore) I(gnore) I(gnore)
Initialization Batch N(o) N(o) N(o)
Termination Mode M(essage) M(essage) M(essage)
Standard Output /oai/app/svr/msg.log /oai/app/svr/con.log /dev/null
Number of Restarts 0 0 0
---NDA-30009 Revision 3.0 Page 5
Server Installation Guide Application Configuration
Step 3: Facilities (Messenger and Logical Monitor only)
According to instructions in the APM Operations Manual, designate the following NEAX2400 facilities for each Messenger and Logical Monitor component using the Facilities command on the APM Configuration Entry screen. You only need to specify those facilities whose corresponding Server commands will be used. For example, if you only use commands 10 to 17, you should only select SCF. The only facilities that the Logical Monitor uses are SCF, SMFN, and SMFR.
Note: The MSF Op-Codes and/or TMF Op-Codes that are selected in the APM during Step 3 must also be assigned at the NEAX MAT. For more information, see Chap-ter 3, "MAT Assignments".
Step 4: Secondary OAI Configuration Parameters (Messenger and Logical
Monitor only)
Using the OAI-Conf command on the Configuration Entry screen, make the entry shown for each of the following parameters required by the indicated Server components. Use the instructions provided for this option in the APM Operations Manual:
* Differs for each PBX link.
Facility Command
KTF #33
MRFR #42
MRFI #30, #40
MSF #40, #41
NTF #33
RCF #20-#24
SCF #10-#17, #60, #61
SMFN #50, #51, #60, #61
SMFR #50-#52, #60, #61
TCFD #33
TCFI #32
TMF #30, #31
Parameter Messenger Logical Monitor
Timeout Value #1 10 0
Tenant Number 0 0
Source Link Name OAI1TCP OAI1TCP
Destination Link Name PBX1TCP* PBX1TCP*
Page 6 NDA-30009 Revision 3.0
Application Configuration Server Installation Guide
Parameter Definitions:
• Timeout Value #1: Designates the number of seconds that Server is to wait for NTF/KTF input (default, if not specified in a command). Applies to the Messenger only.
• Tenant Number: Specifies the number of the tenant that this Messenger and Logical Monitor each serves. 0=everyone.
• Source Link Name: Identifies the port on the source side of the communication link; entry should correspond to a link name in the APM system configuration file.
• Destination Link Name: Identifies the PBX port on the destination side of the communication link; entry should correspond to a link name in the APM system configuration file.
• Association Recovery: Designates the number of seconds this Messenger and Logical Monitor will each wait before trying to re-establish an association with the NEAX that has been released.
Step 5: User-defined Parameters (All Components)
Make the following additional parameter entries through the UserDefined command on the APM Configuration Entry screen.
• Messenger User-defined Parameters:
• Logical Monitor User-defined Parameters
User-defined Entry Definition
#1 01
Messenger identifier. Used in the header of Server commands. Must be unique for each Messenger.
#2 Controller Name of the Command Controller.
#3 Logmon
Name of the Logical Monitor associated with this Messenger. Required only when using commands #60 and #61.
User-defined Entry Definition
#1 /oai/app/svr/logmon.log Log filename (with path) of the Logical Monitoring process.
NDA-30009 Revision 3.0 Page 7
Server Installation Guide Application Configuration
• Controller User-defined Parameters
Note:An application can create a command file containing a sequence of commands that Server reads and executes, or it can exchange messages interactively with Server through a command FIFO. If the application interacts with Server, it sends to Server through a command FIFO and receives from Server through a response FIFO. These are configured with the User-defined Parameters.
This completes the configuration of Server in the APM. Now go to the next section to make the necessary command assignments at the NEAX2400 Maintenance Administration Terminal (MAT).
User-defined Entry Definition
#1 no Whether or not (yes/no) a command file
exists.
#2 /oai/app/svr/cfifo
If #1 is yes, the name (with path) of the command file; if #1 is no, the name of the command FIFO.
#3 yes
Whether or not (yes/no) to set up for a response FIFO; must be no if #1 is yes (uses a command file).
#4 /oai/app/svr/rfifo Response FIFO name (if #3 is yes).
#5 all
Logging options:
All - log comments, responses, asynchronous messages.
Error - log only responses with errors. None - no logging requested
#6 /oai/app/svr/log
Path name of the directory where logging file is to be updated and maintained.
#7 daily Log file backup period: daily or hourly.
#8 50
Maximum number of unresponded commands that will be queued before new incoming messages are rejected.
#9 1
Page 8 NDA-30009 Revision 3.0
Application Configuration Server Installation Guide
NDA-30009 Revision 3.0 Page 9
Server Installation Guide MAT Assignments
Chapter 3
MAT Assignments
This guide assumes that data settings that affect the operation of all OAI software on a system-wide basis have already been assigned on the NEAX Maintenance Administration Terminal (MAT). Such settings include, system index values and assignment of Interface I/O Port Data in the Interface Processor (IP). For more information about these system data settings and the MAT commands described below for Server, refer to the OAI Module Installation Manual for the NEAX2400 IMS, the NEAX2400 IMS Command Manual, and the NEAX2400 IMS Job Specification Manual.
Server is configured for access to several facilities, but its use of those facilities is dictated by the application(s) that uses Server to interface with the NEAX2400 IMS. Refer to the NEAX2400 IMS Programming Manual to determine what MAT assignments are necessary as the needs of applications supported by Server become clear. The following relationships between NEAX facilities and MAT assignments are provided as examples only:
Mode Set Facility (MSF) And Terminal Multi-Transfer Facility (TMF)
Page 10 NDA-30009 Revision 3.0
MAT Assignments Server Installation Guide
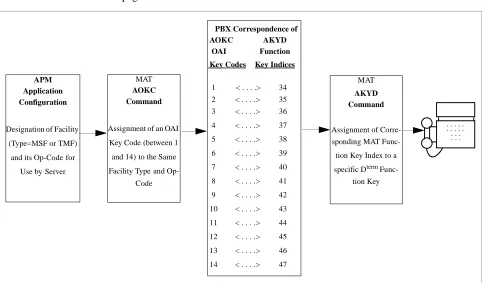
The MSF/TMF facility and its Op-Code are assigned to one of the 14 OAI Key Codes in the MAT. (The MSF Op-Codes range from 128 to 191 and TMF from 192 to 255; assignments are available for on-screen viewing through the Providers command in the APM Application Configuration option.) Each of the OAI Key Codes corresponds to an AKYD Function Key Index (FKI) value which is then assigned to the specific Dterm function key. This process is illustrated on the next page.
Figure 3-1 OAI Function Key Assignment
A knowledge of the Dterm stations in the NEAX system and which ones will be set up to access the user application through Server is necessary to using the following commands:
AOKC: Assignment of OAI Key Codes
This command is used to associate the MSF or TMF facility and its Op-Code that was configured in the APM for Server to one of the OAI Key Codes in the MAT.
(a) Select an unused OAI Key Code, from 1 to 14. To determine what Key Codes are available for assignment, use the LOKC command to list the AOKC Key Codes that are already assigned.
(b) Enter the type of facility using the value that designates the MSF or the TMF.
(c) Enter the same Op-Code that was configured for Server in the APM. If nec-essary, retrieve it using the Providers command on the APM Configuration Entry screen (See page 3 of this guide).
APM Application Configuration
Designation ofFacility
(Type=MSF or TMF)
and its Op-Codefor
Use byServer
MAT AOKC Command
Assignment ofan OAI
Key Code(between 1
and 14)to the Same
Facility Typeand Op-Code
MAT AKYD Command
Assignment of Corre-sponding MAT
Func-tion Key Index to a
specific Dterm Func-tion Key
. . . . . . . . . . . . . . . . PBX Correspondence of
AOKC AKYD
OAI Function
Key Codes Key Indices
1 < . . . .> 34 2 < . . . .> 35 3 < . . . .> 36
4 < . . . .> 37 5 < . . . .> 38
6 < . . . .> 39
7 < . . . .> 40
8 < . . . .> 41
9 < . . . .> 42
10 < . . . .> 43
11 < . . . .> 44
12 < . . . .> 45 13 < . . . .> 46
NDA-30009 Revision 3.0 Page 11
Server Installation Guide MAT Assignments
AKYD: Assignment of D
termFunction Key
The AKYD command (formerly AKY1) can only be used to assign key data on those Dterms that have already been assigned through the ASDT command. MAT Function Key Indexes #34 to #47 have been designated for use in the OAI system and correspond to the 14 OAI Key Codes as illustrated above. The AKYD command is used to assign a Dterm function key to the specific MAT Function Key Index that, in turn, corresponds to the previously assigned OAI Key Code. This command must be used to assign the function key on each Dterm that is to be set up with access to Server.
(a) Enter the tenant and station number of the Dterm on which the function key is being assigned.
(b) Enter the number of the Dterm function key that is to be pressed to activate Server from the Dterm.
(c) Enter the MAT Function Key Index that corresponds to the previously as-signed OAI Key Code.
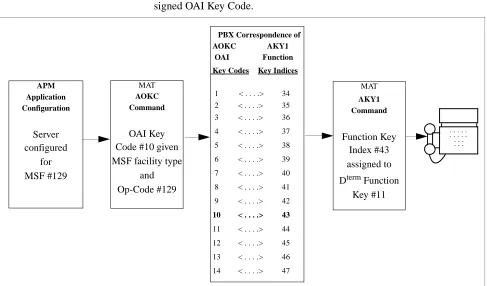
Figure 3-2 OAI Function Key Assignment Example
For example, suppose that the Messenger component is configured to use MSF Op-Code #129. Through the AOKC command, OAI Key Op-Code #10 is assigned MSF #129. In this example, we want to use Dterm function key #11 to access the server.
Since OAI Key Code #10 corresponds in the PBX to MAT Function Key Index #43, Dterm function key #11 is assigned to Function Key Index #43 using the AKYD command.
Now whenever a phone user presses function key 11 on any assigned Dterm, MSF 129 initiates communication with Server.
APM Application Configuration Server configured for MSF #129 MAT AOKC Command OAI Key Code #10 given MSF facility type
and Op-Code #129 MAT AKY1 Command Function Key Index #43 assigned to
Dterm Function
Key #11
. . . . . . . . . . . . . . . . PBX Correspondence of
AOKC AKY1
OAI Function
Key Codes Key Indices
1 < . . . .> 34 2 < . . . .> 35 3 < . . . .> 36
4 < . . . .> 37 5 < . . . .> 38
6 < . . . .> 39
7 < . . . .> 40
8 < . . . .> 41
9 < . . . .> 42
10 < . . . .> 43
11 < . . . .> 44
12 < . . . .> 45
13 < . . . .> 46
Page 12 NDA-30009 Revision 3.0
MAT Assignments Server Installation Guide
Key Transfer Facility (KTF)
Activities needing KTF as an input device require MAT commands AKYD and AOKC for the assignment of the KTF op-code to a particular function key on specified Dterms. Refer to the descriptions above for the MSF and TMF.
Restriction Control Facility(RCF)
When Server uses RCF, it specifies RSC and SFC values that have been defined through the following MAT commands:
ARSC: Assignment of Route Restriction Class
Assigns and displays route restriction information for a tenant and route number. Combined with ASDT, this command activates route restrictions at a station.
ASFC: Assignment of Service Feature Class
Assigns various NEAX call processing features to SFC values from 0 to 15. Combine with ASDT, this command activates service features at a station.
ASDT: Assignment of Station Data
Associates the pre-assigned route restrictions and service features to a specific station, besides specifying the telephone class and LENS of the station. Use the same tenant number (except 0) that was configured for Server.
Switch Control Facility(SCF)
AADT: Assignment of Announcement or Dictation Trunk
This MAT command may apply when Server commands #14 (Announce a Call) or #15 (Monitor a Conversation) is used.
Up to eight trunks can be assigned to each announcement package and up to eight trunks can be assigned to each dictation package.
1. Enter the type of trunk to be assigned (announcement –ANT or Dictation– DCT).
2. Assign a package number (message number) — announcement packages are numbered between 1 and 58, and dictation packages are numbered between 1 and 5.
3. For announcement packages only: Enter the duration of the message timer, an even number of seconds within the range of 2-120 seconds. When this timer expires, a call is detached from the announcement package, unless the discon-nect timer (D parameter) is disabled. (If D=0, the caller hears the announce-ment repeatedly.)
4. Enter at the CNT prompt the number of announcement or dictation trunks re-quired, up to a maximum of 8 each.
NDA-30009 Revision 3.0 Page 13
Server Installation Guide MAT Assignments
Status Monitor Facility – Request (SMFR)
If Server is to support an application that requires a monitored (sometimes called pilot) number, use MAT command AMNO to establish the monitored number, as follows:
AMNO: Assignment of Monitored Number
Assigns a virtual station number as a monitored number that is controlled by Server. Enter the same tenant number (except 0) configured for Server, the monitored number that Server will monitor, and the optional UCD pilot number to which calls will be routed when Server is not monitoring the monitored number.
MAT Assignments Server Installation Guide
Page 14 NDA-30009 Revision 3.0
NDA-30009 Revision 3.0 Page 15
Server Installation Guide Initialization and Termination
Chapter 4
Initialization and Termination
Initialization
The Command Controller and Facility Messenger components must be initialized by the user through the APM. Command Controller needs to be started prior to or in conjunction with a Facility Messenger. To begin initialization, select the Non-CRT Application Control option of the APM’s System Operations Menu. (Make sure that OAI system has been initialized before you begin this process.) Then, choose the Initialize command, and select the Command Controller and Facility Messenger application names. For more information, refer to the APM Operations Manual.
The Logical Monitor component is initialized by Facility Messenger when needed. The user should never start the Logical Monitor manually. Only two commands require an active Logical Monitor: Initialize Logical Station Monitoring command (60) and Terminate Logical Station Monitoring command (61).
Command Controller does not open the command and response FIFOs (or command file) until a Facility Messenger is ready to receive commands. If the FIFOs do not exist, Command Controller creates them.
Termination
The Command Controller can be terminated in two ways:
• The user chooses the Terminate command form the APM’s Non-CRT Application Control Menu.
• The user’s application issues a Terminate Controller command (09) to Server. In both cases, Command Controller tells all Facility Messengers to terminate and closes the FIFOs (or command file) before terminating itself. Any responses to completed commands remain in the response FIFO until the non-APM application reads them or closes the FIFO. Any unprocessed or incomplete commands are lost.
The user may terminate a Facility Messenger from the APM at any time. The Facility Messenger will notify the Command Controller that is terminating, halt any Logical Monitor, and release its OAI association with the NEAX. Any incomplete commands for that Facility Messenger are lost.
Initialization and Termination Server Installation Guide
Page 16 NDA-30009 Revision 3.0