by Joe LoCicero
Decorating
FOR
Before the cake was doled out, Joe explained to everyone the importance of embellishing a cake with frosting and figures. He developed an immediate interest in deconstructing and designing desserts, and by the time he was in seventh grade, his carrot cakes had become such a hit that local organiza-tions auctioned them off at fundraisers.
More recently, the Southern-bred LoCicero has spent the last 15 years in Los Angeles working in the entertainment industry as a party planner, writer, columnist, and marketing consultant. He also works wonders as a cake deco-rator, accomplished home chef, creative instructor, and entertaining guru.
Having organized big-budget parties for network, studios, agents, and stars, Joe founded Chartreuse Cake in 1999, which specializes in themed, fantasti-cally crafted cakes for large gatherings such as birthday parties, bridal and baby showers, signature events, and private screenings. His Red Velvet Cake and its wide variety of decorations is his most requested. Chartreuse Cake has also catered meals for independent films, and dessert buffets for celebri-ties. LoCicero also continues to offer one-on-one home cooking instruction.
In 2004, Joe and his wife founded Practical Whimsy (www.practicalwhimsy. com), a company that celebrates family style with products, recipes, party tips, and of course ideas for cakes. Joe and his wife champion the importance of family supper and celebrations and have given presentations on those topics to corporations, organizations, and educational institutions including MTV, Paramount, Viacom, Turner Broadcasting, Loyola Marymount University, and Southern California’s Discover Conference.
Joe’s column on entertaining, “Practical Whimsy: Southern Hospitality, Hollywood Style,” is a regular feature in Y’ALL: The Magazine of Southern People,and he’s the author of a number of books, including The Complete Idiot’s Guide to Clear Thinkingand Streetwise Meeting and Event Planning. Additionally, Joe is the Food Contributor for momready.com.
LoCicero has been featured in Cosmopolitan, Woman’s World,several daily newspapers in the U.S. and Canada; radio outlets including Sirius’ Martha Stewart Living Radio;and network affiliate news programs.
Author’s Acknowledgments
I truly regard cake decorating as a way to celebrate the infinite number of happy occasions that can bring friends, colleagues, relatives, and immediate family together. In that spirit, I’m so thankful to my nieces and nephews — Eli, Mary Elle, Samuel, Tucker, Savannah, Ethan, Paulina Jane, and Alex — who take cake and celebrating very seriously and have fueled my passion for cakes, served as excellent taste testers, and proved to be unending idea fac-tories. And to my delightful daughter Garcy, who has already shown me that I was, in fact, prepared to have a girl, particularly one who has such fabulous, discriminating taste.
I’ve realized that people can be just as passionate about enjoying cake as I can be about making and decorating them. Jill and Mark Illsley, Maureen FitzPatrick and Doug Armstrong: Your unending support and encouragement, your graciousness, and your ever-present humor humble me.
I’d also like to thank Kristy Wylie and Shari Kaufman, two champions of my cakes who never missed the chance to express their sheer delight, spread the word, and show me the importance of never making light of a talent you’ve been given And I appreciate all my friends and colleagues at Paramount, Disney, Turner Broadcasting, and Sony who heaped praise on myriad confections, instilling more pride, happiness, and publicity than they’ll ever know.
To those who willingly enter the Practical Whimsy test kitchen and help us so immeasurably — namely the incredibly talented Sarah Kent and Julie Jones. Your assistance in so many areas was absolutely invaluable. You make us smile and never let us down.
At Wiley, I so appreciate my Acquisitions Editor Stacy Kennedy’s passion for this project and understanding of my vision; Project Editor Tim Gallan’s stead-fast commitment and easygoing style; Copy Editor Elizabeth Rea’s cheer and verve; and Pam Mitchell’s expert recipe testing.
In Jacky Sach, I am always happily amazed at what a dedicated advocate I have. I’m so lucky to be in league with such a smart, savvy agent who never wavers from helping me accomplish the ideals I strive for. And that sense of humor: Don’t get me started!
Acquisitions, Editorial, and Media Development
Senior Project Editor: Tim Gallan
Acquisitions Editor:Stacy Kennedy
Senior Copy Editor: Elizabeth Rea
Technical Editor and Recipe Tester:
Pamela Mitchell
Editorial Manager: Christine Meloy Beck
Editorial Assistants:Erin Calligan, Joe Niesen, David Lutton, Leeann Harney
Illustrator: Liz Kurtzman
Photographer: T. J. Hine Photography, Inc.
Food Stylist: Lisa Bishop
Cartoons: Rich Tennant (www.the5thwave.com)
Composition Services
Project Coordinator: Lynsey Osborn
Layout and Graphics: Brooke Graczyk, Joyce Haughey, LeAndra Hosier, Stephanie D. Jumper, Heather Ryan
Anniversary Logo Design:Richard Pacifico
Proofreaders:Melanie Hoffman, Betty Kish
Indexer:Steve Rath
Publishing and Editorial for Consumer Dummies
Diane Graves Steele, Vice President and Publisher, Consumer Dummies
Joyce Pepple, Acquisitions Director, Consumer Dummies
Kristin A. Cocks, Product Development Director, Consumer Dummies
Michael Spring, Vice President and Publisher, Travel
Kelly Regan,Editorial Director, Travel
Publishing for Technology Dummies
Andy Cummings,Vice President and Publisher, Dummies Technology/General User
Composition Services
Gerry Fahey,Vice President of Production Services
Introduction ...1
Part I: Getting Ready to Decorate with Ease
and Expertise...7
Chapter 1: Acquiring the Skills and Creativity...9
Chapter 2: Assembling Your Cake Decorating Kit ...15
Chapter 3: Planning Your Workspace ...31
Chapter 4: Stocking Your Pantry ...39
Part II: Preparing the Canvas of Cake ...49
Chapter 5: Prepping for the Cake Decorating Process ...51
Chapter 6: Baking the Perfect Cakes...61
Chapter 7: Smoothing the Way for Decorating ...81
Part III: Topping, Filling, and Embellishing
Your Creations...93
Chapter 8: Whipping Up Frostings ...95
Chapter 9: Dusting and Glazing: It’s Icing on the Cake ...109
Chapter 10: Amping Up the Flavor: Spreading Fillings ...129
Chapter 11: Tip Talk ...143
Chapter 12: Enhancing with Embellishments ...159
Part IV: Sweetening Life’s Special Occasions ...181
Chapter 13: Festive Cakes for Kids...183
Chapter 14: Cakes for Grown-Ups ...205
Chapter 15: Showering Brides and Moms-to-Be ...223
Chapter 16: Lifting a Fork to Weddings and Anniversaries...243
Chapter 17: Savoring Holidays and Special Occasions ...259
Part V: Thinking Outside the Cake Box ...285
Chapter 18: Prepping for Showtime ...287
Chapter 19: Quick Cakes and Last-Minute Decorating Techniques ...297
Chapter 24: Ten (or So) Troubleshooting Techniques ...341
Introduction...1
About This Book...2
Conventions Used in This Book ...2
Foolish Assumptions ...3
How This Book Is Organized...3
Part I: Getting Ready to Decorate with Ease and Expertise...4
Part II: Preparing the Canvas of Cake ...4
Part III: Topping, Filling, and Embellishing Your Creations...4
Part IV: Sweetening Life’s Special Occasions...4
Part V: Thinking Outside the Cake Box ...5
Part VI: The Part of Tens ...5
Icons Used in This Book...5
Where to Go from Here...6
Part I: Getting Ready to Decorate with Ease
and Expertise ...7
Chapter 1: Acquiring the Skills and Creativity. . . 9
Bridging Baking and Creativity...9
Gathering the Tools and Ingredients ...10
Picking Up the Skills...11
Baking the foundations...11
Spreading on the layers ...11
Decorating with tips and embellishments ...12
Setting up, striking down...12
Infusing Your Own Taste ...13
Calling All Occasions ...13
Recognizing Possibilities...14
Chapter 2: Assembling Your Cake Decorating Kit . . . 15
Targeting Tips and Flower Nails...15
Starting with essential icing tips ...16
Adding couplers ...17
Fixating on flower nails...17
Picking Out Paper Goods and Pastry Bags ...19
Sizing Up Pan Shapes...20
Rectangular and square...20
Round and oval...20
Cupcake tins...21
Bundt...21
Simple techniques: Coloring and cutting ...165
Advanced techniques: Modeling ...166
Working with Gum Paste ...168
Tooling around with gum paste...170
Assembling and coloring gum paste flowers ...172
Tending to Frosting Roses...175
Nailing the form ...175
Skipping the nail and going straight for the cake...177
Dipping into the Candy Jar ...177
Simple but sublime options ...178
Candies ...178
Confections ...179
Other treats ...179
Choosing Inedible Features ...179
Part IV: Sweetening Life’s Special Occasions ...181
Chapter 13: Festive Cakes for Kids . . . 183
Conceiving the Perfect Birthday Cake...184
Carving Cakes into the Shape of Numbers and Letters ...184
Theme Cakes Boys Go Nuts Over ...187
Theme Cakes for Little Ladies ...191
Pleasing the Whole Gang: Cakes for Boys and Girls ...196
Getting Kids Involved ...200
Trying Kid-Friendly Recipes ...201
Chapter 14: Cakes for Grown-Ups . . . 205
Gearing Up for Grown-Up Cakes...205
Brainstorming a design...206
Taking personality into account...206
Simple Letter and Number Designs ...206
Playing the alphabet game ...207
Piping monograms and initials ...207
Designing Cakes Ladies Swoon Over ...208
Winning Over Men...212
Pleasing Both Men and Women ...217
Following the invitation...220
Looking like the honoree ...220
Analyzing the Occasion ...223
Bridal showers: Tying in to the main event ...224
Baby showers: Making parents-to-be feel special ...225
Commanding Popular Shower Power Moves ...225
Crafting cutouts ...225
Adorning with flowers ...228
Piping the lacy look...228
Tossing Cheer into a Bridal Shower...229
Bringing Up the Baby Shower...236
Chapter 16: Lifting a Fork to Weddings and Anniversaries . . . 243
Considering the Event’s Theme and Colors ...244
Figuring out the logistics...244
Daring to be different? ...245
Staying in style...245
Positioning to stand out ...246
Creating a Simple Wedding Cake...247
Tiering Up for Success...249
Moving Up to a More Elaborate Wedding Cake ...251
Celebrating Another Year with Anniversary Cakes ...255
Chapter 17: Savoring Holidays and Special Occasions . . . 259
Bringing Seasonal Treats to Your Decorating...259
Saluting Spring and Summer...260
Having Fun in the Fall ...267
Greeting the Winter Holidays ...273
Celebrating Other Occasions...277
Part V: Thinking Outside the Cake Box...285
Chapter 18: Prepping for Showtime . . . 287
Giving Your Cake the Once-Over...287
A Cake Decorator’s Checklist for the Big Day ...289
Livening Up the Cake Presentation...290
Mapping out the space ...291
Playing around with props ...291
Transporting Your Creation...292
Taking measurements for fit ...292
Using standard gear and procedure...293
Give parting gifts ...295
Refrigerate for good taste ...295
Rework it for another occasion ...296
Chapter 19: Quick Cakes and Last-Minute
Decorating Techniques . . . 297
Keeping a Well-Stocked Pantry...297
The essentials ...298
Decorating odds and ends ...298
Quick Fixes with Mixes ...299
When You Have Only Minutes ...305
Making it special, quickly ...305
Salvaging a broken cake ...307
Fast designs...308
Chapter 20: Starting a Cake Decorating Business . . . 311
Setting Up Your Own Business ...312
Deciding if you have what it takes ...312
Doing your research...313
Determining your specialties...314
Regarding the upsides ...315
Finding a Location for Your Business ...315
Working out of your home...315
Scouting for commercial kitchen space ...316
Getting Down to Basics ...317
Running a cake-centric office...318
Finding out about licensing...318
Drawing up contracts ...319
Attracting a Clientele and Marketing Your Cakes ...319
Spreading the word ...320
Brainstorming cool marketing methods...320
Designing a Web site for your designs...321
Part VI: The Part of Tens...323
Chapter 21: Ten Great Sources for Cake Supplies and Ideas . . . 325
Chapter 22: Ten Ways to Cut a Cake. . . 329
Chapter 23: Ten Easy Baking and Frosting Alternatives. . . 337
Chapter 24: Ten (or So) Troubleshooting Techniques . . . 341
Basic Cakes
A Most Excellent White Cake ...74
Cocoa Chocolate Cake ...75
Delicious Yellow Cake ...76
Flavor-Friendly Sponge Cake ...77
The Best Carrot Cake Ever ...78
Rich Pound Cake...79
White Velvet Cake...80
Frostings, Icings, Glazes, and Fondants
Buttercream Frosting ...98Stiff Decorator Frosting ...99
Cream Cheese Frosting ...100
Chocolate Ganache ...101
Milk Chocolate Frosting...102
Simple Confectioners’ Sugar Icing...113
Simple Chocolate Confectioners’ Sugar Icing ...114
Sunshine Cupcake Icing...114
Royal Icing ...116
Rolled Fondant...117
Poured Fondant ...120
2EZ Petit Fours Quick Fondant ...121
Buttery Vanilla Glaze...125
Chocolate Glaze ...126
Mocha Glaze...126
Caramel Glaze ...127
Lemon Glaze...128
Fruit Glaze ...128
Fillings
Basic Whipped Cream...132Chocolate Whipped Cream ...133
Coffee Cream...133
Pink Cherry Filling...138
Crazy Crunchy Filling...138
Peanut Butter Filling ...139
Coconut Filling...140
Raspberry Filling ...140
Orange Syrup ...141
Your Choice Fruit Syrup ...142
Embellishments
Marzipan...165Gum Paste ...170
Kids’ Cakes
Play Ball! Baseball Cake ...187“Have a Good Year” Race Car Cake ...190
Ballerina Stage Cake...192
“You’re a Real Doll” Cake...194
Down on the Farm Cake...196
Circus Roar Cake ...198
No-Bake Cherry Cake and Icing ...201
S’mores Cupcakes ...202
Berry Good Crumble Cake ...203
Cakes for Grown-Ups
Jewelry Cake ...208Luscious Luau Cake ...210
Vegas, Baby! Cake ...213
Golf Game Cake...215
Rock Star Cake ...217
Bridal and Baby Shower Cakes
Tasteful Registry Cake ...230Floral Fantasy...232
Cupcake Tower ...236
Year-Round Cakes
Garden Path Cake ...260
Chick-Chick Cupcakes...262
Patriotic Star ...264
Haunted Mansion ...267
Jack-O’-Lantern ...269
Cornucopia Cake ...271
Christmas Tree Cake ...273
Skating Rink Cake ...276
Heart-O’-Mine Cake ...278
Housewarming Cake...279
Cap ’n’ Tassel Graduation Cake ...282
Quick and Easy Cake Ideas
Tropical Fruit Panorama Cake ...161Lori’s Chocolatey-Chippity Cake ...300
Cinco Leches Cake ...301
Summer Lovin’ Lemon Cake...302
Moussetachio Cupcakes...303
Barbara and Vera’s Rum Cake...304
I
often hear moms and dads, girlfriends and boyfriends, wives and husbands say, “I really wanted to decorate a special cake for this birthday (or party, or dinner, or . . . insert occasion here), but it just seemed too hard,” or “I meant to come up with a cake, but I ran out of time,” or “I’d like to do that, but I’m not that creative.” If you’re guilty of using these excuses or others like them, banish them from your mind because an admirable desire to bake and decorate a beautiful cake for someone (or some event) means that you already have the perfect running start. Add some cake flour, confectioners’ sugar, a few techniques, and a couple of easily attainable supplies and you’ll be pleas-antly amazed at how easy and fun it can be to produce a delicious, lovely cake that becomes the smashing centerpiece of a celebration.From a very early age, I was enthralled with cakes as the four kids in my family got to select whatever birthday cakes we wanted. I often requested a sunshine orange cake with orange frosting; my sister’s favorite was strawberry through and through; one brother favored milk chocolate cake, frosting, and filling; and my other brother routinely asked for a choo-choo chocolate chip ice cream cake with chocolate frosting. Eventually, we graduated to more innovative tastes and accoutrements, like the coconut cake that hosted a big top and circus on parade and the banana peanut butter cake that featured a wild configuration of Flintstone toys. I also started to understand how cake delighted grown-ups as much as (if not more than) it did kids, and as an adult planning events and parties for networks, studios, and Fortune 500 companies, I realized that celebrations and opportunities to enjoy cake are everywhere. Particularly delicious, eye-catching cakes can put anyone in a festive mood and make any event that much more memorable.
No doubt you have much to celebrate with friends, family members, and col-leagues. And a cake is that winning component that makes everyone realize that where they are, who they’re with, and what they’re doing is special. Although you certainly may order the cake from a local bakery or supermar-ket (and occasionally, you may have to), the taste, look, charm, and feelings conveyed by a homemade decorated cake are simply unparalleled. Be it at a birthday party, bridal shower, wedding reception, anniversary celebration, graduation, holiday gathering, date night, awards banquet, retirement party, bon voyage soirée, or dessert buffet, your own specially created cake is always welcome.
advertising relic from a certain decade . . . and of course the person or event being honored.
About This Book
This book shares the basics and beyond necessary to bake, frost, fill, and decorate a variety of cakes. Because I cover varying degrees of difficulty, this book truly is accessible to all. Each cake commands different skills for all the activities that complete the cake’s look: mixing up batters, whipping up frostings and fillings, modeling frosting roses or marzipan miniatures, get-ting desired results from assorted icing tips, handling frosget-ting-filled pastry bags, and selecting the perfect embellishments to be eaten or just simply marveled at. But ultimately, the beauty of cake decorating is that it can be very simple and elegant or extraordinary and detailed.
You can use the tips, tools, guidelines, and instructions herein to create your own designs, or you can rely on the proven recipes and directions I provide to bake and decorate tested (and happily tasted) cakes for a variety of occasions and celebrations. Regardless of your choice, you can use the information I pro-vide on an assortment of techniques and a wide range of embellishments to complete, accomplish, and perfect stunning creations.
I promise that, in no time at all, you’ll be creating, baking, and decorating your very own cakes that will amaze, impress, and delight . . . and bring incalculable rewards for your time and effort.
Conventions Used in This Book
Baking is one culinary art in which using precise ingredients and following a recipe to a T are absolute musts. If you’re not the type to read a recipe before diving in, here’s my gentle plea to change your ways for the better.
For optimal results, keep the following recipe conventions in mind as you embark on each new cake project:
⻬Most of the cake recipes call for cake flour, which is a lighter, finer version of all-purpose flour that makes cakes more tender.
⻬Confectioners’ sugar (also known as powdered sugar) is 10X.
⻬White granulated and brown sugars are cane sugars.
otherwise indicated.
⻬Salt is finely granulated table salt, not kosher or sea salt.
⻬Oil is all-vegetable. Avoid other kinds of oil (such as peanut), and definitely steer clear of any type of olive oil.
⻬If water is called for, use filtered water.
⻬Unless otherwise directed, mixing should be done with a stand mixer rather than a hand mixer.
Occasional patches of text highlighted in gray are known as sidebars,and they contain information that I think may come in handy or interest you. Although I’m fond of the details doled out in sidebars, reading them isn’t required for your understanding of the text or your ability to execute any of the projects. (But if you do read the sidebars, you’ll have some great con-versation starters to use at parties and an even deeper understanding of cake trivia, origins, and such.)
Foolish Assumptions
Call me crazy, but in writing this book, I assumed a few things about you, the reader:
⻬You love cake or are eager to impress with cake.
⻬You know your way around a baking aisle or have a friend to guide you.
Beyond that, anything goes: You may be ready to try cake decorating for the first time; you may have done some cake decorating in the past but want to expand your repertoire, ratchet up your skill level, add a few techniques; or both. In any case, you don’t need to have any experience whipping up prize-winning confections in order to get something from this book. You just need an appetite for sweet success.
How This Book Is Organized
Part I: Getting Ready to Decorate
with Ease and Expertise
This part offers up everything you need to know about gathering all the tools you need for cake decorating, setting up your very own cake station, and fill-ing your pantry with the finest fill-ingredients for the most delicious and most impressive cakes.
Part II: Preparing the Canvas of Cake
The chapters in this part delve into the details for determining how your cake should look and embracing some easy artistic concepts with which to design it. With design in hand, you prepare to make the cake from scratch and set it up for the decorating process.Part III: Topping, Filling, and
Embellishing Your Creations
With a luscious cake baked and waiting, this part tackles demystifying and deconstructing the cake decorating process with foolproof recipes and instructions for topping the cake with frostings and icings, spreading the layers with complementary fillings, and embellishing the creation with the perfect accoutrements, designs, and accompaniments.
Part IV: Sweetening Life’s
Special Occasions
Part V: Thinking Outside the Cake Box
This part addresses a few things sure to get your heart racing: transporting your finished cake, creating a cake in a flash when an occasion surprisingly pops up, and turning your cakes into an exciting new moneymaking venture. If you’re so inclined to start a cake decorating business, you find out what you need to consider and how to get your venture up and running and successful.Part VI: The Part of Tens
The indispensable reference information in this part includes the ten best places to find cake supplies and inspiration, ten ways to cut and serve a cake, ten easy alternatives to conventional baking and frosting practices, and ten techniques to try when your cake just doesn’t come out according to plan.
Icons Used in This Book
You’ll notice a few symbols repeatedly scattered throughout this book. These icons are intended to point out useful information and advice.
This icon alerts you to information that’s time-saving, creatively instructive, or otherwise helpful in your cake decorating adventures.
This icon points to something that you should pay close attention to and keep in mind as you consider and put what you read here into practice.
When you see this icon, take heed: It’s attached to safety essentials and ways to prevent mistakes and mishaps in your preparation, baking, and decoration.
Where to Go from Here
Obviously, I love cake decorating and just can’t get enough of it. The endless design possibilities, flavor combinations, vibrant colors, amazing tastes, and happy cake eaters coalesce for a remarkably fulfilling experience.
If you’re just starting out, you may want to flip to Part I to find out about get-ting the cake decoraget-ting tools and ingredients you need for the job as well as map out space in which to work. Then you may want to segue into mastering a few basic recipes and trying some simple designs.
If you already have some experience decorating cakes, you may want to head to the chapters containing recipes for cakes and frostings and add those to your repertoire. Or you may turn to Chapters 11 and 12 to pick up a new embellishment technique or two, like working with different icing tips, modeling with marzipan, or crafting buttercream roses.
Part IV, the home of recipes and instructions to create specific cake designs, is a great place to start if you have experience in decorating or if you have a child’s birthday party, a cousin’s wedding, or another special occasion on the horizon. The cakes in these chapters will cheerily light up a celebration and cake eaters’ faces.
If someone you want to impress is coming over tonight and you don’t have time to go through the whole process of cake decorating, skip directly to the fast fixes in Chapter 19.
Getting Ready to
Decorate with
Acquiring the Skills and Creativity
In This Chapter
䊳Linking baking skills with your creativity and tastes
䊳Working through the cake process
䊳Becoming a cake designer
䊳Embracing all cake opportunities
C
ake decorating requires both skill and creativity . . . but you can do it for every occasion that calls for a celebration! With an understanding of some basic mechanics (and maybe a few secrets), you can create amazing, memorable cakes that impress and delight partygoers, event attendees, and families alike.Truth be told, who needs an occasion to bake and decorate a cake? When you get wrapped up in the sheer enjoyment of dreaming up a cake’s design, mixing batters and making frostings, selecting the perfect accompaniments and colors, and the tasty results that undoubtedly bring smiles aplenty, you don’t need an occasion to create a delicious masterpiece.
If you peruse magazine pages or fancy bakery cases with cakes that you think your work can’t possibly match up to, fear not! All you need is the instruction in this book, the inspiration provided by your family, friends, and events . . . and a love of cake!
Bridging Baking and Creativity
From a very young age, practically everyone loves to eat cake. (Do you have pictures of yourself on your first birthday with cake smeared all over your hands and face? I do.) For most people, the word “cake” conjures up images of sweet times, fun gatherings, and memorable celebrations.
the celebrant or honoree feel even more special.
Chefs and bakers sometimes are referred to as culinary artistsbecause, in many ways, food influences expression and creativity like more conventional art forms. There may be sweet ingredients you can’t wait to try, an imported candy in the perfect color that inspires you to create a whole design around it, or a restaurant dessert that you’re eager to recreate.
Cake decorating, as an art and activity, allows you to express yourself in so many ways. You build upon an array of talents such as baking, cooking, pairing flavors, thinking up and drawing designs, creating and assigning colors, mas-tering tip techniques, and modeling embellishments. In addition to executing the final cake design, you also infuse your personality and artistic expression into how the cake is showcased and served.
And cake decorating can be as simple or complex as you like. You can transform cake layers and sizes into a towering masterpiece, like a multitiered chocolate cake castle with edible stone walls and gum paste flowers climbing multiple stories, or a simple confection, like a double-layer round white cake with raspberry filling and swirls of buttercream frosting on the outside. You can elaborately script a message in chartreuse frosting or feature rows of different colored shredded coconut. You can top it with pink roses or festoon it with silver dragees. Experimenting with and practicing different techniques helps you swiftly take on more delicate or demanding decorations.
Gathering the Tools and Ingredients
have to be efficiently appropriated and used. Trust me: You absolutely don’t need a five-star kitchen to work on your masterpieces. Keen organization skills help you make the most out of your existing counter space for sufficient elbowroom.
Picking Up the Skills
The art of cake decorating breaks down into several skill sets, which you eventually combine (effortlessly, of course) to create your cakes. From the first hint of a desire to decorate cakes, it’s important to remember that cake decorating is a process; you get to mix things up and get your hands dirty with decorations, but you also need to spend time thinking about your cake and planning your design and execution.
Baking the foundations
The foundation for your work — that is, moist and delicious cakes — means that you have to tackle baking with verve. And baking — believe it or not — has rules you should follow for ultimate success. For instance, to get the most out of your baking efforts, use key ingredients, line your pans, and take care to mix the perfect batters.
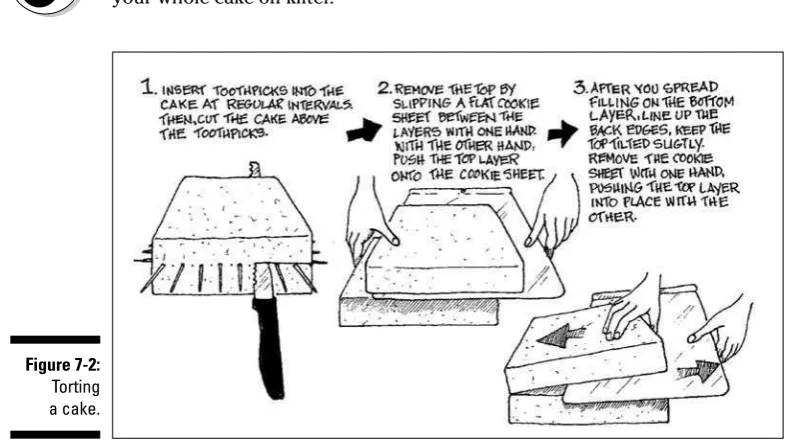
When your cakes come out of the oven, you must prepare them . . . much like an artist readies a canvas. From leveling to torting to crumb-coating, you depend on a host of strategies to create the optimal surface for decorating.
In Part II of this book, I provide some master cake recipes, such as Delicious Yellow Cake, A Most Excellent White Cake, and Cocoa Chocolate Cake. When you get these cakes under your belt, you can experiment with them in a vari-ety of ways to create new and different flavors.
Spreading on the layers
Before segueing to decorate the outside of the cake with designs and embellish-ments, you may want to consider adding a filling other than frosting between the cake’s layers. Fruit curd, whipped cream, and nut spreads can all comple-ment the cake and frosting flavors while adding another flavor dimension.
are delicious standards. Of course, even though frostings are fun to mix and master, other cake coverings, including icing, fondant, and glaze, have their own distinct advantages, too.
Decorating with tips and embellishments
Oftentimes, when people dream of a tasty and perfectly decorated cake, they can’t help but imagine frosting lined up in rosettes or stars, in ridges around a cake’s circumference, spelling out names and greetings, or even forming complete pictures. These decorations are all made possible thanks to icing tips, of which there are many different kinds to use for cake decorating. You can almost certainly replicate in frosting any frill, design, or picture you have in mind thanks to the tips that you guide to outline and fill in designs. Because there are so many different tips available to you, and because the designs you create using them can range from simple to highly complex, Part III covers tips from all angles: the staggering array of available tips, the amazing effects they can produce, and how you can pick up tip skills with some guidance, instruc-tion, and a little practice.Icing tips unleash a veritable juggernaut of choices and effects, while embell-ishments also enhance cake designs. Embellembell-ishments are edible and inedible, common and uncommon, accoutrements, trimmings, frills, and figures. They range from fresh flowers you pick up or order from a nursery to candies you find on a grocery store aisle. An inedible embellishment may be a wedding cake topper made out of fine bone china or a car made out of pressed tin. Or you may choose to apply a few more techniques to craft embellishments out of frosting, as in roses or hyacinths; out of marzipan, as in miniature, realistic versions of fruits and vegetables; or out of gum paste, as in flowers.
Setting up, striking down
Your cake no doubt will be a stunning creation in its own right, but you should keep in mind how it will be presented just before it’s served. You never want your amazing work of art just to be plopped down on a table next to a garbage can or in a dark corner surrounded by the wires of a nearby coffee pot! Set up your cake for success by placing it properly on a sturdy, decorated cake board and taking care with transportation, and showcase and serve your cake in a venue that does it — and cake eaters — justice.
Infusing Your Own Taste
After you master some basic recipes and techniques, a good deal of the fun of cake decorating lies in bringing your own tastes, talents, preferences, and personality to the proceedings. For your creation, you’re part architect and part fashion designer . . . and the best part is that you actually get to eat your work of art.
When you’re wearing the architect hat, you figure out your cake’s structure and size and how the layers and embellishments will hold up. And much like a fashion designer working on apparel, you get to decide your own look, texture, and overall appearance using frostings, icings, and embellishments instead of fabrics. Draw upon your own preferences and palette while taking into account the celebration and the honoree being feted with cake.
For the most impressively decorated cake, you have to start with a plan, so hunker down and map out what your cake will look like. With only a vague image in mind, you’re on the road to disaster if you take a stab at decorating willy-nilly with an icing bag filled with an arbitrarily colored frosting. Some people want to race right on to picking up that icing spatula and getting that frosting on the cake, but they’re really missing out. Part of cake decorating’s charm and allure definitely plays into laying out how your particular confec-tion will look and how you plan to achieve it and then doing your best to follow that path or — if need be — improvising to get your desired result.
In putting your own creative spin on a cake, you need to consider several points regarding the event, party, or occasion, and the honoree (or honorees). To make sure that you devise the right cake plan for the occasion, your cake research entails finding out about the celebrant’s likes and dislikes, the theme of the party, the colors involved, the feel of the location, and so on.
Your plan may involve deftly following a pattern, adapting a design from a template, or coming up with your own design from scratch. Whatever design route you decide to take, you’ll be choosing colors, considering shapes and sizes, plotting out the design in the space available, and factoring in curves, lines, and outlines.
Calling All Occasions
With cake decorating, you quickly realize that opportunities for a wonderfully decorated cake are limitless. Consider making cakes for these special events:
⻬Kids’ birthday parties
⻬Grown-up dinner parties
⻬Weddings
⻬Anniversaries
⻬Graduations
⻬Housewarmings And these holidays:
⻬Valentine’s Day
⻬Easter
⻬The Fourth of July
⻬Halloween
⻬Thanksgiving
⻬Christmas
⻬New Year’s Eve
Part IV of this book arms you with recipes and instructions for creating cakes for a variety of special occasions and a variety of honorees. From whimsical birthday cakes for boys, girls, or both, to themed creations that prove that cakes aren’t just kids’ stuff, baby and bridal shower cakes, to wedding and anniversary confections, and cakes for many holidays in between, your memorable creations add to the events and stand the test of time. Some of the designs I provide feature elements particular to the occasion, such as fondant, frosting flowers, or kid-friendly decorations. And each chapter in this part reviews considerations you should bear in mind when making cakes for kids (both boys and girls), men, and women.
Recognizing Possibilities
Your cake decorating ventures (and adventures) may be so entertaining, thrilling, and fulfilling that you decide to switch careers or make cake deco-rating a part-time job. Taking cake decodeco-rating to the next level isn’t as simple as making cakes and selling them to friends and family. When starting a cake decorating business, you have goals to consider, a workspace to locate, equipment to get your hands on, and marketing strategies to implement.
Assembling Your Cake
Decorating Kit
In This Chapter
䊳Gathering the tools for cake decorating
䊳Storing your supplies
I
n a sense, the magic of cake decorating begins with your very own cake decorating kit that’s tailored to your needs, wants, skills, and aspirations.Depending on the level of decorating you’re taking on, this kit could be a durable box, a plastic case, or an entire cupboard; it includes all the goods, gadgets, and tools you need to turn out decorated cakes. You may already have some of the items for your kit, but others may be new and mysterious. So this chapter helps with the intimidation factor by explaining the uses and various functions of your kit items along with where you can get them in the first place.
The items included in this chapter cover quite an extensive range of equipment that assists in baking, leveling, frosting, filling, and decorating. Don’t feel like you have to run out and buy everything listed here all at once or like you can’t give cake decorating a go without having every single item on hand. Throughout the chapter, I point out the items that are absolutely essential, and you can choose to add other items to your cake decorating kit as you become increasingly profi-cient in some areas or veer off in new decorating directions.
Targeting Tips and Flower Nails
resources.
Starting with essential icing tips
When it comes to stocking your cake decorating kit, you have dozens of icing tips to choose from, but you’re likely to rely on only a handful of tips over and over again in your cake decorating escapades. Because of that, you can start off with a simple collection of some standard sizes.
Before I get into specific tip sizes, I recommend that you work with nickel-plated tips, which should be washed by hand. Plastic tips are widely available — and usually you can run them through a dishwasher for easy cleanup — but they aren’t as reliable as metal tips in design or execution.
Based on my experience, a collection of round tips in a variety of sizes will serve you well; when you’re just getting started, you’ll repeatedly call on round tips #1 through #10. These tips are appropriate for a range of techniques that are both simple and stunning and include piping dots and strings, scripting, forming block letters, and writing messages. You should also gather the following more-specialized tips:
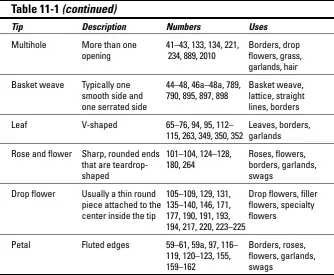
⻬Star tips, such as #16, #18, #21, and #32
⻬Basket weave tip, such as #48
⻬Leaf tips, such as #67 and #352
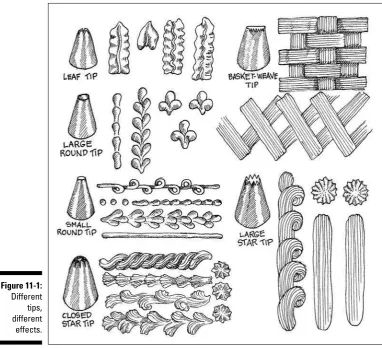
⻬Petal tips, such as #102, #103, #104, and #125 A variety of tips are shown in Figure 2-1.
Rather than purchase individual tips, many people opt for tip sets, which include many of these essential tips; sets range from student sets that have less than 10 tips to professional ones that boast more than 50 tips. (I was pretty ambitious from the get-go, and my first kit had more than 30 tips, which I continue to supplement.) Standard tips run less than $1 each, so if you start out with a small tip set, you certainly can keep adding on at a rela-tively slim cost.
When you purchase your tips, make sure to buy a tip cleaning brush, too. A very worthy and very inexpensive investment, the tip cleaning brush helps you get deep into pointed tips to remove any frosting residue that running water (or a wadded-up, damp paper towel) just can’t get!
sides to maximize the frosting effects.
For a more-detailed discussion of all kinds of tips and their forms and functions, check out Chapter 11.
Adding couplers
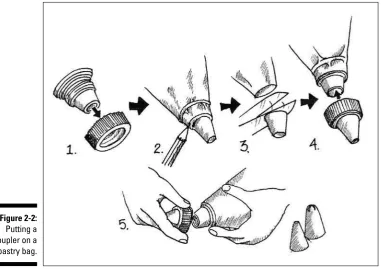
To fit a tip onto a pastry bag, you need a coupler,which consists of two parts:
⻬A round plastic cone that you fit inside the pastry bag
⻬A coupler ring that you screw over the tip on the outside of the bag I like having lots of couplers handy (see Figure 2-2) because they allow me to ready several different colored frostings all at once. Also, couplers are useful when your cake design involves different piping designs in the same color frosting: Instead of preparing a pastry bag for each tip you need to use, you just outfit one bag of frosting with a coupler and then change the tips.
For some reason, cake decorating kits sold as a complete lot rarely include more than one or two couplers. Invest in at least a few more; they’re inexpensive, and having them on hand is guaranteed to save you time.
Fixating on flower nails
A flower nailis a spindly tool with a large, circular flat head; as you can see in Figure 2-3, it looks very much like its name suggests. However, the head of a flower nail is much larger than that of any nail you’d find in a hardware store. Flower nails come in different sizes, but a #7 is a good standard size for your decorating kit.
Figure 2-1:
The head of a flower nail is big enough to craft a single frosting rose bloom on, but even if rose-making doesn’t interest you, you also can use it for creating other types of flowers.
Figure 2-3:
Flower nails.
Figure 2-2:
Sizing Up Pan Shapes
Baking pans are a necessity. Invest in chef-quality ones, which, although expensive, more than make up for the cost with durability and results. Good pans produce cake layers that are higher and more level. Chef-quality pans have perpendicular sides, which give your cake straight and clean lines (rather than slanted ones) for a much more professional look.
As far as pan shapes are concerned, you can get a lot of decorating mileage out of just a few basics.
Rectangular and square
Rectangular cake pans produce some of the most common cake shapes, like quarter-sheet, half-sheet,and sheet cakes.Typically, these sizes are for cakes for crowds, big and small. While this terminology is consistent among bakers, I’ve found that the sizes for these cakes actually varies. As a general guideline though, a quarter-sheet cake is 9ⴖx 13ⴖ, a half-sheet is 12ⴖx 18ⴖ, and a full-sheet is 18ⴖx 24ⴖ. Therefore, a full-sheet could be “put together” by having the more regular 12ⴖx 18ⴖsize on hand. The rectangular cake pans you should have are the 9-x-13-inch and the 12-x-18-inch. In addition, for variety, I recommend picking up a 10-inch square pan as well.
When you have only one pan of a certain dimension, you double your baking time when you need two layers. Consider getting two pans in the 9-x-13-inch and 10-inch sizes. The 12-x-18-inch pan is big enough and deep enough that it’s unlikely that you’ll stack two such generous layers.
Round and oval
Round cakes are perhaps the most ubiquitous cake shape. Because smaller rounds are perfect for cakes for small dinner parties and family gatherings, invest in two 8-inch or 9-inch rounds. If you occasionally take on bigger parties and like a little variety, consider having 10-inch, 12-inch, and 14-inch rounds on hand, too. I’m also a fan of the 6-inch round pan; a decorated cake that size makes a simple thank-you to someone, and it also provides a nice accent to a bigger cake.
Cupcake tins
If you opt to go the cupcake route on a cake recipe, you’re likely to need two cupcake tins, each one with 12 wells. A nonstick surface is only necessary if you don’t plan to use cupcake liners.
Bundt
Some bakers like Bundt pans because they can just pour in the batter and not worry about leveling and layering. I developed a fondness for these pans when I was mastering the Tunnel of Fudge recipe from scratch.
Traditional Bundt pans allow you to create interesting shapes with cake (such as the doll dress cake in Chapter 13 and the jack-o’-lantern cake in Chapter 17) with a minimal amount of work. I recommend that you have at least one Bundt pan in your equipment cupboard. Nonstick varieties are available but not necessary. And while you can certainly invest in a cavalcade of different shapes and sizes of Bundt pans, I suggest you at least have one traditional-shaped one.
Specialty shapes
In recent years, you may have noticed that cooking stores and even chain stores are flooded with an assortment of cake pans in all sorts of shapes. These specialty pans aren’t necessary for general cake decorating, but if a particular shape catches your attention and triggers your creativity, go for it!
Unfortunately, cakes don’t always turn out like the pictures on pan packaging, so if you plan to use a specialty shape pan for a special occasion, do a trial run and bake a cake in it ahead of time to avoid any mishaps with your final product. Also, many specialty pans turn out cakes with raised or indented features, and baking a test cake gives you the opportunity to figure out the best way to spotlight the intricate design. For example, you may want to sprinkle the cake with powdered sugar or coat it with a thin icing that settles into the design’s fine lines.
Boarding Cakes
cardboard, plywood, and Masonite.
If you work with only one cake at a time, you need only one pastry board, which you can easily dress up to go with the cake or the occasion. For example, you can cover the board with wrapping paper and then heavy cellophane wrap to keep it clean. Or you can dress the board with an assortment of decorative foils that are available online or at national craft stores. (I cover cake board deco-rating in Chapter 7.)
Don’t cover your cake board in aluminum foil. Sure, it does the job, but it isn’t the most attractive covering. You have so many options for coverings, and the shiny, wrinkly presence of plain aluminum foil will definitely detract from your delicious, beautiful cake.
Gathering General Utensils
You may already have some of the items in this category of goods in your kitchen. In the cake decorating process, they’re the workhorses that both fortify and enhance your endeavors.
Ruler
A ruler is a must when measuring out designs and transferring the width, height, and length of a sketch to the actual cake. You may also need it to figure out the lengths of frosting strings, garlands, swags, and borders.
Cookie, fondant, and gum paste cutters
Cookie cutters provide you with ready-made outlines and stencils for filling in with sanding sugars and nonpareils. (Plus, you can incorporate different-shaped cookies into your cake design.) Gum paste cutters are specifically sized for shaping flowers, and fondant cutters come in a nice range of graduated sizes for layering or creating other designs with rolled fondant. Most of these dif-ferent kinds of cutters come in either metal or plastic; I find that metal cuts more easily, but plastic’s easier to clean . . . so in the end, it’s your pick!Cooling racks
16-inch and a 14⁄-x-20-inch. Also, because you have to invert cake layers when they come out of the oven, it’s a good idea to have two cooling racks of each size for flipping the cake over.
Buy stainless steel or nickel-plated cooling racks so that you don’t have to contend with rust.
Pastry brush
A pastry brush, preferably one with silicone bristles, is a great tool for sweeping the crumbs from your just-baked cake. Getting the crumbs off your cake surface and sides makes your crumb coat more effective (because there are fewer crumbs to cover up), which keeps your frosting as crumb-free as possible.
Use a dedicated pastry brush for your cake decorating work. Although pastry brushes clean up well in a dishwasher, it’s better not to worry about what scents or residue may remain on the brush from that barbecue chicken you basted or the roasted vegetables you brushed with olive oil.
Rubber spatulas
No kitchen utensil works quite as effectively for scraping every last drop of cake batter or frosting out of a mixing bowl as a flexible rubber spatula. Rubber spatulas also are perfect for gently folding whipped egg whites or whipped cream into a recipe. Stock up on different shapes and sizes.
Large spatula
I recommend also getting a stainless-steel spatula (or turner) that will make moving a cake layer — from cooling rack to cake board, for example — easier. The wood-handled spatulas I use for this are 14-inches long, with the stainless steel “blade” or “lifter” portion measuring 10-inches long by 3-inches wide.
Thermometers
your pot for an accurate temperature reading. Look for a stainless steel vari-ety that’s dishwasher-safe. A candy thermometer is necessary when preparing cooked frostings and fillings, such as caramel and lemon curd, in which the mixture has to reach a certain temperature for the desired flavor and consis-tency. Some recipes call for a mixture to be heated to the threador soft-ball stages,both of which are clearly marked on a candy thermometer.
An oven thermometer helps you keep your oven’s temperature in check. You may have set the oven to 350 degrees F, but it may not actually be that hot — or it could be hotter. An independent gauge, the oven thermometer clips to an oven rack so that you can easily read the oven’s actual temperature. If the reading doesn’t match up with your oven setting, then you can make the nec-essary adjustments to get the temperature you need.
Cake tester
You can certainly rely on toothpicks or bamboo skewers to test a cake for doneness, but I suggest having something more permanent. This skinny, stainless steel rod usually measures between 5 and 7 inches.
Rolling pins
A rolling pin — which can be wooden, marble, or metal — is a must for work-ing with rolled fondant. Dependwork-ing on how often you work with marzipan, gum paste, and fondant, you may also consider purchasing smaller, nonstick rolling pins designed specifically for working with those confections.
Toothpicks, bamboo skewers, and dowels
This trio of wooden tools works wonders for your cake decorating in a variety of capacities. Their most obvious duties include:⻬Toothpicks:Handy for mixing colors into marzipan or fondant and for testing for doneness (if you don’t have a metal cake tester)
⻬Bamboo skewers:The perfect tools for sketching out a cake’s design on a frosted cake
Tooling Around with Decorating Specifics
The tools covered in this section help you refine your cake design and allow for a more polished and professional look.Decorating comb
This type of comb has no place on a vanity! Drawing it over a layer of frosting creates evenly spaced rows, lines, and V-shaped patterns across the top of a cake or along its sides. Cake decorating combs come in varying lengths. Some have a straight side that produces no texture, and others may have teeth on both sides. Different widths distinguish the teeth on each side of a dual-sided comb (see Figure 2-4).
Turntable
The turntable can be absolutely invaluable in decorating. Invest in one and you’ll wonder how you ever decorated without it! With this device, your cake sits on a platform that rests on a rotating wheel of sorts. You can stay in one position while you spin your cake around to frost and decorate it on all sides. With a turntable, you also get an even visual perspective of all sides of the cake.
Plastic turntables with pedestals are fairly inexpensive. You can also find turntables that have pedestals that angle up, which make decorating even easier (especially when you’re working on a time-consuming and involved design like a basket weave). If you want to step up from plastic, sturdier turntables are available with cast-iron stands and aluminum tops.
Figure 2-4:
Leveling assists
A level cake that provides a flat surface for designs is a cake decorator’s dream. And achieving a level cake is easier than you think with this trio of tools.
Levelers
Cake levelers allow you to slice off a cake’s dome or crown so that you’re left with a completely level, flat surface. Typically, this apparatus consists of a sharp blade or wire stretched between two short steel poles with a handle on the top. You adjust the blade to the height of your cake top, set the poles on your work surface, and slide the blade across the cake, taking off just enough to make the entire layer level. Levelers come in both large and small varieties to accommodate various sizes of cakes.
Particularly sturdy and sharp levelers can also tortelayers, allowing you to split a cake into two or three layers that you then fill.
Bake even strips
These insulated strips fit snugly around a cake pan to insure moist, even cake layers and prevent cracked or domed tops. You soak the strips and then place them around the circumference of the pan before baking. Essentially, the strips retard baking on the outer edges for more evenness throughout.
Heating core
Recommended for cakes that are 10 inches or larger in diameter, a heating core distributes heat so that larger cakes bake more evenly. This hollow stainless steel element is about 31⁄
2inches in height and 4 inches in diameter. You place it in the center of the cake pan and then fill the pan and core with batter. When the cake is done baking, you remove the core, pop out the piece of cake that’s inside it, and use that piece to plug the hole in the cake layer. After you frost the cake, the repaired hole is unnoticeable.
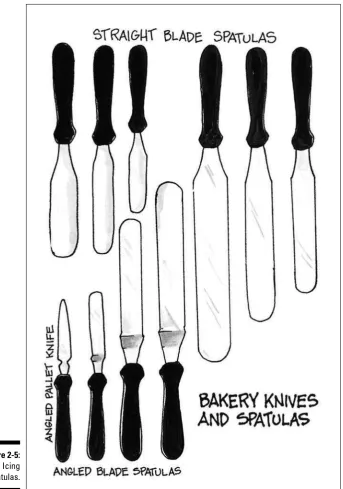
Icing spatulas
Icing spatulas are essential for coating your cakes. These spatulas are quite different from the ones you may use to flip burgers or fried eggs: They look more like knives with rounded blades and usually feature wood or molded plastic handles.
Figure 2-5:
Bench scraper
Usually about 6 inches long, a bench scraper is an ideal tool for smoothing out the frosting on a cake’s sides or circumference. The scraper typically has a molded plastic handle on one side that allows for easy guiding of the other straight-edged side.
Fondant smoother
This tool, which is somewhat shorter than a bench scraper, helps smooth out the draping of rolled fondant for an even finish. You gently glide the fondant smoother across the surface of the cake to take out any wrinkles or bumps.
Modeling tools
Usually made from plastic, a modeling tool set is ideal for shaping creations out of gum paste and fondant. The typical set includes a ball tool to cup and smooth petals, a veining tool for lining up realistic-looking veins in leaves, and a shell tool to emboss patterns.
A color wheel
Color plays an important part in cake decorating for your frosting base, the colors you use to tint frosting, and how you pair colors for different designs. A color wheel, which you can find at art and craft stores, helps you see how certain colors contrast with each other for a dynamic effect or blend together for a complementary tone. You may not even realize some of the colors avail-able to you until you take a few spins on the color wheel and see the limitless possibilities that await you and your cake!
A color wheel has rotating pieces of cardboard stacked on top of each other that let you see gradations of color and how a color mixes with another one to create a third hue (see Figure 2-6). Most color wheels also give you a brief primer on color definitions such as primary, secondary, and tertiary as well as tints, tones, and shades.
Keeping All Your Tools Together
After you collect all your cake decorating kit items, where do you put them? I recommend a portable caddy that will easily store and, if necessary, transport your most vital items. Craft and cake decorating supply stores carry storage boxes that are made specifically for cake decorating, but you can also be inventive. You may find just what you need at a sporting goods store, hard-ware store, or craft store. I’ve seen people repurpose or christen anew a tool kit, art caddy, sewing kit, and even a fishing tackle box for their cake decorat-ing headquarters.
A caddy can’t hold your baking pans or cooling racks, but it should have a place for your tips, spatulas, pastry bags, decorating comb, and so on. Whatever box or caddy you go with needs to be augmented with tip holders, which are molded plastic cones that keep your icing tips clean, upright, and easy to identify when decorating. If you buy a tip set, you can just hang on to the box it comes in. Or you can purchase a tip storage case, which usually is pretty inexpensive.
Figure 2-6:
gels (which I cover along with other related cake foodstuffs in Chapter 4). If you put your gels in the same caddy as your other tools, make sure that you sequester them appropriately, like in a sealed plastic bag, so that if one accidentally breaks open, it doesn’t ooze all over everything else. No matter how into color you are, you probably aren’t too keen on having your tips, icing bags, ruler, and sundry other supplies stained a bright shade of leaf green or neon pink.
Finding the Goods
With the vast array of retail outlets available on the Internet, it’s easier than ever to get your cake decorating kit up and running . . . and staying the course.
Before you pull out your wallet, I recommend wandering through a cake deco-rating store or the cake decodeco-rating aisles at a national craft chain store to famil-iarize yourself with what’s out there. Look at the inventory, touch (but don’t open!) the supplies, read the packaging, and ask questions of a knowledgeable salesperson. Just don’t buy everything you see all at once!
Decorate a few cakes with just the core supplies. Then take another look at the additional offerings to see if any have potential to earn a place in your cake decorating kit.
Planning Your Workspace
In This Chapter
䊳Organizing your kitchen to facilitate baking and decorating
䊳Checking out necessary appliances and equipment
䊳Getting your oven in shape
䊳Dealing with refrigeration and freezing
T
his chapter focuses on laying out the most productive area for designing, baking, frosting, filling, and decorating your creation. I show you how best to use the space you have, and I describe the equipment you need to maximize your cake decorating potential. With the proper set-up and equipment, your cake decorating will flourish (rather than be derailed) . . . no matter what your current kitchen looks like.My initial cake decorating endeavors growing up were in the crushed confines of a kitchen that, decked in the harvest gold hues of the 1970s, was the con-stantly humming hub of a very busy household. When I first started turning out cakes professionally, I worked in a tiny bungalow kitchen with uncoop-erative tile counters and a slanted floor that tested both my patience and the oven’s ability to bake even cake layers. So I can say from experience that, however small, old, or peculiar your kitchen may be, you can make a cake decorating space that works for you!
Organizing Your Kitchen:
What Goes Where
You may have visions of lengthy, polished, stainless steel counters, several deep sinks, and a bounty of double ovens, but you really don’t need a million dollar dream kitchen to accomplish all your cake baking and decorating.
work for you and adopt some tidy habits for a smooth-running endeavor.
The must-haves in a cake-friendly kitchen are the kitchen components that do figure into your entire cake venture. They include the following:
⻬Refrigerator for chilling layers, frostings until they’re ready to tint and in between uses, and your finished cake
⻬Oven for baking
⻬Stovetop for cooking frostings and fillings
⻬Mixer for preparing batters, frostings, and fillings
⻬Freezer for freezing layers (optional)
⻬Microwave for melting and softening
⻬Food processor for chopping nuts, chocolate, embellishments
⻬Spice or coffee grinder for preparing ingredients that should be finely powdered
Creating a decorating zone
Survey your kitchen to determine where you may set up shop to decorate. Fortunately, because decorating largely takes place after baking, you can get all your baking ingredients and equipment such as cooling racks out of the way before bringing in frosting, coloring gels, piping bags, and embellishments. Because you can’t just work anywhere you set down a cake, keep in mind the room you’ll need to decorate and the access you’ll need to your tools and supplies, including your tinted frostings and embellishments, appliances such as a mixer or spice grinder, and equipment such as a sink.
If you have a cake board, a turntable, or cake cardboard rounds, lay them out in the workspace to get a real sense of the room each item takes up. If you don’t have those accessories, lay out your baking pans to get a rough idea of space allotment. If you don’t have enough room in one part of your kitchen to work with your decorating equipment, keep moving around until you find the right-sized space.
Also get a sense of the accessibility of the tools you call on in decorating your cakes. You don’t always use all these utensils and decorating assists on every project, but it’s helpful to get an idea of the space they take up and the space you need to use them. These include (but aren’t limited to)
⻬Cups, glasses, or clear tumblers to hold frosting bags upright
⻬Bowls in which to mix coloring gels into frosting
⻬Decorating combs
The space you decide on for decorating doesn’t have to be exclusively for decorating; it just has to serve you during the actual course of decorating. So if you have to shuffle around or remove counter staples (such as a toaster or coffee maker), you can put them back after you’re done.
If possible, don’t set up your decorating space where you may repeatedly bang your head into an upper cabinet as you work, and the burners of a stove don’t qualify as a working counter space.
Promoting accessibility and efficiency
Much is written about the kitchen triangle,the workspace pathway between the refrigerator, sink, and oven, but I don’t worry so much about that for cake baking and decorating. More important is making sure that all the ingredients for the task are lined up, that all the appliances and apparatuses are in work-ing order, and that all the accoutrements are collected, stacked, and close at hand.Nothing can stifle (and possibly stop) the cake baking and decorating process like a missing ingredient, a burned-out mixer, or an oven that doesn’t reach the desired temperature. If you spot potential problems and troubleshoot from the outset, you’re in for a much smoother operation.
Purchase a couple of clear plastic containers (with lids) in which you can collect only the tools, accessories, and nonperishable embellishments that you plan to use for a particular cake. If you don’t have the space to lay out everything you need, the containers provide a handy resource to pull from so that you aren’t interrupting the cake process to sift through lots of utensils and foodstuffs to find what you need.
Checking out the counter space
In terms of the counter space itself, you really need a smooth, level surface on which to work.
of cutting boards online. If you get one and things are still rocky, lay damp kitchen towels underneath the large cutting board when you’re working to anchor the board and offer you a stable surface for decorating.
Giving yourself a little elbow room
Regardless of whether you’re in a commercial space, an expansive kitchen, or one that could pass for a cooking closet, get rid of the clutter. Baking and decorating a large cake is made more difficult than it actually is when you’re squeezed for room.
Interestingly enough, more space doesn’t necessarily mean more organization; even when working out of a commercial or commercial-grade kitchen with long gleaming countertops, you still have to stay on top of keeping the area clean and constantly putting things away. So as you finish each task, put away all the tools involved. Don’t sabotage yourself!
To aid your progress and process further, begin your decorating with an empty dishwasher or sink, and clean as you go along. Also have a full roll of paper towels and a clean stack of kitchen towels at the ready to tackle inevitable spills and messes quickly.
Hauling Out the Heavier Equipment
In beating batters, making frostings, incorporating ingredients, and fashioning embellishments, you must rely on an assortment of small appliances to effi-ciently and effectively get the job done.
Kitchen mixers
I’m very passionate about my particular mixer. I started with a guaranteed refurbished one from a kitchen outlet store that I still have (and that works perfectly) even though the volume of cakes I produce necessitated getting a professional-grade one.
or it’s on sale. I’ve had to use mixers that were beautiful to look at but didn’t get the job done well at all. Make sure that you fully investigate a mixer’s functionality and comparison shop before you make a decision, particularly if you’re thinking about making a substantial investment. I’ve found that, in the case of stand mixers, you get what you pay for! It’s not worth buying a cheap mixer over and over again if one $250 model can last for decades (and many more expensive models certainly do).
I vastly prefer a stand mixer to a hand-held one. Although a handheld mixer is good for small, quick jobs or to have around as a backup, the recipes you mix for cake decorating projects really require a powerful stand mixer, preferably one that has at least a five-quart capacity with a 325-watt motor.
For best results when making frostings, batters, and fillings, your mixer should come with both a balloon whisk and paddle attachments.
Food processors and grinders
Both full-size and mini food processors are exceptionally handy in chopping ingredients, such as nuts or dried fruits, or pulsing small quantities of fresh fruits, needed for some batters, frostings, and fillings. Here again, take the time to fully investigate the models out there, and find the one that best suits your needs.
Grinders — either spice or coffee — also are useful for pulverizing substances — such as coffee crystals — into a fine powder that’s easy to incorporate into a batter or frosting. You should designate an inexpensive coffee grinder just for nuts and spices so that your nuts don’t taste like coffee and your coffee doesn’t taste like nuts.
Pasta makers
This equipment recommendation may come as a surprise, but depending on how much work you do with fondant or gum paste, you may want to invest in a pasta maker.
Although not an absolute necessity for your kitchen, a pasta maker is very useful for rolling out fondant to make bows, ribbons, and strips. It’s also a timesaver for flattening pieces of gum paste for parts of flowers.
Firing Up an Accurate Oven
Whether you have a double oven or tiny range, your cake depends on a good heating environment. You may be surprised to know that there are actually two kinds of ovens available for baking. Knowing about each kind will assist you in turning out the best cakes. Further, cake decorators also revel in the speed and convenience a microwave oven can provide for a host of related duties.
Conventional vs. convection ovens
Conventional ovensheat from below. At the bottom of the oven chamber is an electric heat source that uses air (heated by gas or electricity) to cook the food (or bake the cake). Conventional is the most common type of oven used in today’s kitchens. As a result, baking instructions in recipes generally assume that this is the type of oven the reader has.
Some ovens simply don’t have the capacity for large pans, so if you’re work-ing with a size or shape of pan for the first time, put the empty pan into your empty, cool oven to make sure it fits.
Most ovens are 27-inches or 30-inches. But, if you have the money to spend and the space to put it, I’d go with a 36-inch oven. While certainly not absolutely necessary for the home baker, the accommodation for multiple cookie sheets and large cakes — and the time you save in baking multiple layers all at once — is worth the investment.
And if you’re currently in the market for an oven, do yourself a favor: Take your baking sheet and cake pans down to the appliance store and get a first-hand look and feel for how everything fits.
Advanced bakers tend to prefer convection ovensfor their dependability. In convection ovens, an embedded fan circulates hot air around the baking pan for faster and more even baking. What’s more, convection ovens don’t have the hot spots or cool spots that may plague conventional ovens. Generally, convection ovens should be set at a lower temperature than a conventional oven. Commonly used in commercial operations, convection ovens have definitely gained in popularity in home use despite their higher cost.
Perfecting temperatures
A good cake depends on a heating environment that you can measure accu-rately. With some ovens, the temperature you set doesn’t match the actual temperature inside the oven; if you aren’t aware of the discrepancy, you’re in for some frustration. When the temperature is off, baking times are woefully unpredictable, and you’re left with an underbaked cake soup or an overcooked cake brick — neither of which is the moist and delicious creation you had in mind.
Invest in an oven thermometer to monitor the temperature inside your oven. Too often, cake problems can be traced to the fact that the oven just isn’t the temperature you think it is. If you’re aware of the fact that your oven is too hot or too cold, you