TECHNICAL UNIVERSITY OF CLUJ-NAPOCA
ACTA TECHNICA NAPOCENSIS
Series: Applied Mathematics, Mechanics, and Engineering Nr. 62, Vol. I, March, 2019
USING COFFEECUP SITE DESIGNER AND BOOTSTRAP FRAMEWORK
TO FAST DESIGN A CAROUSEL
Tiberiu Alexandru ANTAL
Abstract: The paper aims to provide a fast way to design a carousel, as a part of a web site using the CoffeeCup® Site Designer 3.0 application. This web design software allows to use several popular frameworks like Bootstrap 3, Bootstrap 4, Foundation and Materialize based on HTML, CSS, and JS for developing responsive projects on the web. The method keeps a part of the original carousel HTML code from the Bootstrap and implements the minimal sections necessary in Site Designer to obtain a flexible working web site containing the carousel.
Key words: carousel, Web, HTML, Bootstrap, design.
1. HTML - A BRIEF INTRODUCTION
The World Wide Web was invented by Sir Timothy John Berners-Lee, in 1989, when he implemented, using the HTTP protocol, the first client-server communication over the internet. At that time he was an independent contractor at CERN and while in Geneva, he proposed a project based on the concept of hypertext, to facilitate sharing the information among researchers [1]. He designed the world first web browser and together with his team the first web server. The browser was needed to view the Web pages while the server hosted the pages using a public address, so it would be visible all over the world. This machine can still be found today at CERN. As time went on the Web become complex although essentially the base was kept as simple as possible. A Web page is just a text file build on some rules that can be viewed all over the world regardless of the platform used to view it. By following these simple principles, the Web is kept universal.
The Web is based on HTML or Hyper Text Markup Language. As all markup languages it is a mixt between a text of a document and the markup instructions that are all stored in the
same file. The construction of Web page is based on the following concepts:
• the text content you want to show to others which is organized under headers and paragraphs;
• the HTML markup which is made of statements that define how the contents is displayed and
• the HTML references that are links used to connect in a very simple way to other Web pages.
A minimal Web page is organized in head and body sections which label parts of the document contents like this [2]:
<html> <head>
<title>page title</title> </head>
<body>
<h1>text - a level 1 heading</h1> <p> text - a paragraph.</p>
Inside the Web page the HTML statements are surrounded by angle brackets and are called markup instructions (also known as tags), while the text between these instructions is the actual text of the document. The markups are also organized in several categories. Some of the most important ones are called: elements, attributes and values. Most of the HTML tags come in pairs like <head> and </head>. The first tag in a pair is the start tag while the second tag is the end tag. The end tag is written like the start tag, but with a forward slash inserted before the tag name. The <head> tag contains meta information about the document, the <title> tag specifies a title for the document, the <body> tag contains the visible part of the document, while <h1> tag defines a large heading and <p> tag a paragraph. The last version of HTML is 5 and was released in 2014. Compared to older versions HTML5 adds new elements as todays webpages have navigation, body content, sidebar content, headers, footers, and other features.
2. SOME WORDS ON CSS
HTML was created to describe the content of a webpage and not for formatting. When, in HTML 3.2, font and color were added the development of large webpages, were every single page needed this information, became time consuming. The solution to avoid this development overhead was called CSS (Cascading Style Sheets). CSS removed the style formatting from the HTML page by creating rules. These rules allow to control among others the design, the layout and the variations in display for different devices and screen sizes. The rules can be imported from an external file (with the .css extension) or written inside the webpage they affect. They can be applied to an element or a group of elements. Each rule consists of a selector, which defines the parts in the webpage that will be affected and one or more declarations, which define the formatting applied to the parts. Every browser has its own default way of displaying HTML tags. This means that the webpages are displayed slightly different depending on the browser used to open them. CSS allows overriding the browser’s default settings by
applying unified styles to elements. CSS use the principle of the cascade to solve conflicting rules. A selector selects an element from the webpage. If an element is influenced by more selectors then inheritance, specificity and location are used to resolve the conflict and determine the final properties. There are many types of selectors, with different levels of specificity that can target a large number of elements or just a few. Specificity states that the more specific the selector, the stronger the rule. Elements can have a unique name or one that identifies them as being part of a class. Styles can be applied to elements using their name. Inside an element tag the id=”name” will
give a unique name to the element, while the
class=”name” will associate the element to a class. Each id must be unique in a HTML document while more elements can belong to the same class. class and id are very useful with the div and span elements. The div element breaks down a page into divisions that can have an individual style inside a webpage. The following HTML code will use these ways to apply styles to certain page parts in combination with CSS and JavaScript.
3. SOME WORDS ON JavaScript
JavaScript is the scripting language of the Web. It is embedded in the HTML pages, executed by an interpreter that is built into the browser and has access to all the HTML elements on the page. SD will embed the required JavaScript code in the final HTML based on the framework selected when starting the software and create a js subdirectory that will contain the corresponding JavaScript files.
4. SOME WORDS ON RESPONSIVE SITE DESIGN
size. Framework specific breakpoints are indicated by a color, while custom breakpoints will display as white. RWD can be applied with success in simulations based consecutive frames if the results are obtained as pictures [4] – [7] as these can be part of a carousel.
5. DESIGNING A CAROUSEL WITH BOOTSTRAP 3 USING Site Designer
The following steps are describing how to design a carousel based on the HTML Bootstrap code found at https://www.w3schools.com/bootstrap/bootstra p_carousel.asp. The main idea of this article is to keep some parts of the HTML code and implement the minimum required in the Site Designer (SD) software in order to stay as
flexible as possible. For example, SD is able to include any HTML code in the design of a website, however if we follow the HTML in next code, the pictures locations and their names must be included in the HTML in order to make the carousel work. This is a drawback because any changes to them require the corresponding change in the HTML code. To avoid these changes, it is possible that part of this HTML code to be implemented in SD that provides a very simple manipulation of images and the directories in which they are stored. The link between the part implemented in the SD and the one left as HTML is made by keeping the same class names and identifier names in SD with those from HTML.
<div id="myCarousel" class="carousel slide" data-ride="carousel"> <!-- Indicators -->
<ol class="carousel-indicators">
<li data-target="#myCarousel" data-slide-to="0" class="active"></li> <li data-target="#myCarousel" data-slide-to="1"></li>
<li data-target="#myCarousel" data-slide-to="2"></li> </ol>
<!-- Wrapper for slides --> <div class="carousel-inner"> <div class="item active">
<img src="la.jpg" alt="Los Angeles"> </div>
<div class="item">
<img src="chicago.jpg" alt="Chicago"> </div>
<div class="item">
<img src="ny.jpg" alt="New York"> </div>
</div>
<!-- Left and right controls -->
<a class="left carousel-control" href="#myCarousel" data-slide="prev"> <span class="glyphicon glyphicon-chevron-left"></span>
<span class="sr-only">Previous</span> </a>
<a class="right carousel-control" href="#myCarousel" data-slide="next"> <span class="glyphicon glyphicon-chevron-right"></span>
<span class="sr-only">Next</span> </a>
</div>
Before moving towards with the description,
at the web address
https://vimeo.com/282954588, is a video presentation that shows how to implement completely the carousel in SD. The article below shows how to implement the storing of
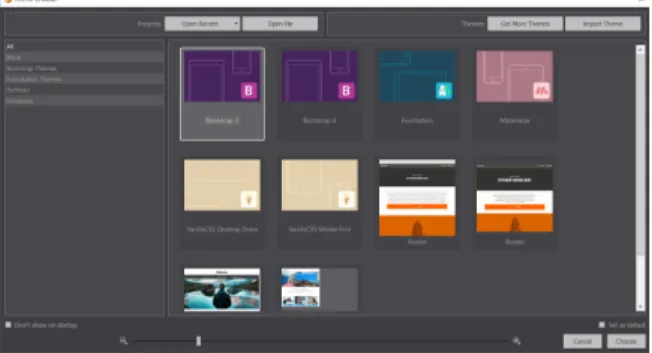
selection the final website published by the SD will include all the CSS and JavaScript code specific for this framework. Also, this selection makes available all the specific Bootstrap 3 framework classes under the SD interface. Transposing the code from HTML to SD requires identifying how to create HTML elements in SD and how to add attributes from the graphical interface of the software.
Fig. 1. – Selection of the Bootstrap 3 framework. If we look at the first italics HTML line that is: <div id="myCarousel" class="carousel slide" data-ride="carousel">, in order to
obtain the same HTML code in SD we must keep the same name for the id (id="myCarousel") and class (class="carousel slide") of the div element and also include the corresponding data-ride attribute (data-ride="carousel").
SD is a visual tool for dealing with CSS that allows to design with Foundation, Bootstrap, and Materialize websites. It is beyond the purpose of this article to provide full details about the use of this product. However, the parts that will be used below will be described succinctly. A large part of the screen is dedicated to the work area (real time-canvas) while on the right site we have the Control Panes organized in 3 panes (Content with the sub-panes (Elements, Contents, Symbols), Style and Element), each with specific roles for visually managing the content, layout, styles, HTML, CSS and Javascript, and page properties. To begin with the design of the carousel we must select a Container Div as shown in Figure 2.
Fig. 2. – Sub-pane Elements from the Contents pane.
Then, in the Pane Style (see Figure 3) set the ID SELECTOR to myCarousel and the Type Class from CLASS SELECTOR to slide and carousel. Finally, as shown in Figure 4, in the Element pane, add an attribute Data Ride and set it to the carousel value. Once we understood how we can create an element with all the attributes related to this we must also take care to keep the elements nested the same way they were in the HTML code.
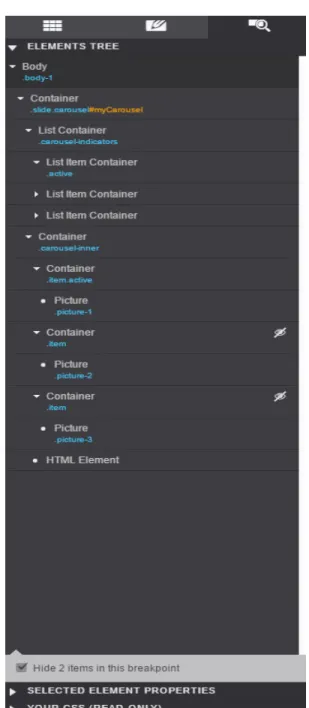
Fig. 5. – The visual content of the site viewed in the PaneElements.
As shown in Figure 5 the visual tree structure of the elements that make up the site are all shown by SD in the Pane Element. By reading it we see that the HTML body has one container. We can check that by clicking the left down arrow next to the Container word which will close or open the body of the container. When closed, if nothing else is shown in the Body (.body-1), then everything is contained in the body of this container. The Pane Element also gives some information about the elements in the tree, in the case of the main container the ”.slide.carousel#myCarousel” shows that the container has type class selectors set to slide and carousel and the id selector set to myCarousel. Please note that ”.slide.carousel” from Figure 5 are
shown in the Pane Style as . Inside the main Container the first element is a
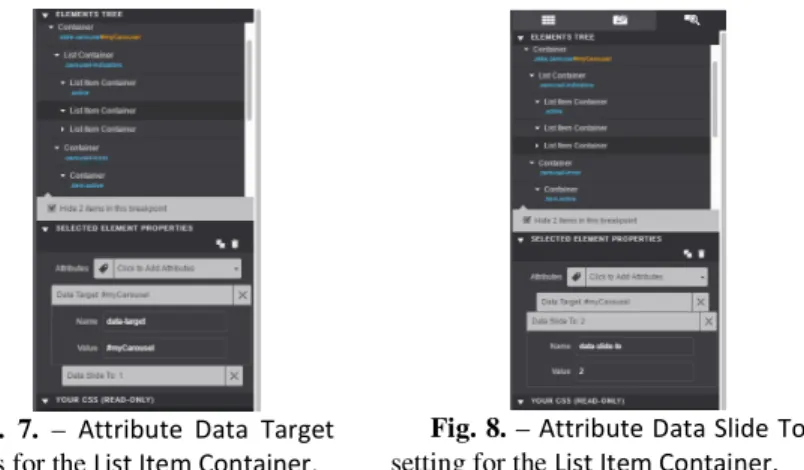
List Container with the class selector set to ”carousel-indicators” which contains three List Item Containers. The first List Item Container has the class selector set to ”active”. Figures 6, 7 and 8 are showing how to set the attributes for each item in the list. The Data Target and Data Slide To
attributes must be set according to the figure to get the right HTML code generated. Further a new Container Div must be inserted which will contain three Containers Div, each of these will contain a picture. Each inner Container Div must have the class selector must be set to ”item” (see Figure 5), and for each Picture
the class selector must be set to the corresponding value (”picture-1”, ”picture-2” or ”picture-3”) as shown in Figure 5. At the end we have to insert a HTML element that will contain the ‘straight-line’ (that follows the <!-- Left and right controls --> comment) HTML code that
"carousel-control-prev" in SD. Then, the following attributes must be set as follows: Role to
button, Data Slide to prev and Aria Hidden to true.
Fig. 6. – List Container and List
Item Container in Sub-pane
Elements from the Contents pane.
Fig. 7. – Attribute Data Target
settings for the List Item Container.
Fig. 8. – Attribute Data Slide To
setting for the List Item Container.
Finally, the button must be connected to the gallery by setting the Href attribute of the button to myCarousel (this will create the
following HTML code
href="#myCarousel"). To finish the buttons, it might also be needed to set the shapes and their color.
At the end the result is based on a mixture of the original HTML Bootstrap 3 code and a partial implementation of the carousel in SD. SD will be able to handle any changes like image content, image size or location, and number of images easily, when publishing the site on some web server.
6. REFERENCES
[1] https://en.wikipedia.org/wiki/Tim_Berners-Lee. [2] ANTAL Tiberiu Alexandru, Proiectarea
paginilor Web cu HTML, VBScript şi ASP - ediţia a II-a, Editura RISOPRINT, 2006, p.264, ISBN 973-751-349-5.
[3]
https://tutorials.coffeecup.com/site-designer/#overview.
[4] Detesan, OA, The numerical simulation of trr small-sized robot. Acta Technica Napocensis, Series: Applied Mathematics, Mechanics, and Engineering, Volume: 58 Issue: 4 Pages: 519-524. ISSN: 1221-5872.
[5] A. F. Cristea, C. Deac – Studies regarding the vibration table and dumping their, Acta Technica Napocensis, Series: Applied Mathematics, Mechanics, and Engineering, Nr.59, Vol II., 2016, pag.181-186, ISSN 1221-5872.
[6] Aurora Felicia Cristea, Acxel Emil Farcas, Mariana Arghir – Study regarding the vibration transmission of the autovehicle about human body – Acta Technica Napocensis, Series:
Applied Mathematics, Mechanics, and
Engineering, 2016, vol.4, nr. 59, pag. 379-382, ISSN 1221-5872.
[7] Deac Dorian Cosmin, Aurora Felicia Cristea –
Study regarding the constructive variants of the vibrating industrial work tables – ACTA Technica Napocensis, Series: Applied Mathematics, Mechanics, and Engineering, 2017, vol. I, nr. 60, pag.153-158, ISSN 1221-5872.
UTILIZAREA COFFEECUP SITE DESIGNERULUI ȘI A FRAMEWORKULUI BOOTSTRAP PENTRU PROIECTAREA RAPIDA UNUI CAROUSEL
Rezumat: Lucrarea îşi propune să dea o descriere a unei proceduri de proiectare a unui carusel folosind produsul sofwareul Coffee Site Designer, împreună cu frameworkul Bootstrap 3. Procedura păstrează o parte din codul HTML iniţial de carusel şi implementează în Site Designer strictul necesar pentru generarea unui carusel funcţional într-un site de web păstrat flexibil.
ANTAL Tiberiu Alexandru, Professor, dr. eng., Technical University of Cluj-Napoca,