Dell SonicWALL™ Analyzer 8.0
Administration Guide
© 2015 Dell Inc.
ALL RIGHTS RESERVED.
This guide contains proprietary information protected by copyright. The software described in this guide is furnished under a software license or nondisclosure agreement. This software may be used or copied only in accordance with the terms of the applicable agreement. No part of this guide may be reproduced or transmitted in any form or by any means, electronic or mechanical, including photocopying and recording for any purpose other than the purchaser’s personal use without the written permission of Dell Inc.
The information in this document is provided in connection with Dell products. No license, express or implied, by estoppel or otherwise, to any intellectual property right is granted by this document or in connection with the sale of Dell products. EXCEPT AS SET FORTH IN THE TERMS AND CONDITIONS AS SPECIFIED IN THE LICENSE AGREEMENT FOR THIS PRODUCT, DELL ASSUMES NO LIABILITY WHATSOEVER AND DISCLAIMS ANY EXPRESS, IMPLIED OR STATUTORY WARRANTY RELATING TO ITS PRODUCTS INCLUDING, BUT NOT LIMITED TO, THE IMPLIED WARRANTY OF MERCHANTABILITY, FITNESS FOR A PARTICULAR PURPOSE, OR NON-INFRINGEMENT. IN NO EVENT SHALL DELL BE LIABLE FOR ANY DIRECT, INDIRECT, CONSEQUENTIAL, PUNITIVE, SPECIAL OR INCIDENTAL DAMAGES (INCLUDING, WITHOUT LIMITATION, DAMAGES FOR LOSS OF PROFITS, BUSINESS INTERRUPTION OR LOSS OF INFORMATION) ARISING OUT OF THE USE OR INABILITY TO USE THIS DOCUMENT, EVEN IF DELL HAS BEEN ADVISED OF THE POSSIBILITY OF SUCH DAMAGES. Dell makes no representations or warranties with respect to the accuracy or completeness of the contents of this document and reserves the right to make changes to specifications and product descriptions at any time without notice. Dell does not make any commitment to update the information contained in this document.
If you have any questions regarding your potential use of this material, contact: Dell Inc.
Attn: LEGAL Dept 5 Polaris Way Aliso Viejo, CA 92656
Refer to our website (software.dell.com) for regional and international office information.
Patents
For more information, go to http://software.dell.com/legal/patents.aspx.
Trademarks
Dell, the Dell logo, and GMS are trademarks of Dell Inc. Other trademarks and trade names may be used in this document to refer to either the entities claiming the marks and names or their products. Dell disclaims any proprietary interest in the marks and names of others.
Analyzer Administration Guide Updated - June 2015
Software Version - 8.0 232-002890-00 Rev A Legend
CAUTION: A CAUTION icon indicates potential damage to hardware or loss of data if instructions are not followed.
WARNING: A WARNING icon indicates a potential for property damage, personal injury, or death. IMPORTANT NOTE, NOTE, TIP, MOBILE, or VIDEO: An information icon indicates supporting information.
Contents
Dell SonicWALL Analyzer 8.0 Administration Guide 1
Part 1. Introduction
Introduction to Analyzer . . . 7
Overview of Analyzer . . . 7
What is Analyzer? . . . 7
Key Features in Analyzer 8.0 . . . 8
Key Features in Analyzer 7.2 . . . 9
Deployment Requirements . . . 9
Operating System Requirements . . . .10
Hardware Requirements for Windows Server . . . .10
Virtual Appliance Requirements . . . .10
Virtual Appliance Deployment Considerations . . . .11
MySQL Requirements . . . .11
Browser Requirements . . . .11
Network Requirements . . . .12
Dell SonicWALL Appliances Supported for Analyzer Management . . . .13
Dell SonicWALL Analyzer Installation . . . .13
License and Registration Requirements . . . .14
Accessing the Correct Management Interface . . . .14
Switching Between Management Interfaces . . . .14
Log In to Analyzer . . . .15
Navigating the Analyzer User Interface . . . .15
Firewall Panel . . . .16
SMA Panel . . . .17
Console Panel . . . .18
Analyzer Views and Status . . . .18
Understanding Analyzer Icons . . . .19
Using the Analyzer TreeControl Menu . . . .20
Provisioning and Adding Dell SonicWALL Appliances . . . 21
Provisioning Dell SonicWALL Appliances . . . .21
Provisioning a Dell SonicWALL Firewall Appliance . . . .21
Provisioning a Dell SonicWALL SMA SMB Appliance . . . .21
Provisioning a Dell SonicWALL E-Class SMA Series Appliance . . . .22
Adding Dell SonicWALL Appliances to Analyzer . . . .22
Adding Dell SonicWALL Appliances . . . .22
Modifying Dell SonicWALL Appliance Settings . . . .24
Deleting Dell SonicWALL Appliances from Analyzer . . . .24
Part 2. Dashboard
Using the Dashboard Panel . . . 26Using the Universal Scheduled Reports Application . . . .26
Dell SonicWALL Analyzer 8.0 Administration Guide 2
Adding a Scheduled Report Component . . . .32
Managing the Scheduled Reports Component . . . .44
Part 3. Reporting
Overview of Reporting . . . 51Dell SonicWALL Analyzer Reporting Overview . . . .51
Viewing Reports . . . .52
Navigating Dell SonicWALL Analyzer Reporting . . . .53
Global Views . . . .54
Unit View . . . .54
Layout of Reports Display . . . .56
The Date Selector . . . .58
Export Results . . . .61
The Filter Bar . . . .62
Adding Filters . . . .62
Scheduling Reports . . . .64
Report Data Container . . . .65
Layout of the Data Container . . . .65
Viewing Syslog Data of Generated Reports . . . .66
Drilling Down . . . .66
Custom Reports . . . .71
Troubleshooting Reports . . . .71
Managing Analyzer Reports on the Console Panel . . . .72
Viewing Firewall Reports . . . 73
Firewall Reporting Overview . . . .73
Benefits of Firewall Reporting . . . .73
Firewall Reports Tab . . . .73
Viewing Available Firewall Report Types . . . .74
How to View Firewall Reports . . . .77
Viewing Global Summary Reports . . . .77
Viewing Data Usage Reports . . . .78
Viewing Applications Reports . . . .79
Viewing User Activity Logs . . . .79
Viewing Web Activity Reports . . . .80
Viewing Web Filter Reports . . . .80
Viewing VPN Usage Reports . . . .81
Viewing Intrusions Reports . . . .81
Viewing Botnet Reports . . . .82
Viewing Geo-IP Reports . . . .82
Viewing Gateway Viruses Reports . . . .83
Viewing Spyware Reports . . . .83
Viewing Attacks Reports . . . .83
Viewing Authentication Reports . . . .84
Custom Reports . . . .86
Using the Log Analyzer . . . .86
Dell SonicWALL Analyzer 8.0 Administration Guide 3
Configuration Settings . . . .89
Setting Up Currency Cost for Summarizer . . . .90
Adding Syslog Exclusion Filters . . . .90
Viewing SMA Reports . . . 92
SMA Reporting Overview . . . .92
SMA Reports Tab . . . .92
What is SMA Reporting? . . . .92
Benefits of SMA Reporting . . . .93
How Does SMA Reporting Work? . . . .93
Using and Configuring SMA Reporting . . . .93
Viewing Available SMA Report Types . . . .94
Configuring SMA Scheduled Reports . . . .95
Navigating Through Detailed SMA Reports . . . .95
Viewing SMA Summary Reports . . . .95
Viewing SMA Unit-Level Reports . . . .96
Viewing Unit-Level Data Usage Reports . . . .96
Viewing SMA Top Users Reports . . . .97
Viewing Access Method Reports . . . .99
Viewing SMA Authentication User Login Report . . . 100
Viewing SMA Authentication Failed Login Report . . . 101
Viewing Web Application Firewall (WAF) Reports . . . 102
Viewing Connection Reports . . . 107
Viewing SMA Analyzer Logs . . . 109
Syslog Exclusion Filter . . . 110
Custom Reports . . . 111
Part 4. Console
Configuring Log Settings . . . .113Configuring Log Settings . . . 113
Configuring Log View Search Criteria . . . 114
Configuring Console Management Settings . . . .116
Configuring Management Settings . . . 116
Configuring Email Settings . . . 116
Configuring Management Sessions . . . 117
Managing Sessions . . . 117
Managing Reports in the Console Panel . . . .118
Summarizer . . . 118
About Summary Data in Reports . . . 118
Configuring the Data Deletion Schedule Settings . . . 119
Configuring Data Storage . . . 120
Configuring Hostname Resolution . . . 120
Configuring the Packet Data Viewer . . . 121
Syslog Exclusion Filter . . . 121
Dell SonicWALL Analyzer 8.0 Administration Guide 4
Configuring Email/Archive Settings . . . 123
Managing Legacy Reports . . . 123
Using Diagnostics . . . .125
Configuring Debug Log Settings . . . 125
Summarizer Status . . . 126
Granular Event Management . . . .130
Granular Event Management Overview . . . 130
What is Granular Event Management? . . . 130
How Does Granular Event Management Work? . . . 131
Using Granular Event Management . . . 131
About Alerts . . . 131
Configuring Granular Event Management . . . 132
Configuring Events on the Console Panel . . . 132
Configuring User Settings . . . .141
Using Analyzer Help . . . .142
About Analyzer . . . 142
Tips and Tutorials . . . 142
Part 5. UMH
Using the UMH System Interface . . . .144Overview of the UMH System Interface . . . 144
Switching to the Application Interface . . . 145
Viewing Online Help and Tips . . . 145
Logging Out of the UMH System Interface . . . 146
Configuring UMH System Settings . . . 146
Viewing System Status . . . 146
Managing System Licenses . . . 147
Configuring System Time Settings (Virtual Appliance) . . . 152
Configuring System Administration Settings . . . 153
Managing System Settings . . . 153
Using System Diagnostics . . . 154
Using System File Manager (Virtual Appliance) . . . 155
Using System Backup/Restore . . . 156
Using System Shutdown (Virtual Appliance) . . . 157
Configuring UMH Network Options (Virtual Appliance) . . . 157
Configuring Network Settings (Virtual Appliance) . . . 157
Configuring Network Routes (Virtual Appliance) . . . 158
Configuring UMH Deployment Options . . . 158
Configuring the Deployment Role . . . 159
Configuring Deployment Settings . . . 159
Configuring Web Server Settings . . . 160
Configuring SMTP Settings . . . 161
Configuring SSL Access . . . 161
Dell SonicWALL Analyzer 8.0 Administration Guide 5
Part 6. Appendices
Upgrading . . . .164
Upgrading SonicWALL ViewPoint 6.0 to Analyzer 8.0 . . . 164
Upgrading from Analyzer to GMS . . . 165
Enabling the GMS Free Trial from Analyzer . . . 166
Enabling the GMS Free Trial from the UMH Interface . . . 168
Completing the Free Trial Upgrade . . . 169
Configuring Appliances for GMS Management . . . 171
Purchasing a SonicWALL GMS Upgrade . . . 173
Miscellaneous Procedures and Tips . . . 174
Miscellaneous Procedures . . . 174
License Agreements . . . .177
End User Software License Agreement . . . 177
About Dell . . . .183
Contacting Dell . . . 183
Technical support resources . . . 183
Third-party contributions . . . 183
Apache Licensing Agreement . . . 184
zlib/libpng license . . . 189
Dell SonicWALL Analyzer 8.0 Administration Guide
Part 1
6Introduction
• Introduction to Analyzer
Dell SonicWALL Analyzer 8.0 Administration Guide
1
7
Introduction to Analyzer
This chapter provides an overview of Dell SonicWALL™ Analyzer and information about the user interface. See the following sections:
• Overview of Analyzer on page 7 • Deployment Requirements on page 9
• Dell SonicWALL Analyzer Installation on page 13
• Accessing the Correct Management Interface on page 14 • Log In to Analyzer on page 15
• Navigating the Analyzer User Interface on page 15 • Analyzer Views and Status on page 18
• Understanding Analyzer Icons on page 19 • Using the Analyzer TreeControl Menu on page 20
Overview of Analyzer
This section contains the following subsections:
• What is Analyzer? on page 7
• Key Features in Analyzer 8.0 on page 8 • Key Features in Analyzer 7.2 on page 9
What is Analyzer?
Monitoring critical network events and activity, such as security threats, inappropriate Web use, and bandwidth levels, is an essential component of network security. Dell SonicWALL Analyzer Reporting complements SonicWALL's network security offerings by providing detailed and comprehensive reports of network activity. The Analyzer Reporting Module is a software application that creates dynamic, Web-based network reports. The Analyzer Reporting Module generates both real-time and historical reports to offer a complete view of all activity through SonicWALL network security appliances. With Analyzer Reporting, you can monitor network access, enhance security, and anticipate future bandwidth needs. The Analyzer Reporting Module:
• Displays bandwidth use by IP address and service • Identifies inappropriate Web use
• Provides detailed reports of attacks
• Collects and aggregates system and network errors • Shows VPN events and problems
• Presents visitor traffic to your Web site
Dell SonicWALL Analyzer 8.0 Administration Guide 8
Key Features in Analyzer 8.0
This section describes the SonicOS enhancements included in the Analyzer 8.0 release:
• Java Applet Replacement — The TreeControl application (that displays all managed appliances) and the
User Management application (Console > Management > Users) have now been replaced with non-Java versions. All Java applets in the front-end have been removed, except for NetMonitor and the “Login to Unit” feature from TreeControl.
• SonicOS Support — New features in SonicOS 6.2 are supported.
• Portuguese Support — The Login screen now includes version information and indicates Brazilian
Portuguese support.
• Reporting
• Report Database Rebuild Utility — The Reporting Database Rebuild Utility allows you to submit a
request to rebuild any specific month's report table if it were to become corrupt.
• Report Data Optimization — In previous versions, report data optimization exported sorted
report data into a file and reloaded that data back to the report database. In Analyzer 8.0, instead of using a file to upload the data, a temporary table is created that exports and reimports that data, leading to better performance.
• Botnet Reports — Botnet reporting is added to the Reports panel and includes four report types:
Attempts, Targets, Initiators, and Timeline.
• Geo-IP Reports — Geo-IP reports contain information on blocked traffic that is based on the
traffic's country of origin or destination. Geo-IP Reporting is added to the Reports panel and includes four report types: Attempts, Targets, Initiators, and Timeline.
• MAC Address in Reporting — This feature shows the Media Access Control (MAC) address on the
report page. This adds detail to the current device-specific information in the report panel and the PDF report. New columns “Initiator MAC” and “Responder MAC” are added to the following reports:
• Data Usage > Initiators • Data Usage > Responders • Data Usage > Details • User Activity > Details • Web Activity > Initiators
• Enhanced Reporting Database — The Reporting Database has been upgraded to a newer version
that offers better performance and higher reliability.
• Distributed Universal Scheduled Report — PDF report generation and uses an engine that can
make better use of your CPU and RAM resources, resulting in faster delivery of scheduled reports with larger volumes and more rows of data.
• Enhanced USR Template Manager — In addition to the PCI Report template, HIPAA and SOX templates
are added to Universal Scheduled Reports as an aid for compliance audits.
• USR-Customizing Sorting Option in PDF — Provides additional sorting options for Scheduled PDF reports • Log Analyzer — The Firewall > Reports > Analyzers > Log Analyzer page has been updated with an
out-of-the-box default view.
• Packet Data View for Signature Alerts
• The disabling of default Syslog filters is allowed • Comments Possible for Syslog Filters
• Number of Syslog messages per file configurable through UI
• All Windows Modules of Analyzer 8.0 are now 64-bit — Provides better usage of system resources and
Dell SonicWALL Analyzer 8.0 Administration Guide 9 • High-level User Interface Changes
• Secure Remote Access (SRA) has been renamed to Secure Mobile Access (SMA). • The CDP tab is removed.
• SMA (formally SRA) tabs are no longer shown by default, but can be activated on Console > Management > Settings.
Key Features in Analyzer 7.2
The following features were key to Analyzer 7.2:
• IPv6 Support — IPv6 is supported in Analyzer 7.2, allowing you to:
• Install Analyzer in an IPv6 network environment. Analyzer can now access various Network
Elements using IPv6 addresses, such as: Firewalls, SMTP servers, RADIUS/LDAP Authentication Servers, SNMP Managers, WebServices, and so on.
• Access Analyzer web interfaces on an IPv6 network. • Generate IPv6 based reports.
• Scheduled Reports Permission Management — In 7.1, scheduled reports created by an end user can only
be viewed and configured by the creator and Administrator. 7.2 gives the scheduled report creator the ability to manage permissions of the scheduled reports so other users in the deployment can view and configure the report.
• Intrusion Reporting Enhancements — Two new reports are added at root level to the Intrusion reports: • Reports > Intrusions > Details
• Reports > Intrusions > Alerts
• Syslogs Sent by Appliances that are not under Reporting or Management— Some of the units which are
no longer managed by Analyzer send syslogs that create NMM files which impact performance. In 7.2, you are notified if this occurs and they can make the unit stop sending syslog messages.
• Application Level Data Archiving and Aging — In 7.1 data was not deleted from the application table
such as logs and meta data tables, causing the number of rows to grow quickly in the tables, affecting overall performance of the application. In 7.2 the console logs and application meta data tables are aged and archived to fix this issue.
• Localization — Support for the Korean language is included in 7.2.
• Disable Archiving of Syslogs to File System— Added the option to disable storing of archived syslogs. • Reverse DNS Support — This feature enhances the quality of data by performing a reverse lookup on the
private IP addresses (LAN Side) with a missing hostname sent by the firewall. The reverse lookup is performed by logging into the DNS server on the LAN side of the firewall. This functionality requires the Analyzer to be installed on the LAN side of the firewall, to be able to access the DNS Server.
• Log Analyzer Enhancements — The Log Analyzer interface is customizable to allow expansion and easy
distribution of columns for ease of navigation.
Deployment Requirements
Dell SonicWALL Analyzer comes with a base license to manage either 5, 10, or 25 nodes. You can purchase additional licenses on MySonicWALL. For more information on licensing additional nodes, visit:
http://www.sonicwall.com/us/Products_Solutions.html
Before installing, review the requirements in the following sections:
Dell SonicWALL Analyzer 8.0 Administration Guide 10
Operating System Requirements
Dell SonicWALL Analyzer supports the following Microsoft Windows operating systems:
• Windows Server 2012 Standard 64-bit
• Windows Server 2012 R2 Standard 64-bit (English and Japanese language versions) • Windows Server 2012 R2 Datacenter
• Windows Server 2008 R2 Datacenter • Windows Server 2008 SBS R2 64-bit • Windows Server 2008 R2 Standard 64-bit • Windows Server 2008 SP2 64-bit
• Windows Server 2003 64-bit (SP2) • Windows 8.1 64-bit
• Windows 7 64-bit
These Windows systems can either run in physical standalone hardware platforms, or as a virtual machine under Windows Server 2008 and 2012 Hyper-V or VMware ESXi.
Hardware Requirements for Windows Server
Use the Capacity Calculator 2 to determine the hardware requirements for your deployment.
Virtual Appliance Requirements
The elements of basic VMware structure must be implemented prior to deploying the Dell SonicWALL Analyzer Virtual Appliance. SonicWALL Analyzer Virtual Appliance runs on the following VMware platforms:
• ESXi 4.1, 5.0, 5.1 and 5.5
• ESXi 4.0 Update 1 (Build 208167 and newer) • ESX 4.1
• ESX 4.0 Update 1 (Build 208167 and newer)
Use the following client applications to import the image and configure the virtual settings:
• VMware vSphere – Provides infrastructure and application services in a graphical user interface for
ESX/ESXi, included with ESX/ESXi. Allows you to specify Thin or Thick (Flat) provisioning when deploying the Virtual Appliance.
• VMware vCenter Server – Centrally manages multiple VMware ESX/ESXi environments. Provides Thick
provisioning when deploying the Virtual Appliance.
TIP: Bundled databases run in 64-bit mode on 64-bit Windows operating systems. All listed operating systems are supported in both virtualized and non-virtualized environments. In a Hyper-V virtualized environment, Windows Server is a guest operating system running on Hyper-V. Analyzer is then installed on the Windows Server virtual machine that is layered over Hyper-V.
NOTE: Analyzer is not supported on MS-Windows Server virtual machines running in cloud services, such as Microsoft Azure and Amazon Web Services EC2.
NOTE: A Windows 64-bit operating system with a RAM of at least 16GB of RAM is highly recommended for better performance of reporting modules.
Dell SonicWALL Analyzer 8.0 Administration Guide 11
Virtual Appliance Deployment Considerations
Consider the following before deploying the Analyzer Virtual Appliance:
• Analyzer management is not supported on Apple MacOS. • All modules are 64-bit.
Use the Capacity Calculator 2 to determine the hardware requirements for your deployment.
• The performance of Analyzer Virtual Appliance depends on the underlying hardware. It is highly
recommended to dedicate all the resources that are allocated to the Virtual Appliance, especially the hard-disk (datastore). In environments with high volumes of syslogs, you need to dedicate local datastores to the Analyzer Virtual Appliance.
• Starting with Analyzer 7.1 the Virtual Appliances are 64-bit that takes advantage of additional RAM
available to it. A minimum of 8GB RAM is required. However, at least 16GB of RAM is highly recommended for better performance of reporting modules.
• When using Thick, or Flat, provisioning as the storage type option, the entire amount of disk space is
allocated when you import and deploy the Virtual Appliance file. When using Thin provisioning, the initial size is very small and grows dynamically as more disk space is needed by the application, until the maximum size is reached. After being allocated, the size does not shrink if the application space requirements are subsequently reduced.
Additional disk space provided to the Virtual Appliance in the virtual environment, beyond the respective limits of 250 GB or 950 GB, is not utilized.
ESX/ESXi 4.1 can be configured with datastores of varying block sizes. The 4 or 8 MB requirement for the 950 GB deployment is because the block size determines the largest virtual disk that can be deployed, as shown in the table:
MySQL Requirements
Dell SonicWALL Analyzer automatically installs MySQL as part of the base installation package. Separately installed instances of MySQL are not supported with Analyzer.
Browser Requirements
Dell SonicWALL Analyzer uses advanced browser technologies such as HTML5, which are supported in most recent browsers. Dell SonicWALL recommends using the latest Chrome, Firefox, Internet Explorer, or Safari browsers for administration of the Dell SonicWALL Analyzer.
This release supports the following Web browsers:
• Chrome 42.0 and higher (recommended browser for dashboard real-time graphics display) • Firefox 37.0 and higher
• Internet Explorer 10.0 and higher (do not use compatibility mode)
Table 1. Datastore block sizes
Block Size of Datastore Largest Virtual Disk
1 MB 256 GB 2 MB 512 GB
4 MB 1 TB
8 MB 2 TB
Dell SonicWALL Analyzer 8.0 Administration Guide 12
Mobile device browsers are not recommended for Dell SonicWALL Analyzer system administration.
To enable NPAPI support, complete the following steps:
1 In your URL bar, enter:
chrome://flags/#enable-npapi
2 Click Enable for the Enable NPAPI configuration option:
3 Click Relaunch Now, which now appears at the bottom of the configuration page.
Network Requirements
To complete the Analyzer deployment process documented in this guide, the following network requirements must be met:
• The Dell SonicWALL Analyzer server must have access to the Internet • The Dell SonicWALL Analyzer server must have a static IP address
• The Dell SonicWALL Analyzer server’s network connection must be able to accommodate at least 1 KB/s
for each device under management. For example, if Global Management System is monitoring 100 SonicWALL appliances, the connection must support at least 100 KB/s.
NOTE: Turn off Compatibility Mode when accessing Analyzer sites with Internet Explorer.
NOTE: If using Chrome version 42 and newer to access Analyzer 7.2 and older, you need to enable NPAPI support in Chrome, which by default has been disabled starting with version 42.
NOTE: Depending on the configuration of Dell SonicWALL log settings and the amount of traffic handled by each device, the network traffic can vary dramatically. The 1 KB/s for each device is a general
Dell SonicWALL Analyzer 8.0 Administration Guide 13
Dell SonicWALL Appliances Supported for Analyzer
Management
Dell SonicWALL Analyzer Installation
Analyzer 8.0 can be installed as a fresh install or as an upgrade from Analyzer 7.2. If you wish to perform a fresh install of Analyzer 8.0, refer to the Analyzer Getting Started Guide that relates to your Analyzer deployment. All software components related to Dell SonicWALL Analyzer and SonicWALL Global Management System (GMS), including the MySQL database, executable binary files for all services, and other necessary files, are installed using the Universal Management Suite (UMS) single-binary installer. All SonicWALL Analyzer and SonicWALL GMS files are installed as part of the Universal Management Suite, but no distinction is made between SonicWALL Analyzer and SonicWALL GMS during the installation. The initial installation phase takes just a few minutes for any type of installation, such as a SonicWALL Analyzer server, a SonicWALL GMS server, a database server, or any other role.
To install the Universal Management Suite from the single binary installer, refer to the Dell SonicWALL Analyzer
Getting Started Guide.
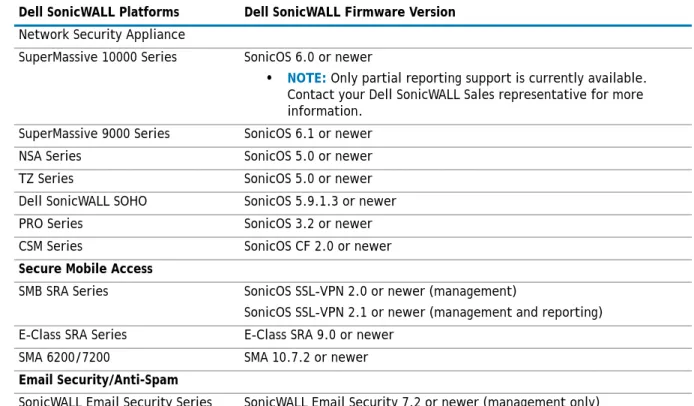
Table 2. Component Requirements
Dell SonicWALL Platforms Dell SonicWALL Firmware Version
Network Security Appliance
SuperMassive 10000 Series SonicOS 6.0 or newer
• NOTE: Only partial reporting support is currently available. Contact your Dell SonicWALL Sales representative for more information.
SuperMassive 9000 Series SonicOS 6.1 or newer NSA Series SonicOS 5.0 or newer TZ Series SonicOS 5.0 or newer Dell SonicWALL SOHO SonicOS 5.9.1.3 or newer PRO Series SonicOS 3.2 or newer CSM Series SonicOS CF 2.0 or newer
Secure Mobile Access
SMB SRA Series SonicOS SSL-VPN 2.0 or newer (management)
SonicOS SSL-VPN 2.1 or newer (management and reporting) E-Class SRA Series E-Class SRA 9.0 or newer
SMA 6200/7200 SMA 10.7.2 or newer
Email Security/Anti-Spam
SonicWALL Email Security Series SonicWALL Email Security 7.2 or newer (management only)
NOTE: Appliances running firmware newer than this Analyzer release can still generate reports. However, the new features in the firmware release will be supported in an upcoming release of Analyzer.
NOTE: Legacy SonicWALL XPRS/XPRS2, SonicWALL SOHO2, SonicWALL Tele2, and SonicWALL Pro/Pro-VX models are not supported for Dell SonicWALL Analyzer reporting. Appliances running SonicWALL legacy firmware including SonicOS Standard 1.x and SonicWALL legacy firmware 6.x.x.x are not supported for SonicWALL Analyzer reporting.
NOTE: Dell SonicWALL Analyzer can be connected to SSL-VPN 2000 and 4000 appliances. Use the Log >
View Log page to set up the Analyzer connection (in addition to the configuration changes made on the
Analyzer). In Dell SonicWALL SMA SSL-VPN 5.5 or later firmware versions, a Log > Analyzer page is provided for configuration of Analyzer settings.
Dell SonicWALL Analyzer 8.0 Administration Guide 14
License and Registration Requirements
SonicWALL Analyzer is registered and licensed from the Windows server on which it is installed. Dell SonicWALL Analyzer registration is performed using the SonicWALL Universal Management Host system interface.
Refer to the Dell SonicWALL Analyzer Getting Started Guidefor detailed instructions on registering and licensing Analyzer on your system.
On Dell SonicWALL appliances that send reporting data to the Analyzer, Analyzer is licensed and activated separately from the Dell SonicWALL appliances. MySonicWALL provides a way to associate Dell SonicWALL appliances with the Analyzer instance installed on the Windows system. Licensing your Analyzer application on a Dell SonicWALL appliance requires:
• A MySonicWALL account. A MySonicWALL account allows you to manage your SonicWALL products and
purchase licenses for various services. Creating a MySonicWALL account is fast, simple, and free. Simply complete an online registration form directly from your SonicWALL security appliance management interface. Your MySonicWALL account is also accessible at
<https://www.mysonicwall.com> from any Internet connection with a Web browser. After you have an account, you can purchase SonicWALL Analyzer and other licenses for your registered SonicWALL security appliances.
• A registered SonicWALL security appliance with active Internet connection. You need to register your
SonicWALL security appliance to activate SonicWALL Analyzer. Registering your SonicWALL security appliance is a simple procedure done directly from the management interface. After your SonicWALL security appliance is registered, you can activate SonicWALL Analyzer by using an activation key or by synchronizing with mysonicwall.com.
Accessing the Correct Management
Interface
Dell SonicWALL Analyzer includes two separate management interfaces:
• SonicWALL Universal Management Host (UMH) System Management Interface – Used for system
management of the Dell SonicWALL Analyzer instance, including registration and licensing, setting the admin password, creating backups, restarting the system, configuring network settings, selecting the deployment role, and configuring other system settings.
Access the system management interface with the URL: http://<IP_address>:<port_number>/appliance/
If you are using the standard HTTP port, 80, it is not necessary to append the port number to the IP address. If you are accessing the interface from the same system on which it is installed, use the following URL:
http://localhost/appliance/
• Dell SonicWALL Analyzer Management Interface – Used to access the Dell SonicWALL Analyzer
application that runs on the system. This interface is used to configure and view Dell SonicWALL Analyzer reporting on SonicWALL appliances and for configuring Analyzer administrative settings. Access the Dell SonicWALL Analyzer management interface with one of the following URLs:
http://<IPaddress>:<port_number>/sgms/ http://localhost/sgms/
Switching Between Management Interfaces
You can easily switch between the SonicWALL UMH system management interface and the Dell SonicWALL Analyzer application management interface.
Dell SonicWALL Analyzer 8.0 Administration Guide 15
One method is to change the URL by adding /sgms for the Analyzer application interface or adding /appliance for the UMH interface.
A second method involves clicking the Switch icon. While logged into either interface, you can switch to the login page of the other interface by clicking Switch in the top right corner of the page.
Log In to Analyzer
After registering your SonicWALL Analyzer product, to log in into the SonicWALL Analyzer management
interface, either double-click on the SonicWALL Analyzer icon on your desktop, or from a remote system, access the following URL from a web browser:
http://<IP_address>:<port_number>
The Analyzer login page appears by default in English. To change the language setting, click your language of choice at the bottom of the login page. The available language choices for SonicWALL Analyzer include English, Japanese, Simplified Chinese, Traditional Chinese, Korean, and Portuguese.
1 Enter the SonicWALL user ID (default: admin) and password (default: password). Select Local Domain as the domain (default).
2 Click Submit. The Dell SonicWALL Analyzer management interface displays.
Navigating the Analyzer User Interface
This section describes the Firewall, SMA, and Console panels in the SonicWALL Analyzer user interface. For information about the Dashboard panel, see the Using the Universal Scheduled Reports Application on page 26.
NOTE: For more information on installation, login procedures, and registration of your SonicWALL Analyzer installation, refer to the appropriate Getting Started Guide, available at:
Dell SonicWALL Analyzer 8.0 Administration Guide 16
Firewall Panel
The Firewall Panel is an essential component of network security that is used to view and schedule reports about critical network events and activity, such as security threats, inappropriate Web use, and bandwidth levels. To open the Firewall Panel, click the Firewall tab at the top of the Analyzer user interface.
From the Firewall Panel, you can view the following for connected SonicWALL appliances:
• View general unit status, license status, and syslog settings.
• View the SonicWALL security dashboard. Dashboard reports display an overview of bandwidth, uptime,
intrusions and attacks, and alerts for connected SonicWALL firewall appliances. The Security Dashboard report provides data about worldwide security threats that can affect your network. The Dashboard also displays data about threats blocked by the SonicWALL security appliance.
• View custom reports of Internet activity or Website filtering at the unit level. Custom reports filter raw
syslog data and you can specify start and end dates or a date range such as “Week to date”. You can filter by user, domain, protocol, traffic, and full URL categories, depending on the type of custom report. The search template can be saved for use again later with the same appliance.
• View general bandwidth usage. These reports include a daily bandwidth summary report, a top users of
bandwidth report, and over-time summary and top users reports.
• View a services report. This report includes information about events and usage of protocols and
megabytes.
• View Web bandwidth usage. These reports include a daily bandwidth summary report, a top visited sites
report, a top users of Web bandwidth report, a report that contains the top sites of each user, and a weekly summary report.
• View the number of attempts that users made to access blocked websites. These reports include a daily
summary report, a top blocked sites report, a top users report, a report that contains the top blocked sites of each user, and a weekly summary report.
• View file transfer protocol (FTP) bandwidth usage. These reports include a daily FTP bandwidth summary
report, a top users of FTP bandwidth report, and a weekly summary report.
• View mail bandwidth usage. These reports include a daily mail summary report, a top users of mail
report, and a weekly summary report.
• View VPN usage. These reports include a daily VPN summary report, a top users of VPN bandwidth
report, and a weekly summary report.
• View reports on attempted attacks and errors. The attack reports include a daily attack summary report,
an attack by category report, a top sources of attacks report, and a weekly attack summary report. The error reports include a daily error summary report and a weekly error summary report.
Dell SonicWALL Analyzer 8.0 Administration Guide 17 • View reports on attempted virus attacks. Virus attacks reports are available for appliances that are
licensed for SonicWALL Gateway Anti-Virus. These reports include the most frequent virus attack attempts, virus attacks by top destinations, virus attacks over time, virus attacks over a period of time, and virus attacks by top destinations over time.
• View reports on attempted spyware attacks. Anti-spyware reports are available for appliances that are
licensed for SonicWALL Anti-Spyware. These reports include spyware attacks by category, spyware attacks over time, and spyware attacks by category over time.
• View reports on attempted intrusion attacks. Intrusion prevention reports are available for appliances
that are licensed for SonicWALL Intrusion Prevention Service. These reports include intrusion attacks by source IP address, intrusion attacks by category, intrusion attacks over time, and intrusion attacks by category over time.
• View reports on traffic triggering Application Firewall policies. Application Firewall reports are available
for SonicWALL firewall appliances that are licensed for SonicWALL Application Firewall. These reports include summary, over time, top applications, top users, and top policies.
• View successful and unsuccessful user and administrator authentication attempts. These reports include
a user authentication report, an administrator authentication report, and a failed authentication report.
• View detailed logging information. The detailed logging information contains each transaction that
occurred on the SonicWALL appliance.
• View current alerts and access alert settings.
SMA Panel
The SMA panel provides access to SSL VPN appliances and is similar to the Firewall panel. It is used to view and schedule reports about critical network events and activity, such as security threats, inappropriate Web use, and bandwidth levels. To open the SMA Panel, click the SMA tab at the top of the Analyzer user interface.
From the SMA Panel, you can view the following for connected SonicWALL SSL VPN appliances:
• View general unit status, license status, and syslog settings.
• View general bandwidth usage. These reports include a daily bandwidth summary report, a top users of
bandwidth report, and over-time summary and top users reports.
• View custom reports of custom reports of resource activity at the unit level. Custom reports filter raw
syslog data and you can specify start and end dates or a date range such as “Week to date”. You can filter by user, protocol, destination IP, and source IP categories. The search template can be saved for use again later with the same appliance.
• View a resources report. This report includes information about connections and the resource used to
connect, such as HTTPS or NetExtender.
• View successful and unsuccessful user authentication attempts. These reports include a user
authentication report and a failed authentication report.
• View detailed logging information. The detailed logging information contains each transaction that
Dell SonicWALL Analyzer 8.0 Administration Guide 18
Console Panel
The Console Panel is used to configure Dell SonicWALL Analyzer settings, view pending tasks, view the log, manage licenses, and configure alerts. To open the Console Panel, click the Console tab at the top of the Dell SonicWALL Analyzer user interface.
From the Console Panel, you can do the following:
• Change the Analyzer password, adjust the amount of inactive time before you are automatically logged
out of Analyzer, and set the maximum number of rows displayed on paginated screens.
• Configure Web sites and Web users that are excluded from Web usage reports.
• View the Analyzer log and delete old log messages. The Analyzer log contains information on alert
notifications, failed Analyzer login attempts, and other events that apply to Dell SonicWALL Analyzer.
• Manage SMTP settings, system email addresses, archive report settings, debug level for logs, and
password security settings. You can set the schedule and server settings, and the email alert recipient schedule and preferred format.
• Manage login sessions. You can view the status of user sessions and, if necessary, end them.
• Configure report settings for sort options and maximum units with Log Viewer enabled. Enabling Log
Viewer allows custom reports for the system, but is resource intensive.
• Control summarizer settings, syslog and summarized data deletion schedules, and host name resolution
settings.
• Configure email archive settings and search settings for scheduled reports, and manage data archiving. • View summarizer diagnostics, useful for capacity planning.
• Configure granular event management report settings, including threshold, schedule, and alert settings. • Configure Web services deployment settings and view Web services status.
• View the version number, serial number, and database information for SonicWALL Analyzer, and access
links to all available tips and video tutorials.
Analyzer Views and Status
SonicWALL Analyzer allows you to view status and reports for all appliances at once using GlobalView, or for a single unit at a time with the Unit view. Analyzer provides status information on the General > Status page of the Firewall or SMA panel.
Dell SonicWALL Analyzer 8.0 Administration Guide 19
GlobalView is a grouping of all the appliances you are monitoring with Analyzer. From the GlobalView of the Firewall or SMA panel, Summary and Over Time reports are available for all SonicWALL appliances monitored by SonicWALL Analyzer.
To open the My Reports view, click the GlobalView icon at the top of the left pane. To display the global status page, navigate to General > Status.
From the Unit view, reports contain detailed data for the selected SonicWALL appliance. To specify the unit view, click any unit in the left pane. To display the unit status page, navigate to General > Status on the
Firewall or SMA panel.
Understanding Analyzer Icons
This section describes the meaning of icons that appear next to managed appliances listed in the left pane of the management interface.
Table 3. Icon meaning
Appliance Status Description
One blue box indicates that the appliance is operating normally. The appliance is accessible from Dell SonicWALL Analyzer, and no tasks are pending or scheduled.
Three blue boxes indicate that all appliances in the global group of this type (Firewall/SMA) are operating normally.
Dell SonicWALL Analyzer 8.0 Administration Guide 20
Using the Analyzer TreeControl Menu
This section describes the content of the TreeControl menu within the Dell SonicWALL Analyzer user interface. You can control the display of the TreeControl pane by selecting one of the appliance tabs at the top of the main window. For example, when you click the Firewall tab, the TreeControl pane displays all the connected SonicWALL firewall appliance units. The two appliance tabs can display the following appliance types when Analyzer is monitoring these device types:
• SonicWALL firewall appliances • SMA and EX-Series SMA appliances
You can hide the entire TreeControl pane by clicking the sideways arrow icon, and redisplay the pane by clicking it again. This is helpful when viewing some reports or other extra-wide screens.
To open a TreeControl appliance menu, right-click GlobalView or a Unit icon.
The following options are available in the right-click menu:
• Find – Opens a Find dialog box that allows you to search for units. • Refresh – Refreshes the Analyzer UI display.
• Add Unit – Add a new unit to the Analyzer view. Requires unit IP and login information. • Rename Unit – (unit view only) Renames the selected SonicWALL appliance.
• Delete – Delete the selected unit
• Modify Unit – (unit view only) Change basic settings for the selected unit, including unit name, IP and
login information, and serial number.
Dell SonicWALL Analyzer 8.0 Administration Guide
2
21
Provisioning and Adding Dell SonicWALL
Appliances
This chapter describes how to provision and add Dell SonicWALL appliances to Dell SonicWALL Analyzer. All Dell SonicWALL appliances must be provisioned before adding them to Dell SonicWALL Analyzer.
This chapter contains the following sections:
• Provisioning a Dell SonicWALL Firewall Appliance on page 21 • Provisioning a Dell SonicWALL SMA SMB Appliance on page 21
• Provisioning a Dell SonicWALL E-Class SMA Series Appliance on page 22
• Adding Dell SonicWALL Appliances to Analyzer on page 22
Provisioning Dell SonicWALL Appliances
This section describes how to configure Dell SonicWALL appliances to support Dell SonicWALL Analyzer.
Provisioning a Dell SonicWALL Firewall Appliance
To provision a Dell SonicWALL firewall appliance for Dell SonicWALL Analyzer, complete the following steps:
1 Log in to the firewall appliance. Navigate to the Log > Syslog page. 2 In Syslog Servers, click Add.
3 Enter the Analyzer IP address to start sending syslogs. The Analyzer service should be activated. Set the log in UTC format and log category.
4 Navigate to the System > Time page, and enable the Display UTC in logs (instead of local time) check box.
Provisioning a Dell SonicWALL SMA SMB Appliance
To provision a Dell SonicWALL SMA SMB appliance for Dell SonicWALL Analyzer, complete the following steps:
1 Log in to the SMA SMB appliance. Navigate to the Log > Analyzer page. 2 In Analyzer Settings, click the Enable Analyzer check box.
NOTE: Prior to adding a unit to Analyzer, the provisioned Dell SonicWALL appliance needs to be registered with License Manager. And during registration, make sure the provisioned Dell SonicWALL appliance has a valid Analyzer license—one Analyzer license for each Dell SonicWALL appliance.
Dell SonicWALL Analyzer 8.0 Administration Guide 22
3 Click Add to add the Analyzer IP address, this starts sending syslogs.
4 Navigate to the System > Time page, and enable the Display UTC in logs (instead of local time) check box.
Provisioning a Dell SonicWALL E-Class SMA Series
Appliance
Currently there is no Analyzer settings implementation in SonicWALL E-Class SMA series appliances. To add Analyzer reporting support, use the Additional ViewPoint settings in the General > Configure Centralized
Management screen. And enter the Analyzer IP address and port number to start sending syslog.
Adding Dell SonicWALL Appliances to
Analyzer
Dell SonicWALL Analyzer checks with the Dell SonicWALL licensing server when you add an appliance, so it is important that Dell SonicWALL Analyzer has Internet access to the server.
Dell SonicWALL Analyzer communicates with Dell SonicWALL appliances using HTTPS protocol.
For information on adding, modifying, and deleting units, refer the following sections:
• Adding Dell SonicWALL Appliances on page 22
• Modifying Dell SonicWALL Appliance Settings on page 24 • Deleting Dell SonicWALL Appliances from Analyzer on page 24
Adding Dell SonicWALL Appliances
To add a Dell SonicWALL appliance using the Dell SonicWALL Analyzer management interface, complete the following steps:
1 Click the appliance tab that corresponds to the type of appliance that you want to add:
• Firewall • SMA
2 Expand the Dell SonicWALL Analyzer tree and select the group to which you want to add the Dell SonicWALL appliance. Then, right-click the group and select Add Unit from the pop-up menu. To not
NOTE: A SonicWALL appliance might already be registered to a different MySonicWALL account, in this case the “Register to MySonicWALL.com” task cannot be executed, and remain in the scheduled tasks queue. To take full advantage of Analyzer managed appliances, it is important that either the managed appliance is not registered when it is added into Analyzer, or it is registered to the same
Dell SonicWALL Analyzer 8.0 Administration Guide 23
specify a group, right-click an open area in the left pane (TreeControl pane) of the Dell SonicWALL Analyzer management interface and select Add Unit or click the Add Unit icon in the tool bar.
The Add Unit dialog box appears:
3 Enter a descriptive name for the Dell SonicWALL appliance in the Unit Name field. Do not enter the single quote character (‘) in the Unit Name field.
4 Enter the serial number of the Dell SonicWALL appliance in the Serial Number field. 5 Enter the IP address of the Dell SonicWALL appliance in the IP Address field.
6 Enter the administrator login name for the Dell SonicWALL appliance in the Login Name field. 7 Enter the password used to access the Dell SonicWALL appliance in the Password field. 8 For Access Mode, select from the following:
9 The Dell SonicWALL appliances are connected with HTTPS by default.
10 Enter the port used to connect to the Dell SonicWALL appliance in the Management Port field (default port for is HTTPS: 443).
11 Click OK. The new Dell SonicWALL appliance appears in the Analyzer management interface. It has a yellow icon that indicates it has not yet been successfully acquired.
Dell SonicWALL Analyzer 8.0 Administration Guide 24
12 Analyzer then attempts to set up an HTTPS connection to access the appliance. Analyzer then reads the appliance configuration and acquires the SonicWALL appliance for reporting. This takes a few minutes.
Modifying Dell SonicWALL Appliance Settings
If you make a mistake or need to change the settings of an added Dell SonicWALL appliance, you can manually modify its settings or how it is managed.
To modify a Dell SonicWALL appliance, complete the following steps:
1 Right-click the appliance name in the left pane of the Analyzer UI and select Modify Unit from the pop-up menu. The Modify Unit dialog box appears.
2 The Modify Unit dialog box contains the same options as the Add Unit dialog box. For descriptions of the fields, see Adding Dell SonicWALL Appliances to Analyzer on page 22.
When you have finished modifying options, click OK. The Dell SonicWALL appliance settings are modified.
Deleting Dell SonicWALL Appliances from Analyzer
To delete a Dell SonicWALL appliance from Dell SonicWALL Analyzer, complete the following steps:
1 Right-click on a Dell SonicWALL appliance in the left pane and select Delete from the pop-up menu. 2 In the warning message that displays, click Yes. The SonicWALL appliance is deleted from SonicWALL
Analyzer.
NOTE: After the Dell SonicWALL appliance is successfully acquired, its icon turns blue, its configuration settings are displayed at the unit level, and its settings are saved to the database.
NOTE: After the deleting the Dell SonicWALL appliance from Analyzer, unprovision the unit as a best practice. To unprovision the unit, log in to the Dell SonicWALL appliance and disable Analyzer management to avoid sending unnecessary syslogs to the Analyzer host.
Dell SonicWALL Analyzer 8.0 Administration Guide
Part 2
25
Dashboard
Dell SonicWALL Analyzer 8.0 Administration Guide
4
26
Using the Dashboard Panel
This chapter provides an overview of the Dell SonicWALL Analyzer Dashboard. See the following sections:
• Using the Universal Scheduled Reports Application on page 26
The Dashboard control bar provides top-of-the page menu items for customizing the settings of this page. When the Dashboard loads after SonicWALL Analyzer login, the control bar is displayed and then becomes hidden until you place your mouse cursor at the top of the page. You can lock the control bar by clicking on the “pin the control bar” icon.
The Dashboard control bar provides the following components:
• Universal Scheduled Reports—Includes Universal Scheduled Reports Wizard to create report templates. • Switch to Full Screen—The four arrows in four corners icon enables the page into full-screen mode. • Pin Control Bar—The pin icon allows you to keep the Dashboard control bar always on.
Using the Universal Scheduled Reports
Application
Scheduled Reporting has been an essential reporting component since the initial release of the Dell SonicWALL Analyzer product. It provides management interfaces to let you setup schedules and configure reports to be exported in a periodic fashion and in various report formats. A typical scheduled report configuration is broken down by functionality and by nodes. Users need to navigate to separate tabs to configure scheduled reports for different nodes. The Universal Scheduled Reporting application streamlines the configuration processes to unify
Dell SonicWALL Analyzer 8.0 Administration Guide 27
and enhance the existing functionality to the system-wide usage patterns. This allows you to collect report data from multiple appliances and create a single global report.
To configure the Universal Scheduled Reports application, refer to the following sections:
• Using the Manage Templates Component on page 27 • Adding a Scheduled Report Component on page 32 • Managing the Scheduled Reports Component on page 44
Using the Manage Templates Component
Manage Templates are used to create a template that makes up the list of reports at group level or unit level. The list of available reports for each of the product types are abstract, so all the available reports in system are presented here. The report list contains the appliance firmware and shows all the available reports in Dell SonicWALL Analyzer for the appliance. This decision on which report is applicable to a particular firmware version (for example, Application Intelligence is for SonicOS 5.8 or higher) is made at run time when the scheduled report engine is ready to create the report. The schedule report creation and the template usage is detailed in this section.
Adding a Template
To add a template using the Template Manager, complete the following steps: 1 Navigate to the Universal Scheduled Report > Manage Templates page.
2 Choose the tab for the appliance you wish to add a template to. 3 Select the option for either a unit or group template.
Dell SonicWALL Analyzer 8.0 Administration Guide 28
5 Enter a name for your template. 6 The Visible To Non-Administrators check box is disabled by default, select the check box to enable this
option. This allows the end users to view list of all the report templates at a read-only level. 7 Select the check box next to the Reports you wish to use for this template.
8 Select the check box next to the Policies you wish to use for this template. 9 Click Add.
The configured template is now populated in the Template Manager list.
Editing an Existing Template
This section details the configuration procedures for editing an existing template. The Universal Scheduled
Dell SonicWALL Analyzer 8.0 Administration Guide 29
To use the search option to find and edit an existing template, complete the following steps:
Searching for an Existing Template
1 Navigate to the Universal Scheduled Reports > Manage Template page. 2 Click the search text field, then enter your search criteria.
A drop-down appears under the search text field
3 Select a filter for your search criteria by clicking Name, Level, Owner, or Last Update from the search drop-down list. In this example, we are entering “unit” for the search criteria and filtering the search results by level.
The Template Manager window displays the latest search results. Notice the template list now only shows report templates for level: units.
Editing an Existing Template
Now that you found an existing template using the search filter, it is time to use the edit option.
1 Click the Edit icon for the report you wish to edit.
NOTE: To clear your search results and return the reports template list back to default, click Clear.
Dell SonicWALL Analyzer 8.0 Administration Guide 30
The Edit Template window displays.
2 Edit the name for your template.
3 The Visible To Non-Administrators check box is disabled by default, select the check box to enable this option. This allows the end users to view list of all the report templates at a read-only level.
4 Select the check box next to the Reports you wish to use for this template. 5 Select the check box next to the Polices you wish to use for this template. 6 Click Update.
Dell SonicWALL Analyzer 8.0 Administration Guide 31
Deleting a Template
The Template Manager offers three different ways to delete a template: deleting a single template, deleting multiple templates, or deleting all templates. Use the section Searching for an Existing Template on page 29to search for templates to delete.
To delete a Universal Scheduled Report Template(s), complete the following steps:
Deleting a Single Template
1 Navigate to the Universal Scheduled Reports > Manage Template page.
2 Click the Trash icon for the template you wish to delete from the Template Manager list.
Deleting Multiple Templates
1 Navigate to the Universal Scheduled Reports > Manage Template page. 2 Click the check boxes for the templates you wish to delete.
WARNING: Deleting a template(s) creates a cascading task to remove it from the Scheduled Reports that are using this template.
Dell SonicWALL Analyzer 8.0 Administration Guide 32
3 Click Delete Selected. This button is grayed out by default until a check box is selected.
Deleting all Templates
1 Navigate to the Universal Scheduled Reports > Manage Template page. 2 Select the Name check box, this selects all templates in the list.
3 Click Delete Selected. This button is grayed out by default until a check box is selected.
Adding a Scheduled Report Component
Using Universal Scheduled Reports gives you the ability to schedule reporting for multiple appliances at once, combined into a single report. The Scheduled Reporting is a wizard based tool that guides you through the steps for creating a scheduled report by manually selecting reports from the report listing or picking a template created in the section Using the Manage Templates Component on page 27, selecting a theme (cover logos, font colors, title, sub title), reporting properties (out put format, language), scheduling a type (weekly, monthly), and choosing a destination (up to five email addresses can be added for a single report). This section contains the following subsections:
• Searching for a Group or Device on page 32 • Creating a Universal Scheduled Report on page 35
Searching for a Group or Device
The Search option allows you to filter the Group/Device list by manually entering a device in the search text field and selecting it from the search drop-down list. You can further filter the Group/Device list by clicking the View drop-down and selecting a view type. The following example guides you through the Device List search process, detailing the versatility of the Universal Scheduled Reports > Configuration Manager search options.
Example
In this example we are using the Configuration Manager search options to find a SonicWALL TZ 210 wireless-N device in the Device List.
Dell SonicWALL Analyzer 8.0 Administration Guide 33
1 Navigate to Universal Scheduled Reports > Add A Scheduled Report.
Note: The Monitor tab is only available for SonicWALL GMS.
2 Select the Firewall tab, located at the top of the Configuration Manager window.
3 Click the View drop-down, then select a view type from the list. In this example we are selecting Model
View (Global View is selected by default), because we are searching for an exact appliance model. You
can also filter the Device List by Firmware View, Global View, or Test View. The Device List now displays all the appliance models.
Dell SonicWALL Analyzer 8.0 Administration Guide 34
A list of devices for that appliance model displays.
You can also click the Search text-box (if you know the exact name of the device), then manually enter the device name or select the device from the drop-down list.
5 Click the Arrow icon to schedule a report for that appliance. Refer to Creating a Universal Scheduled Report on page 35for configuration procedures.
NOTE: Notice that the search history bar populates each time you filter the list. You can use this to navigate back to previous search results.
Dell SonicWALL Analyzer 8.0 Administration Guide 35
Creating a Universal Scheduled Report
The Universal Scheduled Reports > Configuration Manager allows you to create a single report for multiple appliance models/devices at a group and unit level. The following example guides you through the report configuration process, including: Selecting Reports, General Information, and Theme Information, detailing the versatility of Universal Scheduled Reporting.
In this example we are using the Configuration Manager to schedule a single report for a Firewall appliance model (group level) and SMA devices (unit level).
Selecting Reports
1 Navigate to Universal Scheduled Reports > Add a Scheduled Report.
NOTE: The Monitor tab is only available for SonicWALL GMS.
2 Select the Firewall tab, located at the top of the Configuration Manager window.
3 Search for the TZ 210 wireless-N model group. Refer to steps 1-3 in the section Searching for a Group or Device on page 32.
Dell SonicWALL Analyzer 8.0 Administration Guide 36
The Reports tab displays in the Reports List.
5 Click the Reports tab, then select the check boxes for reports you wish to include or click the Use
Templates link to choose a template you created.
6 Click the Policies tab, then select the check boxes for the policies you wish to include or click the Use
Templates link to choose a template you created.
The reports for the Firewall model group are now selected, next is choosing reports for the SMA device. 7 Select the SMA tab.
NOTE: When you select reports in the Reports and Policies tabs, they populate in the list of Selected Reports located on the right side of the Configuration Manager page. The Selected Reports panel allows you to organize the list by dragging and dropping reports/devices, collapse the reports lists for each device (clicking the arrow next to the device name), and add a note to a report/device.
Dell SonicWALL Analyzer 8.0 Administration Guide 37
The SMA models display in the Device List.
8 Click the Model: SMA 4800.
The Device List displays all the SMA 4800 devices.
9 Click the Arrow icon for the SMA 4800.
Dell SonicWALL Analyzer 8.0 Administration Guide 38
10 Select the check boxes for the reports you wish to include or click the Use Templates link to choose a created template.
11 Click Next.
General Information
Dell SonicWALL Analyzer 8.0 Administration Guide 39
The General Information page displays.
12 Enter the following in the Task Info panel:
• Task Name: Example Report 1
• Task Description: This is an example for configuring a Universal Scheduled Report
13 Select the following in the Format/Settings panel:
• Report Type: Daily, Weekly, or Monthly • Report Format: PDF or XML
If XML is selected, the following changes to the management interface occur:
• The Single XML per Report radio buttons display. If you select the Yes radio button, one
XML file per report is generated. In this scenario, the number of XML files created is equal to the number of reports chosen.
• The ZIP Password Protection option is grayed out.
• Report Language: English, Japanese, Chinese (Simplified), Chinese (Traditional), Korean, Spanish,
or Portuguese
• Report Rows Display: 5, 10, 20, 50, 100, 250, 500, 750, 1000, 1500, or 2000 • Disable the Report: Yes or No
• Zip the Report: Yes or No
NOTE: The settings entered in the Task Info, Format/Settings, and Email/Archive Info sections, populate in the Configurations panel located on the right side of the General Information page.
Dell SonicWALL Analyzer 8.0 Administration Guide 40 • PDF Password Protect: Yes or No (If Yes is selected, a pop-up window appears and prompts you to
enter the Password)
14 Click the archive check box to save a PDF report to a new folder. 15 Complete the following in the Email / Archive Info panel:
• Click the E-mail check box to send a PDF report to an email account or alias. The Email configuration options display.
• Click the E-Mail Destination drop-down, then select an Administrator or Adhoc User. • Click Add after each selected destination.
The E-Mail Destination populates in the list.
• Enter the E-mail Subject: Weekly Firewall and SMA Report
Dell SonicWALL Analyzer 8.0 Administration Guide 41 • Enter the E-Mail Body: This Universal Scheduled Report contains the SonicWALL TZ 210
wireless-N group and SMA 4800 unit
• Click the Archive check box to save a PDF report to a new folder. • Archive Folder: Test Archive Folder 1
Dell SonicWALL Analyzer 8.0 Administration Guide 42 Theme Information
The Theme Information page displays. If XML is selected from the General Information page, the Theme Information page is NOT displayed.
17 Select / Enter the following in the Cover Page panel:
• Cover Logo: Select a logo (click the drop-down and select a cover logo image) or Upload a logo
(click Browse and Preview to upload a logo)
• Cover Title: Enter a name (Weekly Data Usage Report) for your Universal Scheduled Report, then
select or enter the foreground and background colors
• Cover Subtitle: Enter a subtitle (U.S Engineering Department) for your Universal Scheduled
Report, then select or enter the foreground and background colors
18 Select or enter the following in the Report Page panel:
• Report Title: Foreground and Background colors
NOTE: The settings entered in the Cover Page and Report Page panels automatically update in the image located on the right side of the Theme Information page. To preview the cover / report pages, select the Cover Page or Report Page tab.