assembly
VX 520 Assembly and Installation
1
The Medi-Cal Point of Service (POS) system was designed and implemented by Xerox State Healthcare, LLC (Xerox) in conjunction with the Department of Health Care Services (DHCS). The POS device with internal printer is manufactured by VeriFone and configured for your operational requirements by the POS/Internet Help Desk.
Full details about the VX 520 POS device can be found in the VeriFone VX 520 Installation Guide,
VeriFone Part Number DOC252-003-EN-B, Revision B. This publication can be downloaded from the
VeriFone website (www.verifone.com).
ASSEMBLY AND INSTALLATION
Overview This section provides instructions about how to install your POS device equipment, set up your Private Automatic Branch Exchange (PABX) code if required, create a shortcut key for provider number and send a test transaction to verify your connection to Medi-Cal. It is very important that you set up the PABX code (if required), create the shortcut key and then perform the test transaction, in this order. Your successful connectivity test transaction will be automatically recorded in a Medi-Cal database management system. Please refer
to the VX 520 DeviceSystem Transactions section for further
instructions. If you are unable to successfully execute these functions, contact the POS/Internet Help Desk.
POS/Internet Help Desk Call the POS/Internet Help Desk toll-free at 1-800-541-5555 for
assistance with installing the equipment and executing the connectivity test transaction.
Package Contents The complete device is shipped in one box and is completely assembled. The internal printer has paper installed and is ready to use. The electrical component is attached to the appropriate socket. The phone cord must be connected to your telephone equipment, and the power supply must be plugged into a 110 volts-AC wall outlet. Unwrap the device and place it in its designated area (see “Area Preparation” on a following page). Return all wrapping and packing
material to the box. Keep this box. If the device must be returned to
Medi-Cal for any reason, it must be returned in the same box and wrapping.
Note: Please verify that the items listed under “Package Contents” on the following pages are included in your shipment. Refer to “Help Information” later in this section if you did not receive all of these items.
PACKAGE CONTENTS:
1 – VeriFone VX 520 POS device 1 – 6-1/2-foot telephone line cord 1 – Paper roll
assembly
3
POS Device The POS device has the following features:
• 8 lines x 21 characters
• 128 x 64 pixel graphical Liquid Crystal Display (LCD) with
backlighting
• Built in magnetic stripe card reader
• Internal printer
• Easy to use alphanumeric, full-size character keys
Power Pack The AC power pack uses a removable six-foot cord to connect to an
electrical outlet and a fixed cord from the power supply connecting to the device.
Telephone Cord The silver, 6-1/2-foot telephone cord connects to a standard modular
telephone wall outlet jack (RJ-11).
POS Printer Paper The internal printer uses single-ply, thermal-sensitive paper 2.25
inches wide and 82 feet long. Most stationery and computer supply stores sell this paper.
Note: The POS device and power pack are designed for this system and cannot be used on other systems.
Area Preparation Place the POS device on a flat, dry non-slip surface with easy and safe access to electrical and telephone outlets.
Electrical Outlet A standard three-prong electrical outlet with 110-volts AC must be
located within ten feet of the device. However, a closer proximity is recommended so the AC power pack cord does not stretch or hang unsafely.
Telephone Outlet A standard modular telephone wall outlet jack (RJ-11) must be
located within 6-1/2 feet of the POS device. However, a closer proximity is recommended so the telephone cord does not stretch or hang unsafely.
Telephone Connection The POS device is pre-configured to support an analog telephone line. A quick way to check to see if you have an analog line is to look on the bottom of the phone for either of the following labels:
“Complies with FCC Rules” or “Ringer Equivalent.” Digital lines will not work with the POS device. If you are not sure whether the phone line is analog or digital, contact your telephone service company. The POS device is pre-programmed to initiate toll-free telephone calls to a Medi-Cal database management system in Sacramento,
California.
Dedicated Line Though not required, it is recommended that you use a dedicated
telephone line that is not shared with other phones or equipment.
Shared Line You may use a shared telephone line in which one or more devices
share the line, but not at the same time. For example, the line may also be used periodically for a computer modem or fax machine. Phone line splitters are available for modem use and for fax line sharing. If the phone line is interrupted when the POS device is being used, interruption will cause failed transmissions and corrupted information. Use this configuration at your own risk.
assembly
5
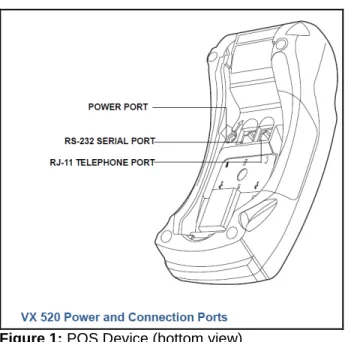
Equipment ConnectionsFigure 1: POS Device (bottom view)
Device to Telephone Line The device is set up using a direct connection. The direct connection
dedicates a line to the device. With the direct connection, a telephone cord runs from the RJ-11 Telephone Port on the device directly to a telephone wall jack.
Connect the telephone cord to the communication port on the
terminal, then route it directly to a telephone wall jack (see Figure 2). This is a direct connection and the line is dedicated to the terminal.
Power Pack to Device The power pack connects to the terminal using a round barrel connector. The plug has a nub on the side that is used to secure the plug into place. Rotate the plug counter-clockwise to lock the plug in the power jack.
Warning: Do not plug the power pack into an outdoor outlet or operate the terminal outdoors. Disconnecting the power during a transaction may cause data files stored in device memory to be lost.
Carefully arrange equipment to face forward so all cables extend backwards from each device. Make sure all cables are hanging loose and do not interfere with other equipment.
The VeriFone VX 520 Installation Guide shows how to connect the power supply cable to the device.
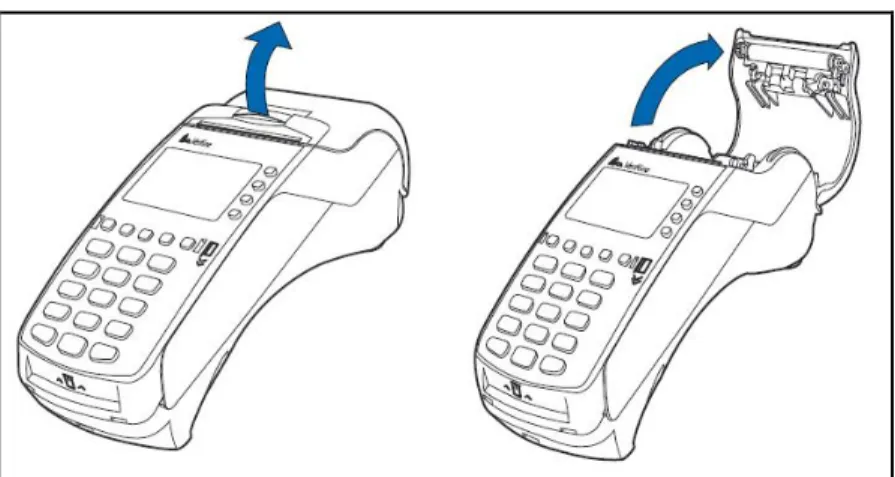
Paper Roll for Printer The internal printer uses single-ply, thermal-sensitive paper.
To install a paper roll:
1. Hook your finger under the latch and lift up to swing the paper roll cover open (see Figure 3 below).
Figure 3: Opening the Printer Cover
2. Remove any partial roll of paper in the printer tray by lifting it up. 3. Loosen the glued leading edge of the new paper roll or remove
assembly
7
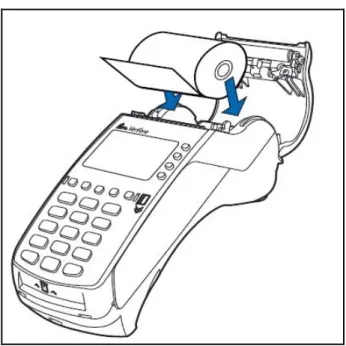
4. Hold the roll so the paper feeds from the bottom of the roll.
5. Drop the paper roll into the printer tray.
Figure 4: Loading Paper Roll
6. Pull paper up past the glue residue.
7. Close the paper roll cover by gently pressing directly on the cover until it clicks shut, allowing a small amount of paper past the glue residue to extend outside the printer door. (see Figure 5)
Figure 5: Closing Paper Roll Cover
GETTING STARTED
Overview The following is a guide for setting up your PABX code (if necessary), creating a shortcut key and executing a test transaction on your POS device. It is essential to set up your PABX code and provider number
shortcut keys prior to performing the test transaction. A successful
test transaction is necessary to activate your device.
For instructions about how to submit transactions, refer to the VX 520
Device System Transactions section in this guide. For further assistance, contact the POS/Internet Help Desk at 1-800-541-5555 from 6 a.m. to midnight, seven days a week.
PABX CODE
(PABX code is only necessary if you must dial a “9” or other number to obtain access to an outside line.)
PROVIDER NUMBERS & SHORTCUT KEYS
TEST
1. At the “Welcome” screen, press any key.
1. At the “Welcome” screen, press any key.
1. At the “Welcome” screen, press any key.
2. Select “SYSTEM” using the corresponding Function <F> key. Press <K2> (NEXT) to display the “DEVICE SETUP” option.
2. Select “SYSTEM” using the corresponding Function <F> key. Press <K2> (NEXT) to display the “DEVICE SETUP” option.
2. Select “SYSTEM” using the corresponding function <F> key.
3. Select “DEVICE SETUP” using the corresponding Function <F> key.
3. Select “DEVICE SETUP” using the corresponding Function <F> key.
3. Select “TEST” using the corresponding Function <F> key.
4. Enter “PASSWORD” using six zeros and then press
<ENTER>.
4. Enter “PASSWORD” using six zeros and then press
<ENTER>.
4. Enter the shortcut key you just set up.
5. Select “TERMINAL” using the corresponding Function <F> key.
5. Select “PROVIDER” using the corresponding Function <F> key.
5. Press <ENTER> to skip the “Provider Number” screen.
6. Press the “NEXT” Function <F> key until the “PABX CODE” option appears on the screen.
6. Choose “SLCT” using the corresponding Function <F> key to display the “Provider Number” screen.
6. Enter PIN and then press <ENTER>.
7. Select “EDIT’ using the corresponding Function <F> key.
7. Select “EDIT” using the corresponding Function <F> key. Enter the new provider number and then press <ENTER>. The new number appears on the screen.
7. Press <ENTER> to skip the “Submitter Number” screen.
8. Enter the new PABX code and then press <ENTER>. The new code appears on the screen. Select <EXIT>.
8. Press the ”NEXT” Function <F> key until the
“SHORTCUT NUMBER” option appears. Select “EDIT” and enter your shortcut number. Press <ENTER> and then select “EXIT.”
8. Select “SEND” to begin the test transaction. Please wait while this transaction is being processed.
assembly
9
9. Select “OK” to confirm the transaction. Select “CANCEL” to cancel the transaction.
9. Select “OK” to confirm the transaction. Select “CANCEL” to cancel the transaction.
9. At the response screen, press any key to continue. A test transaction
confirmation screen appears. Press <K2> (NEXT) to view the applications activated on your POS device. 10. The “OK” selection returns
you to the main edit terminal screen. Press “CANCEL” <X> until you return to the “Welcome” screen.
10. The “OK” selection returns you to the main edit provider screen. Press “CANCEL” <X> until you return to the “Welcome” screen.
10. Press “CANCEL” <X> twice upon successful completion of the Test transaction to return to the main menu. The main menu displays the activated applications on your POS device.
Accessing System At the “Welcome” screen, press any key to bring up the “SYSTEM” menu. Select “SYSTEM” from the main menu by pressing the corresponding function <F> key.
09/01/2011 11:00 SYSTEM
K1 K2 Alpha K3 K4 Medi-Cal POS Help Desk 1-800-541-5555
VeriFone VX 520
Alpha
F4 F1
F3 F2
The system menu displays. Select a transaction by pressing the corresponding function <F> key. Press <K2> (NEXT) to scroll through the entire list. Press <K1> (PREV) to return to the top of the list.
SYSTEM
HELP TEST PASSWORD
ê
K1 K2 Alpha K3 K4 Medi-Cal POS Help Desk 1-800-541-5555
VeriFone VX 520
Alpha
F4 F1
F3 F2
DATE/TIME DOWNLOAD PARAM UPDATE DEVICE SETUP
ê
K1 K2 Alpha K3 K4 Medi-Cal POS Help Desk 1-800-541-5555
VeriFone VX 520
Alpha
F4 F1
F3 F2
assembly
11
Password Select “DEVICE SET UP” using the corresponding <F> key. The
POS device prompts you to enter your password. Enter your password and press <ENTER>. (If you have not changed the password, the device default password is six zeros “000000”.) The POS device displays asterisks instead of your password for security purposes.
DEVICE SETUP
PASSWORD:
K1 K2 Alpha K3 K4 Medi-Cal POS Help Desk 1-800-541-5555
VeriFone VX 520
Alpha
F4 F1
F3 F2
Device Setup Menu The “Device Setup” menu displays. Select a transaction by pressing the corresponding function <F> key. Press <K2> (NEXT) to scroll through the entire list. Press <K1> (PREV) to return to the top of the list.
SETUP
ABOUT PROVIDER TERMINAL
ê
K1 K2 Alpha K3 K4 Medi-Cal POS Help Desk 1-800-541-5555
VeriFone VX 520
Alpha
F4 F1
F3 F2
COMM DOWNLOAD
PRINTER SUITE
ê
K1 K2 Alpha K3 K4 Medi-Cal POS Help Desk 1-800-541-5555
VeriFone VX 520
Alpha
F4 F1
F3 F2
DATE/TIME DEMO MENUS/KEYS
ê
K1 K2 Alpha K3 K4 Medi-Cal POS Help Desk 1-800-541-5555
VeriFone VX 520
Alpha
F4 F1
F3 F2
assembly
13
PABX Code The “Terminal” option allows you to set up your device PABX code.Several functions that are displayed on the terminal option have been disabled, and cannot be accessed.
Select “TERMINAL” from the device setup menuby pressing the
corresponding function <F> key. The following screen is the main terminal screen that displays the available functions for editing.
EDIT TERMINAL PREV
Manager Pwd NEXT
******
EDIT EXIT
K1 K2 Alpha K3 K4 Medi-Cal POS Help Desk 1-800-541-5555
VeriFone VX 520
Alpha
F4 F1
F3 F2
Edit PABX Code The following screens prompt you through the steps to edit the PABX
code. These instructions are also in the VX 520 DeviceSystem
Transactions section of this user guide.
Select “NEXT” with the appropriate <F> key until “PABX CODE” option is displayed.
EDIT TERMINAL PREV
PABX CODE NEXT
X
EDIT EXIT
K1 K2 Alpha K3 K4 Medi-Cal POS Help Desk 1-800-541-5555
VeriFone VX 520
Alpha
F4 F1
F3 F2
Select “EDIT” with the appropriate <F> keyand the edit screen displays. Enter the PABX number and press <ENTER>.
EDIT TERMINAL
PABX CODE
1
NEW: 9
K1 K2 Alpha K3 K4 Medi-Cal POS Help Desk 1-800-541-5555
VeriFone VX 520
Alpha
F4 F1
F3 F2
The new PABX number that you entered displays on the screen. Select “EXIT” and a screen displays that prompts you to save your changes.
EDIT TERMINAL PREV
PABX CODE NEXT
9
EDIT EXIT
K1 K2 Alpha K3 K4 Medi-Cal POS Help Desk 1-800-541-5555
VeriFone VX 520
Alpha
F4 F1
F3 F2
Select “OK” to save your changes; select “CNCL” to cancel your changes.
EDIT TERMINAL CNCL
Save Changes? OK
K1 K2 Alpha K3 K4 Medi-Cal POS Help Desk 1-800-541-5555
VeriFone VX 520
Alpha
F4 F1
F3 F2
assembly
15
The “OK” selection returns you to the main SETUP screen. From this screen you can set up other functions on your POS device.
SETUP
ABOUT PROVIDER TERMINAL
K1 K2 Alpha K3 K4 Medi-Cal POS Help Desk 1-800-541-5555
VeriFone VX 520
Alpha
F4 F1
F3 F2
Provider Number/ Select “PROVIDER” from the device setup menu by pressing the
Shortcut Key corresponding function <F> key. The following screen is the main provider screen that displays the available functions for editing. Choose “SLCT” to display the provider number screen.
EDIT PROVIDER PREV
PROVIDER NUMBER NEXT
SLCT EXIT
K1 K2 Alpha K3 K4 Medi-Cal POS Help Desk 1-800-541-5555
VeriFone VX 520
Alpha
F4 F1
F3 F2
Select “EDIT” and the edit screen displays. Enter the provider number and then press <ENTER>. The provider number appears on the screen.
EDIT PROVIDER PROVIDER NUMBER
NEW: 0123456789
K1 K2 Alpha K3 K4 Medi-Cal POS Help Desk 1-800-541-5555
VeriFone VX 520
Alpha
F4 F1
F3 F2
EDIT PROVIDER PREV
PROVIDER NUMBER NEXT
0123456789
EDIT EXIT
K1 K2 Alpha K3 K4 Medi-Cal POS Help Desk 1-800-541-5555
VeriFone VX 520
Alpha
F4 F1
F3 F2
assembly
17
Select “NEXT” until the “SHORTCUT NUMBER” option appears. The “Edit Shortcut Number” option allows you to assign a two-digit number to the provider number record you selected. This reduces transaction input time and keying errors.
EDIT PROVIDER PREV
SHORTCUT NUMBER NEXT
EDIT EXIT
K1 K2 Alpha K3 K4 Medi-Cal POS Help Desk 1-800-541-5555
VeriFone VX 520
Alpha
F4 F1
F3 F2
Select “EDIT” and the edit screen displays. Enter the new shortcut number and press <ENTER>.
EDIT PROVIDER SHORTCUT NUMBER
NEW: 1
K1 K2 Alpha K3 K4 Medi-Cal POS Help Desk 1-800-541-5555
VeriFone VX 520
Alpha
F4 F1
F3 F2
The shortcut number that you entered displays on the screen. Select “EXIT” and a screen displays that prompts you to save your changes.
EDIT PROVIDER PREV
SHORTCUT NUMBER NEXT
1
EDIT EXIT
K1 K2 Alpha K3 K4 Medi-Cal POS Help Desk 1-800-541-5555
VeriFone VX 520
Alpha
F4 F1
F3 F2
Select “OK” to save your changes or select “CNCL” to cancel your changes.
EDIT PROVIDER CNCL
Save Changes? OK
K1 K2 Alpha K3 K4 Medi-Cal POS Help Desk 1-800-541-5555
VeriFone VX 520
Alpha
F4 F1
F3 F2
The “OK” selection returns you to the main edit provider screen. From this screen you can perform other functions to customize your POS device.
EDIT PROVIDER PREV
#1/10 NEXT
0123456789
SLCT EXIT
K1 K2 Alpha K3 K4 Medi-Cal POS Help Desk 1-800-541-5555
VeriFone VX 520
Alpha
F4 F1
F3 F2
assembly
19
Connectivity Test The connectivity test transaction serves two purposes:• To activate the appropriate POS software device functionality
for each specific provider.
• To enable providers to advise DHCS electronically that they
have received and are using the appropriate and authorized POS device.
Accessing Test Select “TEST”from the system menu by pressing the corresponding
function <F> key. The following screens prompt you through the test option.
Shortcut Key When you choose “TEST” from the system menu, the POS device
prompts you for your shortcut key. If you have activated this function, enter your shortcut key and press <ENTER>. This populates the provider number field. Otherwise, press <ENTER> to skip this
function. To setup a shortcut key, refer to “Device Setup” in the VX
520 Device System Transactions section of this user guide.
TEST
ENTER SHORTCUT KEY:
K1 K2 Alpha K3 K4 Medi-Cal POS Help Desk 1-800-541-5555
VeriFone VX 520
Alpha
F4 F1
F3 F2
National Provider Identification This field populates the National Provider Identification (NPI) number
when the shortcut key has been activated for an NPI. Press <ENTER>. Otherwise, the POS device prompts you to enter your NPI and then press <ENTER>. If you are using a Medicaid Provider ID, press <ENTER> to bypass this screen.
TEST
NATIONAL PROVIDER ID:
K1 K2 Alpha K3 K4 Medi-Cal POS Help Desk 1-800-541-5555
VeriFone VX 520
Alpha
F4 F1
F3 F2
Medicaid Provider ID This field populates the provider number when the shortcut key has been activated for a Medicaid Provider ID. Press <ENTER>. Otherwise, the POS device prompts you to enter your provider number and then press <ENTER>.
TEST
MEDICAID PROVIDER ID:
K1 K2 Alpha K3 K4 Medi-Cal POS Help Desk 1-800-541-5555
VeriFone VX 520
Alpha
F4 F1
F3 F2
Password The POS device prompts you to enter your PASSWORD (Provider
Identification number [PIN]). Enter your PASSWORD and press <ENTER>. The POS device displays asterisks instead of your PASSWORD for security purposes.
TEST
PASSWORD:
K1 K2 Alpha K3 K4 Medi-Cal POS Help Desk 1-800-541-5555
VeriFone VX 520
Alpha
F4 F1
F3 F2
Submitter ID Transactions on the POS device require that you enter a submitter ID.
Enter the ID and press <ENTER>. Press <K2> (NEXT) to skip this function.
TEST
SUBMITTER ID:
K1 K2 Alpha K3 K4 Medi-Cal POS Help Desk 1-800-541-5555
VeriFone VX 520
Alpha
F4 F1
F3 F2
assembly
21
Send/Re-Edit All of the specific fields have been entered. If the information is
correct, select “SEND.” If you need to correct the information that you entered, select “RE-EDIT.”
TEST SEND
RE-EDIT
K1 K2 Alpha K3 K4 Medi-Cal POS Help Desk 1-800-541-5555
VeriFone VX 520
Alpha
F4 F1
F3 F2
After you select “SEND,” the following screens display to indicate that the POS device is processing your transaction and sending it to the Medi-Cal host computer.
TEST
DIAL PRIMARY...
K1 K2 Alpha K3 K4 Medi-Cal POS Help Desk 1-800-541-5555
VeriFone VX 520
Alpha
F4 F1
F3 F2
TEST
RECEIVING...
K1 K2 Alpha K3 K4 Medi-Cal POS Help Desk 1-800-541-5555
VeriFone VX 520
Alpha
F4 F1
F3 F2
Transaction Completion When the system returns the information, you can press <K3> (PRINT) to print the response or view the response on the screen by pressing <ENTER>. When you are viewing the response on the screen, press <K2> (NEXT) to scroll to the next screen of the response, or press <K1> (PREV) to scroll to the previous screen of the response.
TEST
TEST TRANS COMPLETE APPLICATIONS ACTIVATED:
K1 K2 Alpha K3 K4 Medi-Cal POS Help Desk 1-800-541-5555
VeriFone VX 520
Alpha
F4 F1
F3 F2
TEST ELIGIBILITY SYSTEM
K1 K2 Alpha K3 K4 Medi-Cal POS Help Desk 1-800-541-5555
VeriFone VX 520
Alpha
F4 F1
F3 F2
Upon successful completion of the connectivity test, press the “CANCEL” <X> key until you return to the main menu. The main menu screen displays the transactions added.
09/01/2011 11:00
ELIGIBILITY
SYSTEM
K1 K2 Alpha K3 K4 Medi-Cal POS Help Desk 1-800-541-5555
VeriFone VX 520
Alpha
F4 F1
F3 F2
assembly
23
Error Messages The POS device displays messages that are in response to operatorerror or to a transmission failure. The responses are transmitted directly from the host computer at the conclusion of a transaction. The following common messages are divided into “Device Automatic
Re-send,” “Try Again” and “Call the POS/Internet Help Desk.” Refer to
the VX 520 Troubleshooting section of this user guide for a complete list of messages.
“Lost Carrier”: The transmission was disconnected and the POS device did not receive the entire message. Re-send the transaction.
Try again.
“Line Busy”: The sending line was unavailable for transmission. Try again.
“Line Close Fail”: Re-send the transaction. Try again.
“Transaction Failed”: Re-send the transaction. Try again.
“Comm Error”: There is a problem connecting. Call the POS/Internet Help Desk at 1-800-541-5555.
“Fatal Memory Error”: An error has corrupted the device’s RAM resulting in the loss of a program download.
Call the POS/Internet Help Desk at 1-800-541-5555.
“Memory Error”: The terminal’s memory is not initialized. Call the POS/Internet Help Desk at 1-800-541-5555.
Help Information The following are helpful answers to common questions. Please call the POS/Internet Help Desk at 1-800-541-5555 for further assistance.
1. What if I didn’t get all the parts?
Special care was taken to ensure you received all the equipment. If the box did not contain everything listed in “Package Contents” on a previous page, call the POS/Internet Help Desk at 1-800-541-5555 for assistance.
2. What if I don’t have enough desk or counter space?
The POS device is a compact unit with an internal printer. Be sure you do not stress or force the cables or connectors. The connectors will bend and break if too much stress is applied. Please allow enough desk space to accommodate the VX 520 device.
3. What if I’m not getting power?
After you unplug the 110-volt AC adapter from the wall outlet and POS device, perform the following steps:
Find another electrical device such as a radio or desk light and plug it into the wall outlet used by the AC adapter. Check to see if it still works. If the electric device does not work, no power is available at the electrical wall outlet. Have a qualified professional inspect the outlet and perform any necessary repairs.
Inspect the AC adapter and power cable for damage. Look closely for cracks, nicks, cuts, exposed copper wires, stretched insulation and burns. If the AC adapter or power cable appears damaged, call the POS/Internet Help Desk at 1-800-541-5555 to make arrangements for a replacement AC adapter or power cord.
Plug the power cable back into the POS device and the AC adapter into the wall outlet. Check for a secure fit at both ends. Test the POS device for power. If there is now power, the problem may have been a loose connection between the POS device and power cable. Always make sure the power cable is securely connected. If there is still no power to the POS device, the AC adapter and/or POS device power supply may have failed. Call the POS/Internet Help Desk at 1-800-541-5555 and request replacement units.
4. Do I have to pay telephone toll charges?
The POS system is programmed to use a toll-free telephone number so that California and the border-state providers in Nevada, Arizona, and Oregon do not pay toll charges. However, you are responsible for charges associated with the telephone line in your place of business.
assembly
25
5. Can I connect the POS device to my computer?No. You could damage the POS device or your computer. The POS device is a stand-alone unit and does not connect to a computer.
6. What if my internal printer does not work?
Check all power connections. The printer receives its power directly from the POS device. If the screen or the keys on the key pad are not lighted, press any key on the keypad which should illuminate the screen and the keypad.
Check if the paper roll within the paper holder area has paper. If it does not, remove the paper roll cover and install a new roll of printer paper. If the problem persists, contact the POS/Internet Help Desk at 1-800-541-5555.
7. What if my internal printer paper is jammed?
Remove the paper roll cover. Re-position the paper roll so it moves freely within the paper holder area.
Re-install the roll of printer paper. If the problem persists, it may be due to poor thermal paper quality. Install a new roll of higher-quality paper.
8. Why do I see the “Comm Error” message?
The “Comm Error” error message indicates that the POS device cannot make contact with the local telephone network system. The primary cause can be one of three things: (1) the telephone network system has failed, (2) your telephone line is not operational, or (3) the internal modem of the POS device has failed. Perform the following steps to determine the problem:
Inspect the telephone cord for damage. Look closely for cracks, nicks, cuts, exposed copper wires, stretched insulation and burns. If the telephone cord appears damaged, call the POS/Internet Help Desk to make arrangements for a replacement.
Verify that the telephone cord is connected securely to both the POS device and telephone wall jack. A slight tug on the cord should indicate if it is secure. If the cord is not secure, re-attach it to the POS device and the telephone wall jack, securing all connectors snugly. This should solve most “Comm Error” message problems.
Disconnect the telephone cord from the device and plug it into an operational telephone. Lift the telephone handset and listen for a dial tone. If no dial tone is heard, this indicates the telephone line is not operational and needs to be repaired. Contact a qualified service person. If a dial tone is present, either the POS device has failed or the telephone network is down. Call the POS/Internet Help Desk at 1-800-541-5555 for instructions.
Check to see if your phone requires a PABX code to dial an outside line. If so, you will need to program this code into your device.
Please see “Edit PABX Code” in this section and also in the VX 520
DeviceSystem Transactions section of this user guide.
Returning POS Equipment If it is determined that a POS device with internal printer has failed, it will be replaced with a new unit. All replacement orders will be delivered to your place of business using an overnight delivery service.
Your new device will arrive with a prepaid shipping label and instructions on how to return the failed unit. Unpack the new device and place the failed device into the empty box. You will then be asked to seal the box, attach the supplied pre-paid shipping label and return the failed unit.
Note: The POS devices with internal printer are owned by the State of California, Department of Health Care Services. Failure to return any failed devices will be identified by a Medi-Cal database management system. Appropriate action to obtain unreturned or missing devices will be taken.
assembly
27
POS/Internet Help Desk The POS/Internet Help Desk toll-free number is available to allproviders, regardless of whether they have completed a successful test transaction. The POS/Internet Help Desk is available from 6 a.m. to midnight, seven days a week. The toll-free telephone number is 1-800-541-5555.
The POS/Internet Help Desk operator will have your POS system information in a computer database for quick access. Before calling, make sure to have the following information at hand:
Medi-Cal Provider ID/NPI All help is initiated by Medi-Cal Provider ID/NPI only. A business
name or address is not sufficient.
Provider and Equipment The POS/Internet Help Desk operator will ask for your provider
Numbers number and call up your account record on the support computer.
Your name, phone and equipment serial numbers will be requested so a permanent record of the phone call can be maintained. It is sometimes necessary for an operator to research a question or problem and provide the answer at a later time.