Medicaid Medical Management Services
Independent Care Waiver Program
Provider End User Manual
Version 1.7Revision History
Version Date Editor Description
1.0 6/1/2010 D. Barrett Initial Draft
1.1 7/14/2010 D. Barrett Revisions from
previous builds
1.2 8/20/2010 D. Barrett Addition from Build
1.0.0.20
1.3 9/20/2010 D. Barrett Updated screen shots
1.4 10/18/2010 D. Barrett Updates from builds
1.5 10/21/2010 D. Barrett Real Provider data and
PA IDs redacted
1.6 11/23/2010 D. Barrett Update from Build
2.0.0.2
Table of Contents Page
1.0 Overview ... 1
1.1 Document Purpose and Scope ... 1
1.2 System Access and User Type ... 1
1.3 Screen Layout Overview ... 1
1.4 Accessing the PA Application ... 2
1.4.1 General Guidelines for Entering Request Data ... 3
2.0 Operating Instructions ... 13
2.1 Web Entry of a DMA-6 ... 13
2.1.1 Purpose ... 13
2.1.2 Web Entry Instructions ... 13
2.2 Web Entry of a DMA-80 ... 25
2.2.1 Purpose ... 25
Table of Figures Page
Figure 1 Portal Secure Home Page ... 2
Figure 2 Request Types on New Request for PA ... 3
Figure 3 Request Form/Contact Information ... 3
Figure 4 Current Month and Day ... 4
Figure 5 Insert Current Date ... 4
Figure 6 Go to Different Months/Same Year ... 4
Figure 7 Months for the Current Year ... 5
Figure 8 Display Years ... 5
Figure 9 Diagnosis and Procedures Tables ... 6
Figure 10 List of Codes... 6
Figure 11 Procedure Code Inserted ... 6
Figure 12 Add Diagnosis ... 7
Figure 13 Diagnosis Added to Table ... 8
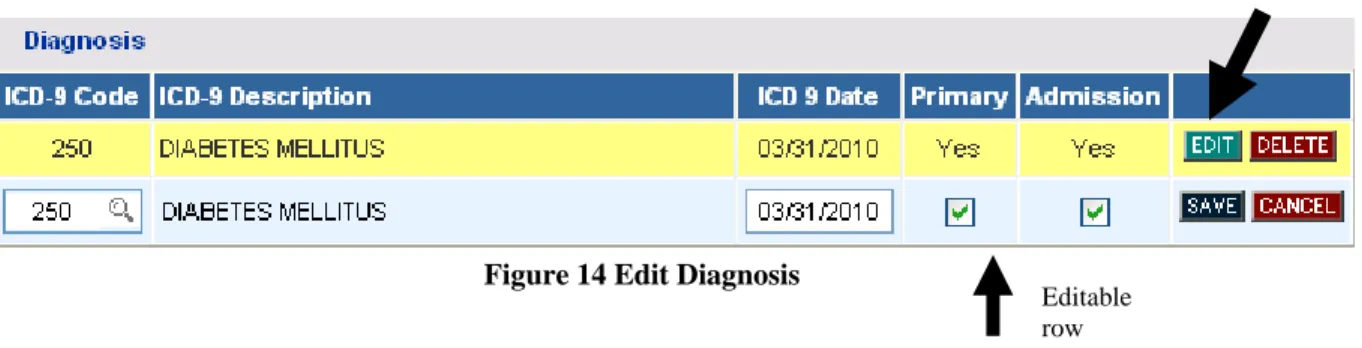
Figure 14 Edit Diagnosis ... 8
Figure 15 Modify Diagnosis ... 8
Figure 16 Save Diagnosis ... 8
Figure 17 Create an Attachment ... 9
Figure 18 All Document Types Selected ... 10
Figure 19 Find File... 10
Figure 20 Select File ... 10
Figure 21 Attach File ... 11
Figure 22 Attached Files Table ... 11
Figure 23 Checkboxes Selected for First File ... 11
Figure 24 Multiple Files Attached ... 12
Figure 25 Select Request Type ... 13
Figure 26 ICWP Provider ID System Populated ... 14
Figure 27 Reference Provider ID Search ... 14
Figure 28 Member and Provider IDs ... 15
Figure 29 Member/Provider Information... 15
Figure 30 Contact Information ... 16
Figure 31 Initial Placement ... 16
Figure 32 Continued Placement ... 16
Figure 33 Diagnosis Table ... 17
Figure 34 Diagnosis Added ... 17
Figure 35 Message Box ... 18
Figure 36 Hospitalization ... 18
Figure 37 Medications Table ... 18
Figure 38 Diagnostics/Treatment Table ... 19
Figure 39 Medication Added ... 19
Figure 40 Diagnostic/Treatment Procedure Added ... 20
Figure 41 Treatment Plan... 20
Figure 42 Certification and Physician Signed Date ... 21
Figure 45 Level of Impairment Choices ... 22
Figure 46 ADLs Choices ... 22
Figure 47 Level of Impairment and ADL Evaluation ... 23
Figure 48 DMA-6 Justification for Services ... 23
Figure 49 Select DMA-80 ... 25
Figure 50 DMA-80 New Request for PA Page ... 26
Figure 51 Verification Page ... 26
Figure 52 DMA-80 Contact Information ... 27
Figure 53 DMA-80 Request Information ... 27
Figure 54 DMA -80 Diagnosis Table ... 28
Figure 55 DMA-80 Diagnosis Added ... 28
Figure 56 DMA-80 Procedures Table ... 29
Figure 57 Procedure Added ... 29
Figure 58 DMA-80 Program Information... 30
Figure 59 DMA-80 Supporting Information... 30
Figure 60 Required Letters/Documents ... 32
Table of Tables Table 1: Add, Edit, and Delete Functions ... 7
1.0 Overview
1.1 Document Purpose and Scope
The Independent Care Waiver Program (ICWP) allows for the provision of services to adult individuals with physical disabilities or traumatic brain injuries. Services are provided in the individual’s home or in the community as an alternative to nursing facility placement. Individuals served by the program are required to meet at least Intermediate Level of Care (LOC), and be Medicaid eligible. The DMA-6 form is used to determine if the member meets and continues to meet level of care criteria. The DMA-80 form is used to request authorization for services under the program. In addition to the DMA-6 and DMA-80, Providers must also submit additional documentation as specified by Department of Community Health (DCH) policy.
The purpose of this manual is to provide ICWP Providers with step by step instructions for entering a DMA-6 and a DMA-80 via the web portal. The manual also provides instructions for electronic attachment of required additional documentation. This guide is not a policy manual. For information on Independent Care Waiver program policy, refer to the Department of Community Health Independent Care Waiver Program manual.
NOTE: VALID MEMBER AND PROVIDER IDS ARE DEDACTED IN THIS MANUAL. IF A MEMBER OR PROVIDER ID OR PA ID DISPLAYS, THE IDS ARE FICTITIOUS.
1.2 System Access and User Type
ICWP Medicaid Providers must log into the Georgia Web Portal in order to access the PA System request authorization functionality. When a provider logs in, or when a provider ID is selected by a billing agent who has logged in, the system ‘recognizes’ the provider’s Medicaid ID and category of service. As a result of this validation, the provider is able to access the request authorization activities appropriate to their category of service.
1.3 Screen
Layout
Overview
The DMA-6 and DMA-80 web request forms are identified by the request type at the top of the form. Required fields are noted by an asterisk and/or a highlighted box. The online request forms include navigational links and functional links, which allows the provider user to review, edit, and submit the DMA6 and DMA80 requests.
1.4 Accessing the PA System
Follow these steps to access the web portal and the PA System:
1. Log into the Georgia Web Portal. The portal opens on the Secure Home page. 2. Select Prior Authorization from the links at the top of the page.
3. Select Submit/View from the drop list. or
4. Select Provider Workspace from the drop list and then select Enter a New Authorization Request.
Figure 1 Portal Secure Home Page
5. The New Request for Prior Authorization page displays with a list of request types
Figure 2 Request Types on New Request for PA
6. To enter a request, click Form DMA-6 or Form DMA-80.
1.4.1 General Guidelines for Entering Request Data
The web request forms include several features to assist providers enter and edit information accurately and efficiently. It is recommended to review the following guidelines before entering a request for the first time.
Auto Formatting of Phone/Fax Numbers: When a phone or fax number is entered, the system automatically formats the number with dashes.
System Populated Contact Information: The system populates the requesting provider contact information in the contact information boxes (Figure 3) when the contact information is available in the provider file. If any of the required contact information (contact name, phone and fax) is missing; the information must be entered manually.
Figure 3 Request Form/Contact Information
Date Lookup: This feature allows users to select a date from a calendar instead of manually entering the date. However, manual entry of a date is still possible, and may be preferable in some situations - such as when inserting a date that is many years in the past.
Follow these steps to insert a date:
Figure 4 Current Month and Day
2. To insert the current date, click the date at the bottom of the calendar. To insert a different day for the current month, click the applicable day in the calendar.
Figure 5 Insert Current Date
3. To select a different month for the current year, use the back and forth arrows at the top of the calendar to advance or go back - OR - Click the year at the top of the calendar.
Figure 6 Go to Different Months/Same Year
4. When the year is clicked, a list of months for the current year displays. Select the applicable month.
Figure 7 Months for the Current Year
5. Click the year again and other years are displayed.
Figure 8 Display Years
6. Click on a year or use the arrows to advance or go back in years. Select the year and then the month and day.
Diagnosis and Procedure Lookup: This function allows the user to search for a diagnosis or procedure code by diagnosis or procedure description. Follow these steps to insert a diagnosis or procedure code:
1. Click the magnifying glass icon in the diagnosis or procedure code box to open the search page.
Figure 9 Diagnosis and Procedures Tables
2. Enter all or part of the first word of the description and click Search. A list of codes matching the description displays.
Figure 10 List of Codes
3. Click on a code and the system inserts the code in the appropriate code box on the request form.
Add - Edit/Save and Delete: This functionality provides a way for providers to add, cancel, edit/save, and delete diagnosis code information, procedure code information or any data entered in a ‘table’ format on the request template. The table below provides a description of the functionality available when a request is being entered.
Function Description
ADD Use Add to add information entered in the ‘table’. If Add is not selected, the
user receives a warning message when Review Request is clicked.
EDIT Use Edit to modify information already added to a table except procedure
codes/modifiers and diagnosis codes. The following diagnosis and procedure information may be changed using Edit when the request is being entered:
Diagnosis information including the ICD-9 date, and primary diagnosis
indicator.
Procedure information including procedure from and to dates and units.
To change a procedure code/modifier or diagnosis code, first click Delete to delete the procedure or diagnosis code line, and then enter and add a new procedure/modifier or diagnosis code line.
SAVE Click Save to save the information that was edited.
DELETE Use Delete to delete all information ALREADY ADDED to a row of a table.
CANCEL Use Cancel to remove all data entered on a row of a table BEFORE the data is added or saved.
Table 1: Add, Edit, and Delete Functions
The following instructions describe how to add, edit/save and delete diagnosis code information on the online request form. The same process is used for adding, editing and deleting procedure code information or any information entered in a ‘table’.
1. Enter the diagnosis code information and then click ADD.
2. When ADD is clicked, the data is added to the Diagnosis Table. A new blank diagnosis line displays which allows for the entry of another diagnosis; although another entry is not required. The EDIT and DELETE functions also display.
Figure 13 Diagnosis Added to Table
3. To edit diagnosis information already added, click EDIT at the end of the diagnosis line. When edit is clicked, the diagnosis information displays in an editable format.
Figure 14 Edit Diagnosis
4. Modify the information that needs to be corrected. In the Figure below, the ICD-9 date was changed to 3/31/2009.
Figure 15 Modify Diagnosis
5. Click SAVE. The new data is saved to the original diagnosis line.
Figure 16 Save Diagnosis
Editable row
Attach Documentation: Required additional documentation may be electronically attached by providers to the DMA-6 or DMA-80 when PA requests are submitted via the portal. Required documentation is represented as ‘checklist’ type items. The purpose of the checkbox is to associate the actual file attached with the specific additional information required by policy. Here are some general guidelines for attaching documents:
One file or multiple files may be attached; but each file must have a different name. Only certain file types may be attached. The acceptable file types are: TXT, DOC,
DOCX, PDF, TIF, TIFF, JPG, JPEG, and JPE. Each file cannot be more than 20 MB in size.
In order to attach a file, it must be saved to the provider’s file directory. Follow these instructions to attach documentation:
1. Enter the DMA-6 or DMA-80 via the web portal. Enter all required information and click Submit Request.
2. Go to the Create Attachment section on the page that displays after the DMA-6 or DMA-80 is submitted.
Figure 17 Create an Attachment
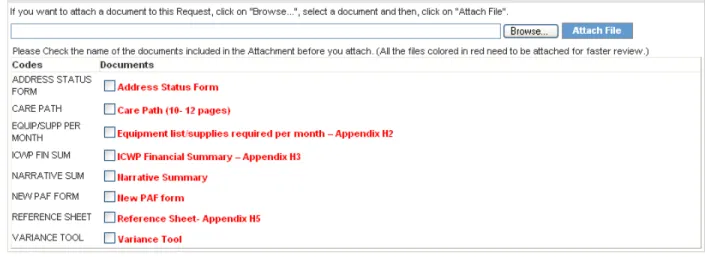
3. To attach a file or files to the request, first determine if one file with all the required information is to be attached; or if individual files are to be attached for one or more document types.
4. If one file is to be attached and that file includes all the required information, click all the checkboxes.
Figure 18 All Document Types Selected
5. To attach the file related to all the checkboxes, click Browse to open your file directory.
Figure 19 Find File
6. Find the file that is to be attached. Select the file by double clicking the file, or highlight the file and then click Open.
7. Once the file is selected, the file name displays in the box next to browse.
Figure 21 Attach File
8. Click the Attach File button.
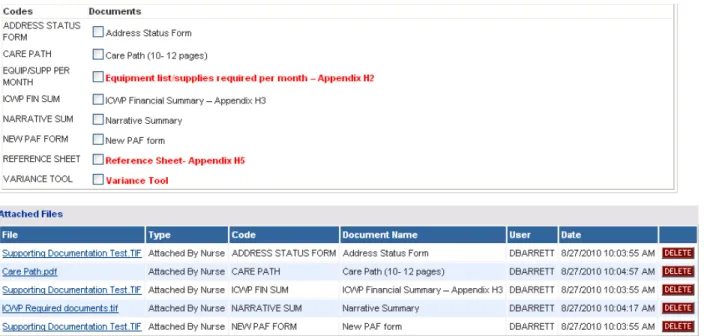
9. If the file is uploaded, the ‘File uploaded successfully’ message displays. The link to the attached file displays in the Attached Files table; and is associated with each document type.
Figure 22 Attached Files Table
10.When more than one file is to be attached and each file relates to a different required document, first select the applicable checkbox or checkboxes for the first file to be attached, and then find/attach the file.
11.To attach additional files, repeat the same process. Select the check box or checkboxes and then attach the file. The files attached are associated with the specific checkbox or checkboxes selected. Any checkboxes not selected after all files are attached will still display in red, indicating that the required document still needs to be submitted.
Figure 24 Multiple Files Attached
2.0 Operating Instructions
2.1 Web Entry of a DMA-6
2.1.1 Purpose
The DMA-6 form is used to certify that the member meets and continues to meet level of care criteria. A DMA-6 request must be entered into the PA system and approved by GMCF before a DMA-80 request for services may be entered. The online DMA-6 request template has one data entry page and a Review Request page; and is similar to the hard copy DMA-6 form. Data fields that are required are identified by a highlighted box and/or asterisk; and must be completed in order to submit the request.
2.1.2 Web Entry Instructions
Follow these instructions to enter a DMA-6:1. Click Submit/View from the portal Secure Home page, or select Enter a New Authorization Request from the Provider Workspace page.
2. On the New Request for Prior Authorization page, select ICWP form number DMA-6.
Figure 25 Select Request Type
3. Once the request type is selected, a second New Request for Prior Authorization page opens. The Provider ID of the ICWP provider requesting the DMA-6 is populated by the system in the ‘Service Provider ID’ box.
Figure 26 ICWP Provider ID System Populated
4. Enter the Member’s Medicaid number in the ‘Member Medicaid ID’ box. This number may be the Member ID (MHN #) or Member Medicaid ID. A member ID is required. 5. If the member’s physician is a Medicaid Provider, enter the physician’s Reference ID in
the ‘Physician Reference ID’ box. The reference ID always starts with REF. If the physician is not a Medicaid provider, leave this box blank.
6. If the physician is a Medicaid provider but the Reference ID number is not known, search for the number by clicking the symbol in the ‘Physician Reference ID’ box.
7. On the search page that displays, enter the physician’s provider ID to quickly find the physician, and then click Search.
OR
8. Enter the physician’s last name and select Physician Services from the ‘Category of Service’ drop list.
Figure 27 Reference Provider ID Search
9. Then, click Search.
10.On the list of physicians that displays as a result of the search, click the Reference Provider ID that corresponds to the correct physician. When the Reference ID is
System inserts the requesting provider ID and name.
selected, it will be inserted by the system in the ‘Physician Reference ID’ box on the New
Request for Prior Authorization page.
Figure 28 Member and Provider IDs
11.After all required ID numbers are entered; click Submit to open the DMA-6 online request form.
12.At the top of the form, the Member Information and Service Provider Information (ICWP Provider) are system populated based on the Member and Provider ID entered on the New
Request for Prior Authorization page. The Physician information is also populated if the
physician’s reference ID was entered. If the reference ID was not entered, the Physician’s name and phone number need to be entered manually since these are required fields.
Contact Information:
In this section, the system populates the ICWP provider contact information.
13.If this information is not correct or is missing, complete or correct the information. The ‘Contact Email’ is optional.
Figure 30 Contact Information
Request Information:
This section captures the following required information: Recommendation Type, Release of Information Code and Place of Service.
14.Indicate if this DMA-6 is an initial request for placement in the ICWP, or a request for continued placement in the program by clicking the Initial Placement or Continued Placement button next to ‘Recommendation Type’.
15.Enter the release of information consent type applicable to the request by selecting the type from the drop list. Generally, the type selected is ‘Informed Consent’.
16.The system defaults the ‘Place of Service’ to Home.
Figure 31 Initial Placement
Diagnosis Table:
This section captures the client’s ICD-9 Diagnosis code, code description (system populated), and primary diagnosis indicator (admission indicator is not required).
17.Enter the ICD-9 code for the Member’s primary diagnosis in the ‘ICD-9’ box; or search for the diagnosis and the system will insert the ICD-9 code. If the ICD-9 has a decimal point, include the decimal point when entering the code as shown in Figure 27.
18.Under ‘ICD-9 Date’, enter the date that the diagnosis was determined, or if not known, the date that the physician signed the DMA-6. Enter the date manually or select from the calendar popup.
19.Click the ‘Primary’ button to indicate that the diagnosis is the primary diagnosis. Note: If only one diagnosis is entered; the system will select the diagnosis as primary when the PA is saved.
20.Click the Add at the end of the diagnosis line to add the diagnosis code to the DMA-6.
Figure 33 Diagnosis Table
21.When the diagnosis is added, a new blank diagnosis line displays; and Edit and Delete
appear.
Figure 34 Diagnosis Added
22.If necessary, repeat the same steps to enter other diagnosis codes. Remember to click
Comments/Message:
The ‘Comments/Message’ textbox is optional; but can be used to enter additional information related to the DMA-6 request other than nursing care or treatment plan information. When data has been entered to the bottom of the visible text box, the scroll bar will activate. Click the up or down arrow on the scroll bar to navigate up or down in the text box.
Figure 35 Message Box
Dates of Hospitalization and Diagnosis on Admission to Hospital:
These sections are not required but may be completed if applicable to the member.
Figure 36 Hospitalization
Medications and Diagnostic/Treatment Procedures:
The Medications table captures medication information including type, dosage, route and
frequency. It is recommended to enter up to 3 primary medications prescribed for the member.
The Diagnostic and Treatment Procedures table captures diagnostic/treatment procedures
ordered as part of the member’s plan of care.
Figure 38 Diagnostics/Treatment Table
23.To enter medication information, first select the medication type by clicking the down arrow in the ‘Name’ box and then selecting a type from the drop list.
24.Next, enter the dosage for the medication in the ‘Dosage’ box.
25.Enter the method of medication administration by clicking the down arrow in the ‘Route’ box, and then selecting the method of administration from the drop list (Oral or Parental or Rectal or Topical).
26.Enter the frequency of medication administration by clicking the down arrow in the ‘Frequency’ box, and then selecting a frequency from the drop list (Regular or PRN: As necessary or Regular & PRN).
27.After all information is entered for the medication, click the Add at the end of the medication line to add the medication information to the DMA-6. When this is done, a new blank line displays; and the Edit and Delete symbols display.
Figure 39 Medication Added
28.Follow the same process to add other medication information. Remember to click Add
after each entry.
29.To add diagnostic or treatment procedures, the general process used is the same as adding medication information. First, select the procedure type by clicking the down arrow in the ‘Type’ box and selecting a type from the drop list. Select ‘Other’, if a diagnostic/treatment procedure is not listed.
30.Next, enter the frequency of the diagnostic/treatment procedure in the ‘Frequency’ box. 31.Click Add to add the diagnostic/treatment procedure to the DMA-6.
Figure 40 Diagnostic/Treatment Procedure Added
32.Repeat the process to add other diagnostic/treatment procedures. Remember to click
Add after each entry.
Treatment Plan:
This section captures information related to the Member’s treatment plan.
33.In the text box, describe the Member’s treatment plan, including the amount and type of services to be provided. When data has been entered to the bottom of the visible text box, the scroll bar will activate. Click the up or down arrow on the scroll bar to navigate up or down in the text box.
Figure 41 Treatment Plan Physician Certification:
This section captures physician certification in regards to communicable diseases, level of care, and management of the Member’s condition via community care and/or home health services Note: The system defaults the responses to No; so the user must change to Yes if Yes is the intended response.
34.Select Yes to indicate that the Member is free of communicable diseases.
35.Select Yes to indicate that the Member’s condition can be managed by Community Care. 36.Select Yes to indicate that the Member’s condition can be managed by Home Health
services.
37.Select Yes to indicate that the physician has certified the level of care.
38.Enter the date that the DMA-6 was signed by the member’s physician in the ‘Date Signed by Physician’ box.
Figure 42 Certification and Physician Signed Date
Evaluation of Nursing Care Needed:
This section documents the results of the nursing care evaluation.
39.For each category, select the applicable item(s) by clicking the corresponding checkbox or button.
40.If applicable to the client’s condition, enter the number of hours ‘out of bed’ per day in the ‘Hours out of the bed per day’ box.
Frequency per Week (Hours):
This section documents the frequency per week in hours of therapies that are provided and needed. This section is not required, but may be completed if applicable to the Member’s plan of care.
41.For each therapy that the member is receiving or needs, enter the number of hours received per week in the first column; and the number of hours of therapy that is needed in the second column.
Figure 44 Hours of Therapies Level of Impairment and Activities of Daily Living:
This section captures the Member’s level of impairment in regards to sight, hearing, speech, limitation in motion, and paralysis. It also records the Member’s current abilities regarding activities of daily living.
Figure 45 Level of Impairment Choices
Figure 46 ADLs Choices
42.To enter information, select the appropriate description from the ‘Level of Impairment’
Figure 47 Level of Impairment and ADL Evaluation Justification and Circumstances:
This required section allows for the entry of information justifying the need for the requested services. The justification should support the level of care requested.
43.In the text box provided, provide a description of the Member’s condition and any other information related to the diagnosis that justifies the services requested. When data has been entered to the bottom of the visible text box, the scroll bar will activate. Click the up or down arrow on the scroll bar to navigate up or down in the text box.
44.Enter the name of the case manager who signed the DMA-6; and the ‘Date Signed’ in the boxes provided.
Figure 48 DMA-6 Justification for Services
45.When all information has been entered, click Review Request at the bottom of the page to display the Attestation Statement. If the Attestation Statement does not display when
Review Request is selected; or a message displays that ‘information is missing or incorrect’, scroll up the page to find what is missing or incorrect. ‘Required’ displays next to a data box when information is missing. Enter or correct the data, and then click
46.Review the Attestation Statement. Before you can submit the request, you must first click
I Agree.
47.Review the DMA-6 for completeness and accuracy. To change information entered, click Edit Request. Otherwise, click Submit Request.
48.When the request is successfully submitted, the system displays the pending PA tracking number at the top of the page; and required documentation may be attached (refer to page 9 of this manual for attachment instructions).
2.2 Web Entry of a DMA-80
2.2.1 Purpose
The DMA-80 web request is used to request authorization for ICWP services. When a DMA-80 is requested, the provider is prompted to enter the approved DMA-6 PA number. This allows the system to validate the following data: the DMA-6 is approved; the DMA-6 is for the same member as the DMA-80; and the DMA-6 is current. The online DMA-80 request template captures the same basic data as the hard copy form. The online form includes one data entry page and a Review Request page. Required data fields are identified by a highlighted box and/or asterisk; and must be completed in order to submit the request
2.2.2 Web Entry Instructions
Follow these instructions to enter a DMA-80:
1. Click Submit/View from the portal Secure Home page, or select Enter a New Authorization Request from the Provider Workspace page.
2. On the New Request for Prior Authorization page, select ICWP form number DMA-80.
Figure 49 Select DMA-80
3. Once the request type is selected, a second New Request for Prior Authorization page opens. The Provider ID of the ICWP provider requesting the DMA-80 is populated by the system in the ‘Service Provider ID’ box.
4. Enter the Member’s Medicaid ID number in the ‘Member Medicaid ID’ box. The member ID is required.
Figure 50 DMA-80 New Request for PA Page
5. Click Submit to open the confirmation page.
6. Enter the DMA-6 authorization number in the box provided.
Figure 51 Verification Page
7. Click Submit. If the DMA-6 number passes system validation, the DMA-80 request template opens. If the DMA-6 number does not pass validation, an explanatory message displays.
DMA-80 Member and Provider Information:
At the top of the DMA-80 request form, the Member Information and Service Provider Information (ICWP Provider) are system populated based on the Member and Provider ID submitted on the New Request for Prior Authorization page.
Contact Information:
In this section, the system populates the ICWP provider contact information.
8. If this information is not correct or is missing, complete or correct the information. The ‘Contact Email’ is optional.
Figure 52 DMA-80 Contact Information Request Information:
This section captures the following request information: location where services are provided; release of information type; and consumer directed status.
9. The system defaults the service location to Home. No action is required.
10.Enter the type of release of information consent by selecting from the ‘Release of Info Code’ drop list. The type is usually Informed Consent; but, if not known, select Plan
Sponsor.
11.Indicate if the member is a consumer directed participant by clicking the Yes button. The system defaults this question to No so you must change to ‘Yes’ if applicable to the member.
Figure 53 DMA-80 Request Information
Diagnosis Table:
This section captures the client’s ICD-9 Diagnosis code, code description (system populated), date of diagnosis, and primary diagnosis indicator (admission indicator is not required).
12.Enter the ICD-9 code for the Member’s primary diagnosis in the ‘ICD-9’ box; or search for the diagnosis and the system will insert the ‘ICD-9 Code’ box. If the ICD-9 has a decimal point, include the decimal point when entering the code as shown in Figure 49. 13.Under ‘ICD-9 Date’, enter the date that the diagnosis was determined. Enter the date
manually or select from the calendar popup.
14.Click the ‘Primary’ button to indicate that the diagnosis is the primary diagnosis. Note: If only one diagnosis is entered; the system will select the diagnosis as primary.
Figure 54 DMA -80 Diagnosis Table
15.Click the Add symbol at the end of the diagnosis line to add the diagnosis code to the request. When this is done, a new blank diagnosis line displays; and Edit and Delete
appear.
Figure 55 DMA-80 Diagnosis Added
16.If necessary, repeat the same steps to enter other diagnosis codes. Remember to click
Add after each diagnosis is entered.
Procedures Table:
The Procedures Table documents the specific services requested. Each line refers to one service code and includes: service code number, requested start date, requested end date, total units requested, units requested for the month, requested amount, cost sharing amount, if applicable, and modifier(s), if applicable.
17.Enter the code for the ICWP service requested in the ‘Service Code’ box; or search for the code and the system will insert the code in the service code box.
18.Enter the date when the service is to start in the ‘From Date’ box. Enter the date manually or select from the calendar popup.
19.Enter the date when the service is to end in the ‘To Date’ box. Enter the date manually or select from the calendar popup.
20.Under ‘Units’, enter the total number of units service requested for the entire service period. Enter whole numbers only.
21.Under ‘Requested Units/Day’, enter ‘0’.
23.Under ‘Requested Amount’, enter the total cost of the service requested for the dates of service.
24.If the member shares the cost of the service, enter the ‘Cost Sharing Amount’ in the box provided.
25.Next, add the appropriate modifier or modifiers if applicable to the service requested. Up to 4 modifiers may be entered. Enter the modifiers in correct order in the ‘Mod 1’, ‘Mod 2’, ‘Mod 3’ and ‘Mod 4’ boxes.
Figure 56 DMA-80 Procedures Table
26.Click the Add at the end of the procedure line to add the code information to the request. When this is done, a new blank diagnosis line displays; and Edit and Delete appear.
Figure 57 Procedure Added
27.If necessary, repeat the same steps to enter another service code. Remember to click
Add after each code is entered.
Program Information:
This section captures program information including: Admission Date, Type of Admission and Certification Date.
28.Enter the date that the member was initially admitted to the ICWP in the ‘Program Admit Date’ box. Enter manually or select from the calendar popup.
29.Indicate if the DMA-80 is for an initial admission or for a continuation of services (renewal) by selecting the applicable button.
30.If ‘Renewal’ is selected, enter the date of the last annual care plan in the ‘Date Last Certified’box. Enter manually or use the calendar popup.
Figure 58 DMA-80 Program Information
Supporting Information:
This section captures a description of the services ordered for the member; and the medical justification for providing the services.
31.In the ‘Description of Services Requested’ text box, describe the services and frequency of services that have been ordered. When data has been entered to the bottom of the visible text box, the scroll bar will activate. Click the up or down arrow on the scroll bar to navigate up or down in the text box. Up to four thousand characters (4000) may be entered in this text box
32. In the ‘Justification and Circumstances for Requested Services’ box, enter a description of the member’s diagnosis and condition, and any other information related to the diagnosis that justifies the services requested. When data has been entered to the bottom of the visible text box, the scroll bar will activate. Click the up or down arrow on the scroll bar to navigate up or down in the text box. Up to four thousand characters (4000) may be entered in this text box.
Figure 59 DMA-80 Supporting Information Social History:
The section captures information regarding the Member’s social history including:
Presenting Problems: Member’s presenting problems and the reason(s) for this evaluation.
Family Information: Member’s family and living situation including information related to significant others and guardian.
Birth and Early Development: Member’s birth and early developmental issues.
Medical Information: Clinical information related to the Member’s present medical status.
Training and Education: Education or training this Member has or is receiving.
Current Functioning: Member’s present level of functioning including capabilities and disabilities.
Summary of Social History: Summary of the Member’s social history.
33. If you plan to attach all required additional documentation to the DMA-80, you may enter ‘See Attached’ in each of the text boxes. Also, if you want to highlight some key information, you can enter that specific information in the applicable box.
34. If you do not plan to attach the additional documentation, you will need to enter information in each textbox. All are required. When data has been entered to the bottom of the visible text box, the scroll bar will activate. Click the up or down arrow on the scroll bar to navigate up or down in the text box.
Required Documents/Letters:
This section includes a series of questions related to required letters and documents. Note: The system defaults the responses to No; so the user must select Yes, if Yes is the intended response.
34.Click Yes to indicate that there is a signed Letter of Medical Necessity at the agency. If ‘Yes’, enter the date that the Letter of Medical Necessity was signed in the ‘Date Signed’ box.
35.Click Yes to indicate that there is a signed Letter of Understanding on file. If ‘Yes’, enter the date that the Letter of Understanding was signed in the ‘Date Signed’ box. 36.Click Yes to indicate that there is a signed Client Rights and Responsibilities on file. If
‘Yes’, enter the date that the Client Rights and Responsibilities was signed in the ‘Date Signed’ box.
38.Click Yes to indicate that the Member is receiving other waiver services.
Figure 60 Required Letters/Documents
39.When all information has been entered, click Review Request at the bottom of the page to display the Attestation Statement. If the Attestation Statement does not display when
Review Request is selected; or a message displays that ‘information is missing or incorrect’, scroll up the page to find what is missing or incorrect. ‘Required’ displays next to a data box when information is missing. Enter or correct the data, and then click
Review Request again.
40.Review the Attestation Statement. Before you can submit the request, you must first click
I Agree.
41.Review the DMA-80 for completeness and accuracy. To change information entered, click Edit Request. Otherwise, click Submit Request.
42.When the request is successfully submitted, the system displays the pending PA tracking number at the top of the page; and required documentation may be attached (refer to page 9 of this manual for instructions).
43.To enter another DMA-6 or DMA-80, click Enter a New PA Request. To conduct other types of authorization activities, click the Prior Authorization tab at the top of the page, and select Provider Workspace.