Maintenance Guide
Release V10.01
information contained in this document and its website without prior notice. The reader should in all cases consult representatives of Extreme Networks to determine whether any such changes have been made.
The hardware, firmware, software or any specifications described or referred to in this document are subject to change without notice.
Trademarks
Extreme Networks and the Extreme Networks logo are trademarks or registered trademarks of Extreme Networks, Inc. in the United States and/or other countries.
All other names (including any product names) mentioned in this document are the property of their respective owners and may be trademarks or registered trademarks of their respective companies/owners.
For additional information on Extreme Networks trademarks, please see: www.extremenetworks.com/company/legal/trademarks/
Support
For product support, including documentation, visit: www.extremenetworks.com/ documentation/
For information, contact: Extreme Networks, Inc. 145 Rio Robles
San Jose, California 95134 USA
Chapter 1: About This Guide...6
Who Should Use This Guide...6
How to Use This Guide...7
Text Conventions... 7
Providing Feedback to Us... 8
Getting Help...8
Related Publications...9
Chapter 2: Backing Up and Restoring the Image...10
Creating a Backup Image...10
Backing Up and Restoring Characteristics by Controller Models... 11
Backing Up Image File Name...11
Backing Up the Current Image During the Upgrade Process from the Wireless Assistant GUI ... 11
Backing Up the Current Image During Upgrade from the CLI... 12
Backing Up the Current Image from Rescue Mode...13
Restoring the Backup Image from the GUI... 18
Downloading a Backup Image from an FTP or SCP Server...19
Deleting a Backup Image That Is Available for Restore... 20
Restoring Characteristics by Controller Models...20
Restoring the Backup Image from the CLI...20
Restoring the Backup Image from Rescue Mode...21
Restoring from the Local Drive... 22
Restoring from a Remote FTP Server...23
Restoring the Rescue Image...24
Restoring to Factory Default...25
Chapter 3: Backing Up and Restoring the Configuration... 27
Backing Up the Wireless Controller Configuration...27
Uploading a Backup to a Server... 29
Copying a Local Backup to Flash... 30
Scheduling a Backup... 31
Deleting a Backup... 32
Restoring the Wireless Controller Configuration... 32
Downloading a Backup File...33
Chapter 4: Upgrading the Wireless Convergence Software...36
Upgrading Process... 36
Upgrading Using the GUI... 38
Upgrading Using the CLI...44
Migrating the Platform Configuration...45
Upgrading Two Controllers in ‘Availability’ Mode...47
Upgrading Two Controllers in ‘Session Availability’ Mode...49
Chapter 5: Working with External Storage Devices... 50
Working with an External Storage Device... 50
Mounting a Flash Device on the Wireless Controller...51
Chapter 6: Using the Console Port...56
Using the Console Port in the Wireless Controller Models C25, C35, C4110, C5110, and C5210 ...56
Using the Console Port for the V2110...56
Chapter 7: Performing System Maintenance... 58
Changing Logs Levels, Syslog Event Reporting, and AP Log Management... 58
Enabling or Disabling the Poll Timer... 63
Shutting Down the System... 63
Resetting Your System Configuration...64
Resetting Wireless APs to Factory Default Settings...65
Replacing the CMOS Battery... 69
Chapter 8: Using Controller Utilities... 72
Using Controller Utilities... 72
Enabling SNMP... 75
Chapter 9: Recovering the Wireless Controller...84
Using Rescue Mode’s Authentication Service Management Menu... 84
Recovering the Wireless Controller from File System Corruption... 85
Chapter 10: Maintaining the Wireless Controller... 87
Maintaining the C35 Controller...87
Maintaining the C25 Controller...88
Maintaining the C5110 Controller...90
Maintaining the C5210 Controller... 95
Maintaining the C4110 Controller...98
Chapter 11: Maintaining the Wireless AP Software...99
Maintaining a List of Current Software Images...99
Deleting a Software Image...100
Downloading a New Software Image... 100
Defining Parameters for a Software Upgrade...101
Chapter 12: Performing Wireless AP Diagnostics... 103
Performing Wireless AP Diagnostics Using SSH... 103
Appendix A: Glossary...106
A...106 B...109 C... 110 D... 115 E...118 F...122 G... 124 H... 125 I... 126 J...130 L...130 M...132 N... 136 O... 137 P...139
Q...142
R... 143
S... 146
T... 150
U... 152
V... 153
W...156
1
Who Should Use This Guide How to Use This Guide Text Conventions
Providing Feedback to Us Getting Help
Related Publications
The purpose of this guide is to assist you in performing the maintenance of the following hardware and software components of the ExtremeWireless Solution:
HARDWARE
•
ExtremeWireless Appliances•
ExtremeWireless APsThis guide covers the following ExtremeWireless Appliance models:
•
ExtremeWireless Appliance C5110•
ExtremeWireless Appliance C5210•
ExtremeWireless Appliance C4110•
ExtremeWireless Appliance C25•
ExtremeWireless Appliance C35•
Virtual Wireless Appliance V2110 (VMWare and MS Hyper-V platforms) SOFTWARE•
ExtremeWireless SoftwareWho Should Use This Guide
Electrical Hazard: Only qualified personnel should install or service this unit.
Riesgo Electrico: Nada mas personal capacitado debe de instalar o darle servicio a esta unida.
Elektrischer Gefahrenhinweis: Installationen oder Servicearbeiten sollten nur durch ausgebildetes und qualifiziertes Personal vorgenommen werden.
This guide is intended for network administrators who are responsible for maintaining the ExtremeWirelessSolution.
How to Use This Guide
Read through this guide completely to familiarize yourself with its contents and to gain an
understanding of the features and capabilities of the ExtremeWireless software. A general working knowledge of data communications networks is helpful when setting up these modules.
This section provides an overview of this guide and a brief summary of each chapter; defines the conventions used in this document; and instructs how to obtain technical support from Extreme Networks. To locate information about various subjects in this guide, refer to the following table.
For... Refer to...
Information on how to back up the existing software image
before performing the upgrades. Backing Up and Restoring the Image on page 10 Information on how to restore the previously backed up
configuration on various platforms.
Backing Up and Restoring the Configuration on page 27
Information on various upgrade paths to upgrade the ExtremeWireless Convergence Software.
Upgrading the Wireless Convergence Software on page 36
Information on how to work with ExtremeWireless external
storage devices. Working with External Storage Devices50 on page Information on how to connect to the ExtremeWireless
console port to access the Rescue mode. Using the Console Port on page 56 Information on how to perform the following system
maintenance tasks: Changing the log level, setting a poll interval for checking the status of the Wireless APs (Health Checking), enabling and defining parameters for Syslog event reporting, forcing an immediate system shutdown with, or without reboot, and resetting the ExtremeWireless to its factory defaults.
Performing System Maintenance on page 58
Information on how to configure the ExtremeWireless
utilities. Using Controller Utilities on page 72 Information on how to recover the ExtremeWireless lost
login password via the Rescue mode.
Recovering the Wireless Controller on page 84 Information on how to maintain various platforms. Maintaining the Wireless Controller on page 87 Information on how to perform Wireless AP software
maintenance.
Maintaining the Wireless AP Software on page 99 Information about performing wireless AP diagnostics using
SSH.
Performing Wireless AP Diagnostics on page 103
Text Conventions
Table 1: Notice Icons
Icon Notice Type Alerts you to...
General Notice Helpful tips and notices for using the product. Note Important features or instructions.
Caution Risk of personal injury, system damage, or loss of data. Warning Risk of severe personal injury.
New This command or section is new for this release.
Table 2: Text Conventions
Convention Description
Screen displays This typeface indicates command syntax, or represents information as it appears onthe screen. The words enter and
type When you see the word “enter” in this guide, you must type something, and then pressthe Return or Enter key. Do not press the Return or Enter key when an instruction simply says “type.”
[Key] names Key names are written with brackets, such as [Return] or [Esc]. If you must press two or more keys simultaneously, the key names are linked with a plus sign (+). Example: Press [Ctrl]+[Alt]+[Del]
Words in italicized type Italics emphasize a point or denote new terms at the place where they are defined in the text. Italics are also used when referring to publication titles.
Providing Feedback to Us
We are always striving to improve our documentation and help you work better, so we want to hear from you! We welcome all feedback but especially want to know about:
•
Content errors or confusing or conflicting information.•
Ideas for improvements to our documentation so you can find the information you need faster.•
Broken links or usability issues.If you would like to provide feedback to theExtreme Networks Information Development team about this document, please contact us using our short online feedback form. You can also email us directly at [email protected].
Getting Help
If you require assistance, contact Extreme Networks Global Technical Assistance Center using one of the following methods:
Web www.extremenetworks.com/support
Phone 1-800-872-8440 (toll-free in U.S. and Canada) or 1-603-952-5000 For the Extreme Networks support phone number in your country: www.extremenetworks.com/support/contact
Email [email protected]
To expedite your message, enter the product name or model number in the subject line. Before contacting Extreme Networks for technical support, have the following information ready:
•
Your Extreme Networks service contract number•
A description of the failure•
A description of any action(s) already taken to resolve the problem (for example, changing mode switches or rebooting the unit)•
The serial and revision numbers of all involved Extreme Networks products in the network•
A description of your network environment (such as layout, cable type, other relevantenvironmental information)
•
Network load and frame size at the time of trouble (if known)•
The device history (for example, if you have returned the device before, or if this is a recurring problem)•
Any previous Return Material Authorization (RMA) numbersRelated Publications
ExtremeWireless and ExtremeWireless AP documentation can be found on Extreme Documentation page at: http://documentation.extremenetworks.com
Extreme recommends the following guides for users of ExtremeWireless products:
•
ExtremeWireless AP3935 Installation Guide•
ExtremeWireless AP3965 Installation Guide•
ExtremeWireless Appliance C5210 Quick Reference•
ExtremeWireless Appliance C5110 Quick Reference•
ExtremeWireless Appliance C4110 Quick Reference•
ExtremeWireless Appliance C25 Quick Reference•
ExtremeWireless Appliance C35 Quick Reference•
ExtremeWireless CLI Reference Guide•
ExtremeWireless End User License Agreements•
ExtremeWireless External Antenna Site Preparation and Installation Guide•
ExtremeWireless Getting Started Guide•
ExtremeWireless Integration Guide•
ExtremeWireless Maintenance Guide•
ExtremeWireless Open Source Declaration2
Image
Creating a Backup Image
Backing Up and Restoring Characteristics by Controller Models Backing Up Image File Name
Backing Up the Current Image During the Upgrade Process from the Wireless Assistant GUI
Backing Up the Current Image During Upgrade from the CLI Backing Up the Current Image from Rescue Mode
Restoring the Backup Image from the GUI
Downloading a Backup Image from an FTP or SCP Server Deleting a Backup Image That Is Available for Restore Restoring Characteristics by Controller Models
Restoring the Backup Image from the CLI Restoring the Backup Image from Rescue Mode Restoring from the Local Drive
Restoring from a Remote FTP Server Restoring the Rescue Image
Restoring to Factory Default
Creating a Backup Image
When creating the image backup, the wireless controller makes an exact copy (snapshot) of the running image and saves it as a tgz file. Restoring the controller with a backup image restores the appliance to the exact state at the time backup was created.
A backup image can be created in two ways:
1 During upgrade of the image. Before installing the new image version, the upgrade process takes the backup of the running image. The backup image can be stored locally, on a flash drive (if present), or remotely on an FTP server.
2 From rescue mode using the menu driven commands. To do this, you have to enter rescue mode on startup. No service to clients is provided while you are in rescue mode. Again, the backup image can be stored on the local, flash (if flash is present) or an FTP server.
Backing Up and Restoring Characteristics by Controller Models
The following table describes the backup and restore capabilities and characteristics for all wireless controllers.
Table 3: Controller Backup and Restore Capabilities and Characteristics
FTP Local Flash
Requires management port
connectivity Administrator can upload/downloadlocal backup images provided they end in ‘-rescue-user.tgz’
USB device
Note
Backup file names must end in ‘-rescue-user.tgz’. Note
Before you proceed with an FTP backup, ensure that the management port is configured correctly and connected to the network. To enter Rescue mode, you must connect to the serial console. The V2110 (MS Hyper-V platform) does not support flash functionality.
Backing Up Image File Name
The default file name used for backup image is: <hostname/domain>-<platform>-<version>-rescue-user.tgz
In order to distinguish multiple backup images, rename the file when saving to flash or FTP. If modification is required, you should prepend the custom text to the default image name.
Backing Up the Current Image During the Upgrade Process from
the Wireless Assistant GUI
You must follow the procedures detailed in this section if you want to backup the current image via the Wireless Assistant GUI while upgrading the image. For more information on how to upgrade the image, see Upgrading Using the GUI on page 38.
Note
When you backup the current image, the license activation key and option keys are also backed up.
External Storage
The wireless controller models C25, C35, C4110, C5110, C5210 and V2110 support only the USB storage device. If you select the Flash option to backup the existing image in these models, the image will be backed up on the USB device. You must ensure that the USB device is installed and mounted on the wireless controller. For more information, see Working with an External Storage Device on page 50.
To back up the existing software:
1 From the top menu, click Controller. The Wireless Controller Configuration screen is displayed. 2 From the left pane, click Administration > Software Maintenance. The EWC Software tab is
displayed.
3 Select the Backup system image to: checkbox and choose the appropriate backup option. To save the existing software image in local storage, select the Local option. The upgrade process will delete the previous backup image stored in local storage (if one exists).
To save the existing software image on the flash device, select the Flash option, and then type a file name for the backup image in the Filename box.
Note
The backup image file name is self generated when saved for both local or remote options (for example, EWC-<platform>10.01.0001-rescue-user.tgz). It is recommended that you maintain this format for the backup image file name. If you must customize the file name, prepend the customized file name to the original generated file name of the backup image.
To save the existing software image on a remote FTP server, select the Remote option, and then type the following:
FTP Server – The IP address of the FTP server that stores the image file. User ID – The user ID used to log on to the FTP server.
Password – The corresponding password for the user ID.
Confirm – The corresponding password for the user ID to confirm the password was typed correctly.
Directory – The directory on the server in which the image file is stored. Filename – The image file name, which must end with -rescue-user.tgz.
Backing Up the Current Image During Upgrade from the CLI
A backup image can be created during an upgrade from the CLI.
1 Check the backups present on the controller by running the show upgrade command. EWC.extremenetworks.com# show upgrade
1: AC-MV-09.01.01.0123-1.rue
2: rue-08.31.01.0192-rescue-user.tgz
If you want a local backup file to be created, the upgrade process removes any previous *-rescue-user.tgz file. Optionally, you can remove any existing local backup file by running the no upgrade <filename> command.
The command deletes the image with index 2, which, in this example, is vps-08.31.01.0192-rescue-user.tgz. You can also specify the full image name.
2 Upgrade the software with a backup image to local storage using the upgrade ac new-image-name bckto local command. During the upgrade process, a backup image with the default backup image name is created on the local storage:
upgrade ac AC-MV-09.01.01.0123-1.rue bckto local
3 Upgrade the software with a backup image to flash using the upgrade ac new-image-name
bckto flash [filename] command.
upgrade ac AC-MV-09.01.01.0123-1.rue bckto flash
The command will upgrade and create a backup image with the default name on the flash drive. You can also specify the custom name for the backup image.
upgrade ac AC-MV-09.01.01.0123-1.rue bckto flash backup-rescue-user.tgz
Note
To backup to flash, you must insert a flash drive before running the command.
4 If backing up the software to FTP, set up the FTP server credentials before running the upgrade by running the upgrade_backup_dest ftp server ip user password dir file command.
upgrade_backup_dest 192.168.4.10 test abc123 system/backups backup-rescue-user.tgz
The name specified for “upgrade_backup_dest” is used as the backup file name.
5 Start the upgrade by running the upgrade ac new-image-name bckto ftp command. upgrade ac AC-MV-09.01.01.0123-1.rue bckto ftp
The command first makes a backup image of the running system preserved on the FTP server, then installs the selected upgrade image.
Backing Up the Current Image from Rescue Mode
You must follow the procedures in this section if you are backing up the current image.
You can also backup the current image via the Wireless Assistant GUI. For more information, see Backing Up the Current Image During the Upgrade Process from the Wireless Assistant GUI on page 11.
Note
When you backup the current image, the license activation key and option keys are also backed up.
1 Connect to the console port. Do not use the ESA ports or the Admin management port. For more information, see Using the Console Port on page 56.
2 Reboot the system.The following menu appears during the reboot process. ---Controller
Controller Rescue
---3 Select Controller Rescue, and then press Enter. The first repairFS script runs after the OS initialization.
Note
The above process may take several minutes. You must not reboot the system. After the filesystem check is completed, the main rescue menu is displayed.
Rescue Start-up Menu. Use with extreme caution. 1) Force System Recovery
2) Create System Backup Image 3) Display Backup Images 4) FTP Menu
5) Network Interface Menu
6) Manually run File System Check Utility (fsck) 7) Restore Backup Image directly from the FTP server 8) Authentication Service Management Menu
9) Flash Menu R) Reboot
WARNING! - Forcing system recovery will erase all files, and reinstall the selected image (either backup or factory).
Reboot will restart the system back into Normal mode.
If you have any questions about these options, please contact Support. Your choice:
Note
If you want to create a backup image either on the wireless controller local drive or the USB device, follow Step 4 and skip the remaining steps. If you want to upload the backup image, follow steps 6 to 12.
4 Type 2 in the Rescue menu to create a backup image. Your choice: 2
mounting rest of normal mode partitions...done
Do you want to create a system backup image to USB key? (Y/N)
5 Type Y to backup the image to a USB device or N to backup the image to the controller’s local drive. Note
Creating a system backup image to the controller’s local drive will overwrite the existing backup image.
If you type Y, the following screen is displayed: Please enter a backup filename:
a Enter the backup image filename ending in -rescue-user.tgz and press Enter. The following screen is displayed.
Proceed with backup (Y/N):
b Type Y. The system backs up the image to the USB device. Creating a Backup image is Complete!
<< Press any key to continue >>
If you type N, the following message is displayed: Proceed with backup (Y/N):
Type Y. The system backs up the image.
--- Creating 'Normal' mode backup
---Please be patient. It may take a while. Do not reboot the machine Mount the normal mode partitions:
mounting root partition...done.
mounting rest of normal mode partitions...done. Creating a backup, please wait
Creating a Backup image is Complete! Unmounting partitions...
done.
<< Press any key to continue >>
Note
You can also upload the backed up image to the FTP server. To upload the image to the FTP server, continue with the following procedures.
6 Enter Rescue mode.
a Type 5 in Rescue menu to enter the Network Interface menu.
b Type 2 in the Network Interface menu. The following screen is displayed. Your choice: 2
Please enter Interface information Format <ip>:<netmask> <gw optional>
Input: 192.168.1.210:255.255.255.0 192.168.1.1
Note
You can use the Network Interface menu options from 3 to 5 (IP, Netmask, and default gateway) one at a time.
7 Press [Enter]. The following screen is displayed.
ip is 192.168.1.210 netmask is 255.255.255.0 Configuring interface …
Setting up network interface … Done! << Press any key to continue >>
8 Test the interface.
a Type 6 in the Network Interface menu.
PING 192.168.3.10 (192.168.3.10) from 192.168.1.210 : 56(84) bytes of data.
64 bytes from 192.168.3.10: icmp_seq=1 ttl=63 time=2.49 ms 64 bytes from 192.168.3.10: icmp_seq=2 ttl=63 time=0.881 ms 64 bytes from 192.168.3.10: icmp_seq=3 ttl=63 time=0.706 ms 64 bytes from 192.168.3.10: icmp_seq=4 ttl=63 time=0.738 ms 64 bytes from 192.168.3.10: icmp_seq=5 ttl=63 time=0.707 ms 192.168.3.10 ping statistics
---5 packets transmitted, ---5 received, 0% loss, time 4031ms rtt min/avg/max/mdev = 0.706/1.106/2.498/0.698 ms << Press any key to continue >>
Note
If the Network Interface is not configured properly, the following screen is displayed.
PING 192.168.3.10 (192.168.3.10) from 192.168.1.210 : 56(84) bytes of data.
192.168.3.10 ping statistics
---9 packets transmitted, 0 received, 100% loss, time ---9038ms << Press any key to continue >>
9 Type B to return to the top menu. The following screen is displayed. Your choice: B
Going back to the top menu... 10 Configure the FTP Settings.
a Type 4 in the Rescue menu to configure the FTP Settings. The following screen is displayed: FTP MENU
---1) Enter FTP Settings
2) Change FTP server IP address 3) Change FTP port
4) Change user name 5) Change password 6) Change FTP directory 7) Change file name
8) Display current FTP Settings 9) Display locally stored images 10) Download Image from FTP server 11) Upload Image onto the FTP server 12) Remove locally stored images B) Return back to the top menu Your choice:
b Type 1 to enter the FTP settings.
c Type 1 in the FTP menu. The following screen is displayed. Your choice: 1
Command syntax: ftp://<user>:<password>@<ftp_ip>:<port>/ <directory&filename>
~port information is optional: the default value is 21~ Please enter ftp info:
d Type the name of the image to be uploaded, as part of the FTP settings. For example: Please enter FTP info:
ftp://tester:[email protected]:21/backup_dir/rue-rescue-user.tgz
Note
When you are uploading the backup image, the filename in the command syntax corresponds to the image that is being uploaded to the FTP server (filenames can be displayed by typing 9 in the FTP menu). When you are downloading the backup image, the filename in the command syntax corresponds to a file that is being downloaded from the FTP server.
11 Check the FTP settings.
a Type 8 in the FTP menu. The following screen is displayed. Your choice: 8
Current Settings:
---FTP IP address: 192.168.10.10 port: 21 user name: tester
password: 123456
FTP directory: "backup_dir" FTP file: "rue-rescue-user.tgzz" << Press any key to continue >>
b Confirm that the name of the file to be uploaded to the FTP server is correct. 12 If applicable, modify the FTP settings.
In the FTP menu, choose options from 2 to 7 to individually configure the FTP settings:
•
FTP server’s IP address•
FTP port•
User name•
Password•
FTP directory•
File Name13 Upload the image on the FTP server:
a Type 11 in the FTP menu. The following screen is displayed: Your choice: 11
Attempting to upload an image to the ftp server. Please be patient
Please verify at the ftp server that image has successfully been uploaded << Press any key to continue >>
Note
The minimum backup image size is approximately 250 MB.
14 Confirm that the image is backed up.
Type 9 in the FTP menu. The following screen is displayed: Your choice: 9
Currently Locally Stored Images: ---1 ) rue-rescue-user.tgz
2 ) AC-MV-09.01.01.0163-1.rue << Press any key to continue >>
Restoring the Backup Image from the GUI
The following section describes how to restore the backup image using the GUI. To Restore the Wireless Controller Software:
1 From the top menu, click Controller.
The Wireless Controller Configuration screen is displayed. 2 From the left pane, click Administration > Software Maintenance.
The EWC Software tab is displayed.
3 In the list, click the backup image you want to restore. The list displays all images available on the local disk or the flash card, if the flash card is mounted. Backup images have names ending in -rescue-user.tgz (see Backing Up Image File Name on page 11).
Note
The Local option must be cleared in the Backup system image to section.
4 To restore the image, click Upgrade now. A dialog is displayed informing you that the restore process requires rebooting the wireless controller.
Note
The Upgrade now parameter does not support IPv6 FTP. 5 Click OK to confirm the restore.
The Software Maintenance window is displayed. The wirleless controller reboots automatically.
Downloading a Backup Image from an FTP or SCP Server
You can choose to download a backup image from an FTP or SCP server for a restore. After it is downloaded, the system is restored in the same way as restoring from the local storage. To Download a Backup Image from an FTP or SCP Server for a Restore:
1 From the top menu, click Controller.
The Wireless Controller Configuration screen is displayed. 2 From the left pane, click Administration > Software Maintenance.
The Software Maintenance screen is displayed.
3 Select the Remote option, and then type the following:
•
Protocol – FTP or SCP.•
Server – The server to retrieve the backup file from. NoteThe Server parameter supports both IPv4 and IPv6 addresses.
•
User ID – The user ID used to log into the server.•
Password – The corresponding password for the user ID.•
Confirm – The corresponding password for the user ID to confirm it was typed correctly.•
Directory – The directory on the server in which the backup file that is to be retrieved is stored.•
Filename – The name of the image file to retrieve.4 Click Get Image now. The image is downloaded and added to the list. Note
SCP can only be used to download an image and cannot be used to start remote upgrade. The Upgrade now button is disabled when SCP is selected from the drop-down list.
Deleting a Backup Image That Is Available for Restore
To Delete a Backup Image That Is Available for Restore: 1 From the top menu, click Controller.
The Wireless Controller Configuration screen is displayed. 2 From the left pane, click Administration > Software Maintenance.
The Software Maintenance screen is displayed.
3 To delete a backup image from the list, click the image in the list that you want to delete. 4 Click Delete selected.
A dialog box is displayed. If correct, click OK to confirm the deletion.
Restoring Characteristics by Controller Models
Refer to Table 3: Controller Backup and Restore Capabilities and Characteristics on page 11 for details on the backup and restoration capabilities and characteristics for each wireless controller.
Note
Before you proceed with an FTP restoration, ensure that the Management Port is configured correctly and connected to the network. You cannot enter Rescue mode without the management port’s connectivity to the network.
Restoring the Backup Image from the CLI
The backup image can be restored using the CLI from local storage, flash and FTP server. To Restore the Backup Image from Local Storage and Flash:
1 Locate the backup image from local storage and flash (if a flash device is inserted) using the show upgrade command. This command lists all upgrade files and backup image files.
EWC.extremenetworks.com# show upgrade 1: AC-MV-09.01.01.0123-1.rue
2: rue-08.31.01.0192-rescue-user.tgz Note
Backup image files are identified based on the file name format.
2 Restore the backup image from the local storage or flash device using the upgrade ac backup-image-name command. Make sure that you do not specify a bckto local option.
EWC.extremenetworks.com# upgrade ac rue-08.31.01.0192-rescue-user.tgz This command restores the system to the backup image selected.
To avoid typing the full image name, you can specify the image using the index returned by the show upgrade command.
rue-08.31.01.0192-rescue-user.tgz.
EWC.extremenetworks.com# upgrade ac 2 To Restore the Local Image from the FTP or SCP Server:
3 Download the backup image from the FTP or SCP server by using the copy upgrade server userdirbackup-file-name [scpscp password] command.
For example, to download backup image
rue-08.31.01.0192-rescue-user.tgz from an FTP server:
EWC.extremenetworks.com# copy upgrade 192.168.4.10 test system/backups rue-08.31.01.0192-rescue-user.tgz
4 Restore the backup image by using the upgrade ac new-image-name command.
EWC.extremenetworks.com# upgrade ac rue-08.31.01.0192-rescue-user.tgz
Restoring the Backup Image from Rescue Mode
To restore the backup image from rescue mode:
1 Connect to the console port. Do not use the ESA ports or the Admin management port. For more information, see Using the Console Port on page 56.
2 Reboot the system. The following menu is displayed during the reboot process: ---Controller
Controller rescue
---3 Use your cursor to highlight Controller rescue, and then press [Enter] to enter Rescue mode. The following menu is displayed.
1) Force System Recovery 2) Create System Backup Image 3) Display Backup Images 4) FTP Menu
5) Network Interface Menu
6) Manually run File System Check Utility (fsck) 7) Restore Backup Image directly from the FTP server 8) Authentication Service Management Menu
9) Flash Menu R) Reboot
WARNING! - Forcing system recovery will erase all files, and reinstall the selected image (either backup or factory).
Reboot will restart the system back into Normal mode.
If you have any questions about these options, please contact Support. Your choice:
4 Do one of the following:
•
If the backup image was backed up to the local drive of the ExtremeWireless Appliance, restore from the local drive.•
If the backup image was backed up to a remote FTP server, restore from a remote FTP server.•
If a USB device with the backup image on it is mounted on the ExtremeWireless Appliance,restore from the USB device.
Restoring from the Local Drive
To restore from the local drive: 1 On the Rescue menu, type 1.
The list of backup images on the local drive of the wireless controller are displayed. Currently Stored Images
---1) AC-MV-09.01.01.0123-1.ruevps 2) rue-08.31.01.0192-rescue-user.tgz B) Abort and go back to previous Menu
Please select which image to use for restoring:
Backup image names end in -rescue-user.tgz (see Backing Up Image File Name on page 11). Be careful not to select the upgrade image (AC-MV-09.01.01.0123-1.rue) when the backup image is needed.
Restoring to the upgrade image will restore the system to factory defaults and lose all of the configuration (see Restoring to Factory Default on page 25).
2 Type the sequence number of the backup image that you want to restore. The following message is displayed:
Selected Restore Image is: rue-08.31.01.0192-rescue-user.tgz This procedure is irreversible, do you wish to continue (Y/N)? 3 Type Y.
The wireless controller initiates the recovery process.
Performing System recovery, this may take a while... Cleaning out normal mode partitions...
Cleaning Completed.
Mount normal mode main partition
Mounting rest of normal mode partitions...done. Restoring from the backup image...
Restoration Completed!
Unmount normal mode partitions System Recovery Complete!
Reboot the system for changes to take effect. Proceed with reboot (y/n):
4 Type y.
The wireless controller will reboot. After the reboot, the wireless controller restores the backed up image with its original configuration.
Restoring from a Remote FTP Server
To restore from a remote FTP server: 1 On the Rescue menu, type 5.
The following menu is displayed:
1) Display Current Rescue Interface Info 2) Enter Interface Information
3) Change default gateway
4) Test interface by ICMP (ping) B) Return back to the top menu
2 Configure the Network Interface. Type in the Network Interface menu, and then type the following:
•
IP address of your wireless controller management port•
IP mask•
IP address of Gateway Your choice> 2Please enter Interface information Format <ip>:<netmask> <gw optional>
Input: 192.168.1.201:255.255.255.0 192.168.1.1 Configuring interface ...
Setting up network interface ...Done! 3 Type B to return to the top menu.
4 Type 4 in the top menu to configure the FTP settings. The FTP menu is displayed.
1) Enter FTP Settings
2) Change FTP server IP address 3) Change FTP port
4) Change user name 5) Change password 6) Change FTP directory 7) Change file name
8) Display current FTP settings 9) Display locally stored images 10) Download image from FTP server 11) Upload image onto the FTP server 12) Remove locally stored images B) Return back to the top menu Your choice: 1
Command syntax: ftp://<user>:<password>@<ftp_ip>:<port>/<directory&file> ~port information is optional: the default value is 21~
Please enter ftp info: 5 Type the FTP information.
ftp://administrator:[email protected]/tester/v6/backup-rescue-user.tgz 6 Type B to return to the top menu.
1) Force system recovery 2) Create System Backup Image 3) Display Backup Images 4) FTP Menu
6) Manually run File System Check Utility (fsck) 7) Restore Backup Image Directly From The FTP Server 8) Authentication Service Management Menu
9) Flash Menu R) Reboot Your choice: 7 Type 7.
The following message is displayed: Your choice: 7
Make sure correct information is entered for Interface and FTP settings. IP: 192.168.4.191 netmask 255.255.255.0 gateway:
FTP Settings: IP 192.168.4.181, port 21, user: administrator, password: abc123,
directory: /tester/v6/, file backup-rescue-user.tgz
This procedure is irreversible, do you wish to continue (Y/N)? 8 Type Y.
The wireless controller initiates the recovery process. 9 Reboot the wireless controller.
After the reboot, the wireless controller restores the backed up image with its original configuration.
Restoring the Rescue Image
The rescue image resides on the wireless controller’s hard disk in a separate partition called the rescue partition; the running software image is stored in the normal mode partition.
You can restore the rescue partition in the rare event that it becomes unavailable or corrupted (for example, because of a hardware disk hardware error or a power failure during upgrade). To restore the rescue partition, you must obtain a healthy rescue image and install it on the wireless controller. A healthy rescue image is available from one of the following locations:
•
The normal mode partition. A locally saved rescue image is delivered as part of the upgrade image and saved on the normal mode partition during the upgrade process.•
The Extreme Networks repository site. On the Extreme Networks repository site, one rescue image exists for each controller platform. The following table lists the file extension associated with each of the controller platforms. The file extension for the rescue image begins with the letter r to identify the file as a rescue image.Table 4: Rescue Image File Naming Conventions
Wireless Appliance Model Rescue File Extension
C5110 .rtxe
C5210 .rrue
C4110 .rgxe
C25 .rpfe
Table 4: Rescue Image File Naming Conventions (continued)
Wireless Appliance Model Rescue File Extension V2110 (VmWare platform) .rbge
V2110 (MS Hyper-V platform) .rize Note
Use the restore procedure in an emergency only when the rescue partition is not accessible. Restore commands are available in the CLI to administrators only; these commands are not listed when you enter the help command.
To Restore the Rescue Image:
1 Log into the CLI as administrator from the console or by using SSH. 2 List the locally saved rescue images by entering the command:
EWC.extremenetworks.com# show restore-rescue 1: rescue.rrue
If a rescue image exists, go to step 3; if no rescue images exist, skip to step 5.
3 To restore the rescue partition using the locally saved rescue image, enter the command: restore-rescue local imagefilename
For example, to restore from the locally saved rescue image, rescue.rrue, enter the command: EWC.extremenetworks.com# restore-rescue local rescue.rrue
4 To restore the rescue partition from any repository site:
a Download the appropriate rescue image to the locally accessible FTP server. Make sure that the rescue image you download matches the main image (platform and version). Table 4: Rescue Image File Naming Conventions on page 24 lists the platforms and the corresponding rescue image file extensions.
b Download the rescue image from the FTP server and install it into the controller by entering the following command:
restore-rescue ftp serveripuserpassworddirimagefilename
For example, to download the rescue image for the model C5210 controller from the FTP site and, as the user admin with the password abc123, install the rescue image,
AC-MV-09.01.01.0183-1.rrue, into the store directory, enter the following command:
EWC.extremenetworks.com# restore-rescue ftp 1.1.1.1 admin abc123 store/ AC-MV-09.01.01.0183-1.rrue
Restoring to Factory Default
To restore the system to a particular image with factory defaults, restore the system from rescue mode with the upgrade image as the restore image.
For example, if the system needs to be restored to factory default image V10.01, enter the rescue mode, follow the procedure to restore the backup image (as explained in Restoring the Backup Image from
Rescue Mode on page 21) and, instead of selecting the backup image, provide the upgrade image V10.01 (local, flash or download from FTP), and perform the restore. The system is restored to the V10.01 with factory default values.
Caution
Be aware that restoring a system to factory defaults means that the configuration is lost including the IP connectivity, certificates, and licenses. Restoring to factory default is possible only from rescue mode.
3
Configuration
Backing Up the Wireless Controller Configuration Uploading a Backup to a Server
Copying a Local Backup to Flash Scheduling a Backup
Deleting a Backup
Restoring the Wireless Controller Configuration Downloading a Backup File
Backing Up the Wireless Controller Configuration
Backing up the wireless controller database and creating a software package backup are two different processes. Backing up the wireless database only involves creating a backup of specific content in the wireless database. For example, you can choose to backup configuration, logs, or audit information. To create a backup image of your operating system, use the backup and restore functionality of the system.
Note
Configuration data for the wireless controller is saved in NVRAM (non-volatile memory). When you backup the wireless database, you can choose to do the following:
•
Back up the wireless database now•
Upload a backup to an FTP or SCP server or flash•
Schedule when a backup occurs•
Schedule a backup and copy it to an FTP or SCP server or flash NoteV2110 (MS Hyper-V platform) does not support flash functionality.
Working with a Portable and Text Editable Backup
When the controller database backup is processed, a .zip file is created. The contents of the .zip file will vary depending on what type of database backup you process.
If you process a configuration information backup, one of the files included in the .zip file is a .cli file. When the .zip file is stored on a server or flash, the .zip file contents can be extracted and the .cli file can be edited.
This editable .cli file when imported to the controller will reproduce the identical configuration from which the original configuration was generated. This editable .cli file provides an easy method for replicating identical configurations on multiple controllers. Below is a sample .cli file. The .cli file contains CLI commands, which will replicate the configuration that the backup was based on when the file is imported.
For information on how to import a backup onto the controller, see Restoring the Wireless Controller Configuration on page 32.
Note
Backup configurations saved in local storage are deleted during the upgrade. To preserve your backed up configurations, upload them to an external FTP or SCP server, or flash before performing the upgrade.
To Back Up the Wireless Database Using the GUI:
1 From the top menu, click Controller. The Wireless Controller Configuration screen is displayed. 2 From the left pane, click Administration > Software Maintenance.
3 Click the Backup tab.
The Available Backups list displays items that have already been backed up and are available. 4 In the Backup section:
•
click an item from the Select what to backup drop-down list.•
select Local or Flash from the Backup to drop-down list. 5 To launch the backup of the selected items, click Backup Now.The Software Maintenance window is displayed, providing the status and results of the backup.
Uploading a Backup to a Server
You can upload an existing backup file to a server using FTP (file transfer protocol) or SCP (secure copy protocol).
To Upload an Existing Backup to a Server Using the GUI:
1 From the top menu, click Controller. The Wireless Controller Configuration screen is displayed. 2 From the left pane, click Administration > Software Maintenance.
The EWC Software tab is displayed. 3 Click the Backup tab.
5 To upload a backup, do the following:
•
Protocol – Click the file transfer protocol you want to use to upload the backup file, SCP or FTP.•
Server – Type the IP address of the server where the backup will be uploaded.•
User ID – Type the user ID used to log into the server.•
Password – Type the corresponding password for the user ID.•
Confirm – Type the corresponding password for the user ID to confirm it was typed correctly.•
Directory – Type the directory on the server where the backup file will be stored.6 In the Filename drop-down list, click the backup you want to upload. 7 Click Copy.
The Software Maintenance window is displayed, providing the status and results of the operation.
Copying a Local Backup to Flash
You can copy an existing local backup file to a flash drive. To Copy an Existing Local Backup to a flash Using the GUI:
1 From the top menu, click Controller. The Wireless Controller Configuration screen is displayed. 2 From the left pane, click Administration > Software Maintenance.
The EWC Software tab is displayed. 3 Click the Backup tab.
4 Select Flash in Copy Selected Backup to. Flash has to be mounted for this. 5 In the Filename drop-down list, select the local backup you want to copy.
6 Click Copy. The Software Maintenance window is displayed, providing the status and results of the operation.
7 The backup copy located on flash is going to be displayed in Available Backups list as well. To Copy an Existing Local Backup to a flash Using the CLI:
8 Log into the system using SSH or console.
9 Transfer the backup file from the local storage to a flash using the following command: copy configuration (to-local | to-flash | to-remote serveruser dir [ftp password | scp password]) (from-local filename|number | from-flash filename| number | from-remote server user dir file [ftp password | scp password]) For example, to transfer the backup file BAK.03122009.071327.zip from local storage to a flash:
EWC.extremenetworks.com#copy configuration to-flash from-local BAK. 03122009.071327.zip
To see all backup files stored locally and on flash, use the show export command. EWC.extremenetworks.com#show export
1: BAK.03122009.071327.zip
Scheduling a Backup
When you schedule a backup, you can choose to upload the backup to a server, have the scheduled backup saved on your system or flash drive.
To Schedule a Backup:
1 From the top menu, click Controller.
The Wireless Controller Configuration screen is displayed. 2 From the left pane, click Administration > Software Maintenance.
The EWC Software tab is displayed. 3 Click the Backup tab.
4 Click Schedule Backups.
The Software Maintenance screen is displayed.
5 In the What to backup drop-down list, click what you want to backup:
•
Configs, CDRs, Logs and Audit•
Configurations only•
CDRs only•
Logs only•
Audit only6 In the Schedule task drop-down list, click the frequency of the backup:
•
Daily – Click the Start Time and Recurrence for the backup.•
Weekly – Click the Start Time and Recurrence for the backup.•
Monthly – Click the Start Time and Recurrence for the backup.•
Never – Click to disable schedule backup.8 If you select Remote (scheduling a backup to a remote server), specify a server to where the scheduled backup will be copied to. Do the following:
•
Protocol – Click the file transfer protocol you want to use to upload the backup file, SCP or FTP.•
Server – Type the IP address of the server to where the scheduled backup will be copied to.Note
The Server parameter supports both IPv4 and IPv6 addresses.
•
User ID – Type the user ID used to log into the server.•
Password – Type the corresponding password for the user ID.•
Confirm – Type the corresponding password for the user ID to confirm it was typed correctly.•
Directory – Type the directory on the server where the image file will be stored.9 To save your changes, click Save.
Deleting a Backup
You can delete a backup if it is no longer needed on your system or flash drive. To Delete a Backup Using the GUI:
1 From the top menu, click Controller.
The Wireless Controller Configuration screen is displayed. 2 From the left pane, click Administration > Software Maintenance.
The EWC Software tab is displayed. 3 Click the Backup tab.
4 In the Available Backups list, click the backup you want to delete. 5 Click Delete.
6 In the dialog box that is displayed, click OK to confirm the deletion.
The Software Maintenance window is displayed, providing the status and results of the deletion.
Restoring the Wireless Controller Configuration
To Restore the Configuration Using the GUI: 1 From the top menu, click Controller.
The Wireless Controller Configuration screen is displayed. 2 From the left pane, click Administration > Software Maintenance.
The EWC Software tab is displayed. 3 Click the Restore tab.
4 The Available Backups list displays available backup files for restore. 5 In the Restore section, Select a backup to restore.
7 The Software Maintenance window is displayed, providing the status and results of the restore.
To Restore the Configuration Using the CLI: 8 Log into the CLI using SSH or console.
9 View all backup files in local storage by using the show import command. EWC.extremenetworks.com#show import
1: EWC.03122009.071327.zip
10 Restore the configuration by using the import filename|number command. For example, to restore the backup file shown in the example under step 1:
EWC.extremenetworks.com#import EWC.03122009.071327.zip
To avoid typing the full name of the backup file, you can use the index number returned by the show import command.
The restore can be run directly from an imported file stored on flash. In this case, the string “(flash)” must be suffixed to the end of the specified file name.
EWC.extremenetworks.com#import 1
The command will restore the controller configuration to the configuration in the backup file.
Downloading a Backup File
You can download an existing backup file from a server using FTP (file transfer protocol) or SCP (secure copy protocol), or from flash to local storage.
To Download an Existing Backup from a Server Using the GUI: 1 From the top menu, click Controller.
The Wireless Controller Configuration screen is displayed. 2 From the left pane, click Administration > Software Maintenance.
The EWC Software tab is displayed. 3 Click the Restore tab.
4 Select a Remote under Copy Backup File From. 5 Enter values for the following:
•
Protocol — Select the file transfer protocol you want to use to download the backup file (SCP or FTP).•
Server — Type the IP address of the server from which the backup will be downloaded. NoteThe Server parameter supports both IPv4 and IPv6 addresses.
•
User ID — Type the user ID used to log into the server.•
Password — Type the corresponding password for the user ID.•
Confirm — Type the corresponding password for the user ID to confirm it was typed correctly.•
Directory — Type the directory on the server where the backup file is stored.•
Filename — Enter the name of the backup file you want to download.•
Destination — Define whether a file is transferred to local or flash from a remote server. 6 Click Copy.The Software Maintenance window is displayed, providing the status and results of the download. To Download an Existing Backup from a Server Using the CLI:
7 Log into the system using SSH or console.
8 Download the backup file from the FTP or SCP server using the following command:
EWC.extremenetworks.com#copy configuration (to-local | to-flash | to-remote serveruser dir [ftp password | scp password]) (from-local filename|number |
from-flash filename|number | from-remote server user dir file [ftp password | scp password])
For example, to download the backup file EWC.03122009.071327.zip locally from an SCP server: EWC.extremenetworks.com#copy configuration to-local from-remote
192.168.3.10 test conf_bak_dir EWC.03122009.071327.zip scp abc123
The command will download the file and store in the local storage.
To see all backup files stored in the local storage, use the show import command. EWC.extremenetworks.com#show import
1: EWC.03122009.071327.zip
To Copy an Existing Backup from a Flash to Local Storage Using the GUI: 9 From the top menu, click Controller.
10 From the left pane, click Administration > Software Maintenance. The EWC Software tab is displayed.
11 Click the Restore tab.
12 Select a source Flash under Copy Backup File From. Flash has to be mounted for this. 13 In the Filename drop-down list, click the backup you want to transfer.
14 Click Copy.
The Software Maintenance window is displayed, providing the status and results of the operation. The local backup copy is going to be displayed in Available Backups list as well.
To Copy an Existing Backup from a Flash to Local Storage Using the CLI: 15 Log into the system using SSH or console.
16 Copy the backup file from the local storage to flash using the following command:
EWC.extremenetworks.com#copy configuration (to-local | to-flash | to-remote serveruser dir [ftp password | scp password]) (from-local filename|number |
from-flash filename|number | from-remote server user dir file [ftp password | scp password])
For example, to copy the backup file BAK.03122009.071327.zip locally from a flash: EWC.extremenetworks.com#copy configuration to-local from-flash BAK. 03122009.071327.zip
To see all backup files stored locally and on flash, use the show import command. EWC.extremenetworks.com#show import
1: BAK.03122009.071327.zip
4
Convergence Software
Upgrading ProcessUpgrading Using the GUI Upgrading Using the CLI
Migrating the Platform Configuration
Upgrading Two Controllers in ‘Availability’ Mode
Upgrading Two Controllers in ‘Session Availability’ Mode
Upgrading Process
During the upgrade process, the upgrade program does the following:
•
Uninstalls the old version•
Installs the new version•
Preserves and migrates the configuration to the new version NoteV2110 (MS Hyper-V platform) does not support flash functionality. Note
When you upgrade the Wireless Controller Software, the previous SSL Configuration file is replaced by a new one. Consequently, the manual edits that were made in the previous SSL Configuration file are lost. If you have done manual edits to the SSL configuration file to install certificates for Captive Portal on the virtual interfaces, it is suggested to use EWC Captive Portal Certificate Configuration instead.
Upgrading to V10
If you are running a software version earlier than V9.01, you must first upgrade to V9 before upgrading to V10.
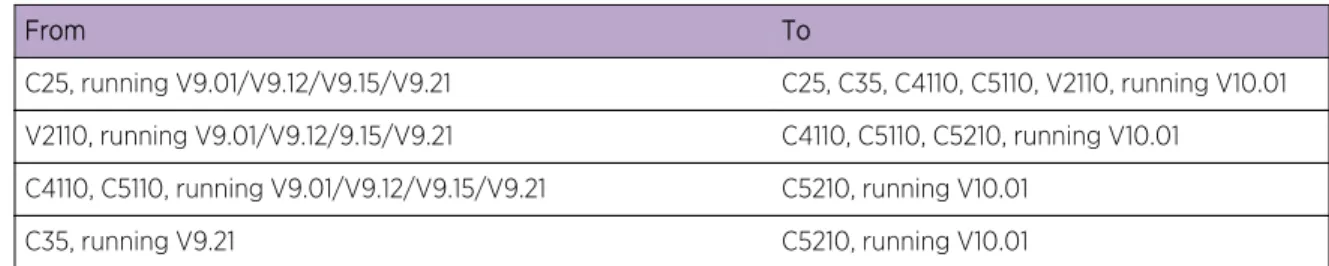
Upgrade Path Matrix to V9
Use the following matrix to determine the upgrade path to required version V9 that is appropriate for your wireless controller and the software running on it.
Table 5: Upgrade Matrix
Platform From To
C5110 V6R0 V6R1 FR5 (or higher FR)
V6R1 FR5 (or higher FR) V7.41 V7.0, V7.11, V7.21, V7.31 V7.41 V7.41, V8.01, V8.11, V8.21, V8.31 V8.32 V8.32, V9.01, V9.12, V9.15 V9.21
C4110 V6R1 V6R1 FR5 (or higher FR)
V6R1 FR5 (or higher FR) V7.41 V7.0, V7.11, V7.21, V7.31 V7.41 V7.41, V8.01, V8.11, V8.21, V8.31 V8.32 V8.32, V9.01, V9.12, V9.15 V9.21 C25 V7.41, V8.01, V8.11, V8.21, V8.31 V8.32
V8.32, V9.01, V9.12, V9.15 V9.21 V2110 V8.01, V8.11, V8.21, V8.31, V8.32, V9.01,
V9.12, V9.15
V9.21 C5210 V8.21, V8.31, V8.32, V9.01, V9.12, V9.15 V9.21
For information about migrating from one platform to another, see Migrating the Platform Configuration on page 45.
For information about upgrading controllers operating in “availability” mode, see Upgrading Two Controllers in ‘Availability’ Mode on page 47.
Upgrading the Image File Name
The format of the upgrade image file name is: AC-MV-<version>-<revision>.<platf>
•
version — version number (for example 08.00.00.0174)•
revision — software release number•
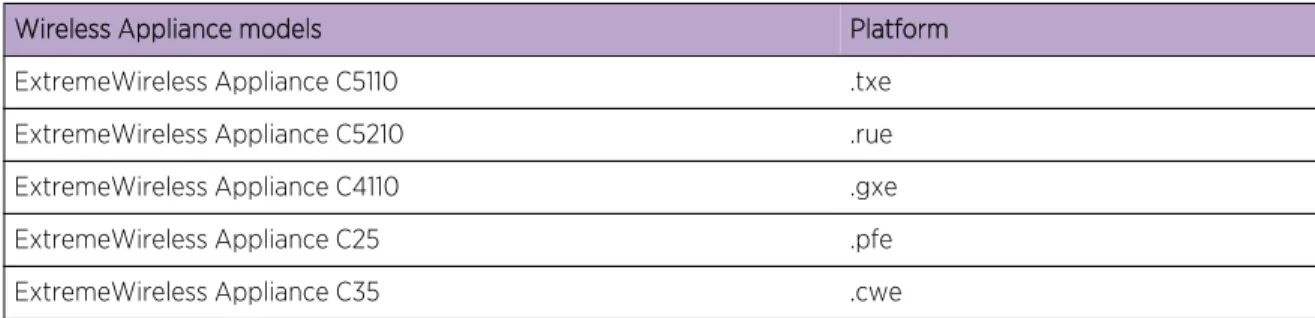
platf — is one of the values from the table belowTable 6: Upgrade File Name Extensions
Wireless Appliance models Platform
ExtremeWireless Appliance C5110 .txe ExtremeWireless Appliance C5210 .rue ExtremeWireless Appliance C4110 .gxe
ExtremeWireless Appliance C25 .pfe
Table 6: Upgrade File Name Extensions (continued)
Wireless Appliance models Platform
ExtremeWireless Virtual Appliance V2110 (VmWare platform) .bge ExtremeWireless Virtual Appliance V2110 (MS Hyper-V platform) .ize
Upgrading Using the GUI
Use the following procedure if you are upgrading using the GUI. Note
You should always backup the existing software image during the upgrade process. Backing up provides you the option of restoring your wirelss controller to its previous configuration. For more information, see Restoring the Backup Image from the GUI on page 18.
The wireless software provides two upgrade options:
•
Local – Upgrades the wireless software by using the image file that is located either on the local drive or USB device. This is the preferred method of upgrade.Note
Before starting the local upgrade, the image file needs to be downloaded to the local drive or a flash device has to be provided with the image file.
•
Remote – Upgrades the wireless software by using an image file that is located on an external FTP server. The upgrade program downloads the image file from the FTP server, unpacks it and installs it directly on the system without retaining a local copy of the image file.Note
The Wireless Assistant GUI displays Remote as the upgrade option for upgrade from a remote FTP server.
Upgrading Locally
When you upgrade locally, the upgrade program upgrades the wireless software by using the image file that is located either on the local drive or USB device.
To Perform a Local Upgrade of the wireless software: 1 From the top menu, click Controller.
2 From the left pane, click Administration > Software Maintenance. The EWC Software tab is displayed.
3 Select Local, and then click the image file you want to use from the list of upgrade files. Note
Multiple images may be listed: image files on the local drive, image files on the flash device (if a flash device is inserted), and image backup files (end with -rescue-user.tgz) if they exist on the local drive or flash device. Select the desired image. Image files use the AC-MV-<version>-<revision>.<platf> name format, as explained in Upgrading the Image File Name on page 37.
Note
Regardless of whether the upgrade image file is on the local drive or flash device, the wireless controller displays it in the list of upgrade files.
Caution
You should always backup the existing software image during the upgrade process. Backing up provides you the option of restoring your wireless controller to its previous configuration if needed. For more information, see Restoring the Backup Image from the GUI on page 18.
4 Select one of the following upgrade options:
•
To schedule a software upgrade, select the Schedule upgrade for option. The earliest you can schedule an upgrade is 5 minutes into the future.Use the Month, Day, Hour, and Minute drop-down lists to schedule the upgrade and then click Schedule upgrade.
Review the upgrade settings in the dialog box, and then click OK to confirm the upgrade settings. The EWC Software tab fields gray out.
Note
A scheduled upgrade is not a recurring event. The wireless controller allows only one Scheduled upgrade to be configured at a time.
•
To upgrade the software immediately, select the Upgrade now option. Click the Upgrade now button.Review the upgrade settings in the dialog box, and then click OK to confirm the upgrade settings. A window displays the upgrade status.
The wrireless controller reboots after the upgrade process is completed. Downloading the Remote Image File to the Local Drive or USB Device
To Download the Remote Image File to the Local Drive or USB Device: 1 From the top menu, click Controller.
The Wireless Controller Configuration screen is displayed. 2 From the left pane, click Administration > Software Maintenance.
3 Select Remote.
The FTP/SCP server boxes are displayed.
4 Type the following:
•
Protocol – FTP or SCP.•
Server – The IP address of the server to retrieve the image file from.•
User ID – The user ID used to log into the server.•
Password – The password for the user ID.•
Confirm – The password to log on to the server. This field is to confirm you have typed the correct password.•
Directory – The directory on the server in which the image file that is to be retrieved is stored.•
Filename – The name of the image file to retrieve.5 In the Destination drop-down list, click Local or Flash to specify where the image is downloaded to. 6 Click Get Image now.
The Download Image window is displayed, providing the status and results of the download. The image is downloaded onto your system and added to the Select upgrade list.
Note
SCP can only be used to download an image and cannot be used to start remote upgrade. The Upgrade now button is disabled when SCP is selected from the drop-down list.
Upgrading Remotely
When you upgrade the wireless software remotely, the upgrade program upgrades the software image by using the image file that is located on an external FTP server. The upgrade program downloads the image file from the FTP server, unpacks it and installs it directly on the system without retaining a local copy of the image file. The Wireless Assistant GUI displays Remote as the upgrade option for upgrade from a remote FTP server with FTP selected as the protocol.
Note
SCP can only be used to download an image and cannot be used to start remote upgrade. The Upgrade now button is disabled when SCP is selected from the drop-down list. Caution
You should always backup the existing software image during the upgrade process. Backing up provides you the option of restoring your controller to its previous configuration if needed. For more information, see Restoring the Backup Image from the GUI on page 18. Running the Upgrade from the FTP Server
To Run the Upgrade from the FTP Server Via the Wireless Assistant GUI: 1 From the top menu, click Controller.
The Wireless Controller Configuration screen is displayed. 2 From the left pane, click Administration > Software Maintenance.
The EWC Software tab is displayed. 3 Select Remote.
4 Type the following:
•
Protocol – FTP.•
Server – The IP address of the FTP server to retrieve the image file from.•
User ID – The user ID used to log into the FTP server.•
Password – The password for the user ID.•
Confirm – The password to log on to the FTP server. This field is to confirm you have typed the correct password.•
Directory – The directory on the server in which the image file that is to be retrieved is stored.•
Filename – The name of the image file to retrieve.5 To schedule a software upgrade, select the Schedule upgrade for option. The earliest you can schedule an upgrade is five minutes into the future.
a Use the Month, Day, Hour, and Minute drop-down lists to schedule the upgrade. b Click Schedule upgrade.
c Review the upgrade settings in the dialog box, and then click OK to confirm the upgrade settings. The EWC Software tab fields gray out.
Note
A scheduled upgrade is not a recurring event. The wireless controller only allows one scheduled upgrade to be configured at a time.
6 To upgrade the software immediately, select the Upgrade now option. a Click the Upgrade now button.
b Review the upgrade settings in the dialog box, and then click OK to confirm the upgrade settings. A window displays the upgrade status.
The wireless controller reboots after the upgrade process is completed.
Modifying a Scheduled Software Upgrade
To modify a scheduled software upgrade, you must first cancel the existing scheduled upgrade, and then reschedule a new upgrade.
To Modify a Scheduled Software Upgrade: 1 From the top menu, click Controller.
The Wireless Controller Configuration screen is displayed. 2 From the left pane, click Administration > Software Maintenance.
The EWC Software tab is displayed. 3 Click Cancel upgrade.
4 In the dialog box that is displayed, click OK to confirm the cancellation of the upgrade. The scheduled software upgrade is cancelled and the EWC Software tab fields become available for scheduling a new software upgrade.
Deleting a Software Image
To Delete a Software Upgrade:
1 From the top menu, click Controller.
The Wireless Controller Configuration screen is displayed. 2 From the left pane, click Administration > Software Maintenance.
The EWC Software tab is displayed.
3 In the Select upgrade list, click the software upgrade you want to delete. 4 Click Delete selected.
5 In the dialog box that is displayed, click OK to confirm the deletion of the upgrade. The Software Maintenance window is displayed, providing the status and results of the deletion.
Upgrading Using the CLI
Note
The first step to upgrade the software is to backup the image of the existing software release. For more information, see Backing Up and Restoring the Image on page 10.
To Upgrade the Wireless Software Locally:
1 Use the copy upgrade serveruser dir file [dest] [scp scp password] command to download the software upgrade bundle from the remote FTP or SCP server.
•
If you want to download the file on the controller flash device, type flash for dest option in thecopy upgrade serveruserdirfile [dest] syntax.
•
If you want to download the file on the controller local drive, leave out the [dest] option in the copy upgrade serveruserdirfile [dest] syntax.•
If you want to download the file from the SCP server, provide the corresponding SCP server, user, dir and file appended with scpscp password.•
If you want to download the file from the FTP server do not specify scpscp password at theend, where server, user, dir and file will specify FTP server parameters.
Example 1 – In the following example, the CLI command states that the upgrade file will be downloaded from the FTP server to the flash card.
EWC.extremenetworks.com# copy upgrade 192.168.4.10 test system/images/ AC-MV-08.00.01.0003-1.pfe flash
Example 2 – In the following example, the CLI command states that the upgrade file will be downloaded from the FTP server to the controller local drive.
EWC.extremenetworks.com# copy upgrade 192.168.4.10 test system/images/ AC-MV-08.00.00.0123-1.pfe
Example 3 – In the following example, the CLI command states that the upgrade file will be downloaded from the SCP server to the flash card.
EWC.extremenetworks.com# copy upgrade 192.168.4.10 test system/images AC-MV-08.31.01.0200-1.rue flash scp TestPassword