Virtualization Guide
Virtualization Guide: Red Hat Virtualization
Copyright©2007 Red Hat, Inc.
This Guide contains information on configuring, creating and monitoring guest operating sys-tems on Red Hat Enterprise Linux 5, using virsh, xm, vmm and xend.
1801 Varsity Drive Raleigh, NC 27606-2072 USA Phone: +1 919 754 3700 Phone: 888 733 4281 Fax: +1 919 754 3701 PO Box 13588
Research Triangle Park, NC 27709 USA
Documentation-Deployment
Copyright©2007 by Red Hat, Inc. This material may be distributed only subject to the terms and conditions set forth in the Open Publication License, V1.0 or later (the latest version is presently available at
ht-tp://www.opencontent.org/openpub/).
Distribution of substantively modified versions of this document is prohibited without the explicit permission of the copy-right holder.
Distribution of the work or derivative of the work in any standard (paper) book form for commercial purposes is prohib-ited unless prior permission is obtained from the copyright holder.
Red Hat and the Red Hat "Shadow Man" logo are registered trademarks of Red Hat, Inc. in the United States and other countries.
All other trademarks referenced herein are the property of their respective owners. The GPG fingerprint of the [email protected] key is:
Table of Contents
1. Red Hat Virtualization System Architecture ... 1
2. Operating System Support ... 3
3. Hardware Support ... 5
4. Red Hat Virtualization System Requirements ... 7
5. Booting the System ... 8
6. Configuring GRUB ... 9
7. Booting a Guest Domain ...11
8. Starting/Stopping a Domain at Boot Time ...12
9. Configuration Files ...13
10. Managing CPUs ...14
11. Migrating a Domain ...15
12. Configuring for Use on a Network ...16
13. Securing Domain0 ...17
14. Storage ...18
15. Managing Virtual Machines with virsh ...19
1. Connecting to a Hypervisor ...19
2. Creating a Virtual Machine ...19
3. Configuring an XML Dump ...19
4. Suspending a Virtual Machine ...19
5. Resuming a Virtual Machine ...20
6. Saving a Virtual Machine ...20
7. Restoring a Virtual Machine ...20
8. Shutting Down a Virtual Machine ...20
9. Rebooting a Virtual Machine ...20
10. Terminating a Domain ...21
11. Converting a Domain Name to a Domain ID ...21
12. Converting a Domain ID to a Domain Name ...21
13. Converting a Domain Name to a UUID ...21
14. Displaying Virtual Machine Information ...21
15. Displaying Node Information ...22
16. Displaying the Virtual Machines ...22
17. Displaying Virtual CPU Information ...22
18. Configuring Virtual CPU Affinity ...23
19. Configuring Virtual CPU Count ...23
20. Configuring Memory Allocation ...23
21. Configuring Maximum Memory ...23
16. Managing Virtual Machines Using xend ...24
17. Managing Virtual Machines Using xm ...27
1. xm Configuration File ...27
1.1. Configuring vfb ...28
2. Creating and Managing Domains with xm ...29
2.1. Connecting to a Domain ...29
2.2. Creating a Domain ...30
2.3. Saving a Domain ...30
2.5. Shutting Down a Domain ...30 2.6. Restoring a Domain ...30 2.7. Suspending a Domain ...30 2.8. Resuming a Domain ...31 2.9. Rebooting a Domain ...31 2.10. Renaming a Domain ...31 2.11. Pausing a Domain ...31 2.12. Unpausing a Domain ...31
2.13. Converting a Domain Name to Domain ID ...31
2.14. Converting a Domain ID to Domain Name ...31
2.15. Configuring Memory Allocation ...32
2.16. Configuring Maximum Memory ...32
2.17. Configuring VCPU Count ...32
2.18. Pinning a VCPU ...32
2.19. Migrating a Domain ...33
3. Monitoring and Diagnostics ...33
3.1. Performing a Core Dump ...33
3.2. Monitoring Domains in Real Time ...33
3.3. Displaying Domain States ...33
4. Displaying Uptime ...34
5. Displaying VCPU Information ...34
6. Displaying Domain Information ...35
7. Displaying TPM Devices ...35
8. Displaying the xend Log ...35
9. Displaying the Message Buffer ...36
10. Displaying ACM State Information ...36
11. Displaying Vnets ...36
12. Displaying Virtual Block Devices ...36
13. Displaying Virtual Network Interfaces ...36
14. Creating a New Virtual Network Device ...36
15. Terminating a Virtual Network Device ...37
16. Creating a New Vnet ...37
17. Terminating a Vnet ...37
18. Creating a Domain Security Label ...38
19. Testing the Domain Resources ...38
20. Displaying System Resources ...38
21. Configuring Credit Scheduling ...38
22. Creating a New Virtual Block Device ...38
23. Terminating a Virtual Block Device ...39
24. Security ...39
24.1. Removing a Domain Security Label ...39
24.2. Creating a Resource Security Label ...39
24.3. Removing a Resource Security Label ...39
24.4. Configuring Access Control ...40
24.5. Creating a Policy ...40
24.6. Loading a Policy ...40
24.7. Creating a Policy for Boot Configuration ...41
24.8. Creating a Label ...41
24.9. Displaying Policy Labels ...41
24.10. Displaying Domain Security Labels ...41 Virtualization Guide
24.11. Displaying Resource Security Labels ...41
24.12. Configuring Access Control Secuirty ...41
24.13. Compiling a Security Policy ...42
24.14. Loading the Security Policy ...42
24.15. Configuring a Boot Security Policy ...42
24.16. Displaying Security Labels ...42
24.17. Attaching a Security Label ...42
18. Managing Virtual Machines with Virtual Machine Manager ...44
1. Virtual Machine Manager Architecture ...44
2. The Open Connection Window ...44
3. Virtual Machine Manager Window ...45
4. Virtual Machine Details Window ...45
5. Virtual Machine Graphical Console ...46
6. Starting the Virtual Machine Manager ...47
7. Creating a New Virtual Machine ...48
8. Restoring A Saved Machine ...57
9. Displaying Virtual Machine Details ...59
10. Configuring Status Monitoring ...62
11. Displaying Domain ID ...64
12. Displaying Virtual Machine Status ...65
13. Displaying Virtual CPUs ...67
14. Displaying CPU Usage ...68
15. Displaying Memory Usage ...69
19. Red Hat Virtualization Troubleshooting ...71
1. Logfile Overview and Locations ...71
2. Logfile Descriptions ...71
3. Important Directory Locations ...72
4. Troubleshooting Tools ...72
5. Troubleshooting with the Logs ...74
6. Troubleshooting with the Serial Console ...74
7. Paravirtualized Guest Console Access ...75
8. Full Virtualization Guest Console Access ...75
9. Implementing Lun Persistence ...75
10. SELinux Considerations ...77
11. Accessing Data on Guest Disk Image ...77
12. Common Troubleshooting Situations ...78
13. Loop Device Errors ...78
14. Guest Creation Errors ...79
15. Serial Console Errors ...79
16. Network Bridge Errors ...79
17. Laptop Configurations ...81
18. Starting Domains Automatically During System Boot ...82
19. Modifying Domain0 ...83
20. Guest Configuration Files ...83
21. Cloning the Guest Configuration Files ...84
22. Creating a Script to Generate MAC Addresses ...84
23. Configuring Virtual Machine Live Migration ...85
24. Interpreting Error Messages ...86
25. Online Troubleshooting Resources ...88
20. Additional Resources ...89 Virtualization Guide
1. Useful Websites ...89
2. Installed Documentation ...89
A. Lab 1 ...90
B. Lab 2 ...95 Virtualization Guide
Chapter 1. Red Hat Virtualization
System Architecture
A functional Red Hat Virtualization system is multi-layered and is driven by the privileged Red Hat Virtualization component. Red Hat Virtualization can host multiple guest operating systems. Each guest operating system runs in its own domain, Red Hat Virtualization schedules virtual CPUs within the virtual machines to make the best use of the available physical CPUs. Each guest operating systems handles its own applications. These guest operating systems schedule each application accordingly.
You can deploy Red Hat Virtualization in one of two choices: full virtualization or
paravirtual-ization. Full virtualization provides total abstraction of the underlying physical system and
cre-ates a new virtual system in which the guest operating systems can run. No modifications are needed in the guest OS or application (the guest OS or application is not aware of the virtual-ized environment and runs normally). Paravirualization requires user modification of the guest operating systems that run on the virtual machines (these guest operating systems are aware that they are running on a virtual machine) and provide near-native performance. You can de-ploy both paravirtualization and full virtualization across your virtualization infrastructure. The first domain, known as domain0 (dom0), is automatically created when you boot the sys-tem. Domain0 is the privileged guest and it possesses management capabilities which can cre-ate new domains and manage their virtual devices. Domain0 handles the physical hardware, such as network cards and hard disk controllers. Domain0 also handles administrative tasks such as suspending, resuming, or migrating guest domains to other virtual machines.
The hypervisor (Red Hat's Virtual Machine Monitor) is a virtualization platform that allows mul-tiple operating systems to run on a single host simultaneously within a full virtualization environ-ment. A guest is an operating system (OS) that runs on a virtual machine in addition to the host or main OS.
With Red Hat Virtualization, each guests memory comes from a slice of the host's physical memory. For paravirtual guests, you can set both the initial memory and the maximum size of the virtual machine. You can add (or remove) physical memory to the virtual machine at runtime without exceeding the maximum size you specify. This process is called ballooning.
You can configure each guest with a number of virtual cpus (called vcpus). The Virtual Machine Manager schedules the vcpus according to the workload on the physical CPUs.
You can grant a guest any number of virtual disks. The guest sees these as either hard disks or (for full virtual guests) as CD-ROM drives. Each virtual disk is served to the guest from a block device or from a regular file on the host. The device on the host contains the entire full disk image for the guest, and usually includes partition tables, multiple partitions, and potentially LVM physical volumes.
Virtual networking interfaces runs on the guest. Other interfaces can run on the guest like
vir-tual ethernet internet cards (VNICs). These network interfaces are configured with a persistent virtual media access control (MAC) address. The default installation of a new guest installs the VNIC with a MAC address selected at random from a reserved pool of over 16 million
ad-dresses, so it is unlikely that any two guests will receive the same MAC address. Complex sites with a large number of guests can allocate MAC addresses manually to ensure that they remain unique on the network.
Each guest has a virtual text console that connects to the host. You can redirect guest logins and console output to the text console.
You can configure any guest to use a virtual graphical console that corresponds to the normal video console on the physical host. You can do this for full virtual and paravirtual guests. It em-ploys the features of the standard graphic adapter like boot messaging, graphical booting, mul-tiple virtual terminals, and can launch the x window system. You can also use the graphical key-board to configure the virtual keykey-board and mouse.
Guests can be identified in any of three identities: domain name (domain-name), identity (domain-id), or UUID. The domain-name is a text string that corresponds to a guest configura-tion file. The domain-name is used to launch the guests, and when the guest runs the same name is used to identify and control it. The domain-id is a unique, non-persistent number that gets assigned to an active domain and is used to identify and control it. The UUID is a persist-ent, unique identifier that is controlled from the guest's configuration file and ensures that the guest is identified over time by system management tools. It is visible to the guest when it runs. A new UUID is automatically assigned to each guest by the system tools when the guest first in-stalls.
Chapter 2. Operating System
Support
Red Hat Virtualization's paravirtualization mode allows you to utilize high performance virtualiza-tion on architectures that are potentially difficult to virtualize such as x86 based systems. To de-ploy para-virtualization across your operating system(s), you need access to the paravirtual guest kernels that are available from a respective Red Hat distro (for example, RHEL 4.0, RHEL 5.0, etc.). Whilst your operating system kernels must support Red Hat Virtualization, it is not ne-cessary to modify user applications or libraries.
Red Hat Virtualization allows you to run an unmodified guest kernel if you have Intel VT and AMD SVM CPU hardware. You do not have to port your operating system to deploy this archi-tecture on your Intel VT or AMD SVM systems. Red Hat Virtualization supports:
• Intel VT-x or AMD-V Pacifica and Vanderpool technology for full and paravirtualization. • Intel VT-i for ia64
• Linux and UNIX operating systems, including NetBSD, FreeBSD, and Solaris.
• Microsoft Windows as an unmodified guest operating system with Intel Vanderpool or AMD's Pacifica technology.
To run full virtualization guests on systems with Hardware-assisted Virtual Machine (HVM), In-tel, or AMD platforms, you must check to ensure your CPUs have the capabilities needed to do so.
To check if you have the CPU flags for Intel support, enter the following:
grep vmx /proc/cpuinfo
The output displays:
flags : fpu tsc msr pae mce cx8 apic mtrr mca cmov pat pse36 clflush dts acpi mmx fxsr sse sse2 ss ht tm syscall nx lm constant_tsc pni monitor ds_cpl vmx est tm2 cx16 xtpr lahf_lm
If a vmx flag appears then you have Intel support.
To check if you have the CPU flags for AMD support, enter the following:
grep svm /proc/cpuinfo cat /proc/cpuinfo | grep vmx
The output displays:
flags : fpu tsc msr pae mce cx8 apic mtrr mca cmov pat pse36 clflush dt acpi mmx fxsr sse sse2 ss ht tm syscall nx mmtext fxsr_opt rdtscp lm 3dnowext pni cx16 lahf_lm cmp_legacy svm cr8_legacy
note
In addition to checking the CPU flags, you should enable full virtualization within your system BIOS.
Chapter 3. Hardware Support
Red Hat Virtualization supports multiprocessor systems and allows you can run Red Hat Virtual-ization on x86 architectured systems with a P6 class (or earlier) processors like:
• Celeron • Pentium II • Pentium III • Pentium IV • Xeon • AMD Athlon • AMD Duron
With Red Hat Virtualization, 32-bit hosts runs only 32-bit paravirtual guests. 64-bit hosts runs only 64-bit paravirtual guests. And a 64-bit full virtualization host runs 32-bit, 32-bit PAE, or 64-bit guests. A 32-bit full virtualization host runs both PAE and non-PAE full virtualization guests.
The Red Hat Enterprise Linux Virtualization kernel does not support more than 32GB of memory for x86_64 systems. If you need to boot the virtualization kernel on systems with more than 32GB of physical memory installed, you must append the kernel command line withmem=32G.
This example shows how to enable the proper parameters in thegrub.conffile:
title Red Hat Enterprise Linux Server (2.6.18-4.elxen) root (hd0, 0)
kernel /xen.gz-2.6.18-4-el5 mem=32G
module /vmlinuz -2.6.18-4.el5xen ro root=LABEL=/ module /initrd-2.6.18-4.el5xen.img
PAE (Physical Address Extension) is a technology that increases the amount of physical or vir-tual memory available to user applications. Red Hat Virvir-tualization requires that PAE is active on your systems. Red Hat Virtualization 32 bit architecture with PAE supports up to 16 GB of phys-ical memory. It is recommended that you have at least 256 megabytes of RAM for every guest you have running on the system. Red Hat Virtualization enables x86/64 machines to address up to physical 64 GB. The Red Hat Virtualization kernels will not run on a non-PAE system. To de-termine if a system supports PAE, type the following commands:
grep pae /proc/cpuinfo
The following output displays:
flags : fpu tsc msr pae mce cx8 apic mtrr mca cmov pat pse36 mmx fxsr sse syscall mmtext 3dnowext 3dnow up ts
Chapter 4. Red Hat Virtualization
System Requirements
The items listed below are required by the Red Hat Virtualization system:
• A working Red Hat RHEL 5 Linux distribution • A working GRUB bootloader
• Root access
• A P6 class (or earlier) processor • The Linux bridge-utils
• The Linux hotplug systems • zlib development installation • Python 2.2 runtime
• initscripts
Chapter 5. Booting the System
After installing the Red Hat Virtualization components, you must reboot the system. When the boot completes, you must log into your system as usual. Then before you start Red Hat Virtual-ization you must log in a root. The xend control daemon should already be initiated byinitscripts, but to start the xend manually, enter:
service xend start
You can also usechkconfig xendwhen installing to enablexendat boot time.
The xend node control daemon performs system management functions that relate to virtual machines. This daemon controls the virtualized resources, and xend must be running to interact with virtual machines. Before you start xend, you must specify the operating parameters by edit-ing the xend configuration file xend-config.sxp which is located in the etc/xen directory.
Chapter 6. Configuring GRUB
GNU Grand Unified Boot Loader (or GRUB) is a program which enables the user to select which installed operating system or kernel to load at system boot time. It also allows the user to pass arguments to the kernel. The GRUB configuration file (located in/boot/grub/grub.conf) isused to create a list of operating systems to boot in GRUB's menu interface. When you install the kernel-xen RPM, a post script adds kernel-xen entries to the GRUB configuration file. You can edit thegrub.conffile and enable the following GRUB parameter:
title Red Hat Enterprise Linux Server (2.6.18-3.el5xen) root (hd0; 0)
kernel /xen.gz.-2.6.18-3.el5
module /vmlinuz-2.6..18-3.el5xen ro root=/dev/VolGroup00/LogVol00 rhgb quiet module /initrd-2.6.18-3. el5xenxen.img
If you set your Linux grub entries to reflect this example, the boot loader loads the hypervisor,
initrd image, and Linux kernel. Since the kernel entry is on top of the other entries, the kernel
loads into memory first. The boot loader sends (and recieves) command line arguments to and from the hypervisor and Linux kernel. This example entry shows how you would restrict the Do-main0 linux kernel memory to 800 MB:
title Red Hat Enterprise Linux Server (2.6.18-3.el5xen) root (hd0; 0)
kernel /xen.gz.-2.6.18-3.el5 dom0_mem=800M
module /vmlinuz-2.6..18-3.el5xen ro root=/dev/VolGroup00/LogVol00 rhgb quiet module /initrd-2.6.18-3. el5xenxen.img
You can use these GRUB parameters to configure the Virtualization hypervisor:
mem
This limits the amount of memory that is available for domain0.
com1=115200, 8n1
This enables the first serial port in the system to act as serial console (com2 is assigned for the next port, and so on...).
dom0_mem
This limits the amount of memory that is available for domain0.
dom0_max_vcpus
This limits the amount of CPUs visible to domain0.
This switches the ACPI hypervisor to the hypervisor and domain0. The ACPI parameter options include:
/* **** Linux config options: propagated to domain0 ****/
/* "acpi=off": Disables both ACPI table parsing and interpreter. */ /* "acpi=force": Overrides the disable blacklist. */ /* "acpi=strict": Disables out-of-spec workarounds. */ /* "acpi=ht": Limits ACPI from boot-time to enable HT. */ /* "acpi=noirq": Disables ACPI interrupt routing. */
noacpi
Chapter 7. Booting a Guest Domain
You can boot guest domains by using thexmapplication. You can also usevirshand the VirtualMachine Manager to boot the guests. A prerequisite for booting a guest domain is to install a guest host first. This example uses thexmcreate subcommand:
# xm create -c guestdomain1
Theguestdomain1is the configuration file for the domain you are booting. The-c option
Chapter 8. Starting/Stopping a
Domain at Boot Time
You can start or stop running domains at any time. Domain0 waits for all running domains to shutdown before restarting. You must place the configuration files of the domains you wish to shut down in the/etc/xen/ directory. All the domains that you want to start at boot time must be
symlinked to/etc/xen/auto.
chkconfig xendomains on
Thechkconfig xendomains on command does not automatically start domains; instead it will
start the domains on the next boot.
chkconfig xendomains off
Terminates all running Red Hat Virtualization domains. Thechkconfig xendomains off
Chapter 9. Configuration Files
Red Hat Virtualization configuration files contain the following standard variables. Configuration items within these files must be enclosed in quotes ("). These configuration files reside in the/ etc/xen directory.
Item Description
pae Specifies the physical address extention
con-figuration data.
apic Specifies the advanced programmable
inter-rupt controller configuration data.
memory Specifies the memory size in megabytes.
vcpus Specifies the numbers of virtual CPUs.
console Specifies the port numbers to export the
do-main consoles to.
nic Specifies the number of virtual network
inter-faces.
vif Lists the randomly-assigned MAC addresses
and bridges assigned to use for the domain's network addresses.
disk Lists the block devices to export to the
do-main and exports physical devices to dodo-main with read only access.
dhcp Enables networking using DHCP.
netmask Specifies the configured IP netmasks.
gateway Specifies the configured IP gateways.
acpi Specifies the advanced configuration power
interface configuration data.
Chapter 10. Managing CPUs
Red Hat Virtualization allows a domain's virtual CPUs to associate with one or more host CPUs. This can be used to allocate real resources among one or more guests. This approach allows Red Hat Virtualization to make optimal use of processor resources when employing dual-core, hyperthreading, or other advanced CPU technologies. If you are running I/O intensive tasks, its typically better to dedicate either a hyperthread or entire core to run domain0. The Red Hat Vir-tualization credit scheduler automatically rebalances virtual cpus between physical ones, to maximize system use. The Red Hat Virtualization system allows the credit scheduler to move CPUs around as necessary, as long as the virtual CPU is pinned to a physical CPU.
Chapter 11. Migrating a Domain
Migration is the transferal of a running virtual domain from one physical host to another. Red Hat Virtualization supports two varieties of migration — offline and live. Offline migration moves a virtual machine from one host to another by pausing it, transferring its memory, and then re-suming it on the host destination. Live migration does the same thing, but does not directly af-fect the domain. When performing a live migration, the domain continues its usual activities, and from the user perspective is unnoticeable. To initiate a live migration, both hosts must be run-ning Red Hat Virtualization and the xend daemon. The destinations host must have sufficient re-sources (such as memory capacity) to accommodate the domain bandwidth after the migration. Both the source and destination machines must have the same architecture and virtualization extensions (such as i386-VT, x86-64-VT, x86-64-SVM, etc.) and must be on the same L2 sub-net.When a domain migrates its MAC and IP addresses move with it. Only virtual machines with the same layer-2 network and subnets will successfully migrate. If the destination node is on a dif-ferent subnet, the administrator must manually configure a suitable EtherIP or IP tunnel in the remote node of domain0. The xend daemon stops the domain and copies the job over to the new node and restarts it. The Red Hat Virtualization RPM does not enable migration from any other host except the localhost (see the /etc/xend-config.sxp file for information). To allow the migration target to accept incoming migration requests from remote hosts, you must modify the target's xen-relocation-hosts-allow parameter. Be sure to carefully restrict which hostsare al-lowed to migrate, since there is no authentication.
Since these domains have such large file allocations, this process can be time consuming. If you migrate a domain with open network connections, they will be preserved on the host destin-ation, and SSH connections should still function. The default Red Hat Virtualization iptables rules will not permit incoming migration connections. To allow this, you must create explicit ipt-ables rules.
You can use the xm migrate command to perform an offline migration :
xm migrate domain-id [destination domain]
You can use the xm migrate command to perform a live migration:
xm migrate domain-id -l [destination domain]
You may need to reconnect to the domain's console on the new machine. You can use the xm console command to reconnect.
Chapter 12. Configuring for Use on a
Network
Integrating Red Hat Virtualization into your network architecture is a complicated process and depending upon your infrastructure, may require custom configuration to deploy multiple ether-net interfaces and setup bridging.
Each domain network interface is connected to a virtual network interface indom0by a point to
point link. These devices arevif<domid>and<vifid>.vif1.0for the first interface in domain 1; vif3.1 for the second interface in domain 3.
Domain0 handles traffic on these virtual interfaces by using standard Linux conventions for bridging, routing, rate limiting, etc. The xend daemon employs two shell scripts to perform initial configuration of your network and new virtual interfaces. These scripts configure a single bridge for all virtual interfaces. You can configure additional routing and bridging by customizing these scripts.
Red Hat Virtualization's virtual networking is controlled by the two shell scripts,network-bridge
andvif-bridge. xend calls these scripts when certain events occur. Arguments can be passed
to the scripts to provide additional contextual information. These scripts are located in the/ etc/xen/scriptsdirectory. You can change script properties by modifying the xend-config.sxp
configuration file located in the/etc/xendirectory.
network-bridge— When xend is started or stopped, this script initializes or shuts down the
vir-tual network. Then the configuration initialization creates the bridgexen—br0and moveseth0
onto that bridge, modifying the routing accordingly. When xend finally exits, it deletes the bridge and removeseth0, thereby restoring the original IP and routing configuration.
vif-bridgeis a script that is invoked for every virtual interface on the domain. It configures
fire-wall rules and can add thevifto the appropriate bridge.
There are other scripts that you can use to help in setting up Red Hat Virtualization to run on your network, such asnetwork-route,network-nat,vif-route,andvif-nat. Or these scripts can
Chapter 13. Securing Domain0
When deploying Red Hat Virtualization on your corporate infrastructure, you must ensure that domain0 cannot be compromised. Domain0 is the privileged domain that handles system man-agement. If domain0 is insecure, all other domains in the system are vulnerable. There are sev-eral ways to implement security you should know about when integrating Red Hat Virtualization into your systems. Together with other people in your organization,you should createa'deployment plan' that contains the operating specifications and services that will run on Red Hat Virtualization, and what is needed to support these services. Here are some security issues to consider when putting together a deployment plan:
• Run the lowest number of necessary services. You do not want to include too many jobs and services in domain0. The less things running on domain0, the higher the level of security. • Enable SeLINUX to help secure domain0.
• Use a firewall to restrict traffic to domain0. You can setup a firewall with default-reject rules that will help secure attacks on domain0. It is also important to limit network facing services. • Do not allow normal users to access domain0. If you do permit normal users domain0
ac-cess, you run the risk of rendering domain0 vulnerable. Remember, domain0 is privileged, and granting unprivilged accounts may compromise the level of security.
Chapter 14. Storage
There are several ways to manage virtual machine storage. You can export a domain0 physical block device (hard drive or partition) to a guest domain as a virtual block device (VBD). You can also export directly from a partitioned image as a file-backed VBD. Red Hat Virtualization en-ables LVM and blktap by default during installation. You can also employ standard network pro-tocols such as NFS, CLVM, or iSCSI to provide storage for virtual machines.
Chapter 15. Managing Virtual
Machines with virsh
You can use the virsh application to manage virtual machines. This utility is built around the lib-virt management API and operates as an alternative to the xm tool or the graphical Virtual Ma-chine Manager. Unprivileged users can employ this utility for read-only operations. If you plan on runningxend/qemu, you should enablexend/qemuto run as a service. After modifying the
re-spective configuration file, reboot the system, andxend/qemu will run as a service. You can use
virsh to script vm work. Like the xm tool, you run virsh from the command line.
1. Connecting to a Hypervisor
You can use virsh to initiate a hypervisor session:
virsh connect <name>
Where<name>is the machine name of the hypervisor. If you want to initiate a read—only
con-nection, append the above command with—readonly.
2. Creating a Virtual Machine
You can make a new virtual machine session from an XML machine definition. If you have a pre-existing guest that you created previously with the xm tool, you can also create a virtual ma-chine for it:
virsh create <path to XML configuration file>
3. Configuring an XML Dump
You can use virsh to perform a data dump for an existing virtual machine.
virsh dumpxml [domain-id | domain-name | domain-uuid]
This command outputs the domain information (in XML) tostdout . If you save the data to a file,
you can use thecreateoption to recreate the virtual machine.
4. Suspending a Virtual Machine
You can use virsh to suspend a domain:
virsh suspend [domain-id | domain-name |domain-uuid]
disk or network I/O when suspended. This operation is immediate and the virtual machine must be restarted with theresumeoption .
5. Resuming a Virtual Machine
You can use virsh to restore a suspended virtual machine:
virsh resume [domain-id | domain-name | domain-uuid]
This operation is immediate and the virtual machine parameters are preserved in asuspend and resume cycle.
6. Saving a Virtual Machine
You can use virsh to save the current state of a virtual machine to a file:
virsh save [domain-name][domain-id | domain-uuid][filename]
This stops the virtual machine you specify and saves the data to a file, which may take some time given the amount of memory in use by your virtual machine. You can restore the state of the virtual machine with therestoreoption .
7. Restoring a Virtual Machine
You can use virsh to restore a virtual machine that you previously saved with thevirsh save
option :
virsh restore [filename]
This restarts the saved virtual machine, which may take some time. The virtual machine's name and UUID are preserved but are allocated for a new id.
8. Shutting Down a Virtual Machine
You can use virsh to shut down a virtual machine:
virsh shutdown [domain-id | domain-name | domain-uuid]
You can control the behavior of the rebooting virtual machine by modifying theon_shutdown
parameter of thexmdomain.cfgfile.
9. Rebooting a Virtual Machine
You can use virsh to reboot a virtual machine:
virsh reboot [domain-id | domain-name | domain-uuid]
You can control the behavior of the rebooting virtual machine by modifying theon_reboot
para-meter of thexmdomain.cfg file.
10. Terminating a Domain
You can use virsh to terminate a virtual machine:
virsh destroy [domain-name | domain-id | domain-uuid]
This command does an immediate ungraceful shutdown and stops any guest domain sessions (which could potentially lead to file corruptted filesystems still in use by the virtual machine). You should use thedestroyoption only when the virtual machine's operating system is
non-responsive. For a paravirtualized virtual machine, you should use theshutdown option .
11. Converting a Domain Name to a Domain
ID
You can use virsh to convert a domain name or UUID to a domain id:
virsh domid [domain-name | domain-uuid]
12. Converting a Domain ID to a Domain
Name
You can use virsh to convert a domain id or UUID to a domain name:
virsh domname [domain-name | domain-uuid]
13. Converting a Domain Name to a UUID
You can use virsh to convert a domain name to a UUID:
virsh domuuid [domain-id | domain-uuid]
14. Displaying Virtual Machine Information
You can use virsh to display information for a given virtual machine identified by its domain ID, domain name, or UUID:
virsh dominfo [domain-id | domain-name | domain-uuid]
15. Displaying Node Information
You can use virsh to display node information:
virsh nodeinfo
The outputs displays something similar to:
CPU model x86_64
CPU (s) 8
CPU frequency 2895 Mhz CPU socket(s) 2
Core(s) per socket 2 Threads per core: 2 Numa cell(s) 1
Memory size: 1046528 kb
This displays the node information and the machines that support the virtualization process.
16. Displaying the Virtual Machines
You can use virsh to display the virtual machine list and the current state:
virsh list domain-name [ ——inactive | —— -all]
The——inactiveoption lists inactive domains (domains that have been defined but are not
cur-rently active). The— -all domain lists all domains, whether active or not. Your output should
re-semble the this example:
ID Name State ———————————————— 0 Domain0 running 1 Domain202 paused 2 Domain010 inactive 3 Domain9600 crashed
Here are the six domain states:
running lists domains currently active on the CPU blocked lists domains that are blocked
paused lists domains that are suspended
shutdown lists domains that are in process of shutting down shutoff lists domains that are completely down.
crashed lists domains that are crashed
17. Displaying Virtual CPU Information
You can use virsh to display virtual CPU information from a virtual machine:
virsh vcpuinfo [domain-id | domain-name | domain-uuid]
18. Configuring Virtual CPU Affinity
You can use virsh to configure the affinity of virtuals CPUs with physical CPUs:
virsh vcpupin [domain-id | domain-name | domain-uuid] [vcpu] , [cpulist]
Where[vcpu] is the virtual VCPU number and[cpulist] lists the physical number of CPUs.
19. Configuring Virtual CPU Count
You can use virsh to modify a Virtual Machine's number of CPUs:
virsh setvcpus [domain-name | domain-id | domain-uuid] [count]
Note that the new count cannot exceed the amount you specified when you created the Virtual Machine.
20. Configuring Memory Allocation
You can use virsh to modify a domain's memory allocation:
virsh setmem [domain-id | domain-name] [count]
You must specify the[count] in kilobytes. Note that the new count cannot exceed the amount
you specified when you created the Virtual Machine. Values lower than 64 MB probably won't work. You can adjust the Virtual Machine memory as necessary.
21. Configuring Maximum Memory
You can use virsh to modify a Virtual Machine's maximum memory:
virsh setmaxmem [domain-name | domain-id | domain-uuid] [count]
You must specify the [count] in kilobytes. Note that the new count cannot exceed the amount you specified when you created the Virtual Machine. Values lower than 64 MB probably won't work. The maximum memory doesn't affect the current use of the Virtual Machine (unless the new value is lower which should shrink memory usage).
Chapter 16. Managing Virtual
Machines Using xend
The xend node control daemon performs certain system management functions that relate to virtual machines. This daemon controls the virtualized resources, and xend must be running to interact with virtual machines. Before you start xend, you must specify the operating parameters by editing the xend configuration filexend-config.sxpwhich is located in theetc/xendirectory.
Here are the parameters you can enable or disable in thexend-config.sxpconfiguration file:
Item Description
console-limit Determines the console server's memory buf-fer limit and assigns values on a per-domain basis
min-mem Determines the minimum number of
mega-bytes that is reserved for domain0 (if you enter 0, the value does not change)
dom0 cpus Determines the number of CPUs in use by
do-main0 (at least 1 CPU is assigned by default)
enable-dump Determines that a crash occurs then enables
a dump (default is 0)
external-migration-tool Determines the script or application that handles external device migration (scripts must reside inetc/
xen/scripts/external-device-migrate
logfile Determines the location of the log file (default is/var/log/xend.log)
loglevel Filters out the log mode values: DEBUG,
INFO, WARNING, ERROR, or CRITICAL (default is DEBUG)
network-script Determines the script that enables the net-working environment (scripts must reside in
etc/xen/scripts directory)
xend-http-server Enables the http stream packet management server (default is no)
Item Description
xend-unix-server Enables the unix domain socket server (a socket server is a communications endpoint that handles low level network connections and accepts or rejects incoming connections)
xend-relocation-server Enables the relocation server for cross-machine migrations (default is no)
xend-unix-path Determines the location where the xend-unix-servercommand outputs data (default is var/lib/xend/xend-socket)
xend-port Determines the port that the http management
server uses (default is 8000)
xend-relocation-port Determines the port that the relocation server uses (default is 8002)
xend-relocation-address Determines the virtual machine addresses that are allowed for system migration
xend-address Determines the address that the domain sock-et server binds to.
Table 16.1. Red Hat Virtualization xend Configuration Parameters
After setting these operating parameters, you should verify that xend is running and if not, initil-ize the daemon. At the command prompt, you can start the xend daemon by entering the fol-lowing:
service xend start
You can use xend to stop the daemon:
service xend stop
This stops the daemon from running. You can use xend to restart the daemon:
service xend restart
You check the status of the xend daemon.
service xend status
Chapter 17. Managing Virtual
Machines Using xm
The xm application is a robust management tool that allows you to configure your Red Hat Vir-tualization environment. As a prerequisite to using xm, you must ensure that the xend daemon is running on your system.
1. xm Configuration File
The operating parameters that you must modify reside within thexmdomain.cfg file, which is
loc-ated in theetc/xendirectory. Here are the parameters you can enable or disable in the xmdo-main.cfgconfiguration file:
Item Description
kernel Determines the fully qualified path to the ker-nel image
ramdisk Determines the fully qualified path to initrd for the initial ramdisk
memory Determines the amount of RAM (in MB) to
al-locate for the domain when it starts
name Determines the unique name for a domain
root Determines the root device for a domain
nic Determines the number of network interface
cards for a domain (default is 1)
disk Determines the arrays of device block stanzas
— the three stanzas are: ·mode- device access mode
·backend-dev- the backend domain that
ex-ports to the guest domain
·frontend-dev- determines how the device
appears in a guest domain
vif Determines arrays of virtual interface stanzas
(each stanza represents a set of name=value operations).
Item Description
builder Determines the builder that constructs the
do-main (default is linux)
cpu Determines the CPU count for the domain to
start on. 0 indicates the first CPU, 1 the second, etc. (default is -1)
cpus Determines which CPUs on the domain's
VCPUs are executable
extra Determines the additional information to
ap-pend to end of the kernel parameter line
nfs_server Determines the NFS server IP address to use
for the root device
nfs_root Determines the root directory as a fully quali-fied path for the NFS server
vcpus Determines the number of virtual CPUs to
al-locate to a domain (default is 1)
on_shutdown Determines the domain shutdown parameter
to trigger a graceful shutdown (or xm shut-down) from insideDomU
on_reboot Determines the domain shutdown parameter
to trigger a graceful reboot (or anxm reboot)
from insideDomU
on_crash Determines the domain shutdown parameter
that triggerDomU crashes.
Table 17.1. The
xmdomain.cfgConfiguration File
1.1. Configuring vfb
A vfb is a virtual frame buffer that is defined as a 'stanza'. The stanza represents a set of name = value options, which when integrated into thexmdomain.cfg.5file, must be separated by
com-mas. The vfb entry in your configuration file resembles:
vfb = [ "stanza" ] "name1=value1, name2=value2, "
You can further configure your vfb environment by incorporating the options shown in Table 16.2:
Item Description
type Thevnctype option initiates a VNC Server
session that connects to an external VNC viewer. The sdl option initiates the internal viewer.
vncdisplay Determines the VNC display number to use
(defaults to the domain ID value). The VNC server listens on port 5900 + the display num-ber.
vnclisten The VNC server's listening address (defaults to 127.0.0.1).
vncunused Determines the numerical value and if
non-zero, enables the VNC server to listen for the first unused port over 5900.
vncpasswd Overrides the default password configured by
Xend.
display Enables the display for the internal viewer to use (defaults to environment variable DIS-PLAY).
xauthority Enables the authority file for the internal view-er to use (defaults to environment variable XAUTHORITY).
Table 17.2. The vfb Configuration Options
2. Creating and Managing Domains with xm
You can use the xm application to create and manage domains.
2.1. Connecting to a Domain
You can use xm to connect to a domain or virtual machine:
xm console domain-id
This causes the console to attach to thedomain-id's text console.
2.2. Creating a Domain
You can usexmto make a domain:
xm create domain001 [-c]
This creates a domain nameddomain001with the file residing in the/etc/xen/ directory. The [-c]option aids with troubleshooting by allowing you to connect to the text console.
2.3. Saving a Domain
You can use xm to save a domain:
xm save [domain-id] [statefile]
2.4. Terminating a Domain ID
You can use xm to terminate a domain-id:
xm destroy [domain-id]
This instantly terminates thedomain-id. If you prefer another method of safely terminating your
session, you can use theshutdownparameter instead.
2.5. Shutting Down a Domain
You can use xm to shut down any domain:
xm shutdown [domain-id] [ -a | -w ]
The[ -a] option shuts down all domains on your system. The [-w] option waits for a domain
to completely shut down.
2.6. Restoring a Domain
You can use xm to restore a previously saved domain.
xm restore [state-file]
2.7. Suspending a Domain
You can use xm to suspend a domain:
xm suspend [domain-id]
2.8. Resuming a Domain
You can use xm to resume a previously suspended session:
xm resume [domain-id]
2.9. Rebooting a Domain
You can use xm to reboot a domain:
xm reboot [domain-id] [ -a | -w ]
The [ -a]option reboots all domains on your system. The[-w]option waits for a domain to
completely reboot. You can control the behavior of the rebooting domain by modifying the
on_boot parameter of thexmdomain.cfgfile.
2.10. Renaming a Domain
You can usexmto assign a new name to an existing domain:
xm rename [domain-name] [new domain-name]
Domain renaming will keep the same settings (same hard disk, same memory, etc.).
2.11. Pausing a Domain
You can use xm to pause a domain:
xm pause [domain-id]
2.12. Unpausing a Domain
You can use xm to unpause a domain:
xm unpause [domain-id]
This makes the domain available for scheduling by a hypervisor.
2.13. Converting a Domain Name to Domain ID
You can usexmto convert a domain name to a domain ID:
xm domid [domain-name]
2.14. Converting a Domain ID to Domain Name
You can use xm to convert a domain ID to a domain name:
xm domname [domain-id]
2.15. Configuring Memory Allocation
You can use xm to modify a domain's memory allocation:
xm mem-set [domain-id] [count]
Note
You cannot grow a domain's memory beyond the maximum amount you specified when you first created the domain.
2.16. Configuring Maximum Memory
You can use xm to modify a domain's maximum memory:
xm mem-max [domain-id] [count]
You must specify the[count]in megabytes.
2.17. Configuring VCPU Count
You can use xm to modify a domain's VCPU count:
xm vcpu-set [domain-id] [count]
You must specify the[count]in megabytes.
Note
You cannot grow a domain's memory beyond the maximum amount you specified when you first created the domain.
2.18. Pinning a VCPU
You can usexmto pin a VCPU:
xm vcpu-pin [domain-id] [vcpu] [cpus]
Where[vcpu]is the VCPU that you want to attach to, and[cpus]is the target. Pinning ensures
that certain VCPUs can only run on certain CPUs.
2.19. Migrating a Domain
You can use xm to migrate a domain:
xm migrate [domain-id] [host] [options]
Where[domain-id] is the domain you want to migrate, and[host] is the target. The[options]
include——live (or -l) for a live migration, or——resource (or -r) to specify maximum speed of the
migration (in Mbs).
To ensure a successful migration, you must ensure that thexenddaemon is running on all hosts
domains. All hosts must also be running Red Hat RHEL 5.0+ and have migration TCP ports open to accept connections from the source hosts.
3. Monitoring and Diagnostics
3.1. Performing a Core Dump
You can use xm to perform a memory dump of an existing virtual machine.
xm dump-core [-C] [domain-id]
This command dumps the virtual machine's memory to thexendump file located in the/ var/xen/dump/directory. You can terminate the virtual machine by including the-Coption.
3.2. Monitoring Domains in Real Time
You can use xm to monitor domains and hosts in real time:
xm top [domain-id]
3.3. Displaying Domain States
You can usexmto display the domain activity states of one or more domains:
xm list [domain-id] [ ——long | ——label]
You can specify a specific domain(s) by name (s). The[——long]option provides a more detailed
breakdown of the domain you specified. The [——label] domain adds an additional column that
displays label status. The outputs displays:
Name ID Mem(MiB) VCPUs State Time Label
————————————————
Domain0 0 927 8 r—————— 204.9 INACTIVE
Domain202 1 927 8 s—————— 205.0/command ACTIVE
DomainQ/A 2 927 8 b—————— INACTIVE
Domain9600 3 927 8 c—————— 205.1 ACTIVE
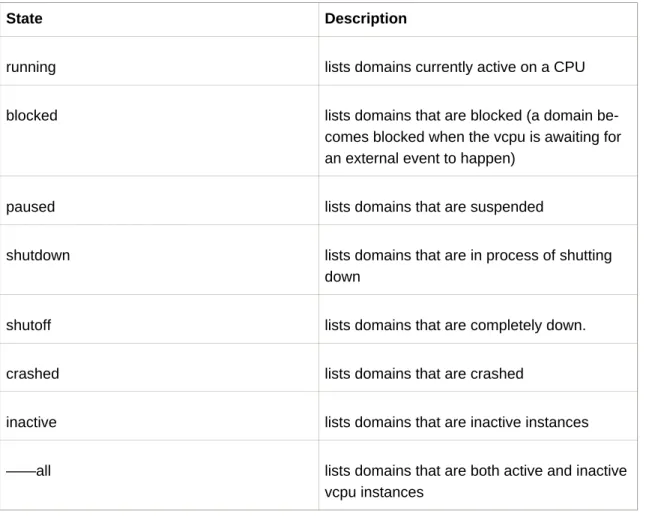
Here are the six domain states per VCPU:
State Description
running lists domains currently active on a CPU
blocked lists domains that are blocked (a domain
be-comes blocked when the vcpu is awaiting for an external event to happen)
paused lists domains that are suspended
shutdown lists domains that are in process of shutting down
shutoff lists domains that are completely down.
crashed lists domains that are crashed
inactive lists domains that are inactive instances
——all lists domains that are both active and inactive
vcpu instances
Table 17.3. The Domain States
4. Displaying Uptime
You can use xm to display the uptime:
xm uptime [domain-id]
The output displays:
Name ID Uptime
Domain0 0 4:45:02
Domain202 1 3:32:00
Domain9600 2 0:09:14
DomainR&D 3 2:21:41
5. Displaying VCPU Information
You can use xm to display domain CPU information:
xm vcpu-list [domain-id]
You must specify the which vcpus you want to list. If you do not specify, the vcpus will be dis-played for all domains.
6. Displaying Domain Information
You can use xm to display host domain information:
xm info
The output displays:
host : redhat83-157.brisbane.redhat.com
release : 2.6..18-1.2714.el5xen
version : #1 SMP Mon Oct 21 17:57:21 EDT 2006
machine : x86_64 nr_cpus : 8 nr_nodes : 1 sockets_per_node : 2 cores_per_socket : 2 threads_per_core : 2 cpu_mhz : 2992 hw_caps : bfeebbef:20100000:00000000:00000000 total_mememory : 1022 free_memory : 68 xen_major : 3 xen_minor : 0 xen_extra : -unstable xen_caps : xen-3.0-x86_84 xen_pagesize : 4096 platform_params : virt_start=0xffff88000000000000000000 xen_changeset : unavailable
cc_compiler : gcc compiler version 4.1.1 200060928 cc_compile_by : brewbuilder
cc_compile_domain : build.redhat.com
cc_compile_date : Mon Oct 2 17:00 EDT 2006
xend_config_format : 2
7. Displaying TPM Devices
You can use xm to display virtual TPM devices:
xm vtpm-list [domain-id] [——long]
The[——long] option provides a more detailed breakdown of the domain you specified.
8. Displaying the
xendLog
You can use xm to display the contents of thexendlog:
xm log
The output displays thexendlog activity.
9. Displaying the Message Buffer
You can use xm to view the xend message buffer:
xm dmesg
The output displays the contents of thexendmessage buffer.
10. Displaying ACM State Information
You can use xm to display hypervisor ACM state information:
xm dumppolicy [policy.bin]
11. Displaying Vnets
You can use xm to view the virtual network devices:
xm vnet-list [ -l | ——long]
The output displays:
List Vnets
-l, ——long List Vnets as SXP
12. Displaying Virtual Block Devices
You can use xm to view the virtual block devices for a domain:
xm block-list [domain-id] [ ——long]
The output displays the block devices for the domain you specify.
13. Displaying Virtual Network Interfaces
You can use xm to view the virtual network devices for a domain:
xm network-list [domain-id] [ ——long]
The output displays the network interfaces for the domain you specify.
14. Creating a New Virtual Network Device
You can use xm to create a new virtual network device:
xm network-attach [domain-id] [script=scriptname] [ip=ipaddr] [mac-macaddr] [bridge=bridge-name] [backend-bedomain-id]
The five parameter options are defined below:
Parameter Description
[script=scriptname] Uses the specified script name to bring up the network
[ip=ipaddr] Passes the specified script name to the ad-apter
[mac-macaddr] The MAC address the domain sees on its eth-ernet device
[bridge-bridgename] The name of the device to attach thevif
[backend=bedomain-id] The back end domain id.
Table 17.4. Parameters
15. Terminating a Virtual Network Device
You can use xm to destroy an existing virtual network device:
xm network-detach [domain-id] [DevID]
This destroys the virtual network device you specify.
16. Creating a New Vnet
You can use xm to create a new Vnet:
xm vnet-create [configfile]
You must specify a configuration file to create the new Vnet.
17. Terminating a Vnet
You can use xm to destroy an existing Vnet:
xm vnet-delete [VnetID]
This destroys the Vnet you specify.
18. Creating a Domain Security Label
You can use xm to create a domain security label:
xm addlabel [labelname] [domain-id] [configfile]
19. Testing the Domain Resources
You can use xm to test if a domain can access its resources:
xm dry-run [configfile]
This checks each resource listed in your configfile. It lists the status of each resource and the fi-nal security decision.
20. Displaying System Resources
You can use xm to view the system Resources:
xm resources
The output displays the resources for the domains on your system.
21. Configuring Credit Scheduling
You can use xm to configure the credit scheduler parameters:
xm sched-credit -d <domain> [ -w [=WEIGHT] | -c [CAP] ]
You can configure Weight with the[ -w] option. You can configure Cap with the[ -c]option.
22. Creating a New Virtual Block Device
You can use xm to create a new virtual block device:
xm block-attach [domain-id] [bedomain-id] [fe-dev] [be-dev] [mode]
You can attach (or detach) virtual devices even if guests are running. The five parameter op-tions are defined below:
Parameter Description
[domain-id] The guest domain's domain-id that attaches to the device
Parameter Description
[be-dev] The device in the backend domain that gets
exported
[fe-dev] The device that gets presented to the guest
domain
[mode] The guest domain's device access mode
[bedomain-id] The back end domain that hosts the device
Table 17.5. New Block Device Parameters
23. Terminating a Virtual Block Device
You can use xm to destroy an existing virtual block device:
xm block-detach [domain-id] [DevID]
This destroys the virtual block device you specify.
24. Security
24.1. Removing a Domain Security Label
You can use xm to remove a domain security label:
xm rmlabel [domain-id] [configfile]
This removes theacm_policylabel entry from the configfile.
24.2. Creating a Resource Security Label
You can use xm to create a resource security label:
xm addlabel [labelname] res [resource] [policy]
24.3. Removing a Resource Security Label
You can use xm to remove a Resource Security label:
mx rmlabel [domain-id] res [resource]
This removes the global resource file.
24.4. Configuring Access Control
Red Hat Virtualization access control consists of two major components. The Access Control Policy (ACP) defines access rules and security labels. When domains request access re-sources, to communicate The Access Control Module (ACM) interprets the policy and handles access control decisions. The ACM determines access rights from the domain security label. Then the ACP enables the security labels and access rules and assigns them to domains and resources. The ACP uses two different ways of label management:
Label Description
Simple Type Enforcement The ACP interprets the labels and assigns ac-cess requests to domains that require virtual (or physical access). The security policy con-trols access between domains and assigns the proper labels to the respective domain. By default, access to domains with Simple Type Enforcement domains is not enabled.
Chinese Wall The Chinese Wall security policy controls and responds to access requests from a domain.
Table 17.6. ACP Label Management
A policy is a separated list of names that translates into a local path and points to the policy XML file (relative to the global policy root directory). For instance, the domain file
chinese_wall.client_V1pertains to the the policy file/example/chinese_wall.client_v1.xml.
Red Hat Virtualization includes these parameters that allow you to manage security policies and assign labels to domains:
24.5. Creating a Policy
You can use xm to create a binary policy:
xm makepolicy [policy]
This creates the binary policy and saves it as binary file[policy.bin].
24.6. Loading a Policy
You can use xm to load a binary policy:
xm loadpolicy [policy.bin]
24.7. Creating a Policy for Boot Configuration
You can use xm to make a binary policy and add it to the boot configuration file:
xm cfgbootpolicy [kernelversion]
This copies the binary policy into the/bootdirectory and modifies the corresponding line in the/ boot/grub/menu.1stfile.
24.8. Creating a Label
You can use xm to create a label:
xm addlabel [configfile] [policy]
Adds a security label with to a domain configfile. It also verifies that the respective policy defini-tion matches the corresponding label name.
24.9. Displaying Policy Labels
You can usexm to view policy labels:
xm labels [policy] [type=dom | res | any]
This displays labels of a type you specify (default isdom) that you define when you create the
policy.
24.10. Displaying Domain Security Labels
You can use xm to view security labels for a domain:
xm getlabel domain-id [configfile]
24.11. Displaying Resource Security Labels
You can use xm to view security labels for a resource:
xm getlabel res [resource]
24.12. Configuring Access Control Secuirty
To enable the Red Hat Virtualization access security, you must modify these parameters in the
xen_source__dir/Config.mk
ACM_SECURITY ?= y
ACM_DEFAULT_SECURITY_POLICY ? =
ACM_CHINESE_WALL__AND_SIMPLE_TYPE_ENFORCEMENT_POLICY
24.13. Compiling a Security Policy
This example demonstrates how to successfully compile a security policy:
xm makepolicy chinesewall_ste.client_v1
This createsclient_v1.map andclient_v1.bin files in the/
etc/xen/acm-security/policies/example/chinesewall_stedirectory.
24.14. Loading the Security Policy
You can use xm to activates the client_v1.bin :
xm loadpolicy example.chwall_ste.client_v1
24.15. Configuring a Boot Security Policy
You can use xm to configure the boot loader to loadclient_v1.bin :
xm cfgbootpolicy chinesewall_ste.client_v1
This causes the ACM to use this label to boot Red Hat Virtualization.
24.16. Displaying Security Labels
You can use xm to view the defined labels:
xm labels chinesewall_ste.client_v1 type=dom
The output displays all policies withdom:
dom_StorageDomain dom_SystemManagement dom_NetworkDomain dom_QandA
dom_R&D
24.17. Attaching a Security Label
You can use xm to attach a security label to a domain configuration file (this example uses the
SoftwareDevlabel):
xm addlabel myconfig.xm dom_SoftwareDev
Attaching the security label ensures that the domain does not share data with other non- Soft-wareDevuser domains. This example includes themyconfig.xm configuration file represents a
domain that runs workloads related to theSoftwareDev's infrastructure.
Edit your respective configuration file and verify that theaddlabelcommand correctly added the
access_control entry (and associated parameters) to the end of the file:
kernel = "/boot/vmlinuz — 2.6.16 —xen" ramdisk="/boot/U1_SoftwareDev_ramdisk.img" memory = 164
name = "SoftwareDev" vif = [ '' ]
dhcp = "dhcp"
access_control = [policy=example.chwall_ste.client_v1, label=dom_SoftwareDev]
If anything does not appear correct, make the necessary modifications and save the file.
Chapter 18. Managing Virtual
Machines with Virtual Machine
Manager
This section describes the Red Hat Virtualization Virtual Machine Manager (VMM) windows, dia-log boxes, and various GUI controls.
1. Virtual Machine Manager Architecture
Red Hat Virtualization is a collection of software components that work together to host and manage virtual machines. The Virtual Machine Manager (VMM) gives you a graphical view of the virtual machines on your system. You can use VMM to define both para-virtual and full virtu-al machines. Using Virtuvirtu-al Machine Manager, you can perform any number of virtuvirtu-alization management tasks including assigning memory, assigning virtual CPUs, monitoring operational performance, and save, restore, pause, resume, and shutdown virtual systems. It also allows you to access the textual and graphical console. Red Hat Virtualization abstracts CPU and memory resources from the underlying hardware and network configurations. This enables pro-cessing resources to be pooled and dynamically assigned to applications and service requests. Chip-level virtualization enables operating systems with Intel VT and AMD Pacifica hardware to run on hypervisors.
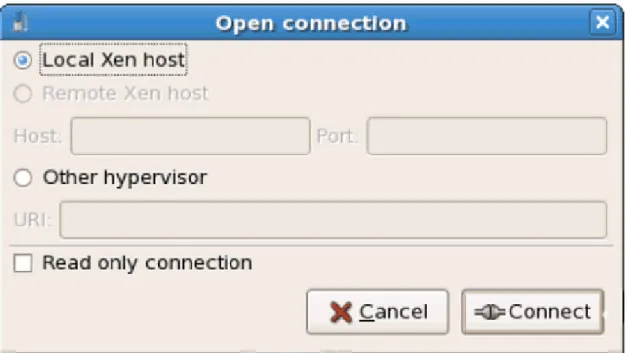
2. The Open Connection Window
This window appears first and prompts the user to choose a hypervisor session. Non-privileged users can initiate a read-only session. Root users can start a session with full blown read-write status. For normal use, select the Local Xen host option. You start the Virtual Machine Man-ager test mode by selecting the Other hypervisor and then typetest:///defaultin the URL
field beneath. Once in test mode, you can connect to a libvirt dummy hypervisor. Note that al-though the Remote Xen host screen is visible, the functionality to connect to such a host is not implemented into RHEL 5.0.
Figure 18.1. Virtual Machine Manager Connection window
3. Virtual Machine Manager Window
This main window displays all the running virtual machines and resources currently allocated to them (including domain0). You can decide which fields to display. Double-clicking on the de-sired virtual machine brings up the respective console for that particular machine. Selecting a virtual machine and double-click the Details button to display the Details window for that ma-chine. You can also access the File menu to create a new virtual mama-chine.
Figure 18.2. Virtual Machine Manager main window
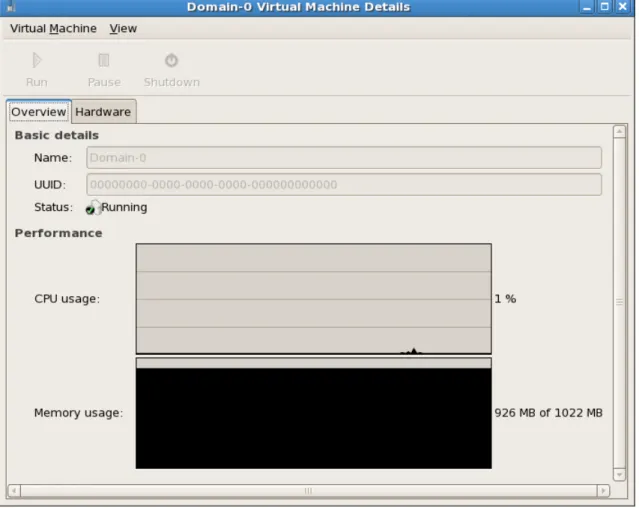
4. Virtual Machine Details Window
This window displays graphs and statistics of a guest's live resource utilization data available from the Red Hat Virtualization Virtual Machine Manager. The UUID field displays the globally unique identifier for the virtual machines(s).
Figure 18.3. Virtual Machine Manager Details window
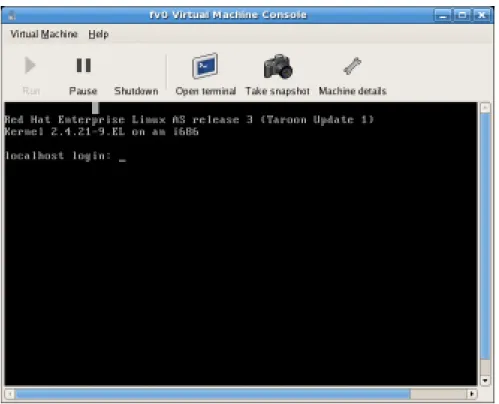
5. Virtual Machine Graphical Console
This window displays a virtual machine's graphical console. Paravirtual and full virtual machines use different techniques to export their local virtual framebuffers, but both technologies use VNC to make them available to the Virtual Machine Manager's console window. If your virtual machine is set to require authentication, the Virtual Machine Graphical console prompts you for a password before the display appears.
Figure 18.4. Graphical Console window
Your local desktop can intercept key combinations (for example, Ctrl+Alt+F11) to prevent them from being sent to the guest machine. You can use the Virtual Machine Manager's 'sticky key' capability to send these sequences. You must press any modifier key (like Ctrl or Alt) 3 times and the key you specify gets treated as active until the next non-modifier key is pressed. Then you can send Ctrl-Alt-F11 to the guest by entering the key sequence 'Ctrl Ctrl Ctrl Alt+F1'.
6. Starting the Virtual Machine Manager
To start the Virtual Machine Manager session, from theApplicationsmenu, clickSystem Tools
and selectVirtual Machine Manager .
The Virtual Machine Manager main window appears.
Figure 18.5. Starting the Virtual Machine Manager
7. Creating a New Virtual Machine
The Virtual Machine Manager (virt-manager) is the desktop application that manages virtual machines.
You can use Red Hat's Virtual Machine Manager to:
• Create new domains.
• Configure or adjust a domain's resource allocation and virtual hardware.
• Summarize running domains with live performance and resource utilization statistics. • Display graphs that show performance and resource utilization over time.
• Use the embedded VNC client viewer which presents a full graphical console to the guest domain.
Note:
You must install Red Hat Enterprise Linux 5.0, virt-manager, and the kernel pack-ages on all systems that require virtualization. All systems then must be booted and running the Red Hat Virtualization kernel.
These are the steps required to install a guest operating system on Red Hat Enterprise Linux 5 using the Virtual Machine Monitor:
Procedure 18.1. Creating a Guest Operating System
1. From the Applications menu, select System Tools and then Virtual Machine Manager. The Virtual Machine Manager main window appears.
Figure 18.6. Virtual Machine Manager window
2. From the File menu, select New machine.
Figure 18.7. Selecting a New Machine
The Creating a new virtual system wizard appears. 3. Click Forward.
Figure 18.8. Creating a New Virtual System Wizard
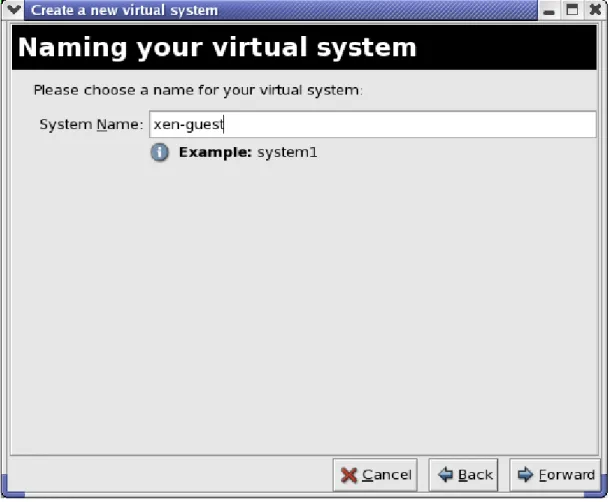
4. Enter the name of the new virtual system and then click Forward.
Figure 18.9. Naming the Virtual System
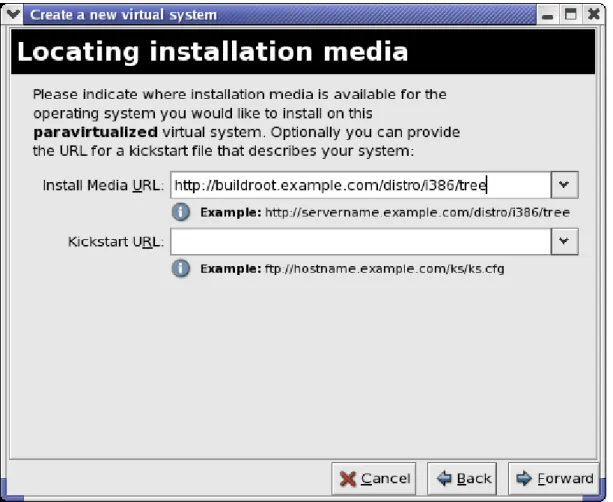
5. Enter the location of your install media. Location of the kickstart file is optional. Then click
Forward .