GFI Product Guide
The information and content in this document is provided for informational purposes only and is
provided "as is" with no warranty of any kind, either express or implied, including but not limited to
the implied warranties of merchantability, fitness for a particular purpose, and non-infringement.
GFI Software is not liable for any damages, including any consequential damages, of any kind that
may result from the use of this document. The information is obtained from publicly available
sources. Though reasonable effort has been made to ensure the accuracy of the data provided, GFI
makes no claim, promise or guarantee about the completeness, accuracy, recency or adequacy of
information and is not responsible for misprints, out-of-date information, or errors. GFI makes no
warranty, express or implied, and assumes no legal liability or responsibility for the accuracy or
completeness of any information contained in this document.
If you believe there are any factual errors in this document, please contact us and we will review
your concerns as soon as practical.
All product and company names herein may be trademarks of their respective owners. Microsoft
and Windows are either registered trademarks or trademarks of Microsoft Corporation in the
United States and other countries.
1 Using GFI Archiver
5
1.1 Logging in to GFI Archiver
5
1.2 Browsing Archived items
5
1.3 Working with archived items
7
1.4 Searching archived items
10
1.4.1 Using Simple Search
10
1.4.2 Using Advanced Search
13
1.4.3 Email search using smart phones
15
1.5 Accessing multiple mailboxes
16
1.6 GFI MailInsights®
17
1.6.1 Generating MailInsights reports
18
1.6.2 Scheduling MailInsights reports
19
1.6.3 Communication Flow
19
1.6.4 WebMail Usage
21
1.6.5 Email Responsiveness
22
1.6.6 Storage Use
23
1.6.7 Inactive Accounts
24
1.6.8 Inappropriate Words
25
1.6.9 Internal Spammers
26
1.6.10 Outside Office Hours
27
1.6.11 Data Leakage Detection
30
1.6.12 Job Search
31
1.6.13 Phrase Search
33
1.6.14 User Traffic Report
34
1.6.15 Email Topics report
36
1.6.16 Email Performance Indicators report
37
1.6.17 Large Emails report
39
1.7 Changing user preferences
41
2 Configuring Client Access
42
2.1 Installing Outlook Connector
42
2.1.1 Outlook® Connector system requirements
43
2.1.2 Software
43
2.1.3 Hardware
43
2.1.4 Downloading the GFI Archiver Archive Assistant
44
3 Configuring Archive Assistant
45
3.1 Deploying the File Archive Assistant
47
3.1.1 Downloading the File Archive Assistant
47
3.1.2 Configuring the File Archive Assistant
48
3.1.3 Adding a Synchronization Folder
49
3.2 Deploying the GFI Archiver App for Windows 8/RT
49
3.2.1 System requirements
49
3.2.2 Configuring the GFI Archiver Touch App
49
3.3 Configuring GFI Archiver IMAP Client Access
51
3.3.1 Configuring IMAP on Android
51
3.3.3 Configuring IMAP in iOS5
53
3.3.4 Configuring IMAP in Microsoft Outlook® 2003
54
3.3.5 Configuring IMAP in Microsoft Outlook® 2007
55
3.3.6 Configuring IMAP in Microsoft Outlook® 2010
56
3.3.7 Configuring IMAP in Microsoft Outlook 2013
57
3.3.8 Configuring IMAP in Outlook® 2011 for Mac
58
3.3.9 Configuring IMAP in Mozilla Thunderbird 10
59
3.3.10 Configuring IMAP in Windows® Live Mail
60
4 Glossary
61
1 Using GFI Archiver
GFI Archiver helps you maintain an easily accessible archive of email correspondence, calendar items
and documents, eliminating the need for PST files and meet a growing number of compliance and
eDiscovery regulations.
With the reporting capabilities of MailInsights business intelligence tools, you are able to get the most
from your archived items. Identify legal risks and manage productivity with reports based on the
business-critical information in your archive.
Read the following sections for information related to:
Logging in GFI Archiver
Browsing archived emails
Working with emails
Searching for archived emails
Accessing multiple mailboxes
Generating MailInsights reports
Changing the display language and other options
1.1 Logging in to GFI Archiver
Select one of the following options to log in GFI Archiver:
Go to
Start
>
GFI Archiver
>
GFI Archiver
. The application loads in your default Internet
browser. Key in your domain credentials (username and password used to login to Windows
®)
when prompted.
Alternatively, from your Internet browser, key in the following URL:
http://<GFI Archiver host name>/<GFI Archiver virtual folder name>
For example:
http://mydomain.com/Archiver
By default, GFI Archiver does not require any login credentials while logging in. It will instead use the
credentials of the currently logged in user. Closing your browser session logs off the currently logged
on user from GFI Archiver.
NOTE
To login as a different user, log off your profile and log in using a different Windows®user.
NOTE
If you are logging in from a computer that is not joined to the domain where GFI Archiver is installed, you will be prompted to key in the credentials used to log in the domain where GFI Archiver is
installed.
1.2 Browsing Archived items
1. From GFI Archiver, select
Archive
tab.
Screenshot 1: Browsing Archived Emails
2. In the Archive tab, you can view archived items for all the mailboxes that you have been granted
access to. You can also perform several actions as described in the table below.
OPTION DESCRIPTION
Enables you to search for emails. Key in the words or phrases to search for and click . Results are displayed in the emails pane. Hides the email preview pane.
Shows the email preview pane.
Toggles the email preview pane from displaying emails at the bot-tom to displaying emails at the side of the email list page.
Displays emails in message view.
Displays emails in mailbox view.
OPTION DESCRIPTION
Displays the list of mailboxes the currently logged in user has access to. From the accounts list, select the Archive Store to view mailboxes for form the List accounts in archive option. Click Close to exit Account list.
Deletes the selected Emails if Email Deletion has been enabled by your System Administrator. If Email Deletion is not enabled, this icon will not be displayed.
NOTE
Emails cannot be deleted from Read-only Archive Stores or when Legal-hold is enabled.
NOTE
By default, GFI Archiver displays 25 items per page. To change this value, click the user name
displayed on the top right hand corner of your screen and change the value of the Number of emails to display per page option. Click Save.
1.3 Working with archived items
Within the GFI Archiver
Archive
tab, you can view and take action on different types of archived
items.
Switch between email conversations and calendar items using the provided controls in the task bar.
For more information refer to
Browsing Archived items
(page 5).
To view an email or an archived file, select the email from the mailbox or message view. This will
display the selected item in the preview pane. Double click an email or archived file to view it in the
email view window.
Screenshot 2: Working with archived items within GFI Archiver
To open an archived calendar item, switch to calendar view. Select the item to view. Click once on
the item to view details in the calendar window.
Depending on the type of archived item selected, the following actions can be performed when
viewing the contents of archived items:
OPTION DESCRIPTION
View email/calendar item header.
Click to view email or calendar item headers. These are displayed in a panel. Click this button again or select close to close panel.
View conversation thread
Click button to view the whole conversation in the mail view window. All emails forming part of the conversation are listed. Click this button again or select close to close the panel.
OPTION DESCRIPTION
Edit email or calendar item labels (Personal and Global)
Enables you to categorize emails and calendar items through labeling. This feature is useful during searches for specific types of archived items. For example search all items labeled as “Important”.
To add a label:
1. From ‘Available Labels’, key in a new label or select an existing one. 2. Click Label Emailto label email with the keyed in or selected label. To remove a previously assigned label:
1. Select a previously assigned label. 2. Click Remove label.
Click this button again or select close to close panel. NOTE
Labels are displayed in the ‘Labels’ field in black. Labels assigned at an organization level through categorization policies are in red. You cannot remove categorization policies labels from an email.
Restore email/calendar item
Restores emails or calendar items using the OneClick Restore feature that restores an archived item to a specific mailbox or forwards a copy to an email address.
In the restore email panel, key in the email address where to send a copy of the current item and clickRestore Email/calendar item.
Save email to disk (EML format)
Downloads the whole email to disk including any attachments, in .eml format. This format is compatible with a number of email clients such as Microsoft Outlook®Express, Windows®Mail, and Mozilla Thunderbird. In theFile downloaddialog box, selectSave, and select the location where to save the file.
Save email to disk (MSG format)
Downloads the whole email to disk including any attachments, in .msg format, which is compatible with Microsoft Outlook®. In the File download dialog box, select Save, and select the location where to save the file.
Download Calendar Item
Downloads the whole email to disk including any attachments, in .msg format, which is compatible with Microsoft Outlook®. In the File download dialog box, select Save, and select the location where to save the file.
Print email/calendar item
Displays archived item in a printer friendly format in a new browser window. Use the print function of your browser to print the item.
Show images in email
Use this button to display embedded images within the email. Mark as not SPAM
Use this button to mark as not SPAM an email that was previously identified as SPAM by an anti-spam solution. Requires a SPAM retention policy to be set up
OPTION DESCRIPTION
Delete Email/calendar item
Deletes the current item if Email Deletion has been enabled by your System Administrator. If Email Deletion is not enabled, this icon will not be displayed.
NOTE
Archived items cannot be deleted from Read-only Archive Stores or when Legal-hold is enabled.
Show Calendar Item Events
Click button to view the Calendar Item Events in the mail view window.
Download When viewing archived files, an additionalDownload link is provided in the body. Click this link to download the file and save it to disk.
1.4 Searching archived items
When searching for archived items, such as emails, files, calendar items or faxes, GFI Archiver queries
the email index and retrieves any matching item with its respective attachment. Within GFI Archiver,
you can search using:
OPTION DESCRIPTION
Quick Search Use the text box in the toolbar to search all archived emails for the selected user across all Archive Stores. In theQuick Searchtext box, you can also use the following wildcards:
? - Matches any single character * - Matches any string of characters For example:
To search for emails containing the word ‘Swiss’, key in ‘sw??s’ or ‘sw*s’.
Simple Search Expand theQuick Searchto filter the search by simple criteria such as Sender, Receiver, Subject, Date and other information. For more information refer toUsing Simple Search(page 10).
Advanced Search Use advanced options for an extensive range of search options. For more information refer toUsing Advanced Search(page 13).
Emails matching the search query are displayed in the emails pane. GFI Archiver displays up to 25
emails per page. If more than 25 emails are matched for each search query, GFI Archiver spreads the
emails out on separate pages. Use the slider at the bottom of the email pane to change from one
page to the next.
1.4.1 Using Simple Search
The
Simple Search
is an extension of the
Quick Search
feature that enables you to use additional
search criteria when searching for emails, files, calendar items or Fax/SMS messages in all Archive
Stores.
Screenshot 3: Simple Search options
2. In the
Search for
area, select
to search for emails in all Archive Stores. Use the following
search features:
OPTION DESCRIPTION
Contains Enter a keyword to search for. You can also use the following wildcards: ? - Matches any single character
* - Matches any string of characters Subject Search for emails having a specific subject.
Sent date Defines the date when the email to search for was sent.
From Specify the email address or display name of the email sender for which to search emails.
To Specify the email address or display name of the email recipient for which to search emails.
Attachment Search for emails that have some specific content anywhere in the attachment. Advanced options Click link to advanced options for an extensive range of search options. For more
information refer toUsing Advanced Search(page 13).
Reset Resets the search conditions and enables you to start all over again.
Save Saves the search conditions as a saved search query that can be triggered at any time. Saved searches are displayed in theClassificationswindow underArchivetab. Search Starts the search for the archived emails. Results are returned as per the conditions
selected.
3. In the
Search for
area, select
File
to search for archived Files in all Archive Stores. Use the
following search features:
OPTION DESCRIPTION
File Name Enter the full file name or part of the file name to search for. You can also use the following wildcards:
? - Matches any single character * - Matches any string of characters
File Type Specify a File Type from the available list or selectAny(Default).
Last Modified Date Select an option from the available list or selectCustomand specify a date range using the calendar controls.
Advanced options Click link to advanced options for an extensive range of search options. For more information refer toUsing Advanced Search(page 13).
OPTION DESCRIPTION
Search Starts the search for the archived emails. Results are returned as per the conditions selected.
Reset Resets the search conditions and enables you to start all over again.
Save Saves the search conditions as a saved search query that can be triggered at any time. Saved searches are displayed in theClassificationswindow underArchivetab.
4. In the
Search for
area, select
Calendar
to search for archived calendar items in all Archive Stores.
Use the following search features:
OPTION DESCRIPTION
Contains Enter the full file name or part of the file name to search for. You can also use the following wildcards:
? - Matches any single character * - Matches any string of characters Organizer Specify the name of the event organizer.
Subject Search for calendar items having a specific subject. Invited Attendees Specify the name of persons invited to an event.
Start of Event Select an option from the available list or selectCustomand specify a date range using the calendar controls.
Location Specify the name of the location where an event is taking place.
Advanced options Click link to advanced options for an extensive range of search options. For more information refer toUsing Advanced Search(page 13).
Search Starts the search for the archived emails. Results are returned as per the conditions selected.
Reset Resets the search conditions and enables you to start all over again.
Save Saves the search conditions as a saved search query that can be triggered at any time. Saved searches are displayed in theClassificationswindow underArchivetab.
5. In the
Search for
area, select
Fax
to search for archived Fax and SMS messages in all Archive
Stores. Use the following search features:
OPTION DESCRIPTION
Contains Enter the full file name or part of the file name to search for. You can also use the following wildcards:
? - Matches any single character * - Matches any string of characters
Type Switch between Fax and SMS using the drop down list.
Sent date Select from available list to define the date when the Fax or SMS to search for was sent.
From Specify the address of the sender for which to search. To Specify the address of the recipient for which to search.
Advanced options Click link to advanced options for an extensive range of search options. For more information refer toUsing Advanced Search(page 13).
NOTE
The Fax Search option is displayed only when theFax Archiving Search Tabis enabled by the GFI Archiver Administrator.
1.4.2 Using Advanced Search
The
Advanced Search
is an extension of the
Simple Search
feature that enables you to use a wide
range of search criteria when searching for archived items.
To use
Advanced Search
:
1. From the
Archive
tab, click the drop down icon
next to the
Quick Search
text box and select
Advanced options
.
Screenshot 4: Advanced Search Options
2. In the
Advanced Search Options
area, use the following advanced search features:
OPTION DESCRIPTION
Search emails for Select the user from the available list.
Archive Store Defines the Archive Store where the search will be performed. Select one or more Archive Stores from the available list of Archive Stores.
Sent date Defines the date when the email to search for was sent.
Includes all/any Defines whether to display items that match all conditions or items that match any of the conditions. From the drop-down list select:
All– Displays archived items that match at least one of the conditions specified. Any– Displays archived items that meet all the conditions specified.
OPTION DESCRIPTION
Click this button to add conditions. Available conditions are: Subject– Search for emails having a specific subject.
Sender- Specify the email address or display name of the email sender for which to search emails.
Recipient- Specify the email address or display name of the email recipient for which to search emails.
BCC- Specify the email address or display name of the recipient whose address was keyed in the BCC field.
Sent Date- Search for emails sent before, after or exactly on a specific date. Key in or select a date, and select Is before, Is after or Is exactly.
Received Date- Search for emails received before, after or exactly on a specific date. Key in or select a date, and select Is before, Is after or Is exactly.
Start Date- Search for calendar items that start before a specified date.
Size (KB)- Search for items that are bigger, smaller or equal to a particular size. Key in a size and select Is greater than, Is smaller than and Is exactly.
Message ID- Search using the ‘Message ID’ field contained in the email header. Key in or paste the message ID of the email to find.
Whole Email- Search for emails that have some specific content in the email body and attachments.
Body- Search for emails that have some specific content in the body.
Attachment- Search for emails that have some specific content anywhere in the attachment.
Contains document- Search only for emails that have an attached document. Folder- Search for items contained in a specific mailbox folder.
Folder/Subfolders- Search for items contained in a specific subfolder within a mailbox folder.
Label- Search for emails labeled with a specific label. NOTE
Click displayed next to a search condition to remove it. Excludes all of
these conditions
Defines a list of conditions that the archived items willNOThave to meet to be returned as a search result. Click and select the conditions to apply. The conditions that can be selected are similar to the ones described above.
NOTE
Click displayed next to a search criteria to remove it from search. Back to basic
options
Click to return to the Simple Search feature. For more information refer toUsing Simple Search(page 10).
OPTION DESCRIPTION
Search Starts the search for the archived items. Results are returned as per the conditions selected.
1.4.3 Email search using smart phones
Within GFI Archiver, you can search for emails using a smart phone.
NOTE
This feature is supported by the following mobile Operating Systems:
Android 2.1+
Apple iPhone iOS 4
Blackberry OS5+
To perform a simple search:
1. Launch the Internet browser on your smart phone and key in the URL where GFI Archiver is
located, using the following format:
http://<GFI Archiver host name>/<GFI Archiver virtual folder name>
For example:
http://mydomain.com/Archiver
2. Sign in using your credentials.
NOTE
The Mobile User Interface uses the same language settings as those configured by the user in GFI Archiver. For more information refer toChanging user preferences(page 41).
3. Key in the text to search for and click
Search
.
4. Browse through the displayed results using the controls provided. Results are sorted by date in
descending order.
NOTE
The mobile search feature returns 10 emails per page. You can browse additional pages using the controls provided. The maximum number of results is 5000.
Screenshot 5: Conversation View Smart Phone
5. Click the Email subject to display the email or click
View Conversation
to display related emails.
NOTE
The mobile user interface is focused on searching email archives. For advanced search and browsing features, access GFI Archiver from your computer.
NOTE
The mobile user interface enables users to access ONLY their mailbox.
1.5 Accessing multiple mailboxes
From within the
Archive
tab, you can also browse archived items in other users mailboxes - provided
that you have been granted access to their archive. A user with Administrative rights can grant or
revoke access to other users mailboxes from the GFI Archiver Access Control feature.
NOTE
Search user to addfeature is disabled if the currently logged on user does not have access to other users mailboxes, or if there are no emails to view.
Screenshot 6: Accessing multiple mailboxes
To view archived items for a different mailbox:
1. Key in the name of the mailbox for which to view archived items in the
Search users to add
search
box . A list of names matching the one keyed (for which you have access to) will be displayed.
2. Select the user and click
next to the search field.
3. Select the newly added user from the
Browse conversations for:
field.
4. Browse or search the displayed archived items using the controls provided.
1.6 GFI MailInsights
®
GFI MailInsights
®is a reporting facility within GFI Archiver that uses archived items to deliver
information related to email usage and trends. Use this feature to generate management and HR
reports that provide insight on email and resource use or misuse.
NOTE
GFI MailInsights®is only enabled for users who have been granted the required access rights. For more information, contact your Systems Administrator.
REPORT NAME DESCRIPTION
Communication Flow Monitor user/group communication patterns inside and outside the organization.
WebMail Use Identify top users exchanging email with WebMail services. Identifies potential data leakages and inappropriate email use.
Email Responsiveness Gain insight into the average time it takes users to reply to internal and external email.
Storage Use Understand the impact of attachments on email storage costs. Create appropriate retention policies to control email-related storage space.
Inactive Accounts Returns a list of user accounts that received email but have not replied within the specified time.
Inappropriate Words Track inappropriate language in email that violates company policy.
Internal Spammers Find out which internal users tend to include too many recipients in the To/CC/BCC fields.
Outside Office Hours Returns a list of internal mail accounts with sending activity outside office hours. Spot behavior which may need more investigation.
Data Leakage Detection Identify emails with major credit card numbers and US Social Security numbers, or other confidential documents and information.
Job Search Identify sent or received emails that contain resumes, or are addressed to job search sites.
Phrase Search Search for specific terms or phrases within archived emails.
User Traffic View the number of emails exchanged between selected users or groups and their contacts.
Email Topics Lists topics and common words found within emails exchanged between selected users or groups and their contacts.
Email Performance Indicators Analyze sent and received emails to classify users'
productivity according to a set of predefined performance indicators.
Large Emails report Identify large emails that can be taking up unwanted space in your archive. Email attachments are classified according to specific categories.
1.6.1 Generating MailInsights reports
Generated reports are sent by email either to the logged in user or to a user specified in the
Forward
To
field. Reports can be exported as an attachment in PDF or Excel (.xlsx) format.
To generate a report:
1. Select
MailInsights
®tab and choose desired report.
2. Use available filters by selecting a value to filter by.
NOTE
When using the email forwarding option, the report is received by the user generating the report and by any users specified in theForward tofield.
NOTE
You can insert multiple email addresses separated by ';'
4. Click
Send Report
, located at the bottom of each report page.
1.6.2 Scheduling MailInsights reports
Every MailInsights
®report can be scheduled to run automatically.
To schedule a report:
1. Select
MailInsights
®tab and choose desired report.
2. Use available filters by selecting a value to filter by.
3. Click
Schedule
.
Screenshot 7: MailInsights®report scheduling
4. In the
Report Name
field, enter a meaningful name for your report.
5. (Optional) In the
Forward to
field, enter the recipient (or recipients) email address.
6. From the
Schedule Report
drop down list, select the report run frequency. Available options
are:
Daily
,
Weekly
or
Monthly
.
7. In the
At
field, specify the time.
8. Click
Save & Schedule Report
.
1.6.3 Communication Flow
The Communication Flow graph provides an overview of emails exchanged between selected
users/groups and their contacts.
Screenshot 8: MailInsights®Communication Flow
Filter the report using the following criteria:
OPTION DESCRIPTION
Scope Specify date range or use default setting. You can only select dates in the last 6 months. Report for Select user or group.
Recipients Select Internal, External or All.
Include Specify number of results up to a maximum of 1000 recipients. Default value is Top 20. Report
format
Select the type of output. Reports can be exported as an attachment in PDF or Excel (.xlsx) format.
The generated report displays the selected user or group as a single entity in the middle of a graph.
Contacts are segregated by domains. Each domain cluster is shown in different color. Edge width
between the nodes shows the strength of the email relation between different entities.
The table below the graph shows the following information:
OPTION DESCRIPTION
Contact Email Contact email address Sent Emails Total number of sent emails Received Emails Total number of received emails
1.6.4 WebMail Usage
The WebMail Usage area enables you to generate a report that shows interaction of internal users
with web email accounts.
Screenshot 9: MailInsights WebMail Usage
The report can be filtered using the following criteria:
OPTION DESCRIPTION
Scope Specify date range or use default setting. You can only select dates in the last 6 months. Report for Select user or group.
Include Specify number of results up to a maximum of 1000 recipients, default value is Top 20. Report
format
Select the type of output. Reports can be exported as an attachment in PDF or Excel (.xlsx) format.
The generated report displays a graph that represents total emails sent and received in the specified
period. A Summary area at the top of the report shows the top WebMail providers, with a summary of
sent and received emails per provider.
The table below the graph contains the following information:
OPTION DESCRIPTION
User User email address.
Total Emails Total number of internal contacts. Sent Emails Total number of sent emails. Received Emails Total number of received emails.
OPTION DESCRIPTION
Average/Day Average emails sent and received per day. Total Percentage Percentage of total web emails.
NOTE
WebMail Usage report covers the following WebMail providers: Hotmail; Gmail; Yahoo!; Live; AOL; Facebook; Yandex.ru; Seznam.cz; Gawab.com; Gmx.com; Mail.ru; Hushmail.com; Rediff.com
1.6.5 Email Responsiveness
The Email Responsiveness report shows on average how long it takes employees to reply to emails.
Screenshot 10: MailInsights®Email Responsiveness
Filter the report using the following criteria:
OPTION DESCRIPTION
Scope Specify date range or use default setting (Last 7 days). You can only select dates in the last 6 months.
OPTION DESCRIPTION
Sort By Specify sorting method. Options are: By name (default)
By responsiveness Report
format
Select the type of output. Reports can be exported as an attachment in PDF or Excel (.xlsx) format.
The generated report displays a bar chart representing users on the y-axis and responsiveness in
hours on the x-axis. Data is sorted according to defined criteria.
Additional data is displayed in a table below the chart with the following information:
OPTION DESCRIPTION
User Name or email address of user.
Average responsiveness Average responsiveness for all emails (Hours). Average Internal responsiveness Average time to reply to internal users (Hours). Average external responsiveness Average time to reply to external emails (Hours).
1.6.6 Storage Use
The
Storage Use
report shows how much space is used by different attachment categories.
Screenshot 11: MailInsights®Storage Use
OPTION DESCRIPTION
Scope Specify date range or use default setting (This Month). You can only select dates in the last 6 months.
Report for Select Everyone (default), Active Directory®user or group
Item type Select from the following available options: Emails,FilesorEmails and Files. Report
format
Select the type of output. Reports can be exported as an attachment in PDF or Excel (.xlsx) format.
The generated report consists of a graph with stacks representing different attachment categories.
The graph’s x-axis shows the different size brackets and the y-axis shows the attachment size.
NOTE
Attachment categories forStorage Usereport are: Images, Documents, Music, Videos and Others
The table below the graph contains the following additional information:
OPTION DESCRIPTION
Date Date email was received.
Total Size Total size of attachment.
Images Total size of attachment for category Images. Documents Total size of attachment for category Documents. Music Total size of attachment for category Music. Videos Total size of attachment for category Videos. Other Total size of attachment for category Other.
1.6.7 Inactive Accounts
The Inactive Accounts area enables you to generate a report that shows internal accounts that are no
longer active.
Screenshot 12: MailInsights®Inactive Accounts
Filter report using the following criteria:
OPTION DESCRIPTION
Scope Specify date range or use default setting (Last 30 days). You can only select dates in the last 6 months.
Report format
Select the type of output. Reports can be exported as an attachment in PDF or Excel (.xlsx) format.
NOTE
An inactive account is an account that has received emails but has not sent any emails in the date range covered.
The report returns a list of inactive accounts.
1.6.8 Inappropriate Words
The
Inappropriate Words
area enables you to generate a report that identifies any inappropriate
language used in emails. Inappropriate words can include words considered sexist, racist or swear
words.
Screenshot 13: MailInsights®Inappropriate Words
Filter the report using the following criteria:
OPTION DESCRIPTION
Scope Specify date range or use default setting (Today). You can only select dates in the last 6 months.
Recipients Select All, Internal Only, External Only Report
format
Select the type of output. Reports can be exported as an attachment in PDF or Excel (.xlsx) format.
The generated report displays data in a table listing the following:
OPTION DESCRIPTION
Date/Time Email date and time
Sender Sender email address
Subject Email subject
1.6.9 Internal Spammers
The
Internal Spammers
report enables you to generate a list that identifies internal email accounts
of users who include a large number of recipients in their emails. This reports takes into
Screenshot 14: MailInsights®Internal Spammers
Filter the report using the following criteria:
OPTION DESCRIPTION
Scope Specify date range or use default setting (Last 30 days). You can only select dates in the last 6 months.
Include Specify the amount of email accounts to include up to a maximum of 1000 users. Report
format
Select the type of output. Reports can be exported as an attachment in PDF or Excel (.xlsx) format.
Report data is displayed in a table listing the following:
OPTION DESCRIPTION
Username Sender username or email address. Average Number of
Recipients
Average number of recipients who received email from the sender during the specified time period.
1.6.10 Outside Office Hours
Screenshot 15: MailInsights®Outside Office Hours
Filter the report using the following criteria:
OPTION DESCRIPTION
Report for
Enables you to choose for whom this report applies. Run report on all employees (default) or on a group.
Include Specify number of results to display, up to a maximum of 1000. Default = 50.
Scope Specify date range or use default setting (This Month). You can only select dates in the last 6 months.
Report format
Select the type of output. Reports can be exported as an attachment in PDF or Excel (.xlsx) format.
OPTION DESCRIPTION
Non-Working Days
Use the calendar to define non-working days for past and future dates. Selected dates are listed in the provided window. Non-working days can include public holidays and company shutdown.
IMPORTANT
The settings will only be saved upon successful generation of the report. If you navigate away from the page before generating the report, all settings will be lost.
NOTE
When using theClear Allbutton, configured dates will be cleared for all years.
The following examples describe how the report will work when configured in typical scenarios:
Scenario 1:
An organization working from Monday to Friday, with start time and end time within the
same day, example from 9.00 am to 6.00 pm.
The report will cover emails sent between 6.00 pm and 9.00 am from Monday to Friday, and all day
during Saturday and Sunday.
Scenario 2:
An organization working from Monday to Friday. Start time and end time span across
midnight, example from 8.00 pm to 5.00 am.
In this case the report will cover emails sent between 5.00 am and 8.00 pm from Monday to Friday
and those sent on Saturday and Sunday. Emails sent on Saturdays between midnight and 5.00 am will
not be taken into account, since they are considered within normal working hours.
Scenario 3:
An organization working from Monday to Friday. Start time and end time span across
midnight, Wednesday is a public holiday.
The report will cover emails sent between 5.00 am and 8.00 pm from Monday to Friday, emails sent
on Saturday and Sunday, and all emails sent on Wednesday from midnight to midnight.
The results of the generated report are displayed in a horizontal bar chart. A report summary above
the chart displays the top 3 users who sent emails outside office hours.
OPTION DESCRIPTION
Email Email address of user
Number of Emails Sent Number of emails sent outside office hours
1.6.11 Data Leakage Detection
Use this report to detect emails that potentially contain sensitive data. The report will detect sent or
received emails containing:
Major credit card numbers (VISA, Mastercard, American Express, Diner’s Club, Discover)
USA Social Security numbers
Confidential documents and information
NOTE
The report analyzes both sent and received email for a selected user.
Screenshot 16: MailInsights®Data Leakage Detection report
Filter the report using the following criteria:
OPTION DESCRIPTION
Report for Enables you to choose for whom this report applies. Run report on all employees (default) or on an user or group.
Recipients Internal recipients, external recipients or both. Default is both. Report
format
Select the type of output. Reports can be exported as an attachment in PDF or Excel (.xlsx) format.
The results of the generated report are listed in a table sorted by date in ascending order. A report
summary above the table displays the top 3 senders.
The table contains the following information:
OPTION DESCRIPTION
Date Displays the date and time of the email. Sender Sender email address.
Subject Email subject. NOTE
Entries in the subject column contain a link to display the detected email.
Leakage Type Leakage type can be: Credit card, Social Security Number, confidential data, medical, NOTE
If more than one type of leak is detected, only the first one is displayed.
1.6.12 Job Search
Use this report to identify internal users who exchange emails with job search sites. The report
detects sent or received emails containing resumes.
NOTE
Screenshot 17: MailInsights Job Search report
Filter the report using the following criteria:
OPTION DESCRIPTION
Scope Specify date range or use default setting (This Month). You can only select dates in the last 6 months.
Report for Enables you to choose for whom this report applies. Run report on all employees (default) or on an user or group.
Domains The list of domains listed in this area will be added to the search criteria of the report. Add domains by typing the URL in the available field and clicking . To remove a domain, click .Clear allremoves all the listed URLs.
The default list of job search sites includes: Monster.com; Jobster.com;
jobcentral.com; hotjobs.yahoo.com; careerbuilder.com; indeed.com; simplyhired.com; jobing.com; reed.co.uk; jobsearch.co.uk; monster.co.uk; totaljobs.com; fish4.co.uk; cityjobs.com.
Report format Select the type of output. Reports can be exported as an attachment in PDF or Excel (.xlsx) format.
OPTION DESCRIPTION
Date Displays the date and time of the email.
Sender Sender email address.
Subject Email subject.
NOTE
Entries in the subject column contain a link to display the detected email.
1.6.13 Phrase Search
Search for specific terms or phrases within archived emails using the Phrase Search report. The
report runs search queries on whole email bodies and attachments to detect emails containing the
specified terms and displays results as a pie chart or stacked line graph.
NOTE
The report detects phrases in both sent and received email for a selected user or group.
Filter the report using the following criteria:
OPTION DESCRIPTION
Scope Specify date range or use default setting (This Month). You can only select dates in the last 6 months.
Report for Enables you to choose for whom this report applies. Run report on all employees (default) or on a user or group.
Chart Type Choose between a Pie chart and Stacked Bar graph. The pie chart displays the total per-centage of emails for the results found while the stacked line graph displays the count of emails sent on a day-by-day basis.
Phrases Phrases can be composed of 1 or more words. Use quotes (") to search for exact phrases or enter words without quotes to search for any of the words entered. A limit of 10 phrases ensures the report does not consume too many resources or take too long to run.
Report format Select the type of output. Reports can be exported as an attachment in PDF or Excel (.xlsx) format.
The results of the generated report are listed in a table sorted by date in ascending order. A report
summary above the table displays the total number of emails, and the total emails that matched a
phrase.
The table contains the following information:
OPTION DESCRIPTION
Date Displays the sent date and time of the email. Sender Sender email address.
Subject Displays the subject of the Email. If you have permission to view the email, you can click the entries in the subject column to display the detected email.
Phrase The phrase that was found within the email.
1.6.14 User Traffic Report
The User Traffic graph provides an overview of the number of emails exchanged between selected
users or groups and their contacts. It also lists unique email addresses of sent or received email.
Screenshot 19: MailInsights®User Traffic
Filter the report using the following criteria:
OPTION DESCRIPTION
Scope Specify date range or use default setting. You can only select dates in the last 6 months. Report for Select user or group.
Report format
Select the type of output. Reports can be exported as an attachment in PDF or Excel (.xlsx) format.
The generated report lists communication with respect to the selected user or group. Email addresses
listed in the table show the various communications exchanged between that particular email address
and the selected user or group.
The table below the graph shows the following information:
OPTION DESCRIPTION
Email Address Contact email address. Sent Total number of sent emails. Received Total number of received emails.
Internal Total number of internal emails sent and received.
Inbound Total number of inbound email from outside the organization.
1.6.15 Email Topics report
The Email Topics report lists topics found within emails exchanged between selected users or groups
and their contacts. It also lists the most common words found within the emails. This report uses the
search indexes to identify the most popular used terms.
Screenshot 20: MailInsights®Email Topics
Filter the report using the following criteria:
OPTION DESCRIPTION
Scope Specify date range or use default setting. You can only select dates in the last 6 months. Report for Select user or group.
Report format
Select the type of output. Reports can be exported as an attachment in PDF or Excel (.xlsx) format.
The generated report displays the selected mailbox (belonging to a user or group) at the top of the
report. A report summary displays the top 5 keywords for the selected user and the total number of
emails for every keyword. A stacked column chart displays the top 10 keywords on the x-axis and the
number of times these words were found on the y-axis.
TABLE DESCRIPTION
Email Topics A table containing the Date, Sender and Subject of every email found and the Phrase searched for.
NOTE
TheTop Keywords for Organizationtable displays information from archive stores that span the requested time period partly or in full. TheEmail Topicstable displays information from emails received during the selected time period only.
1.6.16 Email Performance Indicators report
The Email Performance Indicators report classifies users' productivity according to a set of predefined
performance indicators, comparing user's email usage trends across a period of time. Results are
relevant when the report is run on a group of people with the same job description since such people
should have similar email usage trends.
Performance calculations are based on emails sent and received. Results are displayed according to
the following indicators:
OPTION DESCRIPTION
Sociable A friendly person, willing to talk and engage in activities with other people. Takes Initiative Has the ability to assess and initiate things independently.
Expressive A person able to effectively convey thoughts or feelings.
Organized Systematic approach, likes order and can deal with assigned tasks efficiently. Responsible Carries out obligation to do something as part of a job or role.
Specific emails can be excluded from the report, to eliminate irrelevant emails such as newsletters or
automatic notifications.
Screenshot 21: MailInsights®Email Performance Indicators report
Filter the report using the following criteria:
OPTION DESCRIPTION
Scope Specify date range or use default setting. Select from Last 6 Months or Last 12 Months. Report
for
Select user or group. Excluded
Emails
Enter email addresses you want to exclude from the report. For example, you can exclude news-letters and automatic system notifications. For example*@newsletters.com.
Weight Weights represent user categories that typically define users within a specific role. For example, a salesperson is expected to send more emails than he receives, while an account manager receives more emails than he sends. Select from the following options:
Normal- a Normal user sends and receives an equal amount of emails.
Heavy Sender- a user who in his role is expected to send more emails than he receives. Receiver- a user who typically receives more emails than he sends.
The generated report displays a bar chart with color coded data. Information for the selected
mailbox (belonging to a user or group) is interpreted in two tables below the chart. The tables consist
of the following information:
TABLE DESCRIPTION
Factors Lists a score for each performance indicator per month (or per user if the report is generated for a group).
Statistics Col-lected
Email totals are listed either per user (if the report is generated for a group) or per month. Email Address (User) / Month
Total Sent Total Received Total Replies Sent
Total emails to Multiple Recipients Received Total emails to Multiple Recipients Sent Attachments Sent
Attachments Received
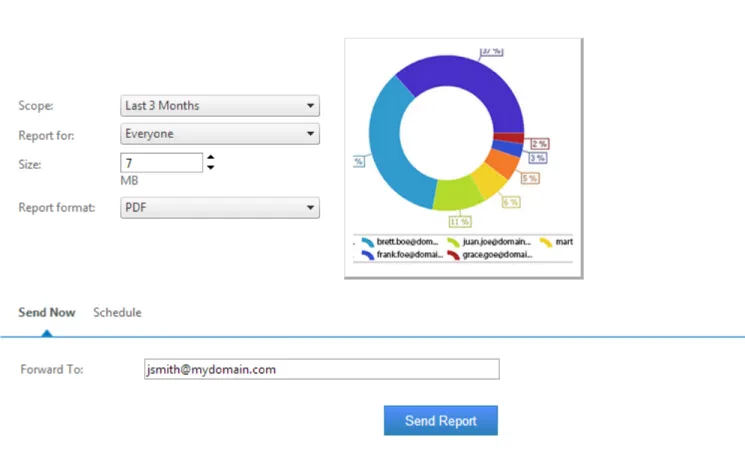
1.6.17 Large Emails report
The Large Email report identifies emails greater than a specified size exchanged between selected
users or groups and their contacts. It also lists the attachment categories (for example video, images,
music, documents and others).
Screenshot 22: MailInsights®Large Emails
Filter the report using the following criteria:
OPTION DESCRIPTION
Scope Specify date range or use default setting. You can only select dates in the last 6 months. Report
for
Select user or group.
Size Define the total email size in MB (message and attachments). Emails greater than the specified size are displayed in the report. The minimum size is 5 MB and is set by default.
The generated report displays the mailbox for the selected user or group at the top of the report. A
report summary displays the top 5 users and the total size of emails sent for the specified period.
Two charts display a graphical representation of the size of the emails being sent in percentages, one
for the top users and the other for attachment categories. For example, if user A sends 5 emails of 5
MB each (total 25 MB) and user B sends 4 emails of 10 MB each (total 40 MB), user B will have more
%age in the chart.
Data is broken down in a table underneath the chart as follows:
TABLE DESCRIPTION
Date Displays the sent date and time of the email.
TABLE DESCRIPTION
Number of Recipients Total number of recipients who received email from the sender during the specified time period.
Attachment Category The file categories of email attachments (for example video, images, music, documents and others).
Size Total size of email including attachments.
1.7 Changing user preferences
1. Click the user name displayed on the upper right hand corner of the screen.
2. From the
Language options
drop down box, select the language to display.
3. From the
Maximum page size
area, configure the number of emails to display per page.
4. From the
Audit Reports Date/Time Format
area (available only if logged in as an administrator),
change the date/time format to display on audit reports.
5. In the
Set your time zone
area use the drop down list to set the correct time zone. The date and
time of emails within GFI Archiver will be displayed according to this setting.
2 Configuring Client Access
GFI Archiver provides integration with various email clients and technologies so that users can access
their archived data from remote locations, while in the office or on the move. Use the Client Access
page to download and configure any of the following:
OPTION DESCRIPTION
GFI Archiver Outlook Connector
A Microsoft Outlook®plugin that enables users to view archived items from their Microsoft Outlook client.
GFI Archiver Archive Assistant
A tool that enables users to manually archive emails, files and calendar items contained in their Microsoft Outlook®installation.
GFI Archiver File Archive Assistant
An agent that enables users to archive files either automatically from a synced folder or manually from any location on their machine.
GFI Archiver Touch App for Windows 8/RT
An App that enables users to search archived data directly from Windows 8 or Win-dows RT.
IMAP Access Configure an IMAP account on your email client of choice to view archived items in mailboxes you have access to.
2.1 Installing Outlook Connector
The Outlook Connector enables users to synchronize their Microsoft Outlook
®folders with the data
archived by GFI Archiver.
The Outlook Connector can be downloaded from within GFI Archiver:
1. Open GFI Archiver.
2. Select
Client Access
tab.
3. Click
Outlook Connector
tab.
4. Select one of the available download options link to download Outlook Connector. Available
options are:
OPTION DESCRIPTION
Outlook Connector (32-bit Outlook) Download the Outlook Connector for Microsoft Outlook 32-bit version. Outlook Connector (64-bit Outlook) Download the Outlook Connector for Microsoft Outlook 64-bit version.
5. Double click on the file and follow the wizard to install
6. To check installation, from Microsoft Outlook, check that a new folder called
GFI Archiver Mailbox
is created.
NOTE
For information on how to use the Outlook Connector, refer to the Outlook Connector manual available from:http://go.gfi.com/?pageid=MAR_DownloadDocumentation.
See also:
2.1.1 Outlook
®
Connector system requirements
2.1.2 Software
NOTE
The machines where Outlook Connector is deployed must be able to connect to the GFI Archiver server.
COMPONENT DESCRIPTION
Supported Microsoft Outlook Versions - 32 bit and 64 bit
Microsoft Outlook®2003 (including Service Packs 1, 2, 3 or 4) Microsoft Outlook®2007 (including Service Packs 1 or 2) Microsoft Outlook®2010
Microsoft Outlook®2013 Supported Operating Systems Windows®8/8.1
Windows®7 Windows®Vista Windows®Server 2003 Windows®Server 2008 Windows®Server 2012 Windows®Server 2012 R2
Other Required Components Internet Explorer®7 or later (Internet Explorer®9 Compatibility Mode only)/Mozilla Firefox/Google Chrome/Safari®
HTTP port 80 (or HTTPS default port 443 for secure connections) -used by Outlook Connector to connect with GFI Archiver.
NOTE
Outlook Connector cannot be installed on the Microsoft®Exchange Server.
NOTE
When using a web-filtering tool, this must be configured to allow all HTTP requests between GFI Archiver server and Outlook Connector. Ensure that the GFI Archiver server’s IP address, NETBIOS name and DNS name are not blocked by the web filter. For more information, refer to:
http://go.gfi.com/?pageid=MAR_WebFiltering
2.1.3 Hardware
COMPONENT REQUIREMENTS
COMPONENT REQUIREMENTS
Memory Minimum:512MB RAM
Recommended:2GB RAM
Physical Storage 20MB physical disk space required for Outlook Connector installation. More space is required to store email headers and emails for offline access.
2.1.4 Downloading the GFI Archiver Archive Assistant
The Archive Assistant is a plug-in installed in Microsoft Outlook
®to enable users to manually archive
email messages and calendar items from Microsoft Outlook client into GFI Archiver. By default, items
stored in GFI Archiver are organized in an identical folder structure to that in the user’s mailbox in
Microsoft Outlook.
The Archive Assistant can be downloaded from within GFI Archiver.
IMPORTANT
Archive Assistant is not available for download ifManual Archivingis not enabled within GFI Archiver. Contact your Systems Administrator for more details.
1. On the machine where you want to install Archive Assistant, log to GFI Archiver using the web UI.
2. Go to
Client Access > Archive Assistant
.
3. Click
Download Archive Assistant
.
4. Wait for the download to complete. The setup file should run automatically.
5. Follow the installation wizard to complete installation.
NOTE
3 Configuring Archive Assistant
When Archive Assistant is installed, default settings are sufficient for the add-in to operate. However,
various settings can be customized according to the user’s preferences.
To change default settings:
1. Open Microsoft Outlook
®.
2. In the Microsoft Outlook
®ribbon, click
Archive Assistant
.
3. From the drop down menu, click
Settings
.
Screenshot 23: Archive Assistant configuration settings.
4. Click the
Connection
tab.
5. In the
Authentication
area, specify one or both methods of authentication:
OPTION DESCRIPTION
Windows authentication Archive Assistant uses your Windows®credentials to connect with GFI Archiver server. This method is used when you are working in an Intranet environment and connected to the same domain as the GFI Archiver server.
OPTION DESCRIPTION
Custom authentication Select this method of authentication to connect to GFI Archiver from a remote location outside your organization's network. TheUsernameandPassword provided here are authenticated on the GFI Archiver server.
IMPORTANT
When forms authentication is configured on the server, Archive Assistant requires custom authentication.
6. In the
Service address for GFI Archiver
area, select from the following options:
OPTION DESCRIPTION
Default This field contains the server address if Archive Assistant is installed through GPO and your Systems Administrator has also deployed the server address. If the field is blank, you will receive an error when trying to archive an email.
Custom Manually specify the address where GFI Archiver is installed. Ignore SSL Policy errors This option is enabled by default. It enables Archive Assistant to
connect to GFI Archiver, ignoring SSL policy errors when validating the remote certificate provided by the GFI Archiver for
authentication. This allows users to connect to GFI Archiver server over SSL even if the server is using a self-signed, expired,
withdrawn, compromised, or otherwise invalid certificate.
IMPORTANT
TheService address for GFI Archiveris always set toDefault, even when Archive Assistant is installed manually. If the field is blank, perform the following actions:
1. Contact your System Administrator and ask for the server address
2. Click theCustombutton and type the address provided in the address field.
7. Click
Manual Archiving
tab. Under
General
, configure the following
Archiving Operations
options:
OPTION DESCRIPTION
Automatically retry on recoverable error
When selected, Archive Assistant automatically retries to archive the selected email when a problem is encountered and recovered.
Automatically close dia-log on completion
Select this option to automatically close the Archive Progress dialog after the selected email is archived.
8. Click
Delete Options
tab.
9. Configure the following options for Email messages and for Calendar items within Microsoft
Outlook:
OPTION DESCRIPTION
Do not delete archived mes-sages
Select this option to keep all emails or calendar items from being deleted after they are archived.
OPTION DESCRIPTION
Permanently delete archived messages after N days
Specify the number of days to keep local copies of messages or calendar items after these have been archived (Default 30 days).
Run deletion policy now on messages
already archived
When enabled, the retention method selected will be applied to all old emails or calendar items that were archived but not yet deleted. If this option is not selected, email dele-tion will become effective only on emails/calendar items archived from that day onward.
NOTE
These settings do not effect emails and calendar items stored within the archive store in GFI Archiver and are not affected by retention policies configured in GFI Archiver.
10. Click
OK
.
3.1 Deploying the File Archive Assistant
The File Archive Assistant enables users to archive files such as documents or images. This can be
done manually from any location on their machine, or automatically, by placing the files they need to
archive in a folder synchronized with GFI Archiver. The File Archive Assistant can be installed
manually or via Active Directory
®Group Policy Objects (GPO).
The deployment of the File Archive Assistant requires the following steps:
STEP DESCRIPTION
Step 1 Download the File Archive Assistant
Step 2 Install the File Archive Assistant on the client computers Step 3 Configure the File Archive Assistant
Step 4 Configure Roles and Permissions for file archiving in GFI Archiver(this step is carried out by your System Administrator)
Step 5 Configure default File Archive Assistant settings in GFI Archiver (this step is carried out by your System Administrator)
3.1.1 Downloading the File Archive Assistant
The File Archive Assistant can be downloaded from within GFI Archiver as an executable file:
1. From the machine where you want to install File Archive Assistant, log to GFI Archiver using the
web UI.
2. Go to
Client Access > File Archive Assistant
.
3. Select one of the following options:
OPTION
Download the 32-bit version Download the 64-bit version
4. Select
Run
to initiate the Installation Wizard immediately or select
Save
to download the
installation file to a desired location, then double click the downloaded file to run.
See also:
Configuring the File Archive Assistant
3.1.2 Configuring the File Archive Assistant
The File Archive Assistant can be installed manually or by the System Administrator using Group
Policy Object (GPO). For both installation types, the URL of the GFI Archiver server needs to be
configured. This is the address used by File Archive Assistant to connect to GFI Archiver.
You should be able to use the File Archive Assistant when logging onto your computer. However, if
authentication fails, you can change the connection settings that enable the File Archive Assistant to
communicate with the GFI Archiver server.
To manually configure File Archive Assistant:
1. In the Microsoft Windows desktop toolbar of your computer, right-click the File Archive Assistant
icon.
2. In the
Connection
tab, configure the following:
OPTION DESCRIPTION
Windows Authentication
File Archive Assistant uses your Windows credentials to connect with GFI Archiver server. This method is used when you are working in an Intranet environment and connected to the same domain as the GFI Archiver server.
Custom
Authentication
Select this authentication method to connect to GFI Archiver from a remote location out-side your organization's network. TheUsernameandPasswordprovided here are authen-ticated on the GFI Archiver server.
Server Address for GFI Archiver
Provide the server address where GFI Archiver is installed. If File Archive Assistant is installed through GPO the server address is provided automatically in the Default field. If the server address field is blank, you will receive an error when trying to archive an email. Ignore SSL
policy errors
When this option is enabled, File Archive Assistant ignores security certificate errors when trying to connect to the GFI Archiver server.
This enables users to connect to GFI Archiver server over SSL even if the server is using a self-signed, expired, withdrawn, compromised, or otherwise invalid certificate.
NOTE
A user can select both Windows Authentication and Custom Authentication methods, given that the user credentials entered in the Custom Authentication field are of the same user logged on the computer. The application will try to use Windows Authentication by default, but if this fails, it will try to use the Custom Authentication settings.
IMPORTANT
If you are logged in Windows and enter Custom Authentication credentials for a different user, all activity history is cleared and your Synchronized Folders are disabled. New Synchronized Folders need to be created for the new user (A default Synchronized Folder is automatically created if this feature is configured in GFI Archiver).