Published June 2014. Revised September 2014. The most recent version of this Technical Note is posted at http://biosupport.licor.com/support
Developed for:
Image Studio Software
Please refer to your manual to confirm that this protocol is appropriate for the
applications compatible with your instrument model.
Technical Note
Image Studio
™
Software Work Area Folder
Table of Contents
Page
I. Work Area Definition
3
II. Avoid Renaming, Moving, or Adding Files to a Work Area
3
If Image Studio Software Does Not Recognize a Work Area That
Was Renamed or Moved
3
If an Acquisition Folder Was Renamed Or Moved
3
III. Creating a Work Area
3
Before Launching Image Studio Software
3
Avoid Creating a Work Area on a Network Drive
4
Procedure for Creating a Work Area
4
IV. One Work Area Per User
5
File Management
5
Sort and View Advantages
5
V. Switching the Active Work Area
6
VI. Removing Unused Work Areas
6
VII. Adding Work Areas Back to the List
7
Procedure to Add Existing Work Areas
7
VIII. When to Add Another Work Area
8
IX. Other Considerations
8
IP Address Must Be Manually Entered For Each New Work Area
8
If New Work Areas Cannot Be Created
9
Nested Work Areas
9
Solving the Nested Work Area Problem
9
I. Work Area Definition
Work Area Folder
Images
Acquisition Folder Text File
TIFF Image File (800 nm)
TIFF Image File (700 nm)
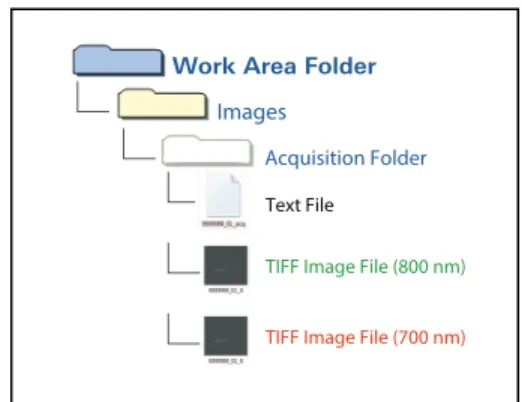
Figure 1. The Work Area folder contains Acquisition Folders. Acquisition folders contain images and associated analysis and scan data.
Work Area:Image Studio Software uses the Work Area as a folder for storing raw scan images, analysis data, software settings, and log files (see Figure 1). Inside a Work Area, software settings and log files are saved in separate folders. Images and data are
bundled together in the Images folder. Under most circumstances, each user should maintain their own Work Area.
Acquisition Folder:Images and associated data are bundled together in sub-folders of a Work Area called Acquisition Folders.
This Technical Note will explain how Work Areas can be used to facilitate data management, and it will address some common questions about Work Areas.
II. Avoid Renaming, Moving, or Adding Files to a Work Area
Under most circumstances, Work Areas and Acquisition Folders should not be renamed, moved, or have files from outside Image Studio Software saved to them. If Work Areas or Acquisition Folders are renamed or moved, Image Studio Software will not recognize them.
If Image Studio Software Does Not Recognize a Work Area That Was
Renamed or Moved
If a Work Area has been renamed or moved, See "Adding Work Areas Back to the List" on page 7 for how to add an unrecognized Work Area back into Image Studio Software.
If an Acquisition Folder Was Renamed Or Moved
If an Acquisition Folder has been renamed or moved, see theImage Studio Software Help
for how to add an unrecognized Acquisition Folder back into Image Studio Software.
III. Creating a Work Area
Follow the procedures in this section, starting with "Before Launching Image Studio Software" below, to create Work Areas in a way that will facilitate data management.
Before Launching Image Studio Software
a. MULTIPLE USERS: If multiple people or multiple labs will be sharing the same computer account to run Image Studio Software, create anOverallfolder on a local drive where each lab member using the system can create their own Work Area or each lab can create aLab Folder. Each group member will create an individual Work Area in the appropriateLab Folder(see Figure 2 on the next page).
Macintosh HD User Name Users Documents LICOR Lab Name A
Lab Member 1A Work Area Lab Name B
Lab Member 1B Work Area Lab Member 2B Work Area
Local Disk (C:) Default Users My Documents LICOR Lab Name A
Lab Member 1A Work Area Lab Name B
Lab Member 1B Work Area Lab Member 2B Work Area Computer
Macintosh Windows
Figure 2. Efficient way to organize Work Area folders when multiple lab groups will be using the same computer account.
b. SINGLE USER:If each Image Studio Software user has an individual account on the computer, create anOverallfolder on each account to save each individual's Work Area.
Avoid Creating a Work Area on a Network Drive
Avoid creating Work Areas on a network drive. Image Studio Software uses a Work Area to save data while scanning, so a scan may be aborted if the connection to the network drive is not fast enough.
If data must be transferred to a network drive, flash drive, or cloud based system, use the Image Studio Software Export option to export folders or zip files. See theImage Studio Software Helpfor how to export Acquisition Folders.
Procedure for Creating a Work Area
1. Double click the Image Studio Software icon.2. TheSet Active Work Areadialog box will open. ClickCreate New...to open the
3. In theCreate New Work Areadialog box: a. Type a name for the Work Area in
theNamefield.
b. ClickBrowseand navigate to the appropriate folder where the Work Area should be created.
c. ClickSaveand Image Studio Software will open with the newly created Work Area as the active directory for saving new scans and analyses.
IV. One Work Area Per User
Maintaining a single user per Work Area provides an orderly system for file management and saves time by allowing Image Studio Software to automatically load the last used settings and analysis tools. Custom scan presets, views, and protein markers that are not standard in Image Studio Software settings will need to be entered and saved manually in each new Work Area.
File Management
Figure 3. Too many Work Areas can make scrolling through theSet Active Work Areadialog box difficult.
Having too many Work Areas can make it difficult to remember which Work Area contains the files of interest. Multiple Work Areas are also inconvenient because the dialog box for selecting the active Work Area may contain many entries, and scrolling through the list can be difficult (see Figure 3).
Sort and View Advantages
In addition to cleaner file organization, leaving all of one's user data in a single Work Area takes advantage of the Image Studio Software tools for viewing andfiltering files. Image Studio Software can display thumbnails of all images when the
Multiple Imagesbutton is selected. Although a large number of images may be present in theImages Table, these images are easily managed using the Image Studio Software
Figure 4. This picture shows 1) theImage View Modein the upper left corner where the view may be changed from single to multiple images and 2) theFiltermenu in the lower right hand corner that can be used to organize images.
V. Switching the Active Work Area
Figure 5. The Switch Work Area option in the Image Studio SoftwareApplicationmenu.
The active Work Area can be switched without restarting Image Studio Software.
1. Click the Image Studio SoftwareApplication
menu, mouse overWork Area, and clickSwitch
(see Figure 5).
2. In theSet Active Work Areadialog, click the desired Work Area in the list of Available Work Areas.
3. ClickOKand the active Work Area will be switched.
VI. Removing Unused Work Areas
Unused Work Areas can be removed from the list of Work Areas in theSet Active Work Areadialog box without deleting any data.
1. Click the Image Studio Software
Applicationmenu, mouse over Work Area, and clickSwitch(or just open Image Studio Software). TheSet Active Work Areadialog box will open.
2. Scroll to find the Work Area to be removed, and click once to highlight it. 3. ClickRemove from List.
4. TheConfirm Work Area Removeddialog box will open. Click "Yes" to remove the Work Area.
Note: Work Areas that have been removed using this procedure can be added back to the list. See "Adding Work Areas Back to the List" below.
VII. Adding Work Areas Back to the List
Use the following procedure to add a Work Area to the list of Work Areas in theSet Active Work Areadialog if:
l A Work Area was removed using theRemove from Listoption and needs to be added
back to the list.
l A Work Area was moved or renamed using the operating system's file manager. The
Work Area in its new location or with its new name will need to be added using theAdd Existing...option.
Procedure to Add Existing Work Areas
1. Click the Image Studio SoftwareApplicationmenu, mouse over Work Area, and clickSwitch(or just open Image Studio Software). TheSet Active Work Areadialog box will open.
3. TheSelect an existing Work Area Folderdialog box will open. Navigate to the Work Area that needs to be added.
4. Click once to highlight the Work Area to be added.
5. ClickOpenand the Work Area will be added to the list in theSet Active Work Area
dialog box.
6. ClickOKin theSelect Active Work Areadialog box and Image Studio Software will open with the newly added Work Area as the active directory for saving new scans and analyses.
VIII. When to Add Another Work Area
l A user may choose to create more than one Work Area to separate different projects, or
if one Work Area is so full that it takes too long to open.
l When dealing with projects that require different settings and analysis types, keeping a
Work Area for each project may be expedient, because Image Studio will recall the last used settings specific to each project when that project's Work Area is opened.
l Data can be moved using the operating system's file manager to prevent making a new
Work Area. Moving and archiving unused data may be a better choice than creating a new Work Area.
IX. Other Considerations
IP Address Must Be Manually Entered For Each New Work Area
On some computer networks, IP addresses for the Odyssey®Classic and Odyssey Sa may need to be entered manually for each new Work Area. Consult the appropriate instrument manual for guidance, theOdyssey Sa Operator's Manual or theOdyssey Operator's Manual.
If New Work Areas Cannot Be Created
Nested Work Areas
The most common reason for this is trying to create a Work Area within another Work Area (nesting Work Areas). Starting with Image Studio Software version 3.1, nested Work Areas can no longer be created to prevent potential data loss.
Solving the Nested Work Area Problem
Figure 6. Use the operating system's file manager to move all Work Areas to be in the same folder at the same level (no Work Area within another).
If nested Work Areas were created in previous versions of Image Studio Software, use the following procedure so Work Areas can be created again.
1. Using the operating system's file manager, create a higher level folder where the nested Work Areas can be stored at the same level in the folder structure (see Figure 6).
2. After the Work Areas have been moved to the higher level folder, they will need to be reassigned as Work Areas in Image Studio Software.
3. Reassign the Work Areas by clicking theAdd Existing...option in theSet Active Work Area
dialog box and choosing the Work Area in its new location. See "Adding Work Areas Back to the List" on page 7 for the complete procedure.
4. Remove unused Work Areas from the list. See "Removing Unused Work Areas" on page 6.
Global Headquarters, Serving the United States • 4647 Superior Street • Lincoln, NE 68504
Toll free: 800-645-4267 • Fax: +1-402-467-0819 •[email protected]
LI-COR GmbH, Germany, Serving Europe, Africa, and the Middle East.
LI-COR Biosciences GmbH • Siemensstraße 25A • 61352 Bad Homburg • Germany
Phone: +49 (0) 6172 17 17 771 • Fax: +49 (0) 6172 17 17 799 •[email protected]
LI-COR Ltd., United Kingdom, Serving Denmark, Finland, Iceland, Ireland, Norway, Sweden, and UK LI-COR Biosciences UK Ltd. • St. John’s Innovation Centre • Cowley Road • Cambridge • CB4 0WS
United Kingdom • Phone: +44 (0) 1223 422104 • Fax: +44 (0) 1223 422105 •[email protected]
LI-COR Biotechnology Distributor Network:www.licor.com/bio/distributors
www.licor.com/bio
© 2014 LI-COR, Inc. LI-COR, Odyssey, Chameleon, and Image Studio are trademarks or registered trademarks of LI-COR, Inc. in the United States and other countries. All other trademarks belong to their respective owners.
LI-COR is an ISO 9001 registered company.
X. Further Questions
1. See the Image Studio Software software help. Click the blue question mark in the upper right corner of the Image Studio Software window to open the help. The upper right corner of the software help has a search box for quickly finding answers.
2. Contact LI-COR Technical Support (details in the footer of this document).
Doc # 988-14727 0614