Accellion,
the
Accellion
logo,
and
kite
works
are
registered
trademarks
of
Accellion,
Inc.
kite
works
is
a
trademark
of
Accellion.
All
other
trademarks
are
properties
of
their
respective
owners.
Corporate
Headquarters
Accellion
1804
Embarcadero
Road,
Suite
200
Contact
Us
p.
1.650.485.4300
|
f.
1.650.485.4308
www.accellion.com
kiteworks Web User’s Guide Page iii
Preface
... vii
Welcome ... vii
Audience ... vii
What’s
New... vii
kiteworks
Update
3:
July
2015 ... vii
kiteworks
Update
2:
May
2015 ... viii
kiteworks
Update
1:
April
2015... viii
Using kiteworks
... 9
What
is
kiteworks?... 9
Supported
Browsers ... 9
Sign
In... 10
Two
‐
Factor
Authentication ... 11
Get
Oriented:
A
Guided
Tour ... 12
The
Navigation
Pane:
Getting
Around
in
kiteworks ... 13
Where
You
Work ... 14
Detail
View:
Explore
Your
Files
and
Folders ...
14
List
View:
Manage
Your
Files
and
Folders ...
15
Recent
Activities
View:
Track
Your
Work ... 17
Go
Mobile... 18
Collaborate... 19
Folder
Management
and
Actions... 20
Create
a
New
Folder... 21
Share
Access
to
a
Folder... 22
Roles ...
23
Change
User
Roles ...
25
Delete
a
User ...
26
Manage
Your
Storage
Quota ... 27
Send
an
to
the
Users
of
a
Folder ... 27
Folder
Actions... 29
Edit
Folder
Properties...
29
Manage
Notifications ...
30
Make
a
Folder
a
Favorite... 34
Access
Enterprise
Content
Sources
(License
‐
Enabled)... 34
Add
a
New
Enterprise
Content
Source
to
kiteworks ...
36
SharePoint
and
SharePoint
Online...
37
File
Share
(CIFS/SMB/DFS)...
37
Documentum ...
38
OpenText
Content
Server ...
39
eDOCS ...
39
Dropbox ...
40
Microsoft
OneDrive ...
40
Remove
an
Enterprise
Content
Source
from
kiteworks ...
42
File
Management
and
Actions ... 42
Add
or
Upload
Files ... 43
Upload
to
Folder...
43
Upload
File(s)
via
Applet...
44
Troubleshooting...
45
Drag
and
Drop
into
kiteworks...
46
Drag
and
Drop
between
Folders...
47
Upload
to
the
Move
Tray...
48
Download ... 48
Online
Viewer ...
49
Download
File(s)
via
Applet... 51
Troubleshooting ...
52
Push
File ... 52
Lock/Unlock... 53
Delete
and
Recover
a
Deleted
File ... 54
Delete
a
File ...
54
Recover
a
Deleted
or
Expired
File...
54
Detail
View...
55
List
View...
56
Delete
a
File
Permanently ...
56
Detail
View...
57
List
View...
58
View
and
Change
Versions ... 58
Download
Version ...
60
Make
Current...
60
Delete
Version ...
60
Add
New
Version ...
61
The
Move
Tray... 61
Move
Tray
Actions:
Copy
and
Move...
61
Upload
Files
Directly
to
the
Move
Tray ...
63
Use
the
Move
Tray
to
Collaborate
with
Outside
Users
on
Enterprise
Content
Files...
63
Change
File
Expiration
Date ... 65
Mail... 66
When
you
send
or
receive
a
file,
send
a
file
preview,
or
save
an
draft,
that
activity
kiteworks Web User’s Guide Page v
Add
Tasks
and
Comments ... 77
Tasks ...
77
Assign
a
Task ...
78
Change
the
Status
of
a
Task...
79
Comments ...
80
Add
a
Comment ...
80
Respond
to
a
Comment ...
81
Search
Functions ... 82
Basic
Search... 82
Enhanced
Search ... 83
Search
Filtering ...
85
Edit
Settings ... 86
Account
Info ... 87
Display
Name...
87
Profile
Picture ...
87
Password ...
88
Preferences ... 88
Language...
89
Time
Zone ...
89
Message
Signature ...
89
Contacts
and
Groups ... 89
Manage
Contacts...
90
Add
a
Contact ...
90
Edit
a
Contact...
91
Delete
a
Contact ...
91
Add
a
Group...
91
Edit
a
Group ...
93
SFTP
Keys... 94
Generate
SFTP ...
94
Add
SFTP ...
95
Delete
SFTP...
95
kiteworks Resources
... 97
Appendix A: Icons and Symbols
... 99
kiteworks Web User’s Guide Page vii
Welcome
At Accellion, enterprise security is our primary focus. Second is our commitment to business mobility. Whether you are sharing files within your organization, or collaborating with multiple teams across the globe, we are committed to providing you with the definitive platform for working with content securely. Welcome to kiteworks™.
The kiteworks solution gives you powerful and secure access to content wherever you are, so you can share with confidence. With kiteworks, you can work seamlessly from web browser, to desktop, to tablet and smartphone—and you are always connected to your files.
Audience
This documentation is intended for users of the kiteworks solution by Accellion.
What’s
New
Each release of the documentation tracks with the current version of the software.
kiteworks Update 3: July 2015
• You can now drag and drop files directly between kiteworks folders
• New mail view.
• Folder Upload is now listed in the Activity Stream.
• Users can now upload an entire folder structure via web applet.
• Folders can be sent as a zip file for sharing.
• Mobile sync/push makes a file available on all devices for offline viewing.
kiteworks Update 2: May 2015
• Updated the User Interface with the following improvements; refer to Get Oriented: A Guided Tour: • Moved the main buttons to the left and added labels for easier navigation.
• Lightened the background for improved readability.
• Toggle button to switch between List view and Detail view for increased productivity. • Added icons next to the actions in the dropdown menus for easier recognition.
kiteworks Update 1: April 2015
• Enhanced the Request a File feature to allow files within the folder to be viewable to all users.
• Added mail to the Enhanced Search feature.
• Added the ability to Change File Expiration Date of a file.
• Added OpenText eDOCS DM to the available EC connectors.
kiteworks Web User’s Guide Page 9
What
is
kiteworks?
kiteworks™ is a secure file‐sharing solution from Accellion that enables you to securely and easily access and share enterprise information any time, anywhere. You can access your files and folders in the office and on the go, and can be sure that your files are up‐to‐date and protected. kiteworks gives you powerful and secure access to content wherever you are, so you can share with confidence.
The concepts discussed here can also be applied to your mobile device. For more information about the mobile app, Go Mobile.
Supported Browsers
The kiteworks interface supports the following browsers:
The Java applet supports Java 6 update 31 and up.
Table 1. Supported Browsers
Browser Version and Notes
Internet Explorer IE 9.0 and up Note Drag & Drop and multiple file select are not supported in IE9 because of the limited HTML 5 support in IE9. Accellion recommends using IE 10.0 and up. Firefox Firefox 26 and up Chrome Chrome 31 and up Safari Safari 5.1.10 and up Note Some default settings in Safari may need to be changed for the Java applet to function properly. Refer to Troubleshooting for more information.
Sign
In
You receive an email as below from your Administrator, indicating that your kiteworks account has been created. Click Activate, and you are taken to the kiteworks URL, where you can sign in.
The following screen appears.
Note Bookmark this page for future reference; this is your access point to kiteworks.
Add your user name (your email address) and password. If you haven’t logged in before and this option is available, click I don’t have an account yet. You will be prompted to create a password.
If you have forgotten your password, click Forgot password, and your Administrator will process your request, usually by sending you a new activation link.
kiteworks Web User’s Guide Page 11
Two‐Factor Authentication
Two‐Factor Authentication (2FA) is a license‐enabled feature that requires an additional security step when users log in to kiteworks. 2FA enhances the regular authentication by adding a “possession factor” (something the user has, such as a token, SMS‐based phone or device, or email connection) with a “knowledge factor” (something the user knows, such as a password) into the authentication process.
Get
Oriented:
A
Guided
Tour
The kiteworks web interface is made up of a navigation pane at the left of the screen that governs all views, and a detail view and list view.
• The Navigation Pane: Getting Around in kiteworks
• Where You Work
• Recent Activities View: Track Your Work
Detail View:
Navigation Panel
List View:
Folder Selected Actions on files or folders
File Selected
Folder and File Selected
Actions on files or folders
kiteworks Web User’s Guide Page 13
The Navigation Pane: Getting Around in kiteworks
At the left of the screen is a navigation pane from which you can perform high‐level functions and navigate through your views of kiteworks.
The icons are described in the following table.
Table 2.Top Menu Icons
Button (selected) Description Notes
All files Lists all the folders to which you have access. For more information, refer to Where
You Work.
Shared folders Filters the list of folders to those you have shared with other users or folders that have been shared with you. The view is identical to the detail view, with unshared folders filtered out of the list. For more information, refer to Detail View: Explore Your Files
and Folders and Share Access to a Folder.
Favorites Filters the list of folders to those you have marked as a favorite. The view is identical to the detail view, but shows only the folders you have marked as favorites.
For more information, refer to Detail View: Explore Your Files and Folders and Make a
Folder a Favorite.
Recent activities Jumps to the Activity view for managing tasks, comments, and other activities. For more information, refer to Recent Activities View: Track Your Work.
Mail Opens the Email Files window. For more information, refer to Email a File.
Where You Work
You have two options of how to best perform the actions you wish on your files and folders. To can see and perform actions on each item individually, use the detail view (Detail View: Explore Your Files and Folders). To see and perform actions on folders and files in the context of the file and folder structure in kiteworks, use the list view (List View: Manage Your Files and Folders).
Detail
View:
Explore
Your
Files
and
Folders
The detail view is your default view, accessed by clicking the view icon. The detail view shows the folders and files to which you have access, as well as details about each file and folder.
The specific sections of this screen are described in the following table. Navigation Pane Folder Selected: File Selected: A C F G D Fi Fi FileleleSSSelelelecececteteted:d:d: H I B E Table 3. Detail View
Identifier Description Notes
A Search, Help, Settings Use the banner bar for performing Search Functions, accessing the Help, and how to Edit Settings for your account.
B List view Allows you to toggle the view to the list view. Refer to List View: Manage Your
Files and Folders.
C Path to folder structure Shows how deeply into the folder structure the current folder resides. You can click each level to navigate through the file structure. D Actions Allows you to perform actions on selected files and folders, including uploading new files, adding new folders, requesting files, and other actions specific to the selected file or folder. E Contents of selected folder Shows all contents of the current folder. F Folder details Shows information about the selected folder, including your role in that folder. For more information about the folder, click the “expand” button ( ).
kiteworks Web User’s Guide Page 15
List
View:
Manage
Your
Files
and
Folders
The list view, accessed by clicking the View button, shows you information about how to manage your files and folders within a navigational structure.
G Activities related to the folder Includes information about invitations, file uploads, locked/unlocked files, etc. H Thumbnail of the file Shows a thumbnail of supported file types. To view the file without downloading
the file, click the “eye” button ( ).
I File collaboration buttons Shows you Tasks, Comments, and Versions relating to the selected file. Table 3. Detail View
Identifier Description Notes
Actions on selected files or folders Folder Selected File Selected A B C E F G H G D
File and Folder Selected
I J
The specific sections of this screen are described in the following table.
Table 4. List View
Identifier Description Notes
A Search, Help, Settings Use the banner bar for performing Search Functions, accessing the Help, and how to Edit Settings for your account.
B Detail View Allows you to toggle the view to the Detail view. Refer to Detail View: Explore
Your Files and Folders.
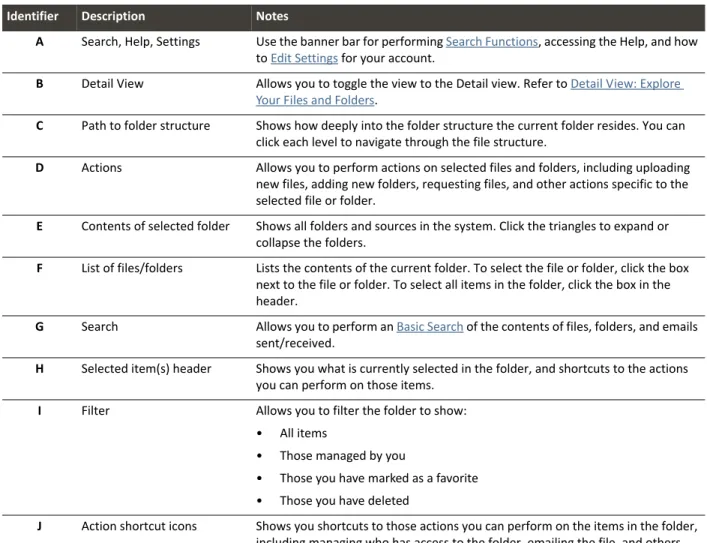
C Path to folder structure Shows how deeply into the folder structure the current folder resides. You can click each level to navigate through the file structure. D Actions Allows you to perform actions on selected files and folders, including uploading new files, adding new folders, requesting files, and other actions specific to the selected file or folder. E Contents of selected folder Shows all folders and sources in the system. Click the triangles to expand or collapse the folders. F List of files/folders Lists the contents of the current folder. To select the file or folder, click the box next to the file or folder. To select all items in the folder, click the box in the header.
G Search Allows you to perform an Basic Search of the contents of files, folders, and emails sent/received. H Selected item(s) header Shows you what is currently selected in the folder, and shortcuts to the actions you can perform on those items. I Filter Allows you to filter the folder to show: • All items • Those managed by you • Those you have marked as a favorite • Those you have deleted J Action shortcut icons Shows you shortcuts to those actions you can perform on the items in the folder, including managing who has access to the folder, emailing the file, and others.
kiteworks Web User’s Guide Page 17
Recent Activities View: Track Your Work
To see the status of tasks and other activities in kiteworks, in the left Navigation pane, click Recent Activities. It is here that you monitor new files sent to or shared with you, view all activities, manage tasks, and view comments.
The icons are described in the following table.
A B C E F D G E G Table 5. Activity View
Identifier Description Notes
A Search, Help, Settings
The top navigation bar has entries for performing Search Functions, accessing the Help, and how to Edit Settings for your account.
B Date Shows today’s date, or the date you have selected using the Date Range picker. C Activities Includes recent activities, upcoming tasks, tasks due today, comments you have made, and emails sent or received on today’s date or the date that you have selected. D Activity Toggle Toggles between all activity and your activities. E Activity Filter Filters activity shown on the activity list. F Activity List Includes comments, tasks, status of tasks, a history of uploads, downloads, file and folder management activities, people management activities, and other information pertaining to your files in kiteworks.
G Quota used If you have a limit to the amount of storage you can use, your usage is shown here.
Go Mobile
The kiteworks Mobile App gives you access to all of your files from your mobile device. The devices supported by kiteworks include phones and tablets for iOS and Android.
To get started, download the mobile app from the iTunes or Android stores. The link to download the app is in the Help screen on kiteworks:
Should your device become lost, stolen, or somehow compromised, your kiteworks Administrator can remotely wipe your device of all files accessed via the kiteworks Mobile App. Contact your Administrator immediately if your device is no longer secure.
For specific details about Accellion’s mobile offerings, refer to the kiteworks Mobile User’s Guide or contact your kiteworks Administrator.
kiteworks Web User’s Guide Page 19
Collaborate
You can collaborate with others in four distinct ways:
1 Folder Management and Actions
Sharing folders enables you to collaborate and share files with groups of people inside and outside of your organization. The process involves creating a folder, adding files to that folder, and then adding people to the folder, giving them access. The extent of their access is determined by you, the creator and manager. Permissions, or “Roles”, that you assign to others can range from being managers of those files (with the ability to add users, upload, download, lock, edit, and delete files), to only having the ability to view the files that exist in that folder.
You can perform the following actions on folders: • Create a New Folder
• Share Access to a Folder
• Edit Folder Properties
• Manage Notifications
• Download an Entire Folder
• Add or Upload Files to a folder • Delete a Folder
2 File Management and Actions
When the recipient receives the Mail, she/he clicks the link and downloads that file to his or her own system from kiteworks.
You can perform the following actions on files: • Email a File or Email a Preview of a File
• Add or Upload Files
• Download or Download File(s) via Applet
• Lock/Unlock
• Delete and Recover a Deleted File
• View and Change Versions
• Add to The Move Tray
3 Add Tasks and Comments
Those people who have access to a shared folder in kiteworks can add a comment to individual files. Owners, Managers, and Collaborators can also assign tasks to other users in the folder. These tasks are tracked on the Activities View and on the activities listed underneath the file.
4 Access enterprise content sources (License‐Enabled)
With the Enterprise Connect feature enabled, kiteworks provides access to remote file shares and cloud storage solutions such as SharePoint, CIFS, Box, Google Drive, and others. Access to enterprise content sources is managed by your kiteworks Administrator.
Folder
Management
and
Actions
Folders enable users to collaborate and easily share the files within the folder. Note that what you’re allowed to do depends on what role you have in that folder. See Roles for more information.
When you navigate to a folder using the detail view, the following information appears.
Folder information includes the following details:
Table 6. Folder Details Information
Detail Header Description and Notes
Last Modified The date the last activity occurred within the folder. Created The date the folder was created.
By The user name of the person who created the folder. Permissions Your role in the folder. For more information, refer to Roles.
Location The folder structure in which the folder resides (“breadcrumb” to the current folder). Also indicates whether the folder was previously “owned” by another user (refer to Roles). Link The link to the folder. You can copy this link and send it to other users of the folder, and those users will be able to follow the link to the folder. If a user hasn't been explicitly added to a folder, the user won’t be able to access the folder using the shared link. Deleted The number of files and folders that have been deleted in the folder, and the size of those deleted folders.
If you click the “expand” icon in the lower‐right corner ( ), the following information appears:
Expiration The date that the folder expires and will be deleted.
Allow Sync Whether the folder allows sync; for more information, refer to the kiteworks Desktop Client User’s
Guide or contact your Administrator.
Quota Your total quota available to you in your kiteworks system. To change this quota, contact your Administrator.
kiteworks Web User’s Guide Page 21
Create a New Folder
To add a folder, perform the following steps.
1 In kiteworks, navigate to where you would like the new folder to exist.
2 In the upper‐right corner of the screen, click New ( ) and select Create folder. The New folder window appears.
3 Name the folder and add a description.
4 Set a folder expiration date and determine whether sync will be permitted. The default is to not allow sync.
Note These options are only available for root folders; i.e., folders that exist in the kiteworks Files folder, not a nested folder within kiteworks Files. Nested folders inherit the setting of the root folder. (For more information about sync, refer to the kiteworks Desktop Client Installation and User’s Guide, located in the help button on kiteworks).
5 Set an expiration date for the files in the folder. To set no expiration, leave the File expiration field blank.
Share Access to a Folder
To invite others to collaborate on the files in a particular folder, perform the following steps.
1 Navigate to the folder that you would like to share.
2 In the upper‐right corner of the screen, click Actions and select Manage People. The Manage people window appears, listing all of the users who have access to the folder.
3 Click Add new user. The Add new field appears at the top of the window.
4 Type in the email address(es) of the person or people with whom you would like to share. If you add more than one user, separate each address with a comma.
5 Using the drop‐down list, select the role you would like the user(s) to have in the collaboration. (For more information about roles, refer to Roles.)
Note If you would like different users to have different roles, you must add them separately.
6 Check to indicate whether that new user should be notified via automatic email that s/he has been added to the folder.
7 Click Add. A confirmation message appears at the top of the window.
kiteworks Web User’s Guide Page 23
Roles
Roles are assigned by the manager of a specific shared folder; your role determines what functions you are allowed to perform in that shared folder.
The available roles that can be assigned to users in a folder are: Viewer
The only action the user can perform is to view the files in a folder via the Accellion interface. Viewers cannot download a file to their device or desktop, they can only view files using the
Online Viewer.
Downloader
Used for someone who needs to be able to download and view the files in a folder, but not upload new versions, upload new files, or assign tasks to others with access to that folder.
Collaborator
Used for someone who needs full access to the files in a folder, but does not need to manage other users’ access to the folder.
Manager
The second‐highest level of control of a folder; generally assigned to someone who needs full access to all files within a folder and to control others’ access to a folder.
Owner
The highest level of control of a folder; assigned by default to the person who creates a folder. Any content in the Owner’s folder counts against his quota.
Note The roles listed below are examples only. Adjust the roles based on your particular organization’s needs.
Table 7. Examples and Use Cases of Each Role
Use Case Viewer Downloader Collaborator Manager Owner
Legal Defending counsel The client Admin. assistant Paralegals Legal team Co‐counsel to the lead lawyer Lead lawyer Research Funding organization Undergrads Admin. assistants Research assistants Grad students Professors involved in the research Research lead High‐tech business Temp. employees Consultants Planning/Logistics Admin. assistants Engineers Marketers Tech Writers Vice‐President Team Managers Dep’t Managers Project Manager Medical Patients Approved family members Nurses Assistants Billing Dep’t Specialists Technicians Primary care doctor Lead doctor Case Manager Dep’t Head Government Enlisted personnel NGOs/Contractors with limited security clearance Non‐commissioned officers NGOs/Contractors with full security clearance Lieutenants Ensigns Lieutenant Commander Commander
The following table lists details about the specific roles and duties/responsibilities of each role. Table 8. User Roles and Access Privileges Permission Control View e r Do w n lo ad er Collabor at o r Manag er Owne r Notes
View files Yes Yes Yes Yes Yes View files without downloading the file to a desktop or device. Refer to Online Viewer.
View file expiration
Yes Yes Yes Yes Yes View the date a file expires. Refer to Change File
Expiration Date.
View Activities — Yes Yes Yes Yes View activities for a file or folder. Refer to Recent
Activities View: Track Your Work.
Download — Yes Yes Yes Yes Download a file or folder to the desktop or to a mobile device. Refer to Download, Download an Entire Folder, or
Download File(s) via Applet.
Send file — Yes Yes Yes Yes Send a file to an internal or outside entity. Refer to Email
a File.
Add Comment — Yes Yes Yes Yes Add comments to a file or folder and see comments made by others. Refer to Add a Comment.
Subscribe for notifications
— Yes Yes Yes Yes Request to receive an email notification any time an action is performed on a folder. Refer to Manage
Notifications.
Be assigned a task — Yes Yes Yes Yes Users with Viewer privileges cannot be assigned a task. Refer to Add Tasks and Comments.
Send message — — Yes Yes Yes Send an email to all users in a folder. Refer to Send an
Email to the Users of a Folder.
View users — — Yes Yes Yes View the users and their roles in a folder.
View other’s tasks — — Yes Yes Yes View tasks that have been assigned to other users. Refer to Add Tasks and Comments.
Assign tasks — — Yes Yes Yes Add a task to a file, set a due date, and assign the task to a user. Refer to Add Tasks and Comments.
Upload — — Yes Yes Yes Upload files to a folder. Refer to Upload to Folder. Edit — — Yes Yes Yes Edit files using the integrated mobile editor. Refer to the
kiteworks Mobile App User’s Guide for your particular device.
View/promote versions
— — Yes Yes Yes Access previous versions of the file and promote a previous version to become the latest version. Refer to
View and Change Versions.
Delete versions — — Yes Yes Yes Delete a previous version of the file permanently. Refer to
View and Change Versions.
Lock/unlock — — Yes Yes Yes Locking a file means the file cannot be edited. Refer to
Lock/Unlock.
Delete files — — Yes Yes Yes Deleted files remain on the system for a set number of days before being permanently deleted. Refer to Delete
kiteworks Web User’s Guide Page 25
Change
User
Roles
To change the role of an existing user in a folder, perform the following steps.
1 Navigate to the folder that you would like to share.
2 In the upper‐right corner of the screen, click Actions and select Manage People ( ). The Manage people window appears, listing all of the users who have access to the folder. Change file
expiration date or status
— — Yes Yes Yes Adjust the file expiration date or whether there is a file expiration date. Refer to Change File Expiration Date.
Delete folders — — — Yes Yes Deleted folders remain on the system for a set number of days before being permanently deleted. Refer to Delete
and Recover a Deleted File.
Manage users — — — Yes Yes Add a user to a folder and set that user’s role within the folder; remove a user from accessing to a folder. Refer to
Share Access to a Folder. Create nested
folders
— — — Yes Yes Create a nested folder under an existing folder. Refer to
Create a New Folder.
Rename folders — — — Yes Yes Rename the folder or edit the folder description. Refer to
Edit Folder Properties. Permanently
delete
— — — Yes Yes Permanently remove an item from the system so that it may not be restored and so that it no longer uses storage quota. Refer to Delete a File Permanently.
Enable/disable sync
— — — Yes Yes Enable and disable sync for a folder. Refer to Edit Folder
Properties. Delete others’
tasks or comments
— — — Yes Yes Remove or edit other users’ tasks or comments. (The comment or task creator can always delete or edit his own comments or tasks.) Deleting a comment also deletes all replies to that comment. Refer to Add Tasks
and Comments. Have uploaded files count against your quota — — — — Yes When you are the owner of a folder whatever files or folders are uploaded to that folder by anyone else counts against your personal quota, set by your Administrator. For more information about quotas, refer to Manage Your
Storage Quota. Table 8. User Roles and Access Privileges Permission Control View e r Dow n lo ad er Collab or at or Manag er Owner Notes
3 Using the drop‐down menu, select the user’s new role.
Note If there are nested folders within the selected folder, you are prompted whether you would like to change the user’s new role to all nested folders.
You may only be able to “promote” the user to a higher level. To “demote” a user, you must go to the root folder to which the user was originally assigned.
4 A confirmation message appears at the top of the window. Click to close the window.
Delete
a
User
You can only delete a user from a folder to which he was originally assigned; that is, you cannot delete a user from a nested folder when he has access to the parent folder.
1 Navigate to the folder to which the user has access.
2 In the upper‐right corner of the screen, click Actions and select Manage People ( ). The Manage People window appears, listing all of the users who have access to the folder.
3 Next to the user’s name, click the “delete” icon ( ). (If the icon does not appear, navigate up one level in the folder hierarchy, until the icon appears.)
4 A confirmation window appears, asking whether the deletion applies to all nested folders. Click your preference.
kiteworks Web User’s Guide Page 27
Manage Your Storage Quota
Your Administrator sets your storage quota. This quota applies to all folders that you own, and all files that are uploaded to the Move Tray (see Add or Upload Files). Having any other role in other folders does not affect your storage quota.
To manage your storage quota most efficiently, follow these best practices:
• Clear the Move Tray of files that you have uploaded (see The Move Tray).
• In folders that you own, delete unnecessary files (refer to Delete and Recover a Deleted File).
• Permanently delete files or folders that you have deleted from your folders (refer to Delete a File
Permanently).
• Remove unnecessary previous versions of files in a folder (see View and Change Versions).
• Contact your kiteworks Administrator to increase your storage quota.
Send an Email to the Users of a Folder
You may need to send an email to users sharing a folder. This procedure is not to email a file to them, but simply to communicate with them via email.
To send an email to the users of a folder, perform the following steps.
1 Navigate to the folder.
2 In the upper‐right corner of the screen, click Actions and select Send message. The Send message window appears.
3 From the list of users listed on the screen, click either TO or BCC. You can also click TO or BCC at the top of the list, selecting all users.
4 Type in the Subject and Body of the email.
Note If you have set a “signature” on the Settings page (refer to Message Signature), your signature is appended to your email.
5 Click Send. Your email is sent to the selected users as being from you (your listed display name).
6 When the recipient(s) click Sign In, they are taken to the folder from which you sent the message.
kiteworks Web User’s Guide Page 29
Folder Actions
When you select a folder, you can perform the following actions on that folder:
Create folder; see Create a New Folder
Upload; see Add or Upload Files
Request files; see Request a File
Recent activities; see Recent Activities
Manage people; see Share Access to a Folder
Set as favorite; see Make a Folder a Favorite
Send message; see Send an Email to the Users of a Folder
Edit properties; see Edit Folder Properties
Manage notifications; see Manage Notifications
Download current folder; see Download an Entire Folder (to enable the applet, refer to Message Signature)
Delete current folder; see Delete a Folder
Your ability to perform these functions may be limited by your role in that folder. For more information, refer to Roles.
Edit
Folder
Properties
If you are an Owner or Manager of a folder, you can edit the folder’s properties. These properties include the name and description of the folder, the folder expiration date, and the file expiration date.
Note If the folder is a “root” folder, that is, at the top of the folder hierarchy under “kiteworks Files”, you can edit the folder expiration date. Otherwise, this date cannot be edited.
In “root” folders, you can also edit whether the folder can be synced using the kiteworks Desktop Client. For more information about syncing, refer to the kiteworks Desktop Client Installation and User’s Guide. To download the Desktop Client, from the Help screen on the kiteworks interface, click Desktop Client for Mac or Windows.
To edit the properties of a folder, perform the following steps.
2 In the upper‐right corner of the screen, click Actions and select Edit Properties. The Edit properties window appears.
3 Make the changes to the field(s) you wish to edit.
4 Click Submit. The properties have now been changed.
Manage
Notifications
If you are an Owner, Manager, Contributor, or Downloader in a folder, you can manage the notifications (email messages) that you receive about activity that occurs within the folder. To edit the circumstances in which you receive notifications, perform the following steps.
1 Navigate to the folder you would like to manage.
2 In the upper‐right corner of the screen, click Actions and select Manage notifications. The Manage notifications window appears.
3 Click the activity for which you would like to receive a notification. Also indicate whether this change should apply to all nested folders within this folder.
4 Click Submit. You will then receive an email notification whenever that type of activity occurs within the folder.
kiteworks Web User’s Guide Page 31
Download
an
Entire
Folder
To download the entire folder and its contents, perform the following steps.
1 Navigate to the folder you would like to download.
2 In the upper‐right corner of the screen, click Actions and select Download current folder.
3 Your browser may prompt you to allow Java permission to run. Click to allow it. Your operating system’s Select destination window appears.
4 Navigate to the location to which you would like the folder to be downloaded, and click Save.
5 You are shown the status of the download, and when the download is complete, you are shown “Download complete”.
6 Click to close.
If you click Cancel during the download, the download stops and, depending on how much of the download has progressed, the folder may be partially downloaded to the location you specified.
Troubleshooting
When you upload multiple files or folders using the applet, you must have Java installed on your system and your Administrator must have enabled the use of the applet.
If you have trouble with the applet, perform the following checks on your Java installation.
1 To check whether you have the most recent version and to download the newest version of Java, go to
http://java.com and follow the steps.
2 If you have the most recent version of Java installed and are still having trouble, you may need to clear your Java cache. For instructions on how to do this, go to
http://www.java.com/en/download/help/plugin_cache.xml and follow the instructions detailed there.
3 For Safari users on a Mac:
Run the applet in “Unsafe Mode” so it can access the files on your hard drive to upload them to kiteworks. The Java applet is blocked by default from running properly in the latest version of Safari on the latest version of Mac OS.
To change this setting manually, refer to Safari: About Internet Plugin Management.
Caution Enable Unsafe Mode only for trusted websites (like kiteworks) to keep your content secure.
For more help, contact your kiteworks Administrator.
Use
Zip
Files
for
Easy
Transfer
of
Multiple
Files
If the folder to upload to kiteworks contains a large number of files, you may find it easier to create a zip file with all of the files in it. You can then upload the single zip file to kiteworks, so other users only have to download the single file.
1 In Windows systems, go to your desktop file management tool and right‐click the folder that contains the large number of files.
2 Click Send To and select Compressed (zipped) folder. The zip file is created.
3 Open kiteworks and navigate to the location that you would like the file to reside.
4 In the upper‐right corner of the screen, click Upload ( ). The Add new files menu appears.
5 From here, you can either:
• Drag the zip file and drop into the window. OR
• Click Choose Files, which opens the File Upload dialog box. From here, navigate to the zip file. Select the file, and click Open.
6 Click Add. The zip file that contains all of the files you compressed is now located in the folder you selected and is available for download to those people with download access to the folder.
kiteworks Web User’s Guide Page 33
Delete
a
Folder
If you are an Owner or Manager of a folder, you can delete that folder and the folders nested within. The file may be recoverable after deletion, depending on Administrative settings. For more information about recovering files or folders, refer to Recover a Deleted or Expired File. To delete a folder, perform the following steps.
1 Navigate to the folder you would like to delete.
2 In the upper‐right corner of the screen, click Actions and select Delete current folder. A confirmation window appears.
3 Click Yes. The folder is now deleted.
Note When you delete a folder, all nested folders are also deleted.
Recent Activities
When you are using the list view, you have the same access to all of the information shown in the detail view; however, you access that information differently.
To view recent activities in a folder, perform the following steps.
1 Using the list view, navigate to the folder about which you would like to see the recent activities.
2 In the upper‐right corner of the screen, click Actions and select Recent activities. The Recent activities window appears.
You can filter the activities that appear by:
Folders, for folder‐related actions (such as adding folders or changing the folder properties; adding, editing, or deleting users of the folder)
Files, for file‐related actions (such as uploading new, deleting, downloading, and viewing files; changing expiration dates; adding, deleting, and promoting versions of files)
Mail, for emails sent, received, deleted, and drafts saved
Tasks, for tasks relating to the files in the folder and progress of a task
Comments, for comments and replies made on files in the folder
Make a Folder a Favorite
You can filter the folder lists to show only those folders marked as “favorites”. When a folder is marked as a favorite, a blue star appears in the details about the folder.
Only folders can be marked as favorites. Individual files cannot be marked as favorites.
1 To mark a folder as a favorite, navigate to the folder to the folder.
2 In the upper‐right corner of the screen, click Actions and select Set as favorite ( ). The folder is now a “favorite” and the action is recorded as an Activity.
To show only favorite folders in your folder list, in the left Navigational bar, click Favorites ( ).
Access Enterprise Content Sources (License‐Enabled)
With the Enterprise Connect feature enabled, kiteworks provides access to file share data when remote interface access is enabled.
Access to enterprise content sources is managed by your Accellion Administrator and you have access to the enterprise content sources based on your Active Directory privileges. Depending on the permissions set by your Administrator, you may also be able to add your own connections to different enterprise content sources.
Your Administrator can also configure your system to include your own Home Directory in a Windows, Unix, or Linux system.
The enterprise content sources appear when you are in the list view (refer to List View: Manage Your Files
and Folders) or if you navigate to the highest level in the folder hierarchy in the detail view (refer to Detail
View: Explore Your Files and Folders).
Detail View: List View: A B C Actions on selected files or folders B C A
kiteworks Web User’s Guide Page 35 From the enterprise content folders, you can perform the varying actions on files, depending on the source. Contact your Administrator for more information.
You use kiteworks to access files and folders, but you cannot make any changes to the folder hierarchy. The folder hierarchy continues to be managed outside of kiteworks. You can, however, add files and versions (where supported).
Refer to Use the Move Tray to Collaborate with Outside Users on Enterprise Content Files for tips on how to collaborate with others across multiple platforms.
Table 9. Enterprise Sources
Identifier Description Notes
A Types of Sources: Box Icon indicates that the content source is Box. Note End‐users cannot add a new Box source. To add a new Box source, contact your Administrator. Documentum Icon indicates that the content source is Documentum. Dropbox Icon indicates that the content source is Dropbox.
Note When you move files from a Dropbox source to kiteworks, the “Return to Content Source” action is not available. The action of moving the file from the Move Tray deleted the file from the source. eDOCS Icon indicates that the content source is eDOCS. Note that the functionality using eDOCS is limited at this time. Google Drive Icon indicates that the content source isGoogle Drive. Note End‐users cannot add a new Google Drive. To add a new Google Drive, contact your Administrator. Home Share Icon indicates that the content source is the home directory of your operating system. To add your Home Directory, contact your Administrator.
kiteworks Icon indicates that the content is in kiteworks.
OpenText Content Server Icon indicates that the content source is OpenText. SharePoint or Microsoft OneDrive Icon indicates that the content source is SharePoint 2007, 2010 or 2013, SharePoint Online, Microsoft OneDrive. File Shares Icon indicates that the content source is Windows File Shares (CIFS / SMB / DFS). B Details about the files and folders Lists details or files and folders contained in the selected folder. C Actions on the files and folders Actions that you can perform on the selected files or folders.
Add
a
New
Enterprise
Content
Source
to
kiteworks
When you have access to files from enterprise content sources, you may be able to add them to kiteworks, depending on your Administrator’s settings.
1 In the upper‐right corner of the screen, click New ( ) and select Add enterprise content source. The Add enterprise content source window appears.
Each enterprise content source prompts you for different information, depending on the source’s requirements. The Source types that you see are those that have been enabled by your Administrator. If you would like to add a source that is not listed, contact your Administrator.
2 Fill out the prompted information for the type of source:
• SharePoint and SharePoint Online; also applies to Microsoft OneDrive
• File Share (CIFS/SMB/DFS)
• Documentum
• OpenText Content Server • eDOCS
• Dropbox
3 Click Add. The new enterprise content source should be added.
Note You may need to enter additional credentials to add a new content source. If this happens, you are shown an error message that says “Invalid credential”. The Add Enterprise content source window re‐appears, with the addition of Login ID and Password fields.
kiteworks Web User’s Guide Page 37
SharePoint
and
SharePoint
Online
On the Add Enterprise content source window, under Source type, select SharePoint or SharePoint Online.
The following information must be added to the screen:
• Source name — You can choose any name for the source. • Source URL — The URL to SharePoint site.
For example, for the SharePoint site http://sp2010‐demo/marketing/default.aspx the Source URL should be http://sp2010‐demo/marketing/default.aspx
• Description (optional) — Used to describe the connection.
File
Share
(CIFS/SMB/DFS)
The following information must be added to the screen:
• Source name — You can choose any name for the source. • Source URL — The path to File Share.
• Description (optional) – Used only to describe the connection.
Documentum
On the Add Enterprise content source window, under Source type, select Documentum.
The following information must be added to the screen:
• Source name — You can choose any name for the source. • Source URL — The URL to Documentum site.
• Repository — The name of the Documentum Repository to which you want to connect. • Description (optional) — Used only to describe the connection.
kiteworks Web User’s Guide Page 39
OpenText
Content
Server
On the Add Enterprise content source window, under Source type, select OpenText Content Server.
The following information must be added to the screen:
• Source name — You can choose any name for the source. • Source URL — The URL to OpeText Content Server site.
• Workspace — The name of the OpenText Workspace to which you want to connect. • Description (optional) — Used only to describe the connection.
eDOCS
On the Add Enterprise content source window, under Source type, select OpenText Content Server.
The following information must be added to the screen:
• Source name — You can choose any name for the source. • Source URL — The URL to eDOCS site.
• Library — The name of the eDOCS library to which you want to connect. • Description (optional) — Used only to describe the connection.
Dropbox
On the Add Enterprise content source window, under Source type, select Dropbox. (This option is enabled by your kiteworks Administrator.)
The following information must be added to the screen:
• Source name — You can choose any name for the source. • Description (optional) — Used only to describe the connection.
Microsoft
OneDrive
kiteworks supports OneDrive as a personal storage tool; each user provides his/her own connection details. The process to add a OneDrive source is slightly different than simply adding a new enterprise source.
To add a OneDrive source, perform the following steps.
1 Navigate to the top‐level of all folders.
2 In the upper‐right corner of the screen, click New ( ) and select Add enterprise content source ( ). The Add Enterprise content source window appears.
kiteworks Web User’s Guide Page 41
4 Add the OneDrive URL through “.com”, for example:
https://<yourcompany>-my.sharepoint.com/personal/<user name>
5 Add a description for the folder (optional).
6 Click Add. The content source has now been added.
Note You may need to enter additional credentials to add a new content source. If this happens, an error message appears with “Invalid credential”. The Add Enterprise content source window then re‐appears, with the addition of Login ID and Password fields. Fill in these fields and click Add.
Remove
an
Enterprise
Content
Source
from
kiteworks
To remove an enterprise content source from kiteworks, perform the following steps.
1 Using the list view (refer to List View: Manage Your Files and Folders), select the source you would like to delete.
2 In the upper‐right corner of the screen, click Actions and select Delete enterprise content source ( ). A confirmation screen appears.
3 Click OK. The enterprise content source is now removed from your list of enterprise sources.
File
Management
and
Actions
When you select a file, you can perform actions on that file from the Actions menu in the upper‐right corner of the screen.
You can perform the following functions on files:
kiteworks Web User’s Guide Page 43 • Push File
• Download and Download File(s) via Applet
• Lock/Unlock
• Delete a File
• Add New Version
• Add to The Move Tray
• Return to Content Source (for files that were copied or moved from an enterprise content source; see
Access enterprise content sources (License‐Enabled)
• Change File Expiration Date
Note Your ability to perform these functions may be limited by your role in that folder. For more information, refer to Roles.
Add or Upload Files
There are four methods to upload a file from your desktop to kiteworks. Choose the one that works best for your circumstances:
• Upload to Folder
• Upload File(s) via Applet
• Drag and Drop into kiteworks
• Upload to the Move Tray
Upload
to
Folder
This procedure uploads files directly to a folder in kiteworks.
1 Navigate to the folder in which the file(s) will reside.
2 In the upper‐right corner of the screen, click Upload . The Add new files window appears.
3 From here:
a. Click Choose Files, which opens the File Upload dialog box. From here, navigate to your file(s). Select the file, and click Open.
OR
a b
c