IJSRR, 8(2) April. – June., 2019 Page 1622
Research article Available online www.ijsrr.org
ISSN: 2279–0543
International Journal of Scientific Research and Reviews
An update on Techniquesto Improve clinical photography while
controlling errors in orthodontics.
Ningombam Robinson Singh
1*, Dinesh Kumar Bagga
2, Hiten Kalra
3,Poonam
Agrawal
4, Disha Sirohi
5and Ritika Gupta
61,2,3,4,5,6
School of Dental Sciences, Department of Orthodontics and Dentofacial Orthopaedics, Sharda University, Greater Noida, Plot No-32,34, Knowledge Park –III, U.P -201306, India
1
Email:Id. [email protected], Mb -7085934757
2
Email Id. [email protected], Mb-7982469219
ABSTRACT
In current years, clinical photography has grown to become a very important diagnostic aid
and proper permanent time-linked clinical record which are not only used for diagnosis and
treatment planning but also for communicating with the patients about the existing problems,
available treatment options and visualization of end results by using various software meant for
showing predictable changes with the treatment. Moreover, the treatment progress can also be
visualized with sequential photographs during various stages of treatment. Digital photography can
have numerous impacts on our dental practice. Photographs can teach patients and improve case
acknowledgment, impart shade to the dental lab, and improve patients' certainty following treatment.
Though, there are numerous possible causes of errors while getting these records. Photographs of
insufficient quality may distort the initial illness of the patient, may record dental anomalies and
defects incorrectly, or may inaccurately replicate the progress. This paper is an attempt to feature
anupdate on techniques to improve clinical photography of the causes of error in every-day clinical
tasks and best-practices for getting proper high-quality photographic records in a clinical setup.
KEYWORDS
: Clinical record, digital photography, sources of errors, photography inOrthodontics
*Corresponding Author
Dr. Ningombam Robinson Singh
Department of Orthodontics and Dentofacial Orthopaedics
School of Dental Sciences
Sharda University, Greater Noida, Uttar Pradesh-201306, India
IJSRR, 8(2) April. – June., 2019 Page 1623
INTRODUCTION
Clinical digital photographs acquired pre, mid and post orthodontic treatment form an
important portion of the patients’ records.1When captured correctly, dental photographs will provide
more correct evidence about malocclusion and possible treatment options than any other clinical
record.2The errors most often encountered in clinical photographs can be distributed hooked on
double groups. The first group comprises of errors that result from an inappropriate selection of
photographic equipment-the camera, lens, flash, backdrop, and auxiliary equipment such as mirrors
and retractors.1 The second group of errors comprises incorrect patient-operator positioning. Why we
shot orthodontic photographic records? Case records (photo documentation), Complement additional
orthodontic records, Significant clinical and lawful role, From a diagnostic opinion of examination,
Case demonstrations to study clubs and former groups, Academic investigate, Guidance of staff and
students, Journals, Patient instruction, Pre-surgical planning, and post-operative analysis.3Hence,
this paper provides an overview of the causes of error in clinical digital photography in every-day
clinical practice and best-practices for achieving proper high quality photographic records in a
clinical setup.
NEED FOR STANDARDIZATION
Shaffer stated in 19364,5, “A review of the orthodontic illustrations in our orthodontic and
dental journals disclosed that they need a surprisingly small share of standardized images of
orthodontic patients. One has to study the before-and-after images used as illustrations in our
textbooks and journals to comprehend the requirement of additional standardization’’
LINEAR SCALE
The clinical pictures must constantly be magnified in well-ordered and standardized manner.
This principle was definitely recognized in what is called the 'Westminster scales', summarized in
Table:1 for recording the assessments of various body elements. The scales check with main
IJSRR, 8(2) April. – June., 2019 Page 1624
Table: 1 The Westminster Scale Percentages
Normal adult magnification ratios View ratio
Full length 1:50
Head & neck 1:10
Face 1: 8
Both hands 1: 10
Single hand 1: 5
Single eye 1: 2
The best thanks to standardize measure is to usage a lens that's marked with copy percentages
on the barrel. The lens is arranged to a precise magnification percentage and focusing is achieved by
moving the whole camera back and frontward.5
COMMON CAUSES OF ERRORS/ MISTAKES IN CLINICAL DIGITAL
PHOTOGRAPHY
A. Apparatus and technical faults due to incorrect choice or utilization of device involving the
camera, lens, flash, retractors, mirrors. 1,6
B. The Error re-counts to some recording and includes incorrect positioning of the subjects.
1)
Camera
Orthodontics photography may be a role procedure of macro photography. Macro
photography is wherever you are taking careful pictures of small things. so you
may want a specialized camera capable of taking sensible macro photography i.e DSLR (digital
single-lens reflex) which is extremely modifiable and may be created to be excellent for orthodontics
photography. Correct camera emphasis is very essential, with extra-oral images taken in portrait
mode andintra-oral images taken in landscape method. To let direct evaluation of images acquired at
totally different time’s reliable magnification of pictures is needed.
IJSRR, 8(2) April. – June., 2019 Page 1625
1)
Lens
The standard lens of a camera provides a field of view just like that of the naked eye. A
macro lens permits you to require sharp, detailed, close-up images of small subject. However, a dedicated Macro lens attached to a DSLR camera provides even better close-up pictures mainly
through higher definition and accurate focus, and is by far the superior choice.3,6,7The
lens required for dental taking pictures may be a Macro lens by a focal length of 85-105mm.
Point flash once used for clinical image, often manufacture distracting shadows, which can
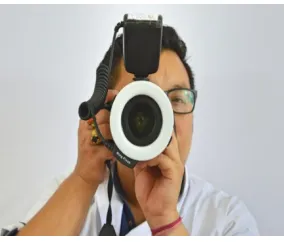
hinder necessary details (Fig 3). These is avoided by employing a ring flash (Fig 5:) that removes
shadows by permitting an additional uniform distribution of light during extra and intra –oral
photographs consequently improving the quality of the pictures.
2)
Flash
Figure3:Problem with point flash even with diffuser Figure 4: Point flash
Figure 5: Distracting shadow is avoided Figure 6: Ring flashby employing a ring flash
4.Retractors
Cheek retractors such like plastic ones are suitable for retracting the cheeks while taking
intraoral images. The single ones help more in retraction than the double ones. Lip retractors
are helpful to keep the lip away once the front teeth have to be snapped or for snapping
mirror photos of the occlusal surfaces.6,8
Cheek retractors
• Wider end of the cheek retractors is used
IJSRR, 8(2) April. – June., 2019 Page 1626
• By propulsion the lips forwards, towards the creative person it makes it simpler for the
patient to bite along in occlusion and retract the soft tissue away from the teeth.
• Use the smaller end of the larger retractor.
• The photographer must hold it & pull it 4-5mm distally and away from the teeth so that the
distal of first molar is taken.9
• The assistant holds the wide end of the cheek retractor on the opposite side
5.Mirrors
• Glass mirrors with front-silvered are best suited
• Long-handled, front-silvered mirrors, rhodium glass mirrors- perfect apparatus for dental
photography.
Figure 7: The top one includes a ghost image from stainless steel mirror and image from rear silver (Bottom) shows sharp image
PROBLEMS RELATED TO DIGITAL PHOTOGRAPHY
1. Depth of field.
2. ISO speed
3. Shutter speed
4. CCD and CMOS problem.
1)
Depth of field
A camera's aperture setting determines the depth of field and variance over which objects
looks in sharp focus.10
When taking an intraoral frontal shot (Figure 8 &9) that needs a large depth of field since as
IJSRR, 8(2) April. – June., 2019 Page 1627
Figure 8: Wide Aperturef/2.8 - low f-stop number Figure 9 : Narrow Aperture f/25 - high f-stop number large depth of field
2)
ISO SPEED
• The ISO speed regulates in what way sensitivity of the camera is toward received light. A
lesser ISO speed is practically always suitable; subsequently higher ISO speeds intensely
increase picture noise.
3)
Shutter speed
.Shutter speed suggests to the length of your time throughout that the shutter is open given as
a fraction of a second. (1/60,1/120 etc)
Faster shutter speeds freeze the act as there is less chance for the camera to move.
Good photography involves an equilibrium amongst shutter speed and aperture that controls
the quantity of light coming into the lens.
4)
CCD and CMOS problem
CCD (charge-coupled device) and CMOS (complementary metal-oxide semiconductor)
image devices
Even when the lenses on the digital cameras are never changed dust can still eventually
acquire on the CCD of the cameras.
This may get as tiny black spots, at an exact promotion on intra- and extra-oral images
Figure10: Hairs and dirtparticles eventually get on the CCD
Suggested camera settings in clinical photography10,11,12
• It is recommended to use manual settings to take perfect photographs
• Shutter speed – 1/125
• ISO – 100-200
• Mode – M
• Aperture for Extra-oral – f-8 to f-11
• Aperture for intra oral – f 25- f-32
IJSRR, 8(2) April. – June., 2019 Page 1628
B) POSITIONING MISTAKES/ERRORS
–Together the patient & also the doctor are required to be arranged in a correct manner, in a
standardized way, to produce good photographs.
Extra-Oral Photographs
Frequently seen features of a lowly extra-oral shooting comprise –
Figure11: The photograph acquired in landscape Figure12: Wrong magnificationorientation
Figure13:Excessively showing of the patient’s body Figure 14: Formation of a dark shadow in background in the image
IJSRR, 8(2) April. – June., 2019 Page 1629
Errors with profile shots include-
Figure 21:Disruptions in the form of jewelry Figure 20 :Background noise
In what way to minimizethis errors-
A. The head must be in the natural rest position, alongside their eyes stable horizontally13(Fig
22).
B. The right aspect of the face must be distinctly visible with no hindrances like caps, hair,
jewelry or scarfs.5,8 ,12
C. The aperture value for extra oral photographs should be set to a least e.g. F8 is frequently a
suitable setting.3
Figure 17: Patient posing with extremeleaning of the head
forwards or backwards
Figure 18: Patients with long hair coming on face
IJSRR, 8(2) April. – June., 2019 Page 1630
Figure 22: Extra oral portrait photographs
Intra-oral photographs Common errors include –
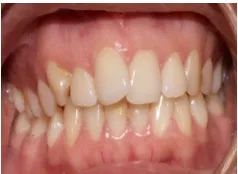
Figure 23: Canted occlusal planes Figure 24:Incorrect choice and usage of retractors
Figure 25: Saliva is not suctioned Figure26: The tongue has not been retracted before the photograph is taken
A suction will be accustomed eliminate saliva before taking every photograph
IJSRR, 8(2) April. – June., 2019 Page 1631
Figure29: Fogging up of the mirror Figure: 30 Stainless steel mirror with scratch
When taking occlusal “mirror” photographs, heating the mirror earlier to insertion prevents “fogging” of
the mirrors.9
(a) (b) Figure 31 (a &b): Camera is not positioned correctly in center
Figure 32: Incorrect choice and use of retractor Figure 33: First molar not visible
POSITIONING ERRORS
Problems is also encountered wherever there's a height distinction between the patient and
also the practitioner. This drawback will be resolved by obtaining the patient or
the practitioner, that ever is suitable, to square on a platform to lift them to the identical height.1,6
CONCLUSION.
Clinical photography has remained an important and integral part of every field of dental
specialties and has become a very valuable resource. pictures are often simply obtained using the
right instrumentation, correct settings and also the simplest techniques, thereby increasing the
possibilities of getting high-quality pictures. Knowledge of entirely doable mistakes in extra- and
IJSRR, 8(2) April. – June., 2019 Page 1632
article provides with the basics that a medical practitioner desires or rather should grasp before he
indulging into the attention-grabbing world of digital clinical photography.
Sources support and sponsorship
Nil.
Conflicts of interest
Nil.
REFERENCES
1. McKeown H, Murray A, Sandler P. How to avoid common errors in clinical photography.
Journal of Orthodontics. 2005;32(1):43-54.
2. Anna Kataoka: Common Mistakes in Clinical Photography and How to Prevent Them the
Journal: spring 2017;18-20.
3. A Nayak. Clinical photography: A to Z APOS Trends Orthod 2017;7: 19-28.
4. R.Sreevatsan ,Koshi Philip, Elbe Peter, Kanwar Singh, Manvendra Singh Gahlot. Digital
Photography in General and Clinical Dentistry- Technical Aspects and
Accessories.International Dental Journal of Student’s Research, January – March
2015;3(1):17-24.
5. Abhilasha R, Ramesh B, Hegde C, Hemanth M, Sharmada BK. Errors in clinical
photography. IOSR J Dent Med Sci. 2016 Mar;15(3):4-13.
6. J Sandler, A Murray; Digital Photography in Orthodontics. Journal of Orthodontics, Vol
28,2001, p.197-201.
7. Nayler J R. Clinical Photography: A Guide for the Clinician. J Postgrad Med 2003;49: 256-
62.
8. Orthodontic Pearls: A Selection of Practical Tips and Clinical Expertise; Eliakim Mizrahi.
(2004) Taylor & Francis Group. (Chapter 4: Orthodontic Photography, by PJ Sandler, AM
Murray).
9. Panchali Batra, Tulika Tripathi, Priyank Rai, Anup Kinase. Clinical photography in the
orthodontic office. J Clin Orthod. 2011Oct;10: 569-78.
10.Ahmad. Digital dental photograph; British Dental Journal 2009;207(2):63-9
11. A Nayak. Clinical photography: A to Z APOS Trends Orthod 2017;7: 19-28.
12.Jonathan Sandler Alison Murray. Clinical Photography in an Orthodontic Practice
Environment -Part 1. Ortho Update 2010; 3: 75–80.
13.Claman L, Patton D, Rashid R. Standardized portrait photography for dental patients. Am J