A step by step guide for IBM Platform HPC evaluation
The IBM Platform HPC Team
8/16/2013
Table of Contents
Overview... 3
A typical HPC cluster ... 3
Pre-installation Checklist... 4
Installing the OS on the Head Node... 5
Installing Platform HPC 3.2 on the Head Node... 8
Managing Cluster Hosts and Users ... 11
Adding cluster hosts... 11
Removing cluster hosts ... 15
Managing cluster users ... 16
Changing cluster host configurations... 17
Changing cluster host location ... 18
Managing Workload... 18
Changing LSF configuration ... 19
Customize and publish application forms ... 20
Submitting jobs using job submission form ... 24
Monitoring & managing jobs... 25
Monitoring & Reporting ... 26
Summary... 28
Overview
This document is a guide for planning, installing, and configuring a cluster managed by IBM Platform HPC (Platform HPC). It assumes that you have hardware available and software installation media from your vendor. You can also download the Platform HPC media ISO file from IBM web site.
Installing Platform HPC on a cluster head-node (also referred to as an “installer node”, “master host” or “management node”) has relatively few steps. Once the Platform HPC master host is installed, you can deploy and manage the cluster either through the Platform HPC Web interface or by using command line tools.
The steps described in this guide apply to Platform HPC Version 3.2.
This guide uses Red Hat Linux 6.2 as an example. Please also read release notes and installation guide carefully for installation details.
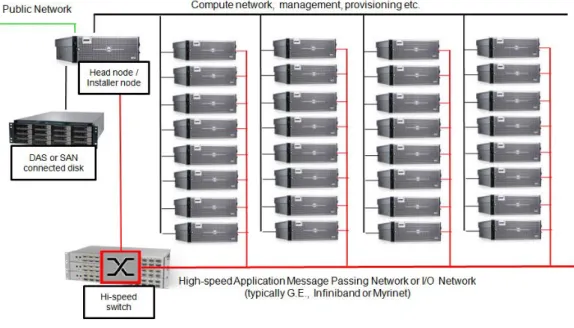
A typical HPC cluster
The following figure shows a typical Platform HPC cluster. Clusters typically consist of a head node and multiple compute nodes, usually connected on a private network.
Figure 1: Typical HPC Cluster
Clusters are often purchased pre-configured and ready-to-run from major systems vendors, although some cluster administrators may choose to assemble required hardware elements on their own.
Pre-installation Checklist
Before installing your cluster, use the following pre-installation checklist:
- Hardware configuration of the head node –The head node should have a minimum of 2.5 GB of RAM, an 80 GB hard drive, a DVD drive for media installation and a minimum of two network interface cards (NICs) configured with static IP addresses. Make sure you collect information for DNS and gateway of the public network.
In addition, the “spanning tree” option of network switches should set to “PortFast”. - Platform HPC Installation Media and License –You should have a DVD containing the
Platform HPC installation media. Your hardware vendor may have supplied such a DVD. In addition to the Platform HPC DVD, you will need operating system media, either on DVD or multiple CDs. Your vendor may require a particular operating system version be installed. You also need a valid Platform HPC 3.2 license entitlement file for proper functioning of Platform HPC 3.2.
- Power and Cooling –Ask your hardware manufacturer for the equipment specs to make sure that you have adequate power and cooling available not only for CPUs but for other equipment like storage arrays and switches before starting your cluster. Don’t neglect issues related to floor loading and clearances during installation planning.
- Checking your compute nodes –Before installing Platform HPC on the head node, make sure that you know about the hardware configuration of your compute nodes, including motherboard type and version, BIOS version and BIOS settings. If you recently purchased a cluster pre-configured to work with Platform HPC, the systems vendor has likely done all this work for you.
o BIOS configuration –IPMI management should be enabled if available, and all nodes should be configured to boot from their primary network interface first (eth0). You should also synchronize the date and time on your various systems since if they are too far out of sync, NTP (network time protocol) included in Platform HPC may not be able to correct clock drift. Synchronizing clocks is especially important if you will be running MPI applications and performing debugging or tracing code execution. You should also verify that the motherboard revisions for your various systems are the same. A common problem with different versions of motherboards is that sometimes the network interfaces may be “switched” causing eth0 and eth1 to be associated with the wrong physical port causing problems during installation.
o Storage on network nodes –You should know the disk configuration of your various systems. If you have different types of disks with different disk capacities, you should use the Node Group management features in Platform HPC to segment different systems into different node groups. Platform HPC allows you to perform “diskless” installs as well if you are running compute intensive application requiring minimal I/O and not requiring “scratch” storage.
o Console management –Many installations will involve some sort of console
management solution. A popular solution is a KVM switch. While not necessary to install Platform HPC, having the console of your nodes connected via a KVM switch can simplify troubleshooting.
Installing the OS on the Head Node
You must install the OS on the head node correctly for Platform HPC to function. The easiest way is to follow the steps below. Modifying an existing installed OS does not guarantee to have a workable head node for Platform HPC.
Screenshots in this document are to install Red Hat Enterprise Linux (RHEL) 6.2. SeeInstalling Platform HPCfor details of installing other Linux packages on the head node.
1. Boot the OS media and start the installation.
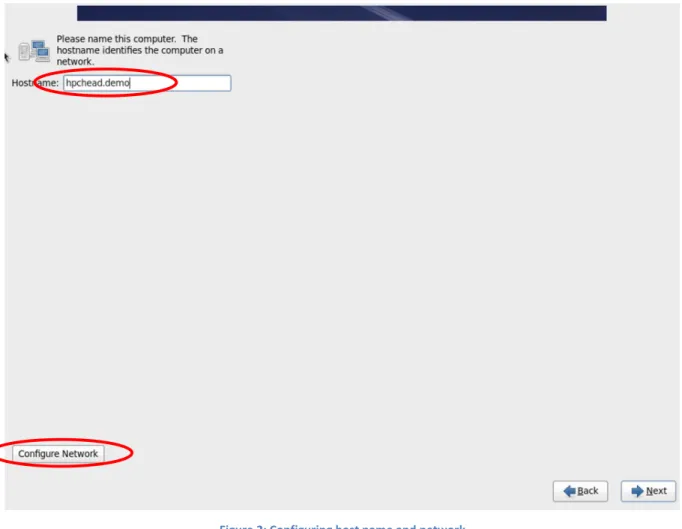
Follow the instructions until prompted for Hostname and Configure. The host name of the head node needs to a fully qualified domain name (FQDN), e.g.hpchead.demo
Figure 2: Configuring host name and network
2. Without leaving this page, clickConfigure Network, then edit two Ethernet interfaces. Configure System eth0as private network for provisioning, andSystem eth1as public network for connecting to the corporate network.
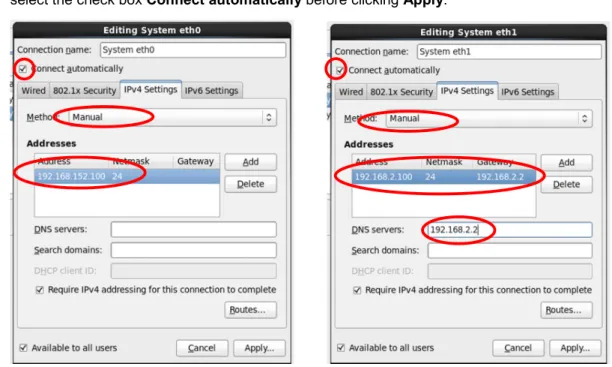
3. After selecting the network interface and clickEdit, select the IPv4 Settings tab, and edit the information. See following example for bothSystem eth0” andSystem eth1. Make sure to select the check boxConnect automaticallybefore clickingApply.
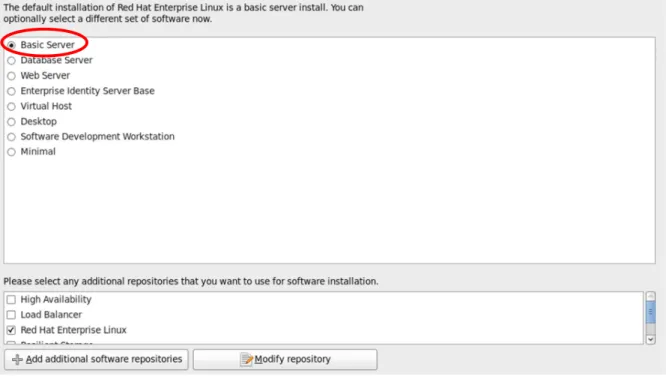
4. Continue installation until the selection of different set of software screen. It is preferred to select “Basic Server”. There is a know issue in RHEL 6.2 which conflicts with Platform HPC 3.2 when selecting “Desktop” or “Software Development Workstation”.
Figure 4: Install RHEL 6.1 with Basic Server mode
5. Complete the installation. We recommend not creating any users at this time. Users should be created after Platform HPC is installed so that they can be propagated to all compute nodes automatically.
6. After reboot, at the prompt, log in as root. You need to configure RHEL 6.2 for preparing installing Platform HPC 3.2
7. Install thecreaterepo package.
a) Mount the RHEL 6.2 media, e.g.mount /dev/cdrom /mnt
b) Create alocal.repofile in/etc/yum.repos.d/with the following contents:
[local-server]
name=rhel-local-server baseurl=file:///mnt/Server enabled=1
gpgcheck=0
c) Runyum install createrepoto install thecreaterepopackage
8. Platform HPC uses MD5 as authentication method. You need to change RHEL 6.2 to use it as well. Then retype the password of root.
# authconfig –-enablemd5 –update # passwd root
9. Disable SELINUX by settingSELINUX=disabledin/etc/selinux/config.
10. There are other settings documented inInstalling Platform HPCin case you have installed additional packages other than the default RHEL 6.2 “Basic Server” packages.
11. On some hardware, the NIC names are set toem*in RHEL 6.2 instead ofeth*, you need to reset them toeth*. Update file/boot/grub/grub.conf in the kernel line by adding
biosdevname=0. For example:
kernel /vmlinuz-2.6.32-220.el6.x86_64 ro root=UUID=f71340a6-78df-4cbea3c4-601571f99de3 rd_NO_LUKS rd_NO_LVM rd_NO_MD rd_NO_DM LANG=en_US.UTF-8
SYSFONT=latarcyrheb-sun16 KEYBOARDTYPE=pc KEYTABLE=us acpi=on crashkernel=auto rhgb quiet biosdevname=0 nonm nicdelay=0 acpi=on
12. Reboot the server.
Installing Platform HPC 3.2 on the Head Node
After system reboot, complete the following steps to install Platform HPC 3 on the head node. 1. Log in as root.
2. Insert the Platform HPC 3.2 DVD and mount it. Or you copy the ISO file to the server, you may mount it using the command “mount –o loop hpc-3.2-xxxx.rhel.iso /mnt”
3. Run the installer: “python /mnt/pcm-installer”.
4. Follow the instructions to continue the installation.
Be careful in selecting the provisioning network and public network. The following figure shows an example.
5. Platform HPC 3.2 comes with head node fail over capability. This requires two head nodes in a cluster. Select the default option N to skip this feature for the purpose of this example.
The installation will then add all kits contained in Platform HPC. After that it will prompt for the OS media.
6. Eject the Platform HPC DVD and insert the RHEL DVD, then select option 1).
7. If RHEL 6.2 is the only OS for the cluster and no other kits to install, select option 4 to continue. See below.
8. Reboot the machine to bring OFED module live, which is installed as part of Platform HPC. Now the head node is up and running.
9. Open a web browser (Internet Explorer 8+ or Firefox 3.6+).
10. Enter the IP address of the head node as the URL to open the Platform HPC login page.
11. Log in ashpcadminwithhpcadminas the password. This user account was created by the HPC
After you are logged in, the Platform HPC Console dashboard is displayed.
This shows the installation of the head node is complete.
Managing Cluster Hosts and Users
Adding cluster hosts
Now you are ready add nodes to your cluster1.
Platform HPC conveniently includes default provisioning template (a.k.a. nodegroup) for different types of compute hosts. Over time you can define and customize your own provisioning templates, but these steps just use the defaults for the purpose of illustration. To add new nodes to the cluster, start by selecting the name of the provisioning template you would like to add hosts to. This is an important Platform HPC concept – hosts actually get added with a specific provisioning template.
1If you prefer command line tools instead, you can use the Kusu
addhostfacility that can be run from the shell on the head node. The remainder of this guide assumes that you use the Platform HPC Web interface.
The provisioning templatecompute-rhel-6.2-x86_64is a supplied template in your installation. Hosts added with this template will have the RHEL 6.2 OS installed using a package-based (anaconda) installation method. This provisioning template was created by the installer when you provided the RHEL 6.2 OS during the installation process. This is the most common way to install hosts, but you could just as easily add hosts with an imaged installation approach or one that adds diskless compute nodes. All of these provisioning templates are deploying RHEL 6.2 since this is the only operating system kit you’ve loaded onto the head node so far. You could just as easily have additional
provisioning templates by copying an existing template, then modify it with different operating systems and associated kits from a different repository.
SelectResources->Hosts, click “Add” as shown in the following figure to provision one or more hosts with the selected provisioning template. You can optionally specify location information. The information will be used to show the host in the dashboard rackview. The naming conventions for hosts in this node group definition are determined using the node group properties.
You can change the naming conventions for the provisioning template depending on your site requirements (inHost Provisioning >select the template> Modify), but the default will be
compute#NNNwhereNNNis a unique ID automatically assigned by Platform HPC (also three digits). You will normally use DHCP to have the head node assign network parameters to newly added hosts. In this example,eth0is the device that is connected to your private (provisioning) network. After specifying the location information, click on theStart Listeningbutton. As shown in the following figure you will then
start to power-on cluster nodes. You should make sure there are no other elements on the private network like a router for example, providing DHCP services.
Assuming your compute is properly connected to the private network, and that it is configured to PXE boot from the network before local media, you should see your hosts boot from the network when powered on as shown below. As nodes are powered on they will be assigned an address via DHCP from the head node (addresses are assigned because the “addhost” program is running on the head node).
When any host boots, it will always boot from the network. The Platform HPC head node will provide different instructions depending on whether it is a new host, an existing host in need of re-provisioning, or an existing host that is already up to date.
In the case of a newly added host, the host will obtain a kernel andinitrdfrom the management host and will proceed with obtaining its Node Installation Information (NII) from the management host via HTTP. Anaconda is then launched with a kickstart file prepared based on the NII information reflecting the desired software to provision to hosts of the provisioning template.
If you don’t have console access on the host being installed you can monitor the installation process from the Platform HPC Web interface itself as shown below. As long as your Web interface continues to listen for new nodes, you can continue to power on hosts and have them automatically added to this cluster as members with the selected provisioning template. The list of hosts being installed and their installation status will be reflected as shown. These steps show a simple example involving only a single host, but Platform HPC can of course install many hosts at one time.
Once installation is complete, the word “Installing” in above figure will changed to “Installed”. Once your new cluster hosts are installed, click “Stop Listening” button. Click “Resources -> Hosts” to see the newly added host.
Also, your newly added host (compute000) will appear as a sub-entry under hosts-> By Provisioning Templatecompute-rhel6.2-x86_64.
Although this guide won’t cover all these capabilities, from the Hosts screen you can easily perform a range of activities including adding more hosts, removing hosts, reinstalling hosts (including both reinstalling with the same provisioning template or a different one), and replacing nodes. You can also perform operations that affect all nodes in a particular provisioning template such as defining network parameters, selecting the software components and packages to be installed on hosts, and changing disk layouts.
Removing cluster hosts
Removing cluster hosts is equally simple. To remove a host, in a host page, select the host(s) you want to remove, and then click More Actions-> Remove.
When asked, confirm that it is OK to remove this host. This host will be removed from the database maintained on the head node and will no longer be part of the node group.
Managing cluster users
Another common operation is adding new users to a cluster. You will use the operating systems native facilities to manage users and groups. If you have access to the GUI on the head node (this example is running RHEL), use the User Manager to add and management your user accounts as shown.
It may be even easier just to use the command line to create user accounts on the cluster however. An example is provided below.
# adduser user1
# passwd user1 # set password for user1
# adduser user2
# passwd user2 # set password for user2
# cfmsync –f
After adding a few users as shown using theaddusercommand, you can usecfmsynccommand (part of the Platform cluster file manager facility) to signal all hosts in the cluster that they should synchronize their local files with the management host. This will ensure that these new accounts are reflected across all hosts in the cluster.
Now that you have Linux level user accounts defined, you can define the role of each cluster user using the Platform HPC Web interface.
On the left panel, selectSettings > Administrators. This is where you define which of your users have administrator privilege on the cluster. Note that the root user implicitly has administrative privilege and this username is not shown. An administrator accounthpcadmin(with default password ofhpcadmin) was created by the Platform HPC installer.
To make a user a cluster administrator, you simply add them to the authorized list of Platform HPC Web interface administrators and apply the changes. You can just as easily remove users using the operating system facilities (userdelcommand for people who prefer using the command line).
As users are removed from the cluster, simply re-run thecfmsync –fcommand (or synchronize nodes via the GUI) and the user accounts will be synchronized across all cluster hosts. Removed users will automatically be removed from the Platform HPC Web interface User Management view shown above.
Changing cluster host configurations
Kits are the way to package software components for Platform HPC to easily provision to nodes. For example, the Platform HPC kit included in Platform HPC includes various open source components, benchmarking tools and libraries. A distributed application like Nagios has components that run on compute hosts (agents) and components that run on a monitoring host (server).
By selecting a provisioning template, then clickModify, in the Components tab, you can choose from among the components available in your repository. When you save these definitions, needed changes will be applied to all hosts using this provisioning template when the next time the hosts are rebooted. Simple changes like new package additions or patch installations typically only require running an
cfmsynccommand, which does not require the nodes to be reinstalled. Administrators may choose to use thengeditcommand from the shell prompt to perform this same function.
Although not covered here, the “Kits” interface in the left panel of the GUI can be used to add new kits to repositories that will be become available for deployment to hosts.
Changing cluster host location
One of the new features in Platform HPC 3.2 is the definition of host location. This information is used for rack view on the dashboard. To change the location information, you can select the host from the Resources > Hosts, and then selectMore Actions > Relocate. In the pop up dialog, you can define the location information.
Once the new information is in the system, the rack view shows the host in the rack.
Managing Workload
Once you’ve added hosts, users, and applications, you’re ready to start using the cluster. Applications aren’t described in this document since specific configuration depends on the applications that you are running. Applications deployed as kits of course are especially useful since they are self-configuring. An important feature of Platform HPC once it’s installed and hosts and users are configured, the workload management system (Platform LSF) is already configured for you ready to run jobs.
The easiest way to deploy most applications is to install Platform HPC on a shared file system that can be accessed from all compute nodes. Then all you need to do is to set up the correct environment before the application runs. This can be done in the application submission form or in the user shell startup source file (.cshrcor.profile).
A cluster running parallel workload or having more sophisticated resource sharing needs Platform LSF since it has considerably more features and is more expandable than other scheduling solutions. Platform LSF by itself is a sophisticated software package that requires some time to learn how to configure and use, but Platform HPC gives users and administrators a head-start by deploying Platform LSF configured and ready to use. Learning how to use a workload manager is time very well invested since they greatly simplify a number of tedious aspects of managing jobs on HPC clusters. In cluster environments with multiple users and applications, a workload manager becomes essential.
Included with Platform HPC is a powerful job submission Web interface which uses the technology of Platform Application Center. Cluster users can log into the same Platform HPC Web interface using any of the accounts defined previously. To submit jobs to the cluster, users can select the menu options Jobs > New >published_application_name:
Changing LSF configuration
Since Platform LSF is embedded in Platform HPC, changing its configuration is very different from the standalone LSF installation. See thePlatform LSF Kitguide for details about how to modify LSF configuration in Platform HPC.
By default, LSF is configured not to allow user root to submit job. If you want to use root to configure application forms in the web interface, you will need to change LSF configuration to allow root to submit test jobs. You should log in ashpcadminto customize and publish application forms without allowing root to submit jobs.
To allow the root user to submit jobs, log in as root in a terminal and edit the file
/etc/cfm/templates/lsf/default.lsf.conf. Add a lineLSF_ROOT_REX=localanywhere in the file. Run commandaddhost –uto populate this to all LSF nodes. The command also restarts all LSF daemons to reconfigure LSF.
You may adjust other Platform LSF configuration files stored in/etc/cfm/template/lsfin order to tailor the workload manager to your own requirements defining queues, resource definitions, cluster users etc. By default, four queues are configured in LSF:high_priority,medium_priority, low_priority, anddynamic_provision. The first three queues are for users to choose job priority. The last queue is for cluster with multiple OS installed and use the workload driven dynamic boot capability to switch a node from one OS to another. The queue configuration filelsb_queueis located in in sub directory oflsbatch/default/configdir.
Always run commandaddhost –uon the head node to synchronize LSF configuration and reconfigure LSF on all nodes after any changes in/etc/cfm/templates/lsf.
Customize and publish application forms
Platform HPC contains job submission templates (Application Forms) of commonly used commercial applications for CAE, reservoir simulation and life sciences. The template needs to be slightly
customized to fit into your environment before used by users to submit jobs. As shown in the previous screenshot, by default, user just sees a generic job submission form.
Customizing and publishing an existing template is straightforward. For example, to publish ANSYS (Mechanical), select ANSYS, clickPublish. Fill in the ANSYS Mechanical executable path and license file path, and clickOK. The form is published and ready to use.
If the application you have is not included in the list, you will need to create a form by following a few simple steps:
(1) Choose a form that is close to the application you have. In this example, just use the form generic. Select the form, then clickSave Asand give a name; for example,gForce. Since Platform HPC will use the form name as a directory name,make sure there are no spaces or other special characters like ‘/’, ‘*’, ‘&’ etc. in the form name.
(2) Select the saved form, clickModify, as shown below.
(3) There are three sections in the form that you can edit: “Basic Job Options”, “Advanced” and “Data”. Within each section, there are a number of existing fields. You may select individual field by clicking it, then click eitherEditorDelete. If you need to add a field in this section, clickAdd then follow the wizard.
The title of the section can also be modified. Just click it to select, and then clickEdit. The screenshot below shows adding a field to indicate application version.
Since the command of the job is fixed for a known application, you also delete the “Command to Run” field.
(4) Now that you’ve added the version field. You need to use its value in job submission script. The field ID isversionand its value will be either2.0or3.0.
ClickOKat the bottom of the window to close Adding field window. Scroll to the bottom and clickSaveto save the form.
Scroll up, and then raise the Submission Script tab to add the logic in the script. See the circled section in the following screenshot.
ClickSaveto save the script. It pops up a window showing what fields have been modified for you to confirm. ClickSaveagain to confirm.
If you feel comfortable, fill out the mandatory parameters, then go to the bottom of the form and clickSubmit Test Jobto make sure the job can be submitted and run correctly.
If there is no error, clickPublishto publish the application form. The form is now ready for users to submit jobs to.
Submitting jobs using job submission form
When a user logs in to the web interface, all published application job submission forms can be used. Select one to submit a job.
These types of application specific interfaces are of high value to cluster users. Advanced features of workload managers like Platform LSF, and command line options associated with a variety of simulation tools, are made easily accessible saving users and administrator’s time, and reducing the possibility of errors in job submissions.
By selecting input file either on the local machine (where the browser runs) or on the head node (typically stored on a shared file system), those files will be transferred to the job execution node(s) automatically.
Advanced cluster users comfortable with the command line can still login to any cluster host and issue native Platform LSF commands. The user environment is setup automatically with the correct
environment variables and paths configured with Platform HPC is installed so that Platform LSF facilities work immediately.
Monitoring & managing jobs
The Platform HPC Web interface also provides users and administrators with an easy way to monitor and manage workloads without needing to learn command line syntax.
After submitting jobs from the Web interface, jobs can be monitored easily. It shows information about their state, the host they are running on, and the queues that jobs were submitted to. Users can easily suspend (pause), resume or cancel jobs without troubling the administrator, or see details by clickMore Details.
The following shows the typical view that non-administrators would see when they log in to the Platform HPC Web interface.
Unlike regular cluster users, cluster administrators have visibility to all jobs. Administrators can perform simple operations on jobs without needing to learn and use command line tools.
Monitoring & Reporting
Platform HPC contains monitoring and reporting capabilities. It uses LSF agent to collect monitoring metrics. Platform HPC 3.2 includes an alerting capability. Any metrics the agent monitors, an alert can be defined using it.
Adding a monitoring metrics is essentially the same as adding an LSF external load index. The following shows the alert definition page.
In addition to the monitoring capability, Platform HPC includes a number of built-in reports, as shown below. These reports are all workload related and use data from Platform LSF.
Summary
This guide has covered some of the highlights of Platform HPC 3.2, and provided enough information for a new cluster administrator to get started evaluating Platform HPC and using a Platform HPC cluster.
Related documents
Release Notes for Platform HPC 3.2
Describes what’s new and known issues of Platform HPC 3.2
Installing Platform HPC
Describes in detail how to install Platform HPC.
Administering Platform HPC
Describes the command line interface for Platform Cluster Manager.
Installing and Managing the Platform HPC Workload Management Scheduler Kit Describes how to configure Platform LSF within Platform HPC
Kit Guides
Platform HPC provides individual kit documents describing individual Platform Cluster Manager and Platform HPC kits.
Notices
This information was developed for products and services offered in the U.S.A.
IBM may not offer the products, services, or features discussed in this document in other countries. Consult your local IBM representative for information on the products and services currently available in your area. Any reference to an IBM product, program, or service is not intended to state or imply that only that IBM product, program, or service may be used. Any functionally equivalent product, program, or service that does not infringe any IBM intellectual property right may be used instead. However, it is the user's responsibility to evaluate and verify the operation of any non-IBM product, program, or service.
IBM may have patents or pending patent applications covering subject matter described in this document. The furnishing of this document does not grant you any license to these patents. You can send license inquiries, in writing, to:
IBM Director of Licensing IBM Corporation
North Castle Drive Armonk, NY 10504-1785 U.S.A.
The following paragraph does not apply to the United Kingdom or any other country where such provisions are inconsistent with local law:INTERNATIONAL BUSINESS MACHINES CORPORATION PROVIDES THIS PUBLICATION "AS IS" WITHOUT WARRANTY OF ANY KIND, EITHER EXPRESS OR IMPLIED, INCLUDING, BUT NOT LIMITED TO, THE IMPLIED WARRANTIES OF NON-INFRINGEMENT, MERCHANTABILITY OR FITNESS FOR A PARTICULAR PURPOSE. Some states do not allow disclaimer of express or implied warranties in certain transactions, therefore, this statement may not apply to you.
Without limiting the above disclaimers, IBM provides no representations or warranties regarding the accuracy, reliability or serviceability of any information or recommendations provided in this publication, or with respect to any results that may be obtained by the use of the information or observance of any recommendations provided herein. The information contained in this document has not been submitted to any formal IBM test and is distributed AS IS. The use of this information or the implementation of any recommendations or techniques herein is a customer responsibility and depends on the customer’s ability to evaluate and integrate them into the customer’s operational environment. While each item may have been reviewed by IBM for accuracy in a specific situation, there is no guarantee that the same or similar results will be obtained elsewhere. Anyone attempting to adapt these techniques to their own environment does so at their own risk.
This document and the information contained herein may be used solely in connection with the IBM products discussed in this document.
This information could include technical inaccuracies or typographical errors. Changes are periodically made to the information herein; these changes will be incorporated in new editions of the publication. IBM may make improvements and/or changes in the product(s) and/or the program(s) described in this publication at any time without notice.
Any references in this information to non-IBM websites are provided for convenience only and do not in any manner serve as an endorsement of those websites. The materials at those websites are not part of the materials for this IBM product and use of those websites is at your own risk.
IBM may use or distribute any of the information you supply in any way it believes appropriate without incurring any obligation to you.
Any performance data contained herein was determined in a controlled environment. Therefore, the results obtained in other operating environments may vary significantly. Some
measurements may have been made on development-level systems and there is no guarantee that these measurements will be the same on generally available systems. Furthermore, some measurements may have been estimated through extrapolation. Actual results may vary. Users of this document should verify the applicable data for their specific environment.
Information concerning non-IBM products was obtained from the suppliers of those products, their published announcements or other publicly available sources. IBM has not tested those products and cannot confirm the accuracy of performance, compatibility or any other claims related to non-IBM products. Questions on the capabilities of non-IBM products should be addressed to the suppliers of those products.
All statements regarding IBM's future direction or intent are subject to change or withdrawal without notice, and represent goals and objectives only.
This information contains examples of data and reports used in daily business operations. To illustrate them as completely as possible, the examples include the names of individuals, companies, brands, and products. All of these names are fictitious and any similarity to the names and addresses used by an actual business enterprise is entirely coincidental. COPYRIGHT LICENSE: © Copyright IBM Corporation 2013. All Rights Reserved.
This information contains sample application programs in source language, which illustrate programming techniques on various operating platforms. You may copy, modify, and distribute these sample programs in any form without payment to IBM, for the purposes of developing, using, marketing or distributing application programs conforming to the application programming interface for the operating platform for which the sample programs are written. These examples have not been thoroughly tested under all conditions. IBM, therefore, cannot guarantee or imply reliability, serviceability, or function of these programs.
Trademarks
IBM, the IBM logo, and ibm.com are trademarks or registered trademarks of International Business Machines Corporation in the United States, other countries, or both. If these and other IBM trademarked terms are marked on their first occurrence in this information with a trademark symbol (® or™), these symbols indicate U.S. registered or common law trademarks owned by IBM at the time this information was published. Such trademarks may also be registered or common law trademarks in other countries. A current list of IBM trademarks is available on the Web at “Copyright and trademark information” at www.ibm.com/legal/copytrade.shtml
Windows is a trademark of Microsoft Corporation in the United States, other countries, or both. UNIX is a registered trademark of The Open Group in the United States and other countries. Linux is a registered trademark of Linus Torvalds in the United States, other countries, or both. Other company, product, or service names may be trademarks or service marks of others.
Contacting IBM
To provide feedback about this guide, write [email protected]
To contact IBM in your country or region, check the IBM Directory of Worldwide Contacts at http://www.ibm.com/planetwide
To learn more about IBM Platform HPC, go to