All Rights Reserved
Printed in the United States of America
Information in this document is subject to change without notice and does not represent a commitment on the part of Bottomline Technologies. Bottomline Technologies makes no warranties with respect to this documentation and disclaims any implied warranties of merchantability or fitness for particular purpose. Bottomline Technologies 325 Corporate Drive Portsmouth, NH 03801 Telephone: (603) 436-0700 Fax: (603) 436-0300 Email: [email protected] Internet: www.bottomline.com SWR-PBE-90-REF
Chapter 1: Introduction . . . 9
What’s New In PayBase . . . 10
User Interface Changes . . . 12
CFA Changes . . . 12
BASS Testing . . . 14
Chapter 2: Online Help . . . 15
Exploring Online Help. . . 16
The Help Menu . . . . 19
Moving Around in a Help System . . . 20
Glossary of Bottomline Financial Terms . . . 20
Chapter 3: Exploring PayBase . . . 21
Exploring the PayBase Interface . . . 22
The Menu Bar. . . 23
View Menu . . . 34
Security Menu . . . 36
Supervisor Menu (Supervisor Users only). . . 40
Before you Begin . . . 40
Modules Menu . . . 49
Report Menu . . . 51
Auto Maintenance . . . 55
Tools Menu . . . 61
SuperLauncher Menu . . . 63
Overview of SuperLauncher Scripts . . . 63
Help Menu . . . 69
Toolbars . . . 70
ACH Toolbar . . . 70
Banking Toolbar . . . 71
Check Fraud Avoidance Toolbar . . . 71
Main Toolbar . . . 72
Processing Secure Disbursements . . . 89
Recovering Payments . . . 90
Participant Toolbar . . . 94
Polling Toolbar. . . 96
User Defined Toolbar . . . 106
Tax Module Toolbar. . . 107
Tax Processing . . . .111
SuperLauncher Toolbar . . . 112
Application Toolbar . . . 112
Manual Data Entry Toolbar . . . 112
MDE Toolbar . . . 113
Preview Toolbar . . . 113
Audit Toolbar . . . 113
Chapter 4: Applications . . . .115
What is an Application?. . . 116
Exploring the Application Tree view . . . .117
Tri-Pane. . . 118
Application Toolbar . . . 119
Tree view . . . 126
Link File Branch. . . .126
Group Files Branch . . . .127
Reports Branch . . . .127
Data File Branch . . . .129
Printers Branch. . . .152
Forms Branch . . . .161
Options Branch . . . .164
Creating an Application. . . 180
Generate a Link File using PayBase Designer+ . . . .180
Manual Data Entry Application (MDE). . . 182
Chapter 5: Sites and Users . . . .189
Sites . . . 190
Working with Sites . . . 190
Change Site . . . 194
Users. . . 196
Work with Users . . . 196
Maintaining Users . . . 198
Modifying ACH Information (ACH Users only) . . . 214
Modifying BACS Information (BACS Users only). . . 215
Modifying CFA Information (CFA Users only) . . . 220
Modifying Tools Information . . . 221
Modifying Super User Information. . . 224
Maintaining Groups . . . 225
Maintaining Group Permissions and Assignments . . . 226
Chapter 6: Major Files in PayBase . . . 229
Data Files . . . 230
Data Files in Link Files . . . 230
Data File Branch . . . 231
Locating a Data Field . . . 232
Data File Analysis . . . 233
Data File Field Positions . . . 234
Group Files . . . 236
Group File Properties Dialog Box. . . 236
Configuring your Group File for a Link File . . . 244
Working with Group Files . . . 247
Importing Group Files . . . 254
Group Files Branch . . . 257
Chapter 7: Modules and Services . . . 259
Dial Up Networking . . . 260
Participant Module . . . 262
Participant Setup . . . 262 Modifying a Participant . . . 264 Customize View . . . 266 Participant Import. . . 271Polling Module . . . 273
Start Polling . . . 280 Polling Screen . . . 281Data Files in the Polling Process. . . 282
Tax Module. . . 283
Tax Preferences . . . . 283
Tax Criteria and Formatting Options . . . 284
Tax Payment Addenda . . . 290
Tax Processing . . . . 292
BT Polling Service . . . 295
BT Encryption Service . . . 304
BT PPE Service. . . 307
Setting up PCL to PDF Output . . . 312
Setting up Fax Support . . . 312
Maintaining Fax Support . . . .313
Chapter 8: Reporting and Sorting . . . .319
Working with Reports . . . 320
Audit . . . 322
Different Kinds of Reports . . . .339
Working with Crystal Reports . . . 348
Work with Crystal Aliases. . . .348
Preview Crystal Reports . . . .349
Auto Maintenance. . . .355
I
NTRODUCTION
Bottomline's PayBase is a client/server payments and document management solution that provides a single platform to support both paper and electronic payment, remittance and document requirements. PayBase integrates quickly and easily into current environments and offers increased security and control for reduced risk. The system is available as either a departmental solution, ideal for single application sites or as an enterprise-wide payments system, providing enhanced control and management from a central location. With fully integrated database reporting and auditing functions, PayBase provides the ability to access, query, report, launch, review and print payments from anywhere in the organization. Adhering to industry standards, PayBase does not require network, database, operating system, or protocol-specific code. Industry-standard technology means that when changing vendors or banking relationships, the payment operating system migrates with you.
About this Manual
The PayBase Reference manual is a complete reference for tools and commands. Use this manual for detailed step-by-step instructions and overviews of all commands, tools and functions within PayBase. In addition, refer to the online help system for the same information contained in this manual. If you have purchased additional modules, such as Check Fraud Avoidance (CFA), ACH, or BACS refer to their respective manuals for more information.
Before using this manual, PayBase must be installed using the procedures found in Technical Note TNPB2.
This chapter covers the following:
What’s New In PayBase
Platform Support
PayBase 9.0 Supports the following operating systems for the client installation
• Windows XP Professional (Service Pack 3) • Windows Vista Business (Service Pack 1)
• Windows Server 2003 (Standard, Enterprise, Datacenter) Service Pack 2
Microsoft Vista Business
PayBase 9.0 supports Microsoft Vista Business SP1 for the Enterprise client or Desktop installation. A user must be an Administratior to install PayBase, and a Power User to run the application.
PayBase 9.0 is certified with the following database platforms and version
• Microsoft SQL Server 2000 (Service Pack 4) • Microsoft SQL Server 2005 (Service Pack 2) • Oracle 10g R2
PayBase Desktop Embedded Database
The embedded database for PayBase 9.0 is now Microsoft SQL Server 2005 Express. It is installed as part of the Desktop installation process so a second CD is not needed. The following limitations apply to both the MSSQL Server 2005 Express and PayBase Desktop applications:
• Database size of up to 4GB
• Database server using up to 1 GB or memory • 1 Processor (or dual core) supported
MSSQL Server 2005 Express, and the PayBase database, are created and installed using the following defaults:
No database management or query tools are installed with PayBase 9.0 but the Microsoft SQL Server 2005 Express Management Studio can be downloaded from Microsoft at the following location:
http://www.microsoft.com/downloads/details.aspx?FamilyId=C243A5AE-4BD1-4E3D-94B8-5A0F62BF7796&displaylang=en
Filename: SQLServer2005_SSMSEE.msi
The Management Studio Express is used to administer, view and query databases just like the SQL 2005 Management Studio, within the limitations of the Express version as described above. It is also used to manage database backups.
While PayBase Desktop may be installed on a drive location other than the C Drive, the installation location of MSSQL Server 2005 Express cannot be altered. SQL Server Express 2005 is always installed in C:\Program Files\ Microsoft SQL Server. The install directory for the data and log files in SQL Server Express 2005 is located in C:\Program Files\Microsoft SQL Server\ MSSQL.1\MSSQL\Data for setup. The size or location of the PayBase database cannot be altered during installation, but the SQL Server 2005
Database Version Microsoft SQL Server 2005 Express v9.2.3042.00
Installation Directory C:\Program Files\Microsoft SQL Server\MSSQL Database Instance Name SQLEXPRESS
Instance ID MSSQL 1
PayBase Database User paybase Database Password password1 PayBase ODBC connection paybase Crystal ODBC Connection PBCrystal
PayBase Database File C:\Program Files\Microsoft SQL Server\ MSSQL\DATA\pb90.mdf
Size = 200MB Max Size = Unlimited File Growth = 10 MB at a time
PayBase Database Log File C:\Program Files\Microsoft SQL Server\ MSSQL\DATA\pb90.ldf
Size = 50MB Max Size = Unlimited File Growth = 10 MB at a time
Express Management studio can be used to alter or move the database files after installation.
With PayBase 9.0, Installing/uninstalling the Data Repository (MSSQL Server 2005 Express) is now optional. This feature is useful for future upgrades, reinstalls, or to accommodate complicated installation environments.
User Interface Changes
Updated Program, Toolbar and Application tree icons and
graphics
The PayBase toolbar, application tree graphics, and icons have been updated to provide a more modern look for support with the Microsoft Vista Business operating system.
CFA Changes
Counts and Totals for Voids and Stops
PayBase 9.0 now totals Voids and Stops separately from checks in the CFA bank files.
The Count and Total fields available in the CFA Bank Formats are:
CFA Bank Format Field Description
ACCOUNT PAYMENT A count of the payments for the account ACCOUNT AMOUNT A sum of all items for the account ACCOUNT COUNT A count of all items for the account ACCOUNT CHECK AMOUNT A sum of checks for the account
ACCOUNT CHK AMOUNT A sum of Checks for the account (provided for back compatibility)
ACCOUNT CHECK COUNT A count of Checks for the account
* New for PayBase 9.0
Include Decimals
The option to include the decimal point in the amount field for CFA bank files has been added to PayBase 9.0. This feature is enabled by selecting a new check box on the CFA Bank screen, Main Info tab.
Checking this box forces inclusion of the decimal point in all amount fields, i.e., "99999999" will become "999999.99". This affects the following fields:
• AMOUNT
• ACCOUNT AMOUNT
• ACCOUNT CHECK AMOUNT
• ACCOUNT CHK AMOUNT
• ACCOUNT VOIDSTOP AMT
• TOTAL AMOUNT
• TOTAL CHECK AMOUNT
• TOTAL CHK AMOUNT
• TOTAL VOIDSTOP AMT
• SUM OF TOTALS
TOTAL PAYMENT A count of the payments for the file TOTAL AMOUNT A sum of all items for the file TOTAL COUNT A count of all items for the file TOTAL CHECK AMOUNT A sum of Checks for the file
TOTAL CHK AMOUNT A sum of Checks for the file (provided for back compatibility)
TOTAL CHECK COUNT A count of Checks for the file (provided for back compatibility)
TOTAL CHK COUNT A count if Checks for the file (provided for back compatibility)
TOTAL VOIDSTOP COUNT * A count if Voids and Stops for the file TOTAL VOIDSTOP AMT * A sum of Voids and Stops for the file SUM OF TOTALS A hash total of all other total on the trailer line
CFA File ID
PayBase 9.0 now includes a File ID in the CFA file. This value is set on the CFA Bank screen, Main Info tab. If the File ID is not set, it defaults to 1. It can be reset or changed at any time. To use this value, include the FILE ID field on any of the Bank Format lines. If the Value of the FILE ID is too long for the field, it is truncated from the left.
BASS Testing
O
NLINE
H
ELP
In this chapter we will explore the following topics:
• Exploring Online Help
• Moving Around in a Help System • The Help Menu
The PayBase Online Help system has been designed for easy navigation, allowing you to find information quickly.
PayBase Online Help gives you detailed step-by-step how-to instructions as well as a comprehensive contents section.
Exploring Online Help
The main PayBase help system is accessed using the Help menu. All help topics concerning PayBase are available along with additional help systems listed later in this chapter.
Select Help and Help Topics and the main help screen will appear:
Figure 2.1: The PayBase Main Help System
Note
Your view may vary depending on how you opened help. See page 20 for more information on different types of help.
Menu Bars
Use the File, Edit, Bookmark, Options and Help menus to carry out standard window functions such as print, copy, exit, bookmark, and open topics.
Tip
The Options menu allows you to keep your help system on top, even when your primary window has focus. This is useful for following steps in a ‘How To’ screen.
To Keep Help on Top
1 Click Help and select Help Topics.
2 Click Options, point to Keep Help on Top and click On Top.
3 Help will remain on top even when PayBase has focus.
Navigation Bar
Navigation bars allow you to quickly move through help. These buttons allow you to jump back and forth between topics as well as define your help view.
Figure 2.2: The navigation bar
Help Topics
When you open help, this button is selected by default, displaying the table of contents. Click this button to deselect it and hide the table of contents.
Note
For large topics with a lot of text or large graphics, un-select the Help Topics button to hide the table of contents view. This eliminates the need for resizing or scrolling left to right.
Back
Click Back to jump back to your previous topic. When you first open Help, this button will be greyed-out.
Click Print to print the current topic. This function will only print the topic that is displayed.
TOC, Index, and Search Tabs
When the Help Topics button is selected on the navigation bar, the following tabs are displayed with the table of contents in focus:
Figure 2.3: The navigation tabs, with the table of contents tab in focus
Table of Contents
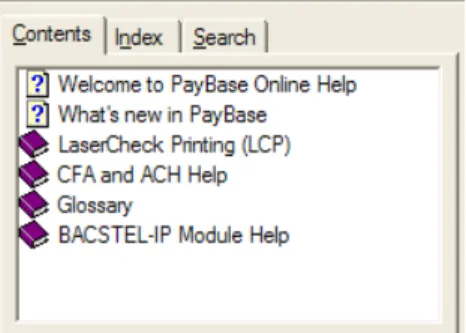
Click the Contents tab to allow selection of a book or topic to jump to a specified area. You can open or close books using the + and - on the left side of each book.
Index
Figure 2.4: The navigation tabs with Index in focus.
Click the Index tab to locate a topic based on an alphabetical index. If you are unsure of an exact topic title, but you know that it contains ACH, for
example, type ACH and all topics with the keyword referenced are displayed. Click the desired topic or key word to jump to it.
Find
The Find tab allows you to further your topic or keyword search using a refined search tool. Follow the onscreen directions for an new search, then type a letter or a combination of letters to begin your search.
The Help Menu
The Help menu can be accessed from any view in PayBase. The following options are available:
• Help Topics - Launches online help. See above for detailed description. • Bottomline Printer Help - Launches online help for all Bottomline
supported printers to use in conjunction with PayBase.
• About PayBase - Opens the About PayBase screen which displays various system information.
• Bottomline Home Page - Opens the Bottomline Technologies web page for easy navigation for our products and services. (Internet access required) • More - Displays information concerning additional Bottomline
Moving Around in a Help System
In addition to the previous menu and navigation bars, PayBase Help uses hotspot text and graphics to jump to certain topics for additional information. Text that is green and underlined (see below) can be clicked to jump to an additional topic.
Hotspot graphics are also used to jumped to certain topics. If you are unsure if a graphic has a hotspot, hover over it and if your cursor has this appearance,
, it is a hotspot.
Glossary of Bottomline Financial Terms
The latest addition to the PayBase Help System family is the Glossary of Bottomline Financial Terms. Click Terms from the main help screen to view this glossary.
E
XPLORING
P
AY
B
ASE
In this chapter, we will explore the following topics:
• Exploring the PayBase Interface • The Menu Bar
Exploring the PayBase Interface
Once PayBase is launched and logged on, the main screen will appear:
Figure 3.1: The PayBase main view
From this view you can use a combination of menus and toolbars to carry out necessary commands.
The Menu Bar
Exploring the various features and functions of PayBase , the menu bar is used to carry out a number of actions. As you become more familiar with the application, you will most likely use quick keys and toolbars to carry out the same actions. However, the menu bar is a good base for navigating within PayBase . The menu bar offers the most complete and comprehensive list of functions. The following menus are visible from the PayBase main screen view: • File • View • Security • Supervisor • Modules • Report • Tools • SuperLauncher • Window • Help Note
Depending on user permissions, you may not have access to certain menu options. If so, they will appear shaded.
Control Menu
Use Control menu commands to:
• Adjust and move windows on the desktop • Close windows
• Switch between windows
The Control menu is indicated by the symbol, , located on the upper left side of the main view. The following commands are available:
File Menu
Table 3.1
Control Action
Restore Restores the window to its former size after it has been reduced to an icon in the Taskbar or enlarged to take up the whole screen. Move Moves the window to another position using the keyboard. Select
Move and the window will be highlighted.
• Use the arrow keys to move the highlighted window outline to the desired position.
• Click ENTER, and the window will be moved.
• The window may also be moved by clicking and holding the mouse on the window Title Bar, and then moving the highlighted window outline to the desired position. When the mouse button is released, the window will be moved. Size Changes the size of a window using the keyboard. Select Size
and the window will be highlighted.
• Use the arrow keys to make the highlighted window outline the desired size. Click ENTER, and the window will be adjusted to the new size.
• The window may also be sized at any time using the mouse by moving the cursor to one of the edges of the window. • When the cursor changes to an arrow, click and hold the
mouse on the arrow and drag the edge to the desired position. Release the mouse button, and the window will be adjusted to the new size.
Minimize Reduces the screen to an icon inside the PayBase main view. Note
To bring PayBase back to its original size, use the Restore command.
Maximize Enlarges the window to its maximum size inside the PayBase main view
Note
Use the Restore command to revert the window back to its original size.
File Menu
The File menu allows you to carry out the following key system functions, including:
• Opening, closing, creating, copying, renaming and deleting PayBase Application files.
• Importing and exporting data and old applications. • Logon and Logoff PayBase
• Establishing APN (automatic payment numbering) and Group File information.
• Setting up printers • Exiting the system.
Select the File menu to access the following commands:
• New Application
• Open Assigned Application
• Copy Application • Rename Application • Delete Application • Import • Export • Close • Logon • Logoff
• Group File Properties
• Automatic Payment Numbering (APN)
• Print Setup
New Application
Click File - New Application from the Toolbar to: • Create a new Application file
To create a New Application
1 Click File - New Application or click .
2 On the Specify a name for the new Application dialog box, type an
Application name and click OK (An application cannot be created without a name).
3 To cancel the new Application, click Cancel.
4 Click Yes to assign the Application and open the Application in the Application Tree view.
5 The Application will open in the Application Tree View. Optional
You can use the SuperLauncher Pad to assign the Application to a Script to facilitate quicker processing of Applications.
Note
See the Applications chapterfor more information on the following topics: • Specify a name for a new Application
• The Application Tree view • The SuperLauncher Pad Tip
You should name the PayBase Application to distinguish it from other existing or future Applications.
To make changes to the Application
• To create a new Link file, use the Designer+ command from the Tools menu. Once selected, PayBase Designer+ will launch and form and field parameters can be added to the Link file.
Open Assigned Application
Click File - Open Assigned Application or to: • Open a PayBase Application file.
To open a PayBase Application
1 Click File - Open Assigned Application.
2 On the Open PayBase Application File dialog box choose from the Applications listed.
3 Select the Application and click OK. The Application is opened in the Application Tree view.
Copy Application
Use the Copy Application command to:
• Copy the settings and paths of an existing Application for use as another Application.
Note
If you are creating multiple Applications that will use the same printers, create a Template Application first. Leave it in the database named Template. Each time you need to create a new Application, copy the Template and begin work.
All Application properties will be copied to the new Application name.
To Copy an Application
1 Click File - Copy Application.
2 Select the Application to copy and click OK.
3 On the Application Name dialog box, type the New Application name and click OK.
4 Click OK to confirm the successfully copied Application.
5 Click Yes to assign the Application and open the Application in the Application Tree view.
Rename Application
Choose this command to:
• Rename an existing Application. Note
When an Application is renamed the previous Application name will no longer exist. Use the File menu Copy Application command to keep a copy of the old and new Application name, when necessary.
To rename an Application
1 Click File - Rename Application.
2 On the Select Applications dialog box, highlight the Application to be renamed and click OK.
3 On the Enter the new name of the Application dialog box, type the new Application name and click OK.
4 Click Yes to confirm the new name of your Application.
5 The Application is now renamed. Note
Click No at any point to cancel the renaming process when applicable.
Delete Application
Choose the Delete Application command to: • Delete an Application from the database
To delete an Application
1 Click File - Delete Applications.
2 On the Select Application dialog box, highlight the Application you wish to delete and click OK.
Import
Choose this command to:
• Import a PayBase item (Application, Group File/ACN Sequence, Settings, Bank Files, or System Information) from another site or network directory.
To Import
1 Click File - Import.
2 On the PayBase Import dialog box, select the type of import to carry out.
3 Depending on the type of import selected, options will be activated or shaded.
4 Click Browse to locate the specific file (based on the type of import highlighted) you need to import.
5 With the appropriate path and file selected, click Open and the path is set in the PayBase Import dialog box.
6 Click Import to carry out the importing process.
Export
Choose this option to:
• Export a PayBase item (Application, Group File/ACN Sequence, Settings, Bank Files, Reports, System Information, Etc.) to another site or network directory.
To Export
1 Click File - Export.
2 On the PayBase Export dialog box type a new Format Name.
3 In the Export Type field, chose an appropriate type.
4 Depending on what is selected, other fields are activated or shaded.
5 In the Export Items field use CTRL, SHIFT or Select All to select items to be exported.
6 Based on what is selected, the Formats and/or Crystal Export Format fields may become active. If they do, modify these sections appropriately.
8 Click Save.
9 If you are satisfied with location, click Done or Export to carry out this function and exit this dialog box, or export and remain in the dialog box. Notes
If you want to choose from a previously created export format, click an export type in place of Step 2 and choose from the list of existing export formats in the Export Formats field. Click Done or Export to carry out this action.
Close
Select Close from the File menu to: • Close an open Application.
Note
There is no confirmation for this action. The Application is closed without notice.
Log On
The PayBase Log On screen automatically appears every time you log on to PayBase . You can also click File - Logon or .
To Log On to PayBase for the first time
1 Click Start - Programs - PayBase (or use the shortcut on your desktop).
2 On the PayBase Login screen, type your UserID and Password.
3 Click OK.
4 If this is your first time opening PayBase , click OK.
To Log on to PayBase
1 Click File - Logon or
.
2 On the Welcome to PayBase dialog box, type the user name and user password (case sensitive).
Additional Log On Information
• If your logon was unsuccessful make sure the user name and password are valid and current. Also, make sure the password is in the correct case, as PayBase passwords are case sensitive. For more information on passwords
see p.37.
• If the logon was unsuccessful twice contact the Supervisor of PayBase . • A third unsuccessful logon will disable the user entirely.
• If you forgot your password, contact your Supervisor who can reset your password so that you are not locked out of the system.
• After three unsuccessful attempts at logging on, PayBase will automatically Disable the current User as a security precaution. In order to use again, the Supervisor must Enable the User ID.
Logoff
Select the logoff command to:
• Sign off the current User before signing on as another User. • To sign-off as a precaution while leaving the Site unattended.
To Logoff
1 Click File - Logoff or . Warning
All PayBase commands, except Exit and Logon, are deactivated. There is no dialog box to confirm the request. Once Log Off is clicked, the current user is not able to access any commands until Log On is used.
Group File Properties
Click File - Group File Properties or to: • Add, change, and delete Group File information. For more information on Group File Properties see p.75.
Automatic Payment Numbering
Click File - Automatic Payment Numbering or to: • Set up Applications for Automatic Payment Numbering.
Automatic Payment Numbering automatically inserts a number onto each check/payment based upon the last check printed/payment processed for a specific account.
Notes
• In order for an Application to be set up for Automatic Payment
Numbering, the Application must have a Group File which includes the following MICR (non-printing) fields; NONPRINTING_INTRANSIT and NONPRINTING_ONUS. The Application’s Link file must also include a check number field which is assigned the REFERENCE Field Parameter. See the Form & Field Parameters Reference Manual for more information on REFERENCE.
• See page 78 for more information on APN.
• See page 202 for more information on the APN tab for setting up users.
Print Setup
Click File - Print Setup or to:
• Add new printers or held files to your current setup. • Change or delete existing printers.
• Change or delete existing held file settings and paths. • Specify AutoMICR adjustments for printers and held files. • Load new printer data into the PayBase database tables.
Process
Select the Process command to:
• Process the currently open Application file. Note
Depending on your current view, this may display “Print” instead of “Process”. When this command is visible you can print an Audit file. See page 335 for Printing an Audit file.
Exit
Select the Exit command from the File menu to: • Close the current session and exit PayBase .
Note
There is no confirmation for this command. PayBase will exit without saving information.
View Menu
From the View menu you can add or remove toolbars from your main view. The following toolbars are located in the View menu and can be added or removed from the main view (for a full description of each toolbar and the functions they carry out, refer the pages listed next to the toolbar):
Table 3.2
Toolbar Functions See Also
ACH Build, extract and transmit ACH batches Review and Release batches
Setup ACH Preferences within the PayBase system
(see p.70)
Banking Create or edit CFA Banks (Check Fraud Avoidance)
Create or Edit ACH Banks (Automated Clearing House)
Setup Federal holidays
(see p.71)
CFA (Check Fraud
Avoidance) Build, Extract, Transmit, Receive, or Match Bank Files Add manual payments to a Bank file Void payments within a Bank file
(see p.71)
Main Create or open Applications Launch a Script
Log on or off PayBase Setup Group Files and APN (Automatic Payment Numbering)
Add or remove printers
Change password or user information Setup and assign Sites
Work with PayBase and Crystal Reports Maintain database
Gather more information about Bottomline Technologies, Inc. Display the Help cursor
(see p.72)
Participant Setup Participant Import Participants
Toolbars that appear with a check mark next to them are displayed. Toolbars with no check will be hidden. Toolbars that are shaded are not available to the current user.
To add a toolbar to your PayBase main view 1 From the main view click View.
2 If the toolbar or status bar does not have a check mark next to it, click the appropriate toolbar to add it to the PayBase main view.
User Tools Access PayBase Designer+
Run custom application associations with one click
(see p.106)
Tax Module Set Tax Criteria formatting options Setup Tax Preferences
Start Tax Module Processing Setup Tax Payment Addenda
(see p.107)
Status Bar View information about toolbar buttons and menu commands
View User and Site information View Capital, Number and Scroll lock status
NA
BACS Displays the BACS toolbar which allows you to carry out BACS payments. This toolbar is applicable for BACS module users only
BACS Reference Manual
Table 3.2
Security Menu
Use the Security menu to: • Change Passwords • Work With User and Sites • Change Site assignment
Change Password
Use this command to:
• Assign or change the current user’s PayBase password. You can access this command from the following locations:
• Security - Change Password
• Click from the main toolbar
• Click the Change Password button from the ID Name Information screen Note
When a User is initially created, the User’s password is identical to the UserID (User Name).
To change your password
1 Click Security - Change Password, , or click the Change Password
button from the ID Name Information tab.
2 On the Change Password dialog box, in the Old Password field box, type the current user password.
3 In the New Password field box, type the new user password.
4 In the Confirm Password field box re-type the new password, to verify this is the correct password.
5 Click OK.
New passwords must meet the following criteria:
• The password can only be changed if the old password matches the one in the database.
• Password must not be the same as the User ID.
• Password must meet the Minimum Password length defined in the Edit Site Information dialog box.
• Passwords are case sensitive.
• Password cannot contain more than 2 repetitions of any character.
• Password may contain only the characters from A-Z and 0-9. Notes
• If the SUPERVISOR password is being changed, the Supervisor User name is displayed instead of Current User.
• If the New Password and Confirm Password do not match exactly, an error message will appear. Recheck your new password to make sure the New Password and Confirm Password fields match. Also make sure your new password meets the above criteria.
• If several attempts are unsuccessful, contact the PayBase Supervisor, or the Bottomline Technologies support department.
Work with Users
Use this command to:
• Edit a User’s Properties.
• Assign User Applications and Printer assignments. • Delete a user or group.
• Print a summary of the existing Users in the database. Note
Access to any of these commands must be granted by the SUPERVISOR. Choosing this command opens the User and Group dialog box.
See page 196 for more information.
Work with Sites
Use this command to: • Create and delete Sites • Specify auditing parameters • Specify archive paths
• Allow Batch Mode processing • Assign Site time-out information • Change other existing Site information
You can access this command the following ways:
• Security - Work with Sites
• Click
Choosing this command opens the Edit Site Information dialog box. See page 190 for a full description of the Edit Site Information dialog box.
Change Site
Use this command to:
• Click
To change a current site assignment
1 Click Security - Change Site or .
2 On the “A Site is assigned to this workstation, do you wish to change it?” prompt box, click Yes.
3 On the Select Site Name dialog box, highlight the new site you want to use.
4 Click OK and Yes to confirm the site change. Note
All sites visible in the Select Site Name dialog box were created using the Work with Sites Command (see p.190).
Supervisor Menu (Supervisor Users only)
NoteOnly users with Supervisor privileges are able to see this menu.
The Supervisor menu is available only to the Supervisor and can perform the following tasks:
• Administer passwords
• Remove edit locks for users and builds • Purge the database tables
• Administer transaction and licensing information
Before you Begin
Read over the following Supervisor facts before proceeding with the Supervisor functions.
• The Supervisor is a default user that already installed when you log on to PayBase for the first time.
• When you log on to PayBase for the first time after installation, you (regardless of your present privileges) are forced to type the Supervisor password. The default password is SUPERVISOR. (PayBase is case sensitive.)
Note
If you are prompted with the Supervisor UserID and Password, contact your system administrator or Bottomline Technologies representative.
• For security purposes, it is highly recommended you change this password after your first log in to ensure system security.
• Supervisor privileges allow you to oversee and maintain User and Group activity as well as carry out all PayBase (except open applications and print checks). In addition, Supervisor Users are the only users who can view and access the Supervisor menu.
• As an added security measure, any Supervisor privilege requires the Supervisor User to typed their password.
The following commands are visible from the Supervisor menu:
• Force Change Password
• Update User Password
• Remove MRU Passwords for User
• Password Dictionary
• Remove Edit Lock for Users
• Remove Edit Lock for Builds
• Purge Database Tables
• Remove Duplicates from CFA Table
• View Transaction Information
• Import License File
• Work With Client Licenses
Force Change Password
Select this command to:
• Force the Selected User to change their password the next time they attempt to Logon.
To force a password change
1 Click Supervisor - Force Change Password.
2 On the Force Change Password dialog box, highlight the appropriate User.
3 Type the Supervisor password and click OK. Note
• If you are not logged on as Supervisor, this command will appear shaded and inactive.
Update User Password
• Update and configure a user’s password at any time. This is helpful if a user has forgotten their password.
To update a user password
1 Click Supervisor - Update User Password.
2 On the Update User Password dialog box, select the appropriate User.
3 Type the Supervisor Password.
4 Type the New Password and Verify Password for the User and click Update Password.
Remove MRU Password for User
Select the Remove MRU Passwords for User command from the Supervisor menu to:
• Clear a designated user’s password history, so the user can re-use old passwords.
Note
MRU stands for Most Recently Used.
To remove MRU’s
1 Click Supervisor - Remove MRU Password for User.
2 Highlight a User from the list.
3 Type the Supervisor password and click OK.
Note
A user whose MRU passwords are cleared will now be able to use previous passwords.
Password Dictionary
Note
An error message will display to any user that attempts to use a password that matches any entries in the Password Dictionary. The Supervisor is the only user that may add or delete entries in the Password Dictionary. For this command the following dialog box is used:
Figure 3.3: The Edit Centralized Password Disallow List dialog box
The Edit Centralized Password Disallow List dialog box allows you to add and delete words, as well as conduct a word check to check for passwords already entered.
To add an entry to the Password Dictionary 1 Click Supervisor - Password Dictionary.
2 On the Edit Centralized Password Disallow List dialog box type a password to disallow, such as “password”, and click Add.
Notes
• If the password is not already in the database, the message “Word was added to password disallow dictionary” appears.
• If the password is already in the database, the error message “Word already existed and was NOT added to password disallow dictionary” appears.
To delete an entry in the Password Dictionary 1 Click Supervisor - Password Dictionary.
2 Type a password name and click Delete.
3 Click Done. Notes
• If the password exists, the message “Word was removed from password disallow dictionary.” appears.
• If the password is not in the dictionary, the message “Word was NOT found in password disallow dictionary” appears.
• If Add or Delete is performed, changes cannot be cancelled, as changes to the database occur instantly. Use Cancel to close the dialog prior to any password changes.
Remove Edit Lock for Users
Select this command to:
• Unlock a UserID that has been locked due to a power or system failure while editing a user’s properties.
Tip
If PayBase stops responding due to a operating system failure or other cause such as a power interruption, the UserID and/or Group ID you were editing will be locked. You will be able to log on using the Group and/or User ID that was previously being edited. Use this function to remove the edit lock.
If a User attempts to log on to the system and is unable, a user with the proper permissions can check to see if the User is locked.
To remove an edit lock
1 Click Supervisor - Remove Edit Lock for Users. (any User currently locked appears in this list)
2 Select a UserID from the list.
Remove Edit Lock for Builds
Use this command to:
• Unlock CFA Builds that have been locked due to errors in an Application, power loss or lock-up.
Much like the Remove Edit Lock for Users function, if there is a power or system failure while building a CFA batch, the batch will be locked down until it is checked and then released.
To remove an Edit Lock and start the Build process 1 Click Supervisor - Remove Edit Lock for Builds.
2 Select the locked Build and click Release Batch.
3 Select the Use all batch numbers for the selected bank check box to select all batches.
4 Click Release Batch to release all batches for the selected bank.
Purge Database Tables
Use this command to:
• Purge the current database of the selected information.
This is an extremely important function, as there may be a problem with the data in the database and you may need to purge data from a table.
Note
It is highly recommended this action is carried out with the assistance of a Bottomline Technologies Support Representative.
If you purge the database tables you will not be able to recover the lost information.
To purge the database tables
1 Click Supervisor - Purge Database Tables. Warning
Read the warning message before proceeding.
3 Purge Me replaces Don’t Touch when the database tables are selected.
4 When the desired tables are selected, type in the Supervisor password in the Enter Password field box.
5 Click OK and Yes to confirm the purge. Notes
• Only qualified individuals should ever attempt to purge this information.
• Alternatively, the Database Administrator can clear the tables using specific database tools. Refer to the specific database manual for information about clearing the database tables.
Remove Duplicates from CFA Table
Use this command to:
• Remove duplicate payments in the CFA Log.
This instance would only happen if the same data file was processed multiple times. The system reviews the CFA_PAYMENTS table and removes any duplicates that match the following fields; Transit, Onus, PmtNum, PmtDate, Payee, Amount, PmtStatus, and PmtType. Any records that are removed will be moved to the SAV_CFA_OVERFLOW table for review.
To remove duplicates from CFA table
1 Click Supervisor - Remove Duplicates from CFA Table.
2 When duplicate records are present, click Start to remove any duplicate records from the CFA payment table.
3 Click Done when complete. Note
• When no duplicate records are present, the Start button will be deactivated and both fields will display 0.
View Transaction Information
appears, the system is currently licensed in a different method (the number of clients and physical printers), so disregard that number.
To view transaction totals
1 Click Supervisor - View Transaction Information.
2 Click OK to close the dialog box.
The Transactions dialog box will appear with the following transactions totals displayed:
Figure 3.4: The Transactions dialog box
Import License File (Supervisor only)
Use this command to:
• Import a license file to enable PayBase functions. You will need to import a new license file when you have purchased additional modules, clients and/ or printer licenses.
To import a license file
1 Log on to PayBase as a Supervisor.
2 Click Supervisor - Import License File.
4 Click OK to save the license file location.
When PayBase is first installed, no functions are enabled. Only after the License file is imported by the Supervisor will any functions and modules be enabled.
If the original configuration will be modified by purchasing separate modules, a new license file must be imported. This will be supplied by Bottomline Technologies at time of purchase and must be imported to enable these modules.
Note
Never attempt to modify this file with a text editor, or other tool. This file is encrypted and cannot be viewed by the User. Any changes to the license file may result in a PayBase fatal program error and the inability to run the program.
Work with Client Licenses
Use this command to:
• Add or delete clients from the PayBase Notes
• This command is useful in the following scenario: Your current setup has four sites, but only three can be concurrently logged on to the system. If three are currently logged on and a user (not the Supervisor) must log onto the fourth Site, the Supervisor can achieve this using this command from a local or remote Site.·
• When a client logs on for the first time, the license will be registered in the database and displayed in this dialog box. Since the number of clients is restricted by the License file, for example three, the fourth would not be allowed to logon. However, the fourth needs to logon to complete a vital system function or start a payment application.·
• The Supervisor may log onto any Site and delete one of the three current licenses. The fourth would then be allowed to log on, as it then would be considered the third, an allowable number according to the License file.
To delete a Client License
1 Click Supervisor - Work with Client Licenses.
Modules Menu
From this menu, the following modules are available:
Table 3.3
Module Features Commands See also...
ACH Build, Extract and Transmit ACH Batches (Transmit ACH Batches is not available for PayBase Express)
Review and Release Batches
Set ACH Preferences.
Build ACH Batch Transmit ACH Batches (Transmit ACH Batches is not available for PayBase Express)
Review/Release Preferences
(See the CFA and ACH Reference Manual)
Banking Create and Edit CFA Banks
Create and Edit ACH Banks
Designate Federal Holidays.
Create CFA Bank Edit CFA Bank Create ACH Bank Edit ACH Bank Federal Holidays
(See the CFA and ACH Manual)
Check Fraud
Avoidance (CFA) Build, Extract and Transmit CFA Batches
Receive and Match Bank Files Add Manual payments to a Bank File
Void or Stop a Payment in the Bank file
Build CFA Batch Extract CFA Batch Transmit CFA Batch Receive
Match
Manual Payments Void/Stop Payment
(See the CFA and ACH Manual))
Dial Up Networking Connect to the PayBase Server when your Network is not functioning correctly
Settings (See the Modules and Services chapter)
Participant Setup Participants Import Participants
Participant Setup Participant Import
(See the Modules and Services chapter)
Polling Start and Stop Polling Setup Polling definitions Setup Polling associations
Setup Polling settings Done Start Associations Settings Stop
(See the Modules and Services chapter)
Tax Setup Tax Criteria and Formats Setup Tax preferences Start Tax processing Setup Tax payment addenda
Criteria & Formatting Options
Preferences Processing Payment Addenda
(See the Modules and Services chapter)
BACS Setup and maintain BACS users. Configure and maintain BACS transmissions Preferences Communication Settings Holidays Approval Submissions Reports
See the BACS Reference Manual Table 3.3
Report Menu
The Report menu is available to access reporting functions of core PayBase processing. The reporting functions are available from the Report menu and the Main Toolbar.
Use this command to:
• Work with PayBase Audit Reports • Work with Crystal Reports
• Work with Crystal Aliases
• Setup Automatic Report Maintenance
Work with Reports
Use this command to:
• View, print and modify any PayBase reports
Reports will be displayed according to your default report. The Default Report displays all columns, and does not sort or total any columns. Change which columns will display by using the Audit Toolbar (see p.322).
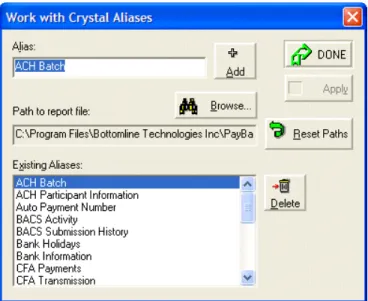
Work with Crystal Aliases
Use this command to:
• Add and delete Crystal Aliases from PayBase • Maintain Crystal Aliases names
When this command is selected, the following dialog box appears:
Figure 3.5: The Work with Crystal Aliases dialog box
To add a new Alias
1 Click Report - Work with Crystal Aliases.
2 In the Work with Crystal Aliases dialog box in the Alias field, type the name of the new Alias and click Add.
3 The Alias is added to the Existing Aliases and alphabetized using the current default directory.
Notes
• The function of adding or deleting aliases is only the recognition of the Alias by the PayBase reporting structure. This does not actually create the Crystal Report. This will be done directly from Crystal Reports. • For ease of administration, it is recommended that all Aliases exist in
the same folder. However, it may be necessary to have private reports. In this case, change the Path of the Alias by pressing the Browse button and specifying the new folder.
To delete an Alias
1 Click Report - Work with Crystal Aliases.
2 In the Work with Crystal Aliases dialog box select an Alias from those available.
3 Click Delete. There is no confirmation for this command. The Alias will be deleted immediately.
To return the Report File path to its original path 1 Click Report - Work with Crystal Aliases.
2 In the Work with Crystal Aliases dialog box, click Reset Paths.
3 Browse to select the appropriate folder and click OK.
4 Click Done.
Preview Crystal Reports
Use this command to: • Preview a Crystal Report
When this command is selected the following dialog box appears:
To preview a Crystal Report
1 Click Report - Preview Crystal Reports.
2 On the Select a Crystal Report dialog box, select an appropriate alias assigned to the current User and click OK.
3 On the Select Printer dialog box select the appropriate printer to print the report, the print orientation and click OK.
Notes
• An Alias for the Report must be setup prior to viewing a Crystal Report (see p.52).
• The current user must be assigned to the report.
• You must select a specific printer before viewing a report because different printers contain different print drivers that affect the output view of the report.
Auto Maintenance
This function allows you to create a schedule for cleaning up dated information within PayBase tables.
Use this command to:
• Setup Automatic report archiving and purging
• Set Auto Maintenance options
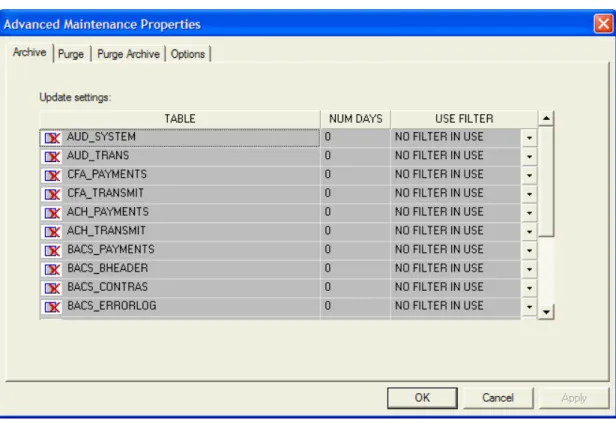
Figure 3.7: The Advanced Maintenance Properties dialog box
Archive Tab
Use the Archive tab to carry out the following:
• Set the number of days until records are archived and assign a filter for the following tables: • AUD_SYSTEM • AUD_TRANS • CFA_PAYMENTS • CFA_TRANSMIT • ACH_PAYMENTS
• BACS_PAYMENTS • BACS_BHEADER • BACS_CONTRAS • BACS_ERRORLOG • BACS_REPORTS • IBACSSUBMISSIONTOSESSION • IPBACSTRANSMISSIONSTATUS • WEBUSERREQUESTTOSUBMISSION • WEBERRORCONDITIONS • WEUSERREQUESTS
To set the number of days and filters to archive 1 Click Report - AutoMaintenance.
2 On the Advanced Maintenance Properties dialog box, click the Archive tab.
3 In the TABLE column, click box to enable the table (the row is greyed out and becomes white).
4 In the NUM DAYS column, type the number of days to wait until all the entries in the Log will be archived.
5 (Optional) In the USE FILTER column, use the drop-down menu to select a filter.
6 Click Apply to save the changes, or click the Purge, Purge Archive or
Options tabs to configure more maintenance parameters.
7 Click OK to confirm the maintenance configuration.
Purge Tab
Use the Purge tab to:
• Purge the Archive files of the same tables available from the Archive tab:
To configure Purge settings
2 On the Advanced Maintenance Properties dialog box, click the Purge tab.
3 In the TABLE column, click box to enable the table (the row is greyed out and becomes white).
4 In the NUM DAYS column, type the number of days to wait until all the entries in the Log will be purged.
5 (Optional) In the USE FILTER column, use the drop-down menu to select a filter.
6 Click Apply to save the changes, or click the Archive, Purge Archive or
Options tabs to configure more maintenance parameters.
7 Click OK to confirm the maintenance configuration. Note
If you specify on the Archive tab to archive records after 2 days and specify to Purge after 3 days, for instance, no records would ever be purged. All the records would be archived prior to being purged. If the reverse were true, Purge after 2 days and Archive after 3 days, no records would ever be archived. All records would be deleted before an Archive could occur.
Purge Archive Tab
Use the Purge Archive tab to:
• Configure Purge Archive settings for the same tables listed above.
To configure Purge Archive settings 1 Click Report - AutoMaintenance.
2 On the Advanced Maintenance Properties dialog box, click the Purge Archive tab.
3 In the TABLE column, click box to enable the table (the row is greyed out and becomes white).
4 In the NUM DAYS column, type the number of days to wait until all the entries in the Log will be Purged and Archived.
5 (Optional) In the USE FILTER column, use the drop-down menu to select a filter.
7 Click OK to confirm the maintenance configuration.
Options Tab
Use the Options tab to:
• Run the Maintenance options with the current settings
• Specify to run the Maintenance options before opening the Report or Crystal Report views
• Run Maintenance Options while PayBase is initializing
• Set up a filter to only archive certain information in the entire table.
Figure 3.8: The Advanced Maintenance Properties screen with the Options tab in focus.
From the Options tab, you can highlight a Table and click Set Up Filter. This displays the same filter screen available from the Reports view. See the Filter
To configure Options settings
1 Click Reports - Auto Maintenance.
2 On the Advanced Maintenance Properties dialog box, click the Options tab.
3 Click Activate Now to run Maintenance options using the current settings.
4 Depending on the action taken, click the appropriate check boxes.
5 If needed, on the right, highlight a Table and click Set Up Filter. You can use this screen to archive only certain information. Click OK when complete.
Tools Menu
The Tools menu is available for efficient access to frequently used tools. Use the Tools menu to:
• Launch PayBase Designer+
• Launch assigned tools with one click The following commands are available:
• PayBase Designer+
• User Tool 1 through User Tool 8
Designer+
PayBase Designer+ is the combination of four previously independent programs. They have been combined to simplify the check design process. Once the check is drawn in the Form Design view, a Link File is created and can later be edited in the Link File view. For unique check printing, you can also create and edit a Manual Data Entry (MDE) and Automated Clearing House (ACH) project.
Refer to the PayBase Designer+ manual or online help for more information.
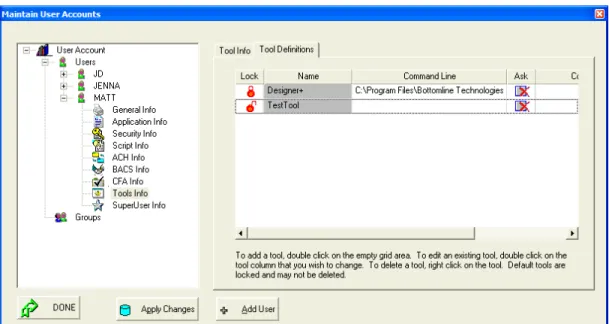
User Tools (1 of 8)
To add a specific User Tool, click Security - Work with Users. On the Maintain User Accounts screen, expand Users and expand the appropriate User and click Tools Info. Click the Tool Definitions tab. On this tab, double-click the white space below the last identified tool. On the Tool Identification screen, type the name for your new tool. On the Tool Definitions tab, type or browse for the correct tool location.
Figure 3.9: The Maintain User Accounts screen with the Tool Definitions tab in focus.
Note
See Modifying Tools Information in the Sites and Users chapter for more information.
SuperLauncher Menu
The SuperLauncher menu is available for quickly launching pre-configured scripts and allowing script maintenance.
Use the SuperLauncher menu to: • Assign Scripts
• Create, delete, rename, and modify Scripts • Launch Scripts.
Overview of SuperLauncher Scripts
A SuperLaucher script is a series of script commands that run numerous PayBase Express functions, using one button.
Note the following criteria prior to operating SuperLauncher script:
• Some commands are only available if the module has been purchased. For example, Build CFA Batch, Transmit ACH Batch and Add MDE records. • Your user must have the appropriate permissions in order to execute
commands.
• Your user must be assigned scripts on the Scripts tab in the user’s properties. Contact your Supervisor for permission issues.
The following commands are available from the SuperLauncher menu:
• Launching Pad • Done • Launch • Create • Edit • Remove • Rename
Figure 3.10: The Super Launcher toolbar
Launching Pad
Use the PayBase Launching Pad to: • Assign scripts • Launch a script • Modify a script • Delete a script • Rename a launch
Done
Use this command to close the Launch Pad after viewing, launching, and/or modifying scripts.
To view the Launch Pad again, click the Display Launching Pad button located on the Main Toolbar. This button is identical to the Launch Script button, but is located on the Main Toolbar. Both buttons will never be displayed simultaneously.
Launch Script
Use the Launch Script command from the SuperLauncher menu to locate the Script to run. Select and click the Launch Script button to start executing the commands as listed in the Script.
SuperLauncher Scripts are created/edited (after clicking SuperLauncher -Create or SuperLauncher - Edit) from the SuperLauncher Script Generator dialog box.
Create Script
To create a Super launcher script
1 Click from the SuperLauncher toolbar.
2 On the SuperLauncher Script Generator dialog box, in the Script Name section, type a script name.
3 From the Script Commands scroll box, select a command and click Add. Commands are moved to the Script Elements field box.
4 Highlight a script element you would like to configure and click Edit.
5 On the Edit Script Command dialog box, configure the script element as needed and click OK. The SuperLauncher Script Generator dialog box is not updated with the configured script element.
6 Repeat this process until you have added and configured all the commands you want for this SuperLauncher.
7 Click Apply to save your changes and Done to exit the screen. The SuperLauncher appears on your main screen.
8 Double-click the SuperLauncher or click the Launch button from the SuperLauncher toolbar to execute your newly created SuperLauncher script.
Edit Launch Script
Use this command to modify existing scripts listed in the SuperLauncher Pad. Assigned Scripts will be listed by date, with the most recent scripts appearing at the bottom of the list. Highlight the Script you would like to edit and click the Edit button. The SuperLauncher Script Generator will appear with the open Script.
To modify the commands, select the command in the right column and use the function keys such as Delete or Edit. To insert a command, select the command that will precede the new command. Click the Add button. Choose the settings for the command and click OK. The command will be inserted.
To edit launch script commands
1 Click from the SuperLauncher toolbar.
2 On the Edit Script dialog box, highlight the script you wish to edit and click
3 On the SuperLauncher Script Generator dialog box, in the Script Element section, highlight a script and click Edit.
4 Edit the script element as needed and click OK.
5 Use the Add or Delete buttons to remove or add a script command.
6 Use the Arrow Up and Down buttons to move selected Script Elements up or down. The Script Commands should be added in a logical order. Certain commands must follow others. For instance, an error would occur if you attempted to Match the Match file prior to receiving the Match file.
7 Click Apply to save changes and Done to exit this dialog box.
Delete Launching Script
Use this command to remove a highlighted script from those listed in the SuperLauncher Script area. Make sure the Script to delete is the selected one. Click Delete - a confirmation dialog box will appear. Choose Yes to delete the Script and it’s assignment to the currently logged in user. Choose No to Cancel the deletion.
To remove a SuperLauncher
1 Click from the SuperLauncher toolbar.
2 On the Select a Script to Remove dialog box, highlight the script you would like to delete and click OK.
Rename Launching Script
Use the Rename command from the SuperLauncher menu to rename the currently selected script in the Script area. The SuperLauncher commands will only be available when the SuperLauncher Pad is open.
Make sure the Script to rename is the selected one. Choose the Rename command. Enter the new name and click OK. A message box will appear informing you that the Script has been renamed. Click Cancel to cancel the rename command. Changes will not be reflected in the Script Name until another function is completed for the Script or the SuperLauncher Pad is closed and then opened again.
To rename a SuperLauncher
1 Click from the SuperLauncher toolbar.
2 One the Select a Script to Rename dialog box, highlight the desired script and click OK.
3 On the Rename SuperLauncher Script dialog box, type the new script name and click OK.
Changing the Super Launcher Icons
Window Menu
Select Window menu options to:
• Make adjustments to the layout of the windows displayed on your screen • View which Applications are currently open and switch to a selected
Application.
From this menu the following commands are available:
• Cascade
• Tile Note
Cascade
Select Cascade from the Window menu to:
• Arrange open windows in an overlapping pattern so that the title bar of each window is visible.
Tile
Select Tile from the Window menu to:
Help Menu
Use the Help menu to:
• Access the PayBase Main Help page • Access help information for BT Printers
• Access version, transaction, and system information • Access the Bottomline Home Page
• Learn how to contact Bottomline Technologies. The following commands are available from the menu:
• Help Topics
• Bottomline Printer Help
• About PayBase
• Bottomline Home Page
• More
Toolbars
Toolbars in PayBase allow you to carry out common commands instead of accessing th