BreathSounds
© 2012 – J. D’Urbano, RCP, RRT“Because at the Head of Every Team is a Respiratory Therapist” http://www.BreathSounds.org
“Because at the Head of Every Team is a Respiratory Therapist”
Airway
Management
For the
Respiratory Therapist
J. D’Urbano
Respiratory Therapists are highly trained and
specialized members of the allied healthcare arsenal.
They deal directly with patients who suffer from a wide
range of cardiopulmonary diseases and disorders,
disturbances in acid/base balance, traumatic injuries, and
hemodynamic instability. Above all, they are the
specialists of airway management…
“Because
at
the Head of
Every Team is a
Respiratory
BreathSounds
© 2012 – J. D’Urbano, RCP, RRT“Because at the Head of Every Team is a Respiratory Therapist” http://www.BreathSounds.org
BreathSounds and BreathSounds.Org was founded by John B. D`Urbano. Mr. D`Urbano has been a Respiratory Therapist in the Phoenix area since June of 1992. He's spent the first half of his career at a top teaching hospital specializing in Emergency Medicine / Level-1 Trauma, with a strong emphasis in critical burn injuries. Currently he's working as a Cardiovascular Respiratory Therapist in a very unique program in one of the top healthcare networks in the state of Arizona. Mr. D`Urbano proudly admits that "...between these two positions I’ve been afforded medical education and experience that I could never put a price on…"
Mr. D'Urbano also had this to say...
"Gandhi said 'Live as if you were to die tomorrow. Learn as if you were to live forever'. “
“In the early years I was taken under the wing of an attending emergency medicine Physician who has never failed to challenge me. He’s proven to me that there is something to learn from each and every patient encounter. One of the first lessons he taught me was this; `every patient you see, regardless of their history, is a real live human being, and nothing less. At the very least they deserve your very best`. That’s a lesson I have never forgotten, and I hope you won’t either".
"Healthcare is a challenging and rewarding career that I truly enjoy. There is no doubt that I will continue to make a positive impact on my patients`, my colleagues`, and the community I serve. If you have any questions or comments please feel free to drop me a note anytime by visiting the 'Contact Us' section of this web site".
BreathSounds
© 2012 – J. D’Urbano, RCP, RRT“Because at the Head of Every Team is a Respiratory Therapist” http://www.BreathSounds.org
Throughout the history of medicine, airway management has been an educational issue for Physicians, Nurses, Respiratory Therapists, and all other members of the healthcare team. With all of the changes and advancements in medical education and practice the one thing that remains the same is not only the importance of maintaining a patent airway, but also the importance of accurately assessing and managing the airway. Even during the most intense of medical emergencies assuring that there is an adequate airway is the first order of business.
Table of Contents
Section-1: Anatomy of the Upper Airway Section-2: Basic Patient Assessment
Section-3: Endotracheal Intubation – Procedure & Technique Section-4: Post Intubation Assessment & Management Section-5: Chest X-Rays for Airway Assessment
BreathSounds
© 2012 – J. D’Urbano, RCP, RRT“Because at the Head of Every Team is a Respiratory Therapist” http://www.BreathSounds.org
Section-1
Anatomy of the Upper Airway
Upper Airway Anatomy:
It’s very important that you are completely familiar with the anatomy of the upper airway because that is your ‘playing field’. Your goal is to find the vocal chords and place a tube between them so that it enters the trachea. But there are several things that can get in the way, and more than one place the tube can end up. Being able to recognize all of the anatomical landmarks of the upper airway will increase your ability to perform an endotracheal intubation quickly, and accurately.
The Pharynx:
The airway isn’t just a simple tube that directs air in and out of your chest. This U-shaped musculofibrous hollow structure is the main interface between the atmosphere and your lungs. It’s made up of a complex network of small parts, each with their own set of functions and responsibilities. They also have their own set of possible complications.
The uppermost section of the airway is the
Pharynx. This is your primary “playing field” when planning an endotracheal intubation. It extends from the opening of the nares posteriorly and inferiorly to the level of the
vocal cords. Figure 1: Upper Airway / Pharynx
BreathSounds
© 2012 – J. D’Urbano, RCP, RRT“Because at the Head of Every Team is a Respiratory Therapist” http://www.BreathSounds.org
The pharynx is divided into three main sections, each of which plays an import role in respiration and defense against foreign body intrusion;
Nasopharynx – The area from the opening of the nares, extending posteriorly and inferiorly, to the level of the uvula. It contains the eustachian tubes, and the pharyngeal tonsils are in its posterior wall.
Oropharynx – Situated between the soft palate and the epiglottis, the oropharynx is the middle section of the upper airway. It contains the palatine tonsils.
Laryngopharynx – Also called the hypopharynx; this is the area that begins at the level of the epiglottis and extends to just below the vocal cords. This is the smallest of the three sections of the pharynx.
Figure 2: Upper Airway / Pharynx
The upper airway (the pharynx) is divided into three main sections. The nasopharynx, the oropharynx, and the laryngopharynx (also called the larynx
The pharynx is a musculomembranous funnel shaped tube that is lined mainly with pseudostratified ciliated epithelium, and stratified squamous epithelium. The three main sections of the pharynx each serve very important roles in respiration, digestion, and defense against foreign body intrusion.
The main function of the nasopharynx is to heat and
humidify the air inspiratory air. Within the lining of the nasopharynx are olfactory cells which give us our
sense of smell. “Think of them as taste buds for the
nose…”
The oropharynx is the primary site of digestion, with
special cells within the lining of the tongue which give us our sense of taste. The oropharynx also serves as a site for respiration, helping to heat and humidity inspiratory air, and it aides in our speech.
The laryngopharynx, also called the hypopharynx, is
the smallest of the three sections of the pharynx. It contains the epiglottis, a cartilage appendage that
Nasopharynx
Oropharynx
Laryngopharynx
Figure 3: Epiglottis open & closed:
The epiglottis is erect and open during respiration, and folds downward to close off the vocal cords when we swallow to prevent aspiration.
BreathSounds
© 2012 – J. D’Urbano, RCP, RRT“Because at the Head of Every Team is a Respiratory Therapist” http://www.BreathSounds.org
functions as the “gate-guard” that protects our lungs from foreign body intrusion, also called aspiration. When we swallow food or drink the epiglottis folds downward to cover the vocal cords. This prevents food or liquid from entering our lungs, which can lead to aspiration pneumonia.
Figure 4: Left- Forward view of the glottis with corresponding anatomical labels; Right- Lateral view of the upper airway / pharynx with corresponding anatomical labels.
Good airway management starts with knowledge and a good understanding of the anatomy of your ‘playing field’, the upper airway. Study this section well. Learn it inside and out, forward and
backward, and especially upside-down. BECAUSE that is how you will see it when you are performing
your next endotracheal intubation.
Uvula Tongue Epiglottis Vallecula Vocal Cords Hard Palate Soft Palate Palatine Tonsil Esophagus Pharyngeal Tonsil Trachea Vocal Cords Tongue Interarytenoid Notch Epiglottis Epiglottic Tubercle Aryepiglottic Fold Ventricular Fold (False Cords) Eustachian Tube
BreathSounds
© 2012 – J. D’Urbano, RCP, RRT“Because at the Head of Every Team is a Respiratory Therapist” http://www.BreathSounds.org
Section-2
Basic Patient Assessment
Airway emergencies often happen when we least expect it. For this reason some of the most important skills that any healthcare professional can have are good patient assessment skills. This is even more important when it comes to airway assessment skills. The human body has an amazing set of built-in alarms and backup systems, and a powerful will to live. But everything has a limit, and when something starts to go wrong something else immediately starts to compensate for it. Unfortunately that compensation is rarely obvious and almost never direct. Learning to recognize the subtle signs of compensation to an impending airway emergency is surely at the top of the list of skills to have. Keeping your education current, and keeping your assessment skills sharp at all times can definitely be lifesaving.
BreathSounds
© 2012 – J. D’Urbano, RCP, RRT“Because at the Head of Every Team is a Respiratory Therapist” http://www.BreathSounds.org
Basic Patient Assessment:
Everything starts with the basics, and patient assessment is no different. A “Look, Listen, & Feel”
approach to patient assessment will never steer you wrong. Look at your patient and notice their facial
expression, skin color, posture, and signs of obvious distress. Listen to your patients’ chief complaint while making a mental note of their vocal tone and quality as well as how many word sentences they are speaking in. Listen for audible wheezes or crackles as their talking. Listen to their breath sounds in all lung fields and their upper airway, and finally; you MUST listen to what your patient is actually trying to
tell you. Feel your patients’ skin temperature, skin tone, and skin moisture. All of these primary
assessment points can alert you to an impending airway emergency.
1. Look: This starts the moment you see your patient, even if it’s from across the room as you
approach their bedside. As you approach your patient ask yourself a couple of simply
questions; “Does this patient appear to be in a great deal of respiratory distress?” “Does this
patient appear to be in a great deal of pain?” “Does this patient appear to be stable?”
a. Facial expression – Simply by looking at a patients’ facial expression can give you an
idea about their level of consciousness, level of pain or discomfort, or the presence of difficulty breathing.
b. Skin appearance – A patient who is pale/pallor
looking, mottled, or cyanotic around the mouth
can indicate hypothermia, hypotension,
dehydration, hypoxemia, or unstable shock.
c. Posture – Patients who are having difficulty
breathing tend to lean forward rolling their back and shoulders forward, and place their hands on their knees or chair. This is often referred to as
tripodding, and is a sure sign of respiratory distress.
d. Signs of obvious distress – Sometimes there is
simply no way to describe it. Your patient just
looks like they are in distress. ”Go with your gut”.
2. Listen: This starts as soon as you introduce yourself, and start listening to their reply.
a. Chief complaint – A very important skill to have is
Figure 5: Diagram of a patient in “tripod” position, which often indicates respiratory distress.
BreathSounds
© 2012 – J. D’Urbano, RCP, RRT“Because at the Head of Every Team is a Respiratory Therapist” http://www.BreathSounds.org
to actually listen to what your patient is telling you. It is what they are experiencing in their own words. It is not always direct, but it is always the most important piece to the puzzle.
b. Tone and quality of voice – While often difficult to describe the tone of your patients’
voice can clue you to their level of distress. More directly you should make a note of vocal quality. Clear smooth voice verses one that sounds raspy or wet.
c. Length of sentences (How many words can they speak before stopping to take
another breath?)
d. Lung sounds, and upper airway sounds – Listening for wheezes, crackles, rhonchi,
diminished sounds, and any other abnormal sound in the chest will alert you to many disorders and diseases. Be careful not to be misled. Like many other things in patient assessment the lung sounds are not always as direct as they may seem.
3. Feel: This starts when you shake their hand during the introduction, and continues during a
‘hands-on’ physical examination.
a. Skin tone: A patients’ skin tone, under normal circumstances, should feel warm, dry,
and supple.
b. Skin temperature: Hypothermia or hyperthermia can indicate several problems.
c. Clammy / Diaphoretic – This can indicate hypotension, bradycardia, unstable shock,
cardiac ischemia, or myocardial infarction.
Remember that good patient assessment skills are some of the most valuable tools you can have in your clinical tool box. This is where you collect the pieces to the puzzle that you are trying to put together. If you miss any of the pieces then you may never know what the real picture is.
BreathSounds
© 2012 – J. D’Urbano, RCP, RRT“Because at the Head of Every Team is a Respiratory Therapist” http://www.BreathSounds.org
Section-3
Tools & Tricks of the Trade
There are many ways of maintaining an open, patent airway. Most involve the use of an artificial airway, but some do not:
Head-Tilt – Chin-Lift: The Head-Tilt – Chin-Lift is a simple maneuver where you put your patients head in a “sniffing” position. The sniffing position helps pull the tongue off of the back of the oropharynx so air can flow through easily. This simple method of opening the airway is taught in most basic first-aid classes, and all CPR classes.
The Modified Jaw-Thrust: The jaw-thrust is a maneuver where you place your patient in a flat
supine position and place your thumbs behind the angle of the mandible (lower jaw) on each side
and literally pull the jaw forward, without bending the neck at all, so that you’re pulling the tongue off of the back of the oropharynx. The jaw-thrust is a maneuver that is used on a patient with a suspected spinal cord injury, or a patient who is unconscious and being manually ventilated with a
bag-valve-mask (commonly called an ambu bag). The jaw thrust
maneuver is no longer being taught to lay-person rescuers. It is taught to, and used by, professional, trained healthcare providers and rescuers.
Here are some commonly used artificial airways:
Nasopharyngeal Airway: Also called a nasal trumpet, the
nasal pharyngeal airway is a small, round, flexible tube that is placed through one of the nares and extends into the back of the oropharynx. This is a tool that is used to help prevent the tongue from occluding the airway during unconsciousness, or to protect the fragile and sensitive lining of the nasopharynx from trauma during frequent suctioning through the nares. This airway adjunct is usually tolerated well by conscious patients.
Oropharyngeal airway: Also known as an OPA. The OPA is made of hard plastic and is used as an
BreathSounds
© 2012 – J. D’Urbano, RCP, RRT“Because at the Head of Every Team is a Respiratory Therapist” http://www.BreathSounds.org
to prevent the tongue from occluding the airway in the unconscious patient. This tool is not usually tolerated well by a conscious patient. It is not uncommon for healthcare workers to place an OPA in a patient who is slow to wake up from anesthesia. It is usually left in place until the
patient is able to spit it out on his/her own, which is a good indicator that the patient is awake enough to manage their own airway.
Endotracheal Tube (also called an ET tube): The ET tube is a semi-flexible tube that is inserted in through the
mouth, through the vocal cords, and into the trachea. This is a more invasive, longer-term, artificial airway and is used to connect a patient to a ventilator (also called a respirator). The endotracheal tube has a
balloon on one end that gets inflated after it’s in place. This prevents air from the patient or the ventilator
from leaking around the tube. The process of placing an endotracheal tube is an invasive procedure called
‘endotracheal intubation’ and is performed by specially trained healthcare personnel.
o When an endotracheal tube is placed is must be assured that it is in the right place, and in
a safe position. There are several ways to assure this:
Capnography: Immediately after intubation a CO2 detection device is placed
between the end of the endotracheal tube and the ambu bag to check for the presence of CO2(carbon dioxide).
Auscultation: The lungs are listened to with a stethoscope to make sure they are
equally bilateral. If the endotracheal tube is too deep the lung sounds will be very diminished or absent on the left, and they will be louder on the right. Anatomically the trachea is almost straight in line with the right bronchus. The left bronchus requires a sharp turn to the left. The stethoscope is then placed over the stomach to make sure there is no air heard.
Chest X-Ray: An X-Ray is obtained to actually ‘see’ where the end of the tube is placed. Ideally the end of the tube should be between 2 and 4 centimeters above the carina (the point where the trachea splits off to the left and right main bronchus), no higher than the level of the aortic arch.
NOTE: When viewing the chest X-Ray for tube placement you must be
actively aware of the distance between the top of the balloon on the
endotracheal tube (5.5cm – 6cm above the tip of the tube) and the bottom edge
of the vocal cords. This is important because if the balloon is too close to the vocal cords the patient can very easily become accidentally extubated before the lungs are healthy enough to support life. This is often a medical emergency, and the patient has to be quickly re-intubated.
BreathSounds
© 2012 – J. D’Urbano, RCP, RRT“Because at the Head of Every Team is a Respiratory Therapist” http://www.BreathSounds.org
Laryngeal Mask Airway (LMA): The LMA is
basically a tube with a laryngeal mask on the end of it. The mask is designed to be seated and inflated in the back of the oropharynx to occlude the esophageal opening thus preventing air from entering the stomach. The only other place air can go from there is through the vocal cords and into the lungs. This is a tool used to help combat a difficult
airway, a well-known risk to all those who perform endotracheal intubations. It is meant for short term use.
Combi-Tube: This is another tool for difficult airway management. It is a short dual lumen tube
that is used by blind-shot intubation when a traditional intubation has failed. When the tube is placed the tip of the tube is usually in the esophagus. A
cuff gets inflated to seal off the esophagus. The 4 air holes above the lower cuff is now in line with the vocal cords. A larger cuff located above the holes gets inflated.
Similar to a LMA, now the esophagus is sealed off and the only place for air to go is into the lungs. This is often used by pre-hospital personnel when a traditional intubation has failed.
BreathSounds
© 2012 – J. D’Urbano, RCP, RRT“Because at the Head of Every Team is a Respiratory Therapist” http://www.BreathSounds.org
Section-4
Endotracheal Intubation
When you are faced with the decision to perform any invasive procedure you must ask yourself
one very important question; “does the benefit outweigh the risk?” That question must be answered
before each and every task that you perform, especially when you are deciding to perform an invasive procedure such as an endotracheal intubation. The benefit MUST outweigh the risk at all times.
Endotracheal intubation refers to the insertion of a tube into a patient’s trachea for the purpose of managing and maintaining that patient’s airway and breathing. It is an invasive skill that is performed in pre-hospital, critical care, and surgery settings both electively, and emergently, by Physicians, Paramedics, and Respiratory Therapists. Outside of the operating room endotracheal intubation is often a life-saving procedure that must be performed efficiently, quickly, and accurately. For this reason it must be practiced on a regular basis in a controlled setting, such as the operating room, or with an intubation training manikin, under the direct supervision of an anesthesiologist, pulmonologist, or other airway/intubation trainer. Frequent practice will greatly improve your skills, and your confidence, so when you are faced with a potential airway emergency you will have no problem performing the very
first, and MOST important, skill of all. Relax. That skill alone will greatly improve the outcome of almost
BreathSounds
© 2012 – J. D’Urbano, RCP, RRT“Because at the Head of Every Team is a Respiratory Therapist” http://www.BreathSounds.org
Indication for Endotracheal Intubation:
Poor oxygenation/ventilation status
Respiratory/Ventilatory Failure as
indicated by ABG with PaCO2 >50mmHg
with a pH <7.30
Loss of cough or gag reflex (patient is unable to manage their own airway safely)
Glasgow Coma Scale <8 (see scale below)
Airway protection
Need for prolonged mechanical
ventilation
Any condition that poses a potential
to cause swelling of the glottis, epiglottis, or vocal cords
Possible Complications of Endotracheal Intubation:
Vocal cord damage
Bleeding
Aspiration
Hypoxemia
Soft tissue damage
Glottic, or epiglottic swelling or
bleeding
Broken teeth
Glasgow Coma Score
The GCS is scored between 3 and 15, 3 being the worst, and 15 the best. It is composed of three parameters: Best Eye Response, Best Verbal Response, Best Motor Response, as given below:
Best Eye Response. (4)
1. No eye opening.
2. Eye opening to pain.
3. Eye opening to verbal command.
4. Eyes open spontaneously.
Best Verbal Response. (5)
1. No verbal response
2. Incomprehensible sounds.
3. Inappropriate words.
4. Confused
5. Orientated
Best Motor Response. (6)
1. No motor response.
2. Extension to pain.
3. Flexion to pain.
4. Withdrawal from pain.
5. Localizing pain.
6. Obeys Commands.
Note that the phrase 'GCS of 11' is essentially meaningless. It is important to break the figure down into its components, such as E3V3M5 = GCS 11.
A GCS Score of 13 or higher correlates with a possible mild brain injury; 9 – 12 is a possible moderate brain injury; and 8 or less indicates a severe brain injury.
BreathSounds
© 2012 – J. D’Urbano, RCP, RRT“Because at the Head of Every Team is a Respiratory Therapist” http://www.BreathSounds.org
Perform Patient Assessment
Is the patient able to manage their
own airway? Reposition Head. Patient up at a 45 Degree Angle. Arouse Patent. Place OPA. Perform Jaw-Thrust maneuver. No Oxygenation and/or Ventilation Adequate? Successful? BVM / Intubate
Is the patient likely to deteriorate?
Yes
Administer oxygen.
Sit patient up at a 45 degree angle if safe to do so. BVM ventilate if necessary. No No Successful? No Intubate No need to intubate. Monitor Closely! No Yes Yes Yes
Intubation Decision Tree
With Everything We Do
The Benefit Must
Outweigh the Risk
Intubate Yes
BreathSounds
© 2012 – J. D’Urbano, RCP, RRT“Because at the Head of Every Team is a Respiratory Therapist” http://www.BreathSounds.org
Difficult Airway Predictability:
Everyone who performs endotracheal intubations will tell you that difficult airways happen, and most of the time they happen when you are least expecting it and less than prepared to deal with it. The difficult airway is a (often unexpected) life-threatening emergency during a situation that may also be life threatening. If your patient is being intubated emergently to save their life when you encounter the difficult airway the risk of death is now doubled. Being able to predict a difficult airway will allow you to be better prepared from the start, which may very well save your patients’ life.
There are many available methods used to help predict a difficult airway. While I do not suggest learning them all I do suggest learning a few. Choose your favorite two or three and use them with each and every endotracheal intubation you encounter. Even if you are 99% positive that your patient will be an easy intubation perform the prediction tests anyway. There is always a slight chance that you will be
wrong. In this program we will learn two of the most popular methods. The LEMON (or MELON) scale
and the 4-D’s.
The LEMON (or MELON) Scale:
The LEMON scale, also called the LEMON law, consists of a 5-step hands-on procedure to help predict a difficult airway:
1. Look Externally
2. Evaluate the 3-3-2 rule
3. Mallampati score
4. Obstruction
5. Neck mobility
1- Look externally;
for normal face and neck size and shape. Some difficult airway predictors will be:
Abnormal face shape
Sunken cheeks Edentulous “Buck-Teeth” Receding mandible “Bull-Neck” Narrow mouth Obesity
BreathSounds
© 2012 – J. D’Urbano, RCP, RRT“Because at the Head of Every Team is a Respiratory Therapist” http://www.BreathSounds.org
2- Evaluate the 3-3-2 Rule;
Able to fit 3 fingers between the teeth when your patient opens their mouth wide
Able to fit at least 3 fingers under the chin between the neck and the front of the mandible
Able to fit 2 fingers on the neck between the thyroid cartilage and the mouth floor
3- Mallampati Score;
With your patient sitting up straight and tall, looking straight ahead, ask them to open their mouth as wide as they can. Basically you are looking at the space between the tip of the uvula and the back of the tongue. In the images below a Class-I score is the easiest, and a Class-IV will be the most difficult airway.
4- Obstruction;
Such as foreign body obstruction, and anatomical obstructions such as tumors, epiglottitis, abscess, etc…
5- Neck Mobility;
Have the patient first place their chin against their chest, then have them look straight up. The greater the angle between the 2 positions the easier the intubation potential, the smaller the angle between the 2 positions the more difficult the airway potential.
BreathSounds
© 2012 – J. D’Urbano, RCP, RRT“Because at the Head of Every Team is a Respiratory Therapist” http://www.BreathSounds.org
The 4-D’s of Difficult Airway Prediction:
The following will make an endotracheal intubation more difficult.
Dentition: Prominent upper teeth, or a receding chin.
Distortion: Edema, blood, vomit, infection, or tumor can distort or obstruct your view of the larynx.
Disproportion: Anatomical abnormalities such as a short chin-to-larynx distance, large tongue, small mouth, or a “bull-neck”.
Dysmobility: Suspected or known C-Spine injury, TMJ, or any other condition that will limit your patients’ ability to bend their neck upwards.
If you encounter a difficult airway, or are predicting a difficult airway for any reason, you should be sure you have plenty of staff to assist you. At the very least make sure you have another practitioner with you who has experience with difficult airways. There are also many tools available designed to assist you with the management of the difficult airway.
LMA – Laryngeal Mask Airway
I-LMA – Intubating Laryngeal Mask Airway
Combi-Tube
Bougie
Optical Stylette
Video Laryngoscope
Fiber-optic flexible bronchoscope/laryngoscope
Emergency cricothyrotomy tray
BreathSounds
© 2012 – J. D’Urbano, RCP, RRT“Because at the Head of Every Team is a Respiratory Therapist” http://www.BreathSounds.org
Preparation for Endotracheal Intubation:
When the decision to intubate is made the next step is the preparation. Before performing any procedure the preparation is really the most important step. How well you prepare for any procedure will directly affect the outcome of that procedure.
Most text books remind us that it only takes 4 – 6 minutes for brain cells to begin dying in the absence of oxygen. What the text books don’t tell you is that fact is pertaining to the normal healthy adult. To a patient who is already sick, and possibly hypoxic, brain cells can begin dying a lot sooner than that. For this reason you must take as much care in the preparation of the procedure you are about to perform as you do in the procedure itself.
1. Obtain / verify Physicians order to intubate
2. Identify your patient by double checking their ID wrist band
3. If possible, explain the procedure and obtain consent
4. Gather all necessary equipment / supplies
a. Functioning laryngoscope handle (check bulb and batteries)
b. Appropriate size Miller (straight) blade
c. Appropriate size Macintosh (curved) blade
d. Appropriate size endotracheal tube
i. Lubricate the end with KY or surgical jelly
ii. Check / test the balloon
e. Endotracheal tube stylette
f. 10cc or 12cc syringe
g. ETCO2 monitor is CO2 detection device
h. Non-rebreather mask
i. Oxygen Source (portable tank, wall oxygen source, etc.)
j. Bag/Valve/Mask – plugged in to oxygen source
k. Suction source with yankauer suction device
l. Mechanical ventilator
m. An assistant
n. Difficult airway equipment
i. GlideScope® Video Laryngoscope
ii. LMA (Laryngeal Mask Airway)
iii. I-LMA (Intubating Laryngeal Mask Airway)
5. Try to predict level of difficulty in performing an intubation on this patient
6. Lubricate the distal end with lubricating jelly (including the cuff/balloon)
BreathSounds
© 2012 – J. D’Urbano, RCP, RRT“Because at the Head of Every Team is a Respiratory Therapist” http://www.BreathSounds.org
8. Place all equipment in hands reach, making sure that you know where everything is located so you
can reach without looking. Your assistant can help you with this.
Laryngoscope blade types:
There are two types of laryngoscope blades that can be used for endotracheal intubation. There is no magic to using either blade. Each is designed to be used slightly differently but they are equally effective and are used by the same basic technique.
Miller (Straight) Blade – This blade is designed to directly lift the epiglottis. The tip of the blade is designed to be placed directly under the epiglottis and lift it up directly to expose the view of the vocal cords. This blade is usually a better choice for the following patients:
o Most pediatric patients
o Patients whose larynx is in an anterior
position
o Patients who have a long or floppy
epiglottis
o Patients whose larynx is fixed by scar
BreathSounds
© 2012 – J. D’Urbano, RCP, RRT“Because at the Head of Every Team is a Respiratory Therapist” http://www.BreathSounds.org
Macintosh (curved) Blade – This blade is designed to indirectly lift the epiglottis. The tip of the Macintosh (curved) blade is designed to be placed firmly into the vallecula (the sharp angle between the base of the tongue and the epiglottis) and indirectly lift the epiglottis to expose the view of the vocal cords. This blade is usually a better choice for the following patients:
o Usually the preferred choice for the
adult intubation
o A better choice for patients who have
prominent upper teeth
o Some report that the curved blade
requires less upper arm strength
HINT: When it is me who is performing an endotracheal intubation my norm is to ask for a #2 Miller blade on the laryngoscope, and a #3 Macintosh blade in my shirt pocket for good luck. This gives me the opportunity to change blades if necessary without leaving the head of the bed, or wasting critical time having someone else look for a different blade.
Determining ET tube size:
Standard endotracheal tubes are made of plastic and are approximately 30cm in length. The tube size is actually the inner diameter of the tube measured in millimeters in increments of 0.5mm. Most adult men are intubated with size 7.5 – 9.0 ET tube, and most adult women are intubated with size 7.0 – 8.0 ET tube.
HINT: If it is reasonable to suspect that your patient will require a bronchoscopy during their time in the ICU, and while they are still intubated, then consider intubating them with nothing smaller than an ET tube size of 8.0 if there is no added risk to the patient. Most bronchoscopes can easily fit through an 8.0 ET tube, which is adequate and safe for most adults.
BreathSounds
© 2012 – J. D’Urbano, RCP, RRT“Because at the Head of Every Team is a Respiratory Therapist” http://www.BreathSounds.org
Performing an Endotracheal Intubation
Once you make your way to the head of the bed and make certain that all of your equipment is in the right place and functioning properly, you position yourself and your patient properly, and you begin performing this procedure while trying to recognize the anatomy of your playing field you’ll soon realize that things look a lot different that you were expecting. That is because you are looking at everything upside down, remember? Relax, remain calm, remain focused, and remember that right now your patients’ life is in your hands.
1. Pre-Oxygenate your patient with 100% oxygen.
a. Use a 100% non-rebreather mask while patient is still awake and/or spontaneously breathing.
b. Pre-Oxygenate via bag/valve/mask ventilation when patient is sedated and/or not
spontaneously breathing Have an assistant perform a good jaw-thrust maneuver while
holding the mask in place.
HINT: During bag/valve/mask ventilation a good jaw-thrust maneuver will do three (3) things:
i. This will help keep the airway open by pulling the tongue away from the posterior
wall of the oropharynx.
ii. Opening the airway more effectively will decrease airway resistance thus allowing
oxygen to more freely enter the lungs while minimizing the volume of gas that enters the esophagus.
iii. When the airway is properly open less physical strength is required to ventilate the patient via bag/valve/mask ventilation allowing one to preserve energy and physical strength for the endotracheal intubation procedure.
BreathSounds
© 2012 – J. D’Urbano, RCP, RRT“Because at the Head of Every Team is a Respiratory Therapist” http://www.BreathSounds.org
2. Assure that your patient is adequately sedated, keeping in mind that paralyzing your patient and
sedating your patient are not the same things.
3. Position your patient;
a. Lay patient on their back (supine position).
b. Pull your patient up until their head is at the top of the bed mattress.
c. Raise the bed until the mattress is approximately elbow level if possible.
4. When you can maintain an oxygen saturation of 100% (or as close to it as possible) via
bag/valve/mask ventilation you can remove the mask and position the patients’ head in a “sniffing” position.
5. Open the patients’ mouth using a scissor maneuver with your thumb and forefingers and look inside
to make sure there are no foreign objects present that can become lodged in the airway. If the patient has dentures or partials now is a good time to remove them.
6. With your right hand hold the patients’ head in a “sniffing” position.
7. With the lighted laryngoscope in your left hand place the blade in the patients’ mouth from the right
side, sweeping the tongue to the left, and advance the blade as far as it will go. Do NOT Touch the
Teeth with the Blade!!!
8. Without ‘tilting’ the laryngoscope backward (often referred to as ‘rocking’ which can damage the
teeth) lift the tongue and lower jaw upward and outward (toward the top corner of the wall that is
across the room in front of you). If the blade is in far enough what you will see is the esophagus. Do
NOT Touch the Teeth with the Blade!!!
9. Begin slowly pulling the laryngoscope blade out toward you until you see the epiglottis fall down into
view.
10. When you see the epiglottis fall into view place the blade appropriately; Do NOT Touch the Teeth
with the Blade!!!
a. Macintosh (curved) blade: Place the tip of the blade in the vallecula (the sharp angle between
the base of the tongue and the epiglottis)
b. Miller (straight) blade: Place the tip of the blade under the epiglottis as if to lift it up.
11. Once the blade is placed appropriately lift upward and outward (without ‘rocking’ or ‘tilting’ the handle backward) until the vocal cords come into view. You absolutely MUST have the vocal cords in
plain view before you can proceed. You may have to reposition a couple of times. Do NOT Touch the
Teeth with the Blade!!!
12. When you have a positive view of the vocal cords ask your assistant to place the top end of the endotracheal tube in your right hand. DO NOT take your eyes off the vocal cords for any reason! 13. Place the tip of the endotracheal tube between the vocal cords and advance the tube until the entire
balloon passes through the cords. When you can no longer see the balloon, advance the tube another 2 – 3 centimeters and stop.
BreathSounds
© 2012 – J. D’Urbano, RCP, RRT“Because at the Head of Every Team is a Respiratory Therapist” http://www.BreathSounds.org
14. Inflate the cuff/balloon with your 10cc or 12cc syringe. (It usually only takes approximately 5cc – 7cc of air to properly inflate the cuff)
15. Immediately check for proper ET tube placement with at least 2 of the following post intubation checks;
a. Check for ETCO2 return with a capnometer or a CO2 detection device.
b. With a stethoscope listen at the axilla for bilateral lung sounds.
c. Watch for equal chest rise and fall with ventilation.
16. Secure the endotracheal tube with tape or a proper endotracheal tube securing device.
17. ALWAYS obtain a portable chest X-Ray (P-CXR) immediately after the procedure to verify proper tube placement.
Your job is not finished when your patient is intubated. The next step is the post intubation assessment, which is covered in the next section…
BreathSounds
© 2012 – J. D’Urbano, RCP, RRT“Because at the Head of Every Team is a Respiratory Therapist” http://www.BreathSounds.org
Section-5
Post Intubation Assessment
Immediately after your patient has been successfully intubated you must be sure that the endotracheal tube is properly and safely placed and secured. There are many resources that suggest the endotracheal tube should be between 3 and 5 centimeters above the carina. There is really more to it than that.
Verify Proper ET Tube Placement:
1. Capnography or ETCO2: Immediately after the endotracheal tube is in place a capnometer or a
colorimetric CO2 detection device on the end of the endotracheal tube and then begin manual
respiration. Allow 3 – 5 breaths before looking for the presence of carbon dioxide. This is done because a significant amount of carbon dioxide can be present in the stomach if your patient had recently been drinking carbonated beverages prior to getting intubated.
2. Chest rise-n-fall: After checking for the presence of carbon dioxide in exhaled gas you should watch for bilateral chest rise and fall during manual ventilation. Also look at the stomach to make sure it is not getting bigger with each breath. In addition to capnography this practice helps assure that the endotracheal tube is in the trachea and not in the esophagus. You can also feel for equal chest rise and fall for a little bit of added piece of mind.
3. Lung sounds: With a stethoscope listen for bilateral lung sounds at the left and right axilla regions. It is important to listen at the axilla and not the anterior chest. Listening anteriorly can cause false confidence because air entering and exiting the stomach can actually be heard as an echo while listening at the anterior chest wall to the left and right of the sternum. This is especially true if your patient is thin built.
4. Chest X-Ray: You’ve looked, you’ve listened, and you’ve felt. Now you’re confident that the endotracheal tube is in the trachea and not the esophagus. You are probably right but you should
get a STAT portable chest X-Ray anyway. Not only is an X-Ray the “golden-nugget” for ET tube
BreathSounds
© 2012 – J. D’Urbano, RCP, RRT“Because at the Head of Every Team is a Respiratory Therapist” http://www.BreathSounds.org
the trachea. It’s not just about the distance above the carina. While that is an important piece of information to have it is equally important to know where the ET tube balloon is, and how far below the vocal cords it is. (Post intubation chest X-Rays are covered in more detail in a separate section).
Figure 4-1: A portable chest x-ray showing that the top of ET tube cuff (balloon) is 6.5cm above the tip of most adult sized ET tubes. Also marked is the level of the carina, and the approximate level of the vocal cords.
BreathSounds
© 2012 – J. D’Urbano, RCP, RRT“Because at the Head of Every Team is a Respiratory Therapist” http://www.BreathSounds.org
Section-6
Chest X-Rays for Airway Assessment
The chest X-Ray is the “golden-nugget” of endotracheal tube placement verification but it
doesn’t stop there. In most ICU’s a portable chest X-Ray is taken every morning of all patients who are intubated. This is done to check the patient’s progress daily, and to verify that the ET tube is still in a safe position within the trachea. Many text books will say that the tip of the ET tube should be placed approximately 2cm – 4cm above the carina, at the level of the aortic arch, or just below the clavicular heads. Many physicians will look at an x-ray and say that the ET tube is in a satisfactory position simply based on the distance between the tip of the ET tube and the carina. Unfortunately that is often only partially correct.
First, think of this. If you look at your patient from the side, you might notice that they are a little bit like an upside down “L”. If the endotracheal tube is secured to our face/mouth then as the head and neck extends downward the ET tube actually moves upward within the trachea. If the head/next flexes upward then the ET tube actually moves downward and deeper into the trachea.
For most adult patients placing the ET tube between 2 – 4 centimeters above the carina is probably a safe bet, but what about the patients who are only 5 feet tall? What about the patients who has a shorter than usual thorax or trachea? The rules change a bit for these folks. While measuring the distance between the carina and the tip of the ET tube is important it is equally important to measure the distance between the vocal cords and the top of the ET tube balloon (or cuff). It sounds easy enough but there is a catch. Neither the ET tube cuff, nor the vocal cords can be seen on the chest x-ray.
This is where good basic knowledge is helpful; Basic knowledge of the thoracic anatomy and a little knowledge of some measurements of the endotracheal tube that is most often used at your healthcare facility.
BreathSounds
© 2012 – J. D’Urbano, RCP, RRT“Because at the Head of Every Team is a Respiratory Therapist” http://www.BreathSounds.org
It is good to know that the top end (proximal end) of the endotracheal tube balloon is approximately 6.5 – 7.0cm above the tip of the tube. This is true of MOST adult sized ET tubes but be aware that some brands differ. Measure the tubes that you use during your free time to be certain.
Most digital diagnostic imaging viewing systems have the ability to allow you to take measurements of just about anything. Follow these few simple steps:
1. Simply measure a line that is 6.5cm in length from the tip of the ET tube upward, or superiorly.
This measured line now represents the balloon of the ET tube. Next;
2. Draw a line straight across from the top of the left shoulder to the top of the right shoulder, going straight across the base of the neck. This line represents the lowest possible location (most inferior possible location) of the lower edge of the vocal chords. Next;
3. Measure the distance between the proximal or superior end of the ET tube balloon and the line
that represents the most inferior possible location of the vocal chords.
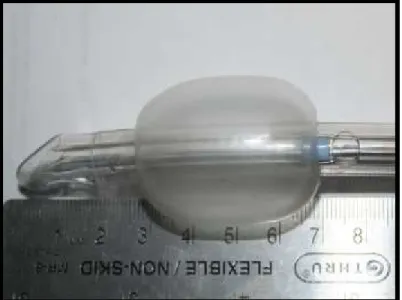
Figure 6: On most adult sized ET tubes the top of the balloon is located 6.5 – 7.0cm above the tip of the ET tube. This includes the “teardrop” balloon ET tubes, but measure the tubes at your facility to be certain.
BreathSounds
© 2012 – J. D’Urbano, RCP, RRT“Because at the Head of Every Team is a Respiratory Therapist” http://www.BreathSounds.org
Because of this “upside-down L” mentioned above a minimum of 2cm below the vocal chords is a
good safety margin. This allows the patient to move his/her head around a bit, and the staff to move the
patient around a bit, with less fear of an unplanned extubation. Unplanned extubations are often the result of the ET tube being inadvertently being secured too high within the trachea, despite the proper measurement from tube-tip to carina.
You’ll notice in the image of the ET tube above that there is also a radio opaque marker and a hole just above it. The ET tube in the image has a subglottic suction port. The marker is present so the location of the suction port can be seen on chest X-Ray. Coincidentally the marker also happens to be right at the proximal margin of the ET tube balloon. If you use these tubes at your facility then finding the top of the balloon is even easier and all you have to do now is look for the level of the vocal cords and measure the distance.
In my experience most intubated patients have a portable chest X-Ray taken every morning. At the beginning of each shift it is a good practice to view the most recent chest X-Ray and check for ET tube placement, measuring not only the distance between the tip of the ET tube and the carina, but also the distance between the top of the cuff and the approximate level of the vocal cords. This is a very simple task, it is almost foolproof, and it only takes a couple of minutes. The benefit of measuring both distances far outweighs the risk of not.
BreathSounds
© 2012 – J. D’Urbano, RCP, RRT“Because at the Head of Every Team is a Respiratory Therapist” http://www.BreathSounds.org
Bibliography
1. Adjuncts for Airway Control and Ventilation. (2005, November 28). Circulation, 112(24 Suppl.), pp. 51-57.
2. Abdel Raouf El-Ganzouri, M., Robert J. McCarthy, P., Kenneth J. Tuman, M., Erik N. Tanck, M., & Anthony D.
Ivankovich, M. (1996). Preoperative Airway Assessment: Predictive Value of a Multivariate Risk Index. Anesthesia
Analgesia(82), 1197-1204.
3. Christopher Evan Hester, C. M., Shelli Ann Dietrich, C. M., Samuel Wayne White, C. M., Janet A. Secrest, R. P., Kay Russel Lindgren, R. P., & Timothy Smith, C. P. (2007, June). A Comparison of Preoperative Airway Assessment
Techniques: The Modified Mallampati and the Upper Lip Bite Test. AANA Journal, 75(3).
4. Gupta, D. S., KR, D. R., & Jain, D. D. (2005). Airway Assessment: Predictors of Difficult Airway. Indian Journal of
Anesthesia, 49(4), 257-262.
5. Keith Littlewoodm, M., & Farnaz Milani Gazoni, S. (2004, March 29). Department of Anesthesiology - Airway
Management. (University of Virginia School of Medicine) Retrieved July 14th, 2010, from University of Virginia School
of Medicine: http://www.healthsystem.virginia.edu/internet/anesthesiology-elective/airway/airwayintro.cfm
6. M J Reed, M. J. (2005). Can an airway assessment score predict difficulty at intubation in the emergency department.
Emergency Medicine Journal(22), 99-102.
7. Magboul M. Ali Magboul, M. (2005). The Dilemma of Airway Assessment and Evaluation. Retrieved July 14th, 2010,
from The Internet Journal of Anesthesiology:
http://www.ispub.com/ostia/index.php?xmlFilePath=journals/ija/vol10n1/airway.xml#h1-0
8. Robert A. Caplan, M.D. (2003, May). Practice Guidelines for Management of the Difficult Airway. Anesthesiology,