The Official
Joomla!
®
Book
The mission of
Joomla! Press
is to enhance the Joomla! experience
by providing useful, well-written, and engaging publications for
all segments of the Joomla! Community from beginning users
to platform developers. Titles in
Joomla! Press
are authored by the leading
experts and contributors in the community.
Visit
informit.com/joomlapress
for a complete list of available publications.
Joomla!
®Press
Make sure to connect with us! informit.com/socialconnect
The Official
Joomla!
®
Book
Second Edition
Jennifer Marriott
Elin Waring
Upper Saddle River, NJ • Boston • Indianapolis • San Francisco New York • Toronto • Montreal • London • Munich • Paris • Madrid
Many of the designations used by manufacturers and sellers to distinguish their products are claimed as trademarks. Where those designations appear in this book, and the publisher was aware of a trademark claim, the designations have been printed with initial capital letters or in all capitals.
The authors and publisher have taken care in the preparation of this book, but make no expressed or implied warranty of any kind and assume no responsibility for errors or omissions. No liability is assumed for incidental or consequential damages in connection with or arising out of the use of the information or programs contained herein.
The publisher offers excellent discounts on this book when ordered in quantity for bulk purchases or special sales, which may include electronic versions and/or custom covers and content particu-lar to your business, training goals, marketing focus, and branding interests. For more information, please contact:
U.S. Corporate and Government Sales (800) 382-3419
corpsales@pearsontechgroup.com
For sales outside the United States, please contact: International Sales
international@pearson.com Visit us on the Web: informit.com/aw
Cataloging-in-publication data is on file with the Library of Congress.
Copyright © 2013 Pearson Education, Inc.
All rights reserved. Printed in the United States of America. This publication is protected by copy-right, and permission must be obtained from the publisher prior to any prohibited reproduction, storage in a retrieval system, or transmission in any form or by any means, electronic, mechanical, photocopying, recording, or likewise. To obtain permission to use material from this work, please submit a written request to Pearson Education, Inc., Permissions Department, One Lake Street, Upper Saddle River, New Jersey 07458, or you may fax your request to (201) 236-3290. ISBN-13: 978-0-321-82154-6
ISBN-10: 0-321-82154-8
Text printed in the United States on recycled paper at RR Donnelley in Crawfordsville, Indiana. First printing, December 2012
To my husband, Pete
—Jennifer
To Tom, Bobby, and Linnea
—Elin
Contents at a Glance
Foreword to the Second Edition xvii Foreword to the First Edition xxi Preface xxiii
Acknowledgments xxvii About the Authors xxix 1 All about Joomla! 1
2 What Now and Where Do I Begin?: Before You Install Joomla! 23
3 Installing Joomla! 49 4 Configuring Joomla! 75
5 Working with and Creating Content for Your Joomla! Site 101
6 The Basics of Joomla! Extensions: Components, Modules, Plugins, and Languages 129
7 Working with Joomla! Templates: The Basics 169 8 Creating Your Own Simple Joomla! Template 191 9 Marketing and Caring for Your Joomla! Web
Site 213
10 Keeping Your Site Up-to-Date 231
11 Practical Application: Joomla! for Business 247 12 Practical Application: Joomla! for NGOs/NPOs, Groups,
Clubs, and Organizations 283
13 Practical Application: Joomla! for Education 319 14 Interviews with Experts 357
A Common Problems and Solutions 423 B Resources 433
Glossary 445 Index 455
Contents
Foreword to the Second Edition xvii Foreword to the First Edition xxi Preface xxiii
Acknowledgments xxvii About the Authors xxix 1 All about Joomla! 1
A Brief History of Joomla! 1
Joomla! the Content Management System 4
Joomla! the Platform 5
The Joomlasphere 7
The Joomla! Forum 7
The Joomla! Community 11
The Joomla! Demo Site 12
The Joomla! Extensions Directory 12
The Joomla! Resources Directory 14
The Joomla! Template Directory 15
The Joomla! Bug Squad 15
Joomla! Internationalization, Localization, and Translations 17
Joomla! Wants You!—How to Be a Contributor 18
Project Leadership 19
Conclusion 20
2 What Now and Where Do I Begin?: Before You Install Joomla! 23
Identifying Your Purpose 23
Domain Names: Registering Your Domain Name 24
Contents x
Trademarks 26
Copyright 27
Licensing 29
The Basics of Branding 30
Memorable Logos and Why You Need One 31
All about Color and Color Schemes 32
Identifying Your Target Audience: The Who, What, Where, and Why 36
Knowing Your Visitors 37
Usability: Users Want to Actually Use Your Site 37
What Is Accessibility? 39
Wireframes, Storyboarding, and Visualization 41
Creating Great Content 43
Mission Critical: Why Choosing a Good Host Matters 44
Conclusion 47
3 Installing Joomla! 49
Choosing a Joomla! Version and Installation Options 49
Downloading Joomla! 51
Creating a Database 52
Using the File Manager to Upload Joomla! 56
Joomla! Web Installation 59
Installation in Joomla! 3 59
Installation in Joomla! 2.5 64
Setting Up a Test Site on demo.joomla.org 71
Conclusion 72
4 Configuring Joomla! 75
Basic Configuration Steps for Your New Site 75
Editing the Super User 76
Basic Global Configuration Options 79
Site 80
System 85
Server 85
Permissions 85
Contents xi
Text Filters 91
Configuration Settings in Specific Components 92
User Manager Configuration 93
Media Manager Configuration 96
Smart Search Configuration 96
Other Site Defaults 98
Default Menu Item 98
Default Template Style 98
Conclusion 100
5 Working with and Creating Content for Your Joomla! Site 101
Defining Content 101
Managing Content 106
Working with the Media Manager and Inserting Images 110
Managing Categories 112
Menus and Menu Items 114
Menu Manager 114
Menu Items 115
Article Menu Types in More Depth 117
Working with Parameters and Options 121
Articles 123 Editing Layout 124 Category 125 Categories 125 Blog/Featured Layouts 126 List Layouts 126 Shared Options 127 Integration 127 Permissions 127 Conclusion 128
6 The Basics of Joomla! Extensions: Components, Mod-ules, Plugins, and Languages 129
Core Joomla! Extensions 129
Components 131
Contents xii
Plugins 156
Languages 158
Adding Extensions 162
Using the Joomla! Extensions Directory 163
Installing Extensions and Viewing Extension Information 164
Popular Extensions 167
Conclusion 168
7 Working with Joomla! Templates: The Basics 169
The Basics of Joomla! Templates 169
The Template Manager 170
Customizing Templates 180
Choosing a New Template 188
Conclusion 190
8 Creating Your Own Simple Joomla! Template 191
Basic Template Structure 191
Adding Joomla! Content 193
Adding templateDetails.xml 194
Adding Module Positions 196
Adding Style Sheets 199
Adding Colors and Typography 208
Conclusion 211
9 Marketing and Caring for Your Joomla! Web Site 213
First Impressions Count: What Your Home Page Says about You 213
Search Engines, SEO, Getting Listed, and Staying There 216
Submitting to Search Engines 217
Search Engine Optimization 219
Using Navigation 220
Engaging Your Visitors and Keeping Your Content Fresh 227
Marketing Basics and Social Networking 228
Contents xiii
10 Keeping Your Site Up-to-Date 231
Updating Your Site 231
Backing Up Your Site 232
Updating Extensions 235
Migrating to a New Major Version 237
The Joomla! CMS Release Cycle 237
Changes in Minimum Requirements 240
Conclusion 245
11 Practical Application: Joomla! for Business 247
Basic Planning of Business Sites 247
Brochure Sites 248
Extending Joomla!: Some Extensions to Consider for Business 248
Extending Brochure Elements 248
Social Media 249
E-commerce Web Sites 250
Which Payment System Is Right for You? 251
Extending Joomla!: Some Extensions to Consider for E-commerce 251
Other Business Site Extensions 252
MaQma 253
Projectfork 253
Joomla! Business Tools 253
Business Web Site Demo 253
Phase 1: Brochure Site 254
Phase 2: Adding a Simple Shopping Cart 278
Conclusion 281
12 Practical Application: Joomla! for NGOs/NPOs, Groups, Clubs, and Organizations 283
Basic Planning of Group Sites 283
Leveraging Your Site to Raise Awareness and Gain Momentum 284
Extensions for Enabling Basic Interaction 285
Nonprofit Web Site Demo 292
Contents xiv
Settings for the Home Page 294
Creating a Contact Form 297
Site Name and Tag Line 298
Setting Up a Calendar 298
Donation Module 301
Social Media Module 303
Forum 306
Modifying the Template 309
Phase 2: Adding Simple ACL 317
Conclusion 318
13 Practical Application: Joomla! for Education 319
Basic Planning of Educational Sites 319
Extensions to Consider for Education 321
School Web Site Demo 328
Creating a School or Education Site 329
Changing the Template 348
Phase 2: Adding Projectfork 353
Conclusion 355
14 Interviews with Experts 357
Andrew Eddie, Software Engineer at eBay Australia and Platform Maintainer—The Joomla! Story 357
Mark Dexter, Production Leadership Team—The Joomla! Bug Squad and Joomla! Development 361
Sam Moffatt, Joomla! Platform Maintainer, Production Leadership Team—Participating in Joomla!
Development 365
Marijke Stuivenberg, Translation Coordinator, Open Source Matters Board—Internationalization 369
Ian MacLennan, Platform Maintainer—Securing Your Site 373
Ron Severdia, Production Leadership Team and Creative Director at Kontent Design—Building a Great Site 377
Elin Waring, Joomla! Contributor—Trademark and Licensing 380
Wendy Robinson, Rochen Ltd.—Creating Your Brand 385
Contents xv
Chris Davenport, Joomla! Production Leadership Team— Finding and Editing Templates 389
Angie Radke, Principal, Der Auftritt; Accessibility Expert; and Designer of the Beez Templates 393
Andrea Tarr, Production Leadership Team 396
Vic Drover, Owner of Anything Digital—Extending Joomla! 399
Gary Brooks, CEO of CloudAccess.net—Benefits of Joomla! for Business 402
Ryan Ozimek, Former President of Open Source Matters, and CEO and Founder of PICnet, Inc.—Joomla! in the NPO/NGO Sector 407
Jennifer Marriott, Joomla! Contributor—Sites for Education 411
Nicholas K. Dionysopoulos, Developer, Akeeba Backup and Other Extensions 415
Louis Landry, Lead Architect of the Joomla! Platform 418
C Common Problems and Solutions 423
Lost Administrator Password 423
Joomla! 1.6 and Later 423
Joomla! 1.5 and Earlier 424
File Permissions and Ownership Problems 427
Editor Background Has a Color or Looks Strange 429
Template Disappears When Turning SEF URLs On 430
Site Displays Differently or Incorrectly in a Certain Browser 430
Problem Assets Table 430
Problems Updating 431
D Resources 433
Basic Joomla! Resources 433
Tools for Web Site Creators and Site Developers 435
Search Engines 436
Learn HTML and CSS Skills 436
Improve the Design of Your Site 437
Web Standards, Usability, and Accessibility 439
Underlying Software of Joomla! 440
Contents xvi
Other Resources for Nonprofits and Organizations 442
Other Resources for Schools and Education 443
Glossary 445 Index 455
Foreword to the Second Edition
T
here are many different books about Joomla! Some are in the form of tutori-als or user manututori-als for Joomla! beginners. Some are more technical and go into depth about programming for Joomla! or creating templates. Who is this book for?The Official Joomla!®
Book takes a different approach from other Joomla! “how-to” books. Instead of focusing solely on using Joomla!, The Official Joomla!®
Book focuses on building a real-life Web site using Joomla! If you want to buy one book to help you get your Joomla! Web site up and running from start to finish, this is the book.
It covers everything a new Joomla! user needs to know to get a real-life Web site up and running. To me, the best thing about this book—and what makes it absolutely unique—is that it includes a lot of topics not normally covered in Joomla! books.
For example, someone building a real Web site needs to think about issues like trademarks, branding, and how to plan the site. These topics are covered in Chapter 2. Most Web site publishers want their site to be as popular as possible. Chapter 9 includes important information about how to market your Joomla! Web site to the widest possible audience.
You hope your Web site has a long life. If so, it will require maintenance and updates. Chapter 10 covers how to back up your site and how to keep it up-to-date as Joomla! and your third-party extensions are updated over time.
Three chapters present practical information about the three most common types of Web sites. Chapter 11 covers Web sites for a business. This includes nuts-and-bolts information about e-commerce extensions and payment systems, shopping cart systems, and simple “brochure” sites.
Chapter 12 covers Web sites for nonbusiness organizations, such as NGOs, nonprofits, and clubs. This includes practical advice about using your organiza-tion’s Web site for creating a community, event calendars and event registra-tion, user forums, customer relationship management, and fund-raising.
Chapter 13 covers building a Joomla! Web site for educational organizations, such as schools or universities. It includes tracking documents, calendars, con-tacts and faculty information, and learning extensions.
Foreword to the Second Edition
xviii
Each of these chapters includes valuable, hard-won, real-world information gleaned by the authors through their long years of experience with Joomla! Web sites. This is information that you will not find in any Joomla! documen-tation, tutorials, or simple “how-to” book.
Finally, the Joomla! Project is about people and community. To help bring this to life, Chapter 14 includes interviews with a number of different Joomla! community members. This helps the reader to better understand the com-munity and how the project works (and maybe even to become a Joomla! contributor).
The second edition of this book was created to cover the Joomla! version 3.x series of releases. Version 3.0.0, released in September of 2012, was the first major release since the adoption of the Joomla! Project’s time-based release strategy. Version 3.1 will be released in March of 2013, and new 3.x releases will continue until the release of 3.5 in 2013 or 2014. At that point, version 3.5 will be the long-term-support release and will be supported by the project for at least two years.
The good news for readers of this book is that this book’s information will be current and fully relevant at least until 2015.
What is the Joomla! release cycle and how does it work? As a community-driven open source project, Joomla! must balance the needs of two different communities: users and contributing developers. Most Joomla! users want a stable, predictable release schedule. When they deploy a Web site, they want to know that the version is well tested and reliable and will have a reasonably long time between major updates.
Contributing developers are volunteers who write new features for the Joomla! core programs. The main motivation these contributors have is to see their code used. Therefore, to attract and retain these developers, it is impor-tant that their contributions be accepted and incorporated into the program on a timely basis. To do this, a relatively frequent release schedule is needed.
The Joomla! release cycle accommodates the needs of both groups by hav-ing two separate release paths. The long-term-support (LTS) path is designed to give users stable versions with relatively infrequent updates. The current LTS release at the time of this writing is version 2.5. This was released in March 2012 and will be supported until 2014, at which time users will update to ver-sion 3.5.
The standard-term-support (STS) path is designed to accommodate contrib-uting developers. STS versions are released every six months, so new features can be rapidly incorporated into the program. This allows contributors to see their code used, which is a major motivating factor for these volunteers. The STS release path is also good for some users who require the latest feature set available.
Foreword to the Second Edition xix
Version 3.0, on which this edition of the book is based, is the foundation for the entire 3.x series. There will be incremental changes in future 3.x ver-sions, but the vast majority of the information for 3.0 will be true for the entire series. Hence the timing of this edition.
Do you want to build a real-life Web site using Joomla!? If so, congratula-tions! You have the right book.
—Mark Dexter Coauthor, Joomla!™ Programming
Foreword to the First Edition
J
oomla! is steeped in a rich and sometimes controversial history. During its tumultuous start in August of 2005, no one could have imagined how far this little project would stretch in terms of reach, nor could anyone have imagined how much it would grow in terms of depth of participation and resources available to the community. I still vividly remember the day I published the now-famous “Open Letter to the Community” that you find in Chapter 1 of this book. Those were uncertain times for the 19 founders and 100 or so mem-bers of the forum team to leave comfortable surroundings and start over with nothing but courage and raw determination.Today, I am writing this foreword having just attended a 200-person-strong local conference in San Jose, California, and my compatriot across the table is off to Italy to address 700 at a similar event. These are but two of dozens of such events held all around the world each year, on every continent (except Antarctica, of course, but maybe one day), to celebrate as a community this amazing thing called Joomla! The right words are hard to find, but one is cer-tainly appropriate: Wow!
Joomla!’s mission is “to provide a f lexible platform for digital publishing and collaboration.” To that end, and at the time of this writing, we have 64 official languages; hundreds of professional service providers; over 6,000 (that we know about) Joomla! extensions; thousands of template designs to choose from; and tens of millions of Web sites deployed all around the world. Joomla! is arguably the easiest software program of its type—both to use and to master. It has been designed both for the most basic user and for the master artisan who wants to take a site beyond the normal limits of the core download. Joomla! carries a legacy of a user interface with pleasing eye candy and a wide choice of the most beautiful templates available for any site-building system in the world. Particularly close to my heart is our passion for continuing to improve the way in which we deliver Joomla! to more and more people in their own languages.
All together by name and all together by nature, Joomla! (meaning “all together” in Swahili) sought from the very beginning to ensure it would be free for the entire community at its founding and into the future. It was set up deliberately to ensure that no one person could ever “own” Joomla!, a detail that gives Open Source Matters—the Joomla! nonprofit—the freedom
Foreword to the First Edition
xxii
to provide stewardship in the best interests of the project rather than a parent company’s bottom line. Combined with the two main project leadership teams for software production and community management, Joomla! as a whole has one of the most progressive and mature leadership structures of any open source project.
Five years after its founding—and on the heels of both Microsoft and eBay becoming collaborators and contributors to the Joomla! core source code—we begin another phase in our life journey as a project: the inception of Joomla! Press and the first (with extreme emphasis on “first”) official Joomla! book. Joomla! is about allowing ordinary people to do extraordinary things, and that is exactly what the authors of this book do for its readers.
So, without further ado, I present this book for your pleasure. It begins with how we began and takes you on a journey through which you can be empow-ered to reach the world.
—Andrew Eddie Member of the Joomla! Production Leadership Team October 2010
Preface
W
hen planning what should be in a book about Joomla!, we thought hard about what process we go through when building Web sites and when helping others build sites. What we decided is that this book should be about building a Web site using Joomla! rather than how to use Joomla! to build a Web site. Even though you can make a Web site using Joomla! in a few hours (or less), most likely it won’t be a great site nor will it allow you take advantage of the power of Joomla! The focus should always be on how you envision your site, the goals of the site, and the audiences you wish to reach rather than on the technology used to create it.Fortunately, with its combination of power and ease of use Joomla! lets you keep your focus on the big picture of your site and the small details of your content and not on mastering a complicated set of processes. This is why we start with a thorough discussion of things to think about before you start build-ing your site.
We’ve also built a set of very simple sample sites that will give you a good idea about the initial process of thinking about and then building sites for vari-ous purposes. We hope that you’ll follow along with the construction of those sites so that you understand the process that site developers use. If you do these first, you will be ready to build your own site with confidence and a good plan.
In addition, we try to help you have a basic understanding of how Joomla! really works “under the hood,” so that when you are ready to take advantage of the power that comes with its extensibility you will have the knowledge you need. We think that, like us, you will want to steadily increase the sophistica-tion of your site and your knowledge and understanding of Joomla! So we’ve written this book with the idea of giving you a strong foundation for the future of your site and other sites you may build in the future. Free and open source software is empowering, but you have to have solid knowledge of the funda-mentals to take advantage of it.
We’re passionate about Joomla!, and we hope that you will be too. That’s why we take time in this book to introduce you to the Joomla! Project and the Joomla! community. We hope that you’ll want to become an active participant in the Joomla! world. And we hope that you enjoy building your site so much
Preface
xxiv
that you end up building other sites for friends, family members, and organiza-tions or causes you care about.
How This Book Is Organized
Joomla! empowers you to produce a beautiful, content-rich, usable site your-self. We wrote this book to help you do just that. It is organized to follow the process of building a Web site in a sequence that is similar to what a Web professional would use. It is not designed to produce an instant Web site, but rather to take you through a process that will end up with a site that will work for you and your users for the long term, whether you keep it simple or decide to make it more complex. We emphasize building a solid understanding of tools that you use in building a Joomla! site so that you have the power to use them on your own.
We start in Chapter 1 with what Joomla! is and why you would use it for your site. Then in Chapter 2 we turn to the planning work you should do before you start creating your site, ranging from planning the design to choos-ing a host. Next, in Chapter 3 we show you how to install Joomla! yourself.
Chapter 4 starts with the process of actually working with Joomla!, begin-ning with configuration. Chapters 5 and 6 continue to get you started with creating your site’s content by showing you how to work with the variety of tools Joomla! offers, including components, modules, plugins, and languages.
Chapters 7 and 8 turn to managing the design of your site by working with Joomla! templates. Chapter 7 explores the core templates in depth and explains how to use built-in customization features. It also explains how to modify them to meet your site’s needs and gives you an introduction to HTML and CSS that will empower you to create and maintain the appearance of your site. Chapter 8 walks you through the process of creating a simple template from scratch.
Chapters 9 and 10 move to making your site successful and managing it for the long term. Chapter 9 looks at how to effectively market your site to the tar-get audience you have identified. It covers how to manage a growing site, main-tenance, and the effective use of navigation. Keeping your software up-to-date and your site content safely backed up is absolutely essential for the long-term health of your site, and Chapter 10 explains in detail how to manage these.
Chapters 11, 12, and 13 go through the process of building a basic site from start to finish. Using a small business, a nonprofit club, and a school as exam-ples, each chapter explores how to put all of the elements of a site—the core of Joomla!, extensions, and a template—together to create a site that works for you and for your users. We encourage you to follow along with building each
Preface xxv
of these sites step by step so that you can follow a similar process when build-ing your site.
One reason we love to use Joomla! to build Web sites is because of the peo-ple who make up the Joomla! community. In Chapter 14 we introduce you to some of those people, and we hope that you like them as much as we do. They give great advice and information about their areas of expertise, ranging from marketing to security to software development. We also hope that you will join the Joomla! community too.
A note about Joomla! versions in this book. This book covers the use of both Joomla! 2.5 and Joomla! 3. Although the two releases look very different, the functionality is essentially the same. In places where there are major differences between the two we have noted that. Many of the images where there are not major differences show Joomla! 3.0 since Joomla! 3 will be the main release for the time that this book will be in print. However, if you would like images for Joomla! 2.5, you can get them at our Web site, http://officialjoomlabook.com. If you are using Joomla! 2.5, you may want to use Chapter 13 (the school) in par-ticular since that chapter uses images from Joomla! 2.5 as the base with exam-ples from Joomla! 3 where there are important differences. If future releases of Joomla! 3 make important changes, you will also find information about them on our Web site.
Finally, check our Web site for information on and downloads of any exten-sions used in the sample sites that are not available for your version of Joomla!
Acknowledgments
T
his book benefited greatly from the help of many people, named and unnamed. We thank them for their assistance.We especially thank all the contributors to the Joomla! Project who have worked together so hard to produce and support this amazing software. All of the people we interview in Chapter 14 have taught and inspired us day in and day out, many since the day Joomla! was born, and we are lucky to consider them friends, too. Thanks to Brad Baker, Gary Brooks, Chris Davenport, Mark Dexter, Nicholas K. Dionysopoulos, Vic Drover, Andrew Eddie, Louis Landry, Ian MacLennan, Sam Moffatt, Ryan Ozimek, Angie Radke, Wendy Robinson, Ron Severdia, Marijke Stuivenberg, and Andrea Tarr. There are dozens of oth-ers whose knowledge we have built on, including Michael Babker, Michelle Bisson, Anthony Ferrara, Lorenzo Garcia, Javier Gomez, Leslie Hawthorn, Gabrielle Heller, Dave Huelsmann, Alan Langford, Rob Schley, Toni Marie Swats, Jean-Marie Simonet, James Vasile, Rouen Weβling, and others.
We also thank all those participants in the Joomla! forums who answered our questions and asked us their own questions, and contributors to the Joomla! Official Documentation wiki, both of which taught us how to use Joomla! in more depth. The Joomla! Bug Squad has been a continuous source of inspiration.
Then there are the people who really made this book possible. Pete and Tom, our families, Linnea and Robert, and the Odd Sheep who were so sup-portive and put up with a lot while we were writing. Also, to our numerous friends who were given a sudden introduction to Joomla! and who gave of their time to read chapters and give encouragement and suggestions, thank you.
A very special thank-you to Terrence H. Pocock for bringing home a Tele-type, which inspired a lifetime love of technology in his youngest daughter. And to Joan and Fred Waring for showing their daughter a counter sorter.
Thank you to Gillian Williams and Scott Wolpow for reading the whole manuscript; to Paul Orwig, Jacques Rentzke, and others at Open Source Mat-ters for their support of the mission and vision of Joomla! Press; and, of course, to Debra Williams Cauley at Pearson who is a tireless advocate for Joomla! Press and kept us on track.
About the Authors
Jennifer Marriott is the Director of Global Support for CloudAccess.net, the official hosting provider for demo.joomla.org, as well as being the host and support system for some of the largest Joomla!-based sites in the world. Jennifer joined the Joomla! community during the beginning days in 2005 and began volun-teering as a forum moderator shortly thereafter. Over the years she has taken on various roles in the community in addition to moderator, such as Joomla! Bug Squad member, Joomla! Google Summer of Code co-administrator and men-tor, and Trademark and Licensing Team Leader. Although Jennifer has stepped down from her official roles in the Joomla! Project, she remains an active com-munity member.
In addition to her work in all things technology related, Jennifer is a profes-sional musician. She has three CDs released. You can find her music in various places all over the interwebs.
Elin Waring is a longtime Joomla! user and former president of Open Source Matters, the nonprofit organization that provides legal, financial, and organiza-tional support to the Joomla! project. In that role she led a number of initiatives ranging from writing the translation policy to obtaining a trademark for the Joomla! brand. She has made more than 7,500 posts on the Joomla! forums and wrote most of the Frequently Asked Questions for Joomla! 1.0. She is an active member of the Joomla! Bug Squad and participates in many Joomla! events.
Elin is a professor of sociology at Lehman College, City University of New York, where she teaches research methods. She has written or coauthored a number of books, including White-Collar Crime and Criminal Careers (Cambridge University Press, 2001), Crimes of the Middle Classes: White-Collar Offenders in the Federal Courts (Yale University Press, 1991), and Russian Mafia in America: Immi-gration, Culture, and Crime (Northeastern, 2001), as well as scholarly articles in the areas of white-collar crime, organized crime, and social organization.
5
Working with and Creating
Content for Your Joomla! Site
N
ow that you have a basic Web site installed, you are ready to start organiz-ing the content of your site usorganiz-ing Joomla! In this chapter we will explain the use of the Joomla! Content component to create articles and organize them into categories. We will demonstrate key features and procedures. The patterns you learn in the Content component will apply in other components.Defining Content
The Content component is the most important component for creating what visitors and users will see on your Web site. Articles are the basic form of con-tent. Articles are organized into categories. This terminology comes from tra-ditional print models, where a newspaper might have News, Sports, Business, and Features categories, and those categories might have different subcatego-ries, such as local and national news in the News section, baseball and basket-ball in the Sports section, the stock market and retail business in the Business section, and home furnishings and cooking in the Features section. In your site you may have many sections or just one. You may have many categories or just a few. What is important is to understand how to use the Content component and to have a good plan for organizing your articles.
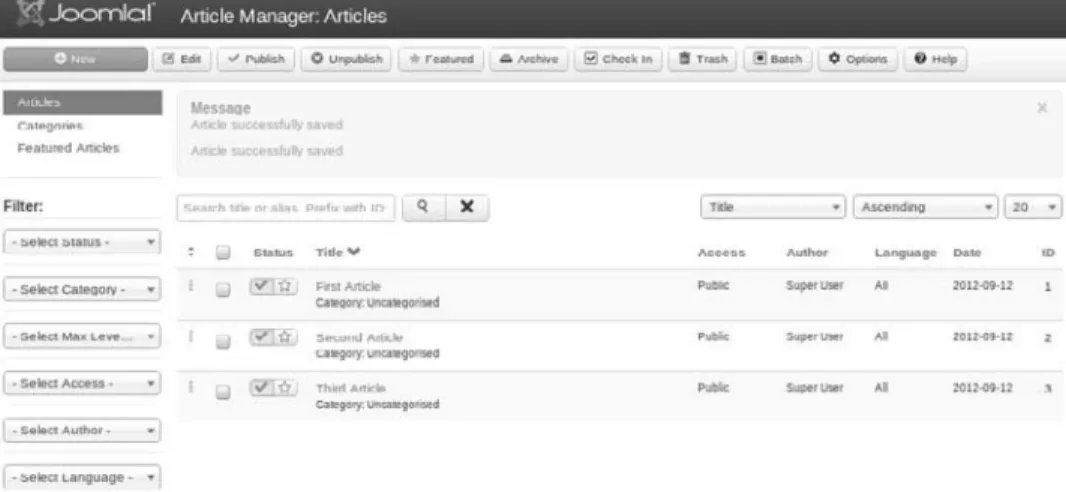
From the Control Panel in the administrator back end, go to the Content menu and click Article Manager. This will open the Article Manager screen. Figure 5.1 shows how the Article Manager screen is organized and what func-tions you can perform while in this area of your site, with two main parts that give you control over your content. The first is the icon menu bar (1), and the second is the Filter options (2). Note that in Joomla! 3 the Filter options and submenu are arranged vertically while in Joomla! 2.5 they are arranged hori-zontally. The other important difference is that in Joomla! 2.5 batch processing
Chapter 5 Working with and Creating Content for Your Joomla! Site 102
options are located at the bottom of the screen, while in Joomla! 3 clicking the Batch button on the toolbar will open a modal window.
Here are the Article Manager icons:
n New: Clicking New allows you to create a totally new article. This opens the article in the back-end editing screen. Once you have entered
A B
2
2
1
1
Figure 5.1 Article Manager (1) menu icons and (2) filtering options for (A) Joomla! 3 and (B) Joomla! 2.5
Defining Content 103
the contents of the article you are creating, click Save & Close to save the article and return to the Article Manager, or click Save to save your changes but leave the article open for further editing if you want to view your changes on the front end. If you have opened an article for editing by mistake, you can click Cancel to return to the Article Manager. n Edit: This allows you to open an existing article to edit it. You use this
by selecting the check box beside an article’s title in the list of articles and then clicking Edit. This opens the article in the back-end editing screen. Once you have edited the article, click Save & Close to save the article and return to the Article Manager, or click Save to save your changes but leave the article open for further editing if you want to view your changes on the front end. If you have opened an article for editing by mistake, you can click Cancel to return to the Article Manager. Note that if you select Save before your article is ready to be seen by the public, you should make sure to change the status to Unpublished.
n Publish: This allows you to publish articles, meaning they will be visible on the front end of your site. You use this by selecting the check box beside an article’s title in the list of articles and then clicking Publish. This works only on articles that are unpublished.
n Unpublish: This allows you to unpublish articles that have been published. You use this by selecting the check box beside an article’s title in the list of articles and then clicking Unpublish. This works only on published articles.
n Featured: This allows you to mark a particular article as Featured, which means it will be displayed in the Featured view.
n Archive: This allows you to archive articles that you want to still be acces-sible, but only if they are accessed through either search or an archive menu link. You use this by selecting the check box beside an article’s title in the list of articles and then clicking Archive. Archiving does not prevent editing of the articles. Archiving articles can improve the perfor-mance of your site dramatically if you have a large number of articles. n Check In: An article is checked out when a user is editing it. This prevents
two users from editing the same article at the same time, which would create problems when one of them saves. At times users may not close an article correctly and it will remain checked out. This button allows super users and administrators to check in articles. Note that users can always edit articles they have left checked out; it is only other users who are pre-vented from editing.
Chapter 5 Working with and Creating Content for Your Joomla! Site 104
n Trash: This deletes an article from the Article Manager and puts it in the article trash. You use this by selecting the check box beside an article’s title in the list of articles and then clicking Trash. This automatically moves the article selected to the article trash without any confirmation screen. To fully delete an article you need to then use the article filters to select trashed articles only. That will make the Trash button turn into a Delete button, and you can fully delete an article. At that point it will no longer be recoverable. It is important that you remember to periodically empty your trash; leaving items in the trash can cause problems, such as if you create a new article with the same name as a trashed one.
You can restore an article that has been mistakenly trashed by filtering as you would for deleting, but instead of deleting the article change its state to Published, Archived, or Unpublished.
n Batch: Note that the Batch functionality is located at the bottom of the screen in Joomla! 2.5. Batch processing allows you to do certain tasks to multiple articles at the same time. These are:
–Set Access Level: Access levels control what groups can see an article in the front end of your site. Each article has one assigned access level. The drop-down menu allows you to select a new access level for the items you have checked. We introduced the concept of access levels in Chapter 4.
–Set Language: If you have multiple languages on your site, you can change the language assignments for articles.
–Select Category for Move or Copy: Move and Copy are the most impor-tant and commonly used functions of bulk processing. Often as you work on your site you will decide to reorganize your content or make similar content in a number of different categories (or even the same subcategories within a number of different top-level categories). So the ability to move or copy many items at once is very useful. First pick the new category you want to move or copy to (the destination). Then select either Move or Copy. Click the Process button to complete the batch processing.
If you copy and your selections create name conf licts because two articles have the same name in the same category, Joomla! will attempt to man-age this, but you will still want to review the results and make sure they are exactly what you wanted.
n Options: This is where you can set the global article parameters that affect every content item in your site. Most of these article parameters can be overridden in two places: they can be overridden on individual content
Defining Content 105
items, and some can be set in the menu parameters, which can affect a group of articles that are linked from the menu. To open article options, click Options, and a new screen will open (in Joomla! 2.5 this will be a small modal box—a pop-up with a dark background that hides the rest of the screen). The options are organized into nine separate tabs. Don’t worry if these seem overwhelming; you can leave them on their default settings until you decide you don’t like the way something looks. At that point you will be glad that Joomla! provides so many options. We will review the nine tabs and highlight some of the most important options later in the chapter, after you have created some content.
n Help: Clicking this will open a Help screen with more information about these parameters.
You can also take advantage of various filtering options to find articles quickly when you are in the Article Manager. This is especially helpful for sites with large numbers of articles. The filtering options are as follows:
n Filter: Allows you to input text contained in the title of an article to do a search for any articles that may use that text as part of their title.
n Select Status: Allows you to filter articles by their state. There are four states that an article can be in: Published, Unpublished, Archived, and Trashed. By default the filtering selects both Published and Unpublished articles.
n Select Category: Allows you to filter your articles by choosing a specific category to display.
n Select Max Levels: Allows you to limit the number of levels of categories. This is mainly useful if you have a very deep nested category structure for your content.
n Select Access: Allows you to filter articles by the viewing access levels to which articles are assigned.
n Select Author: Allows you to filter articles by choosing a specific author to display.
n Select Language: Allows you to filter articles by the language to which they are assigned.
In Chapter 2 we gave you ideas for how to think about your site before you even start, so we hope that at this point you know how you want to organize your content. In this example we will reference a brochure-type Web site that is relatively simple. It will have information about the site or business, a blog category where content will be updated on a daily or weekly basis, a press
Chapter 5 Working with and Creating Content for Your Joomla! Site 106
release category where visitors will find press releases regarding the site or busi-ness, some customer testimonials, and a contact form for visitors to get in touch with the site owner.
Managing Content
The first thing we will do is create some articles. Click on the New button. This will open an editing screen as shown in Figure 5.2. Fill in a title for your article (we’ll call ours “First Article” for clarity’s sake). Then in the large text area add some text. Notice that the article is already assigned to a category with the somewhat funny name of Uncategorised. Joomla! articles must always be assigned to categories, so this provides a catchall one for new sites that do not have their own categories. You will notice that there are tabs (in Joomla! 3) or sliders (in Joomla! 2.5) with many other options and also many additional buttons. If you look through them, you will see that they are either empty or set to Use Global or, in the case of Article Permissions, Inherited. As you learn more, you may want to modify these, but for right now we will leave them as they are. Click on Save & Close. Repeat this process at least two more times. At that point the Article Manager will appear as in Figure 5.3.
Tip
If you are stuck for ideas for text, you can visit a site such as lipsum.com to generate some filler text. This is something that site designers typically do so that they can focus on design rather than content creation.
Now open one of your articles. You can do this by clicking the name or checking the check box next to the name and clicking the Edit button. The Article Edit screen has quite a few options available, but for beginning purposes we will cover only the most important parts of the screen to get you started and give basic information regarding the more complex items. As you get more familiar with Joomla! and content editing, you will be able to decide whether the complex items are a benefit to your site.
First, notice that you can now modify the article if you want. Next, look at the Publishing Options tab or slider. Notice that some of the information that was blank before has now been filled in, including the alias (very important because it is used to create the URLs or links to specific pages on your site), the created date, the author (you), the publication start date (today), the pub-lication end date (set to 0 by default, which means that there is no end date), and the revision number. With the exception of the revision number, you can modify any of these simply by editing the fields and then saving the article.
Managing Content 107
A
B
Figure 5.2 Empty article-editing screen as it looks when adding a new article: (A) Joomla! 3 and (B) Joomla! 2.5
Chapter 5 Working with and Creating Content for Your Joomla! Site 108
However, most of the time you can just let Joomla! manage these fields for you. For example, you may want to change your alias if the title is very long, or you may have a specific idea about the URL you want for that article. An alias should never contain spaces ( Joomla! won’t allow you to save an alias that does), and underscores should be avoided (they can be hard to read), as should uppercase letters (users may mistakenly type the URL in the wrong case and not find your page), but other than that the choice is up to you.
The other tab or slider that you should always pay attention to is Meta-data. Metadata provides search engines and other applications with informa-tion about the content of this specific article. Previously you created metadata that described the site as a whole, but usually you would like this to be more specific to help search engines identify individual articles to people doing searches. Fill in the description with one or two sentences and the keywords with between two and five terms. Keywords are used internally to find content items with the same keywords as other items and are also indexed by Smart Search, the Joomla! advanced search component.
Go back to the main tab for editing your article. Let’s look at the details of this page more closely. There are a number of things to notice and important settings for the article on this page.
When you created your article and now that you are editing it, you are using the default editor that is installed with Joomla! It’s a very popular Web content editor called TinyMCE. As shown in Figure 5.4, across the top of the editor you can see icons that represent the different editing capabilities that the editor has, which are very similar to the editing icons in most word processing
Managing Content 109
programs and office suites. Hovering your mouse over each of the icons in the editor toolbars will supply a tool tip that will tell you what the editing function does (1).
Underneath the content text box are a number of buttons (2):
n Article: This is the button that allows you to link your article to another article on your site.
n Image: This is the button for the Media Manager, which will allow you to upload images to your Web site; you can also use it to place the images you have already uploaded into your Web site.
n Page Break: This is how you can break very long content items into a number of shorter pages through which the user can navigate inside the article itself. Joomla! will automatically create a navigational table of con-tents for your article using the page breaks to define the sections of the article.
n Read More: This is how you insert a link to the rest of the article if you want to show some introductory text instead of the full article on every page. Using Read More allows you to have teaser text to draw people into your site by encouraging them to click to see more of an article. In Joomla! people commonly refer to the first area as the intro text and the second as the full text.
n Toggle editor: This button toggles the editor between What You See Is What You Get (WYSIWYG) mode, which is a visual layout, and a code view mode, which shows your content item with the HTML tags that direct how the content will display. If you are familiar with simple HTML, you can format your content code using HTML tags.
2
1
Figure 5.4 TinyMCE Editor with menu buttons above and below the editing area
Chapter 5 Working with and Creating Content for Your Joomla! Site 110
Also on this main editing page are some very important settings. Status lets you assign this specific article to Published, Unpublished, Archived, or Trashed status. Access determines what viewing access level the article is assigned to. We introduced these in Chapter 4. Featured determines whether this article will be included in a featured article layout that you have the option of using. Featured layouts bring together selected articles from different categories. Lan-guage allows you to select a lanLan-guage for your content, but if you are using only one language on your site, you can simply leave all articles on the All set-ting. This option is used for multilingual sites and the All setting means that readers using all languages should see this article.
Tip
If you are editing a particularly long or complicated article, it is best practice to use the Save button periodically to save the changes you make. This will prevent you from losing the work you have completed if your session time expires. Save applies your changes and keeps the article you are working on open so that you can continue to edit it.
Working with the Media Manager and
Inserting Images
Inserting pictures in the default installation of Joomla! requires two steps. You have to upload images using the Media Manager and then manipulate the pic-ture properties with the “insert picpic-ture” editing button from the editor menu when adding or editing an article.
To insert an image into an article, you must first have an article open for editing. Once you have opened an article, click the Image button (below the editing text area). You can either upload one or more new images and then select one, or simply select an existing image, as shown in Figure 5.5.
Image Title is the text that will appear if a user moves the mouse pointer over the image. This is also the text that is used for the image caption if the Caption box is selected. Always fill in an image title. A screen reader for a blind person will read this out loud even if it is not displayed on the page.
Align is the location of the image on your page. Aligning an image to the left or right will place your picture to either the left or the right side of the text that is next to the image, allowing the text to wrap around the image.
To give the image a caption, just select the Caption check box. This will use the text entered in the Image Title field as the image caption, displayed below the image.
Working with the Media Manager and Inserting Images 111
In the full Media Manager that is linked at the bottom of the Content menu in the main Administration menu rather than the button, you can do these two additional actions:
n Create: Click the Create icon to create a new directory. This will create a new directory in the images/ directory.
n Delete: Delete individual images and folders.
These can be very useful for organizing large numbers of images on your site. After you have inserted an image using the Image button at the bottom of the screen, you can further manipulate the image using the Insert/Edit Image function accessed through the editor buttons located at the top of the editor screen; just select the image in the article and click the small picture icon in the toolbar. This will open a dialog box that will offer a few more options to manipulate the image, such as dimensions, borders, and vertical and horizontal space. Vertical and horizontal space is the amount of space that is around the outside of the image. Figure 5.6 shows the options available in the Insert/Edit Image dialog box.
Another way you can add images to articles is by using the image fields located at the bottom of the edit screen in Joomla! 3 or in a slider on the right in Joomla! 2.5. The first field assigns an image to the intro text area and the second assigns it to the full text area. The advantage of doing it this way is that you can have a consistent layout in all of your articles.
Figure 5.5 The editor Media Manager screen.
Image Title is the text that will appear on the page if you choose to use a
caption; other-wise it is used as the alternative text that will show upon hovering over an image.
Chapter 5 Working with and Creating Content for Your Joomla! Site 112
Managing Categories
As mentioned earlier, all articles in Joomla! need to be assigned to categories. You can have as many categories as you want, and you can arrange the catego-ries and subcategocatego-ries to go as deep as you want. Creating and managing cat-egories is very similar to creating and managing content.
Go to the Content menu, and navigate to Category Manager (or, if you are already in the Article Manager, you can click on the Categories submenu). This will open the Category Manager screen to show the list of all the catego-ries that have already been created. Right now there is just one category, called Uncategorised, as shown in Figure 5.7.
Click on the name Uncategorised and the edit screen for categories will open. It is in most ways similar to the edit screen for an article. You have spaces to insert a title (required), an alias, and a description (optional). The Figure 5.6 The Insert/Edit Image dialog box
Managing Categories 113
alias will be automatically generated if you leave the field blank, just as for an article. The one important difference is that instead of picking a category, you can pick either No Parent or a parent category. The difference here is that with categories you have the option of creating complex category-subcategory struc-tures. Just as with articles, you should pay attention to the metadata fields for categories. Fill in a metadata description and keywords.
Tip
If you are American, you might wonder why Uncategorised is not Uncategorized. This is because the official language of Joomla! is British English, not American English. You can and should change the spelling by editing the category.
After clicking Save & Close, you will be returned to the Category Man-ager. Now create some new categories. You can use filler content or create categories that make sense for your site. In our case we created three catego-ries: News, Blog Posts, and Press Releases. In this case, Blog Posts and Press Releases have News as their parent category. Figure 5.8 shows an example of how your Category Manager should look if you have created these categories. Notice how the child categories are visually displayed in relation to the parent category. Altogether people sometimes refer to this structure as the category tree and each set of categories and subcategories as a branch.
If you would like to, now would be a good time to write some new articles in these categories.
Chapter 5 Working with and Creating Content for Your Joomla! Site 114
Menus and Menu Items
If you have been following along step by step, you have now created several articles and categories. However, if you look at the front end of your site, it does not look any different. That is because we have not done anything to dis-play the pages. There are a lot of ways to disdis-play content in Joomla!, but the most important is through the use of menus and menu items. You currently have one menu on the front end of your site, and it displays one menu item, a link to the home page, which, as of now, is blank. What we will do next is change the home page by changing the Home menu item.
Menu Manager
You can access the Menu Manager by navigating to Menus in the top menu of the Control Panel and clicking Menu Manager. The Menu Manager will show the existing menus. The table columns show data associated with each menu:
n Title: This is the name of the menu. You can reach an item on a menu by clicking its title.
n Menu Type: This is the unique name of the menu. Each menu must have a unique name. Although the name is linked for editing, there are almost no circumstances in which you should edit it; doing so can have serious consequences.
n Published: This is the number of published individual menu items. Menu items have states just as articles and categories do.
n Unpublished: This is the number of unpublished individual menu items. n Trashed: This is the number of individual menu items that have been
deleted but not yet removed from the menu trash.
n Modules: This is the number of modules with which a specific menu is associated. Menus are displayed on a site using modules. Sometimes you will want to display the same menu in several different modules. n ID: This is a unique number that is assigned to each menu.
Tip
Do not delete the main menu or the menu that contains your default or Home menu item. This will cause the front end of your site to show a 404 error message, mean-ing the page is not found (this pretty much means all pages will not be found without a Home menu item to reference to). To remedy this, if you have deleted the main menu or default Home menu item, simply create a new menu item and assign it as the default menu item, or use an existing menu item and assign it as the default menu item.
Menus and Menu Items 115
Menu Items
To access the menu items for a menu, you can click the menu name, click on the Menu Items link in the submenu, or navigate to it by using the top menu and going to Menus and then selecting the menu you want to edit from the list of existing menus.
Once you have gone to the Menu Item Manager screen for that selected menu, you will see a list of existing menu items, if any. You will also see a toolbar with a very similar set of options to those for editing an article. For example, you can click New to create a new item, or select an item and click Edit to change it. You can also change the state of menu items. There is batch processing to handle move, copy, change access level, and change language. Two additional buttons are Home and Rebuild. Rebuild should be clicked only if you have made extensive changes to the menu structure. Home allows you to set the home page for your site. This is the page that people will see when they visit yourdomain.com without any additions to the end of the URL. You must always have a home page for your Joomla! site to work.
In the Menu Item Manager, click New. The screen will look as in Figure 5.9. The first step in creating a menu item is to select a type. To do this, click the Select button. This will give you a list of types. In Joomla! 3 the initial list gives general headings that should be clicked to see specific listings. In Joomla! 2.5 the entire list is shown without the need to click.
n Contacts: This allows you to create links to a single contact, a category of contacts, featured contacts, or a list of all contact categories. Contacts are created and managed using the Contact component located in the Com-ponents menu.
n Articles: This allows you to create links to individual articles or to articles grouped by category, a group of featured articles, and a list of article categories. If you select a group type of category, you can choose a Blog layout showing the introductory text of the articles of the group, or a List layout, which will show the titles and article information in a tabular list. n Smart Search: This allows you to make links to Smart Search. There are
many variations of menu links within the Smart Search type.
n News Feeds: This allows you to create a menu link to any news feeds you have configured using the News Feed Manager located in the Compo-nents menu to a list of news feeds in a category, or to a list of all news feed categories.
Chapter 5 Working with and Creating Content for Your Joomla! Site 116
n User: This allows you to create a menu link to items related to users on your site such as login, registration, reminder for lost passwords and user-names, user profile (which displays a profile), and edit user profile (which allows users to edit their profiles).
A
B
Menus and Menu Items 117
n Web Links: This allows you to create a menu link to a category of Web links you have created using the Web Links component located in the Components menu and to a list of all Web link categories. You can also create a menu item for a submission form to allow users to submit Web links to your site.
n Wrapper: The Wrapper menu item allows you to display an outside page link inside your site using an HTML iframe. Wrapping an external site inside your site can be useful if you want your users to view and be able to navigate another site but still have your site and its navigation available to them.
n System Links: These allow you to add an External Link (to a location out-side your site); a Menu Item Alias, which allows you to link to an existing menu item (you should always use this when making a second link to the same content); and Text Separator, which creates a menu item type that acts as a spacer between other menu items. You can apply a graphic or text to it.
As you add components and extensions, new menu item types may become available that are specific to those components or extensions. After you have selected a menu item type, you will be directed to the screen that allows you to configure the menu item and edit the menu item parameters. These parameters change from menu type to menu type.
Article Menu Types in More Depth
The most commonly used menu item types for articles are Single Article, Cat-egory List, CatCat-egory Blog, and Featured. In this section we will brief ly review these menu item types, giving you a quick rundown on some of the basic parameters that are common to all the menu item types.
Single Article
We will start by creating a menu item linking to one of the articles created earlier. In this case, select Single Article. Once you have done this, a new field will appear directly beneath the menu type in Joomla! 3 or on the upper-right side of the editing area in Joomla! 2.5 as shown in Figure 5.10. This field will allow you to select a specific article to link. Select an article (such as “First Article”) and save the menu item.
Now go to the front end of your site and refresh the page. Your new menu link should now be on the menu beneath the Home link. Click on it and you will see your article as shown in Figure 5.11.
Chapter 5 Working with and Creating Content for Your Joomla! Site 118
A
B
Figure 5.10 Menu item field for selecting an article in (A) Joomla! 3 and (B) Joomla! 2.5
Category Blog
The Blog layout will allow you to set up a page that has the introductory text from a number of articles in one combined view. The page will include “Read more” links to the full articles. You must select the category you want to dis-play. If we make a Blog menu link to the Uncategorised category and follow the link in the menu, it appears as in Figure 5.12.
Menus and Menu Items 119
Figure 5.11 Site with a Single Article menu link on the menu, display-ing the linked page
Chapter 5 Working with and Creating Content for Your Joomla! Site 120
Category List Layout
Category List layouts allow you to show a list of available articles in a category in a table. Figure 5.13 shows a Category List layout as it would appear on the front end of your site.
Featured Layout
The Featured layout is similar to the idea of a front page in a print newspaper. It displays selected articles from a number of different categories in a blog-style layout. To place items in the Featured layout, when editing an article, set the Featured field to Yes. Featured articles are marked with yellow stars when the list of articles is shown, as in Figure 5.14.
Figure 5.13 Category List layout view on the front end
Working with Parameters and Options 121
The Home menu item is already a Featured menu link. Now if you click on the Home menu link, you will see your Featured article or articles as shown in Figure 5.15. (We featured two articles for this example.)
Create Article
This view allows users with appropriate permissions to create a new article from the front end of the Web site. We will examine this in more detail in Chapter 6.
Working with Parameters and Options
Earlier in the chapter and in Chapter 4 we mentioned that there are many options available for displaying your articles. You can see these when you click the Options icon in the Article Manager, when you edit an article, and when you edit a menu item. Most of the time they are the exact same options. Joomla! gives you an incredible array of possibilities for presenting the same content. For example, you can display an article with the author name, creation date, category name, voting, an icon to click to e-mail a link to a friend, and many more. Overall these can be a bit overwhelming, especially since they can be set in three different places. For beginning users we strongly suggest
Chapter 5 Working with and Creating Content for Your Joomla! Site 122
that you decide on a set of global settings for all of the content components. This will give you a consistent design across your site. Later, when you have developed a more complex site, you will be able to customize the display of individual pages if you wish. However, keep in mind that consistency in design helps to define your site.
Go to the Article Manager and click on the Options button. It will open a screen as shown in Figure 5.16.
There are nine separate tabs on this screen. Most of the tabs correspond to the specific layouts that we reviewed earlier: Articles, the Editing Layout, Category (covering common elements of lists and blogs), Categories, Blog and Featured Layouts, and List Layouts. These are followed by Shared Options, Integration, and Permissions. We’ll review each.
Working with Parameters and Options 123
Articles
Articles options control the Single Article layout. Note that some of the words used in the labels have changed between Joomla! 2.5 and Joomla! 3.
n Choose a Layout: This allows you to choose an alternative way to display an article. Alternatives come from templates. In most cases you should leave this as the default unless you are strongly committed to a different design.
n Show Title: Allows you to set whether the article title will show.
n Linked Titles: Allows you to choose whether the title is made into a link to the full article.
n Show Intro Text: Allows you to choose whether to show the intro text of articles. On some sites intro text (the area above a “Read more” line if you decide to add one) is used as teaser content to encourage people to read the full article. If you are not doing this, you would show the intro text on your full article pages.
n Show Category: Allows you to choose whether the title of the category will be shown along with the article.
n Link Category: Allows you to choose whether the category name, if shown along with the article, is made into a link to the category. The linked page will show a list of all articles in the category.
n Show Parent: Allows you to choose whether the title of the parent cat-egory of the catcat-egory containing this article will be shown along with the article.
n Link Parent: Allows you to choose whether the parent category name, if shown along with the article, is made into a link to the list of all of the categories in that parent category.
n Author Name: Allows you to choose whether the author name will be shown in the article.
n Link Author: Links to the author’s contact page if one is available.
n Show Created Date and Time: Allows you to choose whether the time and the date the article was created will be shown in the article.
n Show Modified Date and Time: Allows you to choose whether the article will show if it has been modified or edited and the time and date that occurred.
n Show Navigation: Allows you to choose whether navigation between arti-cles will be shown. This shows links to the previous and next artiarti-cles for people to use to browse your site.