Call 1 (415) 252-9164
Email:
[email protected]
Web:
http://mokumsolutions.com
About the Author
The author of the Oracle Cloud Cookbook is none other than the owner of
Mokum Solutions, Inc., Roddy Rodstein. Roddy is one of the most respected
Oracle Cloud Computing experts, having designed and managed many of the
world’s largest and most complex Oracle clouds. Before establishing Mokum,
Roddy spent three years at Oracle on the Oracle VM and Linux team
designing and supporting Oracle's largest Oracle VM environments. Before
Oracle, Roddy spent six years at Citrix, designing and supporting Citrix's
largest and most complex customer environments, Including Oracle's.
About Mokum Solutions, Inc.
Founded in March 2011, Mokum Solutions, Inc. specializes in virtualizing
Oracle workloads in private and hybrid clouds. Mokum corporate
headquarters are located in San Francisco, CA
http://mokumsolutions.com
or call 1 415 252 9164.
Why Mokum?
Mokum has deployed hundreds of successful Oracle VM environments.
Mokum can save you months, and years of trial and error, and deliver an
enterprise-ready Oracle VM private cloud managed by Oracle Enterprise
Manager 12c or OpenStack, without having to overprovision hardware or
Oracle licenses. All of Mokum’s customers are Oracle VM success stories that
have saved MILLIONS in Oracle licensing and hardware costs.
Unlike Mokum, Oracle consulting and traditional Oracle partners have no
incentive for customers to succeed with Oracle VM, since Oracle VM is used
to reduce Oracle licensing costs, and eliminates the need to buy $$$$ Oracle
Engineered Systems. Our customers that have engaged with Oracle and
traditional Oracle partners for Oracle VM projects received junior engineers
with little or no Oracle VM experience that regularly reference our books and
blogs for their deployments. All of Mokum’s customers are Oracle VM
success stories that have saved MILLIONS in Oracle licensing and hardware
costs.
Copyright © 2015 Mokum Solutions, Inc. All rights reserved.
Distribution of the Oracle Cloud Cookbook or derivative of the work in any
form is prohibited unless prior permission is obtained from the Copyright
holder.
Document Created: 09/02/12 Last Update: 12/22/12
This document applies to Oracle Enterprise Manager 12c Release 1 and above using Oracle Linux and Red Hat Enterprise Linux 4, 5 and 6.
Table of Contents
IntroductionSetup the Oracle Enterprise Manager Software Library
Prepare each Linux host for the Oracle Management Agent installation
Setup the Named Credentials for the Oracle Management Agent Installing User Install the Oracle Management Agent with Cloud Control
Oracle Management Agent Post Installation Prerequisites Setup Oracle RPM Repositories
...Oracle YUM Server Setup Roadmap
...Register the Oracle Linux Yum Server with the Oracle Unbreakable Linux Network
...Install and configure Apache from the Unbreakable Linux Network
...Oracle Unbreakable Linux Network Yum Server Configuration Run the Setup RPM Repository Job
Setup Linux Patch Groups Patch Linux Hosts
Introduction
This chapter of the Oracle Cloud Cookbook describes how to implement a Linux patch management program using Oracle Enterprise Manager 12c' Linux Host Patching feature. A patch management program is an integral component of an
organization's information security program used to mitigate the risk from security vulnerabilities (bugs) that are inherent in all operating systems and applications. Oracle Enterprise Manager 12c Linux Host Patching can be used to effectively manage and distribute operating system and application patches in accordance with your organization's change management policy. The goal of this chapter of the Oracle Cloud Cookbook is to describe how to establish a Linux patch management program that is a part of standard operations.
The first section of this chapter introduces the Oracle Enterprise Manager 12c Linux Host Patching feature followed by the
Linux and Oracle Enterprise Manager prerequisites and requirements. The following sections describes how to select, design and deploy RPM repositories, Linux patch groups and Linux Patch jobs that conform to your organization's change
management policy. The chapter concludes with Linux patch troubleshooting.
Linux Host Patching adds centralized Linux patch management to Oracle Enterprise Manager 12c for Oracle Linux, Red Hat Enterprise Linux and SUSE Linux. The right to use the Oracle Enterprise Manager 12c Linux Host Patching for Oracle Linux and Red Hat Enterprise Linux is bundled with basic and premier Oracle Linux support. Oracle Enterprise Manager 12c Linux Host Patching is a default Oracle Enterprise Manager feature which requires no additional installations or plug-ins. Oracle Enterprise Manager roles and groups can be configured to provide role based access to the Linux Host Patching feature.
Linux Host Patching allows you to set up and manage Oracle Unbreakable Linux Network (ULN) RPM repository, as well as custom and 3rd party RPM repositories, download Advisories from Oracle Unbreakable Linux Network, create Linux patch group, create custom repositories, submit emergency or scheduled patch jobs, submit rollback and/or uninstall patch jobs, create and manage configuration file channels for Linux file management.
Table 1 reviews the Linux Host Patching components:
Component Description
Oracle Management Agent
The Oracle Enterprise Manager client side agent is named the “Oracle Management Agent” or “OMA”. Oracle Management Agents can be installed on unmanaged Linux hosts to convert them to managed hosts which are managed via Cloud Control.
The yum server and yum clients must be managed via Cloud Control.
Sudo as root access
Oracle Enterprise Manager uses a trust-based security model to execute trusted, elevated jobs using sudo (/etc/sudoers). The Oracle Management Agent uses the nmosudo executable to run trusted/elevated jobs. If the Job credentials do not have sudo settings, then the Job is executed without the nmosudo.
Sudo as root must be configured for several commands for the user account that is used to install the Oracle Management Agent.
Oracle Enterprise Manager user account
An Oracle Enterprise Manager user account with operator privilege for each Linux target is required to patch Linux host targets.
Oracle Enterprise Manager Software Library
The Oracle Enterprise Manager Software Library is a storage repository with software patches, Oracle VM Templates and virtual assemblies, ISO images, reference gold images, application software, directive scripts, as well as Oracle-supplied software entities and deployment models. Along with its role as a storage repository, the Software Library is the interface between deployment models and the automation framework used for mass-deployments, patching and provisioning tasks.
The Oracle Enterprise Manager Software Library is a prerequisite for Linux host patching.
Linux Host Target
Oracle Linux or Red Hat Enterprise Linux hosts must be managed via Cloud Control to be patched. Each target host must have Normal Host Credentials, Privileged Host Credentials and Privileged Delegation, as well as a user account with sudo as root access configured to be patched via Cloud Control.
Linux patching groups consist of managed Linux hosts targets associated with RPM Call 415-252-9164 Mokum Oracle Cloud Cookbook http://mokumsolutions.com/
Linux Patching Group
repositories. A host can only be in one Linux patch group.
Compliance Reports Compliance reports provide the RPM patch status of Linux hosts compared to their associated RPM repositories.
Unbreakable Linux Network (ULN)
The Oracle Unbreakable Linux Network is Oracle' cloud repository for Oracle VM, Oracle Linux, Red Hat Enterprise Linux, Exadata and Exalogic RPMs, software patches, updates and fixes.
ULN Channel
An Unbreakable Linux Network channel is a collection of RPM packages hosted on Unbreakable Linux Network. The Oracle Unbreakable Linux Network hosts ULN Channels for Oracle Linux, Red Hat Enterprise Linux, Oracle VM, Exadata and Exalogic.
RPM Repository A RPM repository is a directory on an Apache web server which contains RPM packages.
Yum server
A yum server hosts RPM packages for yum clients. The Oracle Unbreakable Linux Network and Oracle public yum servers host Oracle's RPM channels. The RPM channels include the base OS version installation RPM packages along with the latest software patches, updates and fixes. With a local Oracle yum server, Oracle Linux, Red Hat Enterprise Linux, Oracle VM, Exadata and Exalogic hosts can install packages and updates locally over your network, not over the internet, using the yum client. Custom channels can be created with 3rd party RPM packages to install packages and updates from any vendor, i.e. EMC, HP, IBM, Red Hat, Open Source, etc..
Custom Channel A custom channel is a RPM repository created by the user to host a collection of RPM packages.
Configuration Channel
A configuration channel is created by the user to host Linux configuration files which can be pushed to Linux hosts. For example, a ssh keys channel can be created to push ssh keys to Linux host targets.
The Oracle Enterprise Manager prerequisites for Linux patching are a Software Library, a Linux RPM repository host target, Operator privilege for each patched Linux target, and each Linux host target must have its Normal Host Credentials,
Privileged Host Credentials and Privileged Delegation set. The Linux prerequisites for Oracle Enterprise Manager 12c Linux Host Patching are sudo as root privileges for the Oracle Management Agent installing user, the Oracle Management Agent (OMA) and a yum server. Once the Linux and Oracle Enterprise Manager prerequisites have been met, RPM repositories, patch groups and patch jobs can be created, submitted and/or scheduled for execution.
The following table shows the Oracle Enterprise Manager 12c Linux Host Patching Configuration Roadmap:
Step 1 Step 2 Step 3 Step 4 Step 5 Step 6 Step 7
Setup the Enterprise Manager Software Library Oracle Management Agent Prerequisites Setup Named Credentials Oracle Management Agent Install Setup RPM Repositories
Setup Linux Patch Groups
Patch Linux Hosts
Setup the Oracle Enterprise Manager Software Library
Step 1 Step 2 Step 3 Step 4 Step 5 Step 6 Step 7
Setup the Enterprise Oracle Management Setup Named Oracle Management Setup RPM Setup Linux Patch Patch Linux Hosts
Manager Software Library
Agent Prerequisites Credentials Agent Install Repositories Groups
The Software Library storage repository is a Linux Host Patching prerequisite. An Oracle Enterprise Manager Software Library is a storage repository with software patches, Oracle VM Templates and virtual assemblies, ISO images, reference gold images, application software, directive scripts, as well as Oracle-supplied software entities and deployment models. Along with its role as a storage repository, the Software Library is the interface between deployment models and the
automation framework used for mass-deployments, patching and provisioning tasks. With Linux Host Patching, the Software Library stores RPM channel and Linux host target entities.
For single Oracle Management Service (OMS) environments, the Software Library storage repository can be on the Oracle Management Service host or in a shared location. For multiple Oracle Management Service environments, Oracle
recommends a shared NFS mount point for the Software Library. The storage requirements for your Software Library storage repository entirely depend on the total storage requirements of your software patches, Oracle VM Templates and virtual assemblies, ISO images, reference gold images, application software and configuration files. A best practice is to use storage that can grow with your Software Library.
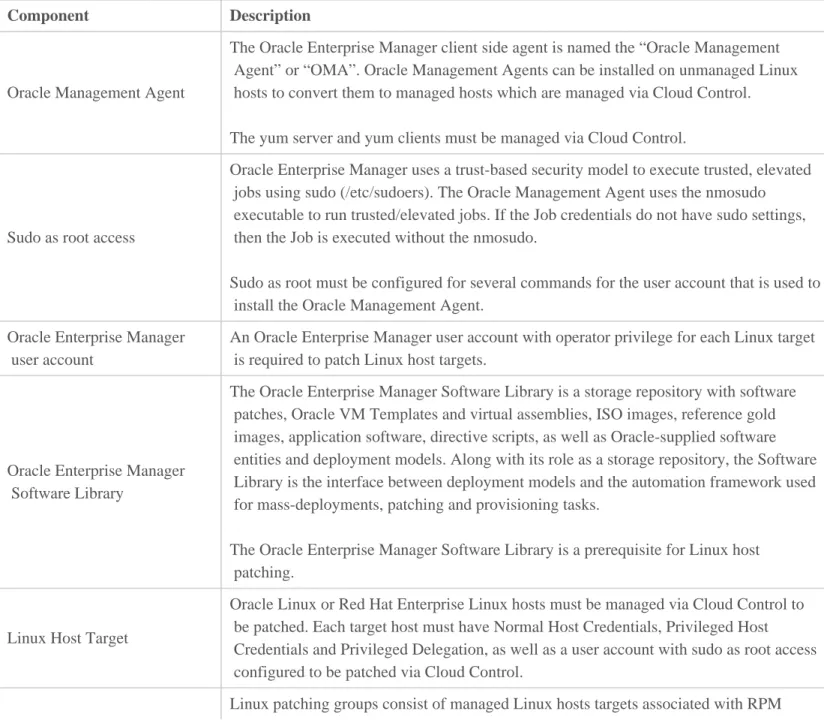
The Software Library framework, not the Software Library storage repository, is installed by default with Oracle Enterprise Manager. The Software Library page can be accessed from the Enterprise menu => Provisioning and Patching => Software Library.
To set up the Software Library:
1. Log in to Enterprise Manager Cloud Control as an EM_CLOUD_ADMINISTRATOR user and click Setup =>
Provisioning and Patching => Software Library. From the Software Library: Administration page, select the Storage Type => OMS Shared Fileystem and click + Add from the Actions menu.
Figure 1
2. From the Add OMS Shared Filesystem Location window, in the Name text area, enter the name of the Software library. Next, enter the directory path to the Software Library storage repository, and click OK to execute the
SwlibRegisterMetadata Job. Figure 2
3. From the Software Library: Administration page, confirm that the Software Library has been created and that the Status is Active.
Figure 3
The Software Library has been created and the Status is Active.
Prepare each Linux host for the Oracle Management Agent installation
Step 1 Step 2 Step 3 Step 4 Step 5 Step 6 Step 7
Setup the Enterprise Manager Software Library Oracle Management Agent Prerequisites Setup Named Credentials Oracle Management Agent Install Setup RPM Repositories
Setup Linux Patch Groups
Patch Linux Hosts
The Oracle Management Agent (OMA) is a core Oracle Enterprise Manager component. The Oracle Management Agent can be installed on unmanaged Oracle Linux, Red Hat Enterprise Linux and SuSE Linux hosts to convert them to managed hosts that are centrally managed via Cloud Control. There are numerous prerequisites that must be met before an Oracle
Management Agent can be installed on an unmanaged Linux host. Each of the prerequisites in Table 2 must be completed before the Oracle Management agent is installed.
Table 2 shows the Oracle Management Agent installation prerequisites.
Prerequisite Description
1- Sudo as root must be configured for several
Pre-installation Sudo Prerequisites:
Option A: Add the following commands in the /etc/sudoers file for the Oracle Management Agent
commands for the Oracle Management Agent installing user in the /etc/sudoers file.
Oracle Enterprise Manager uses a trust-based security model to execute trusted, elevated jobs using sudo. The Oracle Management Agent uses the nmosudo executable to run trusted/elevated jobs. If the Job credentials do not have sudo settings, then the Job is executed without the nmosudo.
installing user:
oma ALL = NOPASSWD: /usr/bin/id, /bin/chmod, /bin/cp, /bin/mkdir, /bin/rm, /bin/tar, /bin/chmod, /usr/bin/yum, /usr/sbin/up2date, /bin/sed, /bin/rpm, /u01/app/oracle/product/agent_inst/bin/emctl, /u01/app/oracle/product/core/12.1.0.1.0/sysman/install/agentDeploy.sh,
/u01/app/oracle/product/core/12.1.0.2.0/oui/bin/runInstaller,
/u01/app/oracle/product/core/12.1.0.2.0/bin/unzip, /u01/app/oracle/product/*/unzipTmp/unzip, /u01/app/oracle/product/*/agentdeployroot.sh, /u01/app/oracle/product/*/agentDeploy.sh
In the above example, oma is the installing user. Change "oma" with your installer user account name.
In the above example, the agent home ($AGENT_HOME) is /u01/app/oracle/product/agent_inst. Change the above $AGENT_HOME with your $AGENT_HOME.
In the above example, the agent base ($AGENT_BASE) is
/u01/app/oracle/product/core/12.1.0.2.0/. Change the above $AGENT_BASE with your $AGENT_BASE.
To add the commands in the /etc/sudoers file, as root, type "visudo" to edit the /etc/sudoer file.
Option B: Add the Oracle Management Agent installing user to the wheel goup and uncomment the "wheel ALL=(ALL) NOPASSWD: ALL" line in the /etc/sudoer file.
To add the Oracle Management Agent installing user to the the wheel group, as root, type: useradd -G wheel oma
In the above example, oma is the installing user. Change "oma" with your installer user account name.
As root type "visudo" and uncomment the "wheel ALL=(ALL) NOPASSWD: ALL" line.
Option A Post-installation Sudo Prerequisites:
Replace the Option A sudo entries with:
oma ALL=NOPASSWD: /u01/app/oracle/product/agent_inst/bin/nmosudo
In the above example, oma is the installing user. Change "oma" with your installer user account name.
In the above example, the agent home ($AGENT_HOME) is /u01/app/oracle/product/agent_inst. Change the above $AGENT_HOME with your $AGENT_HOME.
Tip: With Oracle Linux and Red Hat Enterprise Linux 5 hosts, make the following modifications to allow sudo with NOPASSWD to work with up2date:
rm -fr /usr/bin/up2date
ln -s /usr/sbin/up2date /usr/bin/up2date
Oracle Management Service and /etc/sudoers Prerequisites:
On the OMS host(s) set the oracle.sysman.prov.agentpush.enablePty property to true in the $<OMS_HOME>/sysman/prov/agentpush/agentpush.properties file. If your unable to set the oracle.sysman.prov.agentpush.enablePty property to true in the
$<OMS_HOME>/sysman/prov/agentpush/agentpush.properties file, the following two settings must be made in each linux host's /etc/sudoers file.
Change the default "Defaults !visiblepw" to "Defaults visiblepw" in the /etc/sudoers file must not be commented out.
The "Defaults requiretty" in the /etc/sudoers must be commented out.
2- $ORACLE_BASE and $AGENT_HOME Directories:
The Oracle base directory
($ORACLE_BASE) is the top-level directory for Oracle software
installations. The agent home directory
($ORACLE_HOME) is the directory where the Oracle Management Agent software is installed.
The Optimal Flexible Architecture (OFA) standard is a set of file naming recommendations for managing Oracle installations. The Optimal Flexible Architecture standard offers mount point, directory, and file-naming conventions that work with the Oracle Universal Installer. The Optimal Flexible Architecture includes where to install each part of each Oracle product including the storage of the applications and the data.
To create the directories for Oracle software
$ORACLE_BASE and $AGENT_HOME Requirements:
1. The agent home directory must be empty and should have 4GB of space. 2. The agent home directory name cannot contain any spaces.
3. The installing user must own the agent home directory.
4. The installing user or the root user must own all the parent directories. 5. The root user must own the root directory.
If the $AGENT_HOME is /u01/app/oracle/product/agent_inst, and oma is the installing user, then the /u01/app/oracle/product/agent_inst directory must be owned by oma.
If the $ORACLE_BASE is /u01/app/oracle/product/, and oma is the installing user, then the
/u01/app/oracle/product/ directory must be owned by the oma user, and the root directory /u01 must be owned by the root user.
Note: When installing the Oracle Management Agent using Cloud Control's Add Host Targets Wizard, the Wizard automatically creates the $AGENT_HOME directory.
As root, create and chown the $ORACLE_BASE directory, i.e. /u01/app/oracle/product/. For example:
# mkdir /u01/app/oracle/product/
# chown oma:dba /u01/app/oracle/product
installation using the Optimal Flexible Architecture standard, as root, type the following commands. # mkdir -p
/u01/app/oracle/product/ # chown oma:dba /u01/app/oracle/product
3- This section lists the Oracle Management Agent RPM package prerequisites for Oracle and Red Hat Enterprise Linux 5.x and 6.x.
Tip: For OL 5 install the oracle-validated RPM to meet all the RPM package
prerequisites. For OL 6 install the oracle- rdbms-server-11gR2-preinstall RPM to meet all the RPM package prerequisites.
The following RPM packages are required on 32-bit and 64-bit platforms for the Oracle Management Agent.
To confirm if the prerequisite RPM packages are already installed, as root, type the following command:
Oracle & Red Hat Linux 5.x 64-bit:
# rpm -q --queryformat "%{NAME}-%{VERSION}-%{RELEASE} (%{ARCH})\n" make binutils gcc libaio glibc libstdc++ setarch rng-utils libXtst
Oracle & Red Hat Linux 6.x 64-bit
# rpm -q --queryformat "%{NAME}-%{VERSION}-%{RELEASE} (%{ARCH})\n" make binutils gcc libaio glibc-common libstdc++ sysstat glibc-devel
The above commands lists each of the queried RPM packages installed on the system. The 32-bit RPMs are appended with (i386) or (i686), and the 64-bit RPMs are appended with (x86_64). From any ULN registered Linux host, install any of the missing RPMs by typing "yum install package-name". To install the RPM Package Prerequisites from the Oracle public yum repository, as root type the following commands:
Oracle & Red Hat Linux 6: # cd /etc/yum.repos.d/
# wget http://public-yum.oracle.com/public-yum-ol6.repo
# yum install package-name
Oracle & Red Hat Linux 5: # cd /etc/yum.repos.d/
# wget http://public-yum.oracle.com/public-yum-el5.repo
# yum install package-name
Oracle & Red Hat Linux 5.x 64-bit Oracle & Red Hat Linux 6.x 64-bit
make-3.81 binutils-2.17.50.0.6 gcc -4.1.1 libaio-0.3.106 glibc-common-2.3.4 libstdc++ -4.1.1 setarch-1.6 sysstat-5.0.5 rng-utils-2.0 libXtst-1.0.1-3.1(x86_64) make-3.81 binutils-2.17.50.0.6 gcc-4.1.1 libaio-0.3.106 glibc-common-2.3.4 libstdc++-4.1.1 sysstat-5.0.5
glibc-devel-2.5-49-i686 (This is a 32-bit package)
glibc-devel-2.5-49-x86_64 (This is a 64-bit Call 415-252-9164 Mokum Oracle Cloud Cookbook http://mokumsolutions.com/
installations) (Only for Oracle Linux 6.2) glibc-2.12-1.47.0.2
Oracle & Red Hat Linux 5.x 32-bit Oracle & Red Hat Linux 6.x 32-bit
make-3.81 binutils-2.17.50.0.6 gcc-4.1.1 libaio-0.3.106 glibc-common-2.3.4 compat-libstdc++296-2.96 libstdc++ 4.1.1 libstdc++devel-4.1.0 setarch-1.6 sysstat-5.0.5 compat-db 4.1.25 rng-utils-2.0 libXtst-1.0.1-3.1(i386)
xorg-x11-utils (Required only for GUI installations) make-3.81 binutils-2.17.50.0.6 gcc-4.1.1 libaio-0.3.106 glibc-common-2.3.4 compat-libstdc++296-2.96 libstdc++ 4.1.1 libstdc++devel-4.1.0 setarch-1.6 sysstat-5.0.5 compat-db 4.1.25
xorg-x11-utils (Required only for GUI installations) 4- /etc/hosts requirements Oracle technology products, including Oracle Enterprise Manager, rely on a properly formatted /etc/hosts file which allows the host to be pingable, with long and short host names. The host name in the /etc/hosts file must be associated with the server's public IP address.
The next example shows the proper syntax from a /etc/hosts file. Note that the localhost entries are on one line, and the IP address with the long and short names are on the next line.
127.0.0.1 localhost.localdomain localhost 192.168.4.8 servername.com servername
The /etc/hosts file can be edited by the root user by typing “vi /etc/hosts”.
Tip: The following IPv6 entries in Oracle Linux 5 & 6 /etc/hosts files should be removed to aviod "Bug 13652664 : AGENT DEPLOY FAILS WITH AGENT PORT PASSED BY USER IS BUSY" with Oracle Management Agent installations:
::1 localhost localhost.localdomain localhost6 localhost6.localdomain6
5- The Secure Shell (SSH) provides the connectivity between the Oracle Management Service (OMS) and Oracle Management Agents for jobs and deployment procedures.
If the SSH daemon is not running on the default port (22), the SSH_PORT property in
$<OMS_HOME>/oui/prov/resources/Paths.properties on on the OMS host must be edited with the port.
All of the Linux hosts targets must use the same SSH port.
6- It is important that Enterprise Manager obtains the correct time zone for each Oracle Management Agent.
To set the time zone, as root, type: # export TZ='America/Los_Angeles'
Note: Substitute 'America/Los_Angeles' with your time zone. Time zone details are located in the /usr/share/zoneinfo directory. For example, the time zone example above 'America/Los_Angeles' correspond to the /usr/share/zoneinf/America/Los_Angeles file, i.e. 'America/Los_Angeles'.
The continental United States is divided into 4 time zones:
Eastern Standard Time ( EST ) is the New York time zone, i.e. export TZ='America/New_York' Central Standard Time ( CST ) is the Chicago time zone, i.e. export TZ='America/Chicago' Mountain Standard Time ( MST ) is the Denver time zone, i.e. export TZ='America/Denver' Pacific Standard Time ( PST ) is the Los Angeles time zone, i.e. export TZ='America/Los_Angeles' 7- /tmp directory
requirments The /tmp directory must have 400 MB of free space. 8- oraInventory
directory requirements
If any Oracle technologies are already installed on the host, confirm that the oraInventory directory is read write (rw) by the dba group.
Once all of the above prerequisites have been met the Oracle Management agent can be installed.
Setup the Named Credentials for the Oracle Management Agent Installing User
Step 1 Step 2 Step 3 Step 4 Step 5 Step 6 Step 7
Setup the Enterprise Manager Software Library Oracle Management Agent Prerequisites Setup Named Credentials Oracle Management Agent Install Setup RPM Repositories
Setup Linux Patch Groups
Patch Linux Hosts
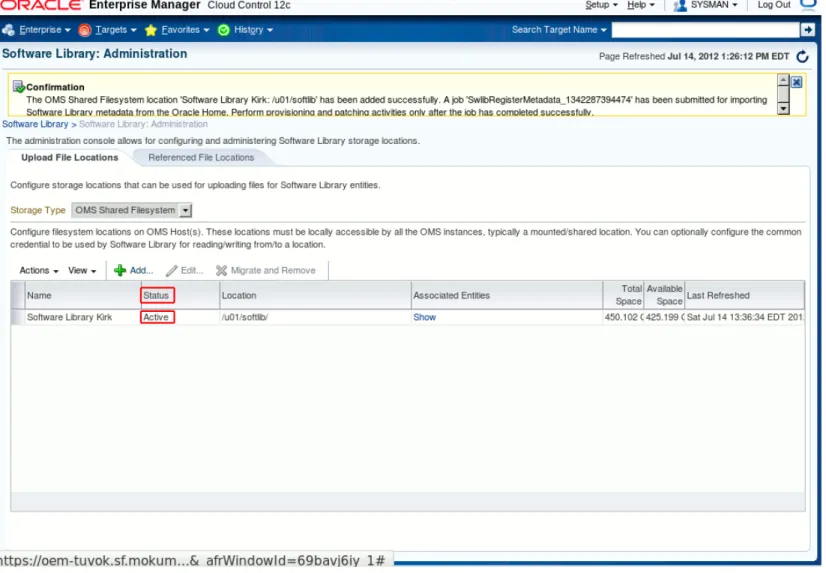
A Named Credential with a user name and password for the Oracle Management Agent installing user is a Linux Host Patching prerequisite for the yum server RPM repository setup job, the Oracle Management Agent installation and for Linux patch jobs. A named credential is a target's user account authentication information that is stored in Enterprise Manager and used in Cloud Control for running jobs. Once a named credential is saved, Enterprise Manager users can run jobs using a named credential and never see the named credential username and password. Named credentials can be created with a user name and password and/or SSH keys. For Linux patch job, a named credentials with a user name and password is the minimum requirement.
A named credential for the yum server RPM repository setup job as well as the Oracle Management Agent installation can be created in advance and selected while executing a job, or created on the fly while executing a job. A best practice is to create named credentials in advance to limit and control the number of named credentials stored in Enterprise Manager. For example, a named credential created in advance for the the Oracle Management Agent installing user can be reused an unlimited number of time for patch jobs and agent deployments. Each time a named credential for the Oracle Management
Note: The Oracle Management agent can be installed using a named credential with SSH Keys, although SSH Keys are not supported for patch jobs.
To create a named credential, click Setup => Security => Named Credentials, as shown in Figure 4.
From the Named Credentials page, create a named credential for the Oracle Management Agent installing user. As shown in Figure 5, click the Create link to access the Create Credential page.
As shown in Figure 6, from the Create Credential page, select the GlobalScope option, and enter the following properties.
General Properties:
Credential name: Enter the user name of the Oracle Management Agent installing user. This is the name that is displayed in Cloud Control.
Credential description: Enter an optional description.
Authentication Target Type: Select Host from the drop down menu.
Credential type: Select Host Credentials from the drop down menu.
Scope: Select Global.
Credentials Properties:
UserName: Enter the user name of the Oracle Management Agent installing user.
Password: Enter the password for the Oracle Management Agent installing user.
Confirm Password: Enter the password for the Oracle Management Agent installing user.
Run Priviledge: Select Sudo and in the Run As text box enter root.
Click Test and Save.
Figure 6
From the Test options page, click the search icon to access the Search and Select: Targets window. Figure 7
From the Search and Select: Targets window, select Host in the Target Type drop down menu. Search for a Linux host target by enterting a host name in the Target Name or On Host text box and click Search, or select a Linux host from list. Once a Linux host is selected, click the Select button to proceed.
Figure 8
From the Test options page shown in Figure 9, click the Click Test and Save button to test and save the named credential.
The named credential is now listed on the Named Credentials page. Figure 10
Install the Oracle Management Agent with Cloud Control
Step 1 Step 2 Step 3 Step 4 Step 5 Step 6 Step 7
Setup the Enterprise Manager Software Library Oracle Management Agent Prerequisites Setup Named Credentials Oracle Management Agent Install Setup RPM Repositories
Setup Linux Patch Groups
Patch Linux Hosts
With Cloud Control there are three Oracle Management Agent installation options. This chapter of the Oracle Cloud Cookbook covers Oracle's recommended option, the Add Host Targets Wizard.
Table 3 shows the three Oracle Management Agent installation options.
Agent Installation Option
Explanation
The Add Host Targets Wizard
The Add Host Targets Wizard automatically installs the agent from Cloud Control without any post installation steps.
Note: Oracle recommends using the Add Host Targets Wizard. Silent Agent
Installation MOS ID 1360083.1
The silent agent installation uses a response file installation which automates the agent installation with two manual post installation steps. The manual post installation steps include running the root.sh scripts along with “emctl secure agent”.
RPM Installation MOS ID 1363031.1
The agent RPM installation is a single agent RPM installation with two manual post installation steps. The manual post installation steps include editing the properties file:
/usr/lib/oracle/agent/agent.properties with the correct values, then executing the /etc/init.d/config.pl command.
To install the Management Agent on an unmanaged Linux host usingthe Add Host Targets Wizard, follow these steps: 1. Log into Cloud Control as an EM_CLOUD_ADMINISTRATOR user.
2. Click Setup => Add Target => Add Target Manually to navigate to the Add Targets Manually page. Figure 11
3. From the Add Target Manually page, select the Add Host Targets option and click Add Host. Figure 12
4. From the Add Host Targets: Host and Platform page, click + Add to add a host. Next, enter the DNS long or short host name and select the platform from the drop down list, i.e. Linux x86-64. Repeat the process for each additional Linux host. Once all of the hosts are added to the Add Target page, click Next to proceed.
Tip: The DNS name entered in the Host textfield will be displayed in Cloud Control. The Host name cannot be edited after the Oracle Management Agent installaion. The DNS long or short name can be entered in the Host textfield. If you have multiple domain names, consider using the long name to be able to quickly identify hosts in Cloud Control by the domain name.
Figure 13
5. From the Add Host Targets: Installation Details page enter the Installation Base Directory path (i.e. the
$AGENT_HOME), click in the Instance directory text field to auto-generate the Instance Directory path, select the
Named Credential from the drop down list, or create a new Named Credential on the fly by clicking the + icon, accept the default port 3872, orclear the port filed to enable automatic port selection. Click Next to proceed.
Tip: The Mandatory Inputs icon will turn green once all of the details have been successfully entered.
Figure 14
6. From the Add Host Targets: Review page, confirm the entries, and click Deploy Agent. Figure 15
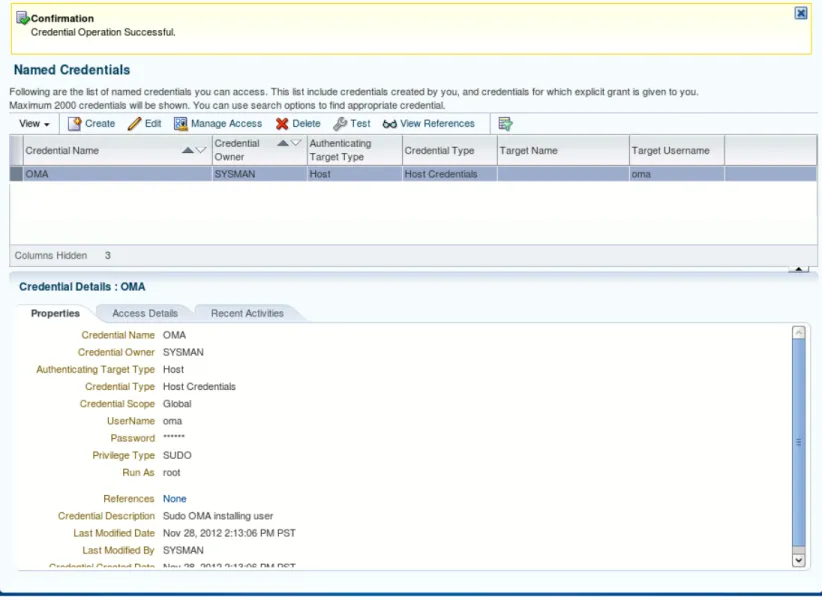
7. The Add Host Status window shows the progress of agent deployments. The agent deployment takes between 5 to 10 minutes.
There are three agent deployment segments: Initialization Details, Remote Prerequisite Check Details and Agent Deployment Details. Each segment can be tracked by clicking the Link under Agent Deployment Details. If any of the agent deployment segments fail, the failed segment will be displayed in the GUI. Resolve the problem and click Retry to rerun that segment.
Figure 16
Click the Initialization Details link to view the Initialization Details.
Figure 17 shows the Initialization Details.
Click the Remote Prerequisite Check Details link to view the Remote Prerequisite Check Details.
Figure 18 shows the Remote Prerequisite Check Details.
Click the Agent Deployment Details link to view the Agent Deployment Details.
Figure 19 shows the Agent Deployment Details.
Once the agents are successfully deployed, the Add Host Status window displays the Agent Deployment Summary with the
Agent Deployment Succeeded message.
Figure 20 shows the Agent Deployment Summary message.
8. Next, click Targets => Hosts to navigate to the Hosts page. Confirm that the hosts are listed on the page. Figure 21
Oracle Management Agent Post Installation Prerequisites
Step 1 Step 2 Step 3 Step 4 Step 5 Step 6 Step 7
Setup the Enterprise Manager Software Library Oracle Management Agent Prerequisites Setup Named Credentials Oracle Management Agent Install Setup RPM Repositories
Setup Linux Patch Groups
Patch Linux Hosts
Normal Host Credentials and Privileged Host Credentials for the Oracle Management Agent installing user, and Privileged Delegation is a Linux Host Patching prerequisite. Once the Oracle Management Agent is installed on a Linux host, its Normal Host Credentials, Privileged Host Credentials and Privileged Delegation settings must be setup in Cloud Control for patch jobs.
Linux Host Privileged Delegation Settings:
Cloud Control supports running Deployment Procedures such as Patch Linux Hosts and Linux RPM Repository server setup with elevated administrator privileges using sudo and PowerBroker. Without elevated administrator privileges, Deployment Procedure jobs will fail.
Privilege Delegation is the Enterprise Manager framework that supports running Deployment Procedures using sudo and PowerBroker. All Enterprise Manager Deployment Procedures require administrator privileges to run. Many of the Deployment Procedure steps can be run as a normal user, although there are steps that require elevated administrator privileges.
To setup Privileged Delegation for Linux host targets click Setup => Security => Privileged Delegation to access the
Manage Privileged Delegation Settings page. Figure 22
From the Manage Privileged Delegation Settings page configure the Yum server and each Linux host target by clicking the
Edit icon. Only one target can be configure at a time. Repeat the process for each Linux host target. Figure 23
From the Host Privileged Delegation Settings page select the Sudo radio button and enter /usr/bin/sudo -u %RUNAS% %COMMAND% in the text box. Next, click Update to proceed.
Figure 24
From the Confirmation page click Yes to save the Privilege Delegation Settings (PDP) for the Linux host targets. Figure 25
From the Manage Privileged Delegation Settings page repeat the previous steps above for each Linux host target. Figure 26
Preferred Credentials Setup:
Preferred credentials simplify access to targets by saving login credentials in Enterprise Manager. Once preferred credentials are saved, administrators can run jobs using preferred credentials without having to enter login credentials. Both Normal Host Credentials and Privileged Host Credentials for the Oracle Management Agent installing user account must be setup for Linux Host Patching.
Tip: Preferred credentials are configured on a per user basis.
Setup => Security => Preferred Credentials
From the Preferred Credentials page click the Host Target Type, then click Manage Preferred Credentials to access the
Host Preferred Credentials page. Figure 27
From the Preferred Credentials page select the Hosts Target Type and click Manage Preferred Credentials. Figure 28
From the Host Preferred Credentials page select one or more Linux host target and click Set. Figure 29
From the Select Named Credential window, select the Oracle Management Agent installing user account from the drop down menu, then click Save.
Note: In the example, the Named Credential was created in advance using the Oracle Management Agent installing user oma. Change "oma" with your installer user account Named Credential.
Figure 30
From the Host Preferred Credentials page confirm that the Linux host targets Normal Host Credentials and Privileged Host Credentials are set.
Figure 31
Setup Oracle RPM Repositories
Step 1 Step 2 Step 3 Step 4 Step 5 Step 6 Step 7
Setup the Enterprise Manager Software Library Oracle Management Agent Prerequisites Setup Named Credentials Oracle Management Agent Install Setup RPM Repositories
Setup Linux Patch Groups
Patch Linux Hosts
Oracle Enterprise Manager Linux Host Patching allows you to setup and manage local Oracle Unbreakable Linux Network (ULN) RPM repositories, as well as custom and 3rd party RPM repositories used to install RPMs, patches, updates and erratas for Oracle Linux, Red Hat Enterprise Linux, Oracle VM, Exadata and Exalogic hosts. With Cloud Control, administrators can create, clone and edit RPM repositories used to install RPMs, patches, updates and erratas for Oracle Linux, Red Hat Enterprise Linux, Oracle VM, Exadata and Exalogic hosts from on premiums yum servers over your local
The Oracle Unbreakable Linux Network is Oracle' cloud repository for Oracle VM, Oracle Linux, Red Hat Enterprise Linux, Exadata and Exalogic RPMs, software patches, updates and fixes. Access to the Oracle Unbreakable Linux Network is available to all levels of Sun Premier support customers and Oracle Linux support basic and premier customers. Access to Unbreakable Linux Network requires an Oracle Single Sign-on account and a valid customer service identifier (CSI) and registration.
There are two options for updating Oracle Linux and Red Hat Enterprise Linux hosts using the Oracle Unbreakable Linux Network (ULN). The first option is to manually register each Linux host at the Oracle Unbreakable Linux Network. Once a Linux host is registered, administrators can install RPMs, patches, updates and erratas using the yum or up2date client. The Oracle Unbreakable Linux Network does not offer centralized Linux patch management or custom RPM channels. The second option is to use Cloud Control to centrally manage RPM repositories and Linux patch jobs using local, on premiums yum servers. With Cloud Control only the yum server needs to be registered with the Oracle Unbreakable Linux Network. A local yum server can be setup on any registered Oracle Linux or Red Hat Enterprise Linux host with Internet access, Apache (httpd) and enough disk space for the RPM files. Cloud Control supports custom channels.
By default Oracle Unbreakable Linux Network registered Linux hosts are subscribed to their respected OS version “el*/ol*_latest” RPM channel, i.e. Enterprise Linux 4 latest, Oracle Linux 5 latest, and Oracle Linux 6 latest. Latest RPM channels include the base OS version RPM packages along with the latest software patches, updates and fixes. Patch jobs using the latest RPM channel will update hosts to their respected latest version update with the latest software patches, updates and fixes. A patch job executed on a Oracle Linux 5U2 host would update the host from 5U2 to 5U8 with the latest software patches, updates and fixes. To keep a host at its respected update level, at Oracle Unbreakable Linux Network remove the default “el*/ol*_latest” RPM channel and select the el*/ol*_base along with the el*/ol*_patch RPM channel. When hosts are patched using the el*/ol*_base and el*/ol*_patch RPM channels, the hosts are patched with the latest
software patches, updates and fixes from their respected update channel, i.e. 5U2, 5U3, 5U4, etc... not with the latest, i.e. 5U8 RPM channel.
Table 4 lists the Oracle Unbreakable Linux Network RPM channels, and the yum server storage requirements.
ULN Channel Name
Yum Server Storage Requirements
ULN Channel Contents and Usage
el*/ol*_latest 3-10G
Enterprise Linux and Oracle Linux latest RPM channel. This channel includes the installation media and the latest Enterprise Linux and Oracle Linux software patches, updates and fixes.
el*/ol*_addons 600M
Enterprise Linux and Oracle Linux add-ons channel. This channel has the add-on RPM packages like the OEM yast wrapper, Zend, yum-arch and the Oracle VM Manager 2.x patches.
el*/ol*_oracle 1G
Enterprise Linux and Oracle Linux Oracle RPM channel. This channel has Oracle specific RPM packages like Oracle Configuration Manager, Instant Client for Oracle Database, Tools for Oracle Database, The Oracle Automatic Storage Management library userspace code, etc..
el*/ol*_base 3G The Enterprise Linux and Oracle Linux base channels. These channels contain the RPMs from the installation media for the respected version and update release.
el*/ol*_patch 1G The Enterprise Linux and Oracle Linux patch channels. These channels contain the
latest software patches, updates and fixes for the respected version and update release.
ovm*_latest 500M
The Oracle VM latest RPM channels. These channels includes the installation media and the latest Oracle VM software patches, updates and fixes for the respected version and update release.
ovm*_base 400M The Oracle VM base channels. These channels contain the RPMs from Oracle VM installation media for the respected version and update release.
ovm*_patch 100M The Oracle VM patch channels. These channels contain the latest software patches, updates and fixes for the respected version and update release.
List 1 shows the Oracle YUM Server Setup Roadmap
1- Register an Oracle Linux or Red Hat Enterprise Linux host with the Unbreakable Linux Network. 2- Install and configure Apache on the Linux host.
3- Oracle Unbreakable Linux Network Yum Server Configuration
4- Run the Linux RPM Repository server setup job in from Cloud Control
1- Register the Oracle Linux Yum Server with the Oracle Unbreakable Linux Network
Before an Oracle Linux or Red Hat Enterprise Linux host can connect to the Oracle Unbreakable Linux Network, Oracle’s GPG key must be imported using the rpm command. To import the Oracle’s GPG key, as root type “rpm --import
/etc/pki/rpm-gpg/RPM-GPG-KEY”, as shown in the next example.
# rpm --import /etc/pki/rpm-gpg/RPM-GPG-KEY
Tip: If the RPM-GPG-KEY if not in the /etc/pki/rpm-gpg/ directory, locate the file and use the correct path to import the GPG key. For example, as root, type "find / -name RPM-GPG-KEY -print" to locate the RPM-GPG-KEY file.
Once the GPG key has been imported, the Linux host can be registered at the Oracle Unbreakable Linux Network from the command line or using a X Windows application. Linux 4 and 5 systems use the up2date command as root to access the registration screen by typing “up2date --register” for X Windows or "up2date --nox --register" for text mode. Linux 6 systems use the "uln_register" command as root to access the registration screen. The registration process requires you to enter your Unbreakable Linux Network associated Oracle Single Sign-on user name and password and a valid Oracle Linux Support Identifier number (CSI).
If a proxy server is in the mix, for Oracle Linux 4 and 5 systems, as root type “up2date --configure” to list and edit the up2date program defaults. There are five proxy configurations that can be edited to allow access from your Linux host to the internet. The next example shows the up2date proxy configuration items with their default settings and item numbers.
3. enableProxy No 4. enableProxyAuth No 11. httpProxy
21. proxyPassword 22. proxyUser
To edit an up2date program item, type the item number, i.e. enter 3 or 4, etc.... then type C to clear the default value or type q
to quit without saving. Next, type the new value and press Enter to save the new value and to exit. If you need to enter multiple values, separate them with semicolons (;).
Oracle Linux 6 systems use the “--proxy” option to specify a http proxy, i.e. “# uln_register –proxy=<HOST NAME>: <PORT NUMBER> “. If your proxy server requires authentication, use the “--proxyUser” and “--proxyPassword” to add a username and password, i.e “# uln_register –proxy=<HOST NAME>:<PORT NUMBER> proxyUser=<USER NAME> --proxyPassword=<PASSWORD>”
List 4 shows the six steps to register a Linux host with the Oracle Unbreakable Linux Network: 1. Review the Unbreakable Linux Privacy Statement
2. Register a User Account
3. Register a System Profile—Hardware 4. Register a System Profile—Packages
5. Send Profile Information to the Unbreakable Linux Network 6. Finished Registration
The following examples walk through the six steps to register a Linux host with the Oracle Unbreakable Linux Network.
Step 1. Review the Unbreakable Linux Privacy Statement
From the Review the Unbreakable Linux Privacy Statement screen use the Alt key to select the Next tab, once the Next tab is selected press the Enter key to proceed.
Figure 32 shows the Review the Unbreakable Linux Privacy Statement screen.
Step 2. Register a User Account
On the Register a User Account screen, enter your your Unbreakable Linux Network associated Oracle Single Sign-on User name, Password,Password confirmation and a valid Oracle VM CSI number. Use the Alt key to select the Next tab, and then press the Enter key to proceed.
Figure 33 shows the Register a User Account screen.
Step 3. Register a System Profile—Hardware
On the Register a System Profile—Hardware screen, accept the defaults and use the Alt key to select the Next tab. Once the Next tab is selected, press the Enter key to proceed.
Note: The information gathered from the system profile step is saved in your user profile at the Oracle Unbreakable Linux Network.
Figure 34 shows the Register a System Profile—Hardware screen.
Step 4. Register a System Profile— Packages
On the Register a System Profile—Packages screen, accept the defaults and use the Alt key to select the Next tab. Once the Next tab is selected, press the Enter key to proceed.
Figure 35 shows the Register a System Profile—Packages screen.
Step 5. Send Profile Information to the Unbreakable Linux Network
From the Send Profile Information to the Unbreakable Linux Network screen, accept the defaults and use the Alt key to select the Next tab. Once the Next tab is selected, press the Enter key to proceed.
Figure 36 shows the Send Profile Information to the Unbreakable Linux Network screen.
Step 6 Finished Registration
On the Finished Registration screen, accept the defaults and use the Alt key to select the Next tab. Once the Next tab is selected, press the Enter key to proceed.
Figure 37 shows the Finished Registration screen.
The Oracle Linux host has been successfully registered.
2- Install and configure Apache from the Unbreakable Linux Network
Installing Apache from an Unbreakable Linux Network registered Oracle Linux host is accomplished by typing “up2date -i httpd” for 5.x hosts or "yum install httpd" for 6.x hosts while logged in as root.
Once Apache is installed, configure Apache to automatically start by typing “chkconfig httpd on”. Next, start Apache by typing “service httpd start”. The next example shows how to install, configure and start Apache.
Using up2date, as root type (ULN 5.x): # up2date -i httpd
# chkconfig httpd on && service httpd start
Using yum, as root type (ULN 6.x): # yum install httpd
# chkconfig httpd on && service httpd start
Once the “up2date -i httpd”, or "yum install httpd", “chkconfig httpd on” and “service httpd start” commands have completed, test Apache by pointing a web browser to the fully qualified domain name (FQDN) or the IP address of the Apache server. You will see the default Apache test page as shown in Figure 38.
Tip: If you don’t see the default Apache test page, check if iptables is blocking http traffic on the Apache host. Consider disabling iptables to test Apache by typing “sudo /sbin/service iptables stop”.
Next, create the yum repository base directory in /var/www/html by typing "mkdir -p /var/www/html/yum".
3- Oracle Unbreakable Linux Network Yum Server Configuration
Once your yum server has been registered, and apache has been installed and configured, access the Oracle Unbreakable Linux Network dashboard and click the Systems tab. From the Systems tab click on the yum server to access its System Details page.
Figure 39 shows the Systems tab and the YUM server.
From the YUM servers Systems Details page click the Edit button, as shown in Figure 40.
From the Edit Systems Properties page, select the Yum Server check box, enter a valid CSI number, then click the Apply Changes button, as shown in Figure 41.
Next, click the Manage Subscriptions button, as shown in Figure 42.
From the System summary page select the Oracle VM 3 latest channel. Next, click the Save Subscriptions button to save the changes, as shown in Figure 43.
Note: A prerequisite to synchronize an Oracle Linux and/or Red Hat Enterprise Linux 5.x yum server with the Oracle Unbreakable Linux Network is the uln-yum-proxy RPM package. To install the uln-yum-proxy RPM, from the Manage Subscriptions page add the Enterprise Linux Add ons (platform) RPM channel. Once the Enterprise Linux Add ons
RPM channel has been added, as root, type "up2date -i uln-yum-proxy". The Enterprise Linux Add ons RPM channel can be removed from the Manage Subscriptions page after the uln-yum-proxy RPM is installed.
The yum server has been successfully configured using the Oracle Unbreakable Linux Network dashboard.
Run the Setup RPM Repository Job
This section of the Oracle Cloud Cookbook discribes how to run the Setup RPM Repository Job and how to edit and schedule the job that automatically downloads RPMs from the Oracle Unbreakable Linux Network.
Tip: As of this writing, there is a known bug with the Setup RPM Repository job and the permission for the
/var/www/html/yum directory. "EM12C : Setting up Linux Patching fails with : ERROR OCCURS WHILE READING THE CONTENT OF FILE PRIMARY.XML.GZ (Doc ID 1473479.1)"
To allow the Setup RPM Repository job to successfully run, add "umask 022" to the "/usr/bin/createrepo" file on each yum server.
The default /usr/bin/createrepo file: #!/bin/sh
exec /usr/share/createrepo/genpkgmetadata.py "$@"
The next examples show the /usr/bin/createrepo filw with the necessary "umask 022"line. #!/bin/sh
umask 022
exec /usr/share/createrepo/genpkgmetadata.py "$@"
1. In Cloud Control, from the Setup menu, click Provisioning and Patching => Linux Patching to access the Patching Setup page.
Figure 44
2. From the Patching Setup page, click the Linux Patching Setup tab, then click Setup RPM Repository to access the
Linux Patching page. Figure 45
3. From the Linux Patching page:
1) In the RPM Repository Server section, either enter the name of the yum server, or click the search icon to search for and select the ULN subscribed yum server from the search page.
2) In the Credentials section, select Preferred with Privileged Host Credentials for both the Normal Host Credentials. 3) In the Credentials section, select Preferred with Privileged Host Credentials for both the Privileged Host Credentials. 4) Click Apply.
Figure 46
4) Once the Linux Patching page refreshes, the Confirmation message is displayed. Next, click Linux RPM Repository Server Setup link.
Figure 47
5. From the Provisioning page, click For all hosts to display the Procedure Steps. Next, select Real Time: 30 Second Refresh from the View Data drop down list to automatically refresh the page every 30 seconds. The Register with ULN
(Figure 49) as well as the Subscribe to ULN channels (Figure 50) jobs must each be selected and manually confirmed. If the
Download RPM packagesProcedure Step fails, correct the errors and rerun the job (Figure 51).
The Provisioning page lists a total of six Procedure Steps: 1. Create Stage Location
2. Installing Up2date
3. Installing ULN Registration Packages 4. Register with ULN
5. Subscribe to ULN channels 6. Download RPM packages
Each job must succeed to complete the RPM Repository Server job. Failed jobs can be rerun by first correcting the error, then clicking the Rerun action item.
Figure 48 shows the Provisioning page with the six Procedure Steps.
Select the Register with ULN Procedure Step, click Confirm and OK. Figure 49
Select the Subscribe to ULN channels Procedure Step, click Confirm and OK. Figure 50
If any of the Download RPM packagesProcedure Steps fail, review the failed procedure by clicking Step Output =>
View. Correct the errors, then click Retry or Update and Retry from the Actions button. Use Retry to test Linux host changes and use Update and Retry to edit Cloud Control procedure properties.
Figure 51
Once the Setup the RPM Repository Job completes, the RPM Repository Server (aka yum server) will be listed on the
Setup linux Repositories page under Currently Configured.
Click Setup => Provisioning and Patching => Linux Patching to access the Patching Setup page, then click the Setup RPM Repository link to access the Linux Patching page.
Figure 52
Once the Setup the RPM Repository Job completes, a recurring job is created that automatically synchronizes the yum server with the Oracle Unbreakable Linux Network every 24 hours. By default the job is scheduled to run each day at the time when the Setup the RPM Repository Job completed. Edit the job to select a time and frequency which meet your requirements.
Click Enterprise => Job => Activity to access the Job Activity page. Figure 53
From the Job Activity page select Active in the Status drop down box and click Go to display the active jobs. From the list of active jobs, select the DOWNLOADLATESTPKGS job and click the Edit button.
Figure 54
From the Edit page click the Schedule tab and select the desired Schedule properties. Click the Submit button to save the changes.
Tip: Selecting One Time (Immediately) immediately runs and expires the job, i.e. the job will not run again. To recreate and reschedule the job, rerun the Setup the RPM Repository Job.
Figure 55
Setup Linux Patch Groups
Setup the Enterprise Manager Software Library Oracle Management Agent Prerequisites Setup Named Credentials Oracle Management Agent Install Setup RPM Repositories
Setup Linux Patch Groups
Patch Linux Hosts
Linux Patch Groups consists of Oracle Linux and Red Hat Enterprise Linux targets with patch properties tailored to your patch management program. Patch groups allow you to patch many hosts as one. The following steps walk through how to create a Linux Patch Group.
1. In Cloud Control, click Setup => Provisioning and Patching => Linux Patching to access the Patching Setup page. Figure 56
2. From the Patching Setup page, click the Linux Patching Setup tab, then click Setup Groups to access the Setup Groups
page. Figure 57
3. From the Setup Groups page, click Create. Figure 58
4. On the Create Group: Properties page, enter the following properties, then Click Next.
Name: Enter a unique Name for the Linux patch group. Tip: Spaces and special characters are not supported. The Name cannot be changed once the Group is created.
Maturity: Select one of the maturity levels from the drop down list: alpha, beta or stable. The maturity level is displayed in Cloud Control and can be changed after the Group is created.
Linux Distribution: Select the Oracle Linux/Red Hat Enterprise Linux from the Linux Distribution from the drop down list.
Move the desired Linux hosts from the Available Hosts window to the Selected Hosts window.
Tip:"Unable to Delete Linux Patching Groups In Grid Control [ID 1368592.1]" still affects Oracle Enterprise Manager 12c
Name property. Select a Name without spaces or special characters to avoid ID 1368592.1. Figure 59
5. On the Create Group: Package Repositories page, search, select and Test URL each RPM Repository to be associated with the group (click the search icon to select repositories), unselect Automatically Update Hosts, under the Package Compliance section unselect the Consider Rogue packages for Determining Compliance, click Next.
Tip: When using multiple Package Repositories, the Priority list determines the compliance report results. For example, to update or upgrade Linux hosts using the Base and the Patch Package Repositories, the Patch Package Repository must have a higher priority (before) Base in the Priority list. If Base is before Patch in the Priority list, the compliance report queries the hosts using Base, not Patch, and the Patch updates are ignored in the compliance reports.
Figure 60
6. From the Create Group: Credentials page, select the Use Host Preferred Host Credential and Next. Figure 61
7. On the Review page, validate all the parameters. Click Finish. Figure 62
8. From the Linux Patching page the Confirmation message is displayed with a link to each of the follow-up jobs.
From the Linux Patching page, Patch Groups can be Deleted, Edited and Created. Figure 63
Patch Linux Hosts
Step 1 Step 2 Step 3 Step 4 Step 5 Step 6 Step 7
Setup the Enterprise Manager Software Library Oracle Management Agent Prerequisites Setup Named Credentials Oracle Management Agent Install Setup RPM Repositories
Setup Linux Patch Groups
Patch Linux Hosts
Cloud Control Linux Host Patching supports emergency patch jobs and compliance patch jobs. Emergency patch jobs allow administrators to apply any number of security patches, updates and erratas to one or more Linux hosts. Compliance patch jobs are schedulable and are applied to Linux Patch Group using the Linux Patch Group properties. Enterprise Manager queries each RPM package from each Linux Patch Group member against the Linux Patch Group's RPM repositories. Compliance patch jobs update all of the patch group member RPM packages to the same level as the patch group RPM repositories.
Table 5 shows each step of a Compliance Linux Host Patching job.
Job Name Job
Operation Job Description
Job Error
Operation Job Credentials
Patch Linux
Hosts Procedure for patching Linux host targets.
Stop On Error
For all hosts Parallel Iterates over a list of hosts.
Inherit (Stop On Error)
Configure Host For Patching
Job
This step configures the host for patching by creating the configuration files required by update tools. Inherit (Stop On Error) Host Credentials, Privileged Host Credentials
Update Host Job This step updates the host machines with selected packages. Inherit (Stop On Error) Host Credentials, Privileged Host Credentials
Reboot Step Manual Manually step to reboot the machine.
Inherit (Stop On Error)
Refresh Host
Configuration Job
This step updates the latest configuration of the host machine to OMS.
Inherit (Stop On Error)
1. In Cloud Control click Enterprise => Provisioning and Patching => Linux Patching to access the Linux Patching page. Figure 64
2. On the Linux Patching page click the Compliance Home tab and review the Status section. The Status section displays the patch status for the Linux Groups and Linux Hosts. In the Compliance Report section, Select the desired Linux Patch Group and click Schedule Patching to start the Patch Linux Hosts Wizard.
Tip: The Patch Linux Hosts Wizard auto-populate each following page with the Linux Patch Group properties.
Figure 65
3. On the Package Repository page, the Patch Linux Hosts Wizard auto-populates the Linux Distribution, the update tool, the Stage Location and the Package Repository. Click Next.
Figure 66
4. On the Select Updates page, the Patch Linux Hosts Wizard auto-selects all of the RPM packages. Click Next. Figure 67
5. On the Select Updates page, the Patch Linux Hosts Wizard auto-selects the Linux Patch Group. Click Next. Figure 68
6. On the Credentials page, the Patch Linux Hosts Wizard auto-selects the Host Prefered Credentials. Click Next.
Tip: Preferred credentials simplify access to targets by saving login credentials in Enterprise Manager. Once preferred credentials are saved, administrators can access targets and run jobs using preferred credentials without having to enter login credentials.
Figure 69
7. On the Pre/Post scrtips page, click Next. Figure 70
8. On the Schedule page, you can select One Time (Immediately) to immediatley run the patch job, One Time (Later) to schedule the patch job to run in the future, or Repeating to setup a recurring patch update schedule. Select the desired schedule Type and setting. Click Next.
Figure 71
9. On the Review page, click Finish to submit a deployment procedure to patch the Linux Patch Group. Figure 72
10. After clicking Finish, the page automatically redirectes to the Provisioning page. Search for the Patch Linux Hosts job and click the Running link to track each of the procedure steps.
Figure 73
11. From the Provisioning page, click For all hosts to display the Procedure Steps. Next, select Real Time: 30 Second Refresh from the View Data drop down list to automatically refresh the page every 30 seconds.
The Provisioning page lists a total of four Procedure Steps: 1. Configure Hosts For Patching
2. Update Host 3. Reboot Step
4. Refresh Host Configuration
If any of the Procedure Steps fail, review the failed procedure by clicking Step Output => View. Correct the errors, then click
Retry or Update and Retry from the Actions button. Figure 74
The following list shows some emergency PatchSetup errors and solutions: 1) Missing Dependency: kernel-xen
# rpm -qa --queryformat '%10{NAME} %20{GROUP}\n' | grep -i ocfs2 ocfs2-2.6.18-274.0.0.0.1.el5xen System Environment/Kernel
ocfs2-tools System Environment/Kernel ocfs2console System Environment/Kernel
# rpm -qa --queryformat '%10{NAME} %20{GROUP}\n' | grep -i xen ocfs2-2.6.18-274.0.0.0.1.el5xen System Environment/Kernel
netxen-firmware System Environment/Kernel kernel-xen-devel System Environment/Kernel kernel-xen System Environment/Kernel
oracleasm-2.6.18-274.0.0.0.1.el5xen System Environment/Kernel # rpm -e ocfs2-2.6.18-274.0.0.0.1.el5xen
# rpm -e oracleasm-2.6.18-274.0.0.0.1.el5xen
2) Couldn't open temporary file /etc/sysconfig/rhn/ Permission denied
/bin/sed: couldn't open temporary file /etc/sysconfig/rhn//sedfoGA9Y: Permission denied /bin/sed: couldn't open temporary file /etc/sysconfig/rhn//sedZoGJ2Y: Permission denied /bin/sed: couldn't open temporary file /etc/sysconfig/rhn//seds2SfT1: Permission denied
Resolve the permissions issue for the /etc/sysconfig/rhn/ directory.
3) Password for root: Password for root: Password for root: STATUS: FAILED Password for root: Password for root: Password for root: STATUS: FAILED ERROR TYPE: UNSUPPORTED_COMMAND_ERROR
ERROR INFO: The user does not have access for "/usr/bin/up2date" command(s)!
INFO: Following commands requires root access: INFO: /bin/sh, /bin/sed, /usr/bin/up2date
Did you forget to setup sudo for the Oracle Management Agent installing user? Check the Oracle Management Agent installing user's sudo setting by accessing the host as the Oracle Management Agent installing user and type "sudo -l" to list the available commands.