within the <oXygen/> XML Editor
Abstract
This article is intended to prove how easy it is to create a TEI XML (Text Encoding Initiative) document and then convert it to the PDF format, all from within the <oXygen/> XML editor. We will use the TEI Lite DTD, the TEI XSL-FO stylesheets and the Apache's FOP, all of which are integrated into the <oXygen/> installation kit.
Table of Contents
Creating an XML Document Using the TEI Lite DTD ... 1
Editing the XML Document ... 3
Transforming to PDF ... 6
Configuring an external FO processor, or other post processor ... 9
Creating an XML Document Using the TEI Lite
DTD
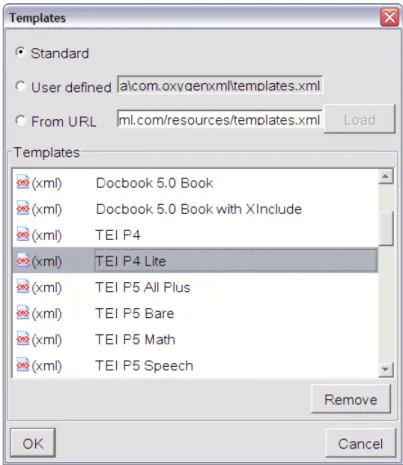
From the File menu choose New from Templates .... The following window will be displayed, allowing you to choose from a list of built-in document templates as starting points for your TEI XML documents:
Figure 1. Document templates in <oXygen/>
Choose one of the TEI document templates from the list of built-in templates. If you select the TEI Lite template and click on the OK button <oXygen/> will automatically generate and open a skeleton document with a DTD declaration and minimum markup conforming to the declared DTD. The encoding is automatically set to "UTF-8".
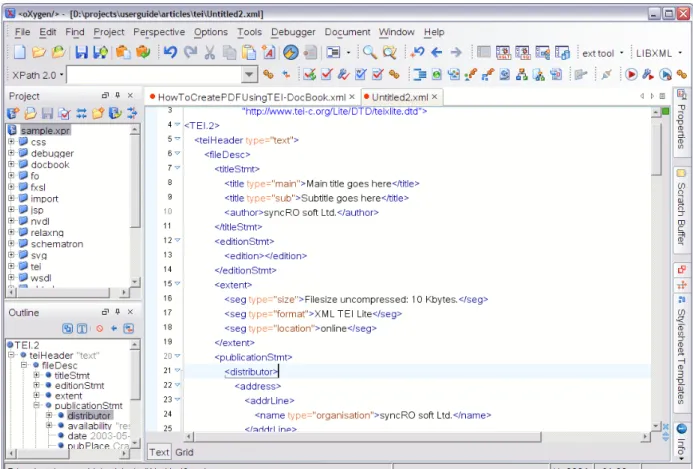
Figure 2. Skeleton TEI document
If you wish to use a customized special-purpose TEI schema of type DTD, RELAX NG and W3C XML Schema (for example generated with the Roma program [http://tei.oucs.ox.ac.uk/Roma/], available on the TEI website [http://www.tei-c.org/Software/]) you can manually modify the default document type declaration at the beginning of the document.
Note
The encoding can be changed at any time by editing the XML prolog, for instance, changing to UTF-16:
<?xml version="1.0" encoding="UTF-16"?>
Editing the XML Document
The editor will scan the DTD file and will initialize the content completion assistant. By pressing the "<" key, it is displayed a window containing all the elements that can be inserted at that point in the document. Notice that the window appears also when adding new attributes or when an attribute has default values you can choose from. In the first case the content completion window is triggered by pressing the SPACE key or the TAB key, in the later by pressing ' or " keys.
A simple TEI document can be:
<?xml version="1.0" encoding="UTF-8"?> <!DOCTYPE TEI.2
PUBLIC "-//TEI Consortium//DTD TEI Lite XML ver. 1//EN" "http://www.tei-c.org/Lite/DTD/teixlite.dtd" [
<!ENTITY % TEI.XML 'INCLUDE'>
]> <TEI.2>
<teiHeader type="text"> <fileDesc>
<titleStmt>
<title type="main">Main title goes here</title> <title type="sub">Subtitle goes here</title> <author>syncRO soft Ltd.</author>
</titleStmt> <editionStmt> <edition/> </editionStmt> <extent>
<seg type="size">Filesize uncompressed: 10 Kbytes.</seg> <seg type="format">XML TEI Lite</seg>
<seg type="location">online</seg> </extent> <publicationStmt> <distributor> <address> <addrLine>
<name type="organisation">syncRO soft Ltd.</name> </addrLine>
<addrLine>170 Nicolae Titulescu Street</addrLine> <addrLine> <name type="place">Craiova</name> </addrLine> <addrLine>1100</addrLine> <addrLine>[email protected]</addrLine> </address> </distributor> <availability status="restricted">
<p>Freely available for non-commercial use provided that this header is included in its entirety with any copy distributed</p>
</availability>
<date>2003-05-27</date>
<pubPlace>Craiova, Romania</pubPlace>
<publisher>© 2003, syncRO soft Ltd</publisher> </publicationStmt>
<notesStmt>
<note>This is a prototype header</note> </notesStmt>
<sourceDesc>
<p>Compiled from existing internal syncRO documents.</p> </sourceDesc>
</fileDesc> <encodingDesc> <editorialDecl>
<p>Paragraph, page divisions and punctuation have been checked before publication. Unless otherwise indicated (by a REND attribute) all EMPH elements should be rendered in italics, and all SOCALLED elements should be enclosed by quotation marks.</p>
</editorialDecl> <refsDecl>
<p>div sections bear IDs in the form Sn.</p> </refsDecl>
</encodingDesc> <revisionDesc> <change>
<date>2003-05-25</date> <respStmt>
<name>syncRO soft staff</name> <resp>edt (Editor)</resp> </respStmt>
<item>Created the initial version of the article</item> </change>
<change>
<date>2003-05-26</date> <respStmt>
<name>syncRO soft staff</name> <resp>pfr (Proofreader)</resp> </respStmt> <item>check text</item> </change> <change> <date>2003-05-27</date> <respStmt>
<name>syncRO soft staff</name> <resp>cvt (Converter)</resp> </respStmt>
<item>convert to PDF using TEI XSL-FO stylesheets and Apache FOP</item> </change> </revisionDesc> </teiHeader> <text> <front> <titlePage> <docTitle>
<titlePart type="main">Main title to be displayed on screen</titlePart> <titlePart type="sub">Subtitle to be displayed on
screen</titlePart> </docTitle> <docAuthor> <name>syncRO soft</name> </docAuthor> <docDate>May 27, 2003</docDate> </titlePage> </front> <body> <divGen type="toc"/>
<div id="S0" rend="italic" type="abstract"> <head rend="italic">Abstract</head>
<p rend="italic"> This template is intended to prove how easy it is to create a TEI XML (Text Encoding Initiative)
document and then convert it to the PDF or HTML format, all from within the <oXygen/> XML editor. We can use the TEI Lite DTD, the TEI XSL-FO stylesheets and the Apache's FOP, all of which are integrated into the <oXygen/> installation kit. </p>
</div>
<div id="S1" type="sect">
<head>Title of first section</head> <p>First para</p>
<p>Second para</p> <p>Third para</p> <note>
<p>The encoding can be changed at any time by editing the XML prolog, for instance, changing to UTF-16:</p>
<p> <?xml version="1.0" encoding="UTF-16"?></p> </note>
</div>
<div id="S2" type="sect">
<head>Title of second section</head> <p>First para of second section</p> <p>Second para of second section</p>
<p id="S3" rend="roman">Third para of second section</p> </div>
</body> </text> </TEI.2>
Transforming to PDF
Before proceeding to the FO transformation you need to check the validity of the document. For this, press the Validate Document button from the Validate toolbar, or use the shortcut of the Validate
Document action, by default CTRL-SHIFT-V (COMMAND-SHIFT-V on Mac). The validity report
will be displayed in the status bar. If there are errors, they will be listed in a special panel at the bottom of the <oXygen/> window.
Figure 3. Validation errors
Procedure 1. Configuring the XSL-FO transformation
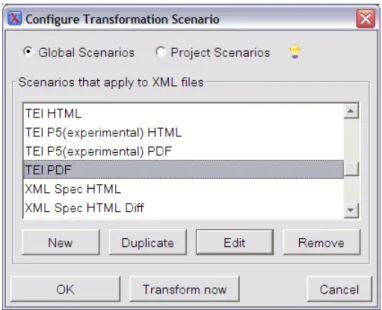
1. Press the Configure Transformation Scenario button from the Transformation toolbar. This will open the Configure Transformation Scenario dialog where you can create a new transformation scenario or edit an existing one. Also you can use one of the predefined scenarios, for example the TEI PDF one which transforms a TEI XML document to PDF.
Figure 4. The XSL-FO transformation configuration dialog
2. On the XSLT tab of the Edit scenario dialog in the XSL URL field choose the tei.xsl file. Yo u c a n f i n d i t b y b r o w s i n g t o t h e f o l d e r $ { f r a m e -works}/tei/xml/teip4/stylesheet/fo/tei.xsl, where ${frameworks} is the
frameworks subfolder of the <oXygen/> install folder. An XML FO document is generated when applying this stylesheet. Next, the FO processor can process it in order to generate output in the PDF format.
Figure 5. The XSLT configuration tab
3. On the FO Processor tab of the dialog make sure that the Perform FOP checkbox is selected. itor
Figure 6. The FO configuration tab
4. Make sure that the XSLT result as input radio button is selected. 5. Let the FO processor set to Built-in (Apache FOP).
6. Let the method set to pdf.
7. On the Output tab of the dialog choose the output file name and press the OK button. itor
Figure 7. The Output configuration tab
Press the Apply Transformation Scenario button from the Transformation toolbar or use CTRL-SHIFT-T (COMMAND-SHIFCTRL-SHIFT-T-CTRL-SHIFT-T on Mac) shortcut. CTRL-SHIFT-This way the XSLCTRL-SHIFT-T and FO processing is started. In the status bar is presented the current processing state. It will be displayed FO transformation successful when the FO processor ends. You can inspect the generated PDF file using the Acrobat Reader™ program.
Configuring an external FO processor, or other
post processor
The built-in FO processor is based on the Apache project, and is under development. Problems may occur, depending on the complexity of the intermediate FO file.
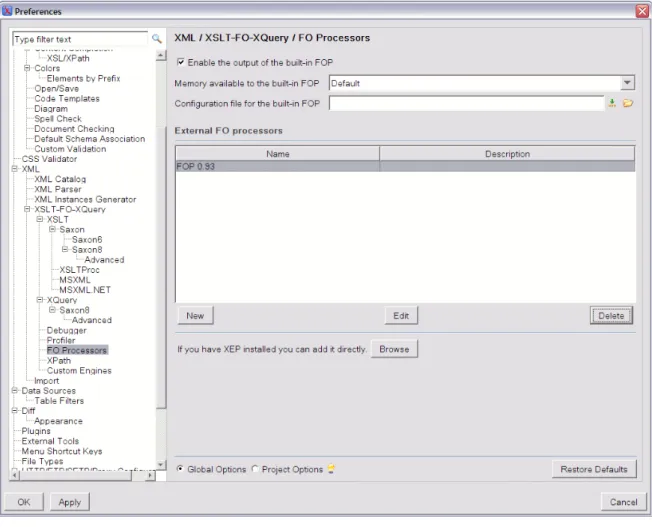
To avoid this kind of difficulties it is possible to configure one or more external FO processors. (In other situations, you may need to run other post processors, not necessarily FOP.) Go to Options → Preferences → XML → XSLT / FO / XQuery → FO Processors to set up a post processor.
Figure 8. The external FO configuration dialog
By default, the list is empty. By pressing the New button it can be created a new FO entry. The entry consists of:
• Name - This is the name that must be selected in the Processor combo box of the Edit scenario dialog when this processor is used in a transformation.
• Description - A text description of the processor displayed in the FO Processors preferences panel. • Output encoding - The encoding of the output stream of the processor.
• Error encoding - The encoding of the error stream of the processor.
• Working directory - The start directory of the command that runs the FO processor.
• Command line template - The command line is specifying the name of the FOP executable and the command line parameters. Try not to use environment variables in its expression, since those will not be expanded. Four editor variables can be used:
• The FO method (the ${method} editor variable) - this being replaced by the editor with pdf, ps or
txt;
• The FO input file (the ${fo} editor variable) - this can be the edited file or the result of an XSLT transformation;
• The file in which the result is stored (the ${out} editor variable). • The directory of the current oXygen project (the ${pd} editor variable).
Figure 9. Adding an external FO processor
Note
Your editor may take as argument just one or two of the possible parameters. It is not re-quired to use all the macros in the command line.