Integrated IR Dome Camera
WZ45
Integrated IR Dome Camera Table of Contents | en 3
Table of Contents
1 Safety 5
1.1 Safety Precautions 5
1.2 Important Safety Instructions 5
1.3 Important Notices 6
1.4 FCC & ICES compliance 9
1.5 Warranty / Limitation of Liability 12
1.6 Contact Information 14
2 Introduction 15
2.1 Description 15
2.2 Parts Included 15
3 Installation and Connections 16
3.1 Installation 16
3.2 Connections 18
4 Camera Adjustments 20
4.1 Adjusting the pan, tilt, and focus/zoom settings 20
5 On-Screen Menu 23 5.1 OSD Menu 23 5.1.1 Exposure Submenu 23 5.1.2 Color Submenu 24 5.1.3 Day/Night Submenu 24 5.1.4 Function Submenu 25 5.1.5 Motion Submenu 26 5.1.6 Privacy Submenu 27 5.1.7 Setup Submenu 28 5.1.8 Exit Submenu 28 6 Troubleshooting 30 6.1 Troubleshooting 30
4 en | Table of Contents Integrated IR Dome Camera
TBD | 2.0 | 2010.12 Installation Manual Bosch Security Systems, Inc.
Integrated IR Dome Camera Safety | en 5
1
Safety
1.1
Safety Precautions
1.2
Important Safety Instructions
Read, follow, and retain all of the following safety instructions. Heed all warnings on the unit and in the operating instructions before operating the unit.
1. Read these instructions. 2. Keep this instruction. 3. Heed all warnings. 4. Follow all instructions.
5. Do not use this apparatus near water. 6. Clean inside only with dry cloth.
DANGER!
High risk: This symbol indicates an imminently hazardous situation such as “Dangerous Voltage” inside the product. If not avoided, this will result in an electrical shock, serious bodily injury, or death.
WARNING!
Medium risk: Indicates a potentially hazardous situation. If not avoided, this could result in minor or moderate bodily injury.
CAUTION!
Low risk: Indicates a potentially hazardous situation. If not avoided, this could result in property damage or risk of damage to the unit.
CAUTION!
These servicing instructions are for use by qualified service personnel only. To reduce the risk of electric shock, do not perform any servicing other than that contained in the operating instructions, unless you are qualified to do so.
6 en | Safety Integrated IR Dome Camera
TBD | 2.0 | 2010.12 Installation Manual Bosch Security Systems, Inc. 7. Do not block any ventilation openings. Install in
accordance with manufacturer’s instructions. 8. Do not install near any heat sources such as radiators, heat
registers, stoves or other apparatus (including amplifiers) that produce heat.
9. Do not defeat the safety purpose of the polarized or grounding-type plug. A polarized plug has two blades with one wider than the other. A grounding type plug has two blades and a third grounding prong. The wide blade or the third prong is provided for your safety. If the provided plug does not fit into your outlet, consult an electrician for replacement of the obsolete outlet.
10. Protect the power cord from being walked on or pinched particularly at plugs, convenience receptacles, and the power where they exit from the apparatus. 11. Use only attachments/accessories specified by the
manufacturer.
12. Unplug this apparatus during lightning storms or when unused for long periods of time.
13. Refer all servicing to qualified service personnel. Servicing is required when the apparatus has been damaged in any way, such as power-supply cord or plug is damaged, liquid has been spilled or objects have fallen into the apparatus, the apparatus has been exposed to rain or moisture, does not operate normally, or has been dropped.
1.3
Important Notices
All-pole power switch - Incorporate an all-pole power switch, with a contact separation of at least 3 mm in each pole, into the electrical installation of the building. If it is needed to open the
Accessories - Do not place this unit on an unstable stand, tripod, bracket, or mount. The unit may fall, causing serious injury and/or serious damage to the unit. Quick stops, excessive force, or uneven surfaces may cause the cart/unit combination to overturn. Mount the unit per the manufacturer's instructions.
Integrated IR Dome Camera Safety | en 7
housing for servicing and/or other activities, use this all-pole switch as the main disconnect device for switching off the voltage to the unit.
Camera grounding - For mounting the camera in potentially damp environments, ensure to ground the system using the ground connection of the power supply connector.
Camera signal - Protect the cable with a primary protector if the camera signal is beyond 140 feet, in accordance with
NEC800 (CEC Section 60).
Coax grounding:
– Ground the cable system if connecting an outside cable system to the unit.
– Connect outdoor equipment to the unit's inputs only after this unit has had its grounding plug connected to a grounded outlet or its ground terminal is properly connected to a ground source.
– Disconnect the unit's input connectors from outdoor equipment before disconnecting the grounding plug or grounding terminal.
– Follow proper safety precautions such as grounding for any outdoor device connected to this unit.
U.S.A. models only -Section 810 of the National Electrical Code, ANSI/NFPA No.70, provides information regarding proper grounding of the mount and supporting structure, grounding of the coax to a discharge unit, size of grounding conductors, location of discharge unit, connection to grounding electrodes, and requirements for the grounding electrode.
Disposal - Your Bosch product was developed and manufactured with high-quality material and components that can be recycled and reused. This symbol means that electronic and electrical appliances, which have reached the end of their working life, must be collected and disposed of separately from household waste material. Separate collecting systems are usually in place for disused electronic and electrical products. Please dispose of these units at an environmentally compatible recycling facility, per European Directive 2002/96/ EC.
8 en | Safety Integrated IR Dome Camera
TBD | 2.0 | 2010.12 Installation Manual Bosch Security Systems, Inc. Electronic Surveillance - This device is intended for use in public areas only. U.S. federal law strictly prohibits surreptitious recording of oral communications.
Environmental statement - Bosch has a strong commitment towards the environment. This unit has been designed to respect the environment as much as possible.
Electrostatic-sensitive device - Use proper CMOS/MOS-FET handling precautions to avoid electrostatic discharge. NOTE: Wear required grounded wrist straps and observe proper ESD safety precautions when handling the electrostatic-sensitive printed circuit boards.
Fuse rating - For protection of the device, the branch circuit protection must be secured with a maximum fuse rating of 16A. This must be in accordance with NEC800 (CEC Section 60).
Outdoor signals - The installation for outdoor signals, especially regarding clearance from power and lightning conductors and transient protection, must be in accordance with NEC725 and
NEC800 (CEC Rule 16-224 and CEC Section 60).
Permanently connected equipment - Incorporate a readily accessible disconnect device external to the equipment.
Pluggable equipment - Install the socket outlet near the equipment so it is easily accessible.
Power resupply - If the unit is forced to power down due to exceeding the specified operating temperatures, disconnect the power cord, wait for at least 30 seconds, and then reconnect the power cord.
Power lines - Do not locate the camera near overhead power lines, power circuits, or electrical lights, nor where it may contact such power lines, circuits, or lights.
SELV - All the input/output ports are Safety Extra Low Voltage (SELV) circuits. SELV circuits should only be connected to other SELV circuits.
Because the ISDN circuits are treated like telephone-network voltage, avoid connecting the SELV circuit to the Telephone Network Voltage (TNV) circuits.
Integrated IR Dome Camera Safety | en 9
System (video) ground is indicated by the symbol . The system ground is only used to comply with safety standards or installation practices in certain countries. Bosch does not
recommend connecting system ground to safety ground unless it is explicitly required. However, if the system ground and safety ground are connected and grounding loops are causing interference in the video signal, use an isolation transformer (available separately from Bosch).
Video loss - Video loss is inherent to digital video recording; therefore, Bosch Security Systems cannot be held liable for any damage that results from missing video information. To minimize the risk of lost digital information, Bosch Security Systems recommends multiple, redundant recording systems, and a procedure to back up all analog and digital information.
1.4
FCC & ICES compliance
FCC Information
(U.S.A. and Canadian Models Only)
This equipment has been tested and found to comply with the limits for a Class B digital device, pursuant to part 15 of the
FCC Rules. These limits are designed to provide reasonable protection against harmful interference in a residential installation. This equipment generates, uses, and can radiate radio frequency energy and, if not installed and used in accordance with the instructions, may cause harmful interference to radio communications. However, there is no guarantee that interference will not occur in a particular installation. If this equipment does cause harmful interference to radio or television reception, which can be determined by turning the equipment off and on, the user is encouraged to try
CAUTION!
Connecting System ground to Safety ground may result in ground loops that can disrupt the CCTV system.
10 en | Safety Integrated IR Dome Camera
TBD | 2.0 | 2010.12 Installation Manual Bosch Security Systems, Inc. to correct the interference by one or more of the following measures:
– Fit Ferrite beads on all cable to and from the power supply box, within the box walls.
– Route the composite cable between the camera and the power supply in steel conduit piping over the entire run of the cable up to and including connection to a deep conduit base fitted under the camera and a conduit fitting adaptor in the wall of the PSU box.
– Consult a Bosch Service Center for further advice. Intentional or unintentional modifications, not expressly approved by the party responsible for compliance, shall not be made. Any such modifications could void the user's authority to operate the equipment. If necessary, the user should consult the dealer or an experienced radio/television technician for corrective action.
The user may find the following booklet, prepared by the Federal Communications Commission, helpful: How to Identify and Resolve Radio-TV Interference Problems. This booklet is available from the U.S. Government Printing Office, Washington, DC 20402, Stock No. 004-000-00345-4.
Informations FCC et ICES
(modèles utilisés aux États-Unis et au Canada uniquement)
Suite à différents tests, cet appareil s'est révélé conforme aux exigences imposées aux appareils numériques de classe B, en vertu de la section 15 du règlement de la Commission fédérale des communications des États-Unis (FCC), et en vertu de la norme ICES-003 d'Industrie Canada. Ces exigences visent à fournir une protection raisonnable contre les interférences nuisibles lorsque l'appareil est utilisé dans le cadre d'une
installation résidentielle. Cet appareil génère, utilise et émet de l'énergie de radiofréquences et peut, en cas d'installation ou d'utilisation non conforme aux instructions, engendrer des interférences nuisibles au niveau des radiocommunications. Toutefois, rien ne garantit l'absence d'interférences dans une installation particulière. Il est possible de déterminer la
Integrated IR Dome Camera Safety | en 11
production d'interférences en mettant l'appareil successivement hors et sous tension, tout en contrôlant la réception radio ou télévision. L'utilisateur peut parvenir à éliminer les interférences éventuelles en prenant une ou plusieurs des mesures suivantes:
– Modifier l'orientation ou l'emplacement de l'antenne réceptrice;
– Éloigner l'appareil du récepteur;
– Brancher l'appareil sur une prise située sur un circuit différent de celui du récepteur;
– Consulter le revendeur ou un technicien qualifié en radio/ télévision pour obtenir de l'aide.
Toute modification apportée au produit, non expressément approuvée par la partie responsable de l'appareil, est strictement interdite. Une telle modification est susceptible d'entraîner la révocation du droit d'utilisation de l'appareil. La brochure suivante, publiée par la Commission fédérale des communications (FCC), peut s'avérer utile : How to Identify and Resolve Radio-TV Interference Problems (Comment identifier et résoudre les problèmes d’interférences de radio et de télévision). Cette brochure est disponible auprès du U.S. Government Printing Office, Washington, DC 20402, États-Unis, sous la référence n° 004-000-00345-4.
CE Information
NOTE: This equipment has been tested and found to comply with the limits for a Class A digital device, pursuant to EU Standard EN55022. In a domestic environment this product may cause radio interference in which case the user may be required to take adequate measures.
Precautions
– Do not modify.
– Do not put objects inside the unit. Make sure that no metal objects or flammable substances enter the camera. This may cause fire, short-circuits and other damages.
12 en | Safety Integrated IR Dome Camera
TBD | 2.0 | 2010.12 Installation Manual Bosch Security Systems, Inc. – Be careful when handling the unit. To prevent damage, do
not drop the camera or subject it to strong shock or vibration.
– Install the camera away from electric or magnetic fields. – Protect the camera from humidity and dust. – Do not subject the unit to high temperature. Be careful
when installing close to ceilings, in a kitchen or a boiler room as heat rises and will affect the camera. – Dirt can be removed from the exterior of the camera by
wiping it with a clean soft moistened cloth and soft detergent solution.
– The mounting surface material must be strong enough to secure the camera.
1.5
Warranty / Limitation of Liability
The WZ45 Integrated IR Day/Night Dome Camera has a three-year warranty.
BOSCH Security Systems warrants that its products, at the time of shipment by BOSCH Security Systems, are free from defect in material or workmanship under normal use and service for the respective warranty periods specified in the applicable Price Schedule or as otherwise published. To assure conformance with operating limitations, Buyer should refer to the applicable data sheet.
The warranty is void (i) if the Product is not operated in conformance with installation, environmental, mechanical or electrical requirements, or within thermal stress limits, or (ii) to the extent that any malfunction is the result of misuse, abuse, vandalism, neglect, improper installation or application,
NOTICE!
This is a class B product. In a domestic environment this product may cause radio interference, in which case the user may be required to take adequate measures.
Integrated IR Dome Camera Safety | en 13
alteration, accident, or negligence in use, storage, transportation, or handling or if the original identification markings on the product have been removed, defaced or altered, lightning, electricity, water, fire, environment or other hazard, or act of God, or other impact outside of normal operating guidelines.
The foregoing warranty is subject to Buyer’s (i) promptly written claim and (ii) timely provision to BOSCH Security Systems of an opportunity to inspect and test the Product claimed to be defective. Such inspection may be on Buyer’s premises and/or BOSCH Security Systems may request the return of the Product at Buyer’s expense. However, BOSCH Security Systems shall not be responsible for packing, inspection, or labor costs in connection with the return of Product. No Product shall be accepted for warranty service that is not accompanied by a Return Authorization issued by BOSCH Security Systems.
The liability of BOSCH Security Systems hereunder or otherwise is solely and exclusively limited to replacement (new or refurbished Product), repair, or credit of the amortized purchase price, as BOSCH Security Systems may elect, for any Product which is returned by Buyer during the applicable warranty period, or services for which timely notice of defect has been given by Buyer, and which are found by BOSCH Security Systems to be subject to adjustment under this warranty.
BOSCH Security Systems’ warranty shall not be enlarged, diminished, or affected by, and no obligation or liability shall arise or grow out of BOSCH Security Systems’ rendering or technical advice, facilities, or services in connection with Buyer’s order to the products furnished hereunder. For more information about the warranty on this product, see the Warranty Repair section on Bosch’s Customer Care web page at www.boschsecurity.us/en-us/Service/CustomerCare.
14 en | Safety Integrated IR Dome Camera
TBD | 2.0 | 2010.12 Installation Manual Bosch Security Systems, Inc.
1.6
Contact Information
Americas
Bosch Security Systems, Inc. 130 Perinton Parkway Fairport, New York, 14450 USA
Phone: +1 800 289 0096 Fax: +1 585 223 9180 [email protected] www.boschsecurity.us
Europe, Middle East, Africa
Bosch Security Systems B.V. P.O. Box 80002
5600 JB Eindhoven, The Netherlands Phone: + 31 40 2577 284 Fax: +31 40 2577 330 [email protected] www.boschsecurity.com
Asia-Pacific
Robert Bosch (SEA) Pte Ltd, Security Systems 11 Bishan Street 21 Singapore 573943 Phone: +65 6258 5511 Fax: +65 6571 2698 [email protected] www.boschsecurity.asia NOTICE!
Do not remove the serial sticker for the warranty service. Doing so will void the warranty.
Integrated IR Dome Camera Introduction | en 15
2
Introduction
2.1
Description
The WZ45 Integrated IR Dome camera is a night vision DSP color CCD camera with 1/3 in. LXR CCD with mechanical filter. The camera can be installed easily in most indoor and outdoor locations.
Features include:
– Day/night mode (automatic, photocell-controlled) – Privacy masking
– Even-distribution infrared LED array with 30 LEDs – Operates at temperature range from -10 °C to +55 °C
(14 °F to 131 °F) at up to 90% humidity (non-condensing) – IP66 rating
2.2
Parts Included
Quantity Item
1 WZ45 Integrated IR Dome camera 1 Hex key
4 Mounting screws 1 Adapter cable 1 Installation Manual
16 en | Installation and Connections Integrated IR Dome Camera
TBD | 2.0 | 2010.12 Installation Manual Bosch Security Systems, Inc.
3
Installation and Connections
3.1
Installation
WARNING!
To prevent injury, this apparatus must be securely attached to the floor/wall in accordance with the following installation instructions.
CAUTION!
To prevent humidity problems, the camera must be installed in dry conditions. Removing the dome in a wet or humid environment may result in condensation on the dome.
CAUTION!
Integrated IR Dome Camera Installation and Connections | en 17
1. Select a mounting surface that is strong enough to support the camera.
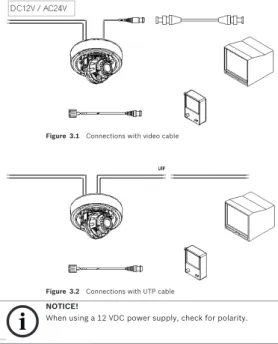
Installation - Video Cable Installation - UTP cable
Letter Description A Dome ring B Dome C Mounting screws D Camera base E Power cable F Video cable / UTP cable
18 en | Installation and Connections Integrated IR Dome Camera
TBD | 2.0 | 2010.12 Installation Manual Bosch Security Systems, Inc. 2. Use the supplied security tool to remove the four (4)
mounting screws (B) of the dome ring (A). 3. Align the supplied mounting template with the selected
mounting surface. Mark the locations of the screw holes and the cable hole on the mounting surface. (See Figure .) 4. Drill holes for the mounting screws.
5. Drill a hole 1 inch (25 mm) in diameter for routing the cables.
Note: Alternately, you can route the cables through the 0.5 inch NTP cable entry at the side.
6. Route the power cable (E) and the video cable (F) or UTP cable (*F) from the camera base through the cable hole in the surface or out of the NTP cable entry at the side. 7. Align the four (4) screw holes in the camera base with the
screw holes on the mounting surface, and then fasten the four (4) mounting screws through the camera base into the mounting surface.
8. Adjust the camera settings as describe in Section 4. 9. Tighten the mounting screws (B) to secure the dome ring
(A) to the camera base (D).
10. Ensure that the rubber ring between the lens and the dome cover is in place and that it forms a tight seal against the inside of the dome.
3.2
Connections
CAUTION!
To ensure reliable operation in wet or moist conditions, the cable leads should be sealed once connected.
Integrated IR Dome Camera Installation and Connections | en 19
Figure 3.1 Connections with video cable
Figure 3.2 Connections with UTP cable
NOTICE
NOTICE!
20 en | Camera Adjustments Integrated IR Dome Camera
TBD | 2.0 | 2010.12 Installation Manual Bosch Security Systems, Inc.
4
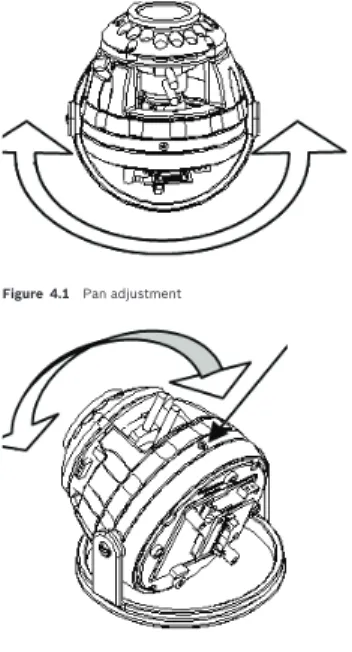
Camera Adjustments
4.1
Adjusting the pan, tilt, and focus/zoom
settings
Figure 4.1 Pan adjustment
Integrated IR Dome Camera Camera Adjustments | en 21
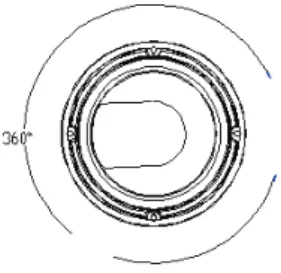
Figure 4.3 Maximum pan adjustment of 360 degrees
22 en | Camera Adjustments Integrated IR Dome Camera
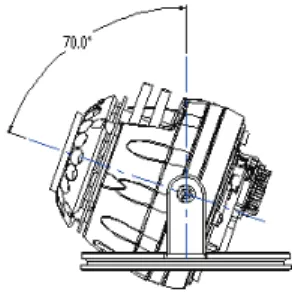
TBD | 2.0 | 2010.12 Installation Manual Bosch Security Systems, Inc. Figure 4.5 Maximum tilt angle of 70 degrees
Follow these steps to adjust pan, tilt, and focus/zoom settings: 1. Loosen the 2 cross head screws that secure the pan
position of the camera.
2. Loosen the cross head screw that secures the tilt position of the camera.
3. Adjust the pan (360˚), tilt (70˚), and rotate as necessary. 4. To adjust the focus and zoom settings, loosen the focus
and zoom adjustment screws located on the camera module, and adjust until desired image is obtained. 5. Fasten the focus and zoom adjustment screws to fixate
these settings.
6. Fasten the three cross head screws to fixate the camera position.
NOTICE!
Do not pan or rotate beyond 360˚and do not tilt beyond 70˚ as shown in Figure 4.3, Figure 4.4, and Figure 4.5 above. Do not apply excessive force when adjusting the camera positioning.
Integrated IR Dome Camera On-Screen Menu | en 23
5
On-Screen Menu
5.1
OSD Menu
5.1.1
Exposure Submenu
This menu allows you to set and adjust the lens functions.
– MANUAL/DC: A setting for switching between manual and DC operation of the lens.
– E. SHUTTER: Electronic Shutter - A function that allows you to set the shutter speed (from 1/60(50) to 1/100K). – BLC: Backlight Compensation - A function for overcoming
(compensating for) the light behind the object of interest in a scene. BLC selectively amplifies parts of the image to compensate for large contrast differences when part of the image is very brightly lit (for example, a person in a sunlit doorway).
– AGC: Automatic Gain Control - A function for regulating the gain or amplification as the light level decreases and the lens opens fully.
Exposure Color Day/Night Function Motion Privacy Set Exit
LENS MANUAL/DC
E. SHUTTER AUTO~1/100000 BLC
24 en | On-Screen Menu Integrated IR Dome Camera
TBD | 2.0 | 2010.12 Installation Manual Bosch Security Systems, Inc.
5.1.2
Color Submenu
This menu allows you to control and adjust the RGB level for the camera to represent accurate white color.
– WB MODE: White Balance Mode
– AWC: Auto White Balance - A function that allows a color camera to adjust its output color automatically to give a natural color independent of the lighting used. – ATW: Auto Tracking White balance - A function that allows
the camera to adjust white balance constantly for optimal color reproduction.
– MANUAL: A function that allows manual adjustment of the white balance.
– PUSH LOCK: A function that enables you to set up automatically, readjusted only at the request of the user.
5.1.3
Day/Night Submenu
This menu allows you to set the day/night mode in order to adjust the output image depending on the light levels.
WB MODE AWC
ATW MANUAL PUSH LOCK
D&N MODE AUTO COLOR B/W
Integrated IR Dome Camera On-Screen Menu | en 25
– AUTO: In this mode, the camera output switches automatically between color and day/night modes, depending on light levels.
– COLOR: In this mode, the camera output is only in color. – B/W: In this mode, the camera output is only in black and
white.
5.1.4
Function Submenu
This menu allows you to set and adjust the various camera functions.
– MIRROR: A function that enables you to set up reversed LEFT and RIGHT images.
– SHARPNESS: A function that enables you to set up sharpness control.
– GAMMA: A function that enables you to set up compensation according to gamma value.
– SLC: Side Light Compensation - Select this mode when the corner of the screen is darker than the center. As the level increases, the image becomes brighter.
– HME: Highlight Masking Exposure - This function masks the bright areas on the screen. As the level of HME is increased, the masking area increases.
– DRC: Dynamic Range Compensation - This function is to compensate darker images when different exposures are in one scene.
MIRROR SHARPNESS GAMMA
SLC SET LEVEL
HME SET LEVEL
26 en | On-Screen Menu Integrated IR Dome Camera
TBD | 2.0 | 2010.12 Installation Manual Bosch Security Systems, Inc.
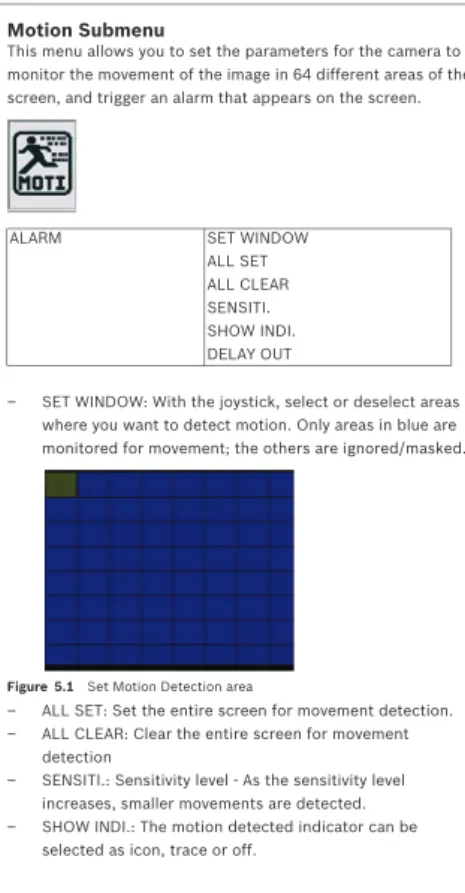
5.1.5
Motion Submenu
This menu allows you to set the parameters for the camera to monitor the movement of the image in 64 different areas of the screen, and trigger an alarm that appears on the screen.
– SET WINDOW: With the joystick, select or deselect areas where you want to detect motion. Only areas in blue are monitored for movement; the others are ignored/masked.
Figure 5.1 Set Motion Detection area
– ALL SET: Set the entire screen for movement detection. – ALL CLEAR: Clear the entire screen for movement
detection
– SENSITI.: Sensitivity level - As the sensitivity level increases, smaller movements are detected. – SHOW INDI.: The motion detected indicator can be
selected as icon, trace or off.
ALARM SET WINDOW
ALL SET ALL CLEAR SENSITI. SHOW INDI. DELAY OUT
Integrated IR Dome Camera On-Screen Menu | en 27
– DELAY OUT: The alarm signal display on the screen is delayed from 1 second to 15 seconds.
5.1.6
Privacy Submenu
This menu allows you to set and adjust the privacy functions that prevent the camera from viewing parts of the scene.
– MASK 1 - MASK 4: These are the four (4) mask areas that you can set.
– COLOR SET: A function that enables you to select the color of the masking cells.
Figure 5.2 Privacy Mask
If “SET WINDOW” is selected, the cell appears on the screen. To adjust the cell, move the joystick UP / DOWN / RIGHT / LEFT. Once you have selected the desired privacy mask area, press the joystick in until the mask area is black, and then move the joystick any direction to return to the previous screen.
MASK 1 SET WINDOW
MASK 2 SET WINDOW
MASK 3 SET WINDOW
MASK 4 SET WINDOW
28 en | On-Screen Menu Integrated IR Dome Camera
TBD | 2.0 | 2010.12 Installation Manual Bosch Security Systems, Inc.
5.1.7
Setup Submenu
This menu allows you to set miscellaneous parameters for the OSD such as camera ID, language, etc.
– CAMERA ID: This is where you set the ID (title) of the camera.
– TITLE EDIT: This is where you select the value for the camera title.
– TITLE RESET: This is where you clear the value of the camera title.
– TITLE POSITION: This is where you select the area to display the title.
– DPC SET: Defect Pixel Cancellation Set - This function automatically removes dead pixels in real time. – LANGUAGE: This is where you set the language (English,
Chinese).
– PC CONT.: This function enables you to set PC communication (by selecting ON).
5.1.8
Exit Submenu
This menu allows you to exit the OSD menu with or without saving your settings.
CAMERA ID TITLE EDIT TITLE RESET TITLE POSITION DPC SET WHITE THR. BLACK THR. DPC LEVEL LANGUAGE ENG/CHA PC CONT.
Integrated IR Dome Camera On-Screen Menu | en 29
– EXIT: Exit the OSD menu.
– SAVE & EXIT: Save your settings and then exit the OSD menu.
– FACTORY SET: Restore the factory defaults of the OSD menu.
EXIT SAVE & EXIT FACTORY SET
NOTICE!
The settings for Lens, Day & Night, and ID/Title stay the same even after a FACTORY SET.
30 en | Troubleshooting Integrated IR Dome Camera
TBD | 2.0 | 2010.12 Installation Manual Bosch Security Systems, Inc.
6
Troubleshooting
6.1
Troubleshooting
Before sending the camera out for repair, check the items below. If the problem persists after checking these items, contact your service center.
- If no image appears, verify that:
– The coaxial cable is attached securely. – The power and voltage are normal.
– The iris of the lens inside the camera was adjusted correctly (with the level volume).
– There is adequate illumination. - If the image is unclear, verify that:
– The lens is in focus.
– The lens is not dirty. Dirt or fingerprints on the lens can adversely affect the images. Gently wipe any dirt or fingerprints off the lens with a soft cloth or lens cleaning paper and cleaning fluid (available commercially). – The monitor is adjusted correctly.
Integrated IR Dome Camera Technical Specifications | en 31
7
Technical Specifications
Electrical Video Mechanical Power consumption 12 VDC 10 - 16 V 24 VAC 20 - 28 V with LED on DC = Max 6.7 WAC = Max 8 W
Signal Format NTSC PAL
CCD Type 1/3” 410 K Pixels Color 1/3” 470 K Pixels Color Horizontal Resolution 520 TVL (Color); 560 TVL (B&W) Total Pixels 811 x 508 795 x 596 Lens IR-corrected, varifocal 5 - 50 mm Signal-to-Noise
Ratio
> 48 - 50 dB (with AGC off) Sensitivity/
Min. Illumination
0.1 Lux (F1.2, 30 IRE) at Color 0.001 Lux (F1.2, 30 IRE) at B&W 0 Lux (with infrared on)
Gamma 0.45
Sync System Internal/External
Dimension Φ 98mm x 202mm (L) Weight 1.7kg (3.8lbs) Construction Robust aluminum extrusion Finish Anodized silver Camera Pan/Tilt Range Pan: 360° total Tilt: 90° total
32 en | Technical Specifications Integrated IR Dome Camera
TBD | 2.0 | 2010.12 Installation Manual Bosch Security Systems, Inc. Environmental
Rating IP66
Operating Temperature -10 °C to +55 °C (14 °F to 131 °F) Storage Temperature -20 °C to +70 °C (-4 °F to 158 °F) Operating Humidity under 90% (non-condensing)
Integrated IR Dome Camera Technical Specifications | en 33
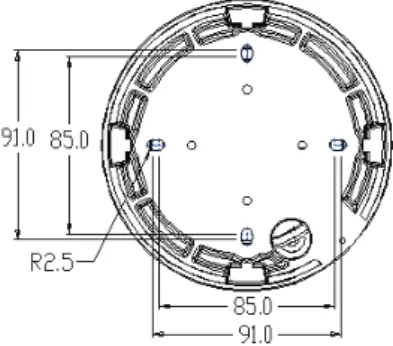
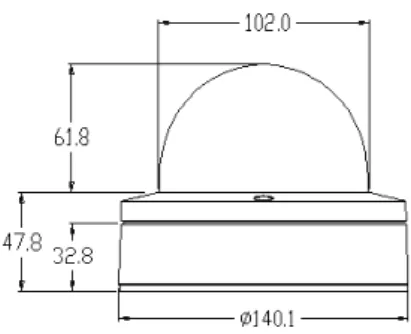
Dimensions
Below are several dimensional drawings of the camera. Unit of measure is mm.
34 en | Technical Specifications Integrated IR Dome Camera
TBD | 2.0 | 2010.12 Installation Manual Bosch Security Systems, Inc. Figure 7.2 Side view
Bosch Security Systems, Inc. 850 Greenfield Road Lancaster, PA 17601 U.S.A.
www.boschsecurity.com © Bosch Security Systems, Inc., 2011